
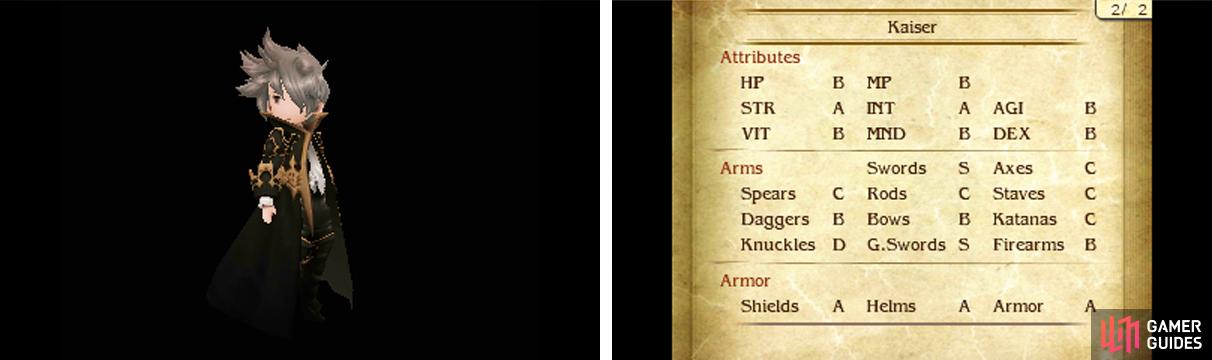
The Kaiser is an imperial tour de force with a range of abilities that can alter the battlefield. As you might expect from such a sought after job, the Kaiser’s stats are all good at worst, although it doesn’t really excel in any particular area. It’s a dab hand with swords and greatswords too.
Despite first impressions, the Kaiser isn’t exactly an offensive powerhouse, but rather a trickster with solid all-around stats. Many of its abilities affect all combatants, drastically changing the flow of battle. Meanwhile, Cerberus is perfect for grinding, restoring its HP, MP and status after a battle.
Specialty: Cerberus
After every battle, the user’s HP, MP and status will return to their states before the battle. This includes KO and other statuses that could lead to a Game Over. Does not trigger between consecutive battles.
Be sure to read this ability carefully! What this means is that if your Kaiser starts off with full HP, MP and no ailments, after returning to the map, they will have full HP, MP and no ailments again no matter what happened during the battle(s).
If you’re silly (or curious) enough to enter a battle with your Kaiser already KO’d, then resurrect your Kaiser mid-battle and have them as the sole survivor at the end, your Kaiser will return to being KO’d and you’ll get a Game Over. Oops…
Level 1: Blinding Light
| Type | Cost |
|---|---|
| Command | 1 BP |
Deals damage to all enemies equal to the user’s current HP divided by 2 (capped at 9999 without Bravely Second).
This is the same as Flash when used by the enemy. Naturally in your hands, it’s not quite as effective as enemies–particularly bosses–have more HP than your characters. Still, with high HP, it’s an easy way to deal with lesser mobs. You could even use the Guardian’s Possession to boost your HP.
Level 2: Sonnenblume
| Type | Cost |
|---|---|
| Command | 16 MP |
For 5 turns, the order of actions are reversed, with the slowest combatants acting first. Abilities that normally trigger first will trigger last instead.
If you’re familiar with Pokemon battling, this is very similar to the move “Trick Room”. When you’re dealing with exceptional fast foes or you’re fielding slow and clunky characters, this is a good ability to use. In most cases, it’s unnecessary though and Prescience lets you outsmart most foes anyway.
Level 3: Centurion
| Type | Cost |
|---|---|
| Support | 1 slot |
Converts certain multi-target attacks into single-target attacks and doubles the attack’s damage.
This is a neat ability when dealing with solo bosses. For instance, Blinding Light now does damage equal to the user’s current HP, allowing for easy 9999 damage.
Level 4: Spring Awakening
| Type | Cost |
|---|---|
| Command | 24 MP |
For 5 turns, all combatants recover up to 9999 HP at the end of the turn (or take equivalent damage if undead).
What this actually does is restore 10,000 HP for both parties (friend and foe), with each party member receiving an equal share. For example, if all four of your party members are standing, each will recover 2500 HP. Similarly, if there’s only one foe, they will heal 10,000 HP, which is truncated to 9999 HP.
While this ability seems like it may artificially prolong the battle, it’s a handy way to passively heal your party so long as you can deal a lot more than 9999 damage to the foe. For most situations, Benediction Mist is probably better though.
Level 5: Westwind
| Type | Cost |
|---|---|
| Command | 16 MP |
For five turns, the Physical Defence and Magical Defence values are switched for each combatant.
For example, if a character has 200 Physical Defence and 100 Magical Defence, they will have 100 Physical Defence and 200 Magical Defence. Normally, there’s little reason to flip your defence values or the opponents’, but there are times when you may want to.
Level 6: Winter Storm
| Type | Cost |
|---|---|
| Command | 16 MP |
For three turns, all combatants cannot increase HP, MP or BP.
This is a killer move if used right, but also deadly to your party if used incorrectly. Its main use is to stop foes from recovering HP or gaining BP (except when Defaulting). However the same applies to you. Fortunately the Exorcist’s Undo HP still works to recover HP.
Level 7: Noble Eagle
| Type | Cost |
|---|---|
| Command | 16 MP |
For five turns, the Physical Attack and Magical Attack of all combatants is boosted to 200%.
Everyone deals double damage! If you can handle the enemy’s improved damage, this is a quick and easy way to boost your own damage output. Trouble is, you can achieve the same result with the Astrologian’s Limit Breaker and Bloody Wolf or similar buffs and the effects don’t stack either.
However it is a nice way to buff your ghosts who normally cannot be buffed because they’re dead.
Level 8: Citadel
| Type | Cost |
|---|---|
| Support | 1 slot |
At the end of every second turn, all combatants lose 1 BP. This ability works even if the user is KO’d.
This used to be the Time Mage’s Slow World. Having your own party members gradually lose BP is awkward, but this also causes most foes who don’t bother to Default (or gain BP via other means) to become immobile after every second turn.
For best results, use it with a BP Farmer build (see our Recommend Builds later on for some suggestions) so you’ve got no shortage of BP to use.
Level 9: Cerberus
| Type | Cost |
|---|---|
| Support | 2 slots |
After every battle, the user’s HP, MP and status will return to their states before the battle. This includes KO and other statuses that could lead to a Game Over. Does not trigger between consecutive battles.
The Kaiser’s Specialty in ability form at long last. It’s a bit pricey, but makes grinding mindlessly easy.
Level 10: Dawn of Odyssey
| Type | Cost |
|---|---|
| Support | 1 slot |
At the end of every fourth turn, all combatants gain 1 BP. This ability works even if the user is KO’d.
A nerfed version of the Time Mage’s Hasten World. Not particularly useful since it’s so infrequent, but can be used in conjunction with the Performer’s Zero Sum on the turn a foe has 1 BP to trick them into becoming immobile. In that sense, it might be better than Citadel.
Level 11: Overlord
| Type | Cost |
|---|---|
| Command | 24 MP |
For five turns, all combatants will hit for critical damage. Has no effect on attacks that cannot critical normally.
This is essentially Noble Eagle, but stackable with attack buffs. As such, it’s a better ability, but again only worth using if you can survive the enemy’s improved onslaught.

 Sign up
No Comments