Overall description
Greenband is THE map where people use Boost Movements the most. This is one big open area that somewhat resembles a labyrinth. It has a corridor on one side while it has two buildings on both the north and southern sides. It also has two large gaps that run across the center of the map which is instant death if you fall down so don’t go crazy double jumping all the time.
Action areas
The areas where all the action mostly take place are (non-objective game types like Free-for-All and Team Deathmatch/Kill Confirmed):
- The building to the north is a respawn point and it has two levels. The upper level oversees most of the map and you can easily spot the enemies double boosting so a sniper up here can take out these enemies in one shot. There are also 4 entrances/exits to this building which make everyone come in to seek out enemies. The little roof to the upper right is also a good point to place turrets.
- The “hallway” on the left side of the map is the most concurred area of the map. Most people like to run across it using the roof and this is good because it gives you a lot of range to spot enemies and take them out but you’re also an easy target and since most people come up here, expect a gunfight or two when you make your way across. On the other hand using the walkway is much safer because you only have to worry what’s in front of you and on your back. Make note that you can jump from down here up to the roof and the other way around using your double jump. Takes a little bit of practice but you can surprise your enemies easily like this.
- The southern building is another respawn point and a really strong area. There is a platform inside hanging in the center of the room where people like to camp so don’t let them. The little terrace on the left of this building is another strong point because you can oversee most of this side of the map and the rooftop of the previous point. You can also jump up to the little roof in front of the building (outside) that oversees ALL the map but also leaves you with no cover whatsoever so using your Heavy Shield for extra protection is recommended.
Hardpoint
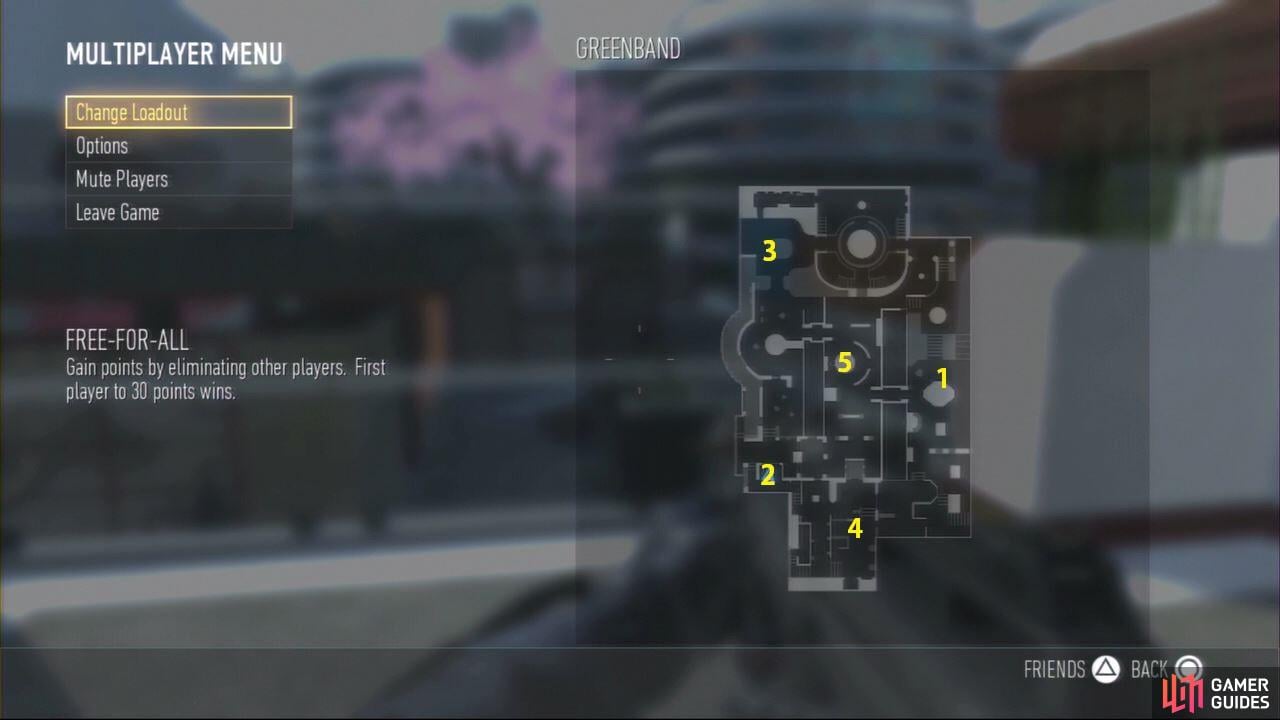
The following is a list of the hardpoints in the map and how to approach each one:
- There is no easy way to get to this hardpoint. Take note that being on top of the building doesn’t count towards the capture so you have to be on the ground in order to capture it. Using the stairs to the north as cover to take out the enemies is your best bet, although you’ll have enemies swarming from everywhere.
- This little terrace is a hard one to protect. Since most of the map is available from here, coming up using the stairs on the left (not double jumping) helps out a lot, specially if you’re not using the Perk Blast Suppresor.
- Only one thing I can say, use the corridor to the north to approach this hardpoint. This is the safest way to get in there.
- The building to the south. Go in through the windows to the north of it. Coming in from the sides is the most expected thing to do.
- This is the same as the first hardpoint. There’s no real easy way to get in here but seems that approaching from the south using the plants and whatnot as cover seems effective.

 Sign up
No Comments