
At the beginning of the second episode, the Innocent Shop and Skill Shop are now open for business. The former lets you move Innocents on items around to other items, as well as combine them. However, in order to combine them, you will have to subdue them, which requires defeating them when they show up in the Item World, something you don’t have access to yet. The Skill Shop allows you to power up skills, as well as learn new Evilities and convert unneeded ones into Mana.
You can find the free chests at the following locations:
- At the top area with the couch and TV
- Next to one of the stairs leading to where Data and Memories NPCs are location
- In the open in the area with all of the tables
In order to open up the next area, you’ll need to talk to some of the Prinnies around your base. When they mention Spirit Interment, you can go to the Dimension Prinny to head to the next area.
Companion Zone
| Enemies | Equipment | Evility |
|---|---|---|
| Lv. 5 Imp (x2) | Medal of the Weak, Thin Cape | Bullying |
| Lv. 5 Zombie (x2) | Hooked Claw, Thin Cape | Predation |
| Geo Symbol | Geo Effect |
|---|---|
| Green | Enemy Boost +50% |
| Yellow | Ally Boost +50% |
| Null | EXP +50% |
This level will introduce you to Geo Symbols, Geo Panels and Geo Effects. If you’ve never played a Disgaea game before, it’s highly advisable that you watch the tutorial to get a grasp on this concept, as it will be used throughout the game. For now, you have the Enemy Boost +50% sitting on the central area, where the enemies are sitting. That’s a big no-no, as their attack and defense will increase by 50% as long as they are standing on those green tiles. So, start the battle by bringing out a ranged attacker and destroying the green Geo Symbol, making the blue area turn green, which makes that entire area now Ally Boost +50%.

Destroy the Enemy Boost symbol (left), then toss the EXP +50% symbol onto the now green area (right) to make this a fairly decent map for leveling.
You now have to make a choice here, as the Ally Boost effect will be extremely beneficial in clearing the stage without any problems, since there’s only four enemies. Destroying the yellow Geo Symbol will spread the EXP +50% effect across the entire map, making it so that any enemies defeating while sitting on that color will grant more experience. It’s entirely up to you what you want to do, as the slightly extra EXP will help, especially with lower level characters. Another thing you can do is have a character move next to the EXP Geo Symbol, pick it up and then toss it onto the area affected by the Ally Boost effect, essentially giving you two beneficial effects.
Darkfall Memorial
| Enemies | Equipment | Evility |
|---|---|---|
| Lv. 5 Novice Skull (x2) | Wooden Cane, Thin Cape | Magic Bundle |
| Lv. 5 Red Mage | Wooden Cane Thin Cape | Magic Moderation |
| Lv. 5 Zombie (x3) | Hooked Claw, Thin Cape | Predation |
| Lv. 6 Green Slime (x3) | Hooked Claw, Thin Cape | Gel Body |
This could be a challenging stage, solely because of the Green Slimes on the north end of the map. Not only does their Evility, Gel Body, decrease non-elemental damage by 50%, they also have high innate resistances to Fists, Guns, Swords, Spears and Bows. They are essentially one of the more defensive creatures in the game, but they have on glaring weakness, elemental attacks. Hopefully, you’ve been building up a Mage or Skull, as you will need them here, unless you want to rely on Red Magnus and his axe for the majority of attacks on the Slimes. Note that the Mage and Skulls have Fire as their spell, so you can use Seraphina and Red Magnus, as well as anyone else with high fire resistance, to tank through their spells and get to them.
Death Promenade
| Enemies | Equipment | Evility |
|---|---|---|
| Lv. 7 Green Slime (x4) | Hooked Claw, Thin Cape | Gel Body |
| Lv. 7 Zombie (x2) | Hooked Claw, Thin Cape | Bullying |
| Lv. 8 Thief (x2) | Battle Gavel, Cotton Bandana | Thief Skills |
| Lv. 8 Imp (x2) | Distasteful Medal, Cotton Bandana | Predation |
| Geo Symbols | Geo Effect |
|---|---|
| Red | Movement +1 |
| Green | Movement +1 |
| Yellow | Movement +1 |
| Purple | Movement +1 |
| Blue | Ally Boost +50% |
| Null | EXP +50% |
This stage is like a gauntlet, as there’s only one path to the top, where you’ll find some enemies guarding the path. The stairs all have Geo Panels, but there are no effects. Each of the landings, though, has a Geo Symbol sitting on them. Four of the six are Movement +1, while the third is an Ally Boost +50% and the one on top is an EXP +50%. As you make your way up the map, you can toss these on the panels to help out your party, especially the Ally Boost one.
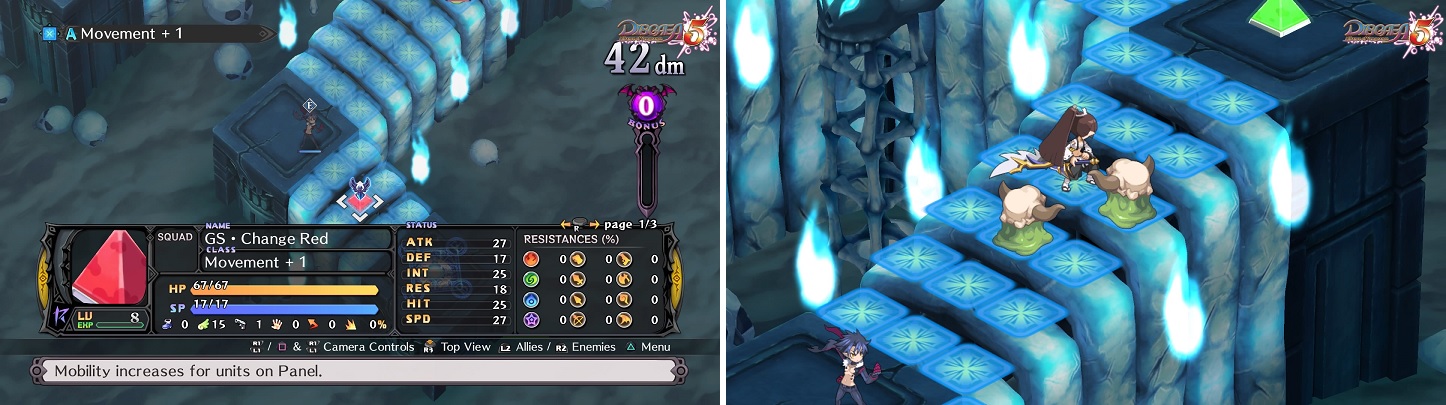
Toss the Geo Symbols onto the panels (left) to help your ascent to the top. You will want some defensively-strong characters here to deal with the enemy attacks (right).
As for enemies, there are sets of two enemies each in between each area with the Geo Symbol. You have the Green Slimes from the previous battle making their appearance again, as well as Zombies and Imps (they have the Star magic spell). The only new enemy type here are the Thieves, who are fairly weak on their own, with the two in this battle equipped with Axes, which lower your defense when hit by them.
Deplorable Tombstone
| Enemies | Equipment | Evility |
|---|---|---|
| Lv. 9 Red Mage (x3) | Magician’s Stick, Cotton Bandana | Magic Moderation |
| Lv. 8 Lady Fighter (x3) | Thorny Bow, Cotton Bandana | Assault Attack |
| Lv. 9 Heretic | Magician’s Stick, Cotton Bandana | Medical Heal |
| Lv. 8 Zombie (x2) | Crab Pincer, Cotton Bandana | Predation |
| Geo Symbols | Geo Effects |
|---|---|
| Red | HL +50% |
| Green | DEF +50% |
| Blue | Recovery 20% |
| Null | ATK -50% |
What may look like a challenging battle is made a bit simple due to the Geo Symbol by your Base Panel. As you will notice at the start, all but two of the enemies are standing on Geo Panels that grant them DEF +50% and Recovery 20% effects. Most of the enemies are in the middle, with two Zombies in the back on either side and two Red Mages on either side by your Base Panel. The first thing you should do is get rid of the those two Red Mages near your base, then pick up the Geo Symbol right behind you (ATK -50%) and throw it onto the yellow Geo Panel in the middle.
This will make things much more manageable should the enemies there try to attack. Now, bring two characters and go up one of the sides, defeating the Zombie in the corner. Throw that character with the other to where the green Geo Symbol is located. Destroy that symbol and it will set off a chain reaction, not only filling up the Bonus Gauge to the max (you get a Heal scroll as your One Time Bonus), but also severely damaging the remaining enemies on the screen. Clean up after this and you’re good to go.
Coffin of Spirits
| Enemies | Equipment | Evility |
|---|---|---|
| Lv. 7 Geese | Distasteful Medal, Cotton Bandana | Evil Eye |
| Lv. 10 Zombie (x2) | Crab Pincer, Cotton Bandana | Predation |
| Lv. 9 Zombie (x6) | Crab Pincer, Cotton Bandana | Predation |
| Geo Symbols | Geo Effects |
|---|---|
| Null | Enemy Level Up 10% |
Another annoying battle, with you having to act quick before things get out of hand. Geese, the boss for this map, is standing on a Geo Panel with the effect of Enemy Level Up 10%. This means that after every turn of his, he will level up by 10% of his current level. This will only increase his level by 1 until he gets to 12, which is when he’ll start coming after you. The only way to get to the symbol before it has a chance to do anything is to toss a character over there, but you need to make sure they can reach the symbol with an attack on their turn, as well as have enough power to destroy it.
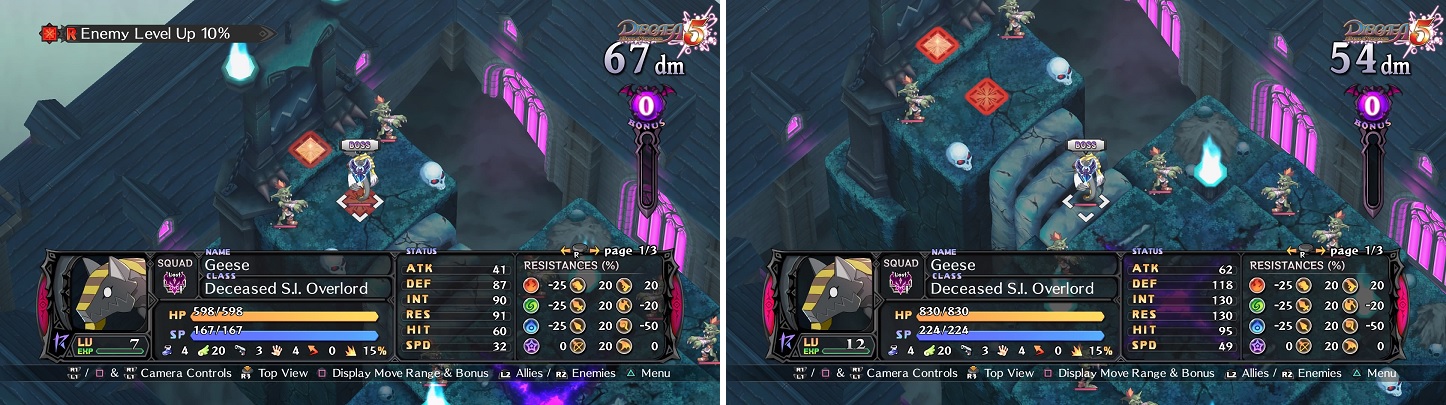
Geese will stay still and level up because of the Geo Effect (left) until he hits level 12, which is when he’ll come after you (right).
Remember that it’s highly likely that the character sent to destroy the Geo Symbol will likely be killed, as well as anyone else thrown in the chain, so used lesser important characters to do this task. After doing this, you will be left with nothing but Zombies and the not-as-strong-as-it-could-be boss. There’s no special tactics left for this, as you simply need to be strong enough to defeat them all without being defeated yourself.


 Sign up
No Comments