Coldridge Prison
Upon gaining control of Corvo, you’ll find yourself in a prison cell. Head over to the door and pick up the bread on the floor. Beneath it, you’ll find a key and a note to read. Open the door and cruise over to the table opposite to pick up a sword and a few coins. From here on out, hit the sneak button to enter stealth mode, which allows you to move around without making noise.
To the left of the table, you’ll find an open door with three guards inside. One is directly in front and two others are further in the room having a conversation. Quickly grab the guy in the doorway and bring his body back into the previous room. Once the other guards have finished their conversations, one will patrol to the far end of the room, whilst the other will head into an alcove to the right to go to the bathroom. Sneak through the shadows along the left hand wall and when the patrolling guard returns, duck into the next room.
Grab the pistol and the Health elixir from the wall on the left and enter the nearby door. Climb up to the platform above and grab another pair of health elixirs, one from the shelf in front and another from the weapon rack nearby. Loot the rest of the room and look through the keyhole on the door. When the guard’s back is turned, open the door and go grab him (and place his body in the shadows nearby) or pickpocket the key from him. Either way, once you have the key, enter the locked door at the end of the hallway to the left (it should have an objective marker on it).
The first room will have three guards, but if you act quickly, you can grab the one near the doorway without alerting the other two.
Enter the hall to the left and at the first corner, lean around and wait for the guard to pass by the end. When he does, head down the hallway after him and grab him. Place his body in shadows, and then continue down the stairs and into the interrogation room.
There is an audiograph at the back of the room you can listen to if you like. When ready, enter the door behind it and open the safe to access the clockwork explosive. As you return to the previous room, you’ll see the door opposite open.
Prison Yard
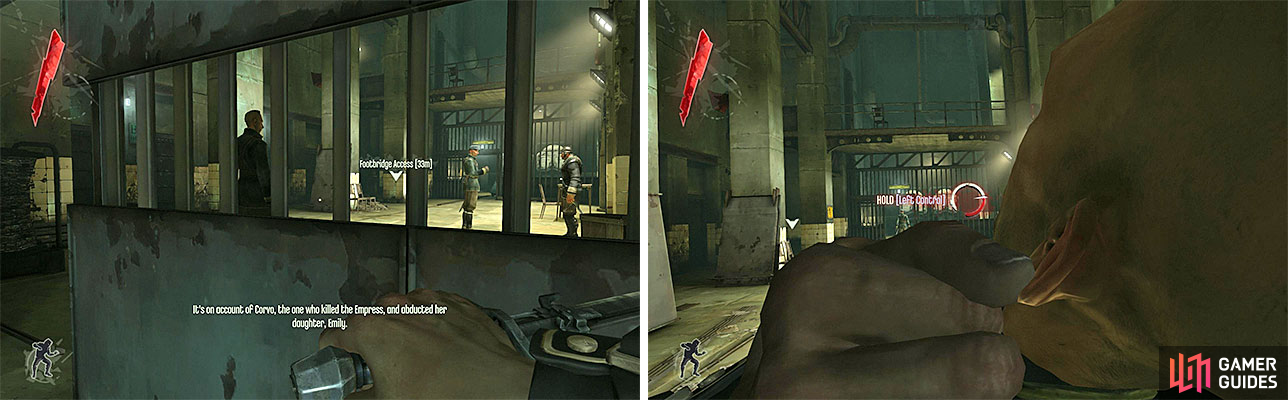
Follow the guard down the stairs and he’ll start chatting with another. At the bottom of the stairs, head off into the shadows to the right and move towards the set of stairs at the far end of the room. After the conversation has finished, one of the guards will come and patrol near the foot of the stairs, so use the cover to lean out and watch him. When his back is turned, scale them and enter the door.
In this room, you’ll see a guard patrolling the room in front and a series of rooms to the left. Here we have 2 options:
- You can enter the rooms to the left through the open window nearby, incapacitate the two guards in here and use the switch inside to open the next door (you’ll be able to collect 2x bullets + 1x health elixir along the way).
- Alternatively, you can wait for the guard in the main room to move away from you a little ways and enter the shadows along the right hand wall, climb the pipes here to the top of the room and use them to crawl over the locked door and into the next room from above.
Inside the next room, incapacitate the two guards when possible, grab the health elixir and bullets from the shelf in the little control platform to the left and then plant the explosives on the door as indicated. Enter the small cage to the left of the door to take cover. Once the bomb goes off, quickly run through the opening and jump down into the water below. Swim to shore and enter the opening here, climb the stairs and enter the door to reach the sewers.
Dunwall Sewers
Enter the first door and use the crates opposite to climb up and onto the grating on the left. Continue along and drop down into the next hallway. After watching the scene below, you’ll now also know that you want to avoid groups of rats at all costs!

The rats in this area will not leave the wheel, but you can throw the dead bodies being dumped into the hole to distract them long enough to turn the wheel.
In the next area, drop down into the water and swim to the right. Climb out and make your way to the lit up area ahead. Grab the body off the valve and put it down elsewhere so that you can use it to open the next door. Continue until you enter the next large room. You’ll see a swarm of rats at ground level and some bodies drop down onto a raised central platform from above.
Rats love dead bodies, so quickly make your way to the central platform, pick them up and toss them down into the room below, this will lure the rats away from the next valve we need to open. Whilst they are distracted, run over and open it to continue.
Turn to the right and at the top of the stairs, climb the chain into the next room. At the top, look in the hallway just to the right, it is trapped so keep an eye out for a tripwire, which will trigger something that shoots at you and explodes. You can disable this safely by interacting with it.
When its safe, follow the hallway to the end for some incendiary bolts (from the trap) and a health elixir and some coin from the crate. Return to where you jumped up from the chain and check out the stairs to the left. Again, trigger the tripwire here before climbing up. Continue along the platform, and open the crate at the end for Corvo’s gear.
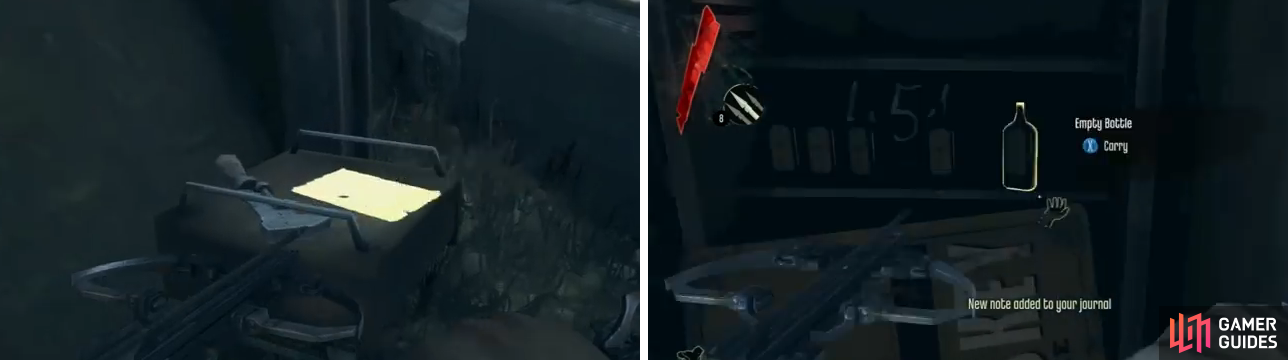
The note telling you to where to find the safe combination is right next to it, and the whiskey bottles are hiding it on the shelf right behind the safe.
Open the door nearby and disarm the tripwire immediately inside. You’ll see a safe on the ground in front and a nearby note will tell you where to look for the combination behind the safe on the shelf behind the whiskey bottles (the combination is 4-5-1 ). Continue to the other side of the room (and loot the trap for more incendiary bolts) before climbing up into the opening on the left.
Inside you’ll see a hole in the floor, so look to the left of this for a container for some objects to loot and behind it for a cabinet you can open for some more goodies with a health elixir on top. Return to the hole and hop on down.
Once the guards below have finished their conversation, they will separate. Drop down and grab the first guard, hiding his body in the shadows. Hug the left wall and stay in the shadows as you continue round the corner. You’ll find some rocks you can climb here, so do so. At the top, you will be able to access some pipes that will let you traverse the top of the room without being spotted.
If you work your way over to the left hand wall you can find a small opening above a boarded up doorway below, giving you access to a secret room you can loot for a few coins (this is optional). Climb back up to the pipes and out, this time making your way around the corner.
When you reach the end of the pipe, drop down to the crate below and continue around the walkway on the far edge of the room, across the water from the patrolling enemies. Keep your eye on the guards and continue along the wall when they are not looking, staying put in the shadows when they are. Once you reach the far end, climb up and mosey into the tunnel on the right. Follow it all the way to the end and speak with Samuel in the boat to complete the mission.


 Sign up
No Comments