
1) Cheap, But Effective
Book - Nikola Tesla and You
Enter the Metro station and head north-west down the tunnel, turning south-west around a corner and through a door to the north-west. Head north-east through some rooms and go down a tunnel to the north-west. Head down stairs, turning north-east when you must, after which you’ll get the joy of going down more stairs. When you reach a small room, head up some stairs, where you’ll find some Ghouls behind a locked gate [Very Easy]. It’s easy enough for us to bypass, but impossible for the Ghouls. You can save yourself the trouble of fighting a Feral Ghoul Reaver by simply shooting it to death through the door. Cheap, but effective. Just don’t get too close to the gate or the Reaver will throw projectiles at you. Opposite the locked gate you’ll find a door leading to a well-maintained room. Grab the loot around the room and access the MDCTA Service Access Terminal, which can unlock the safe [Average] behind the deck. In the safe you’ll find some Caps, the note “DCTA Laser Firearms Protocol”, a Laser Pistol, and a copy of Nikola Tesla and You .
2) From Farragunt to Tenleytown
Book - U.S. Army: 30 Handy Flamethrower Recipes
Go through the gate and down some stairst. You’ll find a locked door [Average] to a storage room, where you’ll find several Missiles, three Pre-War Books, two 10mm Pistols, an Assault Rifle, two Frag Grenades, a Baseball Bat and a copy of U.S. Army: 30 Handy Flamethrower Recipes . Go back up the stairs and through another locked door to the north-west. Head up some more stairs, and through a door leading to the Tenleytown/Friendship Station.
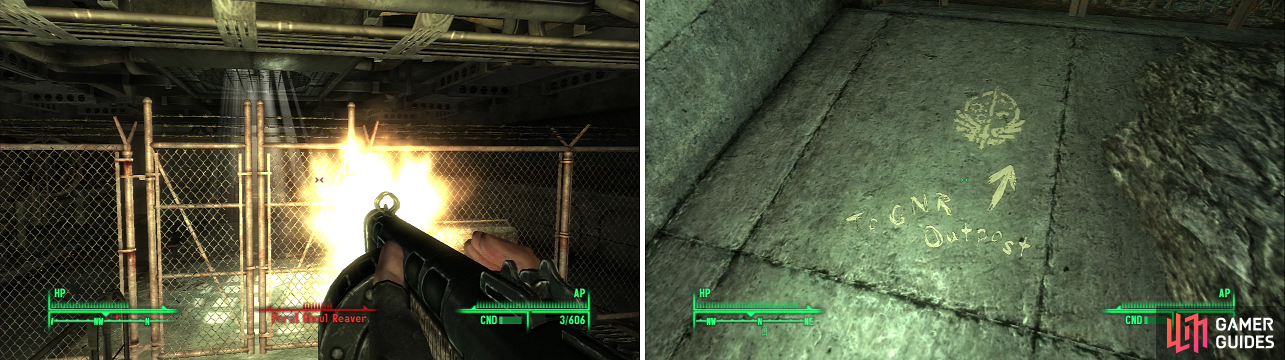
You can open locked doors, but Ghouls cannot. Use this to your advangage (left). Following the Brotherhood’s markings will help you find your way to the GNR Outpost (right).
3) The Detour Trek
Head down the tunnel to the east, turning south when you get the chance. In this small tunnel connecting two metro tunnels you’ll find a Nuka-Cola vending machine. If you head into the southern train tunnel and turn west, followin the tunnel as it bends you’ll reach a large, open metro hub room. Here you’ll see a Super Mutant chasing a Radroach. Give him a shotgun surprise, then proceed to clear the room of Ghouls. Go up some stairs and into a tunnel to the east and you’ll shortly find a gate leading to Chevy Chase. Note the Brotherhood symbol painted on the floor in front of the gate. “To GNR Outpost”-looks like we’re on the right track. This is our destination, but… well, you know what’s coming. It’s more lucrative to take a detour and explore the rest of the metro. So return to the beginning of the level and get ready to detour!
4) Ghouls and Their Prey
Book - Lying, Congressional Style
Follow the tunnel east, past the small tunnel that connects to the southern train tunnel. Keep following it past a train, turning north-east, then north, until you find another small connector tunnel to the east. Here you’ll find some Ghouls feasting on a Mercenary corpse. The Mercenary has Leather Armor and a Laser Pistol. You’ll also find some components, a first aid box and a copy of Lying, Congressional Style on a metal shelf.
5) Another Pair of Ghouls, Another Dead Mercenary
Keep going north until you reach another a large metro hub room. Kill whatever Ghouls and Radroaches present themselves, then continue north, past the stairs, and into another metro train tunnel. Turn east to find another short connector tunnel, where you’ll find another pair of Ghouls. Kill them and find another dead Mercenary near a generator, who has some Frag Mines near him and a Laser Rifle.
6) Looting Friendship Station
Book - Grognak the Barbarian
Now return to the large metro room and go up some stairs. East, past a dead Wastelander you’ll find a Nuka-Cola Quantum on a bench. Continue to the east, where you’ll find a tunnels going uphill. Go through it, continuing east, then turning north when you can. Past some ticket turnstiles you’ll find some rooms on either side of the hall-bathrooms to the east, and offices to the west. You want to explore the western offices, where you’ll find a dead Mercenary and some wooden shelves with minor loot on them in the northern room. In the room to the south you’ll also find a computer [Average] which can unlock a wall safe [Average]. There’s also a copy of Grognak the Barbarian on the upper left shelf of the left-most locker. It’s very hard to see, since it’s above you, but it’s there. Some Radroaches lurk in the bathrooms across the hall, and there’s an Assault Rifle in a toilet in the northern bathroom, and a first aid kit in the southern one. Anywho, detour over. Return to the metro leading to Chevy Chase.
7) Chevy Chase
Exit the metro and you’ll soon discover Chevy Chase North. North of the stairs leading to the metro you came out of, along the northern concrete ledge around the stairs, you’ll find an Assault Rifle and some ammo. Go over to the Pulowski Preservation Shelter and disarm the landmine, inside the shelter is some Purified Water, a Teddy Bear, and a Lead Pipe. From the Chevy Chase North metro entrance head south to find a road, then follow the road east to find Chevy Chase East and a gate leading to the Metro Junction. Don’t worry, we’re not exploring them yet, we’re just getting map markers.
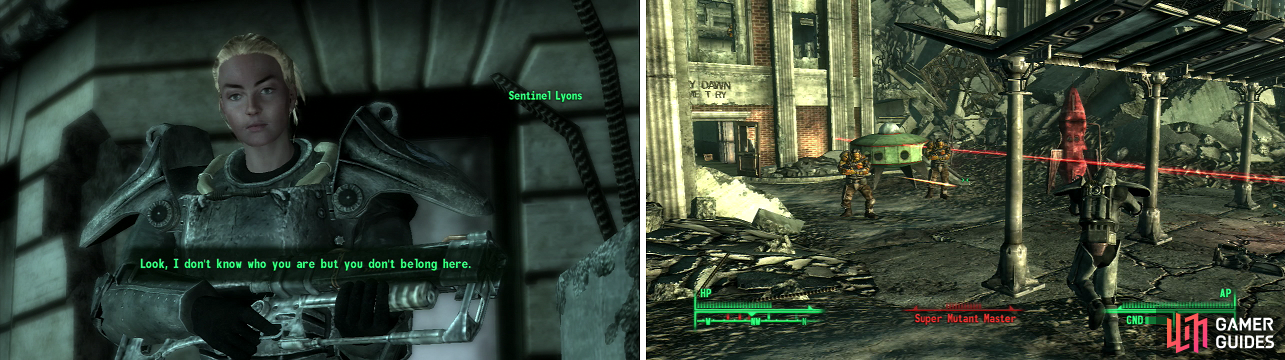
Sentinel Lyons leads the Brotherhood squad in this area (left). There’s no shame in letting the Brotherhood do the fighting against the Super Mutants (right).
8) Relieving the GNR Garrison
Return to Chevy Chase North, then head south to some Super Mutants and some Brotherhood of Steel Paladins, led by Sentinel Lyons. She’ll chat you up if you get too close, and you can find out that her squad is heading to relieve the garrison at GNR. Follow her around a building to find the rest of her squad. Loot the dead Initiate Jennings then follow the squad west into an old school absolutely crawling with Super Mutants. You can either help the Brotherhood out, or let them and the Super Mutants tangle. Continue through the school through the south to find the GNR Plaza, which is under attack by Super Mutants.
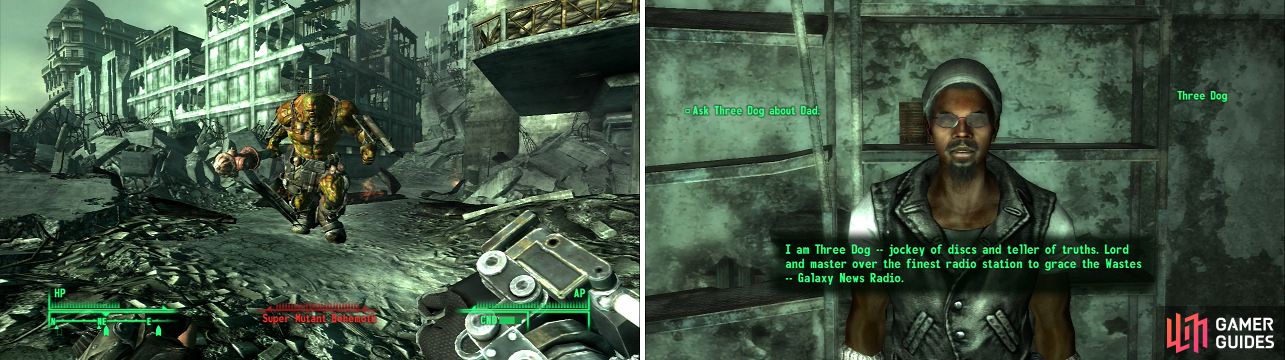
The Brotherhood of Steel might be strong, but they’re no match for a Super Mutant Behemoth (left). Your reward for fighting your way through to GNR? A face-to-face meeting with Three Dog (right)… and maybe some answers.
9) The Brotherhood and the Behemoth
Super Mutant Behemoth
After the Super Mutants are all dead the squad will split up, and a Super Mutant Behemoth will show up from the east and kill Initiate Reddin. To make this fight easy run back into the school and shoot the helpless Behemoth to death. Just in case, however, one of the dead Brotherhood of Steel Paladins near the fountain will have a Fat Man and some Mini Nukes on him, in case you need them. When the Behemoth falls loot it, and any dead Brotherhood Paladins you find lying around. Go up to the door to the GNR building an talk to the intercom and you’ll be allowed in.
10) Galaxy News Radio
You can loot around and talk to the Brotherhood characters around, but they have little of interest to say. They don’t mind if you grab everything of value, so help yourself to the ammo boxes and first aid boxes behind the sandbag. When you’re done looting, head up stairs and go through the door to GNR Studios.
11) Where Dad Went
Three Dog isn’t as generous with his stuff as the Brotherhood of Steel is, so if you want any loot you’ll have to steal it. Some notes before we talk to Three Dog. Three Dog will say he’s seen your dad, but before he’ll cough up his location he has a task for you. Try to succeed at a Speech check instead, in which case he’ll tell you that your dad was heading to Rivet City. It’s not an easy Speech challenge, and some reloads may be in order. This is the way you should finish “Following in His Footsteps” in order to get the experience reward.


12) Three Dog’s Request
Book - Big Book of Science
Talk to Three Dog again and this time he’ll ask for your help in exchange for telling you about a hidden weapons cache. He wants you to find another relay dish for GNR, one of which happens to be located in the Museum of Technology. You’ll get two notes, “Virgo II Lunar Lander”, and “Washington Monument Access.” This starts the quest “Galaxy News Radio” , and you’ll get the map marker for the Museum of Technology. Before you leave loot around, how much is entirely up to you, but at least grab the Big Book of Science on the desk in the central room. Now head downstairs and to the north until you find a door leading to the Dupont Circle.
We’ll solve Three Dog’s problem in case you didn’t use Speech on him and take the long route through D.C. to reach Rivet City. A little exploration now will make it easier for us later.
 Sign up
No Comments