
| Important Items in This Area |
|---|
| Guns and Bullets |
| La Coiffe |
| Total Hack |
It’s finally time to return to Goodneighbor and get back to playing the Silver Shroud to entertain old Ghouls. First, however, head west then south from Goodneighbor to find a Tool Case outside of a Super Mutant stronghold. Inside you’ll find 500 Caps, your reward for killing Shelly Tiller. The four suits of Power Armor you found along the way was more lucrative, but hey, 500 Caps is 500 Caps. Return to Goodneighbor and listen to the radio station to hear that Hancock wants to meet with you. Or rather, the Silver Shroud.
Head into the Old State House and talk to Hancock, who wastes time questioning your vigilantism in “his” city. Eventually he gets to the real deal: an asshole named Sinjin has been connected to all the people you’ve killed as the Silver Shroud, and he wants revenge. Fortunately for Hancock, Sinjin’s growing power worries him, so he’s got a vested interesting in seeing him taken out, hence the tip off. To start things out, however, you’re going to need to take down two of Sinjin’s goons, Smiling Kate and Northy. Pass a moderate speech check to get 50 Caps up front, then… it’s time to hunt down these two Raiders, which gives you a wonderful excuse to explore Charleston.
Mass Gravel & Sand
Fast-travel to the Corvega Assembly Plant (or if you want to avoid Raiders here, to Mystic Pines) and from the Corvega Assembly Plant head south-east to find the Mass Gravel & Sand map marker (south from Mystic Pines). On the ground you’ll have to face some Mole Rats and in an unimpressive building lurks a Raider. From here head north-east to find a road running south-east, which you should follow until you reach Wattz Consumer Electronics, which will be south-west of the road.
Wattz Consumer Electronics
Enter the building and drop down a ledge, then descend a rubble ramp to the west. There are plenty of robots on the ground floor, but they’re all deactivated for now. Who wants to bet it won’t stay that way? Make your way through a doorway to the north, then use a Terminal to open another nearby door, beyond which is an office. Interact with another Terminal on a desk and, if you select the option “Activate Demo Mode” you’ll turn on all the robots, who will be thirsty for human blood. Alternatively, however, you can just kill them while they’re deactivated and save yourself a lot of trouble.
Anyways, grab an issue of Total Hack from the desk near the Terminal, loot a safe [Expert] in the north-western corner of the room, then return to the large central room and head up some stairs to the west. Make your way through some doors and go up another flight of stairs to reach the sales floor, where more robots await. If you go south past some sales counters you’ll find a door [Advanced], beyond which you’ll find… well, not much, aside from a Military Circuit Board. Head up some stairs over the door then head east to find a door [Expert] leading to a cage, wherein you can find a Stealth Boy on a shelf and a Mini Nuke in a safe.
Return back to the sales floor and head north to find another locked door [Novice], beyond which is a break room with little of interest inside. Leave the break room and head east, keeping your eye to the north until you find some stairs. Up these stairs is a small office in which you’ll find a Steamer Trunk and a Terminal. Access the Terminal and select the option [ > Safe Control] to unlock a wall safe to the west, which can only be opened with this terminal. Make your way to the sales floor again and search two bathrooms to the north, one of which has a First Aid Box inside, then go through another door to reach a storage closet with some containers to loot inside. That done, head south to exit the store via the same door you used to enter it.
Killing Northy
Leave the Wattz Consumer Electronics building and head south to find the building where Northy is hiding, conspicuous because of the Bodyguards outside. Kill Northy’s Bodyguards, who are sharply dressed goons in business suits, typically carrying Submachine Guns, then gun down Northy, who is more likely to run and hide than fire back. You can also find a Safe [Novice] in the building he was hiding in. After you’ve killed North and left your calling card, return to Wattz Consumer Electronics, which will carry you to your next destination.

There are two intersting things to find in the BADTFL Regional Office; the Chief’s Key (left) which will make getting around easier, and the Eddie Winter Holotape 0 (right).
BADTFL Regional Office
Leave Wattz Consumer Electronics and head east to return to the road, which you should follow south-east. Eventually you’ll reach a four-way intersection, notable for the church you’ll see to your left (east) under a collapsed overpass. At the intersection follow the road north-east then at another fork turn south-east to find the BADTFL Regional Office building on the left (east), which is protected by several Raiders. At least you’ll know what to expect before you head inside, right?
Enter the building and make your way to the north to spot some Raiders having a dispute with - and about - a turret. This is a great time to get a drop on them, but be wary, as there are plenty more lurking in the tunnels nearby. Still, it’s a good bottleneck. Kill the Raiders if you can, including a unique specimen named Sparta then head down a hallway to the west to reach an large office room. Go through a locked door [Novice] to the west and grab a copy of Guns and Bullets off the desk. Hack the Terminal [Novice] and you can use it to deactivate the turret causing the Raiders so much trouble, unlock a nearby safe [Expert] and read the logs of the most cliche police chief ever.
Next make your way through a doorway to the east and go through a door to the south [Novice] to reach a bathroom, in which you can find the Chief’s Key on the top of a ruined toilet. Leave the bathroom and continue east through a doorway and down some stairs to reach a room with a jail cell in it [Novice]. Grab the “Eddie Winter Holotape 0” off a short filing cabinet near a Caps Stash, then pick the lock to the cell, where you can find some chems and ammo. Make your way through a hole in the wall to the south and you’ll enter into a records room, where you can find a Terminal [Expert], which will allow you to activate the nearby Protectron.
Head up two flights of stairs to return to the room you initially entered. To the north is the room where the Raiders and the turret played tag. Return there and head up the hallway to the east and pick a locked cage door [Novice]. Beyond this door you’ll find the treasure the Raiders rightfully coveted, which includes plenty of alcohol, a Fat Man, a Mini Nuke, a Stealth Boy, the note “We Are Done”, a Steamer Trunk, a Duffle Bag and a Safe [Expert].
Super Mutant Tower
Leave the building and head south-west to reach an intersection, at which sneak your way to the south-east. Note the barricades and the hanging bags of meat… it can mean only one thing. Super Mutants. Indeed, there are a lot of them around here, around and within a half-ruined sky-scraper south of the barricades. Make your way south, past a fence and into the building, where you’ll have to fight quite a few Super Mutants and their Mutant Mongrels, perhaps up to a dozen foes. You’ll have to ascend some stairs, then some ramps, then more stairs to reach what now serves as the functional top of the tower. Your reward for this fight? A Steamer Trunk and the loot the Super Mutants were carrying.
Return north to the BADTFL Regional Office and from here backtrack up the road to the north-west to return to the intersection in front o the church. Follow the road south-west at this intersection and when the road splits again, follow the smaller road to the west. Note the white brick building with a Nuka-Cola sign on the back to the south. Inside or around this building you’ll face a random encounter, for what that’s worth. This place is also just east of the building where Northy was hiding. What a roundabout route!
Cambridge Crater
From this building head west to reach a road, which you should follow south until you find a tunnel leading through a building. Go through the tunnel, grabbing a Nuka Cherry near a skeleton on the way, then turn east and go between a half-buried wooden building and a stone wall, through through a ruined fence. Ahead - past the campsite you’re currently at - you’ll find a large, heavily irradiated impact crater to the south-west, which is absolutely crawling with Feral Ghouls… and perhaps an exceptional dangerous Glowing One variant. Kill them and take some Rad-X (or in some other way protect yourself from the fire) then head down into the crater where, in the center of it you’ll find a Trunk containing some goodies.
Monsignor Plaza
Backtrack north-east from the crater and make your way past some barricades. When you reach the street beyond the barricades turn south-east and, when this road bisects another, turn north-east to find Monsignor Plaza. Sneak down the road to the north-east and watch for a Raider stronghold to your right (south-east). Make your way down to the front of the building by going down an adjacent road to the south-east and kill the Raiders - and their Machinegun Turret MK I - in and around the building. Inside the building you can find a Terminal that controls the turret, an Ammo Box and a Wooden Crate to loot, but more importantly you’ll find the door leading to Monsignor Plaza.
Enter the plaza and, given the opposition you faced out side, it should be no surprise that the place is crawling with Raiders. You’ll need to fight your way east, dealing Raiders and a Machinegun Turret MK I as you go… including one jerk who loves to lob Molotov Cocktails down on you from high ground. The former can be killed conventionally, and the latter can be reached with the help of an elevator. While you’re up on the high ground reached by the elevator, you can reach the roof of this building by heading west, then south, but aside from another Raider, there’s little to see up here.
Continue south from the entrance until you find a trench. If you go down into the trench and continue south-west, then south, you’ll find a few stores you can rob, but little else of interest. So instead head south-west up some stairs to find… well, some stores you can rob, but these ones are guarded by Raiders! Search the store to the west to find Griswold’s Terminal, on which you can find the holotape “Griswold’s Poetry Collection”. Fight your way south until you reach a room at the end of a hallway where you’ll find a bed should you need to rest away ouchies, a Steamer Trunk and Sue’s Terminal. You can also grab Monsignor’s Plaza Key from a counter near a large red espresso machine. When you’re done, open a door in the south-eastern corner of the room then carefully disarm a tripwire beyond the door. Descend the stairs disabling hanging cans as you go, but be quick as you’ll catch RADS as you descend. At the bottom of the staircase, unlock a door [Expert], which can by bypassed with the Monsignor Plaza Key.
Science Center Gift Shop
Back outside, if you turn north and follow the circular railing you can find several Frag Mines on the ground, which can be yours if you’re both quick and brave. Although you initially start out by going north, follow the railing as it turns south-east until you find a road near a bridge. Cross the road and enter a blue-doored building to enter the Science Center Gift Shop, wherein you find a Mr. Handy, who will sell you a variety of junk.
Charleston Laundry
Exit the Gift Shop and follow the road north-east, maneuvering around rubble as you go. Follow the waterfront more or less east, passing a bridge to the south as you go. Continue following the road as it curves north-east until you find Charleston Laundry to your right (south-east). Inside, in a Shopping Basket on top of a Dryer you’ll find an issue of La Coiffe. After that’s yours unlock a door [Novice] behind a counter to the west, beyond which lies an office wherein you can find a Nuka Cola Quantum on a desk and a Safe [Expert].
Slaying Smiling Kate
Leave Charleston Laundry and cross the road diagonally to the west to find a road running north-west, which you should follow until you see an obelisk walled-off by makeshift fortifications. When you reach a three-way intersection, follow the road north, leap over some vehicles, and head up some stairs to discover the Bunker Hill map marker. In the old world, it marked the site of a battle between the English and their colonists over which was a better beverage; soda, or tea. Soda won, but the British continue drinking tea in defiance. Or something like that. Anyways, head into the settlement where you’ll find numerous merchants and other interesting characters.
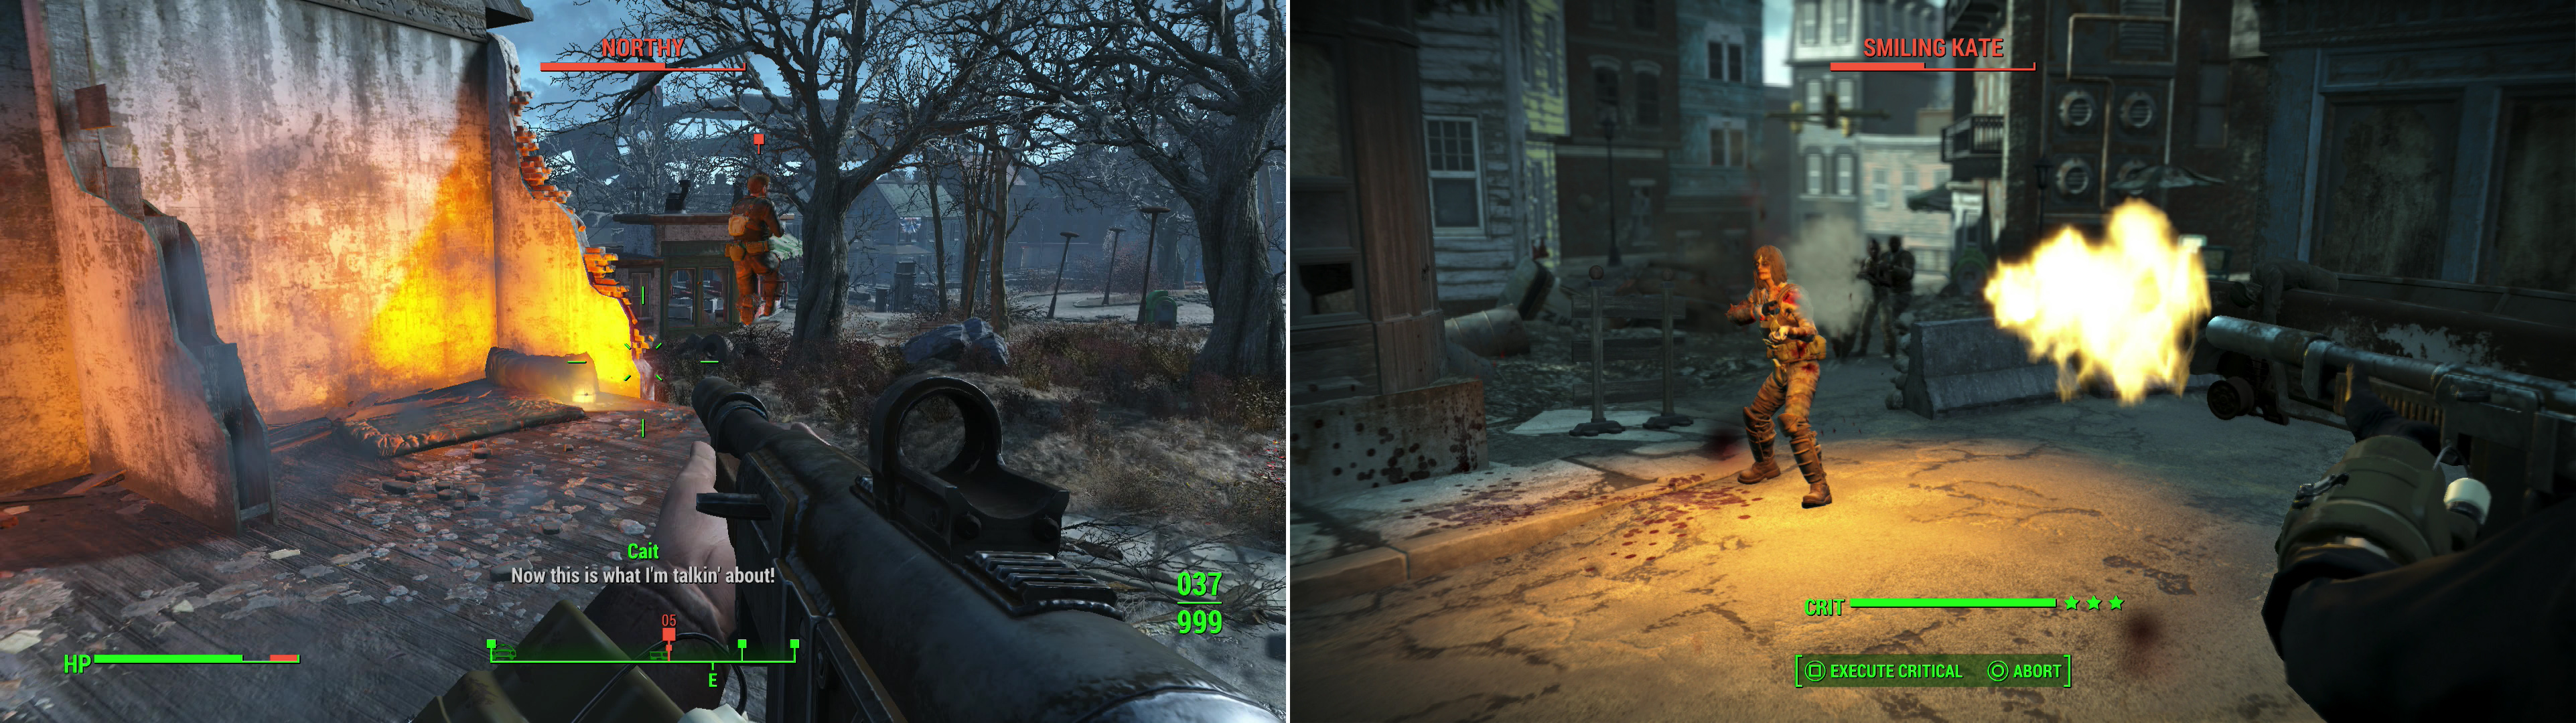
Northy will try to flee and fight another day once you make it past his goons (left). Smiling Kate, on the other hand, will stand and put up a fight (right).
Or at least you would, if you were going to explore Bunker Hill yet. You’re not. You’ve got a job to do, remember? Don’t worry, you’ll come back here once you’re done messing around in the south. From the Bunker Hill map marker head south-west to find Smiling Kate and several members of Sinjin’s gang. She’ll talk to you when you approach and pretty much announce that she’s going to kill you. Take her and her fellow gangers out, then search Smiling Kate’s body to find the “Find the Silver Shroud” holotape from somebody named Avery. Leave you calling card then listen to the Holotape. Bunker Hill will have to wait for now, you’ve got some more justice to dispense!
Fast travel back to Goodneighbor and listen to the Silver Shroud Radio station to find out that Kent had a run-in with Sinjin. If you head into the Memory Bank, Irma will tell you what happened and tell you to listen to the radio station, if you already haven’t. Looks like Kent needs rescued, and this will take you south of Diamond City. If you guessed that this would make a great excuse for more exploration, you’re getting the hang of how this guide works.

 Sign up
No Comments