
| Important Items in This Area |
|---|
| Pugilism Illustrated |
Vault 11
Make your way to Vault 11 along the northern end of the El Dorado Dry Lake, then head down a natural cave tunnel to reach the opened vault door. The rush and presence of Mojave wildlife (in this case Giant Mantises) is not encouraging. The skeletons near the vault door is even less so. Pick up a 10mm Pistol on the ground and some ammo for it, then download the “Security Recording: Vault Entrance” off the nearby terminal. Give the “System Recording: Vault 11 Front Entrance” note a listen to discover that something sinister occurred in this vault. Something most of the five survivors were so ashamed of that they took their own lives.
Continue through another door to the north to find a second type of critter inhabiting this Vault; Giant Rats. Yeah, not too challenging. Go through another door to the north to find a small clinic (infested with Mantises) where you can loot two First Aid Boxes. Through a door to the west you’ll find a hallway which ultimately ends in a dead-end, but there are two rooms to search along the way. In the first you’ll find a Public Terminal which discusses the vault’s democratic process in action. The candidates statements sound more like appeals for leniency than campaign propaganda, however, and the position of Oversee doesn’t seem like an office on aspires to, but something somebody is sentenced with. Curious… The other room down this hallway isn’t very interesting, and other than a dead NCR Trooper to loot, there’s not much to note.
Return to the four-doored room back east and continue through another door to the east to reach a hallway. If you go north you’ll find some bathrooms to loot, for what that’s worth, while if you continue following the hallway east or west you’ll find some stairs down. There are a few more rooms to explore with minor loot inside, some bugs to squash, rats to kill, and more clone Public Terminals (including one rigged Terminal (keep an eye out for the antenna if you don’t want it blowing up in your face) but ultimately this level has little else of interest, so continue down until you find the door to the Vault 11 Living Quarters at the southern end of this level.
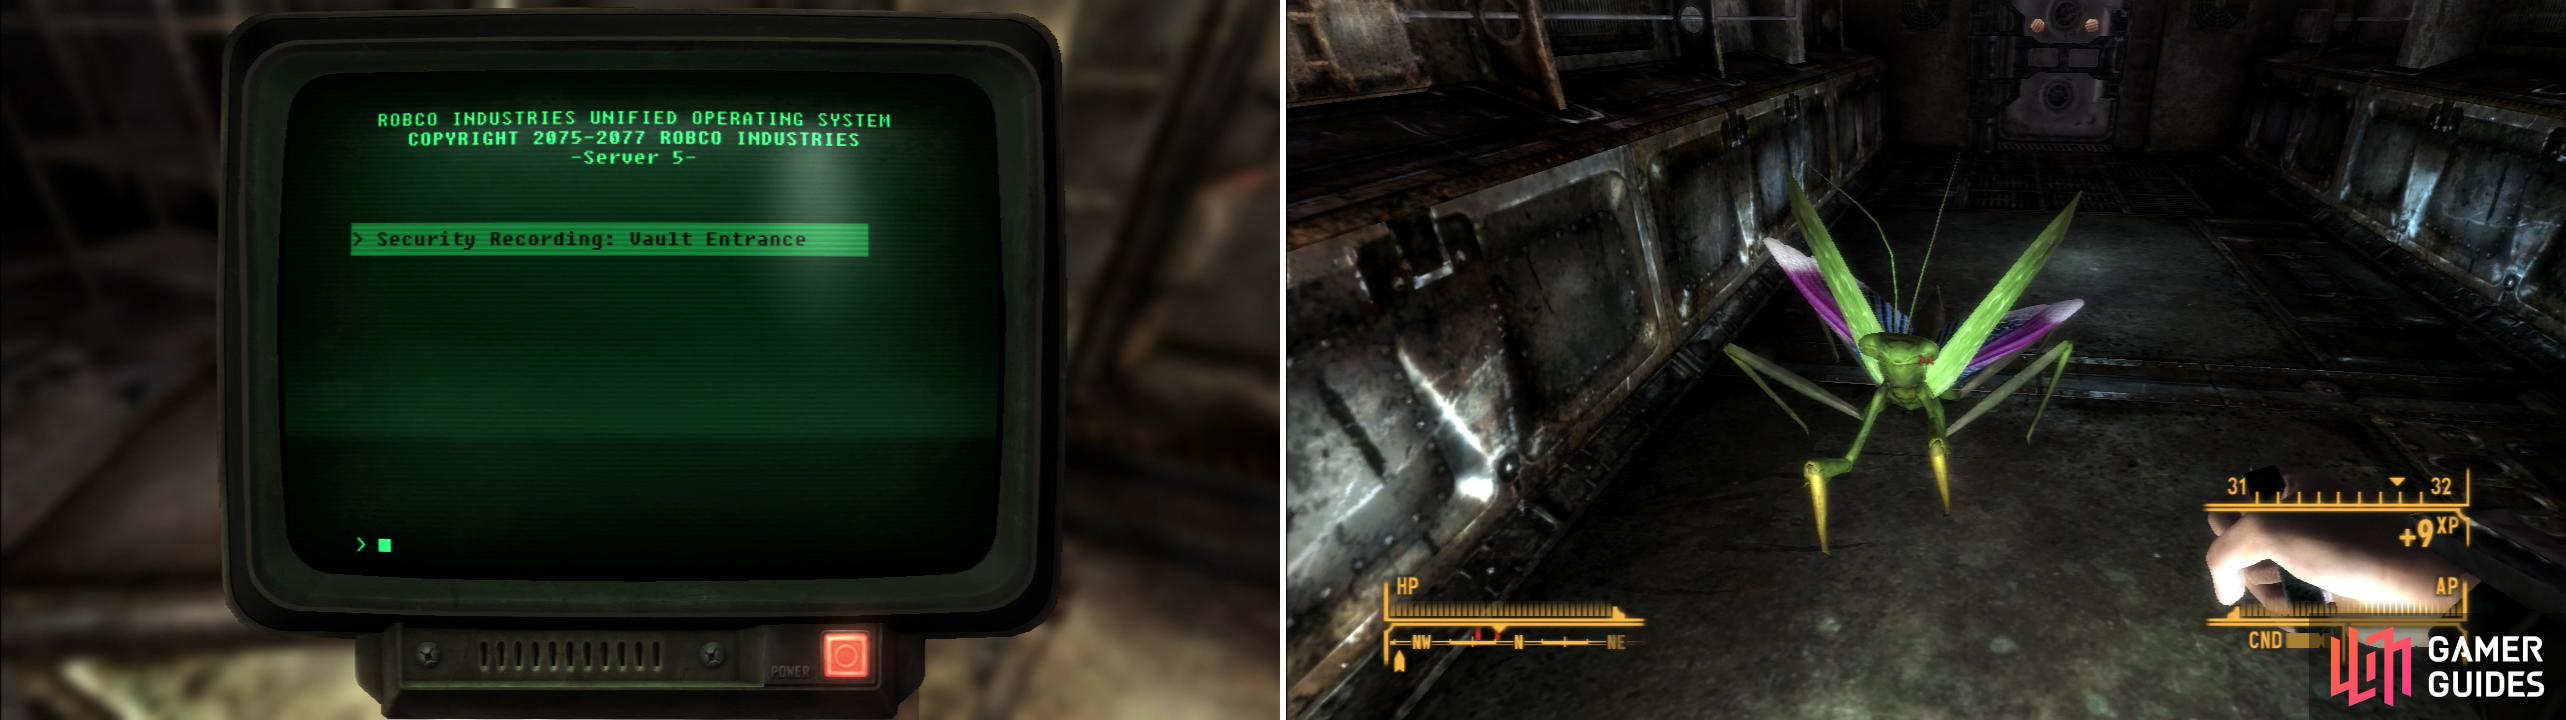
Search near the entrance of Vault 11 to discover an ominous recording (left). Obviously devoid of human life, Vault 11 has become the home of Giant Mantises and Giant Rats (right).
Vault 11 Living Quarters
Head around a corner, then south down some stairs and through a door to reach a room with a pair of Mantises in it. Seems the mammals lost this fight. You can loot a First Aid Box along the eastern wall behind a counter and also score some components (Fission Batteries and Conductors).
Once you’ve harvested this room for whatever you care to carry around head through a door either to the north or south and go down some stairs. Here you’ll find the actual living quarters, rooms surrounded by hallways and occupied by either Giant Rats of Giant Mantises. There are eight rooms in total, two groups of two pairs of rooms connected by a short north-south running tunnel. In the south-western most of the northern four rooms you’ll find a Personal Terminal [Very Easy] which can be unlocked by searching a Footlocker under some metal shelves which contains “Roy Gottlieb’s Terminal Password”. Gain access to the terminal then download the entry “Security Recording” to get the note “Justice Bloc HQ Security Tapes”, which is worth listening to. In the north-western of the southern-most rooms you’ll find a copy of Pugilism Illustrated lying on the ground near a collapsed Dresser near the southern door. Other than these two things, however, there’s not much other mundane loot to be hand.
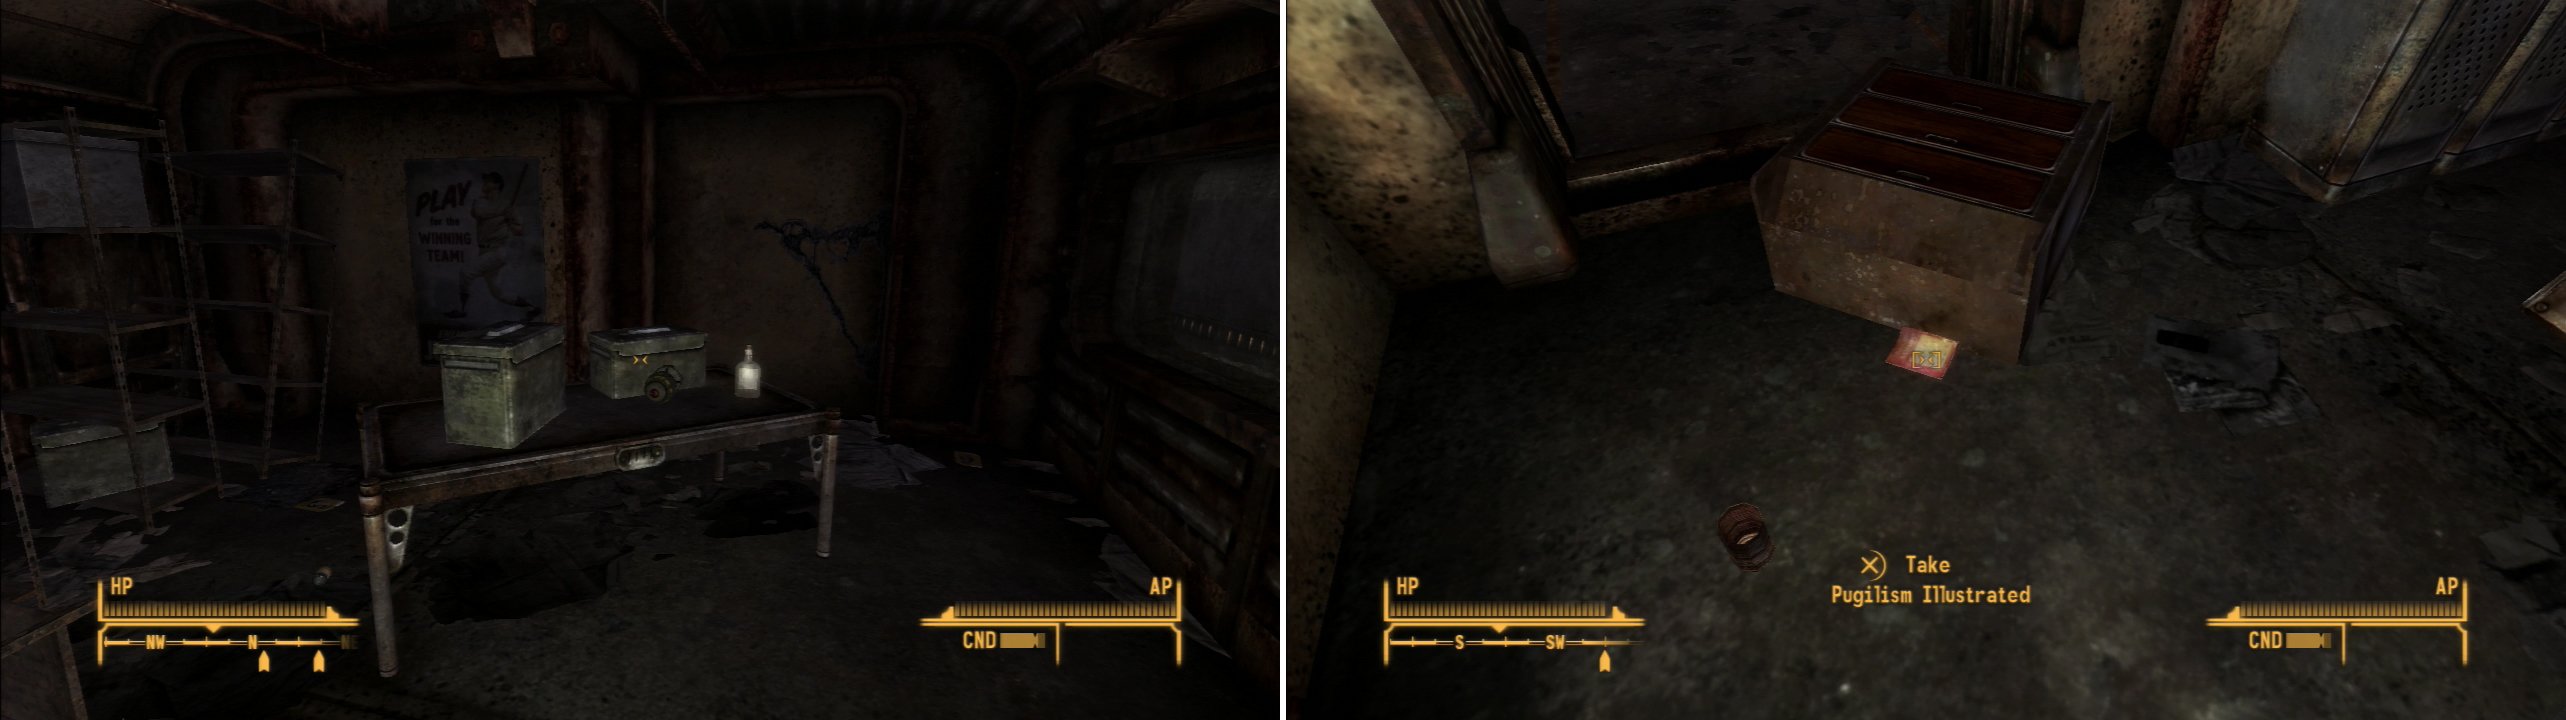
Beyond a locked door you can find a cache of loot, including a Mini Nuke (left). On the floor of one of the living quarters you’ll find a copy of Pugilism Illustrated (right).
Return upstairs to the first room you arrived on in this level and go through a door to the west, then turn south and pass by a locked door [Hard] and a Terminal [Hard]. Ignore them for now and continue south into a security room, which you can loot for a variety of ammo, including four Ammo Boxes on some metal shelves behind a counter. On the counter you’ll find a “Security Terminal” which you can access to find the “Deposition” entry, which brings the vault’s political darkside into focus.
Leave the room and return to the hallway back north, then either pick the locked door [Hard] or hack the Terminal [Hard] to gain access to the room. Inside you’ll find a variety of treasures, including a Mini Nuke, a Mine Box, four Ammo Boxes, and assorted loose ammo. Once you’re done looting, return to the hallway and head north, down some stairs and through a door to reach the Vault 11 Lower Level.

Find the Differential Pressure Controller in a submerged locker (left). Bugs aren’t the only threat left in this vault; remnants of the civil strife like this Grenade Bouquet remain behind (right).
Vault 11 Lower Level
Continue down some stairs to the north, through a doorway and down a hallway, turning east when you must. When you reach an intersection, ignore the room to the east, as it’s the Overseer’s office. While it’s the ultimate goal, you need to find some other items before you bother with it. Instead go down a tunnel to the south, turning east when you must, then go down the first flight of stairs to the south. Go through the first door to the east and disable a Tripwire that triggers a Grenade Bouquet. Along the eastern side of the room you’ll find another Tripwire that triggers a swinging beam trap, which is far less dangerous. Signs of conflict here are obvious; apparently the Justice Bloc underestimated the resolve of the rest of their fellow vault dwellers. Loot two Ammo Boxes and a First Aid Box, then return to the western hallway and continue south.
Go down some stairs and into a flooded lower section of the vault (having that Rebreather obtained during the Boomer questline will come in handy here), then swim east. When you find a room to the south, swim into it and search a locker to find the a Differential Pressure Controller - the item the Brotherhood of Steel wants from this vault. Leave the room and swim east, then north when you run out of east. To the east will be another, less interesting room, but you can find an Ammo Box inside.
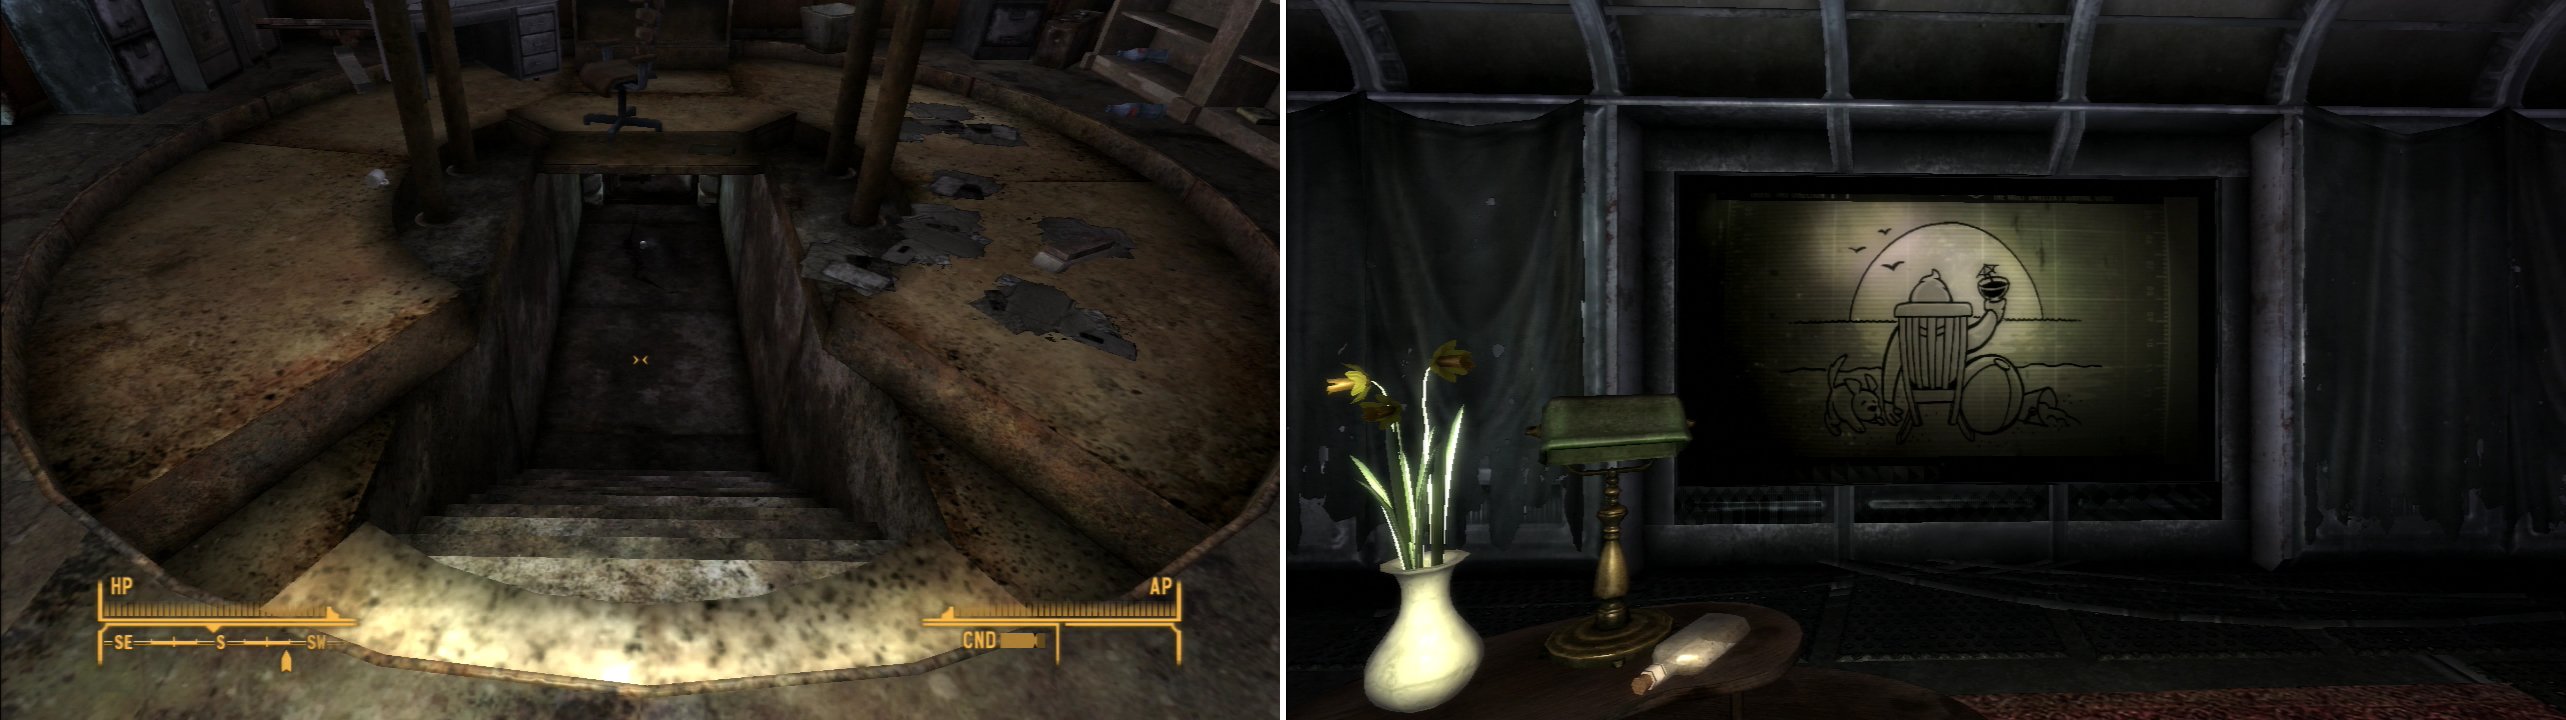
Open the “sacrificial chamber” under the Overseer’s desk (left) then watch the presentation in the room below (right).
Return to the hallway then swim north, then ascend some stairs. Continue north up a hallway until you find some stairs to the east, which you should descend to reach a Giant Rat occupied room with little of value inside. Go through a door to the north, down a hallway occupied by Mantises and into another room. Loot some Ammo Boxes (one of which is locked [Average]) then press on north through a control room to reach the damp, barricaded, northern end of the room. Loot an Ammo Box behind a barricade then pick a locked door [Average] to the west to enter a small room with meager loot guarded by rodents.
The way forward is up some stairs to the west, but if you have the Rebreather, you can claim some loot by going through a door to the north. Go down some stairs to the north, then swim into a room, turn east through a door, down a hallway and into the reactor room. Through another door to the east you’ll find a small room with two Ammo Boxes on the ground, a First Aid Box on the wall and several Metal Boxes on some metal shelves. Loot, then return to the reactor room and swim south to return to the damp barricaded room.
Continue west up the aforementioned stairs to reach a three-way fork. Proceeding west will lead to the cafeteria, where you’ll find some Mantises and a Frag Mine near the door. Search the room (and the kitchen beyond) to find plenty of food in various containers and several Ammo Boxes, but nothing of great value.
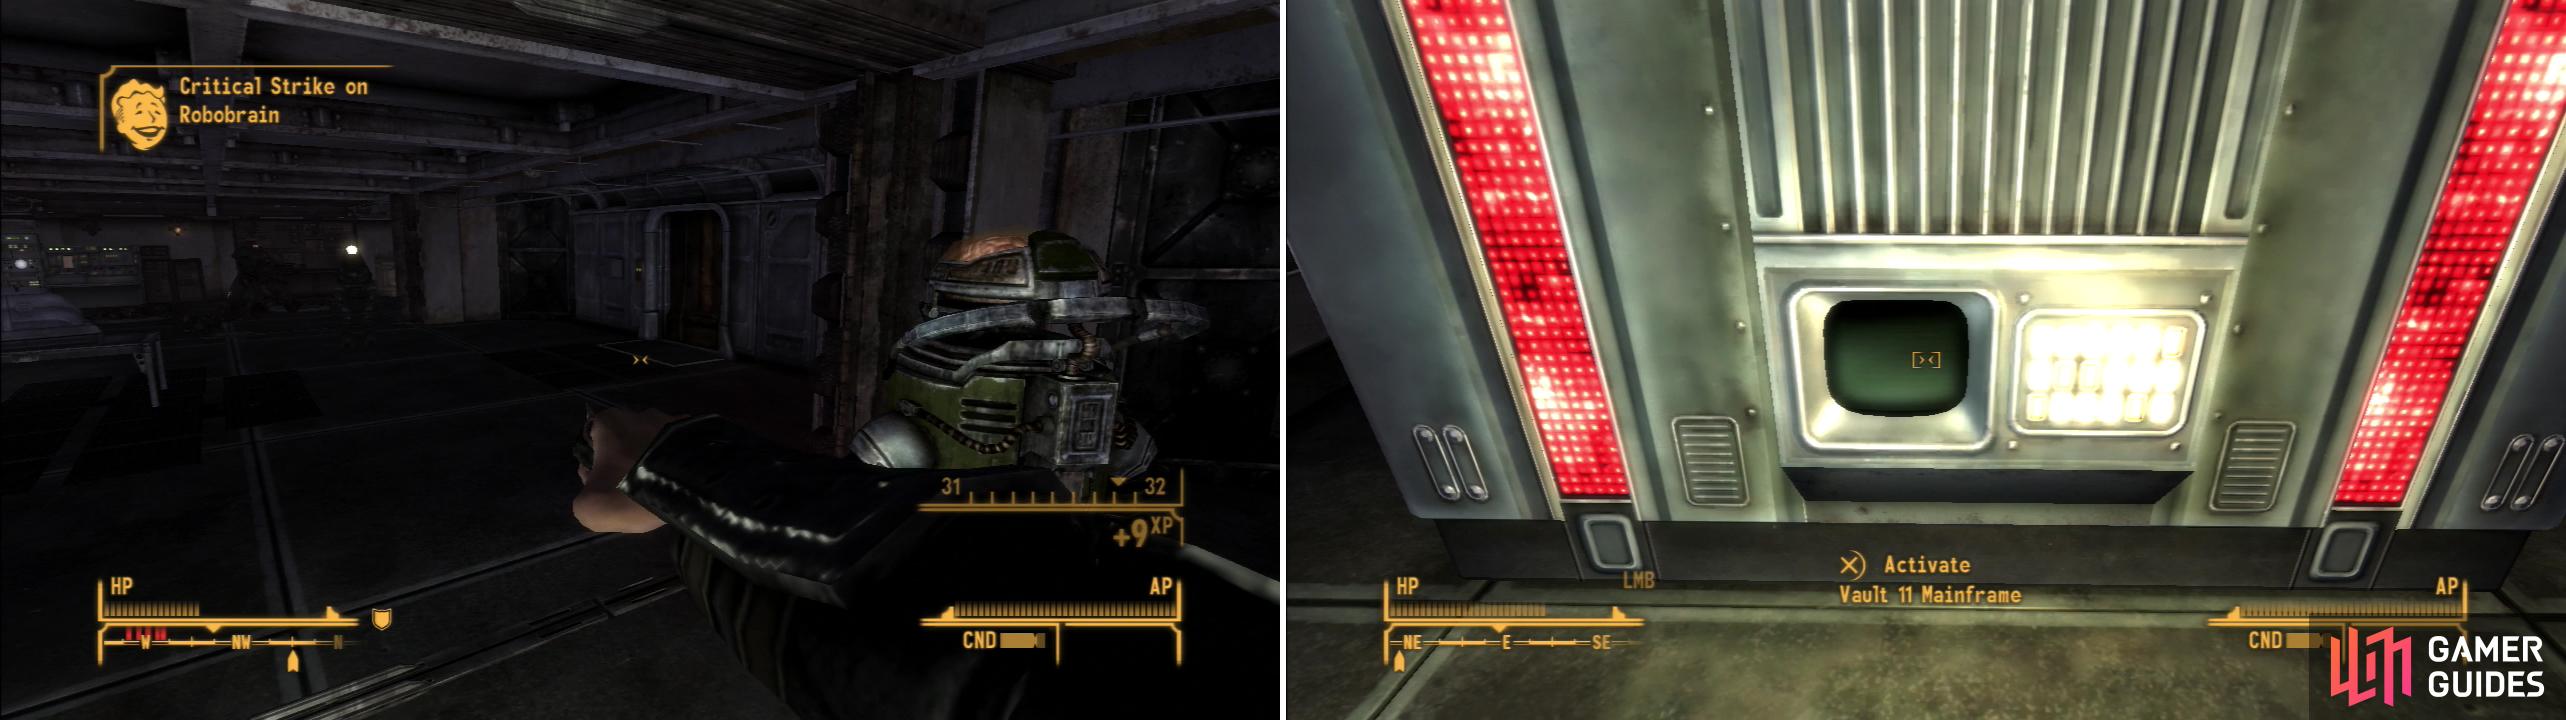
Fight off the robots that ended the life of many an Overseer (left) then hack the Vault 11 Mainframe to find out exactly what happened to the vault and its dwellers (right).
Return back to the hallway and head down the unexplored path to the south, following the winding tunnel until you reach the atrium to the south. Kill two Mantises and search the podium to obtain the note “Prepared Speech of Gus Olson, Ombudsman, for the Annual Overseer Election”, which will also net you the note “Vault 11 Overseer’s Password”. Reading the first note will confirm the obvious; that being elected Overseer is a death sentence which all too often turned into an unpopularity contest… and a rigged one, at that. If you return to the hallway and head east, then up some stairs, you can find the Atrium Terminal, which only contains the note you obtained on the podium.
Backtrack to the Overseer’s office near the beginning of the level and disable a Tripwire rigged to a shotgun in the doorway. Loot a bookshelf for what minor goodies it contains, then activate the Overseer’s Terminal and pick the entry “Open Sacrificial Chamber”. Head down some stairs and proceed through a doorway, then down a tunnel to the south. A computerized voice will urge you on into the sacrificial chamber, where you’ll witness the last moments of many an Overseer. After the presentation, the walls to the east and west will open, and you’ll be attacked by two groups of robots, including a Mister Gusty, a Robobrain, a Sentry Bot, a Protectron as well as four turrets in each room. Popping a Med-X as the fight begins might not be a bad idea, neither is focusing on the turrets in one of the rooms. Destroying one will damage, even destroy the others, and once the turrets in a room are gone you can fight from there… anything’s better than staying in the central chamber. Once you’re victorious head through a door to the east to reach the Vault 11 Mainframe, where you can find the entries “Override Lockdown”, “System Recording: Vault 11 Solution” and “Automated Response: Vault 11 Solution”. Free yourself from the vault, then listen to the recordings to find out just why the near-survivors of Vault 11 killed themselves.
| Objective | Reward |
|---|---|
| For discovering Vault 11’s dark secret | 500 XP |
South Vegas Ruins
Leave Vault 11 behind and fast-travel to the South Vegas West Ruins map marker, which are located west of Camp McCarran. Now that the quest Three-Card Bounty has been completed there shouldn’t be any complications, just kill the Fiends in the ruins north of the entrance to the South Vegas Ruins (the associates of Cook-Cook, who probably respawned by now) then head into the South Vegas Ruins where you’ll find… more Fiends! Many, many more Fiends than you’ve faced in any one area before. Exterminate all the Fiends in the area and locate two areas of interest; the entrance to Vault 3 along the southern end of the area, and to the north you’ll find Zapp’s Neon Signs. The former is the goal, but there’s no harm in exploring the latter, first, and there’s no other reason to ever go there, so…

Beware the traps in Zapps Neon Signs (left). The leader of the Fiends here, Duke, will shoot mines and air canisters to make them explode near you (right).
Zapps Neon Signs
Enter the Zapp’s Neon Signs building and search a small bathroom to the west to find a First Aid Box on the wall, then continue north from the entrance (grabbing two magazines on a table near a couch as you go) and turn west to find stairs leading down. Disarm a Tripwire triggered to a Grenade Bouquet at the top of the stairs then continue to the bottom of the stairs to find some Frag Mines placed around an oxygen tank. In the room beyond, a unique Fiend named Duke aspires to shoot this tank if you get too close, triggering the mines, too. If you want to be safe, you can always just shoot the tank yourself (from a safe distance, of course), then clear out Duke and his small army of Fiends in the room beyond. There are several more instances of this tank-and-mine setup on the stairs in the next room, and Duke prefers to fight at range with his Service Rifle. You can easily out-range him with the Gobi or Ratslayer, however and make it safe for you to clear the way once he’s dead.
Loot the ground floor of the room to score some components, then head up a ramp to the west to find two Ammo Boxes, then head up some stairs to the east to reach an office at the southern end of the building. Search the southern wall to find a Bumper Sword in a cabinet, some magazines can be found on some metal shelves along with two bottles of Nuka-Cola Quartz. Near a desk you’ll find a safe containing some 9mm Rounds, a Mine Box, an Ammo Box, and on the desk sits a Terminal [Easy]. Finally, loot a First Aid Box on the wall near the door, then exit the building.
The area around Vault 3 is crawling with Fiends (left). You won’t get a much warmer reception inside the vault, but some diplomacy can prevent a fight (right).
Vault 3
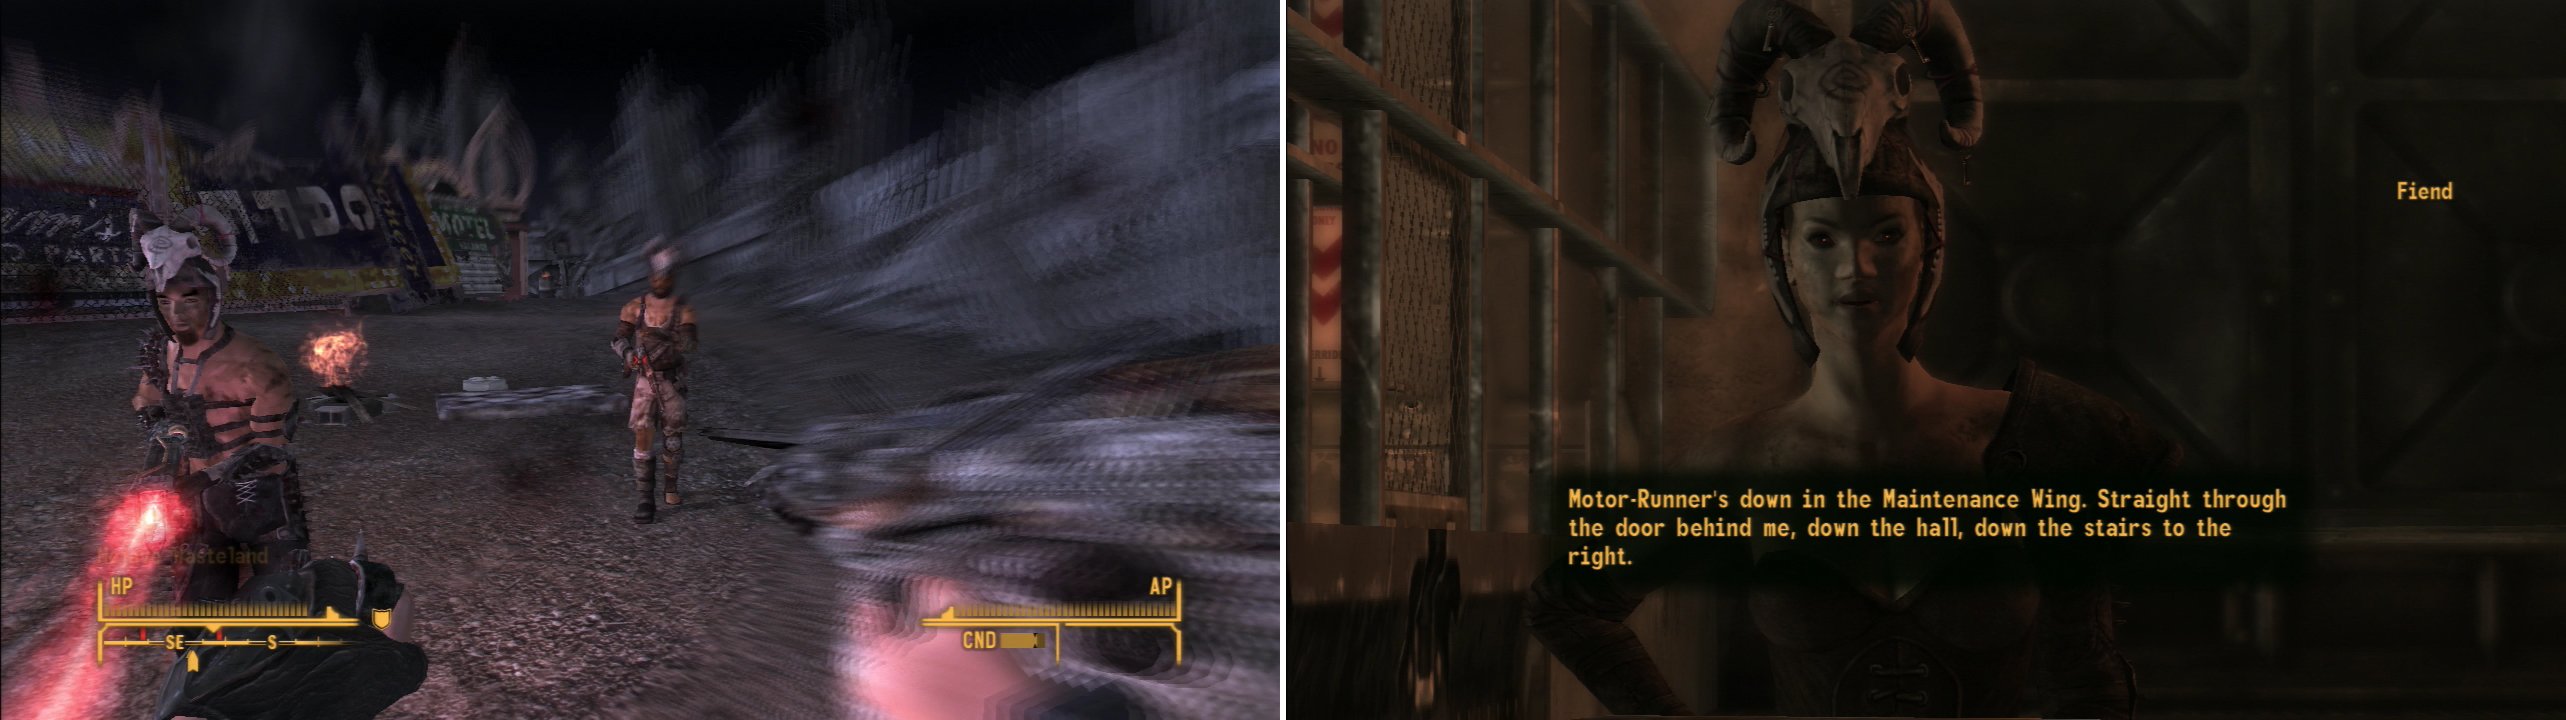
Once outside, head to the southern end of the South Vegas Ruins to find a large building that contains the entrance to Vault 3. Activate a “Vault Door Control Pad” to open the door, then head inside. Once you’re in the vault you’ll be pestered by an aggressive Fiend, whom you can placate by succeeding at a [Speech 64] check. She’ll even give you directions on how to reach Motor-Runner, the boss of the Fiends… and coincidentally the person you need to see. Well… perhaps you don’t need to see him, but you’ll end up talking to him anyways.
Ignore the rest of the vault for now; in this instance you’ll just bee-line to the item the Brotherhood of Steel wants. Go through a doorway to the west, then head north a bit before turning west again. At the end of the hallway to the west you’ll find some stairs leading north; descend them, turn west again, then go down another flight of stairs to the north to reach the Vault 3 - Maintenance Wing.
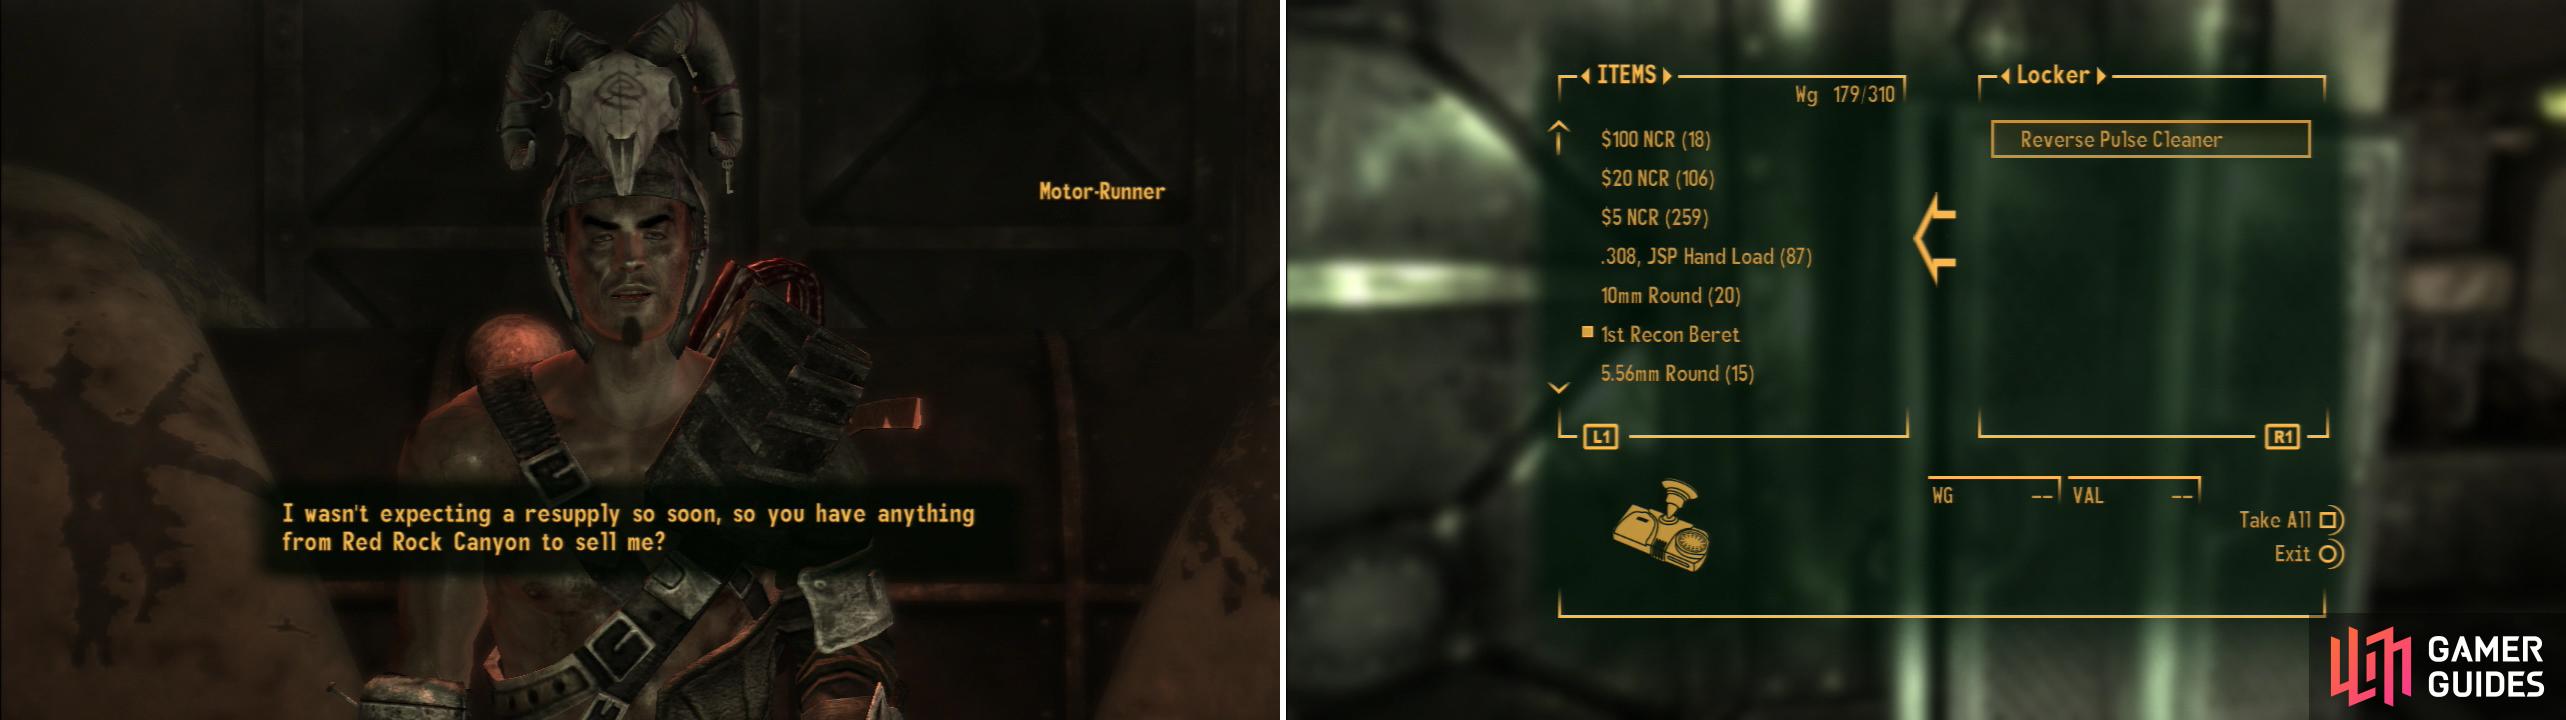
At the bottom of Vault 3 you’ll find Motor-Runner, the leader of the Fiends (left). More importantly, you can obtain the Reverse Pulse Cleaner (right).
Note the well-armed Fiends here, then head north through a doorway and down a hallway until you reach a “T” intersection, at which point turn west. When you run out of west, enter a room to the north, then go through another door to the east to find Motor-Runner, flanked by his pets BoneGnash and GhashBone. He’ll initiate dialogue with you when you approach and mistake you for a Great Khan. Succeed at a [Speech 25] check and he’ll tell you about killing the former residents of the vault and why he moved the Fiends in here. You can even offer to sell him chems (Jet, Psycho or Buffout) and succeed at a [Barter 65] check to bump the prices up a bit. Deal with him however you will, but leave him alive for now and search a locker to the north to find a Reverse Pulse Cleaner. Another of the three items the Brotherhood wants. With that in your possession, it’s time to leave Vault 3 and head for the third - and final - vault you need to search.

 Sign up
No Comments