


| Bestiary |
|---|
| Anchag (Rare Game) • Baritine Croc • Dark Skeleton • Ice Elemental • Lizard • Skull Knight • Slaven Warder • Twintania • White Wolf • Wild Onion • Yeti |
| Items In This Area |
|---|
| Bangle • Betelgeuse • Brigandine • Burgonet • Close Helmet • Death • Demonsbane (Drop from Yeti) • Diamond Shield • Elfin Bow • Flame Shield • Gaia Rod • Glacial Staff • Glacial Staff (Drop from Baritine Croc) • Gladius • Headband • Headband (Steal from Slaven Wilder) • Healing Rod (Poach Wild Onion) • Hunting Crossbow • Ice Shield • Icebrand • Jujitsu Gi • Jujitsu Gi (Steal from Skull Knight) • Kogarasumaru (Drop from Garuda-Egi) • Lamia’s Tiara • Lohengrin (Steal from Twintania) • Long Bolt • Loxley Bow • Mage’s Habit • Mage’s Hat • Murasame • Obelisk (Drop from Anchag) • Parallel Arrows • Paramina Crossbow (Steal from White Wolf) • Platinum Shield • Power Rod • Recurve Crossbow • Red Hat • Revive • Shielded Armor • Six-fluted Pole • Sledgehammer • Thorned Mace |
Fading Vale
When you exit the Golmore Jungle you’ll find yourself in the snowy, inhospitable, wind-swept environs of the Paramina Rife. It may be a bit jarring to find verdant, tropical jungles yielding to so different a climate through one measely cavern, but such is the fare of fantasy terrains. It’s also worth noting that, despite the weather, not a single member of your party (decidedly dressed for warmer climes!) feels the slightest bit of need to cover up. Don’t wonder at how the exposed arms, legs, stomachs… and other, more conspicuously bare parts managed to fare so well in this climate. The first area is pretty tame, consisting only of some unimportant NPCs you can talk to and a Save Crystal. Seems you’ll have to pass through these frozen lands to reach Mt. Bur-Omisace.
Head of the Silverflow
Make your way northeast of the Save Crystal to find an area transition leading to the Head of the Silverflow zone. Here you’ll find new foes, monsters adapted to - or unhindered by - the extreme weather in this area. A good number of new foes can be found in this area, listed in order of which you’re likely to encounter them: the White Wolf, Wild Onion, Skull Knight, Slaven Warder and Lizard. There is, of course, much new loot to find in these lands as well, but at first most of it is old equipment you could have found or purchased in earlier areas. It’ll still be pointed out, of course, if you wish to try your luck and obtain more of it.
White Wolf:
The first enemy you’ll encounter in Paramina Rift, the White Wolf is indicitive of the power of the monsters you’ll be facing here. A notable - but marginal - power increase over the foes you fought in the Golmore Jungle, if you were handling the former area with some ease, you likely won’t be bothered overmuch by these. Expect most foes to have levels in the mid-twenties and slightly higher Attack Power and HP.
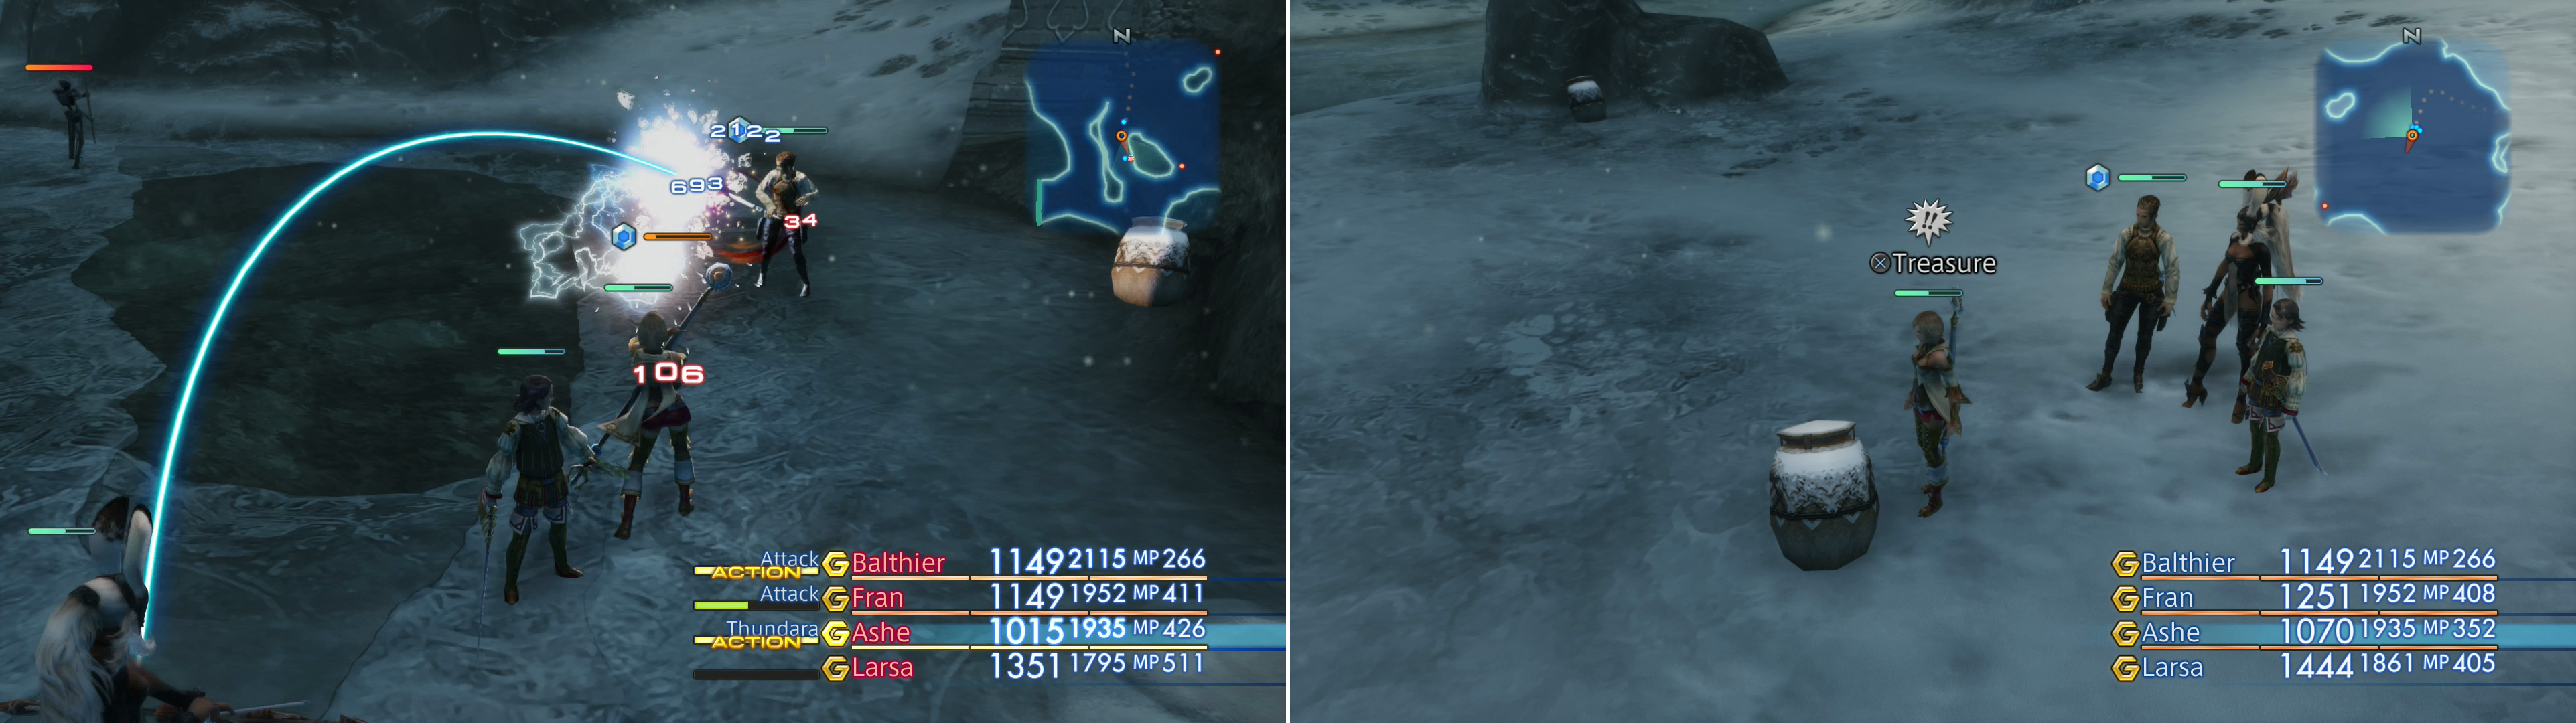
Despite meeting these criteria, White Wolves aren’t terribly dangerous foes. They can use Sonic Fangs, which always has a chance to inflict instant KO, and their physical attacks can inflict Poison. So far these attacks make them occasionally annoying, but otherwise offensively unremarkable - their Screech attack is what makes them worrisome, however, as it can Confuse the target. Since your characters are probably stronger than most common enemies right now, having one of them go rogue can be pretty dangerous.
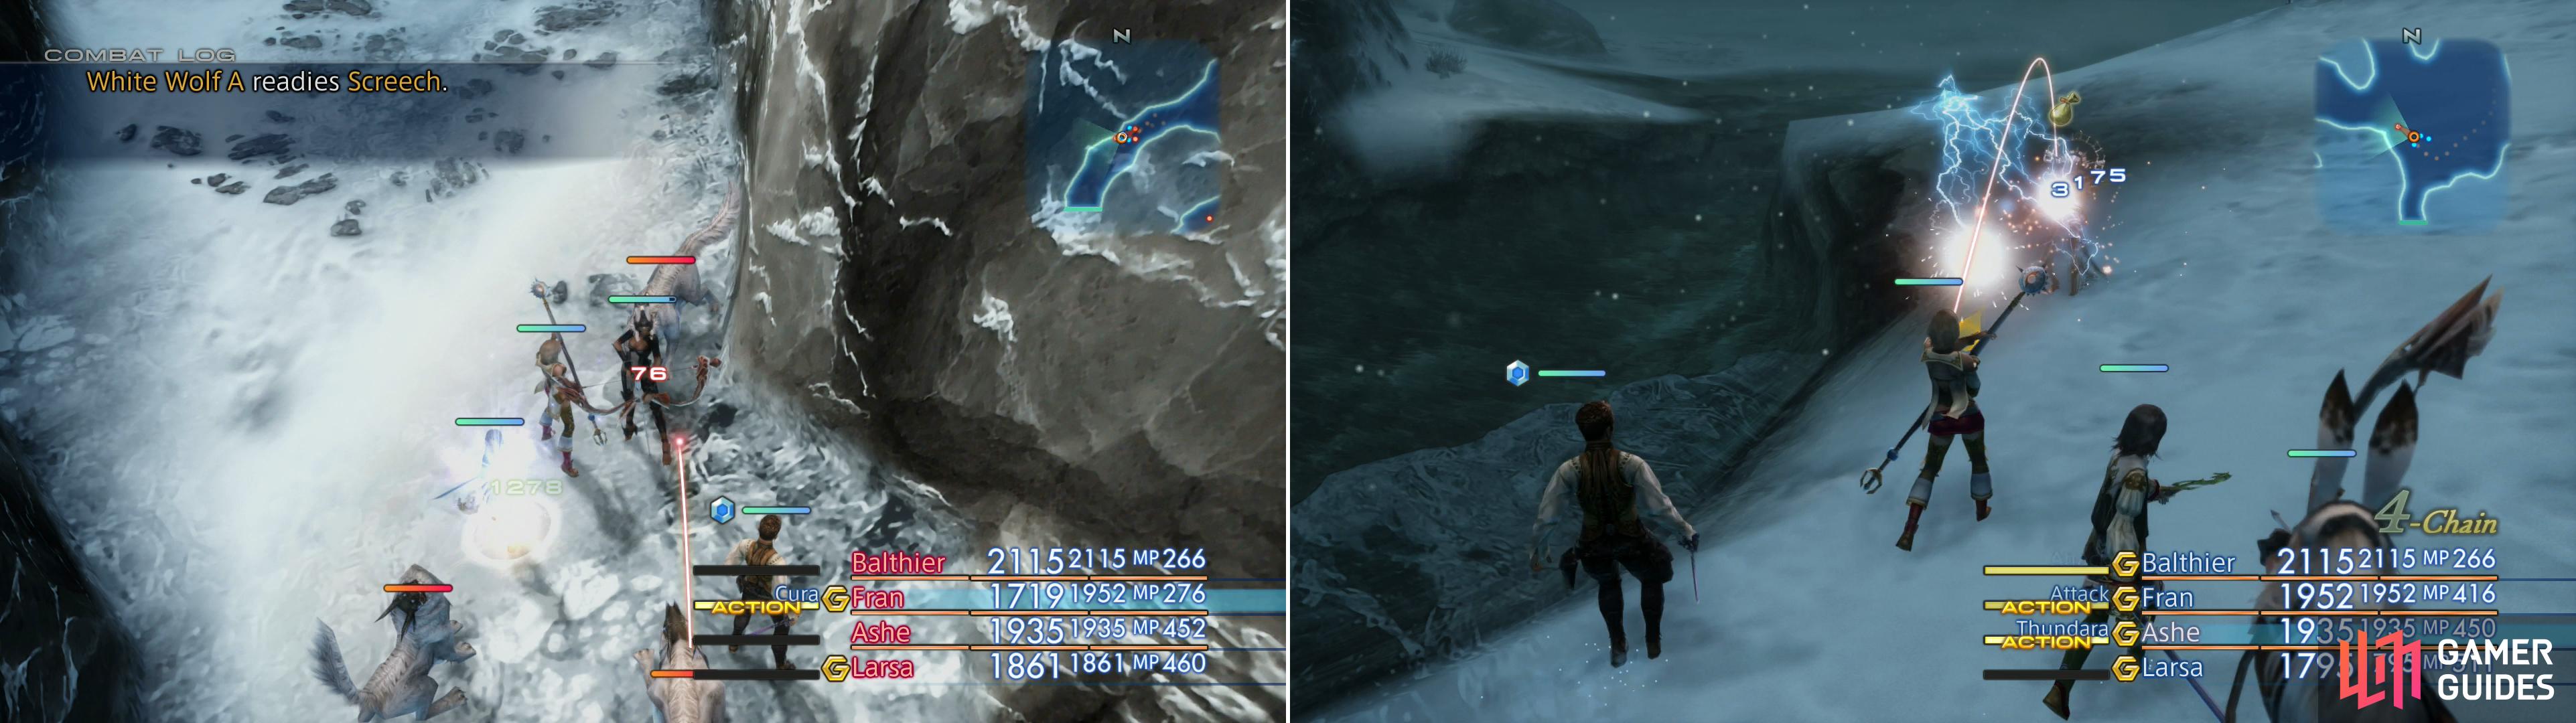
Be wary of the White Wolf, whose Screech attack can inflict Confuse (left), most enemies in Paramina Rift will crumble before a well-equipped Black Mage tossing around Thundara magicks (right).
They can drop Ice Magicite, a Phoenix Down, a Tanned Hide or a Quality Pelt, you can steal an Ice Stone, a Quality Pelt or a Paramina Crossbow from them, and they can be Poached for a Tanned Hide or a Quality Pelt. They are weak to Lightning.
Wild Onion:
These plants seem to bear the cold temperatures of the Paramina Rift no mind, and despite their apperances, they’re actually stronger in many respects than White Wolves! Fortunately, they’re docile, but if you do provoke them they’ll respond with white magicks like Cura, Protect and Shell, and technicks like Vespersong (increases Magick Power) and Warsong (increase Attack Power). All in all, however, they’re better healers than they are threats in their own right. They can drop Succulent Fruit, Wind Magicite, an Antidote, or a Float Mote, you can steal Wind Magicite, a Phoenix Down of Succulent Fruit and they can be Poached for Succulent Fruit or a Healing Rod . They are weak to Earth.
Skull Knight:
If you’re sick of smashing undead… well, bad news, they’re here to stay. In the Paramina Rift you’ll find a new undead variant, the Skull Knight, which aren’t terribly dissimilar from the Skull Defender. Boasting nearly 2,000 HP, they’re fairly stout for normal foes, and they can frustrate you in combat with Slow and Flash (inflicts Blind), and with attacks like Dark, Bone Toss, Lunge and Tremor, the last of which can also inflict Slow. They can drop a Sturdy Bone, Dark Magicite, a Hi-Potion or a Remedy, you can steal a Sturdy Bone, a Capricorn Gem or a Jujitsu Gi (Light Armor 6), while they can be Poached for a Sturdy Bone. Like all proper undead, they are harmed by curatives, are weak to Holy, and absorb Dark.
Slaven Warder:
Possibly the third sort of Slaven you’ve encountered thus far, not including Rare Game or Marks, the Slaven Warder is somewhat weaker in relation to the rest of the creatures it shares a habitat with compared to other Slaven. It’s HP and Attack Power are nothing special, although it can defend itself with Protect and Shell magicks, its attacks are limited to Gnaw and Spinkick, the latter of which being an area-of-effect attack. It can drop Fire Magicite, a Gold Needle, Tanned Giantskin or a White Fang, while you can steal 10 Gil, a Gemini Gem or a Headband and it can be Poached for a Tanned Giantskin or a Slaven Harness. It is weak to Water.
Lizard :
Having somewhat more than 2,000 HP and similar Attack Power to the rest of the monsters in Paramina Rift, this Gigantoad palette-swap fails to stand out stat-wise, nor are its attacks terribly impressive. It can use Angelsong to approximate Regen, while Magick Ballad will heal it fully. Otherwise, it’s stuck with normal melee attacks. It can drop a Pointed Horn, a Horn, Fire Magicite or a Fire Crystal, you can steal Fire Magicite, a Pointed Horn or a Fire Crystal and they can be Poached for a Pointed Horn or a Taurus Gem. They are weak to Water.
Now that you’re familiar with all the foes you’ll be facing, it’s time to explore the level and collect what loot there is to find. Continue east from the western end of this level until you reach a fork, then head east down the northern of the two paths, past a Wild Onion. Here, along the southern wall, you’ll find an urn which may contain a Mage’s Hat . Backtrack west to the fork, then head down the southeastern path, smiting Skull Knights as you go until you reach another fork. At this fork turn east to reach the eastern edge of the level. Follow the cliffs north and you may find an urn that can contain a Burgonet , while if you track the cliffs south you’ll find an urn inside of which a Flame Shield may be stashed.
Return back west to the fork and this time head west to find a frozen river you can cross. At this river turn south and cross the eastern-most edge of the ice, whereupon a Lizard should leap out of the icy waters to attack you. Another new foe can be found across the river - a Slaven Warder - but for the most part you’ll be dealing with White Wolves and Skull Knights. Venture across the snow southwest of where you found the Lizard to reach the southwestern edge of the level where, behind a rock you’ll find two urns. In the eastern-most urn you may find a Red Hat.
With that, you’ve been introduced to every monster in this area, as well as every treasure. You can exit this zone and continue deeper into the Paramina Rift by using one of two area transitions along the eastern edge of the zone. If you follow the northern path past the docile Wild Onions you’ll find an area transition leading to the Freezing Gorge area, while if you follow the river south you’ll find an area transition leading to the Icebound Flow zone. Given which way you go, your current stay in Paramina Rift may be quite short, as Mt. Bur-Omisace is just beyond the Freezing Gorge. That said, you might as well try to get as much done as possible while you have Larsa with you, which includes exploring Paramina Rift, obtaining its treasures, killing its Rare Game and later, taking care of some hunts.
Icebound Flow
Follow the river south past where you may have been ambushed by a Lizard to reach the Icebound Flow area. Enemies in this area include Skull Knights, Slaven Warders, as well as two new critters - the Baritine Croc and the Yeti. It’s also worth noting the weather, at this point, as even though it could have varied earlier, its variances now have an note-worthy effect. While it’s always cold in Paramina Rift, the weather can go from bad to worse - from calm (occasional gusts of wind, skies are mostly cloudy with infrequent breaks showing the blue sky, distant objects appear bluish), to cloudy (moderate winds with constant snow flake effects, sky is grey with dark grey splotches, distant objects appear grey) and finally blizzard conditions (heavy winds, sky cannot be seen, as it and distant objects are obscured by white). In blizzard conditions you may encounter a Leshach Entite here, which like Gnoma Entites and Salamand Entites, you want to avoid. Otherwise the monsters and loot in this area are unaffected by the weather.
Baritine Croc:
While larger than most other creatures in the Paramina Rift, the Baritine Croc’s power isn’t proportionate with its size. While its 4,000~ HP are more than double the average Paramina critter’s, its Attack Power doesn’t offset its solitary nature, and it doesn’t even have the ability to inflict status effects to help offset this, making them less worrisome than even White Wolves. They do, however, have the annoying Sonic Fangs technick, so be wary of the low chance to KO when they use it.
They can drop Fine Wool, Wind Magicite, a Hi-Potion or a Glacial Staff, the first being a useful bit of loot and the last being a potent staff you may have picked out of the high-level Barheim Passage. You can steal Wind Magicite, a Remedy or a Rime Fang and they can be Poached for Fine Wool or a Broken Sword. They are weak to Earth.
Don’t let its size fool you, the Yeti can be brought down by Lightning just like most foes in the Paramina Rift (left), speaking of which, be sure to grab the Storm Spear out of the urn so your Uhlan can contribute (right).
Yeti :
Only marginally more of a threat than the Baritine Croc, Yetis are shameless palette-swaps of the Werewolf. They, too, boast over 4,000 HP but have more Attack Power to back it up, plus the ability to cast Blizzara and inflict Berserk on themselves by drinking some Bacchus’s Wine, which will increase their damage further still. They can drop Ice Magicite, Tanned Giantskin, a Teleport Stone or a Demonsbane , you can steal Tanned Giantskin, a Remedy or 1,000 Gil, while they can be Poached for Tanned Giantskin or Arctic Wind. They are weak to Lightning and absorb Ice.
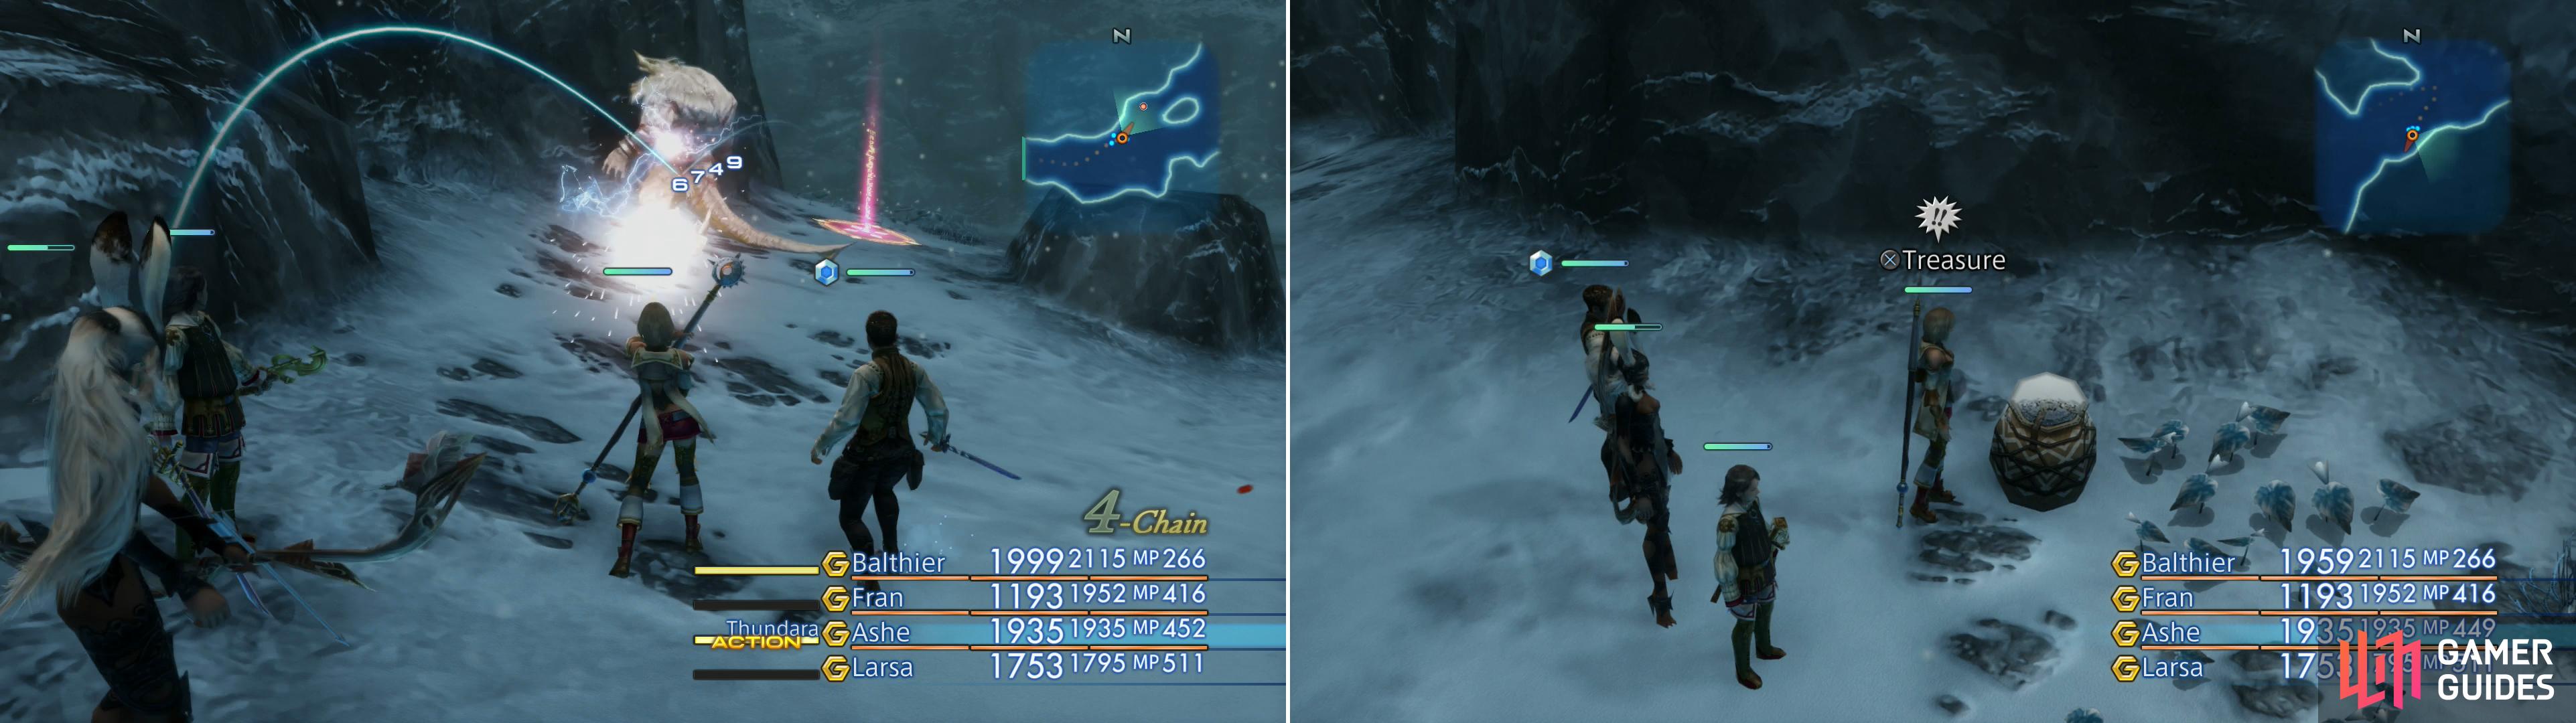
With that out of the way, it’s time to focus on the loot, and there’s quite a haul in this zone, as every one of this area’s eight (randomly spawning) urns can possess something interesting. That said, each urn only has at best a 20% chance of spawning, and giving you the item you want instead of Gil or a curative, so it may take a few zone-ins to get everything. This is just as well, as it gives you more chances to get some Fine Wool off the Baritine Croc - grabbing at least four of these will help you open up some Bazaar bundles shortly.
From the area transition to the Head of the Silverflow area follow the frozen river southeast, then east to find a rock on its northern shore. Along the western edge of this stone you may find an urn possessing a Jujitsu Gi . Follow the river back west until you find an un-frozen patch of river, at which turn south to find another urn, out of which you might pluck a Storm Spear (Spears 3), a Lightning-elemental spear. From here continue west and follow the edge of the un-frozen patch of river, where you’ll find another urn near the cliffs. This urn may yield a Demonsbane .
Continue following the cliffs that form the western boundary of the area south and near some ruins you’ll find an urn, which you can plunder for a Headband . They can’t all be winners. Turn east to return to the river, then follow it south until the path forks at another thawed section of river. The area transition to the southeast is your ultimate goal, but there’s still plenty of loot to be had. Bearing that in mind, turn southwest and head uphill to find an urn in the middle of the snow, wherein you may find a Close Helmet (Heavy Armor 5). From here turn south to find another urn near some cliffs and a ruin, which you can loot to find a Diamond Shield.
Just two more chests to finish up this area. Follow the cliffs east and dodge a trap to reach a snowy ledge looming over the river. At the dead-end here you’ll find an urn, which may contain a Lamia’s Tiara . Return back west to the previous urn near the ruins and follow the cliffs west, past where the Yeti prowls. You should eventually find a cubby to the south, in which an urn rests. Pillage it to score a Recurve Crossbow .
Now that all the loot has been pointed out turn your attention to the area transitions. The area transition in the southwestern corner of the map leads to the Feywood, a new area you need not bother with just yet. On the other hand, the northeastern exit will take you to the Frozen Brook zone, which you’ll reach via another route later. Instead, head back to - and across - the river and exit using an area transition in the southeastern corner of the map to reach the Karydine Glacier zone.
Karydine Glacier
In this area you’ll find the Skull Knights have been joined by Dark Skeletons, which you may have encountered in the Golmore Jungle while you were attempting to take down the Grave Lord Rare Game. Given the strength of that Rare Game, and the advice given by this guide, however, it’s likely this is your first encounter with such foes.
Dark Skeleton:
Like normal Skeletons, Dark Skeletons have a wide variety of magicks at their disposal, including Dark, Flash, Poison, Protect and Shell, giving them a wide variety of offensive magicks, defensive magicks and status effects. Their technicks provide further diversity as Hawk Glare can inflict Immoblize, and they can also use Aquara Motes and Aero Motes. These particular Dark Skeletons can drop a Dark Stone, Sturdy Bone, Teleport Stone or Death’s-Head, you can steal a Sturdy Bone, a Dark Stone, or a Capricorn Gem, and you can Poach a Sturdy Bone or a Death’s-Head. Like all undead, they’re harmed by curatives, are weak to Holy, and absorb Dark.
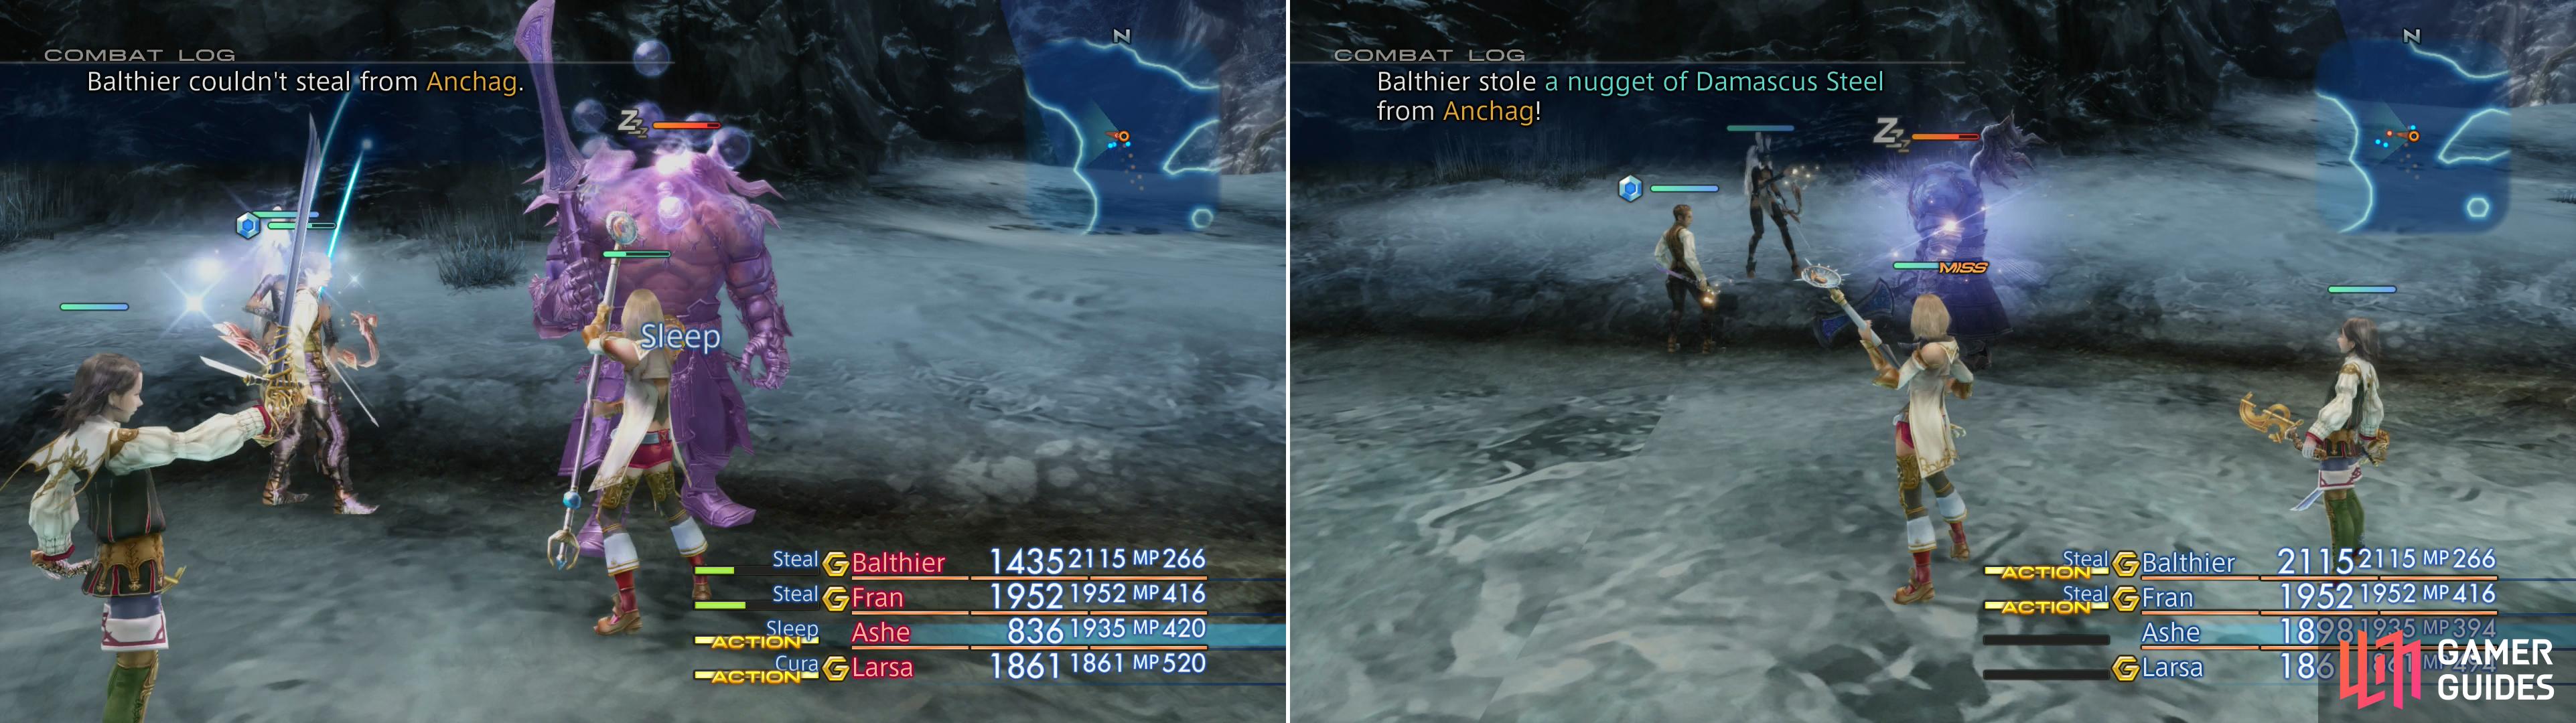
Anchag might be powerful, but he’s also susceptible to Sleep (left). Use this to your advantage and neutralize hit attacks while you steal Damascus Steel from him (right).
You’ll ecounter Dark Skeletons along the western edge of the area, while Skull Knights can be found further east. The undead are joined by another Baritine Croc, White Wolves, and some docile Wild Onions. If you manage to clear the entire area of foes (including the Wild Onions) you’ll cause the Rare Game Anchag to spawn, as well.
Anchag :
Anchag is fairly beefy, if you just look at his stats - he boasts over 30,000 HP and has an Attack Power that outright eclipses that of the common foes in the Paramina Rift. That said, he has little in the way of attacks, no magicks to utilize, and a downright embarassing host of status vulnerabilities, including Blind, Disable, Immobilize and Sleep, many of which will greatly hinder him if not outright incapacitate him. Anchag absorbs Fire, but is weak to Water.
You can steal Damascus Steel from him, which is used in the Bazaar bundle “ Matchless Steel “, which yields Gemsteel, which in turn is required for two powerful swords. While you won’t be acquiring any of these treasures yet, this is a fine way to gather those rare components, so you might as well grab it. Put him to Sleep, Blind him, steal his Damascus Steel, then finish him off with Aqua, recasting Sleep if he wakes up. Easy as pie. Other than that, he can drop Festering Flesh (another, more immediately useful component) or an Obelisk , whic you can Poach him for a Pebble or Forbidden Flesh. Four units of Festering Flesh are all you need for all three Bazaar bundles it’s part of, although it can be obtained easier a little bit later.
In addition to the treasure you can farm off of Anchag, you can also secure loot via more tradition methods - looting urns! From the western-most area transition (leading back to the Icebound Flow) follow some cliffs southeast to find an urn near the edge of a partially frozen river. Loot it to get a shot at an Ice Shield . Attempt to gather this item, then follow the area’s northern boundary cliffs to the east and you’ll find yourself running on some ice north of a thawed section of river, at the end of which you’ll find an urn with the Death magick inside (Arcane Magick 2). This urn will not respawn once it has been looted.
After you acquire the new magick, follow the edge of the ice back southwest until the thawed section ends. From here you should note that the area splits in four directions, and since you came from the northwest and already explored the northeast, you should turn your attention to the two other options, the southwest and the east. Head southwest first, where you can follow the frozen river until it thaws, blocking your path. Along the way, keep an eye turned towards the cliffs to the northwest and southeast, where you may find urns. The northwestern urn can contain a Thorned Mace , while the urn to the southeast may possess a Gaia Rod (Rods 2), an Earth elemental rod.
Backtrack up the ice to the north and when you reach the four branching ice paths, follow the only unexplored one to the east until you find another frozen branch of the river running southeast. Follow this branch until it, too, terminates where the ice has melted and note the three urns that may spawn here, one to the west, a central one behind a trap (don’t worry - it’s a rare rejuvenation trap) and one to the east. The western urn may yield a Betelgeuse , the central one offers up a Murasame (Katana 3), and the eastern urn might forfeit a Six-fluted Pole (Poles 4). To finish off the loot in this area, simply follow the eastern cliffs to the north and you’ll find another urn, inside of which you may find a Power Rod (Rods 3).
Now that the loot has been covered, turn your attention to new areas. The western-most area transition leads back to the Icebound Floor area, and the eastern-most area transition leads to the Frozen Brook area. You need not travel to either of these locations yet (or again), instead head south from the western-most area transition to find another exit on the western edge of the map, this one leading to the northern half of the fragmented Silverflow’s End zone.
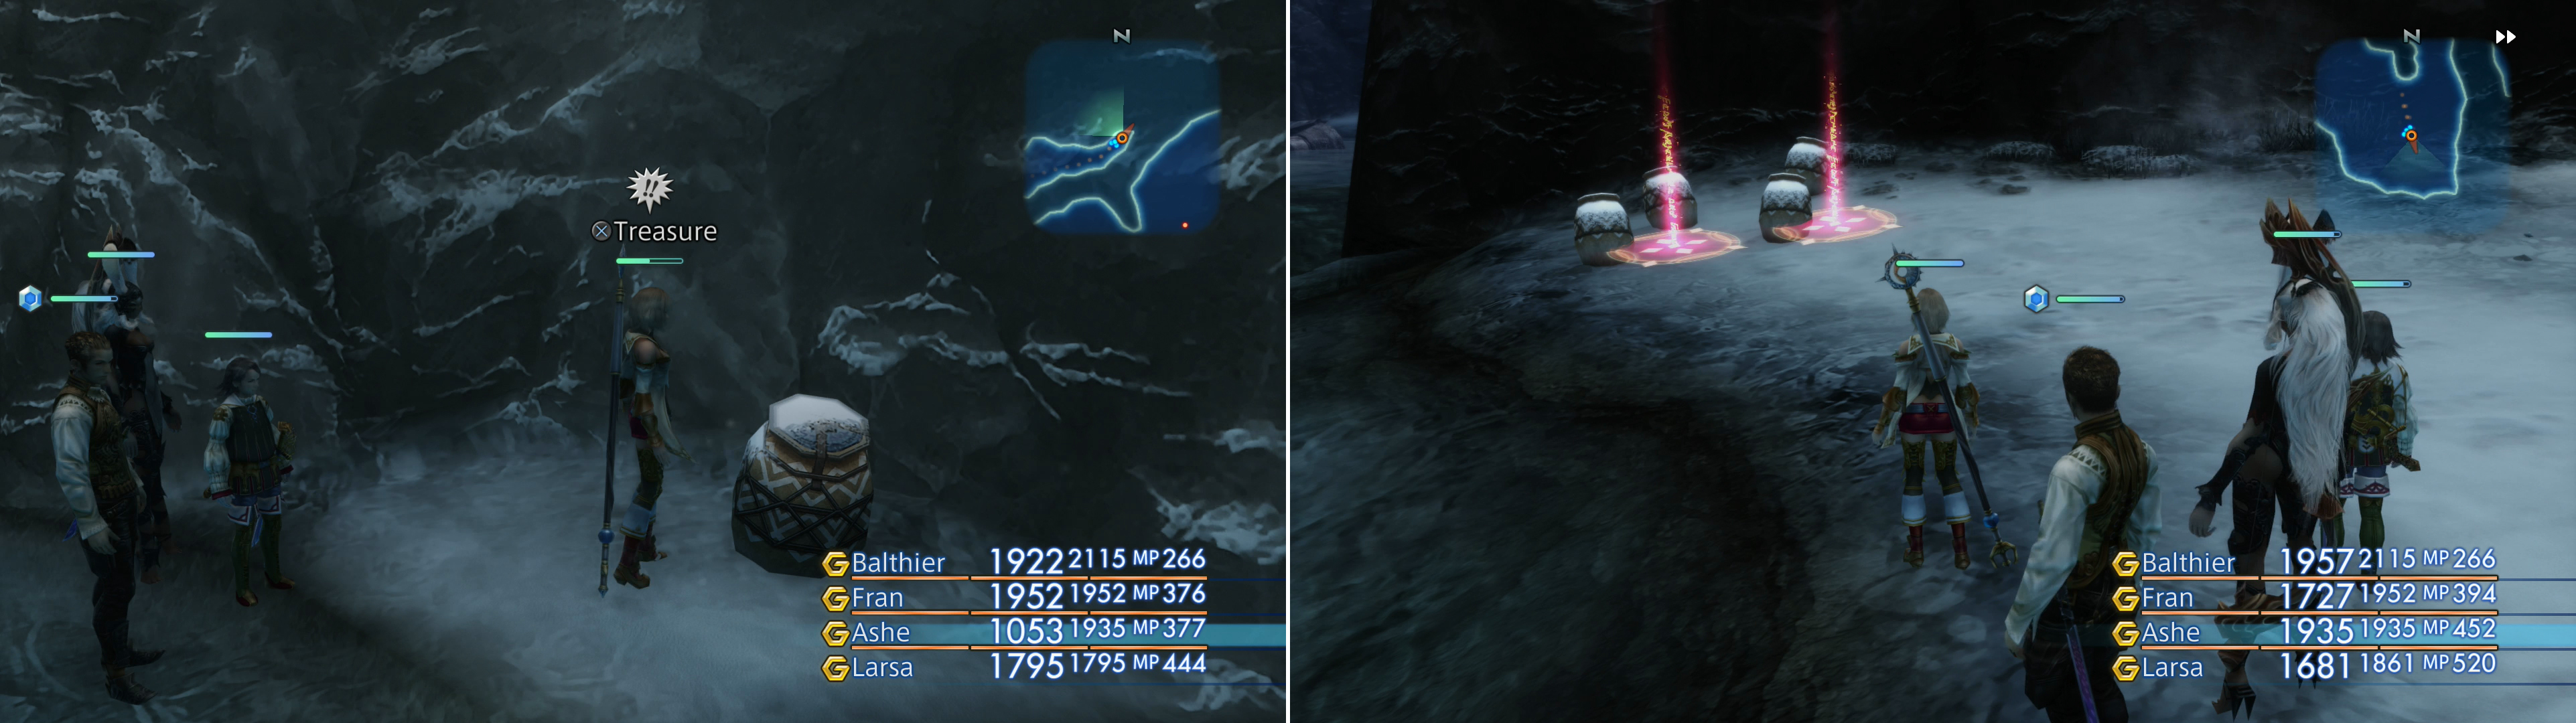
This urn in the Karydine Glacier zone will yield the Death magick unto you (left). A collection of urns in the Silverflows End (North) zone contain random gear (right).
Silverflows End (North)
For once there’s little to say about the monsters in this area. You’ll encounter Wild Onions, a Slaven Warder and a Yeti. As far as loot goes, you’ll find a few urns along the northern and central end of the area, but all the note-worthy loot can be found along the southern edge, clustered around and behind two traps. Given that some urns are actually on the traps, you might want to equip Steel Poleyns (if you have some), as they’ll make you immune to trap damage. Of the northern-most two urns, the eastern one can yield a Platinum Shield (Shields 4), while the western one can forfeit a Hunting Crossbow (Crossbow 3). Of the southern-most urns, the eastern one one may contain a Loxley Bow and the western one only possess junk.
Deal with the monsters, plunder the loot, then return north to the Karydine Glacier zone, then make your way to the eastern edge of the zone, where you’ll find an area transition to the north leading to the Frozen Brook area, which it’s finally time to explore.
Frozen Brook
In this area you’ll find familiar foes in the form of a Lizard, Skull Knights, White Wolves, but you can also encounter the Ice Elemental here, as long as the weeather is cloudy, anyways. Like Entites, they’re stronger than most normal enemies in an area, but the Ice Elemental - like the Storm Elemental from the rainy season in the Giza Plains - isn’t overwhelmingly so. With a good bit of healing and Thundara, you can easily take one down.
Ice Elemental:
Possessing nearly 15,000 HP and a slew of magicks to throw at you, the Ice Elemental isn’t to be taken lightly. Their Blizzara magick is particularly potent, but it’s also their only offensive magick, and can be greatly diminished by using an Ice Shield, a Lamia’s Tiara or a Tourmaline Ring. It’s not powerful enough that you need these items, though, just expect to be casting Cura more regularly if you don’t. They can complicate matters somewhat by casting Silence and Sleep, but they can only affect one character at once, so a White Mage with Esuna (or other mages using Vox) should be able to keep up just fine. Other than that, they’ll use Protect and Shell - you should ensure that you elminate any nearby monsters before engaging them, as a White Wolf’s Screech can be lethal in conjunction with an Ice Elemental.
As for your own offense, they’re immune to nearly every debilitating status effect save Immobilize, which doesn’t hinder them too much, considering they only use magick. The absorb Ice damage (obviously), but are weak to Lightning, so using Thundara or a Storm Spear will allow you to do significant damage. They drop Ice Magicite, an Ice Stone, a Feystone or an Ice Crystal and you can steal Ice Magicite, a Feystone or an Ice Crystal. They cannot be Poached.
Dispatch the Ice Elemental using Lightning magicks (left) so you can get around to looting treasures like these Long Bolts (right) in peace.
Pick a fight with - or avoid - the Ice Elemental as your means allow, after which it’s time to get to looting. There’s not as much treasure here as in previous areas, but there’s still a few things worth pointing out. From the exit to the Karydine Glacier zone, follow the cliffs north until you spot an L-shaped chunk of rubble to the west, near which is an urn which can contain a quiver of Parallel Arrows . From here, make your way west past the L-shaped rubble to find another urn standing alone in the middle of the snowy field, wherein you might find some Long Bolts . From this urn turn south and return to the river, then follow the river as it winds northwest through the area until you spot a trap on the southwestern bank. Loot an urn near this trap to possibly find and Elfin Bow . The final loot-worthy urn can be found across the river to the north, in a cubby, wherein you may find a Bangle .
There are four area transitions branching off this zone, and since the western-most exit will take you to the Icebound Flow area and the southeastern-most exit will take you back to the Karydine Glacier, you can safely ignore those. The northern-most exit will take you to the Freezing Gorge area, which in turn leads to Mt. Bur-Omisace, while the southwestern-most exit will lead to the Path of the Firstfall, and ultimately to the Stilshrine of Miriam further south. While you’ll end up going to the latter shortly, after your visit to Mt. Bur-Omisace, you might as well fully explore Paramina Rift so that when the time comes you can simply head right there… and to keep this exploration section nice and tidy.
Path of the Firstfall
Take the southwestern exit to reach the Path of the Firstfall, which is a safe transition area, a staging ground for the Stilshrine of Miriam, if you will. There’s little here of note but a junk-filled urn, some NPCs to talk to, an a Save Crystal which you can use to replenish yourself. When you’re ready to move on, head to the area transition along the northern end of the area to reach the Spine of the Icewyrm zone.
Spine of the Icewyrm
This area is noteworthy for two things - traps, and large, flying creatures. Or winged creatures, in any event, as Twintania lumber around on two legs. Kill them and make your way south to find a large land-bridge, which bears more traps and is guarded by several flying Garuda-Egi. You should have started their bestiary entry when you fought the Garuda boss outside of the Tomb of Raithwall, but you can complete it now by taking down these beasts.
Twintania :
Twintania’s possess 5,000 HP, making them some of the sturdier enemies in this area Despite this, the offensive potency of the Twintania doesn’t enable them to be much of a threat, as they can only protect themselves with Shell before resorting to simple Lunge and Bile attacks, the latter of which can inflict Sap. They can drop Ice Magicite, an Antidote, a Wyrm Carapace and Nu Khai Sand, you can steal an Ice Stone, a Soleil Fang or a Lohengrin , while they can be Poached for a Wyrm Carapace or Ice Magicite. They are weak to Lightning.
Garuda-Egi:
These large fliers aren’t as potent as they might appear, or perhaps as potent as Dive Talons may have conditioned you into thinking they might be. They have only 3,000 HP (about twice as much as the humble White Wolf) and nominally superior Attack Power. Their most annoying ability is Kamikaze, which is shared by them, Dive Talons and Zu. They’ll use this attack when low on HP, self-destructing to deal large damage to a single target. They can drop a Large Feather, Holy Magicite, a Soleil Fang or a Kogarasumaru , you can steal a Holy Stone, a Hi-Potion or a Taurus Gem, and they can be Poached for a Large Feather or White Incense. They are weak to Dark and absorb Holy.
Navigate the traps, kill the winged beasts and cross the bridge to reach the southern end of the area, where, against the eastern cliffs you can find an urn containing the Revive technick. This ability, when used, causes the user to sacrifice themselves and revive a fallen companion, bringing them to full HP. When you’re done here, continue south to find the area transition to the Silverflow’s End zone.

In the Spine of the Icewyrm area you’ll have to pass a trapped stone bridge guarded by Garuda-Egi (left), beyond which you’ll find an urn with the Revive magick inside (right).
Silverflows End (South)
This is the southern half (or southeastern two-thirds, if you prefer) of the Silverflow’s End zone. On this half of the river you’ll intermittently encounter Dark Skeletons, as well as a Yeti on the southern end of the level. Depending on the weather you may also bump into an Ice Elemental. Most interesting, however, is the Emperor Aevis foe, who looks very similar to the Twintania.
Emperor Aevis:
Slightly stronger than the Twintania, the Emperor Aevis has about 6,000 HP and a very tiny Attack Power boost. It’s an incredibly rare foe, as only one spawns and only in this zone. Despite its rarity, it’s hardly any more dangerous, as it possesses the same two non-magick attacks (Bile and Lunge), so aside from being afflicted with the Sap status-effect, you have little to fear. They can drop a Wyrm Carapace, Ice Magicite, or a Teleport Stone, you can steal an Ice Stone, a Wyrm Carapace or a Leo Gem, and they can be Poached for a Wyrm Carapace or a Battlewyrm Carapace. They, too, are weak to Lightning.
Deal with the redundant foes in this level, then turn your attention to the task of looting. Follow the eastern cliffs south until you find an urn near some rubble, inside of which you may find a Sledgehammer (Axes & Hammers 4), a weapon for the Foebreaker which can Disable foes on hit. Now head southwest across the frozen river to find another urn standing along in the snow, northeast of a large boulder. Inside you may find a Gladius . Continue south along the eastern edge of the rock, then turn west until you find a path to the south and a cubby to the west. The path south leads to the Stilshrine of Miram, while in the cubby you can find a Glacial Staff . Finally, follow the nearby cliffs (which form the western boundary of the area) north until you find another urn in a cubby, from which you may claim an Icebrand (Swords 5), an Ice-infused sword.
After you’ve claimed this treasure, it’s time for some back-tracking. Return north to - and through - the Spine of the Icewyrm zone, then through the Path of the Firstfall zone to reach the Frozen Brook area. From here, take the northern-most exit to finally reach the Freezing Gorge, the northern-most of the areas in Paramina Rift.
Larsa will make some naive declarations when you reach the Freezing Gorge area (left) meanwhile, events transpire in Archades which prove him wrong (right).
Freezing Gorge
When you enter this area you’ll be treated to - or have to suffer through, depending on your perspective - a lengthy cutscene. Balthier will bestow upon Larsa some rather obvious, if pessimistic insight on Larsa, who reacts poorly, after which you’ll get to see an interaction between the emperor and Vayne.
Once the scenes are done, turn your attention to the Freezing Gorge which, compared to the previous areas, is a pretty simple area. The only foes you’ll encounter are Skull Knights and White Wolves - the weakest, most common foes in Paramina Rift. As for loot, from the southern-most area transition (which joins the Frozen Brook and Freezing Gorge areas) make your way north until you readh a fork. Just south of this fork, along the cliffs to the east you can find an urn in which may rest a suit of Brigandine . At the fork, turn west and search the northern cliffs to find another urn, wherein you may find a Mage’s Habit . Backtrack east to the fork, then head west until the path turns north. At the elbow of this turn, search the corner to find an urn, which may yield a suit of Shielded Armor .
Once you’ve claimed that loot, you’re finally done with Paramina Rift. Just continue to the northeastern-most edge of the Freezing Gorge zone to find the area transition to Mt. Bur-Omiscae.

 Sign up
No Comments