


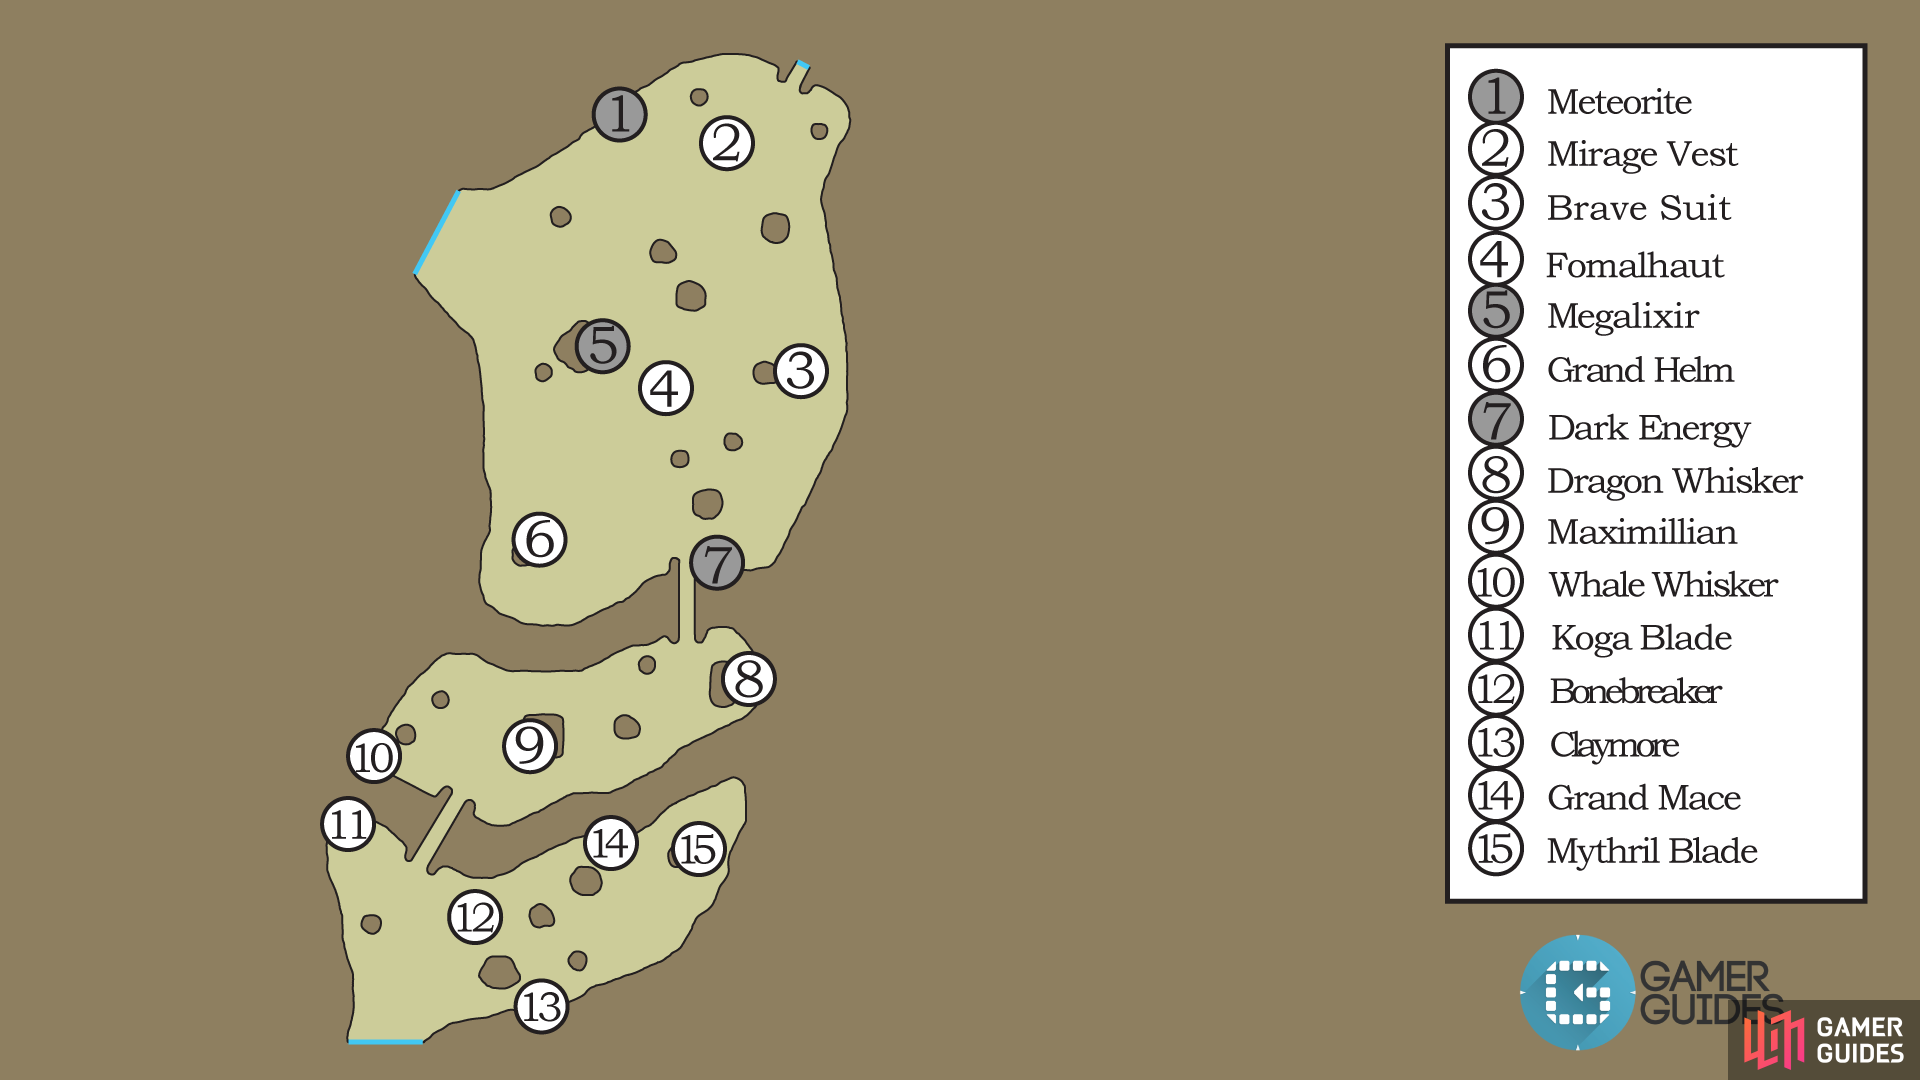
| Bestiary |
|---|
| Aspidochelon (Trophy Rare Game) • Bluesang (Trophy Rare Game) • Etherian (Rare Game) |
| Items In This Area |
|---|
| Adamantine Trophy • Aegis Shield • Ame-no-Murakumo (Steal from Etherian) • Antares • Artemis Arrows • Artemis Bow • Bone of Byblos • Bonebreaker • Brave Suit • Chaperon • Circlet • Claymore • Crown of Laurels • Cruel Trophy • Defender • Demon Shield • Dragon Mail • Dragon Whisker • Dueling Mask • Eight-Fluted Pole (Drop from Etherian) • Euclid’s Sextant • Fomalhaut • Gastrophetes • Gilt Measure • Glimmering Robes • Golden Skullcap • Grand Armor • Grand Bolts • Grand Helm • Grand Mace • Holy Rod • Icecloud Arrows • Kagenui • Koga Whisker • Lordly Robes • Magepower Shishak • Maximillian • Mirage Vest • Mythril Blade • Mythril Sword • Orochi • Renewing Morion • Sagittarius • Scorpion Tail • Shell Shield • Shikari Nagasa • Staff of the Magi • Stink Bombs • Telekinesis • Thief’s Cap • Tumulus • Ultima Blade • Venetian Shield • Volcano • Whale Whisker • White Robes • Yagyu Darkblade |
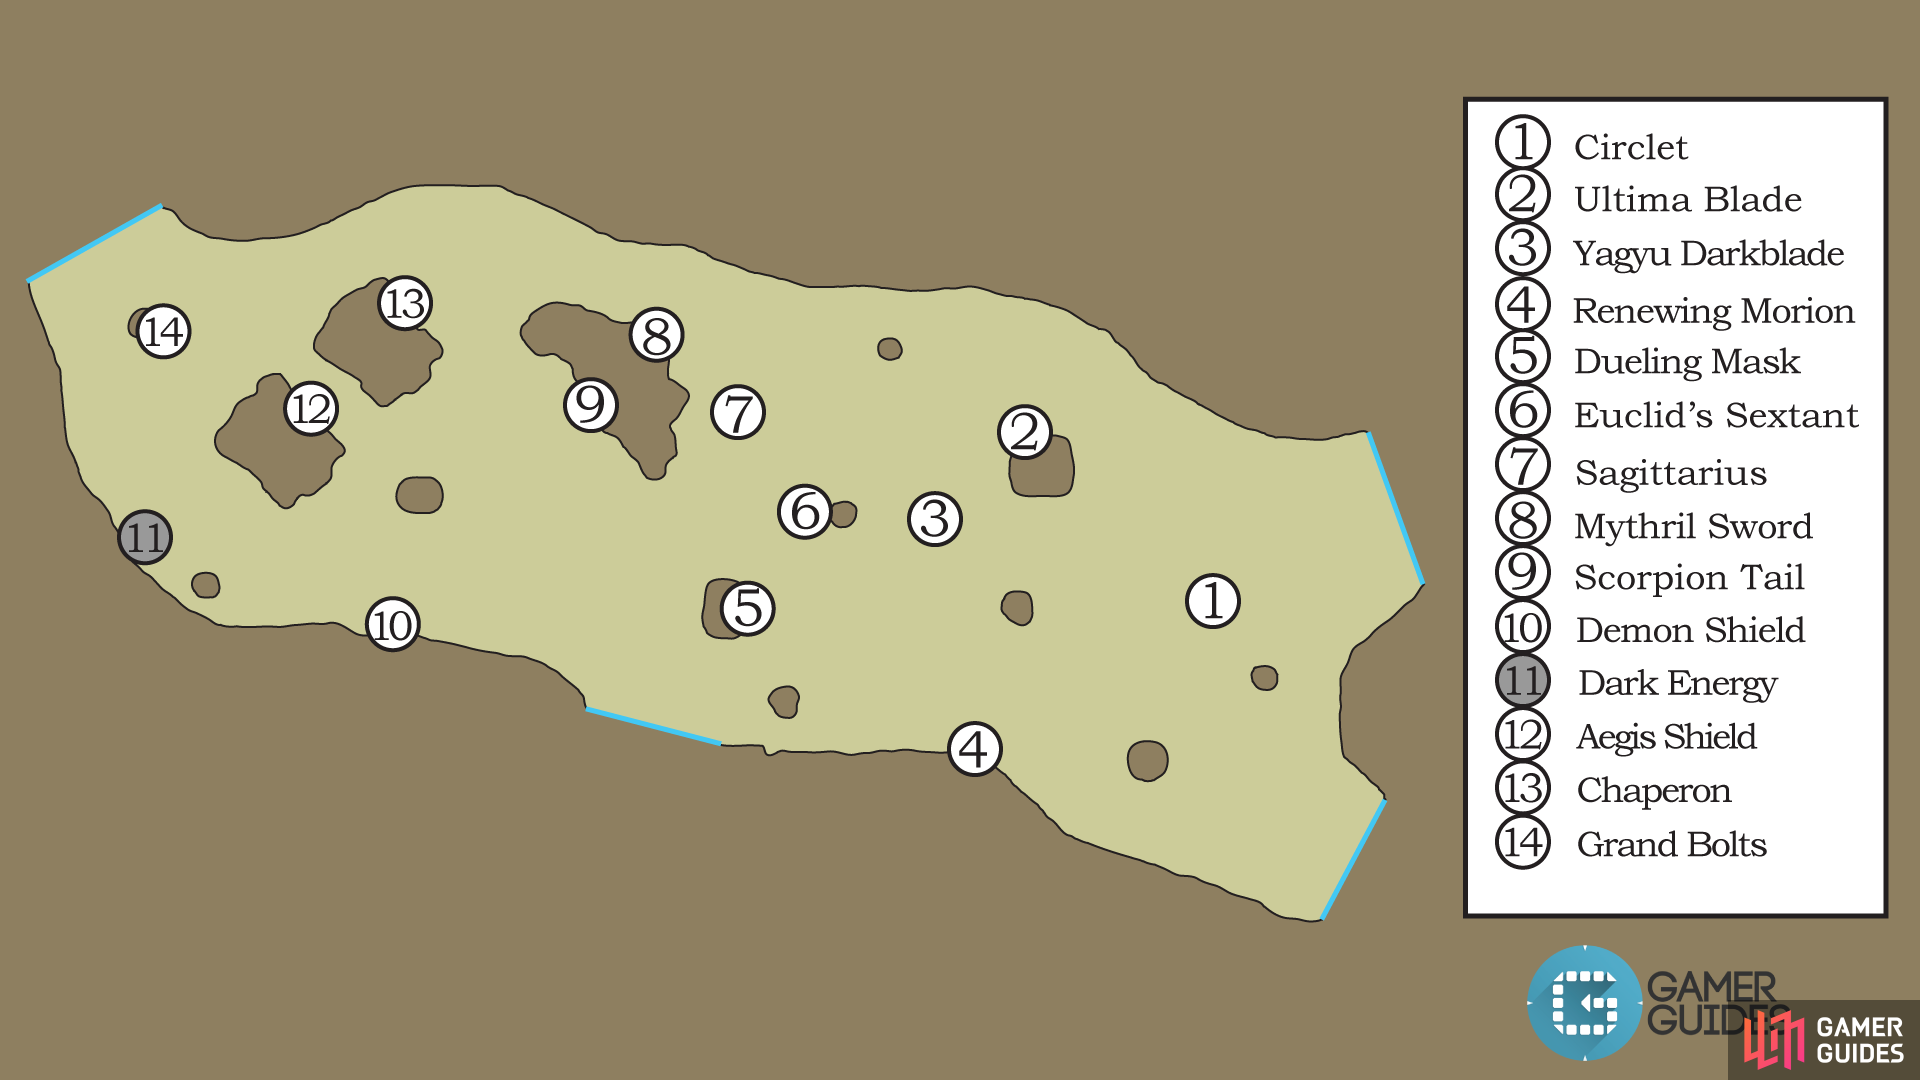
Crossfield
The Crossfield area is interesting for several reasons - one of which is not its inhabitants. You’ll find a common collection of Cerobi foes, including the Bandercoeurl, Charybterix, Shield Wyrm and Silver Lobo, which don’t warrant any further description.
The loot, on the other hand, does bear description, as it’s both bountiful and valuable. There are no fewer than three helmets in this area, including the Chaperon , the Renewing Morion , Dueling Mask and the Circlet . Starting out with the least impressive helm, the Chaperon (Light Armor 10) can be obtained more easily from other sources, and arguably isn’t worth going after when compared to other pieces of armor in this area. For example, the Renewing Morion (Light Armor 12) is the second-to=highest their Light Armor helm in the game, giving 52 Magic Resist, +4 Vitality and +370 HP, as well as bestowing Regen upon the wearer. The Dueling Mask (Light Armor 13) is the top-tier Light Armor helm in the game, granting 55 Magick Resist, +2 Strength and a whopping +800 HP. The Circlet (Mystic Armor 13), on the other hand, is the top-tier Mystic Armor helm, boasting 60 Magick Resist, +2 Strength, +10 Magick Power and +151 MP.
There are two shields in this area, too, the Aegis Shield (Shields 6) and the Demon Shield (Shields 6), both of which you’ll find by simply continuing the story. The Aegis Shield is noteworthy for its high Magick Evade rate (albeit at the expense of its Evade rate), while the Demon Shield boasts a whopping 40 Evade rate and absorbs Dark elemental attacks on top of that.
As for weapons, there’s a number of them of various types, the least interesting of which include include Euclid’s Sextant , Grand Bolts and the Mythril Sword . Euclid’s Sextant (Measures 4) is a Measure that inflicts Bubble upon the target, Grand Bolts are Crossbow ammunition with 4 Attack Power (a dubious upgrade over status-effect inflicting bolts) and the Mythril Sword (no license) is something of a joke weapon. Gamers well-versed in fantasy lore might expect better from a “mythril” weapon, but in Final Fantasy XII it’s the base equip for Reks in the prologue. With an Attack Power of 14, it doesn’t get anymore low-quality than this.
On the other hand, the Sagittarius (Sagittarius license) is the third-most powerful bow in the game. Despite being far down the list, considering it’s only behind the Seitengrat and Dhanusha - one of which is more of a game-breaking Easter egg than a proper weapon and the other can only be gained via the Bazaar or Trial Mode - it’s the most powerful bow you’re likely to get your hands on any time soon. Certainly before you delve into any of the game’s more dangerous dungeons. The Scorpion Tail (Axes & Hammers 5) is likewise the second-strongest Hammer in the game, behind only the Vrscika (only obtained via the Bazaar), and a fine weapon for any Foebreaker that doesn’t have a better alternative to Axes & Hammers.
The Ultima Blade (Greatswords 3), despite its name, isn’t a terribly impressive or potent weapon… at least not by Cerobi Steppe standards. It’s 109 Attack Power has a 17 point advantage over the next strongest Greatsword - Save the Queen, which you can buy at Balfonheim Port. Still, it’s weaker than Ragnarok, Excalibur, Tournesol and the Wyrmhero Blade, so there’s much room for improvement in the Greatsword department. Finally, there’s the Yagyu Darkblade (Yagyu Darkblade & Mesa license), which is the ultimate Ninja Sword… at least if you’re playing with the Bushi/Shikari combo, in which case this sword paired with Black Robes can deal immense damage. Otherwise, the elemental properties of the weapon are more likely to be a detriment than a boon. It does, however, have a chance to inflict the Doom status when you strike a foe, although most enemies you can’t simply chop down before the counter runs out will be immune, anyways.
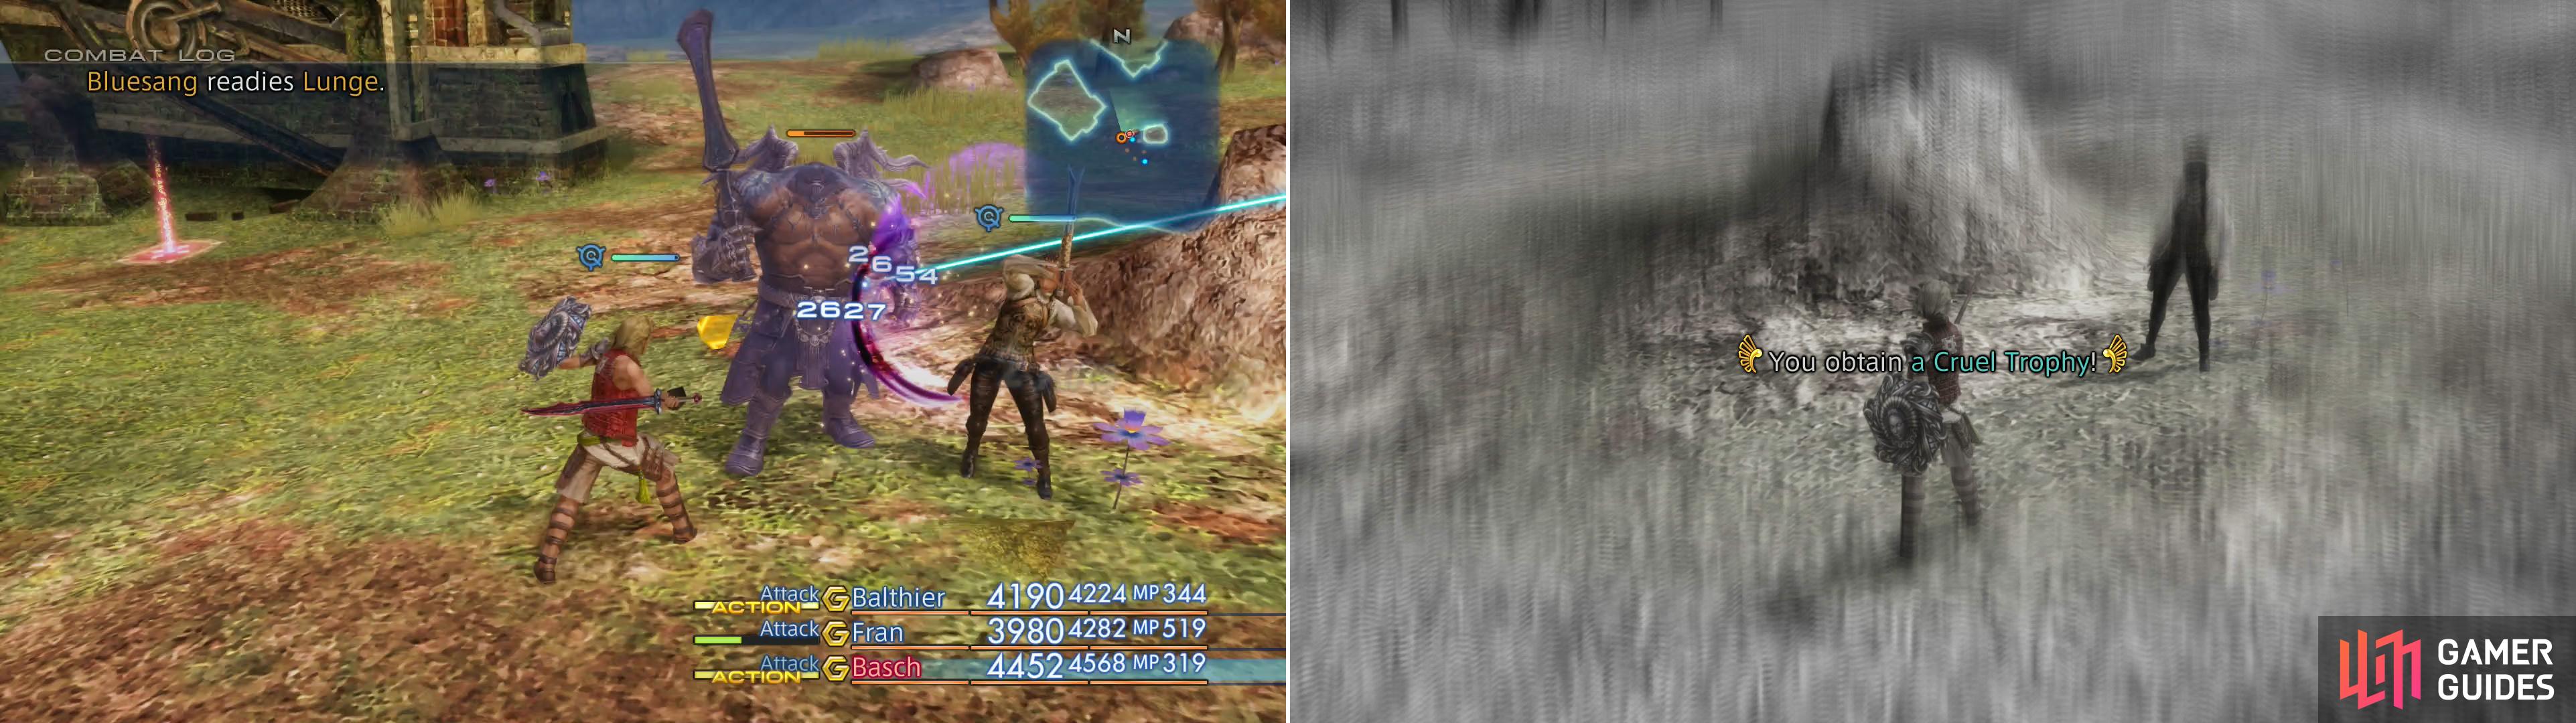
As long as you lure Bluesang away from the traps, he should be easy to chop down (left). Your reward for doing so is a Cruel Trophy (right).
Bluesang
Loot isn’t the only interesting thing in the Crossfield, as you can find the Trophy Rare Game Bluesang here. Unfortunately, it’s a weaker specimen of Trophy Rare Game - even a Shield Wyrm, a common (but potent) monster on the Cerobi Steppe is stronger. Bluesang has a 40% chance to spawn every time you zone-in to the Crossfield area, appearing between the two windmills on the area’s western end, so there’s a great chance you’ll run into it as you grind for loot.
Bluesang’s has a level in the low 40s, and just over 30,000 HP. Its attacks include unimpressive Dullahan mainstays like Lunge, Pyromania and Rage, and has no status effects imposed by its physical attacls, although it attacks instantly when its HP get low enough. It is susceptible ot Blind, Disease, Oil, Reverse, Silence and Slow, should you care to inflict any status effects on it, and absorbs Fire damage and is weak to Water. You can steal Damascus Steel from it, should you need more.
Once felled, Bluesang will leave behind a Cruel Trophy as proof of the deed.
When you’re done here, there are a whopping four area transitions for you to choose from. To the east are two area transitions, the northern one leading to The Northsward, while the southern one leads to the Feddik River. The area transition on the south/central end of the area leads back to Journey’s Rest. Finally, on the western end of the area you’ll find a transition leading to the Old Elanise Road, which will be the next area covered.
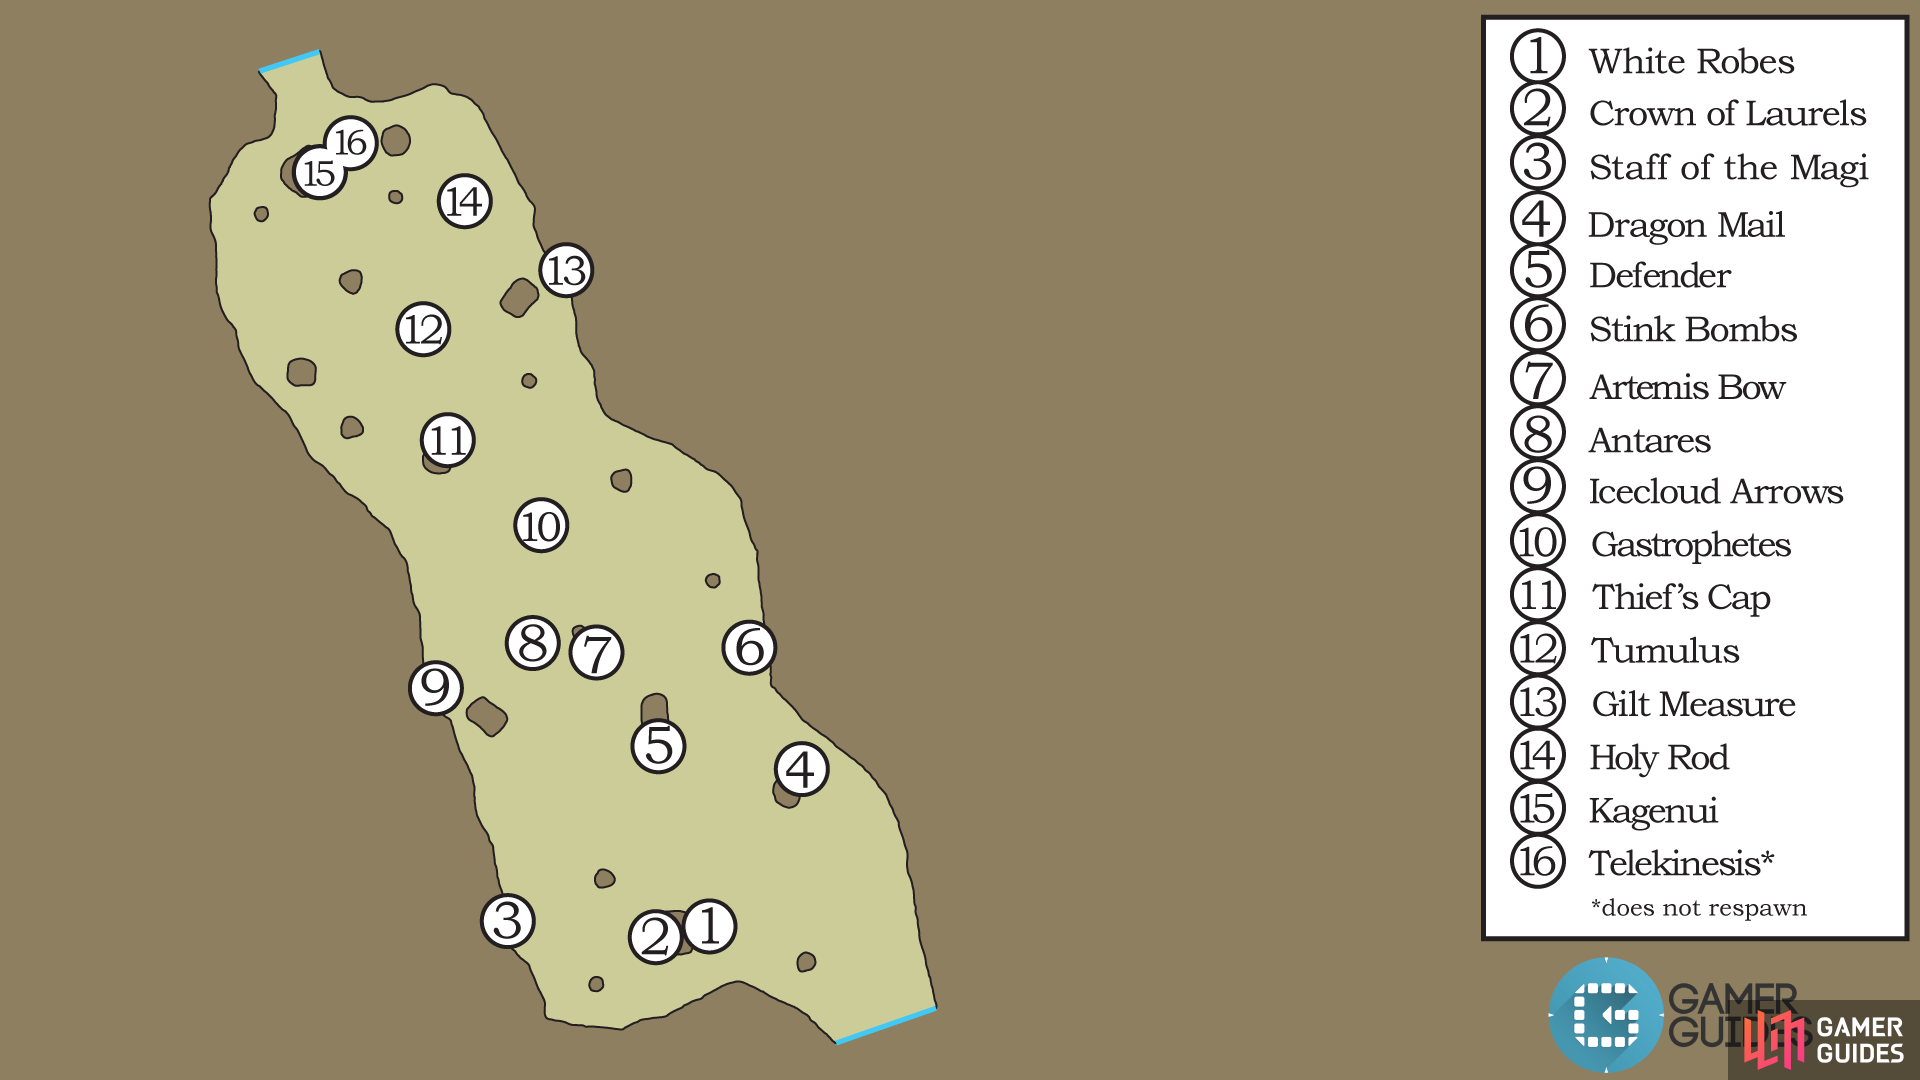
Old Elanise Road
The northern-most area of the Cerobi Steppe has the same old monsters you’re used to fighting - the Bandercoeurl, Charybterix, Shield Wyrm and Silver Lobo - and as usual these beasts haven’t been of much concern for a few areas now. Of more bother are the line of traps along the southern area transition (to the Crossfield area), which will complicate zoning for loot. Clear the area, strip your party down to one character, set up a Gambit to auto-cast Float, and you’ll make the traps much less of an issue. Speaking of the loot in this area… it isn’t terribly exceptional, either, with a few exceptions, largely ranging from items that you can pick up more easily elsewhere, to items that probably just aren’t worth the trouble needed to obtain them.
Examples of these less-than-coveted items include the Defender (Greatswords 2), which you could have obtained from the “Cockatrices Across Ivalice” quest, the Crown of Laurels (Light Armor 11), which in no way competes with the Renewing Morion or the Dueling Mask, the Thief’s Cap (Light Armor 9) which is inferior to even the Crown of Laurels. The Tumulus (Hand-bombs 2) is another weapon you could have obtained during “Cockatrices Across Ivalice”, while the Gilt Measure (Measure 1), as a weapon that could have been dropped by the Gargoyles back in the Golmore Jungle, has no business being in the Cerobi Steppe at all. Joining this list of infamy is the Kagenui (Ninja Swords 1), an item that could have been obtained from the Bazaar shortly after the Stilshrine of Miriam.
On the other hand, White Robes (Mystic Armor 11) are the Holy-elemental equivalent of Black Robes, although the latter’s superior mage stats ensures White Robes probably won’t get worn as often. The Knight/Bushi combo can use these to great effect by pairing White Robes with Excalibur, granting a hefty damage bonus to the Holy elemental Greatsword… but you probably only really need one suit of these, and you’re guaranteed to get one when you continue the story. The Staff of the Magi (Staff of the Magi license) is hands-down the best mage staff in the game, stat-wise, and will boost the damage of your Ice, Holy and Wind magicks. Granted, the Black Mage doesn’t readily have access to Holy magick (although if paired with the Monk, they can…) but Aeroga and Blizzaga will be extra potent with this staff equipped.
Dragon Mail (Heavy Armor 10) is the third sturdiest suit of Heavy Armor in the game, but it’s hard to advocate spending time hunting for it when the top two lie in eastern areas. Stink Bombs are Hand-bomb ammunition which can inflict Sap, the Artemis Bow (Bows 7) is the fourth strongest bow in the game, behind the Sagittarius, and likewise the Antares (Guns 5) is the fourth strongest Gun in the game, behind both the Arcturus and the Fomalhaut. Icecloud Arrows are a fair improvement over most other arrows, damage-wise, and carry the Ice element. The Gastrophetes (Crossbows 4) is the second-strongest Crossbow in the game, but the strongest Crossbow is a guaranteed drop, so you need not worry yourself with this weapon. Finally, the Holy Rod (Rods 4) has the highest Attack Power of all Rods, and as its name suggests it bears the Holy element.
While that’s all for the loot, there is another treasure here, a chest that always spawns near the road along the northern end of the zone. This chest always contains the Telekinesis technick, a very useful technick that allows characters to attack flying enemies without using magick or a weapon that can strike flying creatures. There are some caveats that one needs to be wary of when using Telekinesis, however. First, the elemental properties of weapons do not count when Telekinesis is used, Telekinesis has a longer ATB charge time than normal attacks do, and Telekinesis inflicts much more variable damage than normal attacks (much like Axe & Hammer class weapons). While it has some downsides, it still provides a better ranged alternative for some jobs (the Knight and Shikari come to mind).
When you’re done plundering this zone, make your way back east to the Crossfield zone, then continue to the eastern end of the zone to find two more area transitions. It doesn’t matter terribly much which one you visit first, but for the sake of argument head through the northeastern area transition first to reach The Northsward.
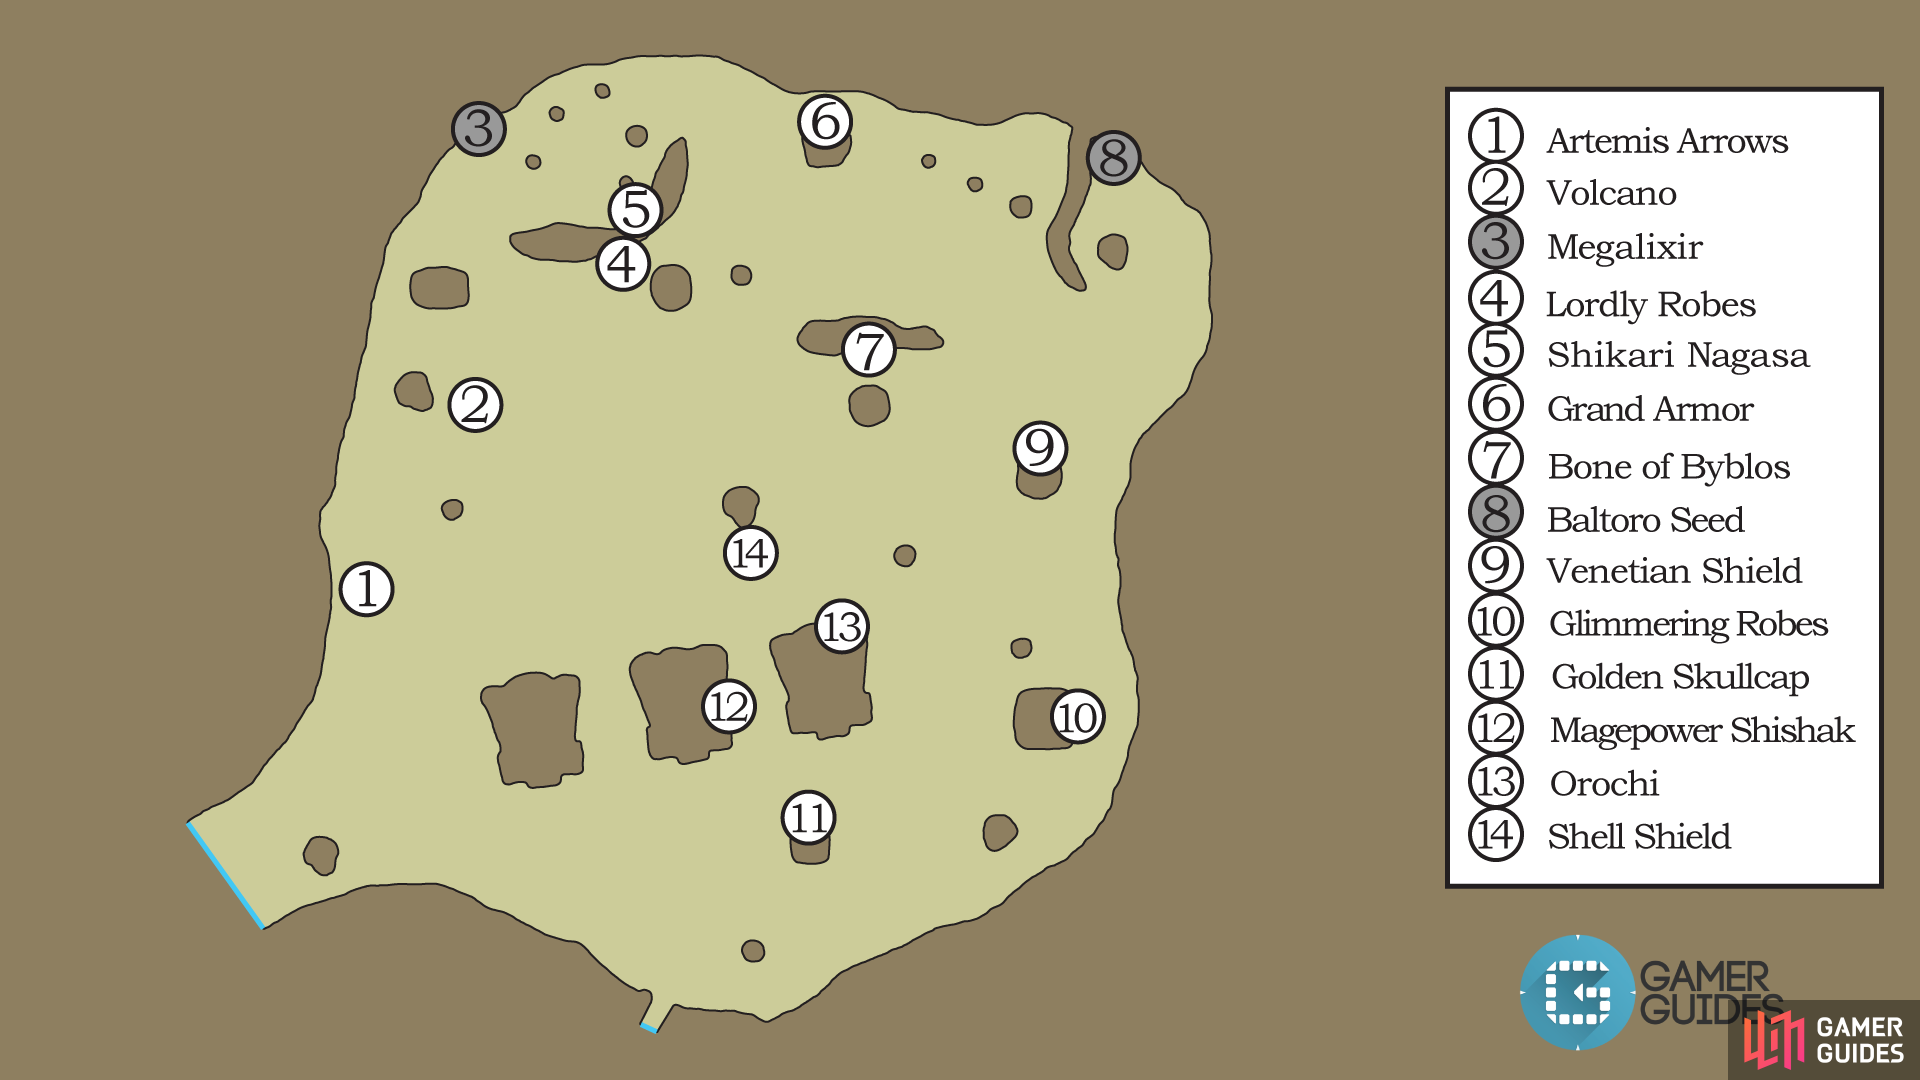
The Northsward
The epic loot is back in full force in The Northsward, but before you bother with that, clear the area out. It’s only occupied by two types of critters, the Bellwyvern and the Silver Lobo, neither of which should present much of a challenge. When all the weaklings are wasted, however, the Rare Game Etherian will spawn where the last foe was slain. Appearing as a normal jelly-type monster, the Etherian isn’t too impressive, stat-wise, but it can inflict Sleep with its normal attacks, can score an absurdly high combo count. Its magicks include Aquaga and Toxify, but its technicks - especially Mythril Bubbles (inflicts Confuse and Poison) - are more dangerous. Etherian can drop Green Liquid, Silver Liquid or an Eight-Fluted Pole , you can steal an Ame-no-Murakumo and its Monograph drop is an Unpurified Ether. It is weak to Fire and absorbs Water. Unlike most Rare Game, Etherian will respawn regularly every time you zone-in, usually appearing between the central and eastern windmills.
Once the enemies are vanquished, there’s quite a bit of quality goodies to discuss. The two best suits of Mystic Armor can be found in this zone, including the Glimmering Robes and Lordly Robes . The Glimmering Robes (Mystic Armor 12) have the second-highest Defense rating in the game (59), but also grant +12 Magick Power, +10 Vitality and +120 MP. Lordly Robes (Mystic Armor 13) grant 61 Defense, +5 Strength, +15 Magick Power and +100 MP. It’s hard to pick a clear winner here, as on a pure mage that Strength is wasted, and if you hit the max Magick Power (99) too easily, the ‘downgrade’ to Glimmering Robes might not be a bad idea for the extra Vitality (resistance to status effects) and MP.
If Mystic Armor isn’t enough for you, this area also houses the top-tier Heavy Armor in the game, Grand Armor . Grand Armor (Heavy Armor 12) bestows 67 Defense and +12 Strength on its wearer. Other noteworthy armor includes the Magepower Shishak , the Golden Skullcap and the Venetian Shield . The Magepower Shishak (Heavy Armor 11) is the next-to-top-tier Heavy Armor helm, granting its wearer 47 Magick Resist, +11 Strength and a token +5 Magick Power. Likewise, the Golden Skullcap trails the Circlet, offering 58 Magick Resist, +10 Magick Power, +3 Speed and +107 MP. The Venetian Shield (Shields 7), despite following only the Gendarme, Ensanguined Shield and Zodiac Escutcheon, isn’t too admirable as far as shields go. It boasts +25 Evade and Magick Evade, but also makes the wearer weak to Lightning. You can also find a Shell Shield here, but frankly, you’d be better off trying to get one from the Elder Wyrm in Trial Mode.
As for weapons, you can find the second-best Hand-bomb in the game, the Volcano (Hand-bombs 3), the third strongest Ninja Sword, the Orochi (Ninja Swords 1), which has no element and can inflict Disable on-hit and the Shikari Nagasa (Shikari Nagasa & Mina license) is the second most powerful Dagger in the game, although it pales in comparison to the superior Mina. The Bone of Byblos (Maces 5) is the strongest Mace weapon in the game, boasting 100 Attack Power. As for ammunition there’s Artemis Arrows , which boost Attack Power by five and deal Earth elemental damage.
After the plundering is over, continue to the southern end of the area to find an area transition leading to the Feddik River zone.
Feddik River
In the final area of the Cerobi Steppe, you’ll see the return of the Adamantitan, which are joined by the Shield Wyrm and the Silver Lobo. After the foes have been cleared, it’s time to get to looting, as there are many fine pieces of loot to pick up here.
Starting with the armor, you can find the top two bits of Light Armor, including the Mirage Vest and the Brave Suit . The Mirage Vest (Light Armor 12) gives its wearer 55 Defense, +10 Vitality, +10 Speed and a whopping +800 HP. As far as pure defense goes, the Brave Suit (Light Armor 13) is inferior, boasting 57 Defense, and giving +500 HP, but it also gives its wearer the Bravery status. So much for Light Armor, you can also find the Grand Helm (Heavy Armor 12), which is the top-tier Heavy Armor helmet, offering 50 Magick Resist, +12 Strength and +10 Vitality. Finally, you can find the Maximillian (Heavy Armor 11) armor, which grants 64 Defense, 1 Magick Defense, +9 Strength and +6 Speed. If your Strength is maxed (99) with Grand Armor, you might want to switch to Maximillian for the Speed boost, instead.
Weapons are by far more abundant, but they’re not by any stretch of the imagination created equal. First you have the Mythril Blade , which is not to be confused with the Mythril Sword from the Crossfield area. Instead of the initial weapon Reks used, it’s Basch’s initial equip, and it boasts a slightly higher (but still unimpressive) Attack Power of 23. It requires no license to use. You can also find a Claymore , which hasn’t been impressive for a long while now.
Other, more interesting weapons include the Dragon Whisker , Fomalhaut , Grand Mace , Koga Blade and the Whale Whisker . The Dragon Whisker (Dragon Whisker license) is the most powerful Spear you’re likely to get your hands on in the Cerobi Steppe, boasting 100 Attack Power and the ability to inflict Disable on hit. The Fomalhaut (Fomalhaut license) is the second strongest Gun in the game, behind only the Mithuna and likewise the Grand Mace (Maces 5) is the second strongest Mace, behind only the Bone of Byblos. Following this trend is the Whale Whisker (Whale Whisker license), which is the second strongest Pole weapon, whose 108 Attack Power and 15% combo rate puts it solidly behind the Kanya. The Koga Blade (Ninja Swords 3) is the sister sword to the Iga Blade, having the same 87 Attack Power and being an Earth elemental weapon, instead of a Water elemental weapon.
Finally, the last weapon you can find in this area is a bit of an oddity. The Bonebreaker (no license) doesn’t appear too impressive, what with its laughable 10 Attack Power, but it also inflicts Disease and Sap 100% of the time on hit… provided the enemy isn’t immune to those two status effects, of course. If they are, it’s a crippling combination, as Disease prevents an afflicted creature from healing (effectively making their current HP their max HP), and Sap continuously reduces their HP. It doesn’t require a license to use, either, despite appearing like a Mace class weapon.
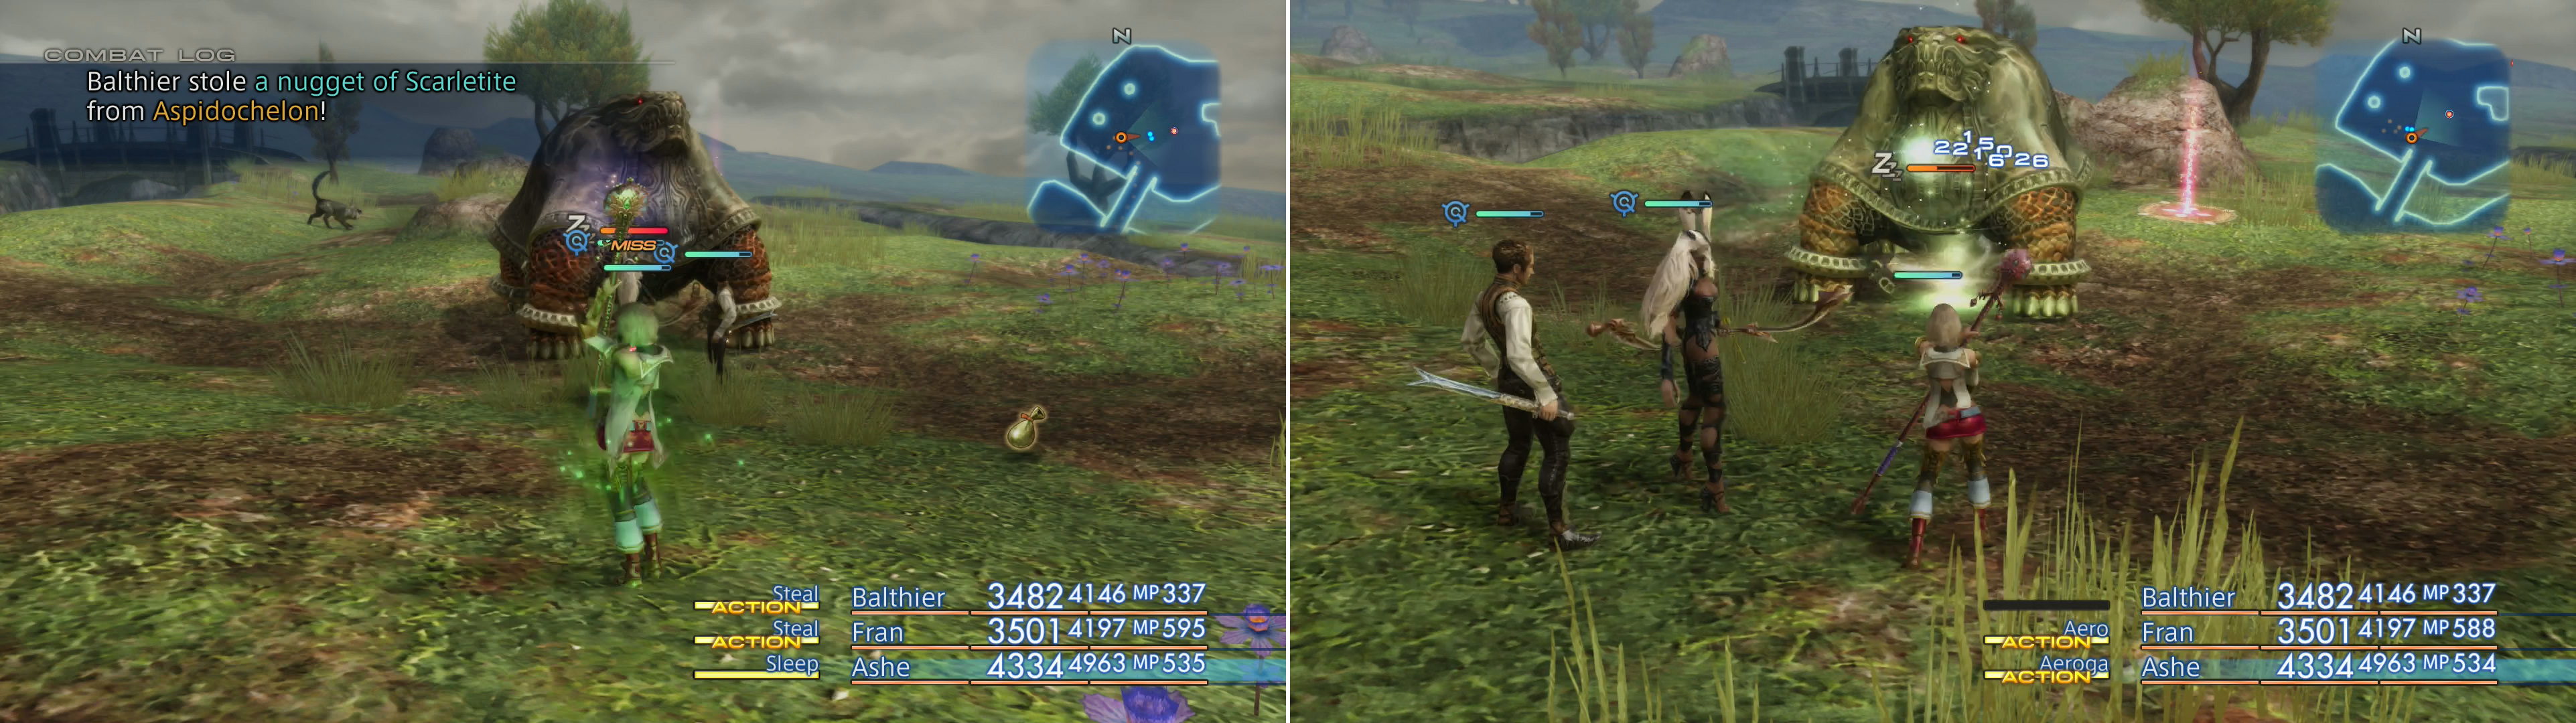
You can steal Scarletite from Aspidochelon (left), after which the Sleep-vulnerable behemoth can be safely bombarded with Aero and Aeroga (right).
Aspidochelon
Although you’re done with the loot in this area, there’s also a Trophy Rare Game which can dwell here, and if you’re zoning for any gear in this place, you’ll certainly come into contact with this beast - Aspidochelon. This creature spawns on the middle of the area’s three islands, likely near other Adamantitans. Another large tortoise monster, this critter is only a marignal step above Thassalinion, having around 60,000 HP and slightly higher Level and Attack Power.
Aspidochelon doesn’t have many new tricks, making use of tortoise staples such as Flatten, Meditate, Purify, Restore and Stone Gaze, along with an impressive array of magicks, including Aeroga, Blizzaga, Firaga, Protect, Shell, Thundaga and Waterga. Like Skullash and Thassalinion, Aspidochelon’s great weakness is its vulnerability to Sleep, which will allow you to safely destroy it with magick, namely Aeroga, which it’s vulnerable to. Before you dispatch it, however, consider stealing some Scarletite from it.
Once slain, you’ll be rewarded with the Adamantine Trophy .
With that, the Cerobi Steppe has been covered in full. While it’s probably too much to expect for you to gain all the gear in the area (much less multiple suits of the top armor), it can at least be assumed you know where to go to find it, and the more time you spend trying to get some of this gear, the better prepared you’ll be for the challenges ahead. In a few situations, some choice pieces of gear will greatly benefit you in certain fights, and may accordingly be included in battle strategies.

 Sign up
No Comments