This DLC is a bridge between the ending of XIII-2 and the beginning of the next, and last, installment in the trilogy; Lightning Returns. It goes some way to explain what happens to Lightning after the tragic events at the end of XIII-2 and the intervening years, Lightning’s promise and the strange and cryptic clip of Lightning crystallised on Etro’s throne. It is an excellent way to prepare for the coming of Lightning.
Gameplay Mechanics
The gameplay for this section centres around an endless battle for the fate of the world with a certain purple-haired menace. Caius and Lightning’s struggles were shown at the beginning and this is an extension of that battle from Valhalla. You are tasked with defeating Caius time and again, getting stronger with each battle, despite a win or a loss. The culmination is to defeat Chaos Bahamut and Caius in one last, uber battle, after which Lightning gains full access to her powers.
You will start off at level 1 with four paradigms, 20000 HP and limited items at your disposal consisting of a few Potions and an Elixir. You regain the same amount of items with each battle, successful or unsuccessful and can never increase that amount so only use them when you really need to or if you want to push for victory without having to go on the defensive.
As you level up (maximum level is 10), Lightning gains more and more stronger abilities. Naturally, this makes it easier to defeat Caius and later, Bahamut. You will also unlock further paradigm roles at certain increments, allowing you to employ different strategies. Caius will always remain the same and he always has full access to his powers so after a few battles you should be familiar with his attack patterns.
Lightning has her own Feral Link gauge that will unleash her ability Legion of One (yes, it’s been upgraded) when the gauge is full. It is rather powerful when employed against Caius in Stagger state or it can drive the Chain Gauge up a little, though not as much as Army of One did.
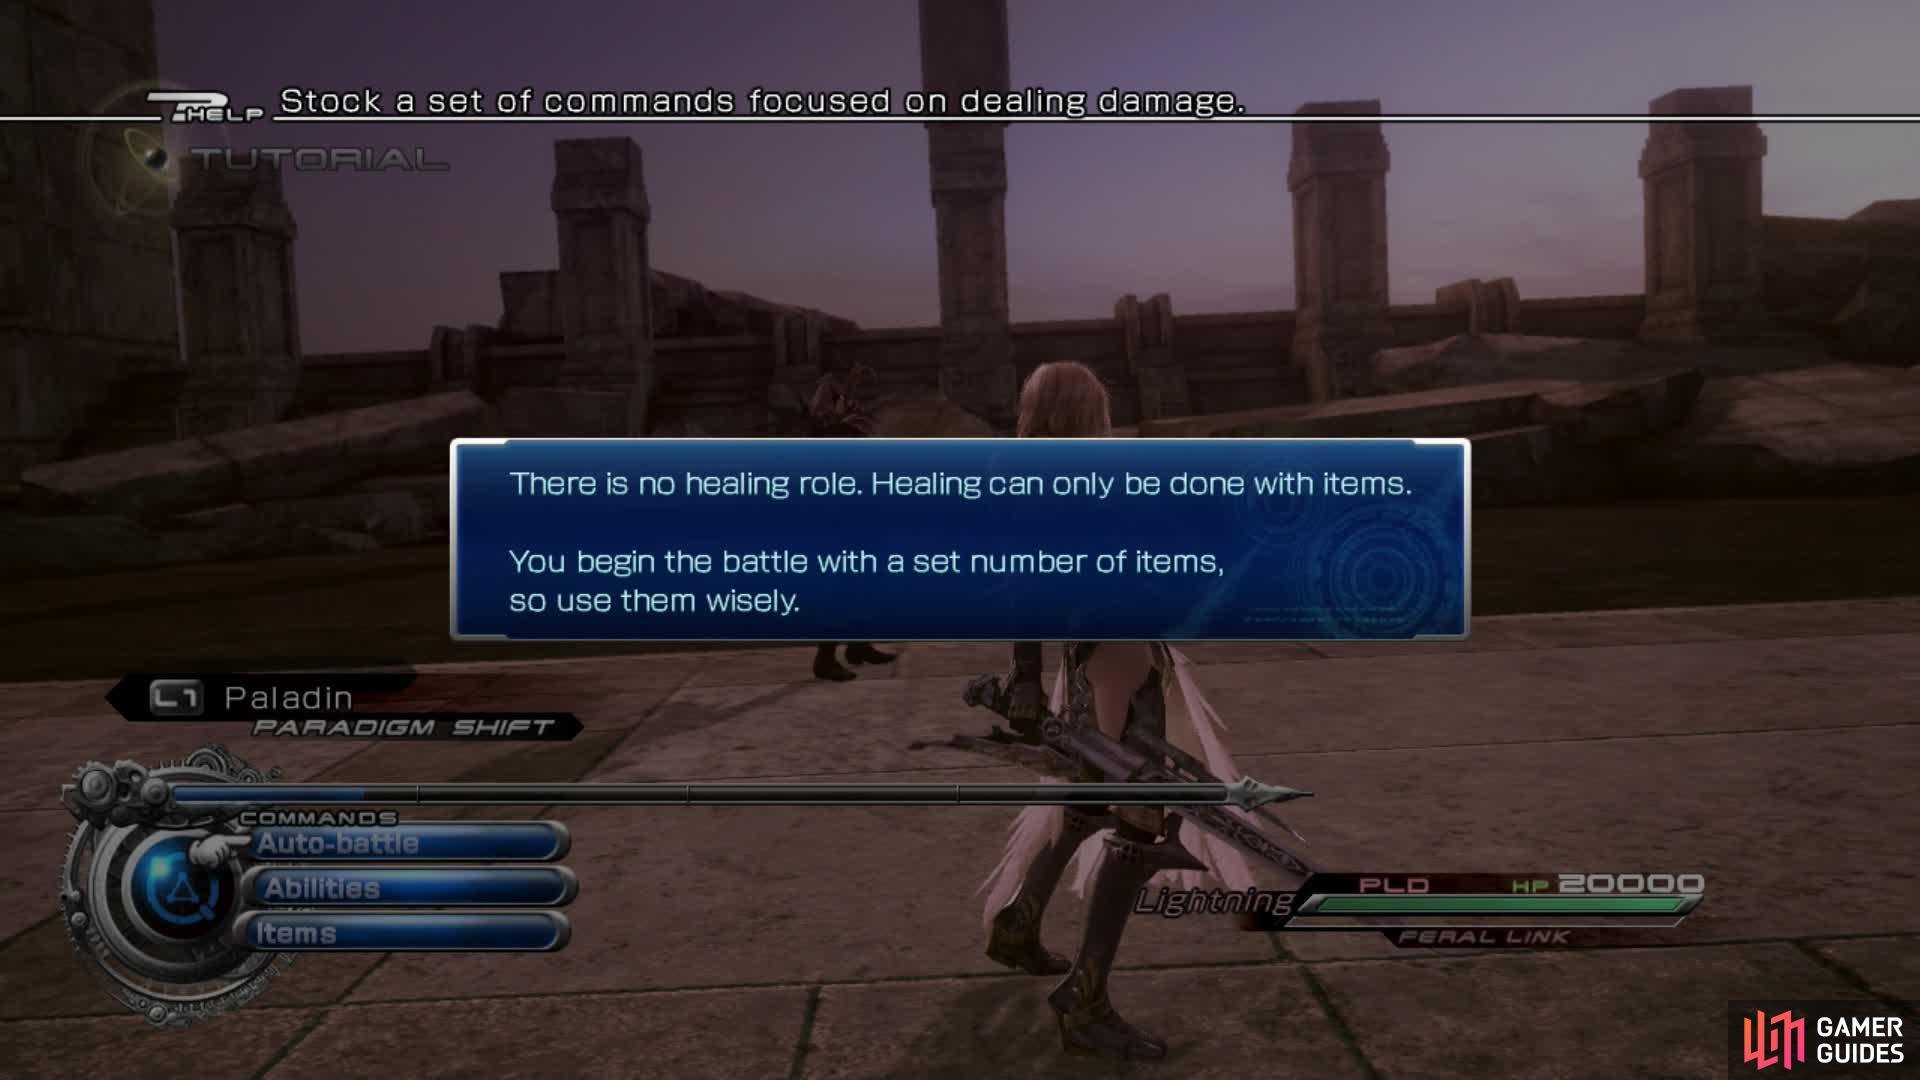
You only have a handful of healing items. Only use them if you are truly desperate or just want a quicker score. You should be looking to negate as much damage as possible without having to worry about healing.
Paradigms and Abilities: Lightning
Paladin
This role acts as the damage dealer and is basically the Commando role. Lightning forgoes her defense in order to maximise her strength and attacking potential. She is vulnerable to attacks and so this role should only be used to maintain the Chain Gauge and when Caius is staggered.
Abilities:
Attack - Deal Physical damage to one foe
Blitz - Deal Physical damage to target and nearby foes
Ruin - Deal non-elemental Magical damage to one foe
Ruinga - Deal non-elemental Magical damage to target and nearby foes
Launch - When performing Attack on a Staggered foe, hits the enemy into the air
Smite - Attack modifier increases to 5.0 against enemies about to recover from Stagger when Launched
Scourge - Attack modifier increases to 5.0 against enemy about to recover from Stagger. Enemy does not need to be launched.
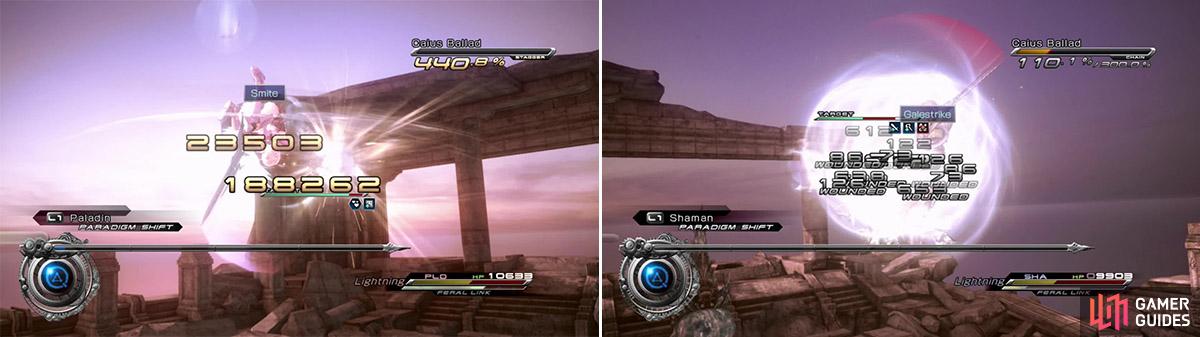
Smite is a very useful skill to try and employ because it does an insane amount of damage to an enemy just coming out of Stagger (left). Use the Shaman role when Caius is launched as it attacks very quickly (right).
Shaman
This role is a type of Ravager role though with a few differences. It is a wind-based paradigm whereby Lightning will use wind attacks to damage Caius. Aside from the usual Ravager way of increasing the Chain Gauge, it also increases the ATB gauge recharge rate. If you alternate between this and the Mage paradigms, making good use of the ATB refresh skill, you can drive up the Chain Gauge to the point of stagger in a very fast time.
Abilities :
Galestrike - Deals physical wind damage to target
Windstorm - Deals physical wind damage to target and nearby foes
Bladestorm - Deals physical wind damage to targets in a wide area
Mage
Like the Shaman role, the Mage paradigm should be used to primarily drive up the Chain Gauge and for ATB refresh between Ravager type roles. The Mage employs lightning-based damage as you would expect and can also increase the ATB recharge rate. Use this paradigm when you need a quick Stagger or when the enemy is Staggered to further increase the Stagger Gauge. You should always be looking to switch between Shaman and Mage in times when you are aiming for a Stagger.
Abilities:
Thunder - Deals lightning damage to target
Thundara - Deals lightning damage to nearby targets, causing extra damage to staggered targets
Thundaga - Deals lightning damage to targets in a wide area
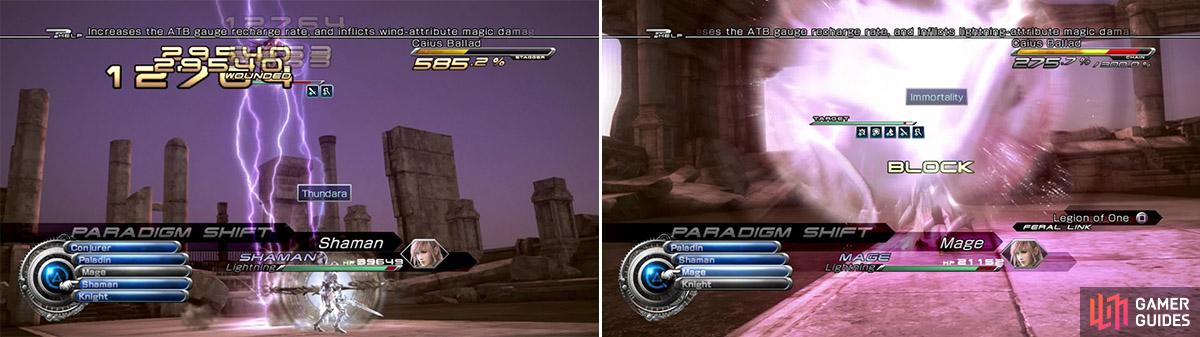
Thundara is an awesome skill when your opponent is in the Stagger state. It deals extra damage and as you can see, the numbers are prodigious (left). Always switch to Knight and use Immortality to deflect the strongest attacks (right).
Knight
The Knight is your Sentinel for these battles. This paradigm has the skill that will keep you alive and is the reason you do not have a healing paradigm: Immortality. Immortality is an incredible skill because when used, it makes Light invulnerable to any and all of Caius’s/Bahamut’s attacks. Put simply, use this skill when your enemy is about to use their strongest attacks. Used correctly you won’t need to heal at all.
Abilities:
Immortality - Grants immunity against debuffs and damage
Conjurer
This role is unlocked when Lightning reaches level 3. It acts as Synergist for these battles and has two abilities; Mighty Guard and Aura. Lightning can cast either defensive buffs on herself, such as Protect and Shell with Mighty Guard, or she can cast offensive buffs like Haste and Faith using Aura. It is entirely up to you how you wish to deploy these skills though Aura is by far the most useful skill because of Haste. You can quickly finish battles if you keep Haste on at all times. Be aware that you can only have one set of buffs on at once. So no stacking Protect with Haste etc.
Abilities:
Aura - Grants Haste, Bravery and Faith
Mighty Guard - Grants Protect, Shell, Vigilance and Veil
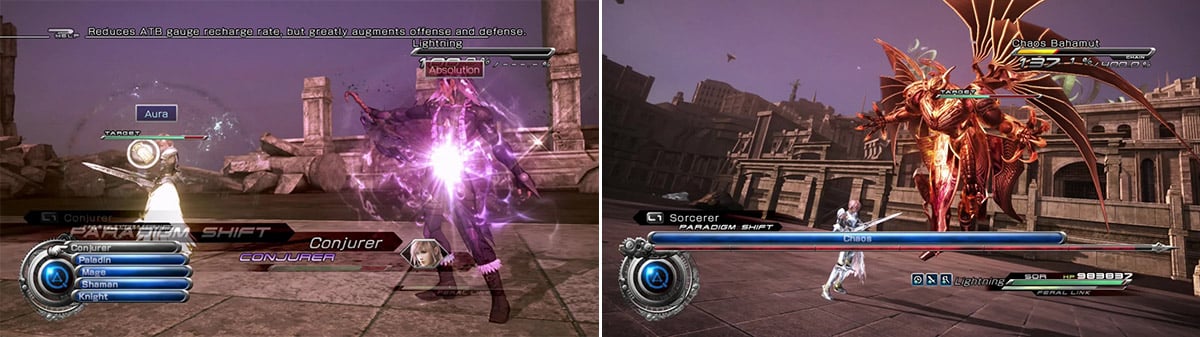
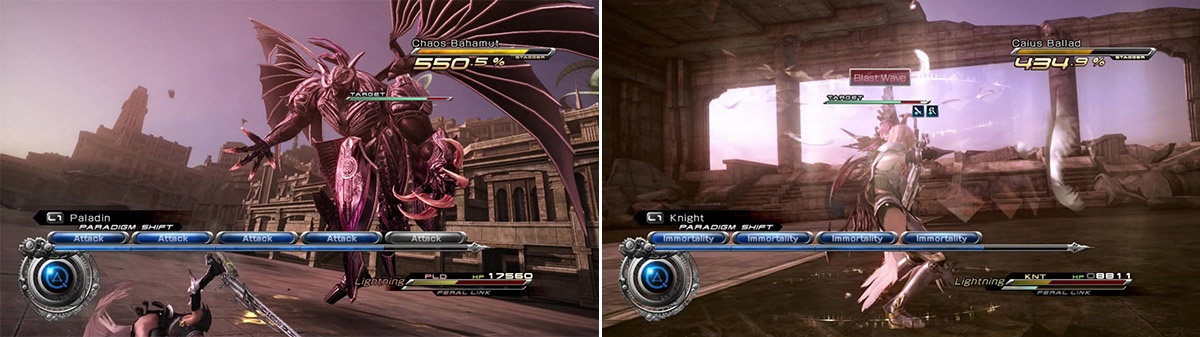
Use Aura when you wish to push for a quick victory or to quickly drive the Chain Gauge higher (left). The status ailments don’t always stick as both Caius and Chaos Bahamut have fairly high resistance until they’re staggered (right).
Sorcerer
This powerful role is unlocked at level 6 after conquering Chaos Bahamut and banishing the Chaos. It acts as a Saboteur and only has one ability; Chaos. This inflicts numerous status ailments and can just create havoc against your adversaries. It does make the battles ridiculously easy at level 10 as well. Use it to dispel status effects or to inflict some pain when an opponent is staggered. Fun stuff.
Abilities:
Chaos - Inflicts Deprotect, Deshell, Curse, Daze, Debrave and Defaith
Paradigms and Abilities: Caius
Caius bears much the same abilities as he has throughout the game though with a few differences. For one, he is much stronger than he is in the main game and secondly, he has very clearly defined roles which are marked with notifications when he changes role. These notifications are especially useful during the course of battle as they can define when you change your role. It is very important you pay attention to these and adjust your strategy accordingly.
Commando
Caius is probably the most dangerous in this role. He has very powerful attacks and can one-hit kill you if you aren’t careful. Luckily, there are very clear indications as to when he is about to attack. He will snap his fingers before he unleashes one of his nasty attacks from his repertoire. The ones to really watch out for are Blast Wave and Ultima (after level 5 and when below half health).
Abilities:
Blast Wave - Deals non-elemental damage and inflicts Wound damage (gains a staggered version at level 5 that shoots one volley and then a further triple volley soon after)
Ultima - Inflicts moderate to massive damage on the party (uses this when HP is below 50%)
Inferno - Deals heavy fire-based damage and inflicts Wound damage
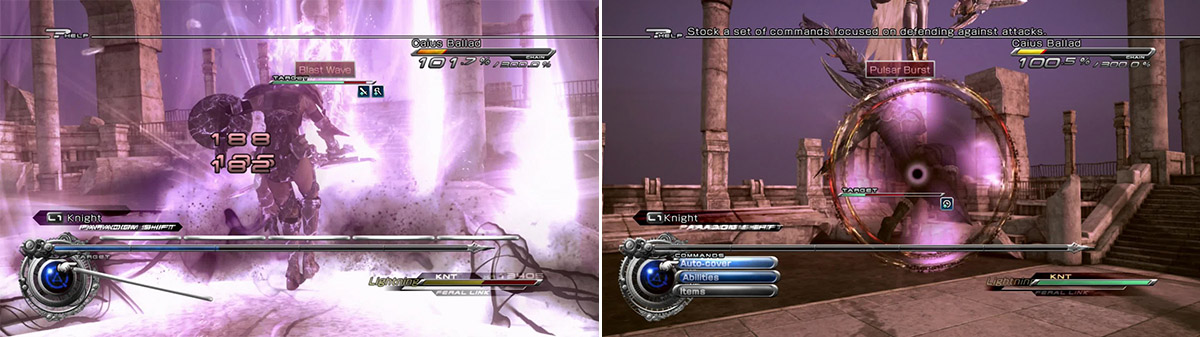
Blast Wave is very nasty, particularly early on when you are a low level. You absolutely must be in the Knight role when he makes this attack or you will most likely die (left). Pulsar Burst is the most dangerous skill in the Ravager stance and is used when you are vulnerable (right).
Ravager
This stance is the most likely to interrupt your attacks, causing you to miss turns and just generally make it difficult for you to get on the offensive. Employ useful tactics to negate some of these effects.
Abilities:
Graviton - Inflicts non-elemental damage. Similar to Ruin
Giga-Graviton - Inflicts moderate non-elemental damage. Similar to Ruinga
Pulsar Burst - A devastating attack used when you are launched. Can decimate HP
Medic
During this phase, Caius will employ several buffs and sometimes Regen. If you get unlucky and Caius uses this stance a lot during the fight, it will make it a lot more difficult to finish or really draw the battle out. Caius can regenerate massive amounts of HP, causing all your hard work to be removed. You should aim to Stagger Caius as soon as you can during this phase as he won’t attack you. He will use Dispelga to remove any buffs you may apply though so watch out.
Abilities:
Absolution - Removes all status ailments from Caius; buffs Caius with Protect, Shell, Veil, and Vigilance
Body and Soul - Grants Bravery, Faith, Haste, and Regen
Dispelga - Removes nearby targets’ most recent status enhancements and deals magic damage
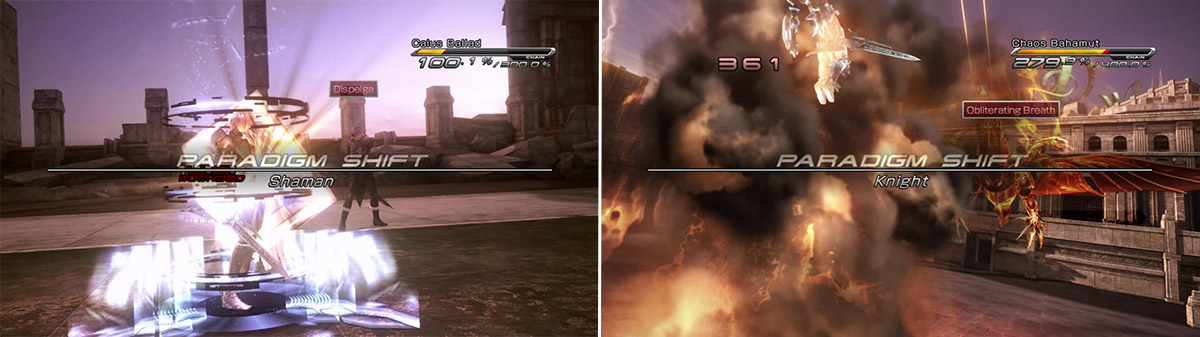
Dispelga only causes minor magical damage but can completely remove all buffs you have (left). As well as heavy damage, Obliterating Breath can launch you up into the air, stopping you from attacking at all (right).
Chaos Bahamut
He’s back and stronger than ever. Bahamut has no roles but he does have two distinct phases: standard and Gestalt. During the standard phase he will switch between a Resist Wind (and physical) phase and a Resist Lightning (and magic) phase. Depending on the phase he’s in, he will use certain abilities. After some time he will transform into his Gestalt phase where he becomes far more dangerous. He has two very powerful attacks that can easily kill you if you aren’t careful. Be on your guard!
Abilities:
Resist Wind - Becomes resistant to wind and physical attacks rendering them ineffective
Resist Lightning - Becomes resistant to lightning and magic attacks rendering them ineffective
Umbral Vise - Inflicts moderate damage on target (Resist Wind phase)
Ignis - Inflicts moderate non-elemental damage (Resist Wind phase)
Whirlwind - Deals moderate damage and can launch target (Resist Lightning phase)
Inferno - Deals heavy fire-based damage and inflicts Wound damage
Metamorphosis - Changes form
Obliterating Breath - A very powerful attack inflicting enormous amounts of damage (Gestalt phase)
Megaflare - Inflicts heavy non-elemental damage on the whole party (Gestalt phase)
Raising Lightning: The Low Levels
During the low levels, you are actually expected to lose because realistically beating Caius at level 4 and under is quite a tough task. It is much easier, and faster, to just get straight to level 5 and defeat Caius and Bahamut at once.
The game uses the following equation to determine how much CP you earn from each defeat:
CP = Time to Death (s) / 3 (capped at 100, or 5 minutes)
The equation is the same whatever level you attempt it. Do not try to use it after level 5 as it becomes an inefficient method in terms of time spent and at level 5, you will have sufficient abilities and stats to beat Caius and Bahamut.
To raise Lightning to level 5 in the shortest amount of time, use the Knight Role’s Immortality to block all of Caius Ballad’s attacks for 5 minutes. Afterward, allow Armor Lightning to die. Repeat this until you have survived for a total of 16 minutes 30 seconds (totaling 4 attempts). You should have access to Lv. 5 when you return to the main menu. Now you are ready for the real battles.
Battle Techniques
ATB Refresh
The best technique you can use is the ATB Refresh . Lightning can sometimes, when switching, have a full ATB gauge. 12 seconds must pass between the last refresh, roughly equivalent to two rounds of combat, though this can vary depending on ATB speed and roles. This technique can be especially useful when you need to charge a very long skill like Aura or Mighty Guard. You will get a rough idea of when you can next use it just by fighting.
Feral Link Recovery
Caius and Bahamut often use attacks that launch you, leaving you vulnerable and stuck waiting to attack. Lightning’s Feral Link ability, Legion of One, can be used when you are launched and basically put you right back in the fight. Lightning will recover to a standing position after using it so it is very useful when you need to turn the tide of battle in your favour.
Intermediate Shift
This technique is exclusive to Requiem of the Goddess and is based around a role bonus that increases the ATB recharge speed. The Shaman and Mage roles make use of this technique. You should aim to switch to either of these roles between bouts of attacking or when you are buffing/debuffing. So in real terms, you can increase the rate of the ATB speed when trying to cast a slow ability or in between rounds with the Paladin role. You can even switch between Mage and Shaman and back again to build up the Chain Gauge more quickly.
Cancel Charge
Sometimes when fighting your attacks can be interrupted and frozen, leaving you with a chunk of ATB left without an ability. If this happens, particularly when Caius is in his Ravager stance, cancel your attacks and then select them again. This will allow you to have a complete attack chain for that round as opposed to having a part missing or frozen.
Getting knocked down with your ATB frozen is very annoying. Cancel your attacks and then select them again to combat this. You should only break the pattern to stop heavy attacks, especially when he is in the Commando stance (right).
Battle Strategy: Caius
As covered in the paradigms and abilities section, Caius uses three different roles. The first battles you face will just be against Caius. He will always start off in either the Ravager or Commando stance. His patterns are fairly predictable in any given role unless he slips below half health in which case they get a little more complex and aggressive.
If you are starting from level one, you won’t be able to use the Conjurer role which really helps in the later battles. This is when you will need the recovery items. You should aim to start in the Paladin role, do a round of attacks and then switch to either Mage or Shaman. Switch between the two to generate a faster ATB until he’s staggered. You will need intermittent bouts of Paladin to maintain the gauge and Knight to counteract his stronger attacks. Only change to those to respond to Caius’s role changes.
During the Ravager stance you should aim to keep attacking as best as you can. The only attack that could really do some damage is Giga-Graviton that he uses when you reach higher levels. If he unleashes Graviton, be sure to switch Knight because he will almost always use Giga-Graviton immediately after. Keep cancelling your attacks and use Legion of One when you are knocked down or launched to keep the momentum with you.
The Commando role will be the time you will need to switch to Knight a lot. It is important not to just stick in Knight because the Chain Gauge will deplete so after stopping a big attack, quickly switch to an attacking role until he is ready to unleash another attack. You can always tell when he’s about to launch a massive attack as he will click his fingers beforehand. This is your cue to switch to Knight as soon as he does this. If you aren’t in Knight, you can and will die at lower levels.
His Medic stance should be the time when you Stagger him and keep him launched continually so he cannot recover his HP. After being Staggered he will always switch roles so it can be an effective way to get him to change out of the Medic role. Concentrate on driving up the Chain Gauge and just ignore any healing he does. It is frustrating because he can heal for large amounts and cast Regen but stick with it.
The Shaman role, and mostly Windstorm, is the best way to increase his Chain Gauge. Switch back and forth with another role making use of ATB Refresh and the ATB role bonuses you get with the Mage and Shaman roles. Stick with the regular pattern, even at higher levels and just react accordingly to his stance changes and attacks. Remember not to get caught out by his attacks at higher levels as they become stronger and more sophisticated. If you aren’t sure he’s finished an attack, stay in Knight a little longer just to make sure.
Once you have learnt Conjurer, always set that as your default paradigm. You should cast Mighty Guard/Aura as soon as the battle begins. Switch to it when you need to refresh your buffs and especially for Vigilance when Caius is in his Ravager stance. Staying on your feet is very useful during these phases.
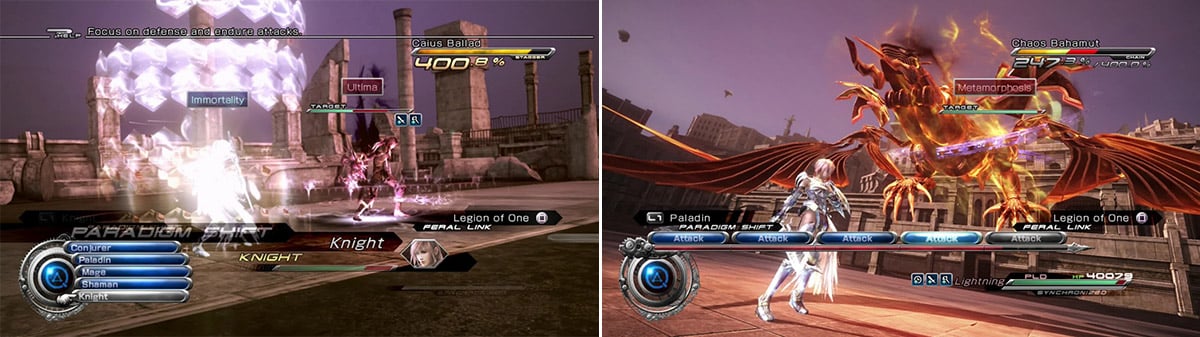
Caius starts to get really annoyed and uses Ultima when he’s below half health at higher levels (left). When Bahamut enters Gestalt mode, you know you’re in for some pain. Make sure to be in Knight for Obliterating Breath but especially Megaflare (right).
Battle Strategy: Chaos Bahamut
Luckily you don’t have to fight Chaos Bahamut straight off the bat. Caius will only send out Bahamut when you reach level 5. He’s particularly nasty for these fights and can switch his resistance between Wind and Lightning.
Bahamut starts off in standard form with no resistances. At this stage, cast Mighty Guard and then switch Paladin to start increasing his Chain Gauge. After a round of that, switch to Shaman and keep attacking until he employs his first resistance.
Depending on the resistance he chose will obviously depend on the type of role you use. If he chose Resist Wind, then you will need to switch between Paladin and Mage. You will also need to switch to Knight for his really powerful attacks. If he chose Resist Lightning, make really good use of the Shaman role, mostly Windstorm. This really increases the Chain Gauge.
When Bahamut’s Chain Gauge has been increased high enough, he will use Metamorphosis to switch to Gestalt mode. This is the time in which you will need to be in Knight a lot. Don’t just sit there though as there is enough time to get off a quick round of attacks to maintain the Gauge. You do not want to Stagger him just yet because this first phase is particularly dangerous. Switch to Knight for Obliterating Breath and especially Megaflare. Once he’s used Megaflare he will go back to his standard phase and so you can repeat the process until he’s staggered.
Just before you Stagger Bahamut, cast Aura to gain the most damage and Haste for when he’s in Stagger state. You will do insane amounts of damage with Aura. Keep repeating these steps until he’s down as his patterns are very predictable. Pay attention to his attacks and resistances and you will have no trouble.
Caius and Bahamut - Level 5
After defeating both Caius and then Chaos Bahamut and earning five stars, you will be rewarded with 10000CP, (effectively getting you from level 5 to level 10) the Sorcerer role, and the Armor Lightning monster crystal. The Sorcerer role is available at level 6 but if you successfully beat Caius and Bahamut at level 5, you will bypass this straight to level 10 because of the amount of CP you earn.) To obtain Armor Lightning, you must earn five stars for both Caius and Bahamut.
Armor Lightning is an Early Peaker Commando and easily the most powerful Commando in the game thanks to her unique passive ability; Uncapped Damage which raises the cap on her damage to 999,999. You can also play Requiem of the Goddess as early as Episode 2: An Unseen Intruder and obtain her, making future battles a lot easier. She is quite easy to develop as well unlike Twilight Odin which requires a ton of materials. Focus on raising her Strength and HP to maximise her potential.

 Sign up
No Comments