

Acquit Not Evil
| Level | Target | Habitat | Reward |
|---|---|---|---|
| 38 | Alphagin (x3), Sahagin (x2) | Upper Wennath (All Times) | 3 Stars, 6,650 Gil, Knight’s Anklet |
Requires Hunter Rank 4 . You will need to approach this hunt from the north, as there isn’t a way to reach them from the south, so head to the Wennath Riverhead parking spot and go down the stairs to reach the bank. You’ll likely run into some Sahagins on the way to the hunt, so you will know what they are like. These alligator-like creatures aren’t too tough, although the Alphagins might pose a little more trouble, as they are higher level (38 compared to Sahagin being 18) and stronger. They both share the same weaknesses (polearms, shields and ice) and strengths (fire and holy).
Help Needed in EXINERIS
| Level | Target | Habitat | Reward |
|---|---|---|---|
| 24 | Garchimacera (x8) | EXINERIS Power Plant (Nighttime) | 2 Stars, 3,540 Gil, Megalixir |
Requires you to finish the first main story quest of Chapter 8 . Once you accept this hunt, you’ll need to go to the gate at the entrance to the power plant, and examine it to get an option to head inside. The Garchimaceras will be on the ring on the bottom portion of the plant, where you fought the daemons during the main storyline. There is not a lot of room here, so a big weapon like the greatsword will do wonders in hitting more than one enemy. Also, since the enemies will likely be grouped together and are weak to fire (although fire is probably not the safest thing to use inside of a power plant), whip up a Fira with Dual/Tricast to burn them to a crisp.
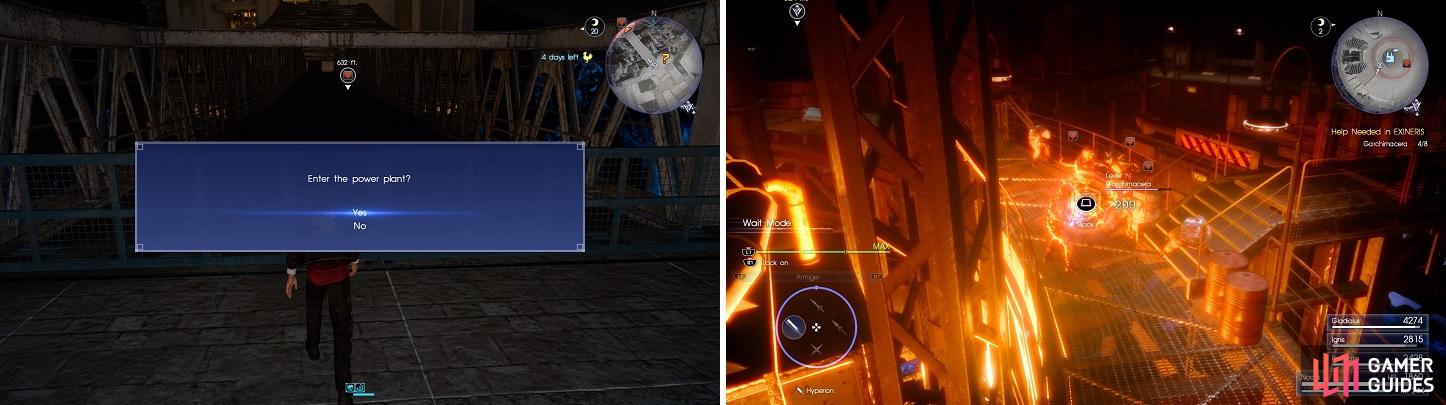
You’ll have to go into the power plant twice for hunts. Just select the front gate to get inside.
No Stopping the Great Stink
| Level | Target | Habitat | Reward |
|---|---|---|---|
| 38 | Malboro (x1) | Kelbrass Grasslands (All Times) | 3 Stars, 6,780 Gil, Golden Hourglass |
Requires you to finish the main story . The Malboro and its bad breath strike again and can be found east of the Taelpar Crag parking spot, inside of the large crater there. This is pretty much the same exact fight as the one during Chapter 10, minus the little Malboro babies. It is level 38 and weak to greatswords, machinery and fire, while being strong against ice and holy and sporting a nice 105,000 health. As with the story one, when it inhales, it will be unleashing Bad Breath, which inflicts a lot of damage and multiple status ailments, so get away from it. Feel free to use the crashed imperial airship as warp-points to get out of range quickly.
Trembling Killers
| Level | Target | Habitat | Reward |
|---|---|---|---|
| 57 | Ziggurat x5 | Kelbass Grasslands (Nighttime) | 4 Stars, 16,480 Gil, Safety Bit |
Requires you to finish the main story . Head to the Cauthess - the Disc parking spot and go south to the crater on your map, which is where you’ll get the five Ziggurats to appear. They look like new enemies and may be similar to a certain strong enemy that you encountered in Chapter 13, but either way, you are in for one hell of a fight. As you will undoubtedly notice, the Ziggurats’s attacks are strong and swift, and able to remove your partners from the battle in mere seconds, with you having to resort to picking them up or using Phoenix Downs to revive them.
At level 57, they have around 62,000 HP and are weak to polearms, shields, lightning and holy, while being strong against only fire. Since they are weak to lightning, preparing a Quintcast Thundara/Thundaga is ideal here, especially if you can get them grouped up. Although they aren’t too common, keep an eye out on their blockable attacks and try to get some distance before you zap their health down to nothing. Once you get their numbers thinner, things will start becoming a little more manageable.
An Omen Crawls Upon the Ground
| Level | Target | Habitat | Reward |
|---|---|---|---|
| 68 | Grootslang x2 | Kelbass Grasslands (All Times) | 4 Stars, 26,840 Gil, Red Choker |
Requires you to finish the main story . Fast travel to the Cauthess - the Disc parking spot and head northeast to the crater there to find these two slippery foes waiting for you. Remember the Midgardsormr outside of the entrance to Greyshire Glacial Grotto? Well, the Grootslang is the same thing, except level 68 and there are two of them this time. Fighting one was enough, but battling two of them at the same time will certainly be a challenge, especially with their health being close to 300k. They are weak to sword, daggers and ice, while being strong against fire and holy.
Equipping your characters with a Star Pendant will help tremendously, since the Grootslangs can poison your characters (or eat a meal that prevents poison). While their attacks that poison still hurt a lot, you don’t have to worry about having to cure it or face a situation where one of your characters is sitting at one HP. It can also be a bit troublesome keeping an eye out for when one of them goes underground. Using ice magic can be a huge help, but even with Quintcast, it’s going to take a lot of uses to cut down the enemies’ huge amounts of health, especially if you don’t get both in a single blast.
Bones Seek an Offering
| Level | Target | Habitat | Reward |
|---|---|---|---|
| 72 | Iseultalon x1 | Kelbass Grasslands (Nighttime) | 5 Stars, 33,790 Gil, Dark Crest |
Requires you to finish the main story . The Iseultalon hunt is located in the exact same crater as the Grootslangs hunt, which is northeast of the Cauthess - the Disc parking spot. If you remember the Deathclaw boss you fought during Chapter 10, then you will be fighting a stronger version of that here (you also possibly encountered one in Chapter 14). This thing hits hard and it’s very possible that the majority of its attacks will put any character into Danger status, especially if you have lower health.
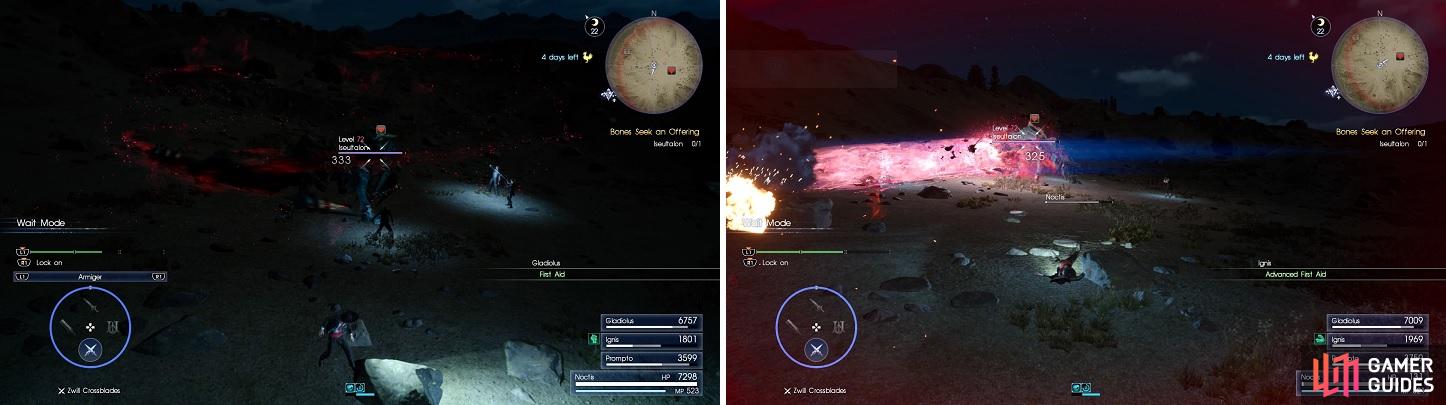
The Iseultalon has two dangerous attacks, a close range swirl with its claws (left) and a large laser (right).
If you’re far away from the enemy, you want to always hold down the dodge button, as it can very quickly fire its claws at you; this is blockable, so you can try to parry it if you want. Likewise, it will send its claws out with some lasers attached, with them being vertical when going out and horizontal when being drawn back in. It can also fire a giant laser back and forth and while it hurts, it is easily dodgeable. Up close, it has a few melee attacks that are nothing to be fearful of. However, it can spin its claws around the body, dealing major damage and this attack cannot be phased through, so it will always hit if you’re in range.
At level 72, the Iseultalon has a lot of health (230,200) and is weak to shields, machinery, fire and holy, while being strong against only ice. The major problem with this enemy is that a lot of its attacks are considered area-of-effect, meaning you can’t dodge them by just holding down Square/X. That makes the warp one of the more prominent abilities in this battle, as there is a small period of invulnerability when performing one. Preparing some fire spells is ideal here to quickly deplete its health and if you should be fighting up close, don’t stick around for too long, to avoid its whirlwind of death.
Dead General Strikes Down the King
| Level | Target | Habitat | Reward |
|---|---|---|---|
| 99 | Ayakashi (x1) | Kelbass Grasslands (Nighttime) | 5 Stars, 42,000 Gil, Ribbon |
Requires you to finish the main story . The Ayakashi is a level 110 samurai enemy and thus, is going to be one tough cookie. Despite that, you should already know all of its moves and will remember that blocking and parrying is a huge help in the battle. It has close to 675k health, so it will be a long battle, and it is weak to polearms, firearms, lightning and holy, while being strong against only fire. Considering its high level, you would figure it has high strength, which means that most of its attacks will instantly put you and the others in Danger, making you have to use quite a few items in the fight.

 Sign up
No Comments