

While there are a few quests leading you further west, towards the Ravatogh volcano, there are plenty more side quests to the east that need to be completed or turned in. When you’re ready to mop these up hop back in the Regalia and travel to the Quest Location for “Wild About Onions” .
Wild About Onions
You should come to a stop on the road east of the Turncouth Haven Campground, west of the Swainsmere Fishing Spot. From there, make your way south-east to find a farm, where you’ll find a Food Spot (Wild Onion), where you can find the Bulbous Onion you’re after. Well, that was easy…
| Objective | Reward |
|---|---|
| For harvesting a Bulbous Onion | EXP 2,500 |
Van, Interrupted Again
Mount the Regalia again and have Ignis drive you to your next objective: the Quest Location for “Van, Interrupted Again” , which is right down the road from where you are now. When you reach your destination (or as close to it as the Regalia can get you) head north-east to find the red van (truck), again inexplicably off-road. Kill the Voretooths prowling around, then secure the van’s contents to appease another Lestallum merchant in a another easy quest.
| Objective | Reward |
|---|---|
| For securing the Van | EXP 2,500 |
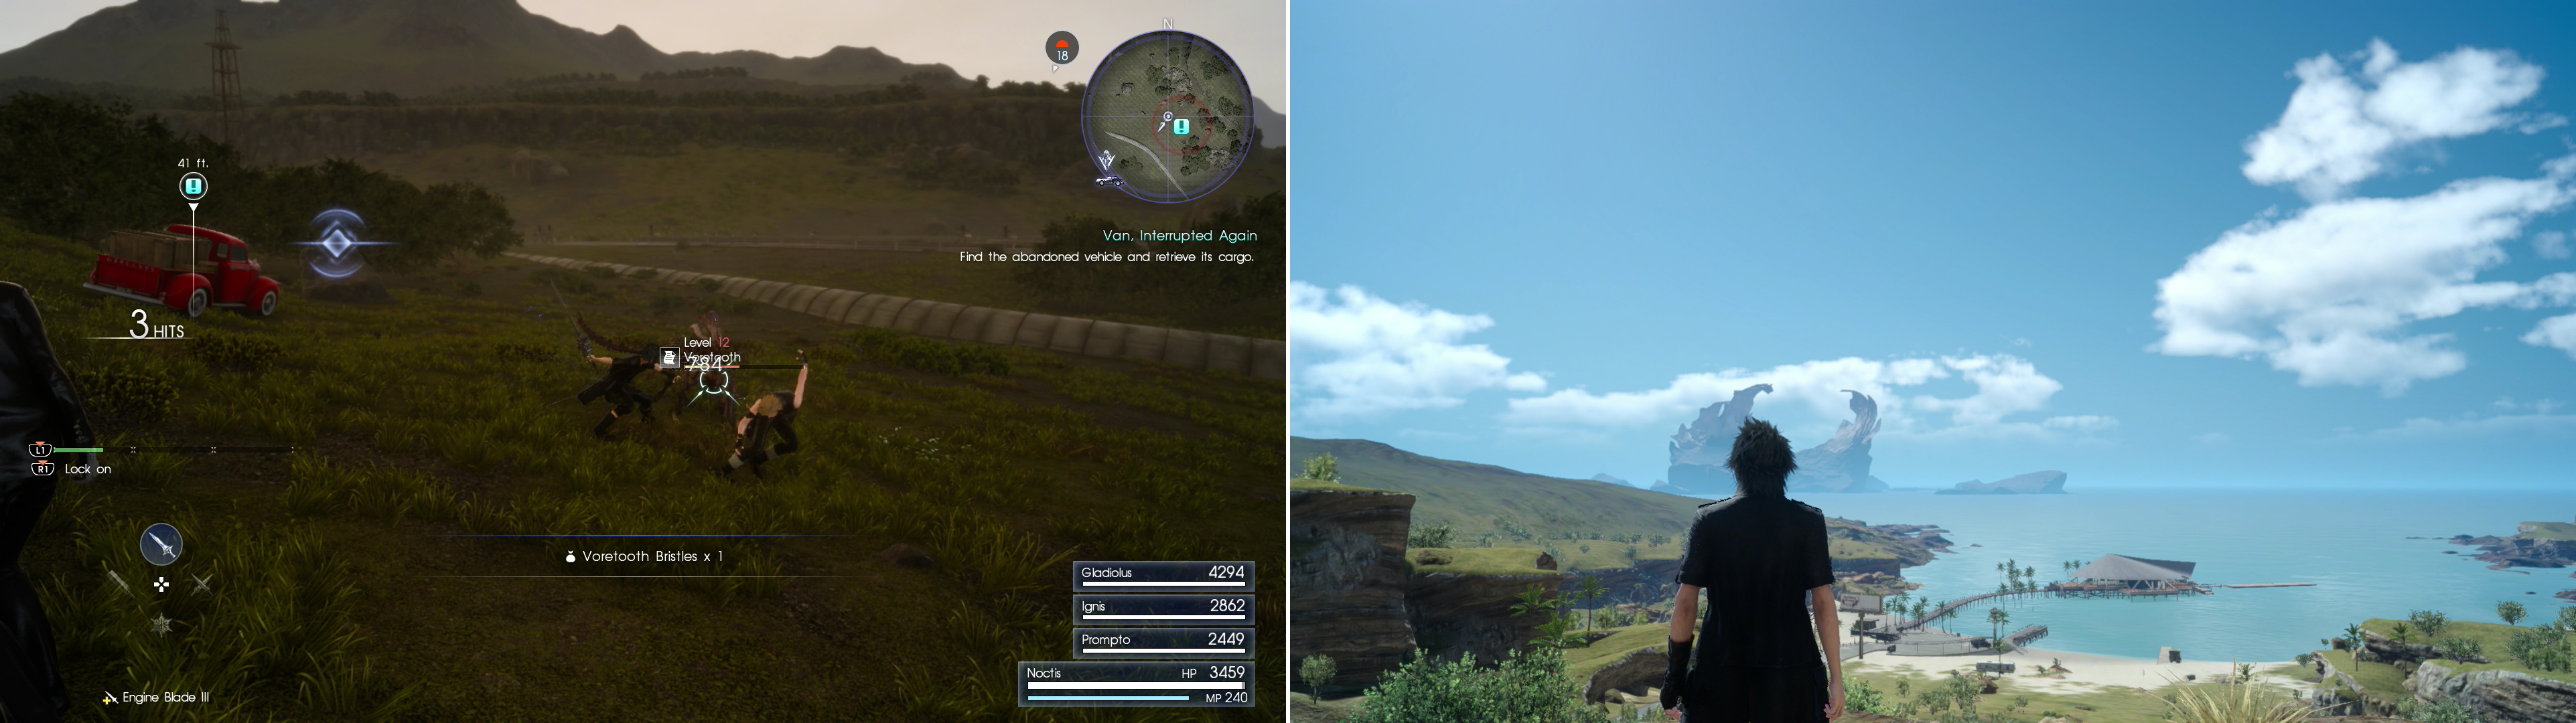
Slay the vermin around the van to secure its contents (left). Return to Galdin Quay to get the photo Vyv wants (right).
An Eye for Islands
Now it’s time to drive all the way down to Galdin Quay and take some more photos for Vyv. When you arrive, make your way down the long pier to the in-ocean resort. There are a total of three photo spots you can choose from, but only two provide the view you need. Skip the one on the pier and continue into the resort, make your way past the Mother of Pearl restaurant and west of The Quayside Cradle to reach the first photo spot. Alternatively you can head to the ferry dock, south, past Dino, to find another spot. Once you have photos from either (or both!) of those two spots you’ll be ready to return to Vyv.
| Objective | Reward |
|---|---|
| For taking pictures of the Umbral Isle of Angelgard | EXP 1,000 / Gil 7,500 |
Before you leave, be sure to return to Dino and hand over the Sapphire Stone he wanted, in return for which you’ll get a Sapphire Bracelet. And of course, he’s got another quest for you, “No Pain, No Gem” , which is far to the north-west, and hence out of your reach for now.
Return to Hammerhead
The last stop you should make while you’re out here is back to good old Hammerhead, where you can pick up any weapons Cid has been upgrading for you and start him out on new tasks. If you get your hands on the Drain Lance III, that’ll end that weapon’s questline, as it’s as upgraded as it can get. Same goes for the Ultima Blade, and in that case Cid’ll also give you the Key Item “Cid’s Old Hammer” . Uh… neat? While you’re here you can also talk to Takka after finally liberating his beans. Naturally he’s got yet another quest for you, and it just so happens that he wants you to pick him up some goodies at Lestallum. What luck, you were just heading back there. This starts the quest “Lestallum’s Finest” .
More Lestallum Labors III
Make your way back to Lestallum again, where you can turn in the quests “An Eye for Islands” , “Wild About Onions” and “Van, Interrupted Again” for the aforementioned rewards. Vyv will, of course, have another job for you, so pick up the quest “Aftermath of the Astral War” while you’re here. The proprietor of the Prissock General Store takes a break from sending you on menial tasks, but offers you a discount at his store as compensation for chasing down two vans (trucks) for him.
As for the vendor at the Furlock Farms stall, check his stock to find out that the shipment of goods Takka wants went missing. Naturally you’re going to have to track the misplaced wares down and do the leg-work to remedy this. This will advance the quest “Lestallum’s Finest” . Once that’s done, interact with the merchant again to finish the quest “Wild About Onions” by handing over the Bulbous Onion. He, too, has another quest for you, so be sure to pick up “Vegging Out” while you’re here. Some people never seem to tire of burdening you with trivial chores…
Aftermath of the Astral War
The next quest for Vyv should be your next target, as it takes you back near your old stomping grounds in Cleigne. Mostly, however, it’s because his next quest will take you back east, which is near some other quests you’ll be doing later. That’s right, to be more efficient later you have to be ineffecient now. Oh well.
Get Ignis to drive you to the Quest Location for “Aftermath of the Astral War” or drive to the CLEIGNE: Coernix Bypass Parking Spot. Either way, you’ll need to be north of the building near which the quest takes place. Furthermore there’s an elevated road that connects the building to the highway, which you’ll also need to be north and east of if you want to access your objective. That being the case, when the Regalia is parked head east along the northern end of the building and kill whatever Spiracorns and imperials stand in your way. Your goal is a watch tower along the eastern end of the building, which you can climb to the top of to find a fine vantage point for a photograph.
The next photo spot is less of a hassle, as it’s simply along the highway to the south (the road east of Old Lestallum). You need merely have Ignis drive you to the new Quest Location for “The Aftermath of the Astral War” , kick Prompto out and have him snap a photo. Once done, return to Lestallum and tell Vyv the good new and pick up the follow-up quest “Of Gods and Kings” .
| Objective | Reward |
|---|---|
| For taking pictures of the gorge at Taelpar Crag | EXP 2,000 / Gil 10,000 |
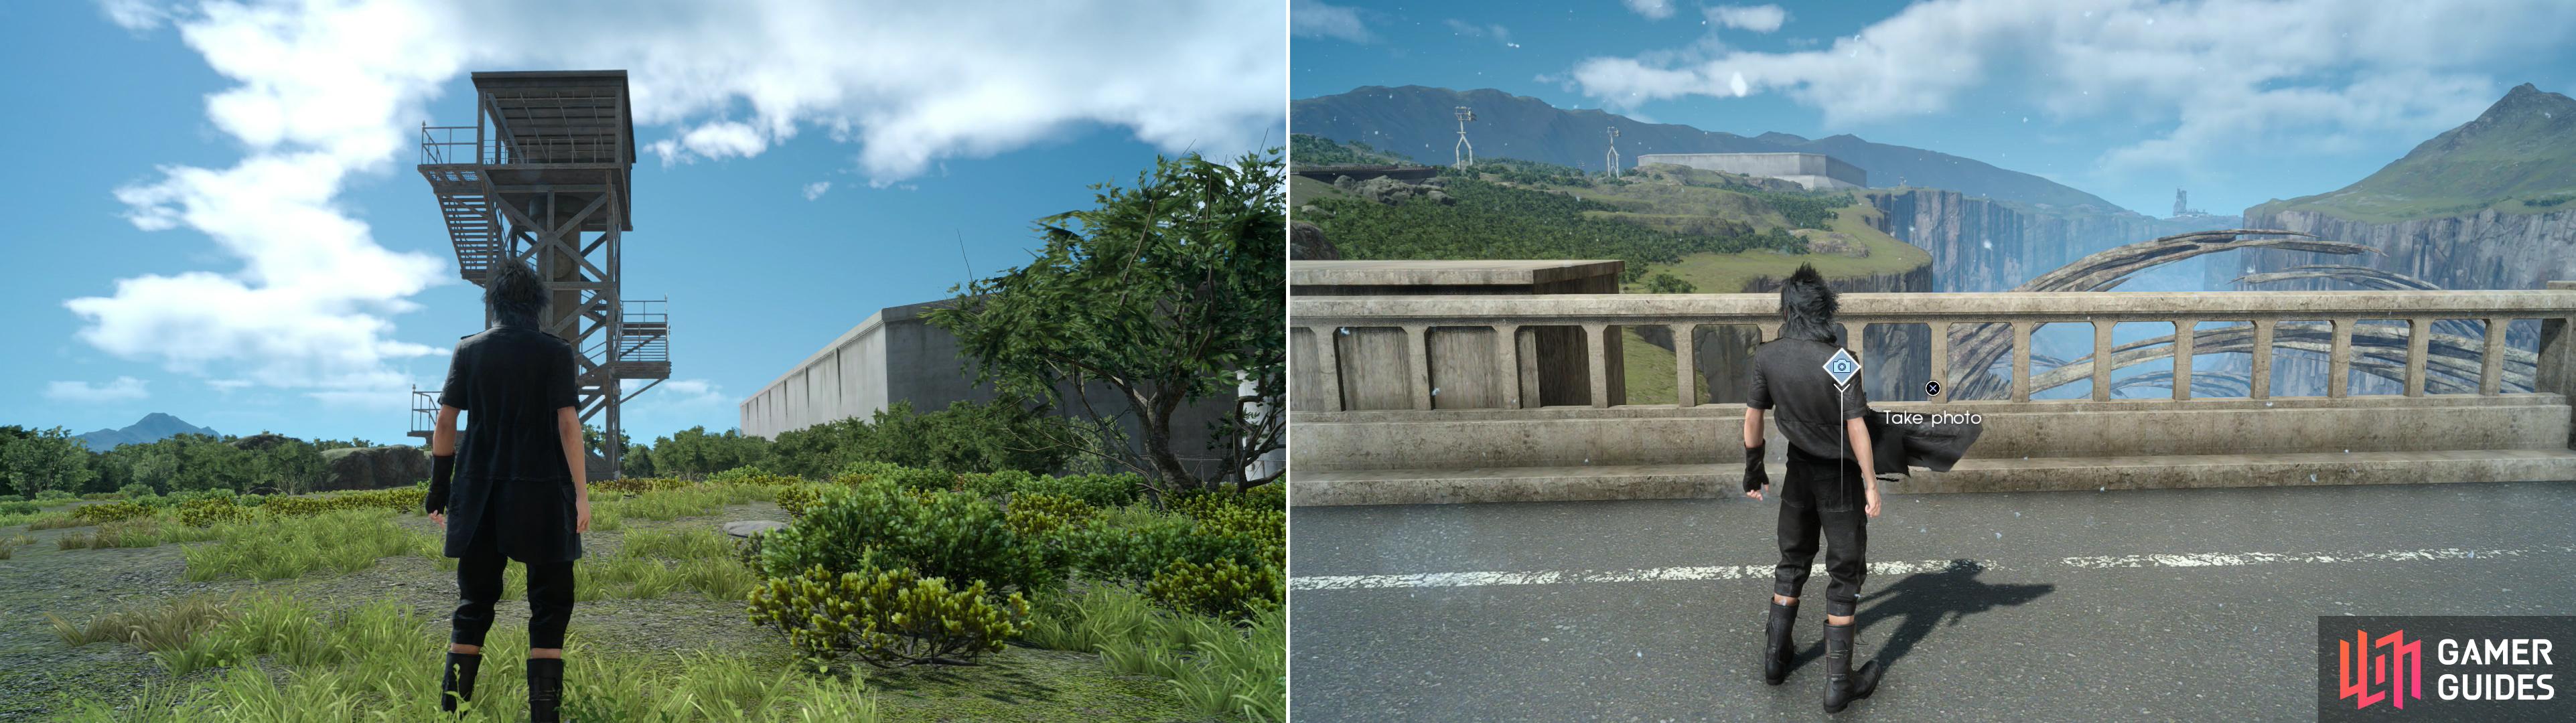
To get the photos Vyv wants, you’ll need to get a photo from a watch tower east of an imperial fort (left) and from a highway to the south (right).
Now it’s time to return to Duscae to complete some quests you picked up in Cleigne. Funny how that keeps happening. Rest up if necessary, as this is going to be another one of those trips that takes you to several places in succession.
Lestallums Finest
When you’re ready, drive to the Quest Location for “Lestallum’s Finest” , which will take you to a point in the road north of the Coernix Station. Disembark and head north-east into the wilderness to find the missing shipment. Unfortunately it’s also attracted the attention of some Garulas, led by a Garulessa. The latter is the real threat, as it has tons of Hit Points and is somewhat high-leveled, but it’s also slow and not dynamic on offense. If you can avoid provoking the Garulas, that’ll make this easier, but laying into them with magic (they’re weak to fire) and circling around the ponderous beasts to perform blindside strikes won’t hurt, either. Cull the herd, then pick up the shipment, which will enable you to return to Takka with your head held high… well, after you return to the Furloch Farms stall in Lestallum and confer with its proprietor.
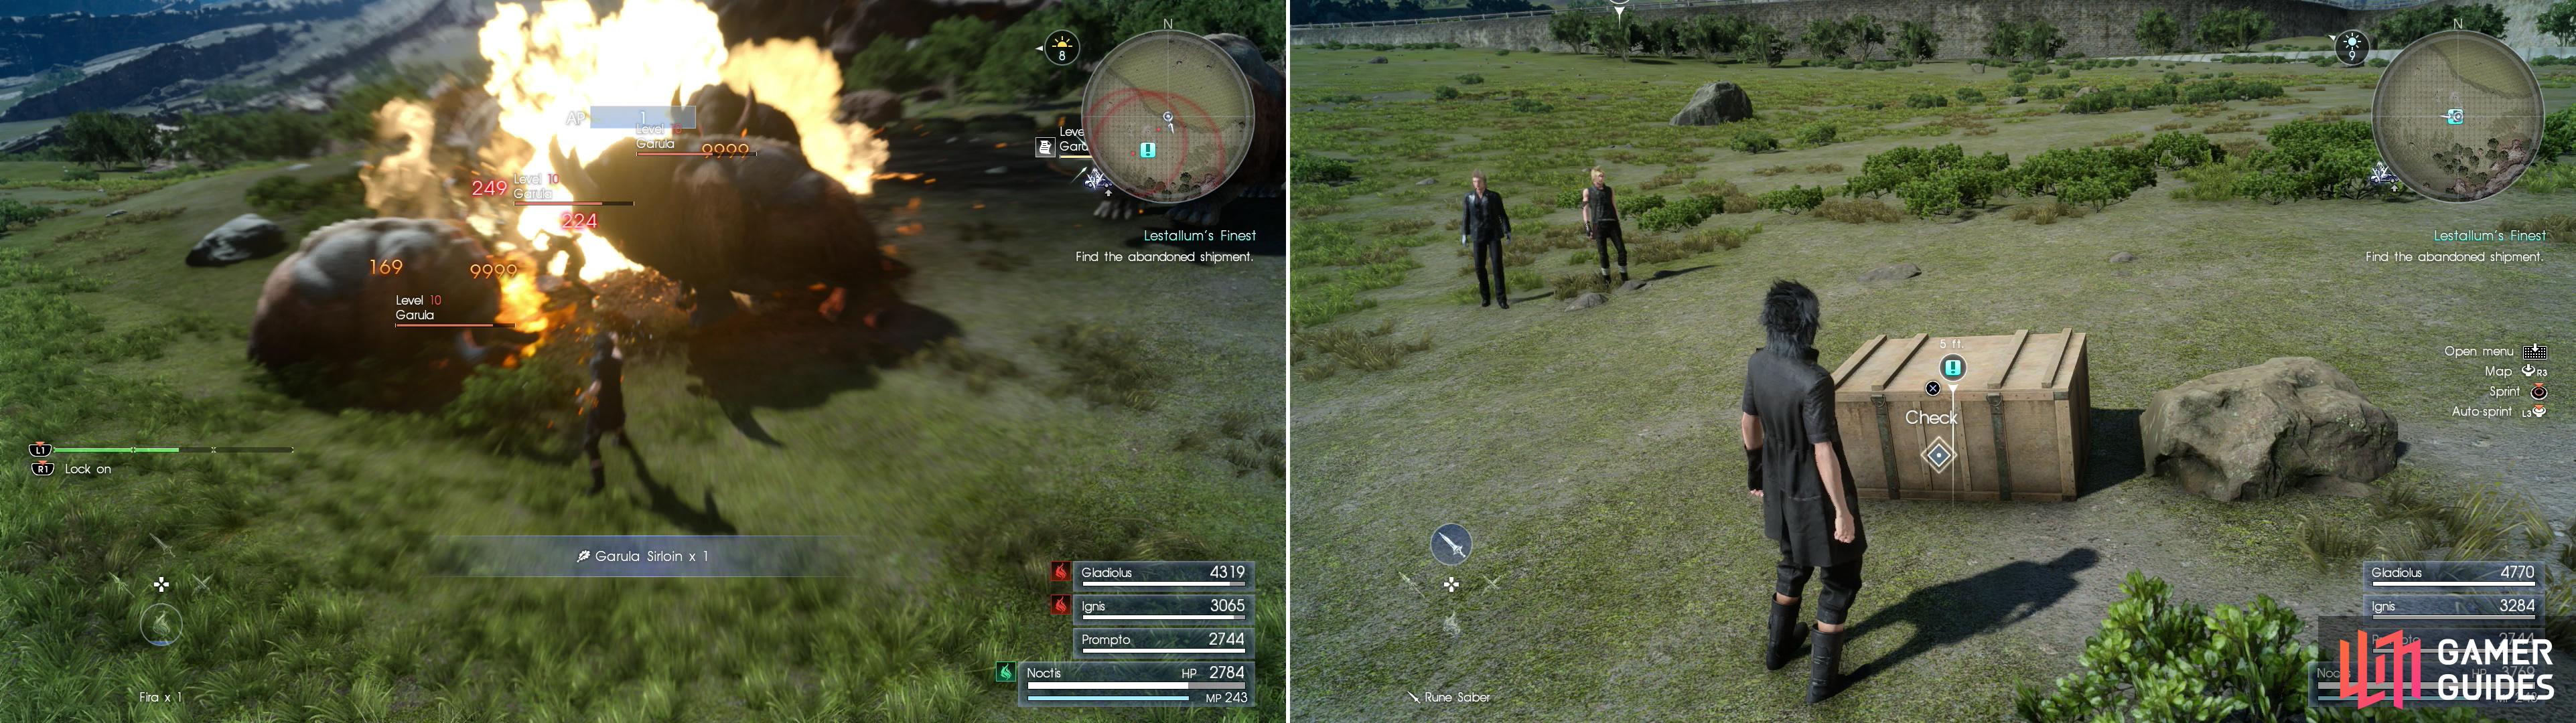
The Garulas near the shipment can be avoided, or can be evicted with some fire magic (left). Either way, claim the shipment to appease Takka (right).
Vegging Out
Next quest is another simple one, drive to the Quest Location for “Vegging Out” and you’ll make your way past the Cauthess Rest Area before coming to a stop along a highway to the south. Leave the Regalia and make your way west through the forest, past a fenced-off radio tower to find a Food Spot. Near the Schier Tumeric Food Spot you’ll find the object of your employer’s desire - an Aromatic Root .
| Objective | Reward |
|---|---|
| For harvsting an Aromatic Root | EXP 3,000 |
Of Gods and Kings
Once you’re done with that easy quest, it’s time to make your way to another one. Drive the Regalia to the Quest Location for “Of Gods and Kings” which will take you to a three-way fork south-west of The Fallgrove Parking Spot and the Oathe Haven Campground. Continue south-west through a breach in the guard rail and follow a path which leads you right to The Tomb of the Tall. Clear out any beasties nearby, then snap two pictures, one of the arch outside, and one of the tomb itself. If you’re hoping to gain a Royal Arm from this, however, you’re going to be disappointed. Head inside the tomb and read a note on the sarcophagi to learn that daemons have taken the greatsword Royal Arm to Costlemark. Drat.
| Objective | Reward |
|---|---|
| For taking pictures of the Tomb of the Tall | EXP 2,500 / Gil 12,500 |
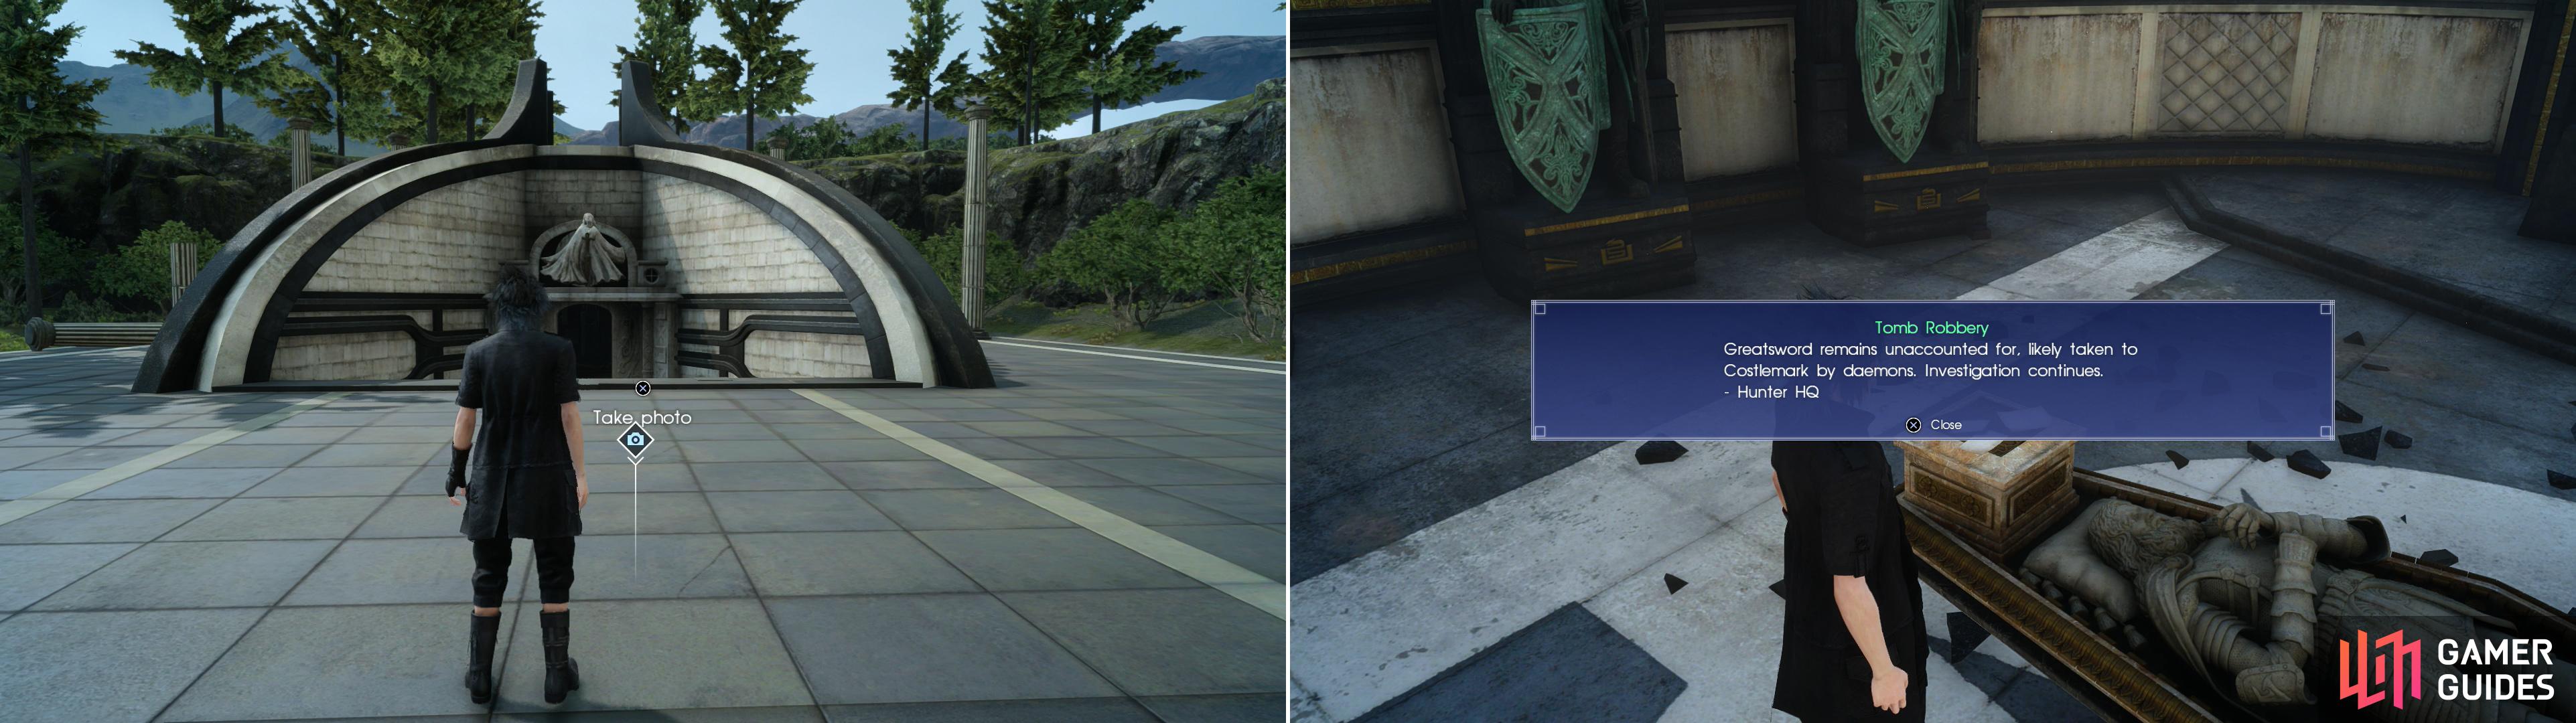
Find the Tomb of the Tall south-east of the Cauthess Rest Area (left). Sadly, the Royal Arm inside has already been plundered… (right).
More Lestallum Labors IV
Now that those quests have been dealt with, it’s time to return to Lestallum for your rewards. Vyv unsurprisingly has another quest for you, “Vyv’s Volcanic Inspiration” , which tasks you with getting a photo from the top of the Rock of Ravatogh. That’s another quest further out west, making it a seriously appealing prospect… for a later date, anyways.
Next return to Furloch Farms and tell the stall’s proprietor that you recovered the misplaced cargo, which will allow you to advance “Lestallum’s Finest” . Afterwards, be sure to talk to him again to give him Aromatic Root you did almost no work to obtain. This finally complete his quest line and earns you a discount at his shop. Score.
You can also return to Takka now and give him the goods he sent you to Lestallum for. He’ll tell you a brief story about his own past after accusing you of the same rough living before forking over your reward.
| Objective | Reward |
|---|---|
| For helping Takka shoppa | EXP 2,000 / Griffon Breast x2 / Saxham Rice x5 / Schier Tumeric x 5 |
Takka will eventually offer up the quest “A Meat Most Magnificent” , which requires you to complete the hunt “Marsh Madness! The Giant Awakens” by killing a Catoblepas. Obviously, this will be put off for later, as a level thirty-eight beastie might not be within your means just yet. It should also be noted that you’ll need to have reached hunter rank four to even take on this hunt, so… you know, go do hunts, earn stars, level up your hunter rank. It’s a good source of Gil, at the very least.
And with that you’re done with side quests for now. There are still a few outstanding quests left, but you can’t access the Vesperpool yet, and there’s no need to slog through The Rock of Ravatogh dungeon. All that said, you’ve gained a great haul of experience, Gil, and perhaps a mighty new weapon. All in all, if you were diligent about completing side quests up until this point the next bits of story are going to be fairly easy. Anyways, time to move on to the quest “The Sword in the Waterfall” .

 Sign up
No Comments