

After your not-date with Iris you learned from Talcott about some local legend claiming there’s some sword behind a waterfall in Cleigne. Sounds like it could be just the sort of thing you’re looking for. Before moving out, note that the level of the main quest is nineteen, so if you feel you are under-leveled check out the previous sections detailing side quests you can do around Cleigne and Duscae. They should be more than enough to get you the experience and Gil you need to overwhelm anything that might come between you and whatever treasures are hidden behind this waterfall… especially if you multiply your gains by resting at inns for that juicy 1.5x experience multiplier.
Burbost Souvenir Emporium
Once you’ve done what you need to do, it’s time to move on to the main story. Instruct Ignis to drive you to the Quest Location for “The Sword in the Waterfall” (or drive yourself) and you should reach the Burbost Souvenir Emporium outpost. This is a humble outpost, consisting only of a Caravan you can use to rest in, a Rent-a-Bird, and of course, the Burbost Souvenir Emporium shop itself. Pick up the Key Item Iron Shelf Recipes, Vol. 3 to teach Ignis the “Taelpar Harvest Galette” recipe. Other than that, however, there’s little of interest aside from a few new soundtracks and decals.
Burbost Souvenir Emporium (Items)
| Item Name | Price |
|---|---|
| Potion | 50 Gil |
| Hi-Potion | 100 Gil |
| Elixir | 400 Gil |
| Hi-Elixir | 800 Gil |
| Phoenix Down | 1,000 Gil |
| Antidote | 10 Gil |
Burbost Souvenir Emporium (Treasures)
| Item Name | Price |
|---|---|
| Sabertusk Claw | 180 Gil |
| Garula Tusk | 280 Gil |
| Mesmenir Horn | 320 Gil |
| Scaled Skin | 480 Gil |
| Anak Fetlock | 600 Gil |
| Anak Antlers | 1,800 Gil |
| Behemoth Horn | 5,000 Gil |
Burbost Souvenir Emporium (Auto Parts)
| Item Name | Price |
|---|---|
| Royal Stripes I | 500 Gil |
| Royal Stripes II | 500 Gil |
| Memories of FFXI (Disc 1) | 100 Gil |
| Memories of FFXI (Disc 2) | 100 Gil |
| Memories of FFXI (Disc 3) | 100 Gil |
| Memories of FFXI (Disc 4) | 100 Gil |
| Memories of FFXI (Disc 5) | 100 Gil |
Burbost Souvenir Emporium (Leisure Goods)
| Item Name | Price |
|---|---|
| Spider Silk | 30 Gil |
| Super Baleen | 100 Gil |
| Dragon’s Beard | 500 Gil |
| Hot Breather: Red Dragon | 50 Gil |
| Hot Breather: Green Dragon | 50 Gil |
| Hot Breather: Blue Dragon | 50 Gil |
| Whiskers: Pearly Moogle | 50 Gil |
| Whiskers: Crystal | 50 Gil |
| Whiskers: Chocolate | 50 Gil |
Burbost Souvenir Emporium (Key Items)
| Item Name | Price |
|---|---|
| Iron Shelf Recipes, Vol. 3 | 1,000 Gil |
| Objective | Reward |
|---|---|
| For indulging Prompto | EXP 300 |
When you’re done shopping, venture south-west from there to find some stairs leading down from the highway to the wilderness below, where you’ll find a path that continues downhill to the south-west. Follow it until you reach the banks of a river, where a rather nasty beastie lurks - the Midgardsomr. This big snake is almost certainly more powerful than you are right now, being capable of inflicting massive amounts of damage with its physical attacks, not to mention its ability to envenomate unlucky opponents.
If you take it on, Star Pendants come advised, and Ignis’s Regroup ability will be a life-saver. Oh, and don’t forget that Warp Striking is the key to staying alive in this fight - Warp Strike in and attack the beast’s head, then retreat, Warping out of trouble when necessary. If you can defeat the beast you can search the end of a triangular peninsula to the south to find a Treasure Spot, which yields a Dynamo - component required to upgrade the Bioblaster… but chances are you’ll want to just run past the Midgardsomr.
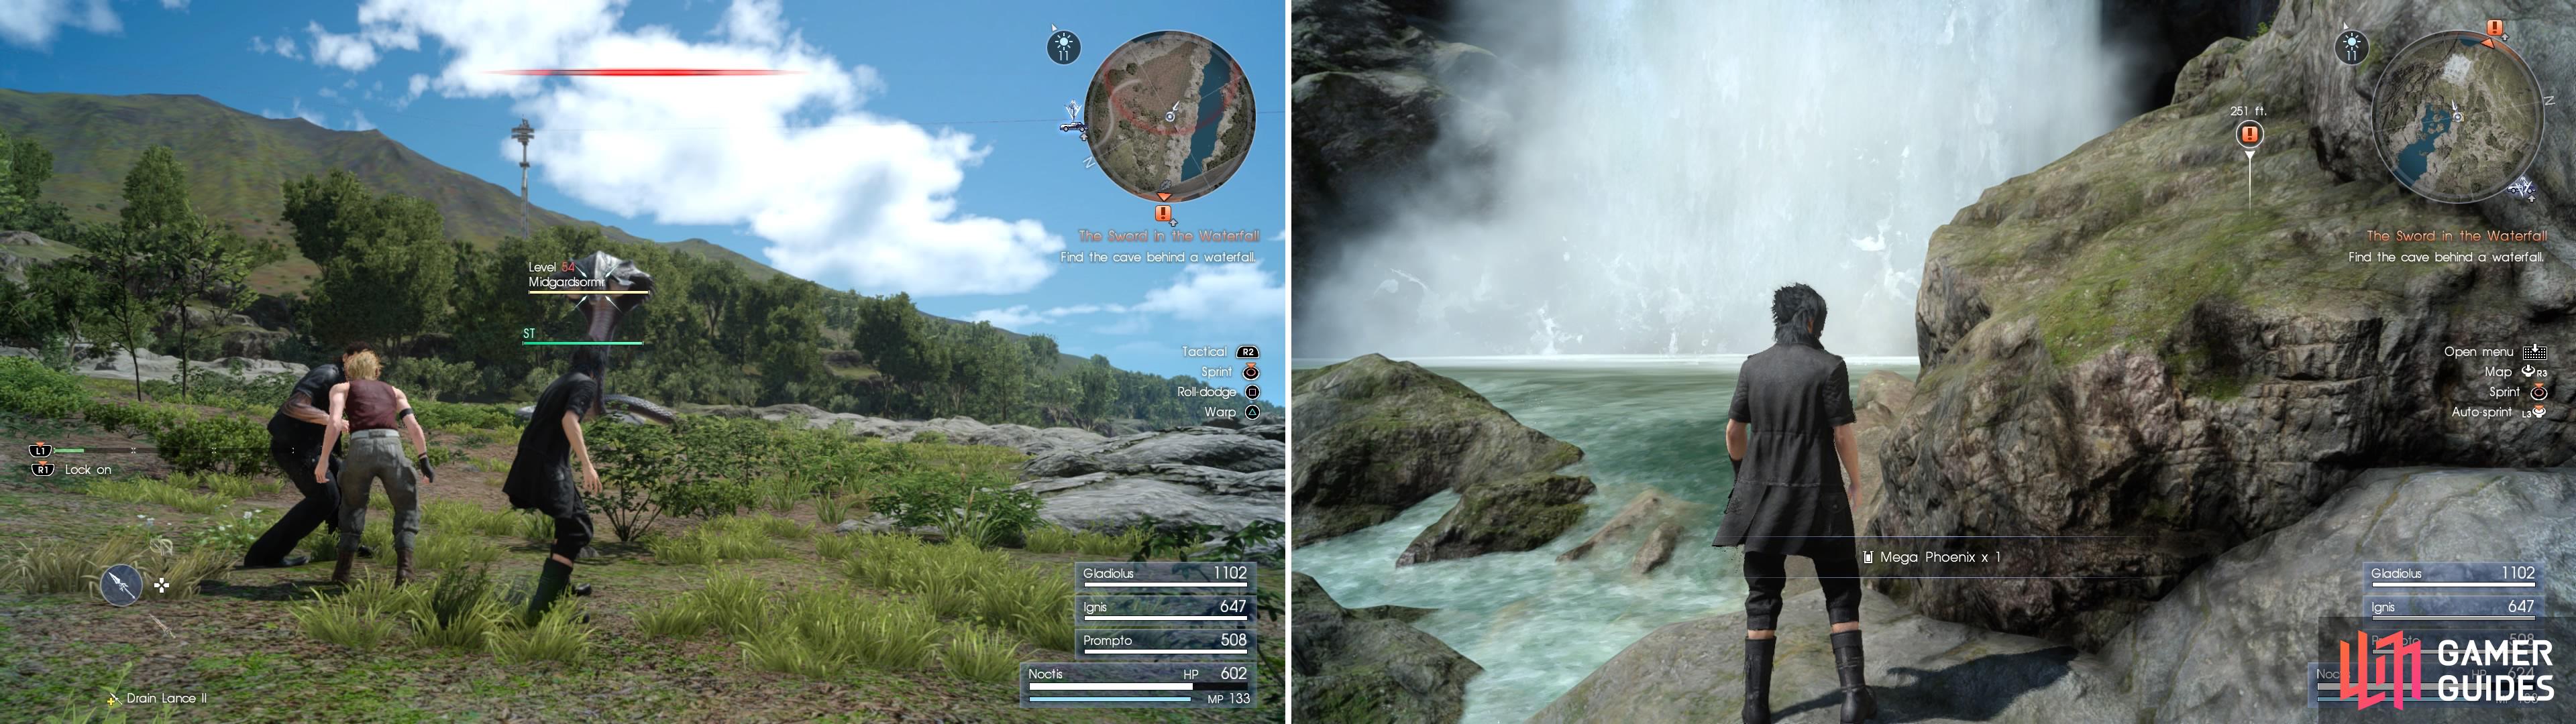
As you stroll towards the waterfall, you’ll come across this Midgar Zolom lookalike (left). Leave quickly! Snag the Mega Phoenix (right) just before you enter the cave.
Fight - more more likely, run past - the Midgardsomr, making your way north-west along the river. Your path isn’t entirely clear even once you make it past the snake, however, as some Shieldshears (giant crabs) lurk along the rocky shore of the river. Crush them, then continue along the shore of the river, jumping over a rock that attempt to obstruct you, to find a Treasure Spot (Mega Phoenix) , which might prove useful after that encounter with Midgardsomr. Once done, head up the nearby ramp to reach the waterfall. A friendly blue sign names the place “Callatein’s Plunge”, but the dungeon behind the waterfall - Greyshire Glacial Grotto - is of somewhat more interest.
Greyshire Glacial Grotto
Enter the cave and make your way west a bit and search the south-western corner of the first chamber to find a loot spot (Fossil Shell) . A little ways past that you’ll encounter the first enemies of the dungeon, Flans. These things are resistant to physical attacks and are only weak to Holy, which you don’t have yet, but they don’t have much in the way of health, so they shouldn’t be too much to handle. As you reach the end of the path, jump down an icy chute and slide all the way to the bottom, where you drop in on some Imps.
After vanquishing the daemons search the eastern end of this icy chamber to find a loot spot (Potion), then carry on down the path to the west. As you’re climbing up an incline keep your eyes turned to the south to find yet another loot spot (Rusty Bit) on a ledge, then continue on until your path is interrupted by yet another ice chute. Ride this one down to its painful conclusion and you’ll find yourself in the presence of an Arachne, which is now just a regular enemy. Poor thing.
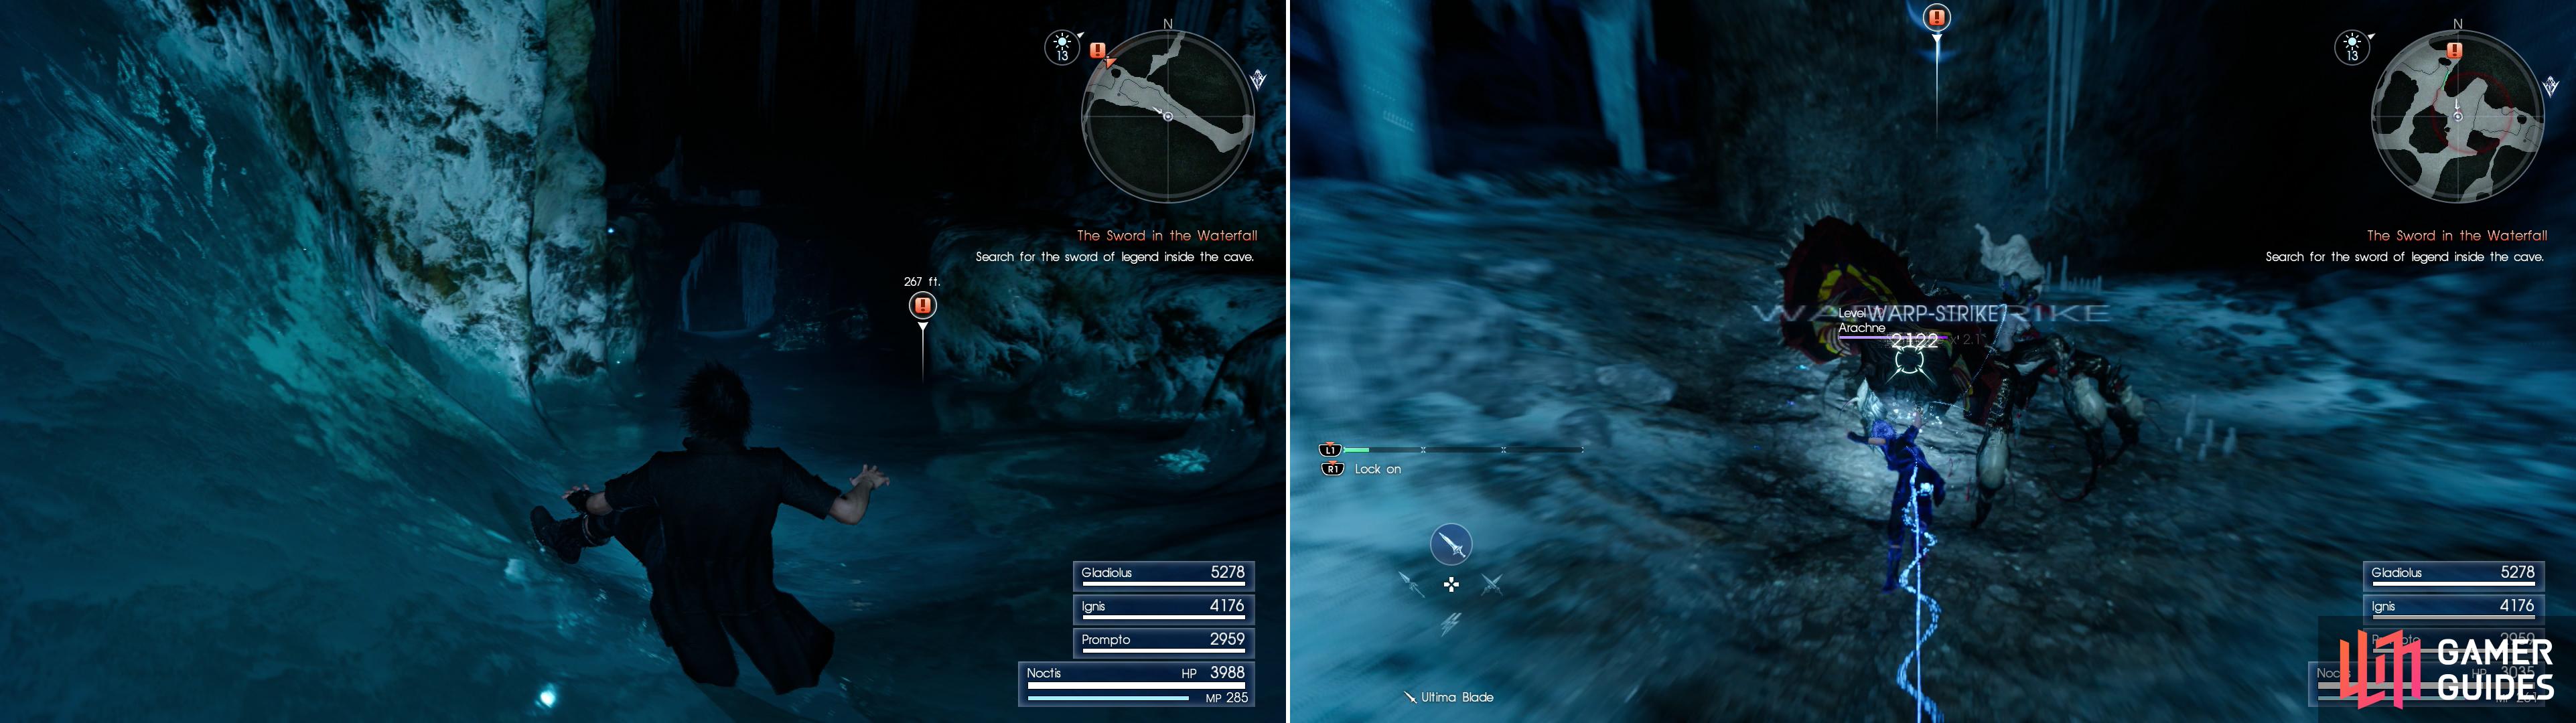
Icy chutes will provide dangerous paths deeper into the dungeon (left), at the bottom of which you’ll encounter an Arachne (right), now a common foe.
Kill the spider-woman and note the ledge to the north-west. North, north-east of this ledge is a narrow shelf you can sidle across, which will allow you to proceed further into the dungeon (this is marked with a green line on your map), but first, there’s some loot to be had. From where you fought the Arachne head south-west until you reach an ice elemental deposit. At that deposit turn east, south-east to find a loot spot (Hi-Potion) .
Continue south-west until the fork splits, with a path continuing up to the south-west, and another leading down to the north-west. Go north-west first and kill any Imps that pop up to annoy, then continue north-west to find a loot spot (Star Pendant) . Another dead-end loot spot awaits you to the north-east (Fossil Shell) . Claim these treasures, then return back up to slope to where the fork split just past the ice elemental deposit.
Now make your way up the previously-ignored path to the south-west, and keep following it after it doubles back around to the north-east, ultimately you past another trio of Flans. Kill them, then search a loot spot (Potion) to the west, near a large, icy pillar. Kill, loot, then continue uphill to the north-east until you find a low section of wall you need to duck under. Do so, and you’ll find yourself standing back near the second icy chute you slid down.
You may have seen some treasures as you slid down the chute earlier. Now it’s time to claim them. First, head east, south-east to find a loot spot (Carbon Bangle) , then make your way across a natural stone bridge over the ice chute. Once you make your way across to the northern end of the chute, immediately turn east, south-east and pass by another tunnel you’ll have to crawl through to find a loot spot (Ether) .
Grab the Ether, then return back to the low tunnel you can crawl through. Do so, then claim the loot spot (Fossil Wood) in the tunnel beyond and continue uphill to the north to encounter some Imps and a Ronin, the latter of which is an emaciated swordsman who is fond of performing attacks that prompt block and counter opportunities. He’s sturdier than the Imps and Flan you’ve been bullying, but otherwise not much of a threat.
After the fight turn east and shortly you’ll find yourself at another fork. Down the fork to the south you’ll find yourself overlooking the first icy chute you slid down. More importantly, you’ll find a loot spot (Debased Coin) near the edge of the passage, near the chute. The northern fork, however, will take you to a ledge looking into the first chamber of the dungeon. Once again there’s a loot spot (Ammonite Fossil) near the edge of the ledge. Once you have both of these treasures, slide back down the icy chute(s) to return to where you fought the Arachne.
From where you fought the Arachne head north-west, then turn north-east and sidle across the narrow walkway. Once across turn north-west to find a rather out-of-place fire elemental deposit. This area can be a bit complicated, but let’s stick to the loot-and-kill first strategy, then worry about progressing through the dungeon.
First up, head down a slope to the west of the fire element deposit and kill another Arachne and her pet Imps, then search behind a pillar to the south-west to find a loot spot (Rusted Bit) . From here continue north, then west to find a cubby housing another loot spot (Oracle Ascension Coin) . When those treasures are yours, return to the fire elemental deposit and make your way north-east, ignore the elevated walkway to the north-west, and continue down the northern edge of the dungeon to the north-west. Go down a slope and kill another pack of Imps, then continue west, then north to find a cubby containing a loot spot (Friendship Band) .
Now that all the bonus loot in this place is yours, it’s time to press on to the end of this dungeon. Return to the fire elemental deposit and turn south-west to find an elevated walkway. Explore it, but be careful to stay to the left, as there’s a slick patch of ice to the right that’ll cause you to fall off the walkway. This will be a persistent nuisance from here on out. After a short distance an Arachne will drop in, and the risk of slipping off this narrow battlefield is rather high. Squash the arachnid, then search down a dead-end to the south to find a loot spot (Hi-Elixir) .
Continue downhill to the south-west, then north, again being wary of some slippery ice to the right. Past this second icy patch you’ll find that the path ahead narrows. Continue north-east, then north-west and ignore the monsters above you (some Flans and a Ronin) instead following the winding path as it turns south-west and back north-west around some ice, then finally south-west to another dead-end, where you’ll find a loot spot (Ancient Dragon Tooth) . Return to the larger chamber to the south-east and head to the lower area south of the winding path you were on earlier, where you’ll be confronted by another Arachne. Smite her, then turn north to claim a second loot spot (Elixir) .
Backtrack to the fire elemental deposit and from there head north-east, this time turning north-west up the elevated pathway you neglected earlier. Follow the linear path and again avoid the right-hand side of the path to avoid slipping down on some ice. Eventually you’ll reach a lightning elemental deposit, which is useful both as a source of elemental energy and as a landmark. From here turn south-west to find a loot spot (Fossil Wood) at the end of a ledge. Grab it, turn north, then continue north-west along a walkway to reach the elevated ground over the chamber you were in previously, where the Flans and their Ronin buddy await. Defeat them, then very carefully continue south-west, as an icy slope threatens your footing to the left, eagerly awaiting a misstep that’ll send you down to the previous area. Once you make it past this ice, turn north-west to find another narrow ledge you can sidle across leading to the room just before the door to the Royal Tomb.
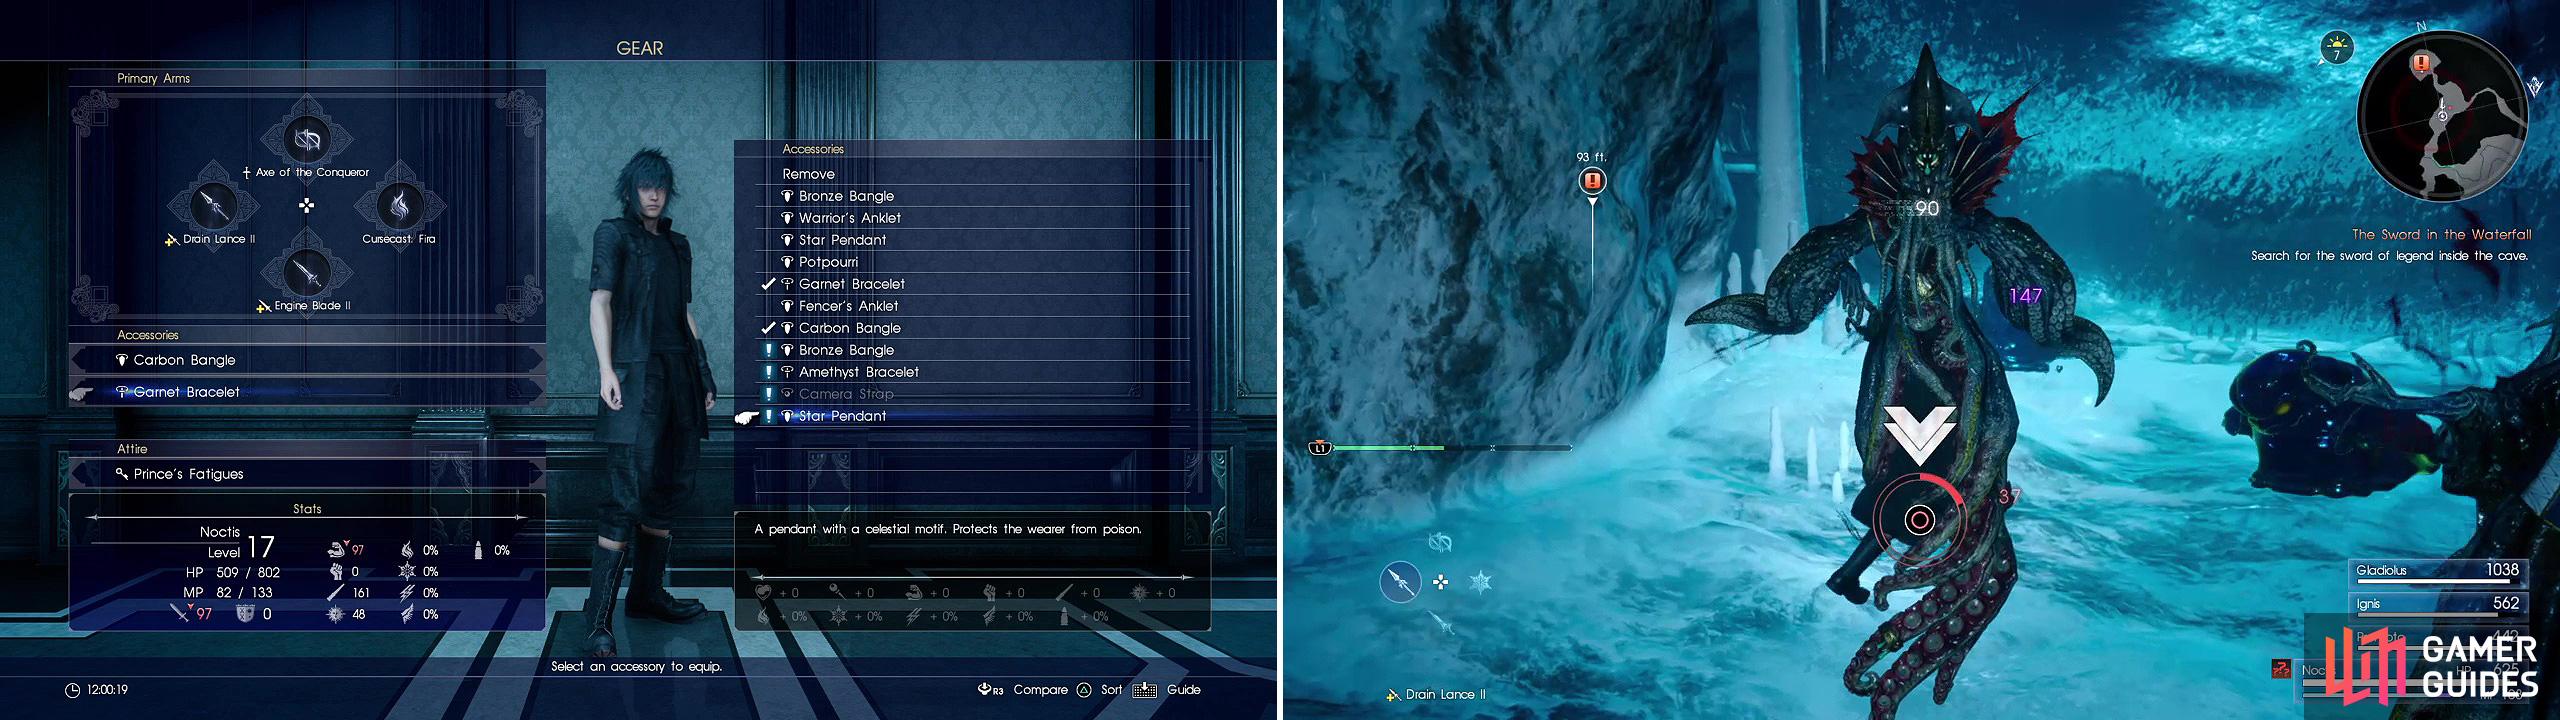
The Star Pendant (left) you find will come in very handy against the Imps here. Later, watch out for the Mindflayer’s powerful grab attack (right).
Just walk on into the tomb and claim your prize, right? Unfortunately, things aren’t quite that easy, as a Mindflayer will show up and bring along some of its little Imp minions. Mindflayers can be highly annoying enemies, as they can inflict Confusion on you and your allies, plus they have a grab attack that is extremely powerful. They are, however, weak to lightning, daggers and polearms, so exploit of those vulnerabilities in helping to take them down. Oh, “them” is mentioned since two more Mindflayers will join the fray, including some extra Flans and Imps, if things weren’t hard enough already. Thundara will serve you well in this fight, as a single, powerful casting can clear out many of the Imps and Flans, allowing you to focus on the Mindflayer(s). Once the final daemon has been exorcised, enter the Royal Tomb and grab the Swords of the Wanderer.
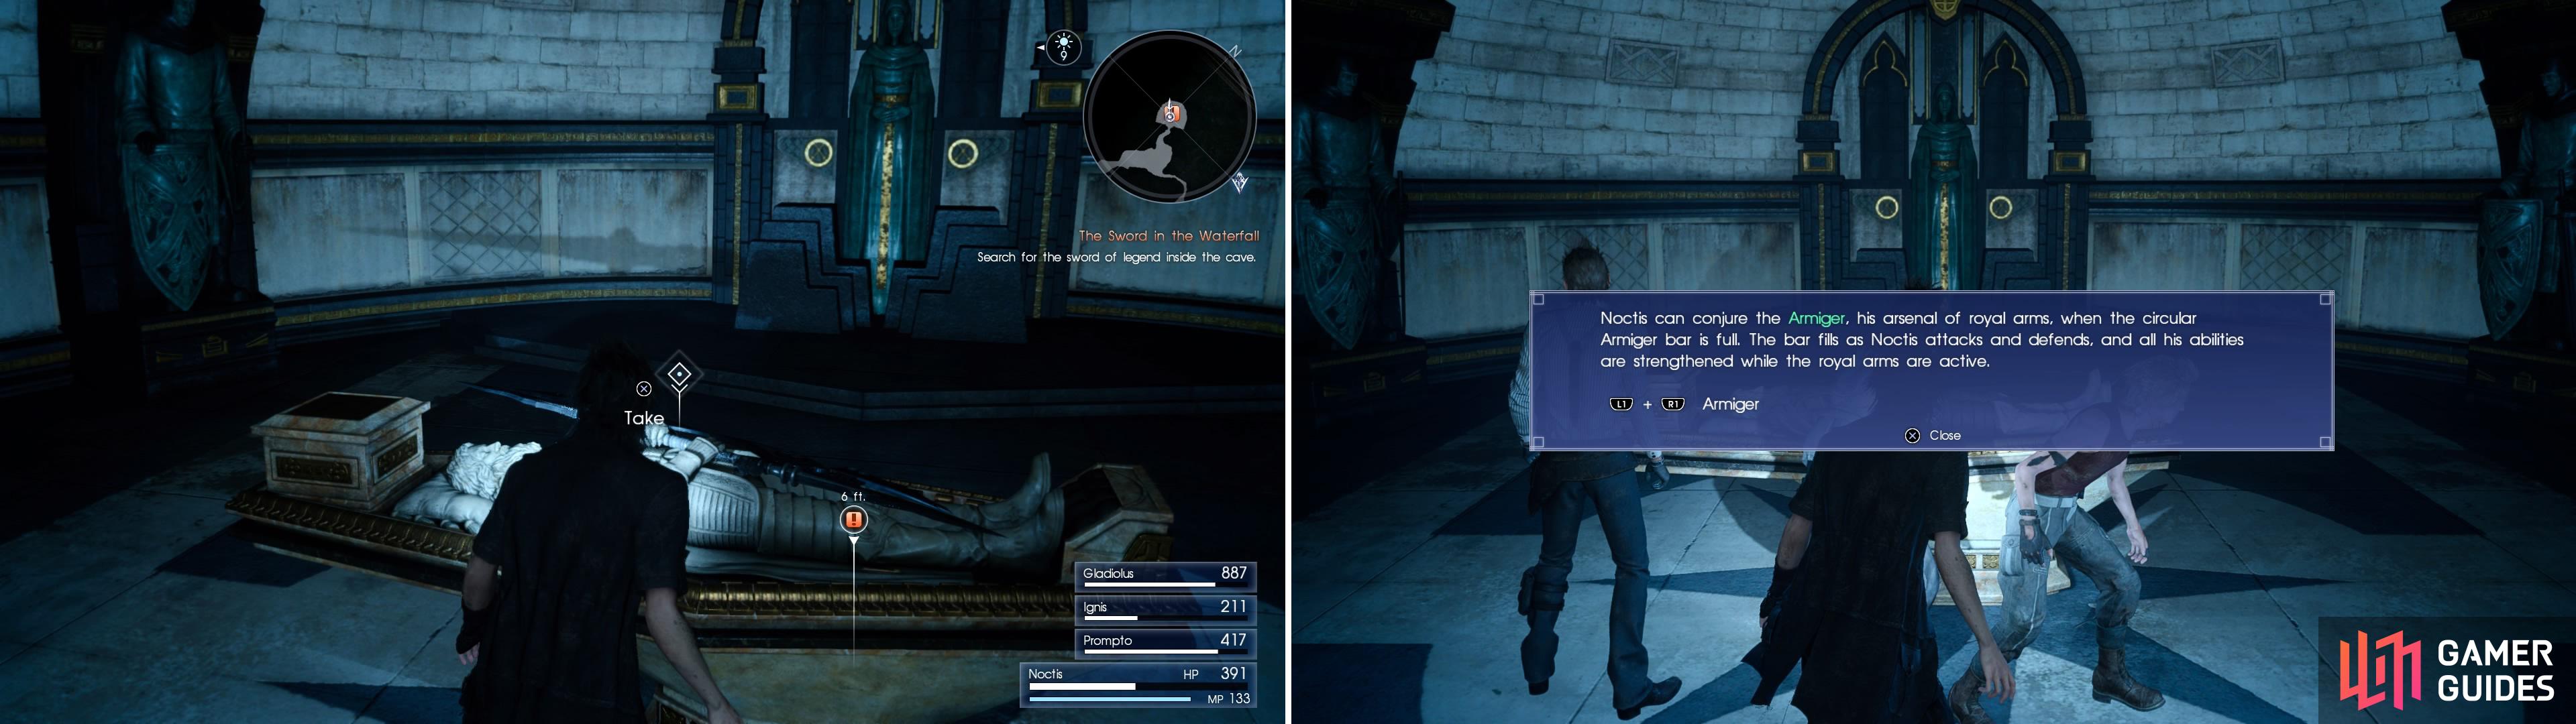
Grab the Swords of the Wanderer (left) after which you will then get access to the Armiger (right), a massive, if temporary boost to Noctis’s power.
There’s nothing else to do in the Greyshire Glacial Grotto (aside from going down a narrow tunnel to the north-east, where a door you can open looms), so when you get the prompt to return to the entrance, take it. You will witness a short scene, with Noctis receiving another headache and vision. Since you likely parked at the closest outpost, make your way back to your car.
| Objective | Reward |
|---|---|
| For finding the sword in the waterfall | EXP 2,500 |

 Sign up
No Comments