
Messing with MyCastle XVII
No new upgrades or buildings this time, but you do have a new character; Shura, who is a LV 10 Adventurer. How did he level up after the last battle? Oh well, he can use bows and rods, making him very versatile in combat, even if his stats aren’t stupendous. And since he actually joined your party, you know he won’t betray you later, right? He also comes with a Beaststone+, which probably will do more good in Kaden’s inventory.
Underground Passage
| Location | Objective |
|---|---|
| Underground Passage, Nohr | Defeat the boss. |
| Enemies |
|---|
| Wyvern Lord |
| Malig Knight |
| General |
| Great Knight |
| Bow Knight |
| Hero |
| Strategist |
| Sorcerer |
| Paladin |
Elise will guide you through the tunnels until, nearing the castle, your protagonist advises her to check out before things get ugly. Not imagining that the entire Hoshidan royal family might have bad intentions for being in Nohr, she goes on to solidify herself as the most naive character in gaming history by suggesting that she can now magically broker peace between the two sides. After reaching a fork, Sakura will challenge Elise for the title of “most naive character in a video game” (seriously, how dumb are these characters?) before another noble shows up. A noble with an awfully violent plan to rehabilitate you.
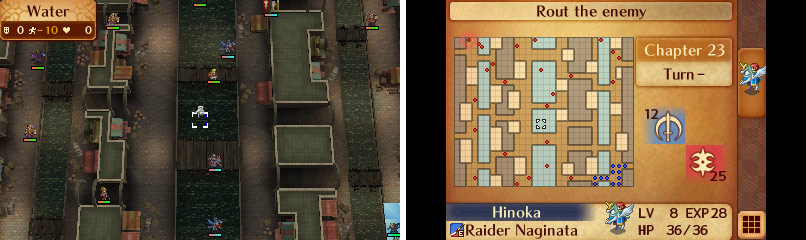
Map of Chapter 23.
You’ll face a varied host of Nohrian units, including many fliers. These are the strongest foes you’ve faced so far, outclassing the ones from last mission. You can’t count on these foes to miss most of the time, or to deal paltry damage when they do it. As usual, match the enemy’s variety with diversity of your own, and given the terrain, bringing around plenty of your own flying units might not be a bad idea. You’re fighting in a sewer, with narrow walkways on either side of three chambers, connected by bridges and short tunnels. The water isn’t impassible, but it will slow units down… yes, even flying units, for some reason. Must be the smell. They’ll still prove doubly valuable if they’ve been promoted to Falcon Knights, as Hinoka and Subaki tend to have good Defense and Resistance, and you’re going to want all the healers you can get!
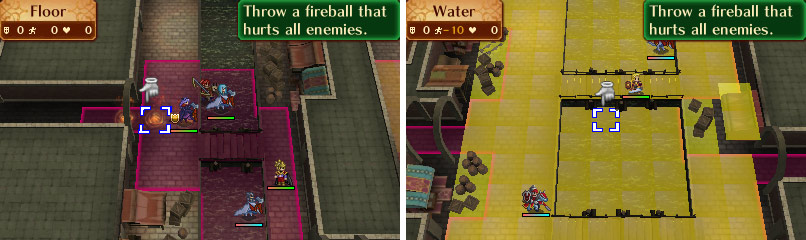
Camilla can, and will, use these Dragon Veins to lay the hurt on you. Play defensively and take your time.
Adding to navigation troubles and bottlenecks, Camilla happens to have a trio of Dragon Veins in front of her. Funny how she always seems to end up with those. Anyways, each of these three different Dragon Veins will “Throw a fireball that hurts all enemies” down one of the three corridors, and this damage isn’t a light poke like environmental effects have been so far; it’ll do around ten damage per shot. She’ll do this every other turn, and constantly weathering it with a large number of units just isn’t feasible. You’ll need to split your forces up and take shelter in the four corridors connecting the larger chambers, each of which can hold four units save the corridors between the middle and western chambers, which only hold three.
This will obviously limit your offensive potential and slow things down, but it’s the lesser of two evils. Just be sure you look ahead to see what enemies are likely to attack you, and lead with a unit that can counter said unit; match ranged with ranged, physical damage units with high Defensive units, magic damage units with high Resistance units, and remember the weapon triangle! As suggested earlier, bringing along Falcon Knights isn’t the worst plan you can have for this battle, as they’re fast, they can heal, and again, they tend to have a good combination of Defense, Resistance and Evade rate to plug the corridors and weather Norhian attacks. Just keep them away from archers, and of course, be sure to withdraw injured units from the fight so they can be healed.
As a change of pace for this map, you’ll need to play defensive at times; as many enemy units aren’t going to wait around for you to lure them to their demise, and Camilla’s constant barrages will also force you to move. Seek shelter and let the enemy wear themselves out on you in the corridors, making opportunistic ventures out and performing tag team attacks where possible. When the chamber ahead is clear and Camilla is taking a break from blasting fire at you, advance into and through the next chamber into the corridors beyond.
If you can get up to Arthur and/or Effie with your protagonist, you’ll get the “Talk” option, which will prompt Elise to give them stand-down orders, turning them into neutral units. Or you can just beat them up for daring to stand in your way. The only other bit of help you’ll get along the way are the item drops, which include an Arms Scroll , a Master Seal , a Moon Festal , a Sun Festal and 10,000G . That extra healing might come in handy, but you should have brought plenty with you.
Clear out the eastern half of the map, then the middle corridor. After this you should discover that the western units are considerably less aggressive than the ones near the beginning of the level. If you can survive the initial blitz you should be able to sneak over to the corridors leading to the western-most chamber and get to the tried-and-true game-plan of luring weaklings away from the boss.
Whittle the enemy down until you’re left with only Camilla and her paired retainers; Beruka (Wyvern Lord) and Selena (Bow Knight). Despite their different attack ranges, Camilla will abandon her Dragon Veins and start to move out once her retainers attack, so don’t bother with subtlety; rush them and put them down. Any decent melee unit should make quick work of Selena, after which Beruka (who drops a Talisman ) and Camilla (who yields a Dragonstone+ ) will be hard pressed to resist your Falcon Knights (or bow users).
After the battle, everybody will chat, because weaponry doesn’t really do damage in this world, it just fatigues people. Words will replace weapons and resolve an issue that rightly should have been dealt with through diplomacy at the outset. Must have knocked the crazy out of Camilla, or something. The important thing is, one less former sibling in your way, and you can continue on to Garon.

 Sign up
No Comments