

Corrupted Zone
As you went into Brightmarket for the Sunstone Rock quest, you undoubtedly saw a few new quest markers inside of the village. Before you delve into the three quests there, you will want to clean up a few distractions surrounding the area first. Fast travel to the campfire just outside the southwestern exit to Meridian Village, then follow the path to the northwest. As you approach the fork with one path going south/southeast, you will see some corrupted machines to your south.
Everyone’s favorite machine, Glinthawks, will be one of the highlights for this Corrupted Zone, with the three of them being joined by three Scrappers. Since they are relatively easier machines, stick to fire arrows for your main source of damage. The Scrappers are weak enough that they should die from two fire DoTs, but the Glinthawks will take a few more than that, so when they drop to the ground, attack them with your spear.
| Objective | Reward |
|---|---|
| For destroying the corrupted machines | 6,000 XP |
Banuk Figure - I Cannot Confess
From the location of the Corrupted Zone, look to the north on your map to spy a Sawtooth Site. Now, go straight north from that marker to spot the familiar Banuk paintings on the rock wall and some handholds right below them. Climb up and jump right to a first ledge, where you need to get off and follow the short path to more handholds. Ascend to the top with these to find the Banuk Figure - I Cannot Confess .
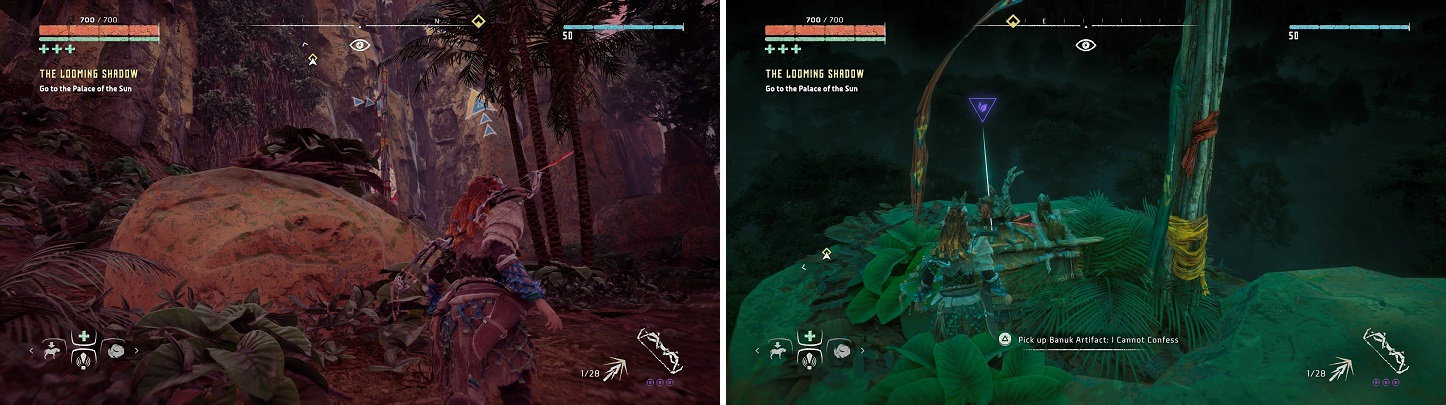
Keep a lookout for the Banuk paintings to find out where you need to start climbing (left) to reach the Banuk Figure (right).
Ancient Vessel - Faro
You’ve grabbed the Banuk Figure, so cross the rope nearby and climb the handholds to the west. When you get to the big hill, look to the northwest to find more handholds, leading to you the main area up above. You will find some Bellowbacks and Sawtooths in this area, so it might be a good idea to take care of them before you go looking for the Ancient Vessel. Once you do, from where you climbed up, go northwest and cross the bridge to your west. There will be a zipline right there that goes back to some stone structure, where you’ll find the pile with the Ancient Vessel at the base.
Sun and Shadow
With that out of the way, fast travel to Brightmarket and find the sidequest that starts from a guy on a bridge. His name is Lahavis and his daughter is missing, or possibly dead, as he seems certain she drowned or something. She was last seen in the garden, so you should start tracking her location over there. Go east, then north across another bridge, and run up the stairs right there to your right to the find garden close by. There are three items to scan with your Focus – a shovel, a bottle and a spyglass – so do that and then examine each one.
This will now put a trail in the game, which is something you have done a million times now, so follow this across the bridge with Lahavis and out the northwest corner of the village. You will come to a small dock, so investigate the one pillar to find some rope that was used to tie up a missing boat. This will send you out to an island in the middle of, supposedly, a big lake or something. From the dock where you found the rope, swim northwest to the island.
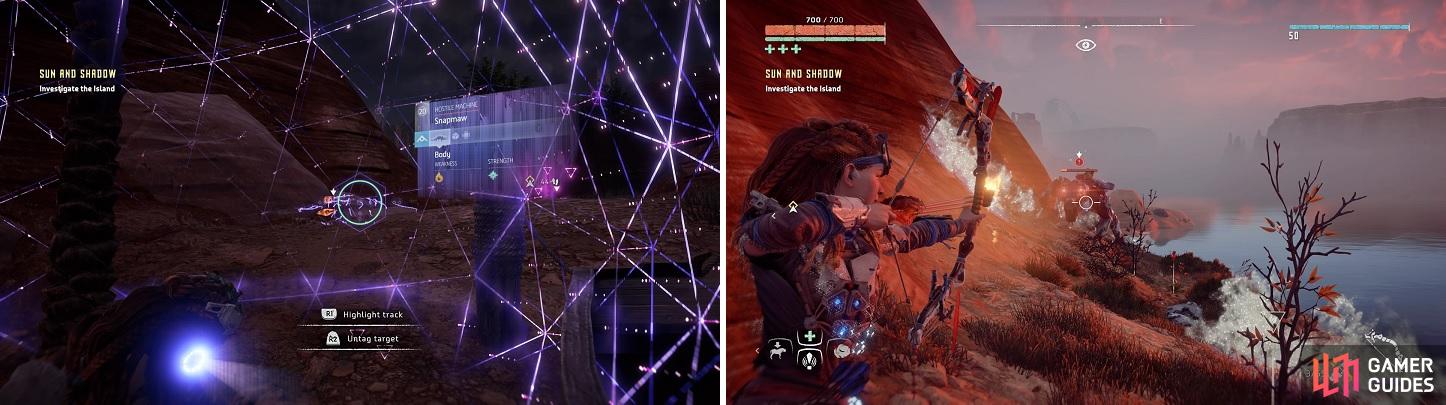
When you arrive on the island, look out for a Snapmaw (left). Fire arrows work well on them (right).
As you reach the shore of this island, look through your Focus and you will spot a lovely Snapmaw. Naturally, before you can do any proper investigating of this island, you will need to get of it, so break out your fire arrows and go to town. Once it’s dead, head into the inside part of the island to hear someone screaming, who turns out to be Elida, Lahavis’ missing daughter. Speak with her to see she’s acting a little strange, so investigate a little bit more. Specifically, look near the campfire to find two bedrolls and some cups, indicating that Elida was here with someone else.
Talk with Elida again to learn of Atral and that he didn’t come to meet with her. She will return to her father, as long as you go and see where Atral is. Swim west from the island to the signal fire, where you see there was some sort of scuffle. Highlight the trail and follow it north to a Shadow Carja fortification. As you get closer, you learn they are holding and torturing Atral, because they think he’s a spy. There will be two guards at the front entrance, so unless you want to risk alerting the entire fort, it’s best to find another entrance.
Go south and down the western wall, until you find some handholds on the wall. Before you climb, it’s a wise idea to mark the enemies inside so you know where they are at all times. Climb the wall to the last handhold, then wait for the patrolling guard to pass before climbing up and Silent Striking the one guard. Now, the patrolling guard might see this body, but he might not, but he needs to die next. You can probably shoot the guard on the opposite side of the wall, then find the door on the southern side up here to enter the fort.
Sneak down some stairs and be aware of one final guard you will want to kill, who is easy enough for a stealth kill. Once this is done, enter the room with Atral and speak with him. When this conversation is over, leave via the way you came in, drop back down the wall at the top and fast travel back to Brightmarket. Have a short chat with Elida, who’s at the garden and includes a Flashpoint choice, then return and speak with Lahavis to finish the quest. You can listen in on their conversation if you wish.
| Objective | Reward |
|---|---|
| For finding Lahavis’ daughter | 5,000 XP |
Suns Judgment
Back in Brightmarket, go to the northern end of town to find a fruits merchant named Gulahni, who tells you that someone has been stealing her goods. She says to start looking at the storehouse, which is the big building to the south with the open doors. There’s a barrel inside, so check it out to get some tracks, leading out the northern door and to the west. It will then lead south out of the village, then west once more along the mountains.

The barrel in the storehouse is your first clue (left). Later on, you’ll need to use your Focus a lot in tracking down the fruit trail (right).
Eventually, the trail will stop and if you look with your Focus, you should spot some discarded fruit. This will put you on another trail, except that you can’t track it without using your Focus, so you need to keep looking with it to find where you need to go. It will lead to the southwest, to some abandoned shack of some sorts, then southwest even more. When you see a bunch of boars, look around for the food pile, then examine it to find more footprints. Continue west, then northwest and up some handholds.
Climb up to a zipline, where there will be a short scene showing off what is presumably the fruit thief and some Glinthawks…yay! You should be able to hit them from the top of the zipline, but it’s best to get down to where they’re at to give yourself more room. After killing them, you see that Dekamin is nowhere to be found, but he luckily left a blood trail for you to follow. West/southwest is where you need to go, leading to Dekamin and all of the fruit he has stolen. Talk to him and the quest will end.
| Objective | Reward |
|---|---|
| For tracking down the fruit thief | 2,500 XP |
Metal Flower
You should be a little close to another Metal Flower, one that doesn’t really fit anywhere else. If you look at your map, you should be just west of a Stalker Site, so continue going west, across a river, until you hit a small mountain range that extends north and south. Follow this north until you discover a Snapmaw site. Kill or them, as you will run into Metal Flower - Mark II (J) if you just follow the shoreline.
A Curious Proposal
There is one more quest in Brightmarket, so fast travel back and look just south of the campfire to find the person who will give it to you. Fernund has a proposal for you, to hunt down an ancient relic that he has located, but can’t reach. It is located at Dusk Mesa and while you can eventually reach it from Brightmarket, it might be easier to fast travel to the campfire just southwest of Meridian Village. Go straight south from the campfire, bypassing some Striders, and when you happen at a fork, continue west, watching out for some Stalkers.
Watch out for Stalkers while exploring the jungle area.
Continue by going southwest, then south and southwest once more until you arrive at a campfire. From that spot, head straight north to find Dusk Mesa and your quest log should update. Head to the rock wall and activate your Focus, then look up to find an Oseram chest on the ledge. While facing the chest, go to your left and you should find some handholds that will allow you to reach the chest. Examine the chest to find that it was all a trap!
Fermund appears and demands you toss your spear down, or else you will be killed. Of course, he doesn’t realize who he is up against. You have two options either, to either kill the outlanders or escape them. The easier of the two, killing them, involves running across the rope nearby and using that ledge to kill them. They will come in two waves of three enemies each, so you aren’t facing overwhelming odds. After killing them all, you will notice Fermund ran off, no doubt to Meridian Village, so fast travel there. He’s to the northwest of the campfire and will scurry off when he sees you, running around the corner and up some stairs. Speak with him, pick your poison, then that will be the end.
| Objective | Reward |
|---|---|
| For taking Fernund’s proposal | 2,500 XP / +1 Generous Reward Box |

 Sign up
No Comments