
There are still a few more moons you can gather here in the Wooded Kingdom, so start off by warping to the Secret Flower Field Entrance and dropping down into the hole again. No, you won’t have to face another boss here, but rather, you’ll need to bloom some flowers. Once you land, you should notice three circular patterns of buds on the ground. You are going to bloom all of these with your hat, but you only have so much time before they retract into the ground. The best option for this is obviously the Spin Throw technique. Get them all blooming at the same time to get a Power Moon (Make the Secret Flower Field Bloom) .
Back in the main area, travel down to the Iron Mountain Path, Station 8 checkpoint and capture the Uproot. Go by the robot near the flag and look over the railing to spot a thin ledge. Get on that ledge and stretch your legs over the taller one right ahead, then look behind you to spot a nut on the wall, which houses a Power Moon (The Nut that Grew on the Tall Fence) . Return to the previous area and look for the seed robot not too far from the secret flower field entrance.
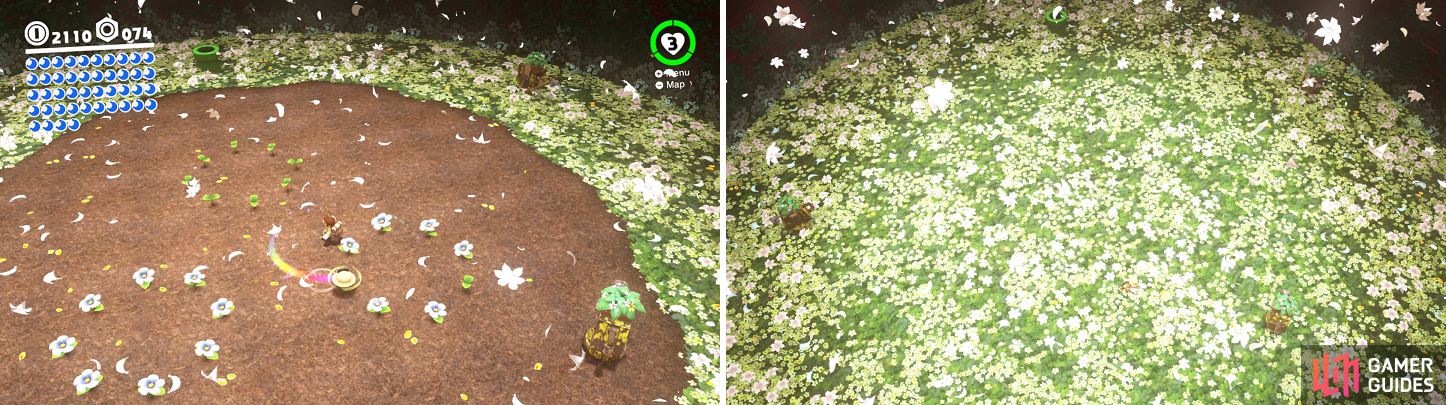
Use a spinning hat throw (left) to bloom all the plants to make a bunch of flowers grow (right).
High in the Clouds
Grab a seed from the robot and look for the P-Switch on the opposite end. Press the switch while holding the seed and quickly make your way to the top, as the platforms here are timed. When you get to the top, touch the flag, put down the seed and toss your hat at the four purple coins (89) . Pick up the seed again and find the planter in which to put it, making a huge vine grow, leading to a new area. Up here, immediately capture the Uproot and get on the blue platform, which starts moving.
Feel free to collect the coins along the way, making sure to nab the three purple coins (92) , and you’ll reach a stable red/green platform. You should see a shadow in one spot, which is a Power Moon in the air, so use the Uproot to reach it (Above the Clouds) . If you missed the blue platform, you can wait, as a new one will come in a little bit. Ride the blue platform to the end and quickly stretch up to grab the Power Moon above the coin rings before the blue platform descends (Walking on Clouds) .
Gliding Along the Trees
You’ll be back on the Observation Deck and you might have noticed before, there was a Glydon up here. You should see a caged area to your west, which you can’t get to now, so ignore it. Capture the Glydon and look to your east, by where the purple coins were up here, to see a lone platform in the distance. Glide your way down there to meet up with Captain Toad (how does he get to these areas), who will hand over a Power Moon (Hey Out There, Captain Toad!) . Before you go into the pipe, glance over to your west to see some spinning platforms, which is where you will be going next.
To get there, warp back to the Observation Deck and capture Glydon again. This time, you will be gliding over to the ledge above the entrance of the secret flower field. Once you manage to get there, follow it and look over the edge until you spot a triangular platform below. At this point, you can ditch Glydon and drop down to this platform. Continue dropping to the south and you’ll reach the spinning platforms you saw earlier. It doesn’t matter where you stand on the first one, but you’ll need to get on top of the second one in order to reach the ledge to the left of that one. It might take a few tries, but you’ll eventually get to the ledge, so go in the pipe and break the nut for a Power Moon (Spinning-Platforms Treasure) .
It’s time for a little bit of clean up, for those miscellaneous things. Return to the area that was full of Goombas and look for a very small hole in the northern wall. It’s small enough that you can only crouch and slowly move into it. This hole will be home to four purple coins (96) . Now, head up one level and grab the Sherm tank and drop off the ledge, which is the area you started in way back at the beginning of the Wooded Kingdom. You’re looking for some brown dirt by a tree near the Odyssey, so use the Sherm to destroy it and nab the Power Moon (Inside a Rock in the Forest) .
The next destination if the Sky Garden Tower checkpoint, which is close to where you fought one of the Broodals. Go into the arena and to the northeast section. Look over the railing and you should spot four purple coins on a platform below you, which will bring you to all of them (100) . Warp to the Forest Charging Station next and there will be a scarecrow on one of the chargers. Toss your hat on it and quickly navigate the platforms before the timer expires to get another Power Moon (Wooded Kingdom Timer Challenge 2) .
If you still have time left on the “clock,” backflip up to the ledge above the previous moon and head to the lone piece of platform sticking up to find a painting. Enter the painting to be brought to the Luncheon Kingdom (or the Sand Kingdom if you chose to visit the Wooded Kingdom before the Lake Kingdom), grab the Power Moon and return (Secret Path to Mount Valbono!) . For the final moon within the actual kingdom, warp to Iron Road: Halfway Point to find another scarecrow. This one will spawn some poles to spin around, similar to the one moon earlier, with the Power Moon at the top (Wooded Kingdom Timer Challenge 1) . Don’t forget to buy all of the stuff from the purple coin shop before leaving, with Sand Kingdom being your next destination.
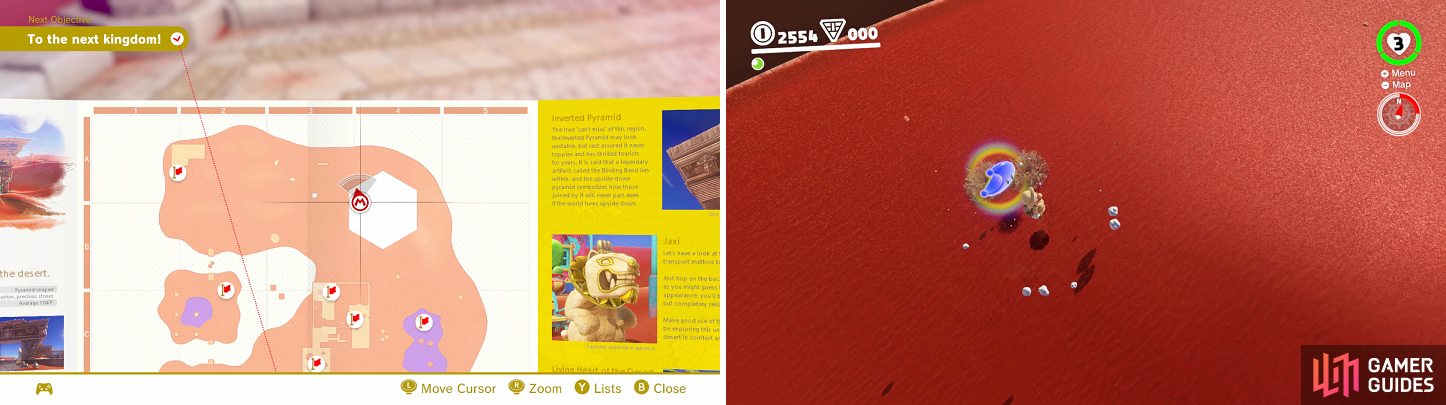
Look for the two bushes along the northern edge of the map by the inverted pyramid for the Wooded Kingdom Art moon.
Found with Wooded Kingdom Art
If you remember the art you found by the Odyssey, it showed the one Koopa Troopa who had you trace a circle back in the Sand Kingdom. The picture above the Koopa Troopa is of two small bushes and if you look in the upper right corner, the compass is pointing to the north. Despite the idea that the moon might be close to the Koopa Troopa, it is not. In fact, it’s pretty much found straight north from the Koopa’s location, near the northern edge of the map. Look at the inverted pyramid on your map and the bushes will be right by the northern tip. When you find them, pound the ground right in front of them to get the Power Moon (Found with Wooded Kingdom Art) . Set off for your next destination, the Metro Kingdom.

 Sign up
No Comments