Suddenly, Link hears Tetra’s voice, despite the fact that she isn’t here. He pulls out the Pirate’s Charm, which Tetra slipped into your pocket before the launch. She apologizes for the accident, then explains how to use the charm.
Begin by climbing the staircase, covering yourself with a barrel as you go. At the top of the staircase are searchlights. Have Link walk forward when NOT in the light. When he IS in the light, touch NOTHING - you will be sent to a prison.
Speaking of the prison, to get out, break the large jar on the shelf, then crawl through the hole to get out. Refer to a later section of this area to see how to proceed from there.

Anyhow, once you get to the top of the staircase, look to the right. There is another staircase there. Climb up it to the much-safer second floor. Once you get to the covered hallway, don’t go into it, but look to the right. There is a ladder nearby. Climb up it to get to a searchlight station.
Running it is a Bokoblin. As you have no weapon, defend the enemy’s attacks with R (you still have your shield, after all). After a few strikes, the stick should fly out of the Bokoblin’s hands. Run over to it and pick it up. Press B to swing it a few times and kill the Bokoblin. Once you do, the searchlights will no longer be focusing on the fortress, but the sky instead.
Now, go back to the covered hallway. Go through the door to the right. In the room is a chest, but a gap is between you and the chest. Swing on the lantern like you did with Niko to get across. Open the chest to get a Dungeon Map, which shows all of the rooms in the current dungeon. Swing back across and use the unused door.
You’ll end up in another covered hallway. Through the gap to the left is another ladder leading to another searchlight station with a Bokoblin with it. Use the strategy from before to redirect the lights. Go to the covered hallway and continue going through unused doors on the floors until you either reach a set of Moblin patrols or the third searchlight.
If you reach the Moblins, sneak past them by using the barrel as a cover - if they see you move while in the barrel (or see you at all outside of it), you will be sent to the prison. Get past them if needed, then continue along the path until the third searchlight. Redirect lights as you did before, then go back to the Moblin-patrol room I mentioned a bit ago.
Use the barrel as previously mentioned to get past the Moblins, then through the door at the back of the room.
Head up the nearby staircase. At its peak, you’ll find a barrel. Pick it up to conceal yourself - another patrolling Moblin is nearby. As before, if he spots you move while in the barrel (or AT ALL outside of it), you’ll go back to the jail cell. Carefully make your way past him, then past the left corner. After passing the corner, you can toss out the barrel.
Continue up the path until you reach what seems to be an impossible jump. Instead of jumping, face the wall and hold A to sidle along it. Along the gap, beside the wall, is a small ledge you can sidle along. You’ll have to do this again after getting across and going a short distance.
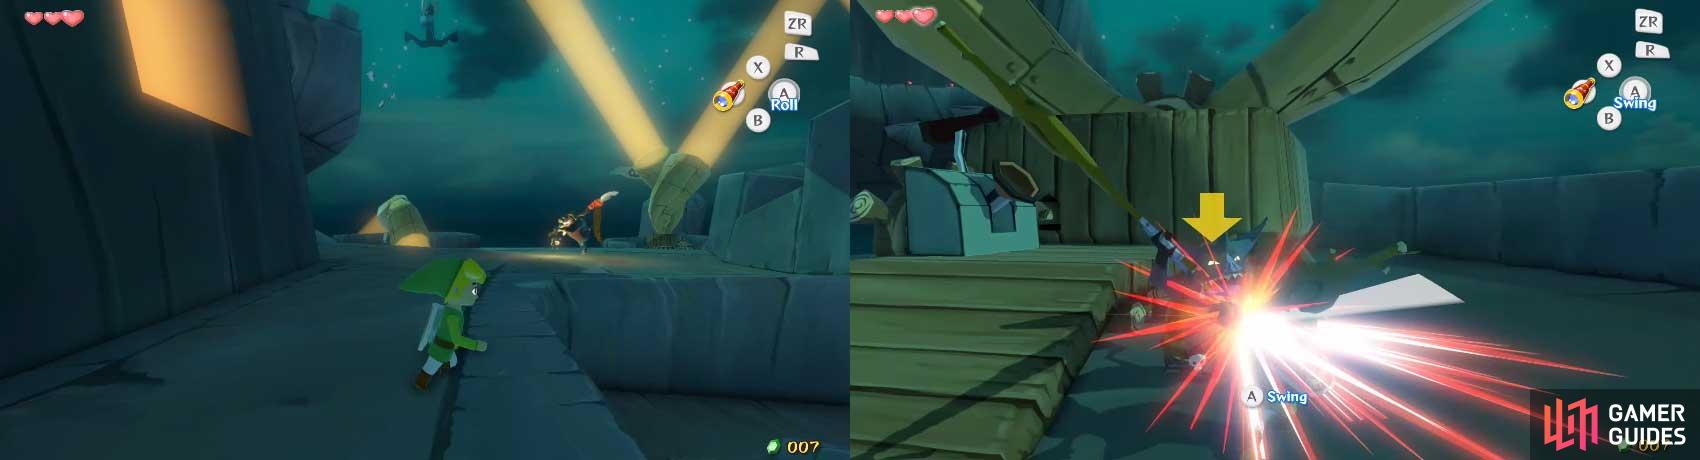
After the second sidling, you’ll come to a ramp. At its peak, you’ll spot your sword - and a Shield Bokoblin! After approaching the sword, the Bokoblin will also approach and spikes will rise from the ground, preventing you progress backwards.
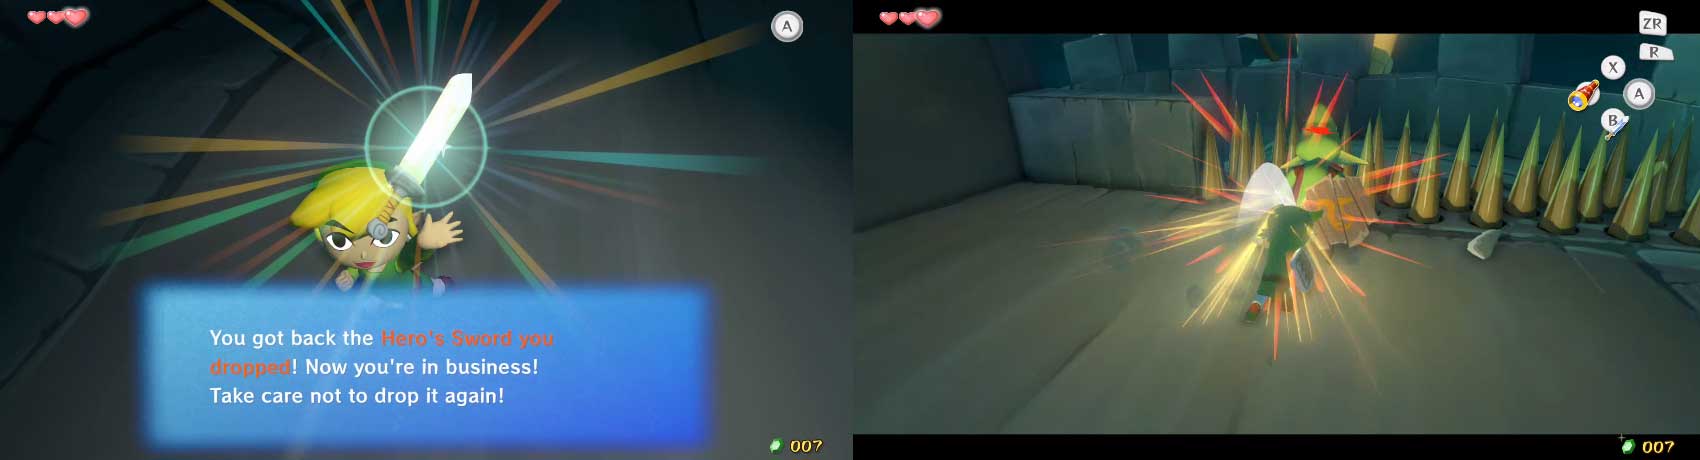
Run to the sword to pick it up, then make battle with the Bokoblin. Seeing as you have your sword, you can finally stop the constant defending. You can still defend and pick up weapons as before, though.
After defeating the Bokoblin, go through the nearby door. Inside is a jail cage similar to those earlier (with better accommodations!). Link will run to Aryll in an attempt to free her; alas, he shall not be able to do so. Before he can reach the cage, the Helmaroc King (the giant bird, remember?) comes down and snatches him away.
The bird flies to a mysterious green-skinned, red-robed man who appears to the be the master of this bird. How can you tell? With no more than a nod from the master, the bird flings Link far, far across the Great Sea.
After the unscheduled flight (and pain-filled landing), we see Link out cold in the middle of the ocean as a boat with a red hull pulls up to him.

 Sign up
No Comments