
Infinite Inferno is the optional dungeon in Yokai Watch and is able to be opened as soon as you beat the main story and load your cleared save file. To open up this dungeon, you will need to head to Breezy Hills and to the house in the upper right corner of your map. This is the Stone House, so go inside and talk to Mr. Stone, who tells you about his dream. On your way out of the house, Mrs. Stone will stop you and give you a key to that mysterious shack in the meadow that’s accessible from the tunnel in Blossom Heights. Head to Shoten Temple and you should see two men standing on the road to the west of it, next to a broken guardrail. This will lead to the shack in question, which you can unlock and finally enter Infinite Inferno.
This dungeon is definitely no joke and while you will be seeing a lot of familiar Yokai, they can definitely dish out some punishment. You will want a well-rounded team of Yokai of your own, that have good stats, as one that has low SPR, for example, will get destroyed by some of the magic, while those with low defense will likely be killed quickly with physical attacks. Infinite Inferno is divided into seven floors, with each one having a boss on it. The first six bosses are all palette swaps of main story ones, although they are certainly tougher and their attacks have slightly different names.
| Floors | Yokai Encountered |
|---|---|
| 1/2 | Greesel, Komasan, Manjimutt, Negatibuzz, Roughraff, Signiton, Statiking, Tantroni |
| 3/4 | Blazion, Draggie, Heheheel, Helmsman, Mama Aura, Suspicioni, Tengloom |
| 5/6 | Blandon, Grumples, Hidabat, Insomni, Jibanyan, Sushiyama |
| 7 | Bloominoko, Compunzer, Infour, Multimutt, Swelterrier, Timidevil, Zerberker |
The first boss you will run into is Eyedra , who is a copy of Slimamander, someone you actually fought twice during the main story, except he’s a lot stronger. Remember to keep an eye out for Slimy Fire Breath, which he will use a lot, as it can inspirit your Yokai, so quickly purify them. Attack the heads until the eye appears, then go after that. Once you beat him, you can head to the second floor, where you’ll encounter a Terror Time when going through a door on the right side. This is the same as every other Terror Time you may have encountered in the game, so head straight for the door to exit. Note on subsequent passings, you won’t need to go through the Terror Time sections again, as well as any defeated bosses.

The tunnel to Infinite Inferno is located west of Shoten Temple (left). You’ll recognize the majority of the bosses inside of the dungeon (right).
The second boss you will encounter is Hoggles , who is a reskin of Sproink. The toughest part of this battle is definitely the fact that he will always get a Soultimate off whenever you do enough damage to his belly button, so prepare for that by either using your back row to take the brunt of the damage, or use something like Guard Talismans to increase your own defense. Remember to do big damage to him, you’ll need to target his head until he covers it with one of the buckets, exposing his belly button. Attack it until he pulls off his Soultimate, sending you back to square one.
On the third floor, you will encounter three different paths. The top and bottom will lead to treasure chests, while the middle will go to another Terror Time, as well as the third boss in Infinite Inferno. The third boss in Infinite Inferno is Styx Mk. VI , a copy of SV Snaggerjag. While the boss isn’t that challenging, like with the previous ones, you will definitely want to be careful, as you might have up to three enemies dealing damage to you. Concentrate on the fish if they get to be too much for you, then go after the main boss during the down time. After finishing off the boss, go through the door and up the ladder, where you can find a bridge that acts as a shortcut that leads back to the Eyepo and Mirapo. Return and descend the next ladder to get to the fourth floor.
The fourth floor is a bit of a maze, with all kinds of doors. Go right and then up to find a chest ( Flood Charm ), then go right in the previous room to continue. In this room, go up to find another chest ( Lightning Ring ), then back and right once more. Keep going right to find two ladders, with the one going up leading to a chest ( Top Techniques ) and the bottom one leading you to another chest ( Staminum Alpha ), as well as ladders going all the way to the seventh floor, where there will be a dead end with one more chest ( Lunar Ring ). Now you can return to the last split and go straight up (a chest with a Purple Coin along the way) to the next boss.
The fourth boss is Clipso , who is a copy of Massiface. You may remember that the “X” on his forehead is the weak spot, but you can also target the eyes. Doing this will affect his accuracy, but Clipso’s eyes have a lot of health, so it may be in your best interest to focus on one eye, then go straight to his forehead whenever it is out of commission. Also, Clipso likes to inspirit Yokai with Forehead Flick and Stinkeye, so make sure you quickly purify them. Whenever he goes for his Soultimate, you can try to mitigate the damage on your front row by bringing in your back row to take the hit.
After vanquishing that boss, go down to the fifth floor and follow the path, taking the ladder you find along the way to extend another shortcut that will lead back to the Eyepo and Mirapo. Head back and follow the other path to eventually reach another door that leads to yet another Terror Time. Do your thing here to escape and you’ll come upon the next boss, Dr. Nogut , who is a copy of Dr. Maddiman. He is quite the annoying boss, as he will inspirit your Yokai A LOT, and you need to do a lot micromanaging in the battle. Remember to use the target pin to pop the hearts as they appear in the background, as the boss can use these to heal.

Terror Time is guaranteed throughout the dungeon (left). Be careful about the Oni (right), or else you’ll have to go back to the beginning of Infinite Inferno!
Onward to the sixth circle now, where you’ll find a straight path that will eventually lead to a choice of going north or east. If you choose to go north, you’ll come to a room with two chests ( A Serious Life and Yellow Coin ); continue east to find another Terror Time. The next boss will be just beyond the Terror Time section, who is named Spooklunk and is a copy of Phantasmurai from the main story. Start by targeting and destroying its sword, then concentrate on the “X” mark on the chestplate to reveal the weakpoint. Once the boss gets below 50% health, it will spawn another sword, so do the same thing as before to down it.
Once you get to the seventh circle, head south at the first intersection to find a ladder that leads to an area on the fifth, where you can find a chest ( Red Coin ) and a shortcut that eventually leads back to the Eyepo at the beginning of the dungeon. Return to that intersection and go east, grabbing the Soul Secrets along the way, until you come to the final Terror Time segment of the dungeon. Beyond that will be the next boss, Squisker , who is a copy of the second form of McKraken from the main story. Squeeheehee is very annoying, as it can inspirit your entire front row, as does Feeling Dizzy. He also seems a lot quicker than his counterpart, especially when he goes into his second phase and starts spamming elemental attacks. Attack the bottom part to make him open his mouth, where the orb is his weak spot; you don’t need to destroy the tentacles if you don’t want, as they will just grow back.
With that annoying boss dead, feel free to head back to the entrance to save and heal your Yokai, as well as head out to refill on any items you need in the upcoming battle. Get ready for the final boss of Infinite Inferno!
BOSS - Wobblewok
When the battle begins, you will see that the boss is hidden. You will need to attack the three seals to reveal the boss, which is when you can begin depleting its HP. However, there is a catch to this boss, as you might notice that your attacks are missing. Wobblewok alternates between two “forms,” one of which is vulnerable to physical attacks and another that is vulnerable to magical attacks (Techniques); you will know which is which from his eyes. If they are blue, use physical and if they are red, use magical attacks; if you see Change, that is when the switch will happen.
Using the information above, you’ll need two teams of three, one of purely physical attackers (preferably equipped with Vampiric Fangs) and another that are strong, magically. You will want them to roughly be inbetween levels 70 to 80 for this battle, with a lot of speed and defense on them. You can also include a tank or healer in with the teams, if you want, although most of the boss’ attacks will hit the entire front row, so maybe a healer will work wonders more than a tank.
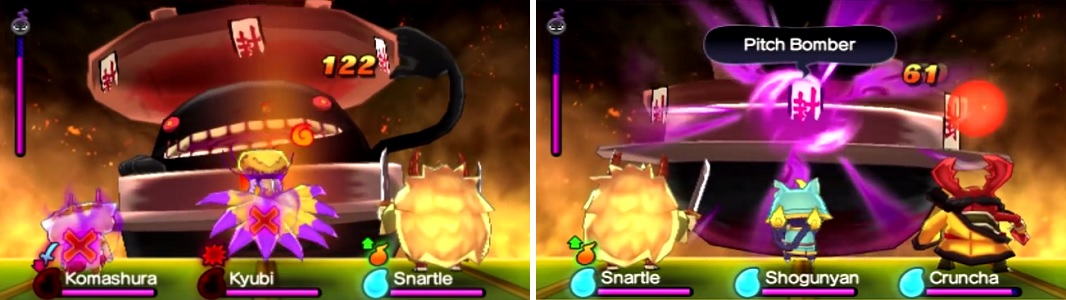
Keep an eye on Wobblewok’s eyes to determine how to damage him (left). Target the seals to stop his Soultimate attack (right).
The first thing that should be said is that the boss is very fast and he looks like he will get two turns in a row a lot, which is likely because of his speed. As for his attacks, Thunk is a physical attack that hits the front row, and he also has a normal physical attack. To add onto that, Laser Eye is another physical attack, but it only hits one Yokai. One of the more annoying moves in his arsenal is called Awful Breath , which inflicts a random inspirit on your entire front row. Lightning Crash , just as its name suggests, is a lightning attack on the front row.
When the boss closes back up, he is readying his Soultimate, Pitch Bomber , which hits your front row. You can stop this and stun the boss for a few moments by attacking the seals, similar to the beginning of the battle. This battle boils down to whether your Yokai can handle the boss’ attacks and then managing them, making sure to purify their inspirits and using items to top off any of their health when needed. Since money is quite bountiful in the dungeon, don’t cheap out and use things like Nom Burgers, Marbled Steak, and Matsutake.

 Sign up
No Comments