
The Lamp can damage enemies too, but your sword is the superior weapon.
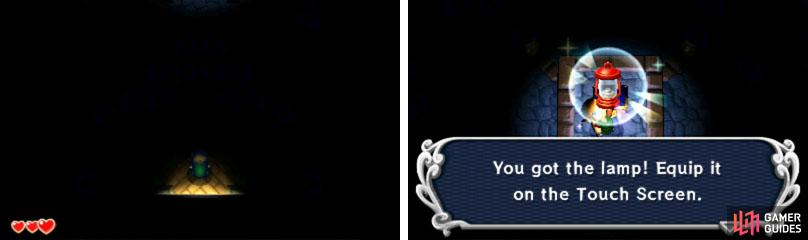
The first room is almost completely pitch black. Well, you are underground and who’d be silly enough to put lights in a secret way? Walk forward towards the faint light ahead and you will encounter something blocking your way that you can’t see.
Slash with your sword to break the pots obscured by the darkness, then go forward and slash again to shatter some more pots. With your path no longer obstructed by pottery, go up the stairs ahead and press A to open the chest, when up close.
You will receive the Lamp . To equip it, touch the “Items” tab at the bottom-right of the touch screen. In the next menu, touch the lamp or select it with the circle pad and press Y or drag it to the panel with a Y in its top-left corner. Then press B to exit.
With the lamp in the Y panel, Link will carry it while he moves and it will light up a small area around him. You can also press Y to make Link swing the lamp, burning enemies or lighting torches.
Walk forward from the chest to find a signpost, in the middle of a shallow pool, with a clue on how to proceed. Supposedly you have to bring light to the room or something.
Head for the top-left and top-right corners of the room to find a block with a peculiar pattern. Swing your lamp next to this block to set it alight; making the room visibly brighter. Light both of these torch blocks with your lamp and the door up ahead will magically open.
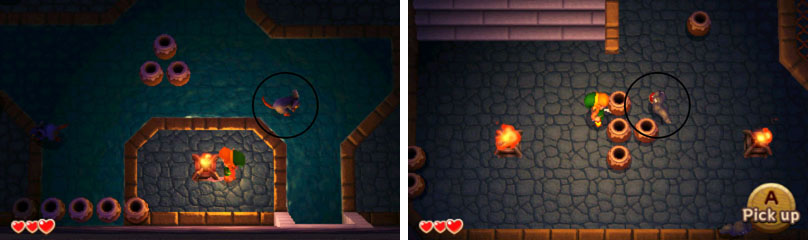
The next room is dark as well. There are monsters too, so keep your sword and B button ready. Carefully walk right and then up, smashing any pots and slaying any monsters (Rats or Ropes) in the way. In the top-right corner is a torch block: swing your lamp at it to light up the room a bit.
You may notice a Piece of Heart sitting comfortably out of reach on a higher ledge; the Zelda games love to tease players with items that cannot be obtained with your current gear.
Next, follow the corridor left, lighting the torches and minding the monsters along your way. Note that swinging your sword at a torch will put it out; the torches in this room will also die out eventually. Halfway across the corridor is a chest that contains a Red Rupee , worth 20 rupees.
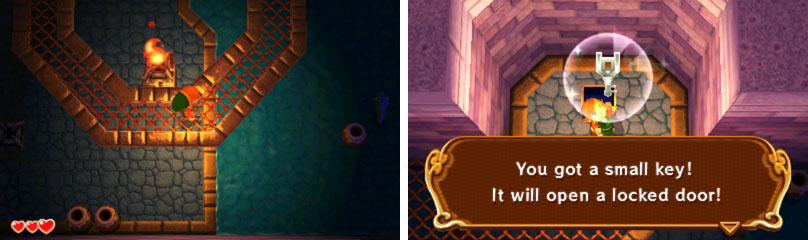
At the far end of the corridor, go up the stairs to find a locked door. To pass through the door, you will need a key of some sort; hopefully we can find one lying around.
Small keys only work in the dungeon they’re found.
From the locked door, head right and cautiously navigate the wire mesh overpass–beware that you can fall off if you go past the edge. At the end of the overpass is a chest with a Small Key–you can use this to open the locked door.
Hurry back to the locked door and open it by pressing A, when up close. In doing so, your Small Key will magically vanish into thin air. Or maybe the door ate it. We’re too scared to imagine.
Inside the next room, the door behind will lock itself and sinister music will play–this is a cue that you must kill all the monsters in the room to progress. Don’t panic and look ahead; it will be hard to see, because of the darkness, but there are 3 Poes (spectres) hovering around the room.
You can wait for the Poes to come to you and use your sword or lamp to end them. Or you can make for the far sides of the room, lighting the torch blocks there, making the Poes easy to see and thus defeat.
The Poes move rather slowly, but unpredictably; keep your distance so they don’t gang up on you. If surrounded, hold B to charge your sword and let go at the right moment (after a circle flashes around Link) to catch them in a sword spin.
Once all the Poes are dead (or maybe “exorcised” is a better word, since they’re probably already dead), the door behind will open up, as will the door ahead.
In the fourth and final room, light the torch block just ahead of you. Then head for the top-left corner of the map, where there’s a pull switch. Grab the pull switch with A and pull the circle pad towards you (backwards) to pull it all the way back, unlocking the door ahead.
If you pull the lever on the other side, some Ropes will appear instead, which is bad. Go through the newly-opened door and Link will walk upstairs, leaving the secret way behind.

 Sign up
No Comments