| Optional Objective/s |
|---|
| 1. Sabotage all printers at once (5 printers). |
| Reward/s | . | . | . |
|---|---|---|---|
| Money: | 1,100 £ | Bonus: | 150 £ |
| XP: | 850 XP | Bonus: | 150 XP |
| Gear: | N/A. |
Part 1: Find and Destroy the Posters
Once we are in control of our assassin of choice following commencement of the memory, check your map. You’ll see that four objective markers are present. We’ll need to head to each of these markers, enter a green search area and locate a poster in each. Once you have located a poster, simply walk up to it and hit the interact button to destroy it.
The first Poster [1/4] is on the small booth directly next to Darwin as we start the memory. The second Poster [2/4] is in the southern section of the train station that we start in. It can be found on a wall directly opposite the base of a set of stairs at the western end of the building. There are several Templars milling about the crowd by the poster, so be prepared for a fight if you can’t get to it undetected.
Leave the station and make your way to the next closest objective marker – it’s in a restricted area to the east.
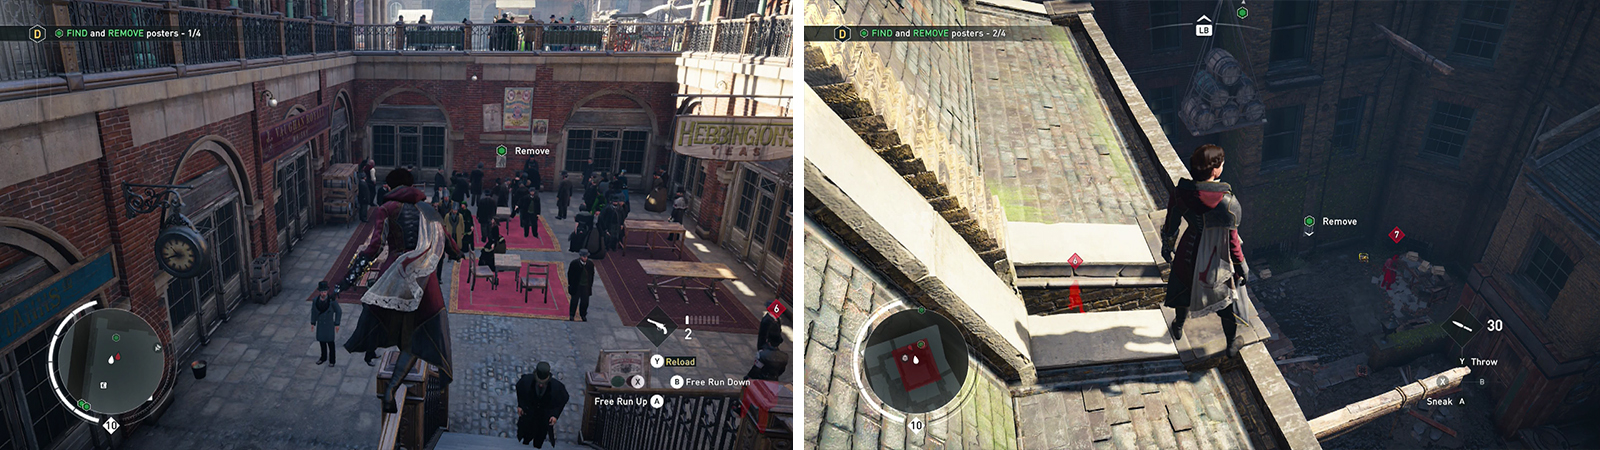
The second poster is in the station (left) and the third can be found within the restricted area (right).
The third Poster [3/4] can be found in the most eastern corner of the restricted area. There are 3-4 Blighters wandering around at ground level and a Sniper on one of the rooftops overhead. So either sneak your way in over the rooftops or kill as you go until you reach the eastern corner, dispatch the nearby enemies before interacting with the poster.
The final objective marker is located a couple of hundred meters away in the City of London borough. As you approach it, the marker will start moving about and give you quite a large search area. The reason it is moving is because the fourth Poster [4/4] is on the side of a cart that is making its way through the streets.
Grab yourself a cart and track down the objective marker. Use Eagle Vision when you get close to identify the correct vehicle. Once you have located the cart with the poster, ride up beside and hijack it. Then, exit the vehicle and tear the poster off.
This will update your objectives and give you a new objective marker in Southwark to the south.
Part 2: Pursue the Target
As you approach the objective marker, you’ll see a fellow placing a poster on a wall. He’ll take off when he sees you. We’ll want to chase after him – again, like the previous chase in a Darwin memory we will be unable to tackle him before he reaches a certain point, so don’t fret about it, just keep up with him.
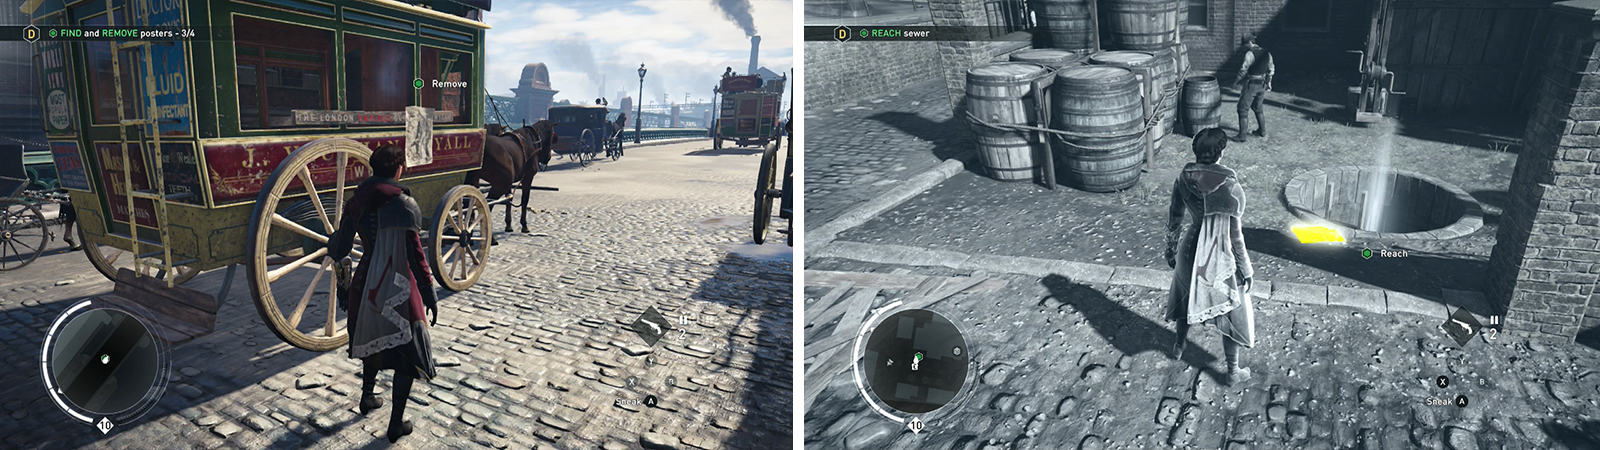
After nabbing the final poster from the carriage (left). Follow the target until you reach the tunnel (right).
Eventually, he’ll lead you through a factory area and disappear. At this point, activate your Eagle Vision to locate a ladder leading down to the sewers. Climb down to progress with the memory.
Part 3: Destroy the Printing Press
Make your way through the sewers (there is only one way so don’t worry about getting lost) until you see a pair of Templars with their backs to you. Slide under the grating here and perform a double assassination on them. Follow the tunnel around the next corner to find the secret printing press.
There are two Templars in here guarding the printers so drop down and deal with them as you please. Once the room is cleared of the enemy presence, we can turn our attention to the printers themselves.
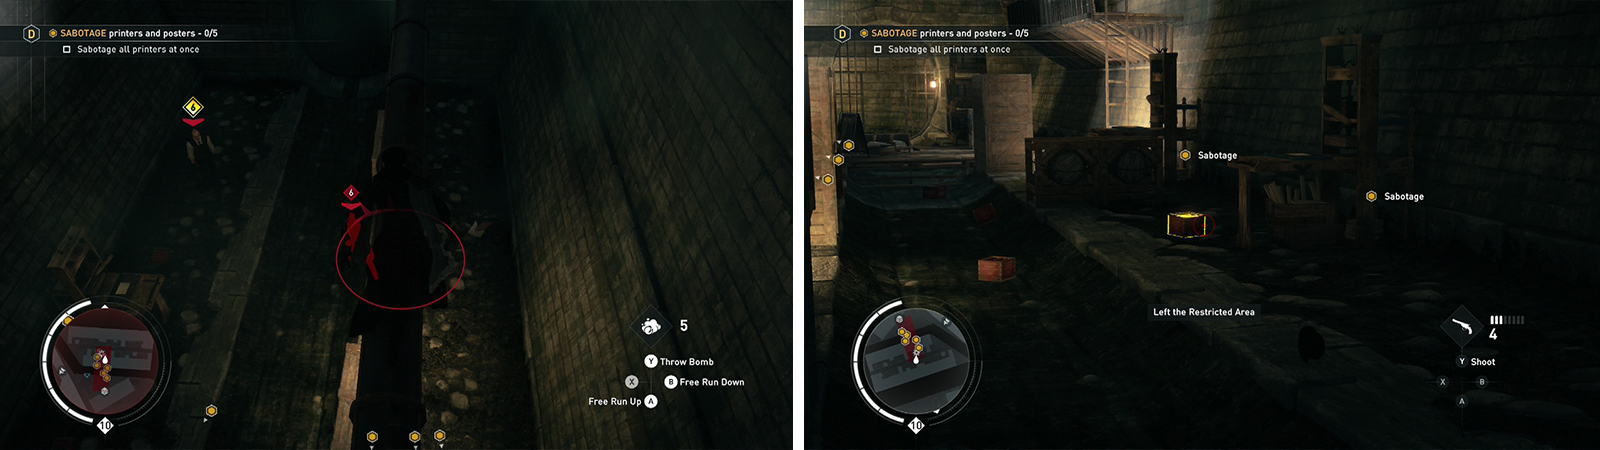
Kill the enemies in the printing room (left). Organise the dynamite crates so that all five printers can be sabotaged at once (right).
We’ll want to destroy all five of the printers at the same time in order to fulfill the optional objective for the mission. Fortunately, there are an abundance of explosive crates around the room. We want to place one explosive crate beside each of the five printers and then position any spare crates in the spaces between printers in such proximity so that any one crate explosion will cause a chain reaction that will blow them all up simultaneously.
Once you are happy with crate placement, retreat to the top of the room and shoot one of the explosive crates to admire your handiwork. If you fail to blow all of the printers up at once, reload the previous checkpoint and try again!
With all the printers out of commission follow the objective marker to find a sewer exit. Leave the sewer to complete the memory.

 Sign up
No Comments