| Optional Objective/s |
|---|
| N/A - There are no optional objective/s in this memory. |
| Reward/s | . | . | . |
|---|---|---|---|
| Money: | 1,500 £ | Bonus: | N/A. |
| XP: | 850 XP | Bonus: | N/A. |
| Gear: | N/A. |
Part 1: Munitions Factory Investigation
This memory begins on a street corner in the southwest corner of the Southwark borough. After speaking with the fellow here to initiate the memory, make your way over to the Munitions Factory marker nearby. In the search area here you’ll find the body. Inspect it.
This will populate the nearby area with an additional six clues for us to find. Activate Eagle Vision to have them appear highlighted in gold to make things easier. You’ll want to inspect the following:
- Dynamite Crates – Just outside of the walled section of the search area closest to the body.
- Blood Stain – On the ground by the corpse.
- Banner – Also on the ground by the corpse.
- Feather – By the fountain in the center of the search area.
- Clock – Propped up against the right hand wall of the search area.
- Bullet Hole – Located in the bench next to the Clock in the search area.
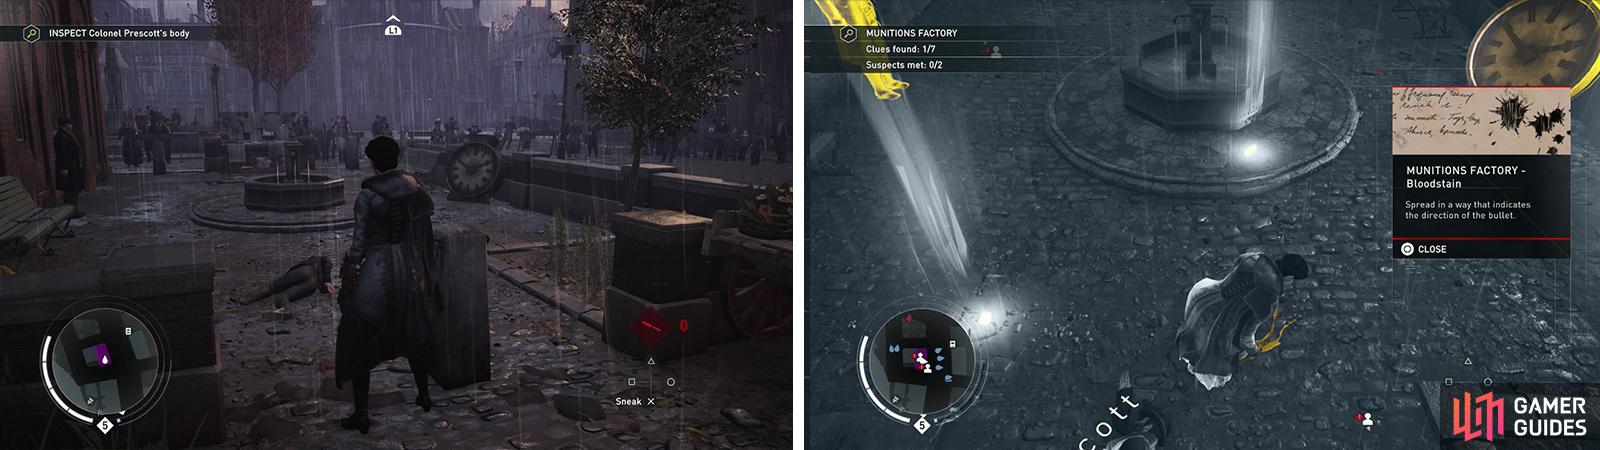
Investigate the body (left) and then investigate the clues in the search area (right).
Speak with the two persons of interest nearby and utilize all of the available conversation options. Abberline can be found by the body (we’ll want to ask him about: Shooting, Clock and then Suspect). Jonas can be found within the search area near the fountain (ask him about: Prescott, Shooting, Clock and then Banner).
Upon speaking to both men and finding all of the clues a new search location will open up nearby – The Courtyard. The adjacent Shop is also a search area, so we’ll do both at once! Mosey on over there to continue the investigation.
Part 2: Courtyard/shop Investigation
The Courtyard/Shop search area has another pair of suspects, Earl and Curtis, whom we can speak with and also features another six clues which we’ll need to discover. Again, activate Eagle Vision to make this task easier. You’ll want to inspect the following:
- Beer – This appears as a puddle on the street in front of the glowing gate.
- Bullet Hole – Inspect the glowing gate from the street side.
- Target – Found on the inside of glowing gate with the bullet hole.
- Mark – Found on the ground by the Target in the alleyway leading to the courtyard.
- Impact – On the ground by the building opposite Earl’s position.
- Whitworth Rifle – Can be found on the floor of the attic of the shop (you’ll need to climb up to the uppermost open windows of the building to get inside).
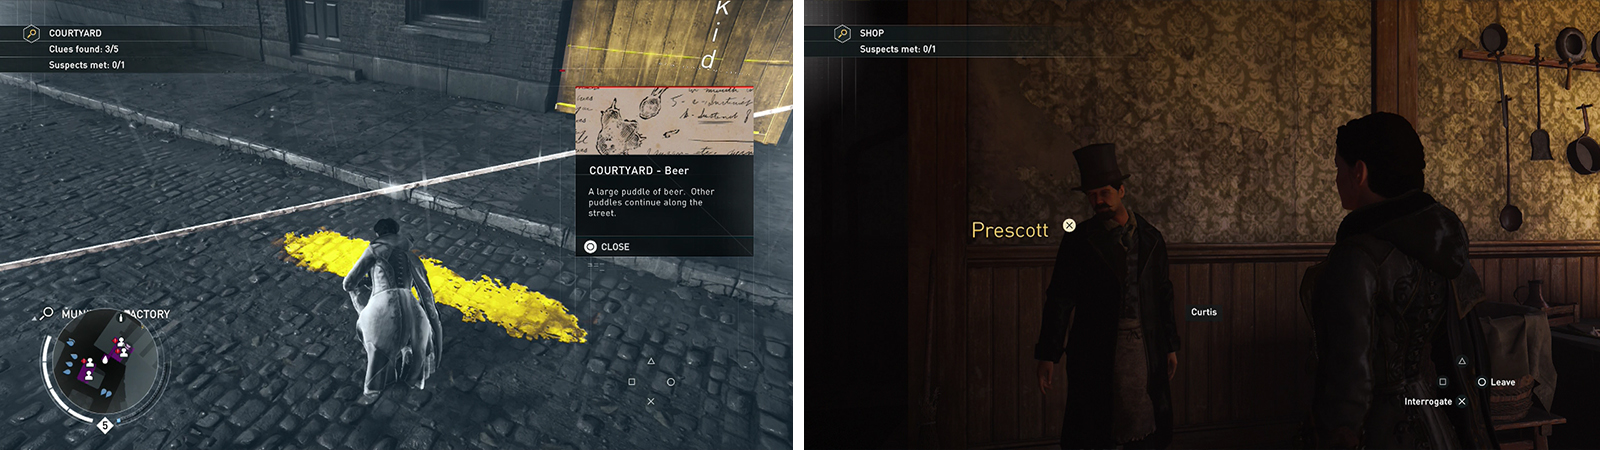
Investigate the clues by the courtyard/shop area (left) and speak with the suspect (right).
Speak with the two suspects nearby and we’ll want to, as per usual, exhaust all possible conversation options. Curtis can be found inside the ground floor of the shop (we’ll want to ask him about: Prescott and then Military, Attic then Whitworth and then Shooting). Earl can be found within the Courtyard search area by the end of the alleyway leading to the glowing gate (ask him about: Shooting, Gun).
Return to the street and whip out your Eagle Vision and you’ll find a trail of spilled beer leading away from the crime scene. Follow this all the way to the end to find another search area – the Barrel Depot.
Part 3: Barrel Depot Investigation
The Barrel Depot investigation includes yet another pair of suspects, Bennet and Samuel, whom we will deal with later. For now, let’s focus on finding the four clues which have been hidden around the area. As per usual, activate Eagle Vision to identify them much quicker. You’ll want to inspect the following:
- Empty Barrel – Next to the railing behind Bennet.
- Backpack – Located on the ground at the top of a set of stairs.
- Goose – Can be found at the base of the stairs.
- Medicine – This is on top of a barrel against the wall of the main building opposite the entry gate.
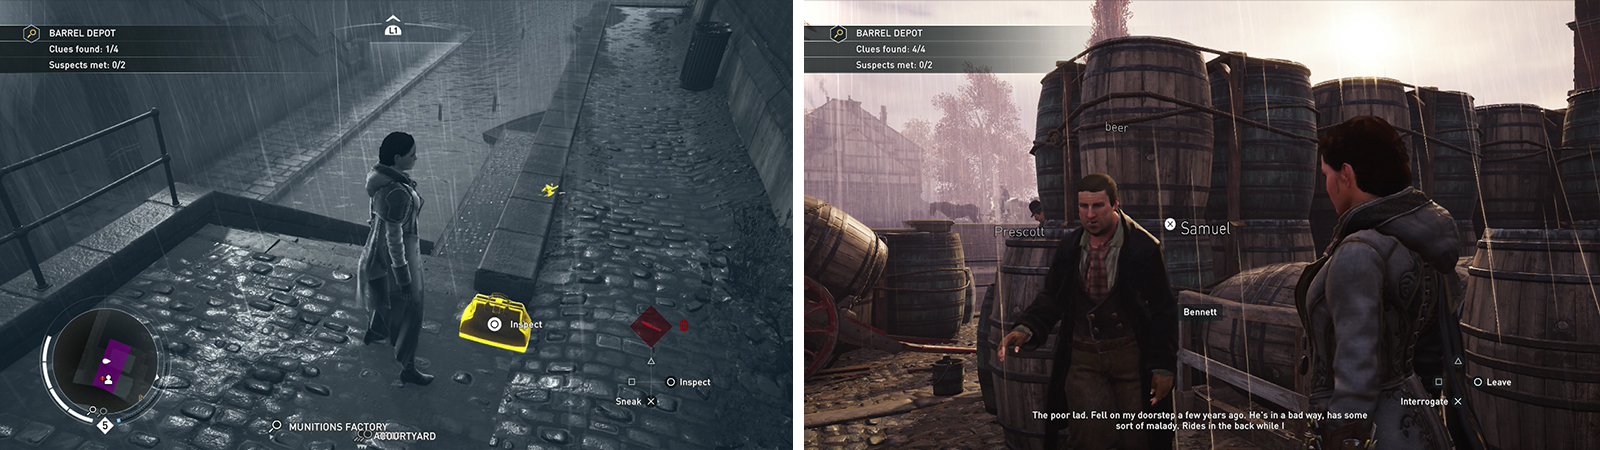
Investigate the clues by the barrel depot (left) and speak with the suspect (right).
After acquiring all four clues, move over to speak with Bennet by the entrance to the area (we’ll want to talk about: Prescott, Beer and then Samuel). This will have Samuel appear as a suspect nearby. As such, head on over and have a chat with him (Interrogate him on: Prescott, Beer, Disease).
At this point you’ll have all the clues at your disposal and will be able to choose and accuse one of the persons of interest. The answer is Samuel.
Once you have accused correctly, the memory will be complete.

 Sign up
No Comments