
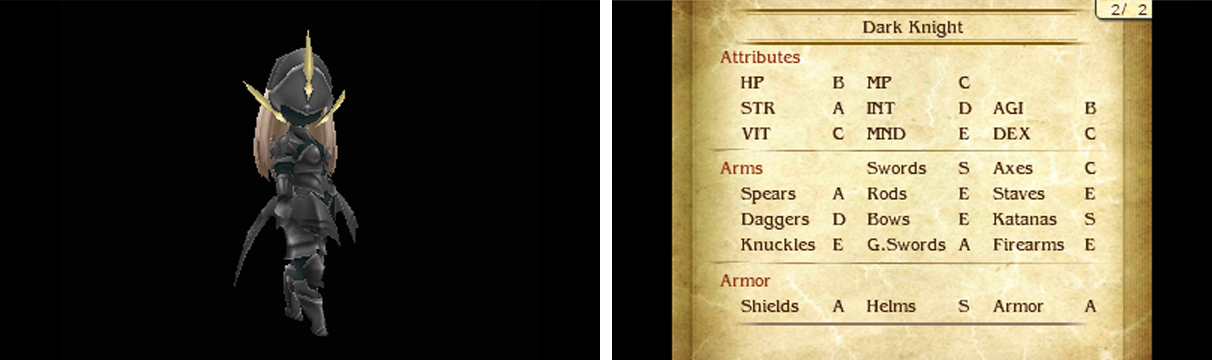
The Dark Knight is an imposing physical fighter who gains strength at the cost of its HP. Stat-wise, it has high Strength and decent HP and Agility, while everything else ranges from average to poor. It’s also skilled with swords and katanas and loves wearing helms.
Joining at roughly the same time as it did in Bravely Default, the Dark Knight is a difficult job to master, but one that packs a helluva punch. Many of its attacks sacrifice its HP to deal damage, while its infamous Minus Strike deals more damage the less HP it has. A deadly job to be sure.
Specialty: Adversity
Each time the user suffers damage equal to at least 25% of their maximum HP, their Physical Attack, Physical Defence, Magical Attack and Magical Defence all increase by 10% for three turns.
The stat increase is tiny in the grand scheme of things, but as a free ability, it’s a nice way to pay back tough foes. You can also use Black Bane to trigger it reliably.
Level 1: Dark Bane
| Type | Cost |
|---|---|
| Command | None |
The user sacrifices 20% of their maximum HP to inflict 1.25 times dark-based damage to a single foe.
A fifth of the user’s HP isn’t a lot, but it’s not a little either. Either way, it’s good against foes weak to dark, but otherwise too risky to use by itself.
One way you can use Dark Bane reliably is by casting Heal Wall on a foe, so your Dark Knight heals between each attack. Or you can assign Exorcist as a secondary job and use Undo HP to revert your Dark Knight’s HP back to normal.
Level 2: Blind Immunity
| Type | Cost |
|---|---|
| Support | 1 slot |
The user is immune to blind during battle.
For physical-based jobs like the Dark Knight, being blinded is hugely crippling. By the time you acquire the Dark Knight, enemies that cause blind are fairly rare, but having an additional way to deal with it is appreciated.
Level 3: Adversity
| Type | Cost |
|---|---|
| Support | 1 slot |
Each time the user suffers damage equal to at least 25% of their maximum HP, their Physical Attack, Physical Defence, Magical Attack and Magical Defence all increase by 10% for three turns.
The same as the Dark Knight’s Specialty. Since this ability was tailor-made for Dark Knights, it’s not particularly useful when on other jobs, unless you’re assigning Dark Knight as a secondary job.
Level 4: Blaze of Glory
| Type | Cost |
|---|---|
| Support | 1 slot |
When the user is KO’d, they deal 4 times damage to all enemies. Does not trigger when KO’d by poison or freeze damage.
Being KO’d isn’t nice, but if you’re going down anyway, this is a great ability to exact revenge on your foes.
Level 5: Minus Strike
| Type | Cost |
|---|---|
| Command | None |
Damages one enemy equal to the amount of HP the user has lost. Damage is capped at 9999 unless Bravely Second is activated.
The Dark Knight’s signature slaying move is slightly less effective in your hands than the enemies, since your HP is usually much less. Still, with enough HP buffs, you can consistently rack up 9999 damage, which is good enough.
Since your Dark Knight needs to be at roughly 1 HP to deal significant damage, you’ll need to find ways to protect them like the Valkyrie’s Spirit Barrier, the Exorcist’s Undo Action, etc. Or you can just let your Dark Knight perish and trigger Blaze of Glory.
Level 6: Black Bane
| Type | Cost |
|---|---|
| Command | None |
The user sacrifices 30% of their maximum HP to inflict 1.5 times dark-based damage to all foes.
The cost is heavy–almost a third of the user’s HP–but the damage is considerable, especially when there are more foes. Afterwards, you can use the HP reduction to power Minus Strike or, again, rely on the Exorcist’s Undo HP to return to full health.
Level 7: Absorb Magic
| Type | Cost |
|---|---|
| Command | None |
From the start of the turn, the user takes no damage from magic attacks and instead recovers MP equal to the MP used for the attack. Does not work for certain magic attacks.
Where Elemental Barrier fails to help, Absorb Magic is a great way to cheese foes that rely on magic for attacks. You could even combine it with the Guardian’s Soul Mirror to negate most physical and magical damage.
Just be cautious that some elusive attacks–particularly from the Ba’als are unaffected by Absorb Magic.
Level 8: Dark Nebula
| Type | Cost |
|---|---|
| Command | None |
The user sacrifices 20% of their maximum HP to inflict 4 times dark-based damage to everyone on the battlefield.
A combination of version of Dark Bane and Black Bane. The damage is incredible and easily capable of wrecking bosses, nevermind regular enemy mobs. To use it well, you should cast Elemental Barrier on your party or your attack will backfire badly.
Level 9: Life or Death
| Type | Cost |
|---|---|
| Command | None |
The user’s Physical Attack, Physical Defence, Magical Attack and Magical Defence all increase by 50%, but the user is inflicted with Doom.
When the situation is grave, this ability could potentially save the day. However it’s far too risky to use normally and largely made redundant by, say, the Fencer’s Bloody Wolf and the final buffs from a Performer. That said, you could use it safely with Re-raise or Resurrection Mist.
Level 10: Rage
| Type | Cost |
|---|---|
| Command | 2 BP |
The user triggers Dark Bane up to 5 times on random foes or until their HP falls to 1.
For the cost of three turns, you can potentially get two free attacks. As with regular Dark Bane, your safest bet is to cast Heal Wall or something similar on the enemy so your Dark Knight recovers HP between each hit.
Level 11: Funeral Pyre
| Type | Cost |
|---|---|
| Command | None |
The user sacrifices 30% of their maximum HP to inflict dark-based damage to an enemy. The damage inflicted increases the lower the target’s BP (up to a maximum of 6.25 times damage).
An immensely damaging blow to any foe that’s stupid (or brave) enough to drop to -3 BP. Or perhaps you can lure a foe into this situation with the Performer’s Zero Sum. There are more convenient ways to deal big damage though.

 Sign up
No Comments