Bonfires is definitely one of the harder challenges and will require you to practice a lot. The idea behind the challenge is that you need to go to each of the red beams that pop up as fast as you can, using Agility Jump (double jump), sprinting and Blink. The bad thing is that besides the first two, every other beam is completely random, so a little bit of luck comes into play.
There’s seven fixed locations for the beams and you start with 30 seconds on the clock. For each beam you go through, you will add time to the clock and also receive 1,000 points. Do it quick enough and it’s possible to get an extra 500-1,000 points. The last bonus you can get are from something called Tricky Jumps, which are set jumps from one location to one of the beams; these are worth an extra 1,000 points.
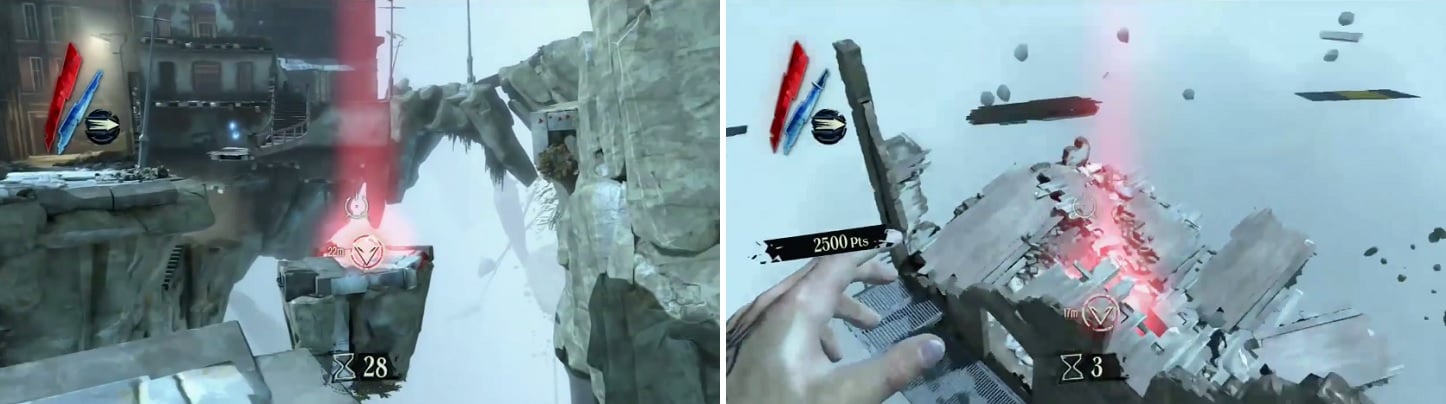
The first and second beams are always the same (left), but after that, they are completely random (right).
Getting Three Stars
It’s not going to be easy getting three stars on this challenge until you get some practice under your belt. As already pointed out, the locations of the first two beams are always static, but they are completely random after that. That means that luck definitely plays a big role in getting a high score, as sometimes a beam could spawn on the other side of the map, making you lose precious time. Play through a few times to learn the locations of the beams, as well as the best route to get to each one.
On the expert version, you do not have unlimited mana, but you will find mana elixirs throughout the stage that will replenish it automatically once you touch them. Also, there are Assassins throughout the map to impede you while running from one beam to the next. There is a glitch, however, that happens that can remove the Assassins from the map. It’s not certain as to what causes this glitch and it’s not 100% foolproof, but restarting the challenge by pausing and choosing “Restart” repeatedly might cause the Assassins to disappear.
Tricky Jumps
One of the hardest things to do for this challenge are completing all six of the Tricky Jumps in one playthrough, mostly because after the first two beams, the rest are completely random. Out of the seven possible beams of light, three of them don’t have a Tricky Jump associated with them, two of them have two jumps each and two more only one jump. Luckily, the first two beams that are set in stone have a Tricky Jump, so it’s easy enough to always get two out of the way at the beginning of each run. Before doing anything, though, a rough map of the challenge is need, which is provided below.
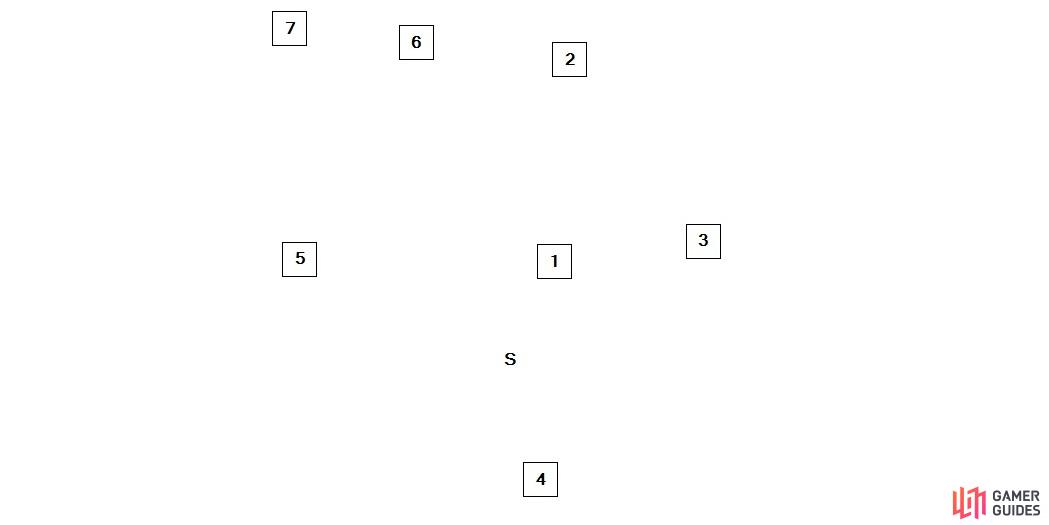
A rough map of the challenge, showing the locations of the beams of light.
Tricky Jump #1
From where you start, look down and to the left to spot a floating platform, where one possible beam of light can spawn (#5 on the map). Double jump and Blink to this platform as soon as you can move, then look towards the first beam. This jump is tough to make consistently, as you need to run to the edge and do the usual double jump/Blink, except that you can possibly spam the jump button to climb onto the ledge. Doing that will 9 times out of 10 get you the Tricky Jump, but sometimes it doesn’t.
Tricky Jump #2
After the first beam, the second one will always spawn inside of a building to the north of your starting position. To get this Tricky Jump, though, you’ll need to go off the beaten path. Look to your right after landing on the first beam and you should see some moving platforms in the distance. Either double jump/Blink from there or use the starting platform to get on them. From here, you need to double jump/Blink up more moving platforms (right in front of you) until you get to a wall with a small window and big window. Blink through either of these and onto the second beam.
The jumps after the first two are completely random, so consult the above map to get a rough understanding of the descriptions.
Tricky Jump #3
This jump will involve the beam being at the same spot as the first one, but you’ll need to approach from another angle. Looking at the map, you need to go where beam #7 is located, which is the large, slanted building. Looking out from here, you should see a large rock formation in the sky, which you can double jump and Blink to from the slanted building. From here, look toward the statue near the beam and double jump towards it, then Blinking while staring straight at the statue; you should land straight on the platform with the beam.
Tricky Jump #4
This one is similar to the second jump, but it involves beam #3 on the above map. Get onto the same moving platforms as with that second jump, and double jump, Blink through the thin window where beam #3 is located.
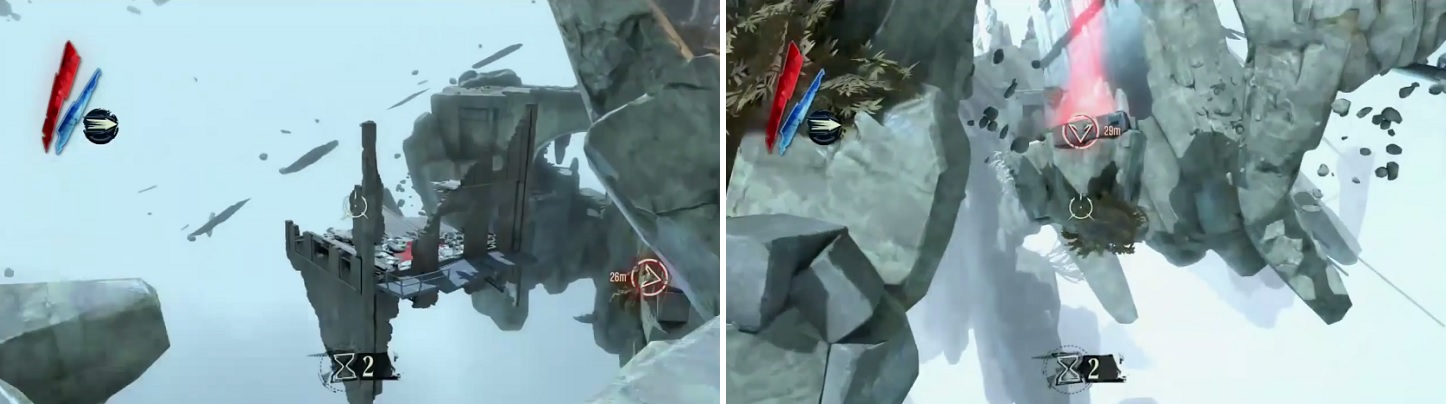
For the first Tricky Jump, get down to the platform below (left), then double jump and Blink to the platform with the beam (right).
These last two Tricky Jumps both involve the beam at #5 on the map above.
Tricky Jump #5
The easiest of the Tricky Jumps involves you going back to the starting platform and heading straight, as if you’re going to the very first beam. Jump on the little island ahead of you and use the rock formation to jump down onto the beam of light.
Tricky Jump #6
This jump can be a little confusing to describe, as well as a little challenging to execute perfectly. From the second beam of light, you can Blink outside of the window and onto a rooftop, which is near the giant slanted building. In between that building you’re on (this is #6 on the map) and the slanted one, there is another building, so get on that rooftop. From here, you can see a broken building with a wooden platform that you can Blink to without jumping, so do just that.
Now, think of the building with the beam of light as having an imaginary second floor. From the wooden platform, you need to jump towards the side of the building with the beam that doesn’t have the metal balcony and Blink through the broken window to the beam of light (just underneath the broken wooden platform that’s above the beam).

 Sign up
No Comments