
Seabreeze Trail
Rook will babble about the Encampment, then run ahead, and the game will pester you about autosaves. When you’re back in control turn north to spot a circle of stones in the ground-a static Portcrystal (fast travel) circle. This will be talked about more when it becomes important, but for now, just note it and continue along the road to the north-west. Not too far ahead you’ll see a merchant being attacked by Goblins. The game will waste time telling you how to attack-like you could have survived the tutorial if you didn’t know that-before leaving you to your bloody business. kill the Goblins and talk to the merchant, Reynard. For saving him, he’ll give you a Leather Cape… which brings up something else you should love about this game; capes! Sure, this one is a bit on the cruddy side, but you saw the beautiful capes in the tutorial… how many RPGs let you wear capes? Really? Not enough. Ahh… anyways, Reynard will run back to Cassardis.
| Objective | Reward |
|---|---|
| For saving Reynard | Leather Cape |
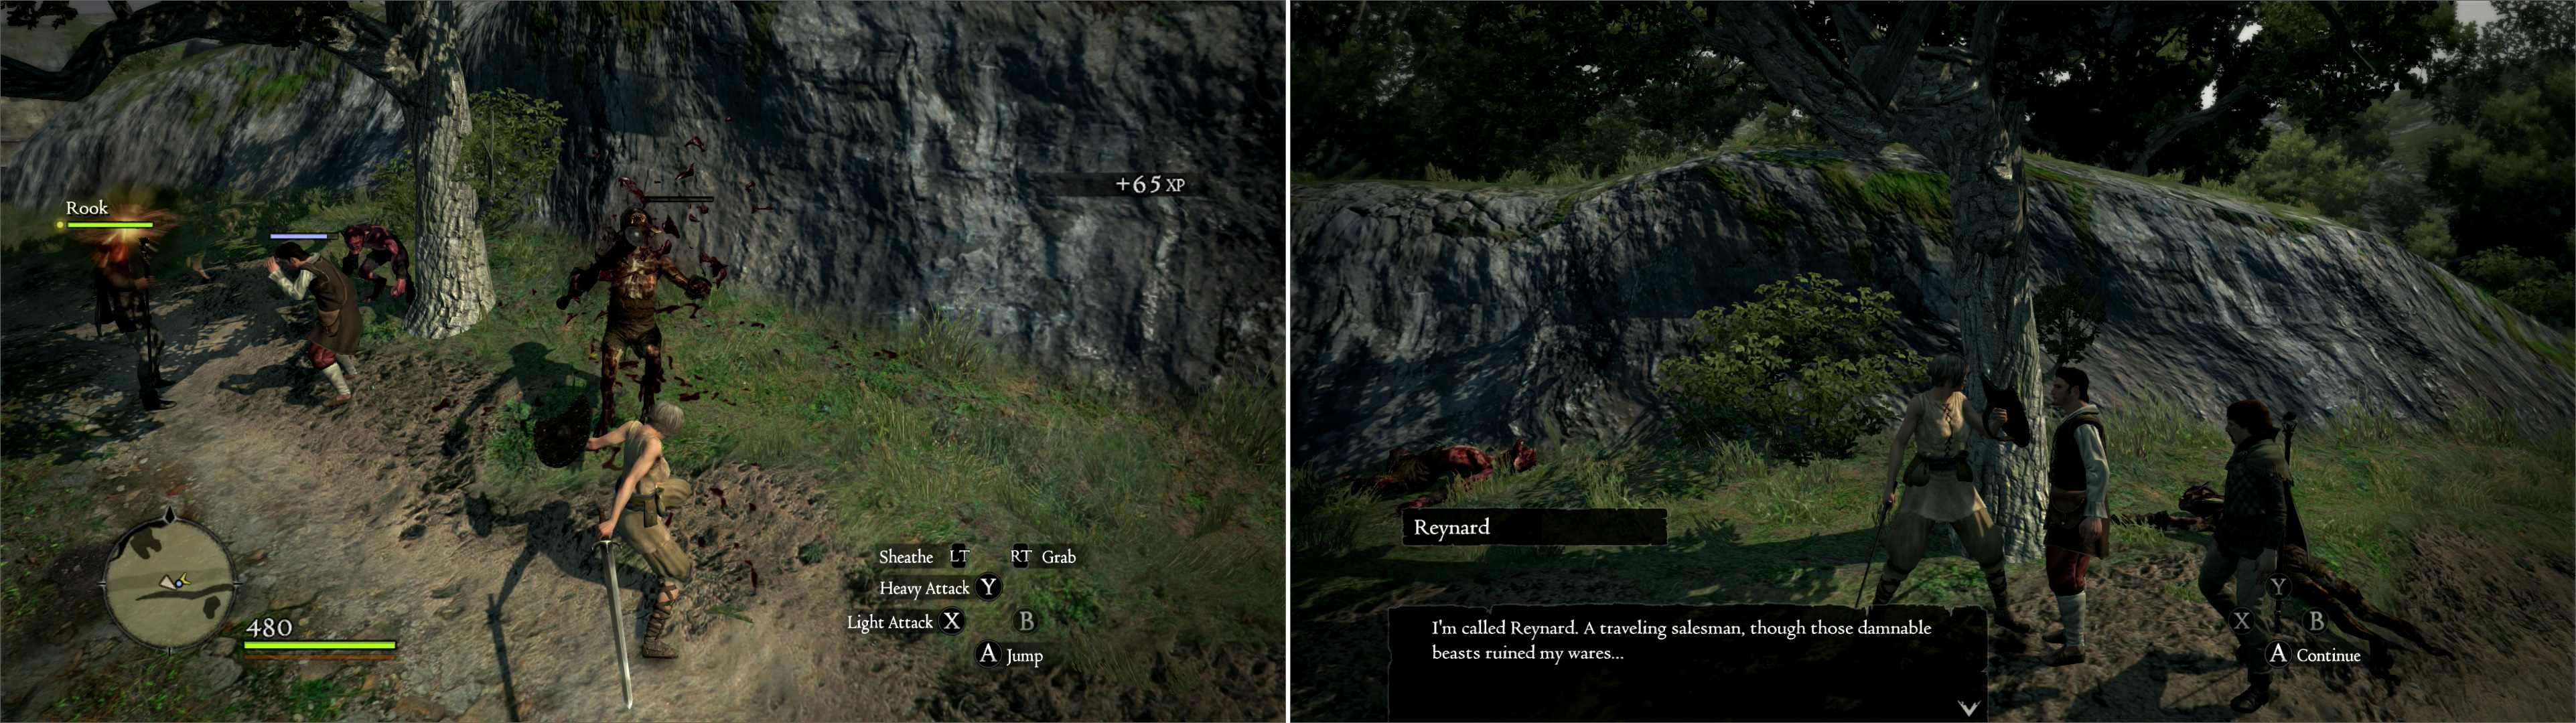
Defeat the Goblins that are attacking the merchant Reynard (left) and he’ll reward you with his continued existence… and a cape! (right)
Monster Info: Goblin
Goblins are one of the weakest and most common pests you’ll encounter throughout the game. Typically they pose little threat, even to a low-level Arisen, but they do often come in numbers, and once in a while serve as fodder for stronger foes. Most are simply melee foes, attacking with crude clubs. Some, however, will throw crap at you, anything from rocks to vials of oil to burning torches, which of course can set you on fire.
Other Goblins prefer more absurdly defensive tactics, having strapped some shields to their front and back, with which they can render themselves immune to all attacks. Their one real goal (besides wasting your time) is to lure you near and perform an awkward ‘charge’ attack, which isn’t too impressive. Although they have a stupidly good capability to withstand attacks, heavy weapons can knock them off balance. Stronger still are the helmeted Goblins, which serve as leaders for the rest. Some Goblins also come with horns, with which they’ll summon allies to the fray. Despite their versatility, however, Goblins are little more than practice dummies.
Now, to give Seabreeze Trail a brief run-down. There are Goblins and Wolves about, and you may encounter the odd Hobgoblin. None of the critters here are worth fearing, and it’s a good time to get a handle on combat… although since you only have one ability, and there’s no sophisticated dodging, so ‘get a handle on combat’ at this point in the game really means, ‘learn how to spam light attacks’. There’s also plenty of mundane treasure to be had-most of it consumables with no long-term game impact. By all means, however, play, roam explore, but try not to gain too much XP here, as you’ll want to get to Gran Soren as quickly as possible, where you’ll be able to change your Vocation. Grinding isn’t really a good idea with that goal in mind.
There are a few detours worth taking, however. Head back east towards Cassardis, and turn north between a ruined wagon and small stone wall. Continue down a ramp to reach a beach and keep going until you hit the water, then turn east along the water line until you spot a small cave. Inside is an ore vein-notice the crystal deposits hanging off the gray stone… this indicates it can be mined, provided you have a Pickaxe… which you probably don’t have yet. Just something to keep in mind for now.
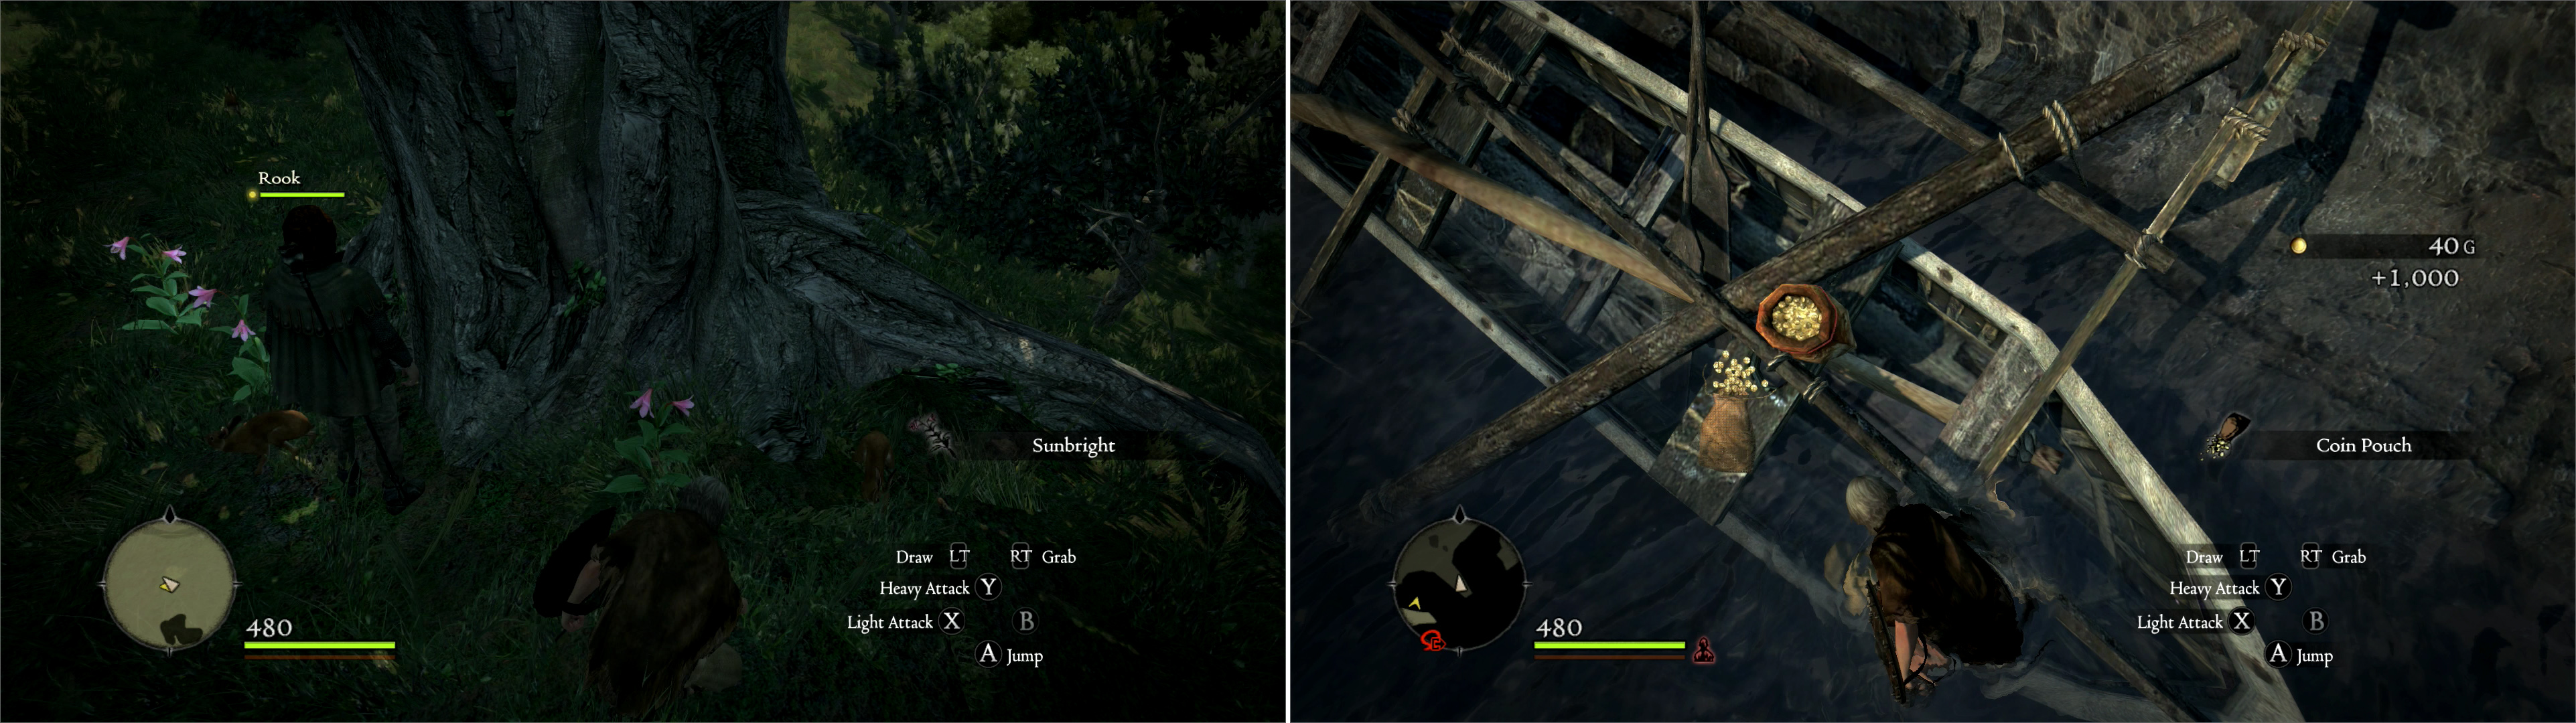
You can find some Sunbright clustering around some large trees on Seabreeze Trail (left). Near the shore, on the other hand, you can find some money scattered around some wreckages (right).
Now turn around and head along the water line to the west. Cross the ‘Unusual Beach’, pass some beached ships (which may or may not be crawling with Goblins) and continue until the water line terminates at a cliff. The large rocks here can - and should be - scaled. First, however, grab a Seeker’s Token near some crates on the beach, then scramble up the rocks, on top of which is a square chest containing more worthwhile treasure. Sweet, sweet, lootage… And there’s more for the pillaging. Along the cliff face to the north is a stone walkway you can traverse until you find more scaleable rocks, atop of which is another square chest. Up one more level of rocks is another Seeker’s Token. What’s a Seeker’s Token? Collectibles strewn about the world. Long story short, you can turn twenty of them in via a Notice Board quest for 200,000 gold… so, each one is in effect worth 10,000 gold. Not bad money.
| Square Chest (south) | Square Chest (north) |
|---|---|
| Hide Armor | Ebon Neck Wrap |
| Mace | Iron Shield |
| Shoulder Cape | Judgment |

Further along the shore you can find some more treasure, including some Seeker’s Tokens (left). Scale the nearby rocks to find some treasure chests containing some welcome loot (right).
Before you continue on to the Encampment, scour the area for the plants you need. Moonglow grows near the water, but only at night. You should be able to spot it easily due to the… well, obvious glowing blue moths flitting around it. Sunbright has pink flowers, and grows near large trees. It’s less obvious, but it’s also more abundant. Once you’ve gathered five Sunbright and one Moonglow, return to Benita for your reward. Once done, everything presently important before the Encampment has been completed. Follow the road from Cassardis west to reach the Encampment.
| Objective | Reward |
|---|---|
| For bringing Benita flowers | 500 XP, 3 Rift Currency, 1000 Gold |
| Objective | Reward |
|---|---|
| For reaching the Encampment | 300 XP, 3 Rift Currency, 800 Gold |
The Encampment
Once you enter the Encampment, a disembodied voice will bother you. Losing your heart sure is complicated. Stupid Dragon. Rook will obediently run off to the north, and you should follow him. Once in a while your Pawns will be useful like, and actually lead you somewhere. Most of the time, however, they jump around like morons, smash crates, throw or consume inventory objects with no regard to economy, and comment on the geography. Head up some stairs and you’ll be shown a short cutscene, directing your attention to a tent, and an odd stone within. Continue north-west to find said tent.
Inside are some shelves with potions worth looting and a man named Ecbal, who functions as an innkeeper. Resting here will cost you 300 gold… and considering how close Cassardis is, why would you waste the money? He also has a new function that stupid Pablos doesn’t have-the ‘Learn or Set Skills’ option. Here is where you can spend Discipline- earned when you defeat foes and complete quests-on skills. The selection of skills you can purchase depends on your class and your Vocation Rank (which is also dependent on how much Discipline you’ve earned while playing as said class.) This is all future reference, however. Do not spend any Discipline here, as you’ll want to use your Discipline to change Vocation when you reach Gran Soren.
Prove Your Worth
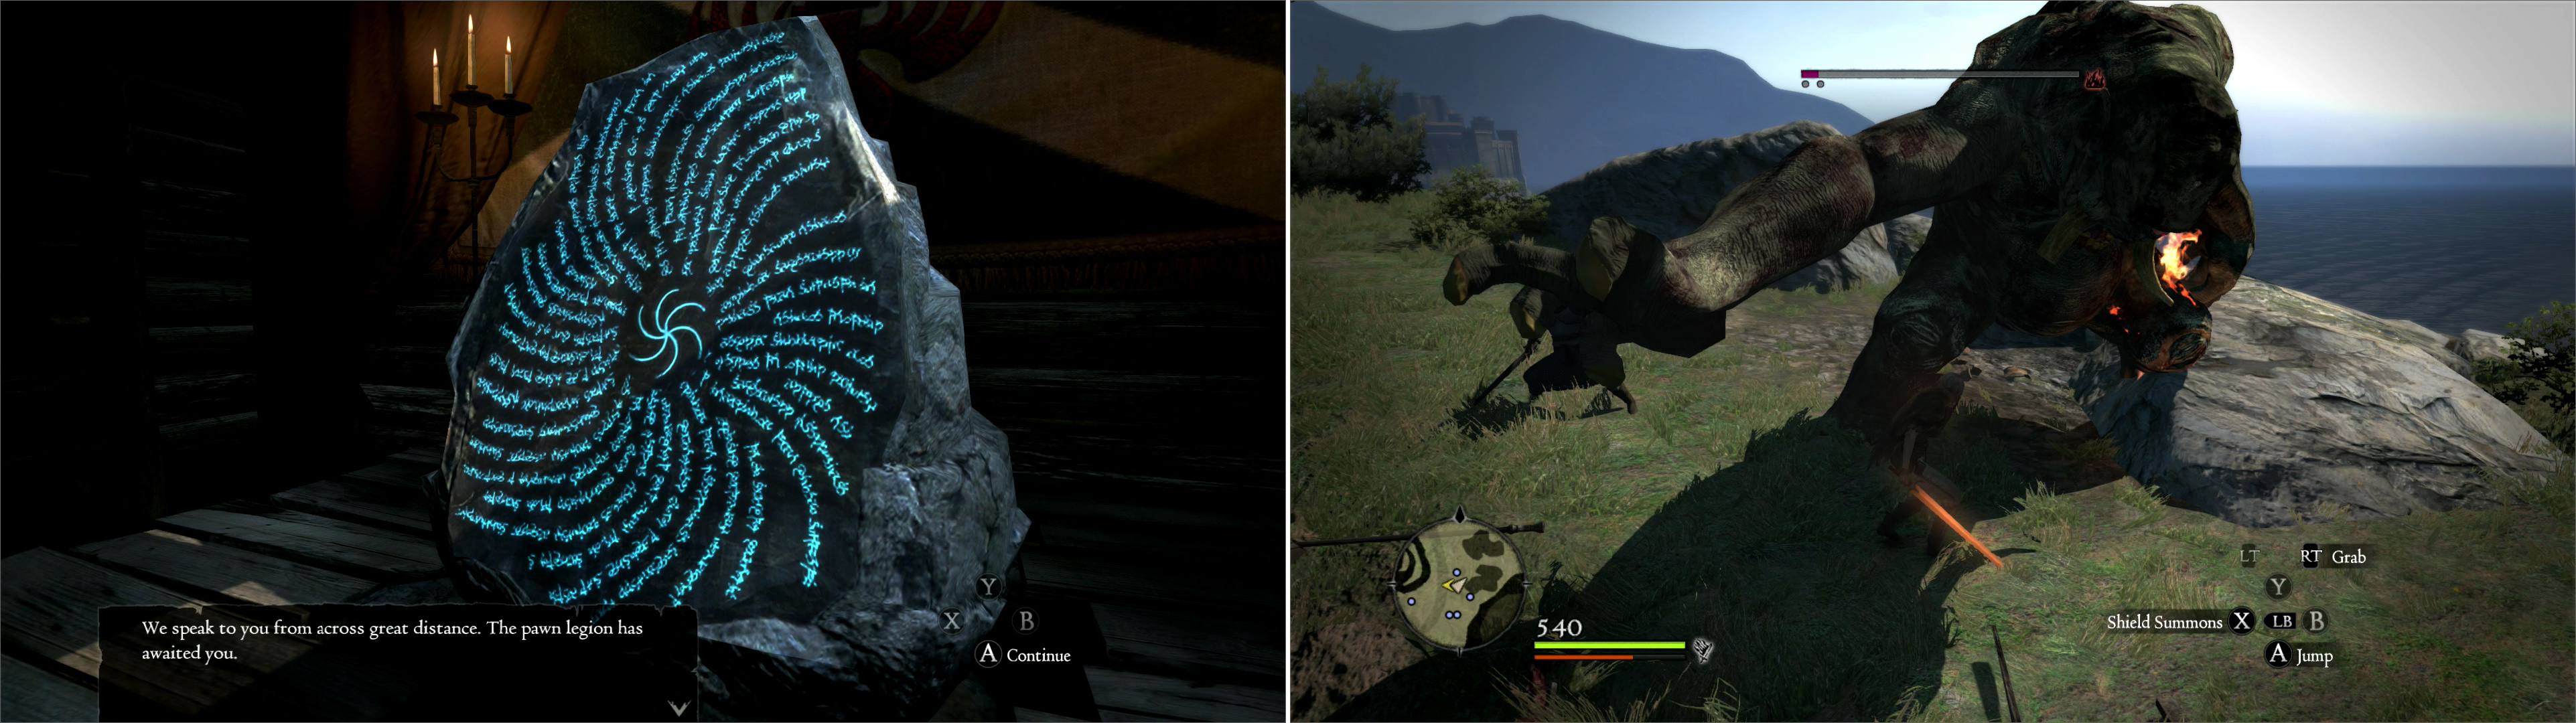
Now that you’re done being distracted by potions and innkeepers, head into the wooden building to the north to find that odd-looking stone the camera forced you to spy on. Examine it by pressing ‘B’ [XBOX] or ‘circle’ [PS3], and the disembodied voice you heard earlier will continue to speak to you. The pawn legion awaits-a bastion of faithful followers that live only to serve the Arisen. To gain their aid, however, you will have to prove yourself. It seems that Rook is just the chump door prize for beginning Arisens.
So… how to prove yourself to a bunch of disembodied soldiers lurking in another dimension only accessible by rune-covered rocks? Leave the tent and head south, back down the stairs you came up. You’ll see some soldiers running to the east in a bit of a panic. Perhaps you should go check it out? Follow a path north-east to find another gate to the Encampment. Before you bother head outside though, explore north of this gate to find the Encampment’s Notice Board. Different Notice Board, different quests. Be sure to check all the Notice Boards in the game at regular intervals (usually after the main quest has been advanced, or after you’ve completed several Notice Board quests). Anyways, do what you wish with the Notice Board and head outside.
Approeach the Riftstone in the Encampment and you’ll be told to prove your mettle as Arisen (left). Since you’re the type who listens to talking rocks, head outside and confront the rampaging Cyclops; a worthy test for any Arisen (right).
‘Lo and behold, a Cyclops is attacking the Encampment! Also note the odd glowing red rune on its forehead. That probably means something. No time to worry about it, though, a fight must ensue, and this is probably your first real fight in the game. This Cyclops is greatly reduced in power compared to other Cyclopes you’ll be fighting later- and it’s a good thing, too. You’re in no state to be tackling humongous elephantine behemoths! This one is also accompanied by Goblins, which are still dangerous at this stage in the game. Ignore the Cyclops for now, and try to steer clear of its flailing limbs. It’ll be easier to dispatch if its Goblin allies aren’t smacking you around. Once the Goblins are dead, play it safe. Stay behind the Cyclops and chop, shoot, or cast at its feet. Again, nowhere near as strong as a normal Cyclops, so you need not worry about hitting it in soft spots, climbing it, or anything else. Once it dies, watch a cutscene where an ominous robed figure walks away. Ooooh… Loot the Cyclops to score… typical dead Cyclops materials-Rugged Tusks, Rugged Bones, Misshapen Eyes, or Beast Steaks. Once done, return to the Encampment.
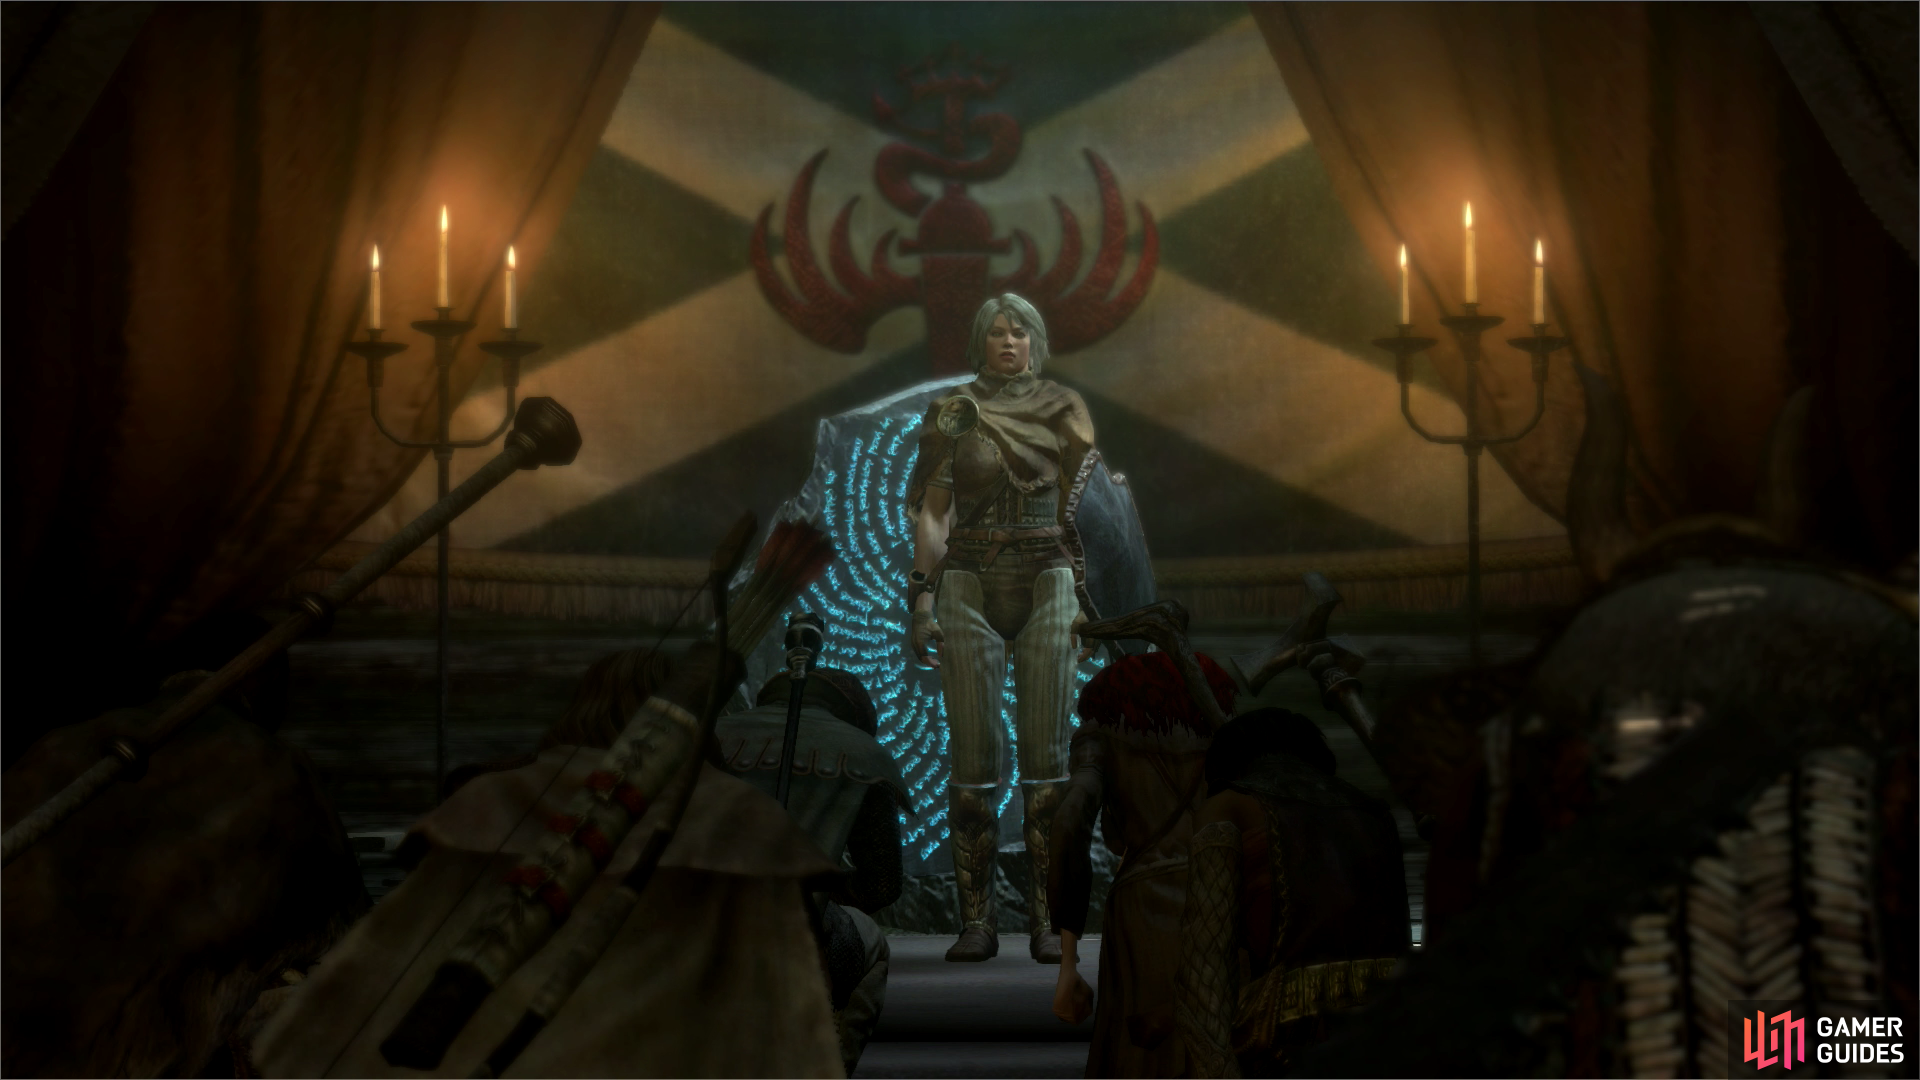
Head back to the Riftstone you saw earlier and examine it again. By taking down an almost-dead Cyclops with the aid of a half dozen soldiers, you somehow proved your worth to the stone. Yay! Good thing that Cyclops showed up, too, else how would you have proven yourself? Video games are convenient like that. Now you get to choose a companion for the rest of your journey, your Main Pawn. What’s different about your Main Pawn? Well, you get to make them, choose their appearance, name, vocation, and gear. They level with you, and you must have your Main Pawn around to recruit other Pawns. They’re kind of important.

Report back to the Riftstone (left) and, acknowledging you success, you’ll get to create a main pawn (right) as your permanent traveling companion.
Master and Commanded
So, what kind of Main Pawn should you make? They don’t really break any gameplay rules that your Arisen follows, so they should be developed the same way. Focus primarily on either Strength or Magick. Just note that they cannot utilize Hybrid Vocations, so they can never become an Assassin, Mystic Knight, or Magick Archer… with the primary implication being that they must resort to the Warrior class for Strength builds. Below are two suggested Pawn builds, pick whichever contrasts with your Arisen the most.
Ranger
A Strength-build Ranger (now that the game has been patched, they will actually use their awesome Longbow skills) will bear fruit in time. If you take away the Pawn’s daggers, they won’t feel tempted to stab at everything, and will do what you want them to do-sit back, and shoot everything down with their Longbow. You can, of course, just recruit a Ranger Pawn, so why build one? Well, you can make a Ranger/Warrior Hybrid for increased Strength (they don’t really need that much Stamina, anyways), which is something that you cannot obtain from computer-generated Rift Pawns. Have your Main Pawn suffer as a Warrior from levels 11-100, then switch to Ranger until 200 for the best of both worlds. One thing to keep in mind, however; this is a bit of a compromise build. The Ranger Pawn build succeeds mostly based on the power of the Longbow, and its associated skills. An Arisen will vastly out-power a Strength-build Pawn equivalent, just because they have access to the Assassin Vocation. Still, for support archery, it’s hard to argue with those stats.
| Projected Final Stats* | HP | ST | STR | MGK | DEF | MDF |
|---|---|---|---|---|---|---|
| Warrior/Ranger | 4820 | 3120 | 766 | 258 | 477 | 268 |
*Assumes Fighter is chosen as the starting vocation.
Sorcerer/Mage
There is one big draw towards making your own Sorcerer/Mage. You can entirely custom what skills and spells your Pawn is using. Considering that casters are only as useful as their spells, this is a great advantage of trusting other people or Pawns to have what you need. Try looking for a good Pawn with High Levin, High Comestion, High Halidom, and High Anodyne. It’s nearly impossible. For this build, get them to Gran Soren as quick as possible, then change them to Sorcerer. Regardless of whether you prefer the Mage spells or Sorcerer spells (many are shared) the Sorcerer undoubtedly has better leveling stats… an extra point of Magick and Magick Defense per level trumps five Hit Points any day. You’ll want to max the vocations in both, because both classes have many augments useful for casters in general.
| Projected Final Stats* | HP | ST | STR | MGK | DEF | MDF |
|---|---|---|---|---|---|---|
| Sorcerer | 3048 | 3070 | 258 | 866 | 177 | 657 |
- Assumes Mage is chosen as the starting vocation.
Anyways, recruit whatever sort of Pawn suits you, then note some things about your main pawn: You can equip your Main Pawn any way you wish (Vocations limiting what they can currently wear, of course), purchase and equip skills, and all that fun stuff. You cannot recruit other Pawns unless you have your Main Pawn with you. If your Main Pawn should die (say, they stupidly jump off a cliff to their own demise?) touching a Riftstone will bring them back, good as new. As for the silly four questions you’re asked after determining your Pawn’s appearance and starting Vocation… pick answers that raise their ‘Scather’ and ‘Challenger’ ratings, as these will make them more likely to attack foes. Otherwise, you could well end up with a Pawn who prefers to pace back and forth uselessly in combat, or pick up crap you don’t need. Chances are, you’ll still end up with a pretty useless Pawn, but this should make them somewhat less useless. You can also change your Pawn’s inclinations and manner of speech by sitting them down at a ‘Knowledge Chair’, usually found near any place you can rest.
| Objective | Reward |
|---|---|
| For earning the fealty of the Pawn Legion | 500 XP, 3 Rift Currency, 1200 Gold |
Training with Ser Berne
As you leave the tent, a seasons soldier named Ser Berne will talk to you and offer you some group training. You’ll be teleported to training grounds north of the Notice Board in the Encampment. Talk to Ser Berne again and he’ll tell you about the three tasks you need to do-and suggest that you improve your party if you’re having trouble… so let’s discuss the Pawns milling about the Encampment now.
You should have your Main Pawn and Rook, leaving one more Pawn left to recruit. Since this task is easier with a full party, turn Ser Berne down for now and head back to the Riftstone tent and touch the Riftstone, whereafter you’ll find yourself… in the rift! (You’ll be distracted by a cutscene where that robed figure from outside is shown walking out of the Encampment towards Cassardis… but don’t let that trouble you just yet…) Within the rift you can recruit Pawns of all sorts, online or offline. What fourth Pawn you pick to flesh out your party is… mostly unimportant. Having a Mage to cast Anodyne/Halidom early on is useful, as is having the power of a Sorcerer later. For now, you should probably travel with at least one Mage (Rook is fine) one Fighter, and perhaps a Strider to shoot at foes, provided you or your Main Pawn already don’t fit any of those roles. Touch the Riftstone again, search by whatever criteria you feel necessary, and summon up and recruit a Pawn-a task that will net you yet another Achievement/Trophy ‘Foreign Recruit’. Try to avoid expending Rift Currency right now. It’s not easy to get and… there’s just no reason to ever spend any on a Pawn. You can also recruit any of the Pawns walking around the Encampment. Recruiting any Pawn you see walking around Gransys will earn you the achievement/trophy ‘Local Recruit’.


Now that you’ve got a full party, return to Ser Berne and start his little exercise. First task? Carry a bunch of boxes. This isn’t too much effort with a full party. Your Pawns should do most of the work for you… really, the game shows you all the boxes and where to put them, so there’s not much to say about this stage of the quest. Your second task is to kill scarecrows, or in this case, wooden targets on posts. They’re scattered about, but still, with a full party, you need merely run about and hit them all. The third and final test is… well, pretty much the same thing, but some scarecrows are blue, and resistant to physical damage, and others are red. All you need to do here is focus on whatever you’re best at taking down, and trust your Pawns to handle the rest. Once they’ve all fallen, Ser Berne will congratulate you, and more importantly, reward you. Score another for the good guys. Head back into the Encampment proper.
| Objective | Reward |
|---|---|
| For training with Ser Berne | 1000 XP, 5 Rift Currency, 1500 Gold |
Prove your competence at carrying boxes (left) then show you’re mightier than some wooden targets (right) to impress the obviously easily-impressed Ser Berne.
To Cassardis and Back Again
Surprise, surprise, you’re done in the Encampment for now. Remember that robed guy walking back to Cassardis earlier? Yeah, you should probably go home and check on that. Sure enough, when you make it back to Cassardis, the robed freak will talk at you, say come cryptic crap, belittle your chances against the Dragon, and generally be an ugly little runt. Fun. You didn’t come all the way home just for that, though, did you? Of course not. Talk to a guard named Poll near the well and he’ll admit to being a coward (hiding in a well sure seems a lot smarter than attacking a massive Dragon.) Offer to investigate the well to start the quest ‘Deep Trouble’. He’ll even be nice enough to give you a Lantern. Score.
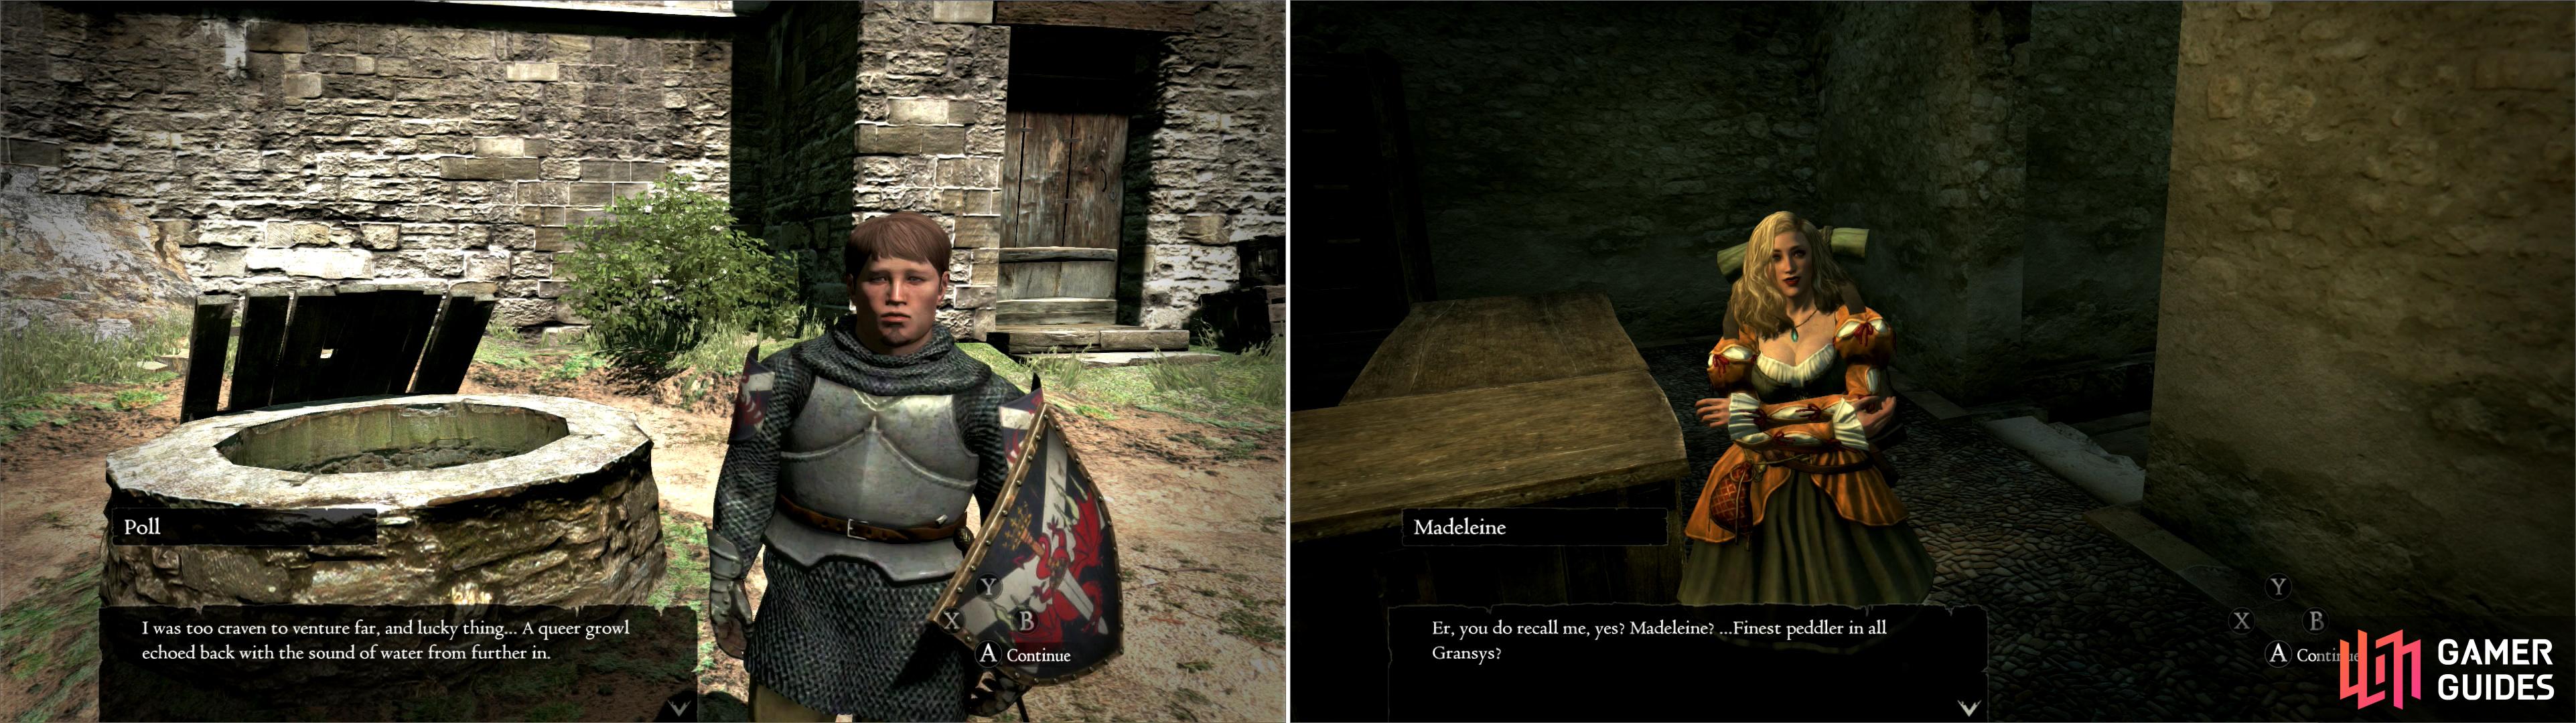
Cowardly Poll will tell you about some scary noises in the well (why is this guy a guard?) (left), while the manipulative Madeleine will try to bum an escort off of you (right).
Now head to Pablos’ Inn, where you should see a cute blonde girl named Madeleine. Talk to her twice and she’ll introduce herself as the ‘finest peddler in Gransys’. Sure. Play along with her leading conversation, and she’ll invite herself to travel with you to the Encampment. Agree to take her and leave Cassardis to embark on your first escort quest. The way back to the Encampment is pretty tame by day time. Even by night, now that you have a full compliment of Pawns this should be child’s play. Madeleine won’t make things easy on you by constantly stopping to find gold under every bush, rock, and branch along the way. Just be patient and escort her there. Once you’re close, she’ll run on ahead, and you’ll automatically follow her in.
Talk to Madeleine once again and shamelessly ask you for 1000 gold, threatening tears if you refuse. Be a sport and cough up the coin, and she’ll invite you to Gran Soren, where she hopes to set up shop. While you’re here and talking to her, you might as well check out her shop. If you continue to support her and complete her quests, she’ll upgrade her inventory substantially as the game goes on, becoming the premier seller of light arms and armor… and chick clothes. It’s good stuff. Right now, however, her stock isn’t great. If you use Daggers and want to upgrade to Throatcutters… well, it can’t hurt. Also Baleful Nails are decent Accouterments that raise your Strength and Magick. You probably won’t find a better Accouterment to wear for… well, quite a long time, really.
| Objective | Reward |
|---|---|
| For escorting Madeleine safely to the Encampment | 700 XP, 3 Rift Currency |
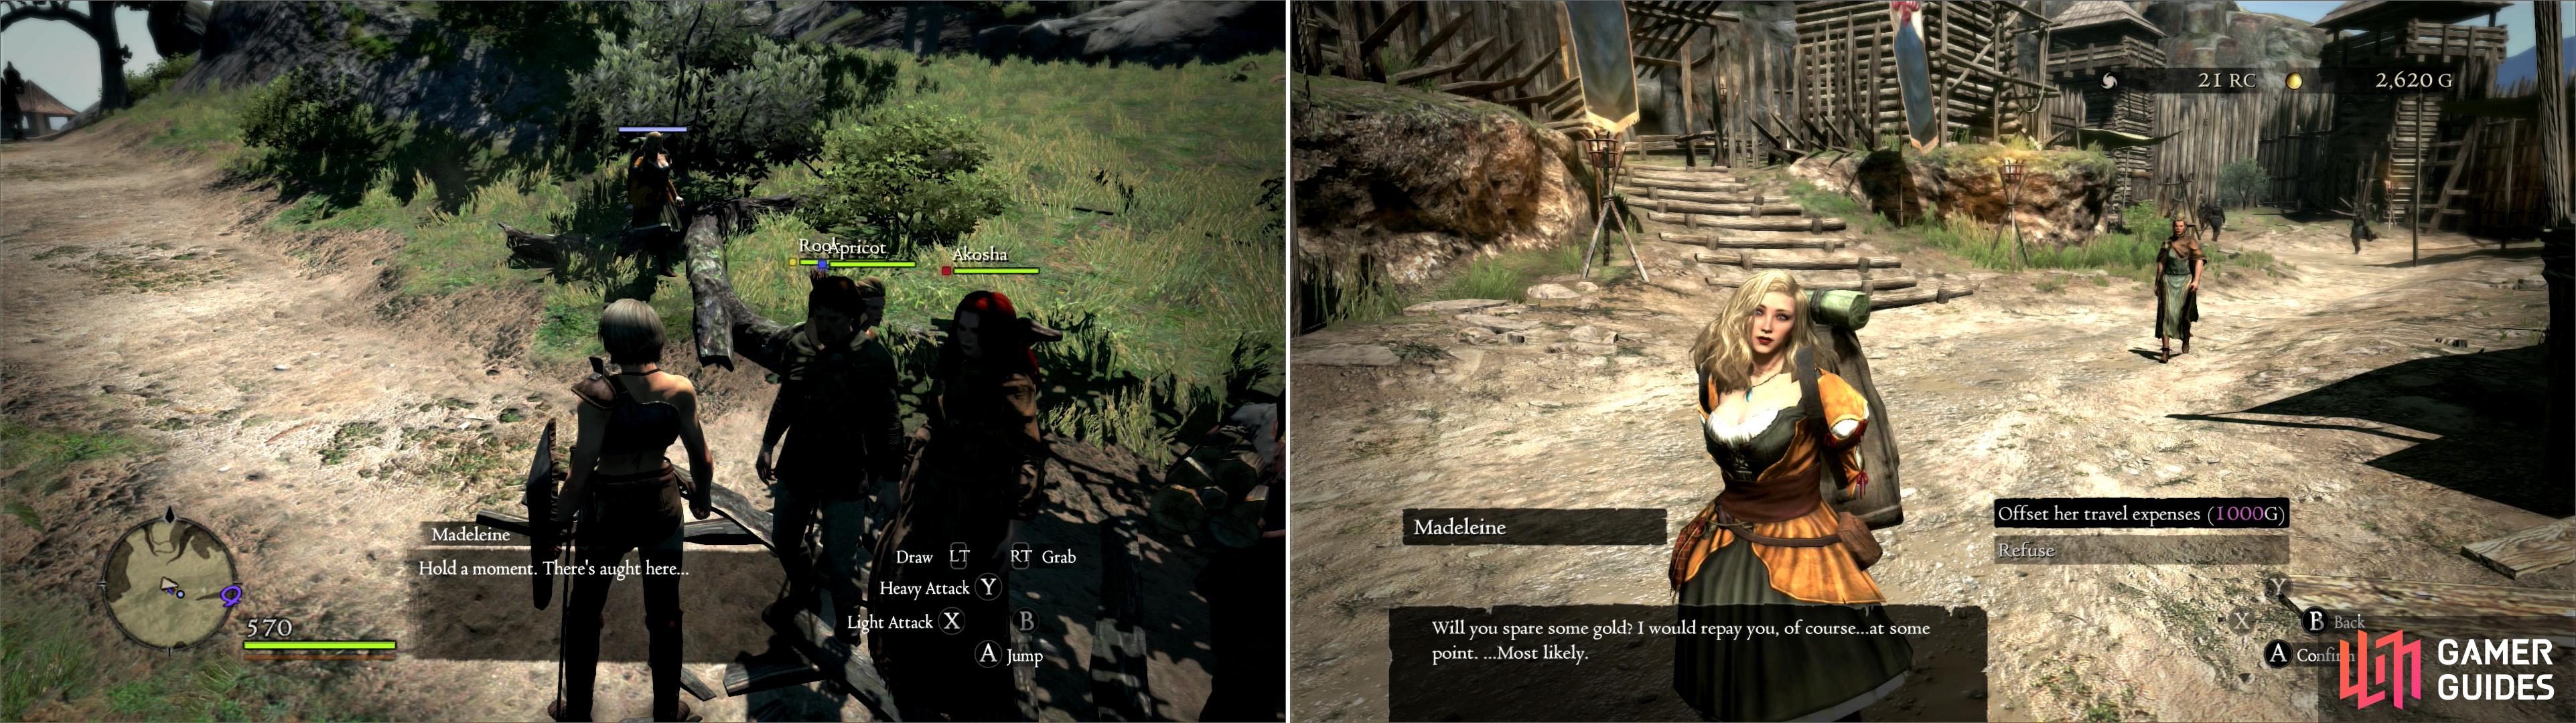
As you progress to the Encampment, Madeleine will constantly hold you up to scavange for gold (left). Despite this, however, when you reach the Encampment she’ll beg for more funding (right).
Once you’re done shopping… let’s go shopping again! Talk to Reynard, the merchant you saved en-route to the Encampment. His stock is more well-rounded than Madeleine’s is. Before you go buying anything, realize that there’s a quest Reynard will give you… but only after you buy enough junk from him. The amount of money you spend doesn’t matter, only the number of individual transactions. Buy one thing from him, exit dialogue, repeat until you have everything you want.
Chances are, you’re going to just have to buy random junk from him repeatedly to trigger the quest… but you need not start this now, when your funds are so limited. Just yet another thing to keep in mind for later. While the subject of Reynard’s quest is still fresh, however… head to the Rift Stone tent and from there head west. The narrow projection of the Encampment to the west is filled with tents, which house the soldiers gathered here. Explore along the southern cliff face until you find a rounded chest, which contains the First Journal Entry . These will come in handy later.
Four-Headed Wake-Up Call
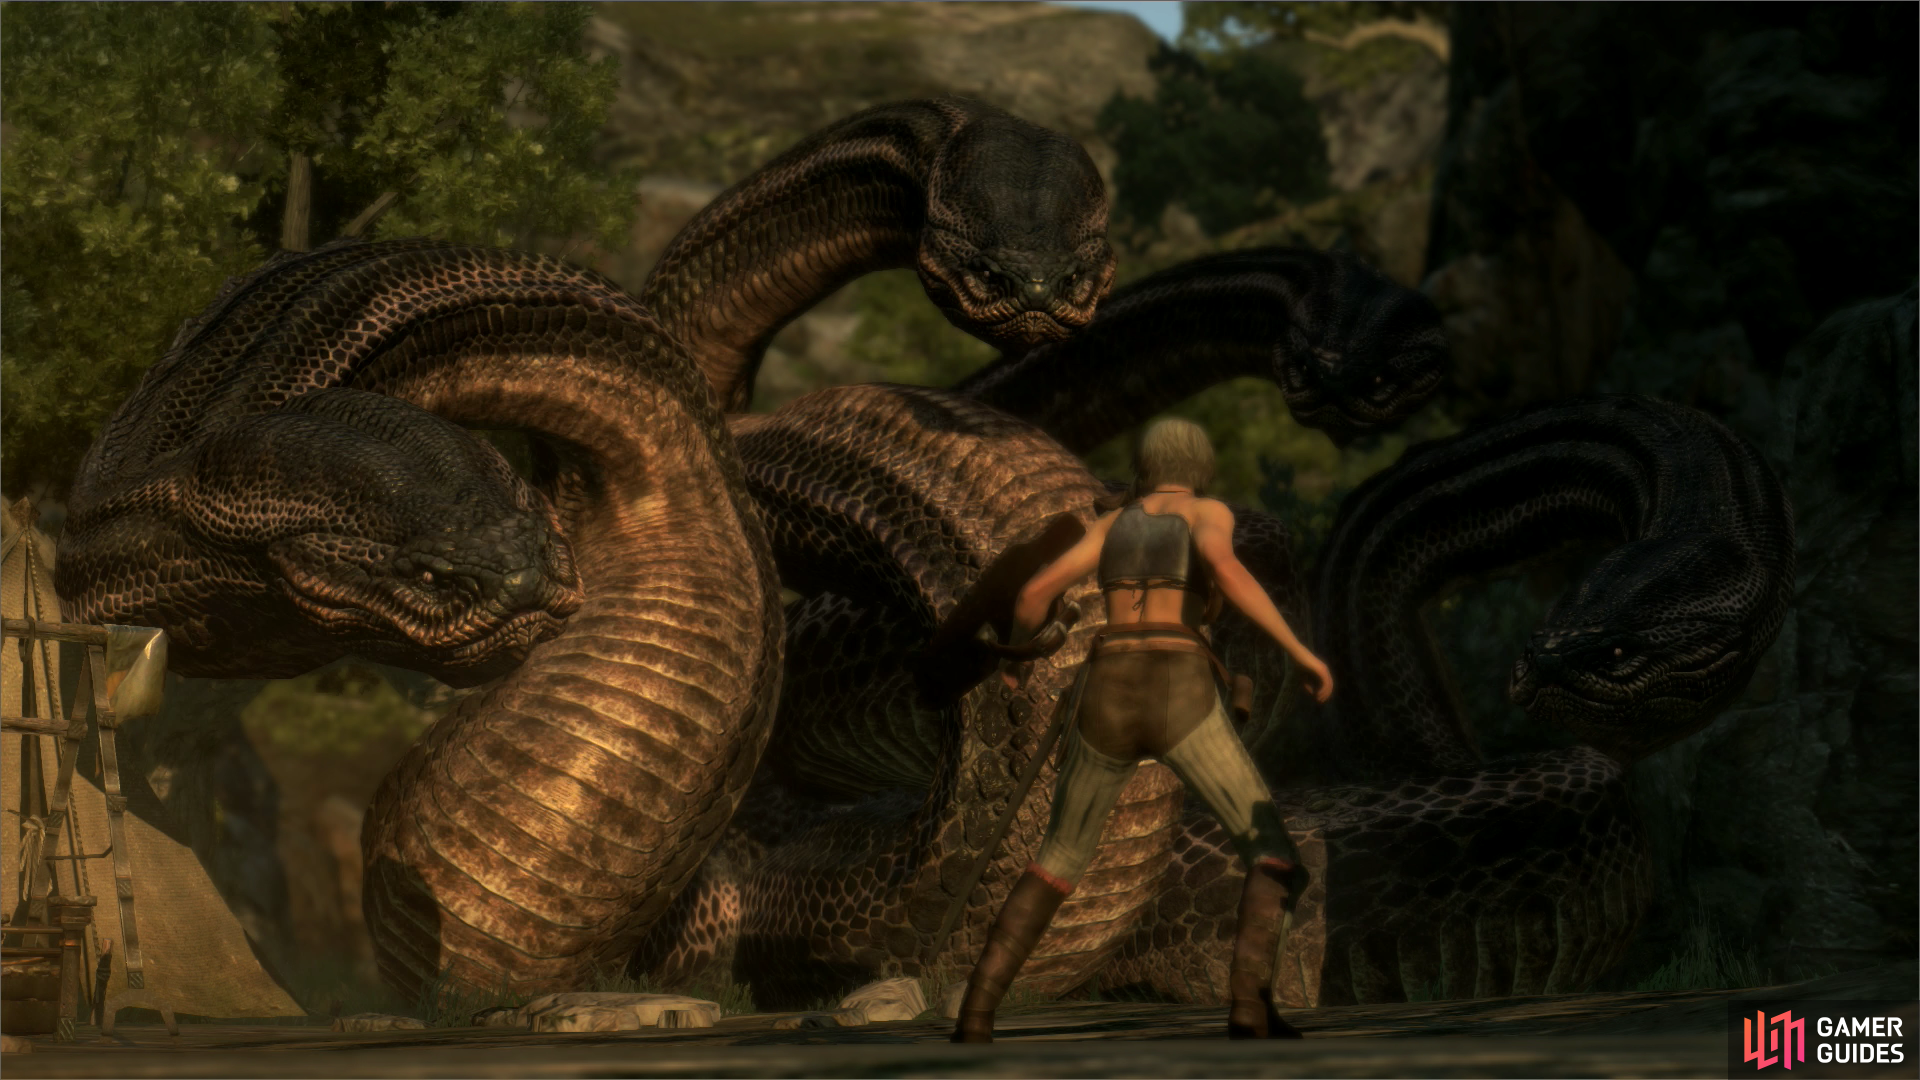
Whew. Now that you’re done messing around, head back to the Rift Stone tent, where you should find a tom-boyish lady warrior in a white cloak. Talk to her to find out that she’s Mercedes-the leader of the men of the Enlistment Corps. She’ll question you about Pawns, then suggest you rest up. Why not? It beats paying 300 gold for it. You’ll wake up in the morning to a commotion. When you go investigate you’ll encounter… a freakin’ Hydra! Now that’s a monster!
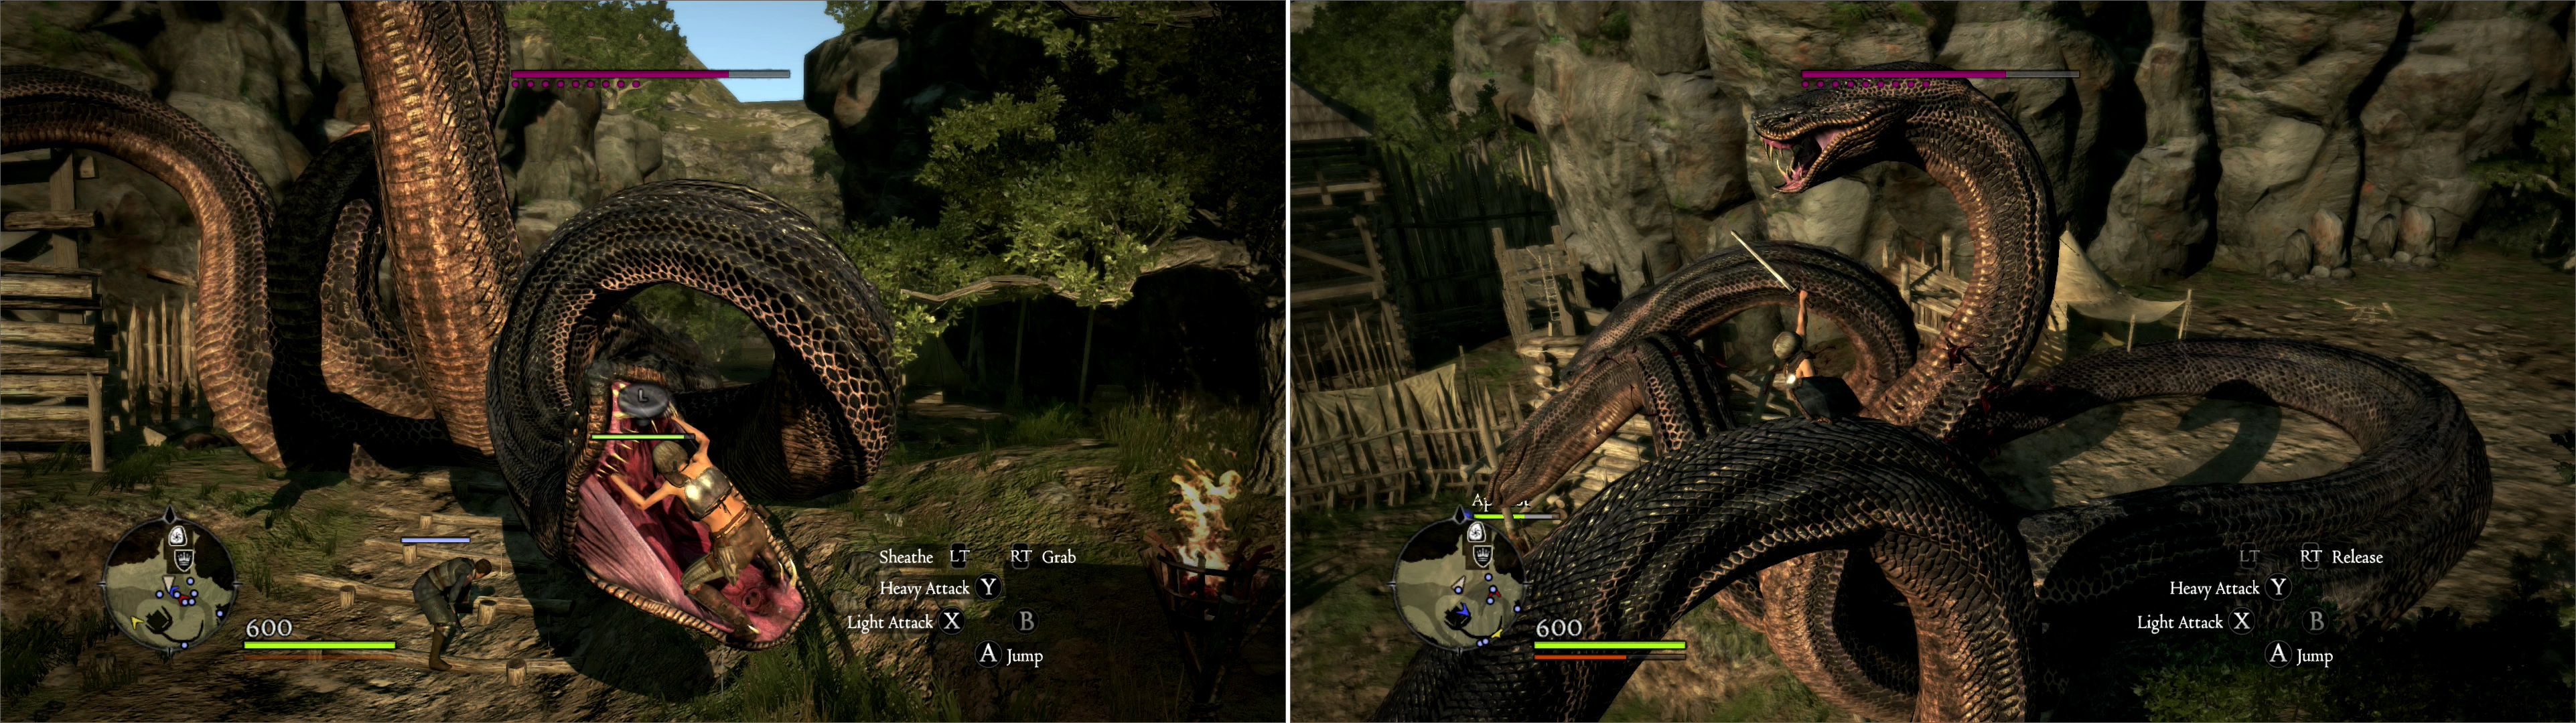
The Hydra has four heads, and they’re all hungry! (left) You want to be outside the beast, however, preferably further away from the body, where the Hydra is more vulnerable to decapitation (right).
Surely you’re no match for such a thing yet? Yeah, you’re really not. Good thing this is an uber-weak version of a Hydra, like the Cyclops you fought earlier. The goal of this fight is to grab the Hydra and climb… around halfway up one of its necks. Grab by hitting the “Right Trigger” button, and attack as normal. If you’re not high enough up, you’ll do less damage. Chop it enough and you’ll sever a head. This fight is much easier for a Strider than the other classes, although a Fighter does alright. If you’re playing a Mage, you’re better off standing back and casting spell. Their grapple attacks are… laughable.
Once its head is severed it’ll run off. You’ll notice another one of those red runes on the Hydra’s severed head (just like the one on the Cyclops’) before a crowd of soldiers rush up and gawk at your grisly accomplishment. Your deed scores you the Achievement/Trophy ‘Getting a Head’, as well as earning you an invitation from Mercedes to accompany her - and the ‘trophy’ you just collected - to Gran Soren. Such a grisly gift might just garner gratitude from the Duke. Accept and she’ll tell you to meet her at the Mountain Waycastle. Fair enough. You’ve messed around in this backwater long enough. Time to head to the capital.
| Objective | Reward |
|---|---|
| For driving off the Hydra | 2000 XP, 5 Rift Currency, 2500 Gold |


 Sign up
No Comments