
1) Dad’s Gone - (Vault 101)
Bobblehead - Medicine
Book - Grognak the Barbarian
You’ll be awakened by Amata, who frantically tells you to get your ass in gear. Apparently dear old dad left Vault 101 and the Overseer has gone facist, ordering that Jonas be killed. Allow Amata to give you the handgun, then take your BB Gun, the BB’s, and the Baseball Bat off the table. Search the First Aid Kit for Med-X and 10 Stimpaks, which will come in handy, and finally and most importantly, search your Dresser for a number of extra Vault Suits and your copy of Grognak the Barbarian . You don’t want to waste precious ammo at this junction, so equip the **** Baseball Bat and head out into the hallway.
2) Kendall and the Radroaches
Take a right and you’ll meet Officer Kendall, who will be attacked by a trio of Radroaches… you never know what’ll come out when you turn out the lights! Let them duke it out. If Kendall survives, he’ll turn on you. Don’t be afraid to use V.A.T.S. to whack him with your bat in melee combat, as this will cause you to sustain less damage. The roaches drop Radroach meat, and Kendall will drop a suit of Vault 101 Security Armor and a Vault 101 Security Helmet, which offer greater protection than your normal Jumpsuit, so it may be worth wearing.
3) Save Butch’s Mom!
Head down a hallway to the west from the intersection where Kendall fought the Radroaches. You should run into Butch at the end of the hallway, and ironically enough, it seems Butch isn’t quite so… butch. His mother is being attacked by Radroaches, and he’s afraid of the critters, so naturally he needs our help. If you confirm that he’s afraid of the bugs (pick the second dialogue option twice) you’ll get a shot at a pair of Speech challenges, where you can either convince Butch to either abandon his mother, or to man up. Alternatively, you can also give him your BB Gun (after failing a Speech challenge), which… well, guns turn cowards into fighters, in reality and in Fallout. The best option is to simply agree to help him, however… especially since a) who wants to give away our BB Gun, and b) even when armed, Butch is usually too incompetent to save his mother.
Follow Butch down to the end of the hallway, then turn south and enter the first door on the right. Butch’s mother is in the second (northern-most) room, and sure enough, she’s being assaulted by several Radroaches. Promptly smash the Radroaches, and Butch’ll thank you, even giving up his treasured Tunnel Snake Outfit (as well as returning your BB Gun, if you lent it to him). Grab the Vodka lying around as well, as its 20 to 1 value to weight ratio makes it worth holding onto. If you’re sneaky you can steal another bottle of vodka from Butch’s mom, and from Butch you can steal three Purified Waters and a Switchblade. If you took-or later take-any damage, the bathrooms that occupy the space between Butch’s quarters and yours have a number of sinks and toilets you can drink from to replenish your Hit Points free of charge… there’s absolutely no reason you should have to use a Stimpak while escaping from the Vault.
4) Avenge Grandma Taylor
From Butch’s quarters head down the hallway to the north and take a left, then a right. Enter the first room on your right to get to the cafeteria wherein your 10th birthday party was held. Inside you’ll find a trio of Radroaches and the body of Grandma Taylor. Kill them and leave, ignoring the passage to the left as there is nothing but inaccessible doors down there. You’ll be discovered by Officer Gomez, who is not nearly as homocidal as Officer Kendall was. When you’re done talking to him continue up the stairs.
5) Incinerator Andy
At the top of the stairs take a right. You’ll run into the robot Andy, who shows off his Radroach torching skills. He’ll head into the infirmary, where Stanley will begin repairing him. Search the room and pick up the two Stimpaks on the ground, and perhaps the Scrap Metal from the Toolbox. If you’re really tricky you can lift a Vault 101 Utility Key off of Stanley. If you continue north you’ll reach your father’s office, which has long-since been sacked. Note that the framed Revealtion 21:6 quote is locked [Average]-following my build, you won’t yet have a high enough Lockpick skill score to even attempt to unlock this yet… don’t worry, however, perhaps we’ll get a chance to tinker around with it later? When you’re done leave the room and take a left, entering the door that leads to Vault 101 Atrium.
6) Vault Gun-Down - (Vault 101 - Atrium)
When you reach the Atrium go into the large central room and head left. You’ll see two Vault dwellers chatting; Tom and Mary Holden. Tom will decide to make a run at two guards, who promptly shoot him down. Follow on his heels so they’re busy shooting at him rather than you, and when you get close enough V.A.T.S. one of the guards, which will kill him with any luck. Kill the other and take both of their pistols, as well as any ammo they might have been carrying. Since you have no way of picking a [Very Hard] lock at this juncture, you’re not going through the nearby door.
7) Pencil Picking!
Head into the small room north of the large one and loot it. Be sure to pick up any pencils you find! They weigh nothing and can be sold… for a bit, so why not? Also take any Scrap Metal you find, as it can be traded for caps and experience later on. Other crafting materials lie around, but since we currently don’t have a way to stash our loot, we might want to be picky about what we… pick up.
8) The Upper Level
Return to the large room to the south and head through the door being propped open by a locker (also to the south) and up the stairs, killing any Radroaches along the way. Atop the stairs turn east, then north to reach the walkways running over the large room we were in earlier. Continue west, ignoring some dink yelling at you through a window and through a doorway marked ‘Admin’. Beyond you’ll find Security Chief Hannon, who needs a dose of death. Search near a console to find a dead engineer-Floyd Lewis-who can be looted.
9) Loot Floyd
Continue west through another doorway marked ‘Admin’, turning north when you must. Enter the first room to the left (marked ‘Security’) where you’ll find Officer Mack, Amata, and the Overseer. If you’re sneaky, you can get near enough to Officer Mack to sneak attack him in V.A.T.S. Amata will run off, and the Overseer will sit around calling for guards. You can chat with him, but there’s no point in killing him yet. When you’re done talking, search the lockers for a Stimpak, 32 10mm Rounds, and two of the following: a Police Baton, Vault 101 Security Armor and Security Helmet. Search the desks for some Pre-War Money and Shotgun Shells. If you need healing, go into the back room and drink from the sink. Before you leave, try and steal the Overseer’s Office Key and the Overseer’s Terminal Password from the Overseer.
10) Confront the Overseer
Leave the guard station and head to the left. Enter the room at the far end of the hallway to the right. Inside you’ll find Jonas, who has some Eyeglasses, a Note from Dad, a Stimpak, and a Vault Lab Uniform. Open up your Pip-Boy and head to the Data section. Your Dad’s note is under the Notes section, listed as ‘Note from Dad’. Search the desks for some more Pre-War Money. You can head into the room to the left to talk to Amata, who will be thankful you didn’t kill her dad, or you can head to the right to get to the Overseer’s Office, which you can unlock by picking it [Very Easy] for some experience, or with the Overseer’s Key.
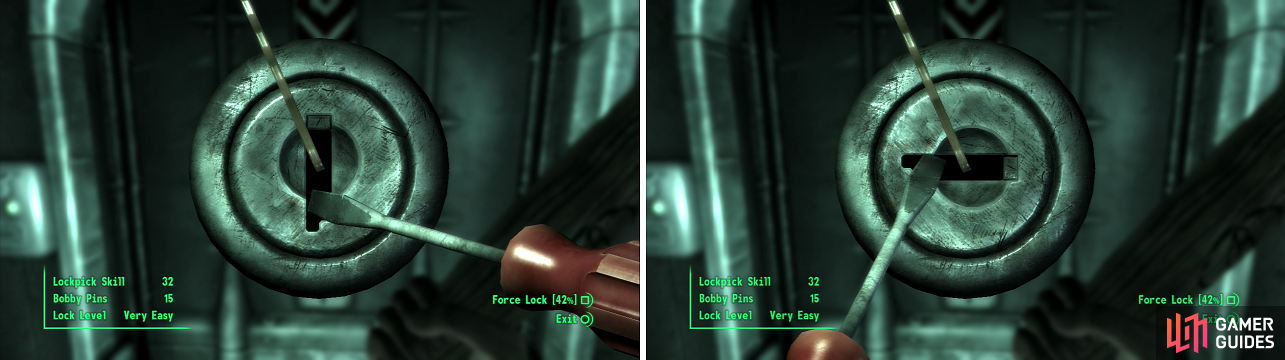
A defiant lock stands imposing and vertical (right), but is soon thrown down in horizontal defeat (left).
How does the unlocking mini-game works, you ask? Well, you rotate the bobby pin up to 180° around the top and sides of the screen. Guess the right spot to apply torque, which turns the lock. If the bobby pin is in the right spot, the lock will turn from vertical to horizontal, and the lock will open. If not, the lock will click and damage the bobby pin. The further the lock turns, the closer the bobby pin is to the right spot. If the bobby pin takes too much damage during your attempt, it’ll break. Run out of bobby pins, and you can’t pick the lock until you get more. The more difficult the lock, the higher Lockpick score you need to be able to even attempt to open it, and the smaller the sweet spot for the bobby pin is. In summary, guess a spot to place the bobby pin, apply torque, and if it doesn’t unlock, move your bobby pin an amount based on how much progress you got before stress was put on the bobby pin. You’ll get the hang of it.
Search the Overseer’s lockers for a whopping 120 10mm Rounds, two Mentats, the Overseer’s Terminal Password (if you don’t already have it) and three Stimpaks. Explore his terminals while you’re here for some more information, where you’ll hear about a town called Megaton, which was presumably explored by the previous Overseer-Anne Palmer-some thirty years ago… that probably has something to do with the current Overseer’s, ah, misgivings about the surface. And of course, make sure to open the Security Tunnel so you can continue on your way. Kill any Radroaches down here and continue forward until you find the door leading to the Vault 101 Entrance.
11) To the Entrance - (Vault 101 - Entrance)
Flip the electrical switch in front of you and head into the large room and activate the Vault Door Security Control. Amata will follow you. Chat with you one last time before heading out. As the door opens… slowly… you’ll be harrassed by two Officers. Ignore them and head out the door… And use thier unwillingness to cross the boundary to the outside world to your advantage and beat them to death. When they’re dead, go through the previously locked door they opened (opposite the exterior Vault door.) Enter the room to your right and loot it. Now’s as good a time as any to set the standards for looting… If it has a Value-to-Weight ratio of 5-to-1 (5 caps for one pound of weight), it might be worth hauling off and selling. If not… leave it behind. Some items, however, are worth more than their simple cap value-typically components for various weapons you can craft or items certain NPCs need (and will reward you for).
12) Last Minute Looting
Speaking of loot, let’s go get some, shall we? From the room with the vault door head west through a doorway (the door the two guards we just beat to death came through). In this room are three new doors-to the west you’ll find a door that’ll eventually take you back to the Atrium, to the south is another door that leads to a room unexceptional save for the locked first aid box on the wall [Very Easy], and finally to the north is a storage room wherein you can score two toolboxes, three bottle of Purified Water and six Bobby Pins.
13) Leaving Vault 101
Now that you’re done, exit the Vault, pass the cheerful skeletons and their angry, angry signs… Let’s hope they weren’t the two “ambassadors” that left the Vault some 30 years ago… and go to the Door to The Capital Wasteland. You’ll hear the ominous screech of the Vault Door closing behind you. There’s no going back now, so head towards the light…


 Sign up
No Comments