
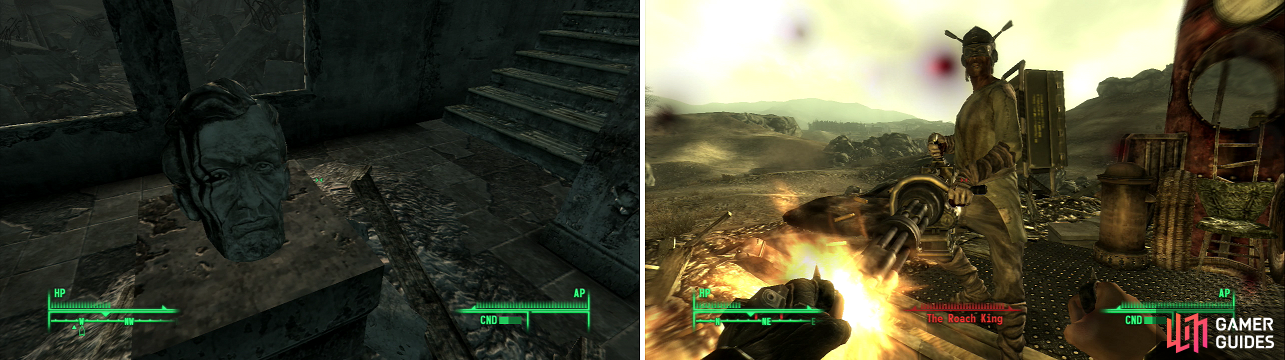
Lincoln’s head is a powerful symbol for the escaped slaves at the Temple of the Union (left), but they hope for more. The Roach King (right) is willing to defend his “kingdom” from all invaders.
1) Temple of the Union
Temple of the UnionOnce you get near the Temple of the Union, an unfriendly lady named Simone Cameron will question you. Suppress your desire to smite her and she’ll open the gate for you. Apparently some one named Hannibal is the one to talk to, so go find him. He’ll ask you to promise not to betray him and his fellow slaves to the slavers at Paradise Falls. If you make the promise, you’ll get the the “Temple of the Union Key”. Offer to help him with his plans of setting up a haven in the Lincoln Memorial and you’ll get the area’s map marker and start the quest “Head of State” . As usual, we’ll be delaying this quest until we’re done with more pressing matters.
Hannibal willl also ask you to talk to Caleb, who has some needs of his own. He’ll ask you to find a picture of Lincoln’s head in the Museum of History, whose map marker you’ll also get. We’ll deal with these quests when we have a reason to travel to the Mall part of D.C. You can grab some decent loot if you don’t mind robbing from slaves. There’s a Pre-War Book in Caleb’s Home, and the Storeroom [Average] has all kinds of food and some ammo.
2) The Roach King
Head west from the Temple of the Union to find the Roach King, enthroned and surrounded by his insectoid court. Loot the rocket behind the Roach King’s ‘throne’ for a Mini Nuke and some Dirty Water. Now head back to the Temple of the Union.
3) Abandoned Farm
Book - Guns and Bullets
From the Temple of the Union head to the north-east, up a large hill until you see a farm in the distance. It’s vacant, of course, but inside the farmhouse you’ll find a terminal that details some of the farmer’s activities. East of the farm house is an outhouse, inside of which is a copy of Guns and Bullets .
4) Relay Tower KX-B8-11
Book - D.C. Journal of Internal Medicine
Head north, north-west to find a radio tower in the distance, this one is marked as Relay Tower KX-B8-11. Flip the electrical switch to pick up Radio Signal Oscar Zulu. This time it’s a dialogue loop instead of Morse code. Head to the south-east and around a large rock to find the entrance to a drainage chamber. Seems like bomb survivors just loved climbing into these things, eh? Once inside head south, then through a door to the west to find that you are much too late to provide any assistance. Sorry Bob. Take all the food and drugs and head across the tunnel to the east and through another door to find Radio Signal Oscar Zulu on a table. Near it you’ll find a Pre-War Book and a D.C. Journal of Internal Medicine . There’s also some Purified Water on the floor.
5) Grisly Diner
Book - Tales of a Junktown Jerky Vendor
Book - U.S. Army: 30 Handy Flamethrower Recipes
Keller Family Transcript (3 of 5)
Head west until you find the Grisly Diner. Either head around to the back or be prepared to deal with a lot of landmines. Once inside the building a trio of Raiders will show up to delay your looting. Once they are dead, grab the copy of Tales of a Junktown Jerky Vendor from the metal shelf from behind the counter. Behind the building is a metal shelf with a Chinese Assault Rifle, a Missile Launcher, and several ammo boxes near and on it. Also in the back you’ll find Keller Family Transcript (3 of 5) on a desk.
Follow the road in front (west) of the Grisly Diner north until you come across the ruined remains of half a bus. Inside you’ll find a copy of U.S. Army: 30 Handy Flamethrower Recipes on the floor. Now that we have what we’ve come for, head back down to Canterbury Commons.
6) Books Around the Corvega Factory
Book - Big Book of Science
Book - Chinese Army: Spec. Ops. Training Manual
Book - U.S. Army: 30 Handy Flamethrower Recipes
From the main street running east/west through Canterbury Commons, head west to reach a circular road. Travel south-west to find the road we took to get to Canterbury Commons the first time. This time, however, we want to follow it south until you find the Corvega Factory. The road won’t last past the Radio Signal Yankee Bravo radio tower, but as long as you keep going south, you’ll reach the destination.
South of the factory you’ll find a truck bed with a **** Big Book of Science inside. The only way to reach the inside of this truck is to go up the the cliff to the south and drop down into the back. Grab the book and use the barrels to jump out. Further south still you’ll find a road running east/west. Follow it wasta bit until you find a red rocket structure. From it head south-east to find a road with an over-turned truck. Inside is a table with a Mini Nuke, some Stimpaks, and a copy of U.S. Army: 30 Handy Flamethrower Recipes . There’s also a locked [Very Hard] footlocker with yet another book inside, a copy of Chinese Army: Spec. Ops. Training Manual . Three books around the factory, what a haul! There’s no way the factory itself could do as well, right?
7) Corvega Factory
Book - Big Book of Science
Book - Lying, Congressional Style
On the desk to the south is a copy of Lying, Congressional Style . Go up the stairs to the west and loot the Talon Company Merc. A female Talon Company Merc? That’s rare. Head across the level to the east and search the room in the north-eastern corner of the map. On a desk you’ll find a Big Book of Science . Vanquish any ants you see and move south until you find the door leading deeper into the Corvega Factory.
8) Another Ant Queen
Book - Dean’s Electronics
Go through the factory, smiting ants as you go. To the south west you’ll find an Ant Queen, which can be easily killed with Fisto! by flanking it. In the south-most room in one of the buildings you’ll find a dead Mercenary and a dead Wastelander. On a desk you’ll find a few Stimpaks and a copy of Dean’s Electronics . Leave the Corvega Factory and head south and slightly west until you find Rock Creek Caverns. Well, we’re not going to find another excuse to explore here, so we might as well.
9) Rock Creek Caverns
What’s there to say? There’s a bunch of Mirelurks around that need to be slain. Keep going through the level until you come to some natural caverns. In a chamber to the eat of the first large cavern you’ll find some loot, the best of which is a Stealth Boy in a safe [Easy]. Continue to the north-east, killing as you go. In the far north eastern corner you’ll find the “Mirelurk King’s Treasure.” A bunch of dead people, two first aid boxes, and a locked safe [Easy]. You’ll find two Laser Rifles, which make up most of the loot. Leave the Rock Creek Caverns and head south-west to find Friendship Heights.
10) Battle of the Big Guns
Just south of Rock Creek Caverns you’ll find a not-so-random encounter. A pair of Raiders with Missile Launchers will engage a pair of leveled Super Mutants, typically Super Mutant Masters with Miniguns or Super Mutant Overlords with Gatling Lasers, depending on your level. This encounter happens along a road, south of which is an impassable wall of rubble. East of here you’ll find the National Guard Armory (our ultimate goal), but we migth as well discover a location to the west-Friendship Heights.
11) Friendship Heights
At Friendship Heights you’ll find several Raiders, one of which typically has a Missile Launcher. They also have a ton of loot around, although none of it is exceptional, you will find a fair amount of ammo and drugs. Now head back east to find the National Guard Depot. Inside is a treasure trove of weapons and other loot, especially if you have all five of the Keller Family Transcripts . And of course, the Bobblehead - Small Guns , which we’ve been wanting for a while now.
12) The Unyielding Door
Book - Nikola Tesla and You
Outside you’ll find two Protectrons. Kill them and head inside. This level is crawling with robots, and you’ll really be thankful for your Robotics Expert perk in here, if you have it. Head to the south-east corner of the level, go down some stairs, around a corner, and through a door to find a small store room. On one of the metal shelves you’ll find a copy of Nikola Tesla and You . To the west is a Utility Door [Very Hard], beyond which lies the treasure we seek. By all rights we should be able to pick the lock, as it is [Very Hard], but if you try it’ll simply tell you the door is activated elsewhere. If that’s the case, why not say [Inaccessible], or [Requires Key] like all the other doors you can’t pick? Ah well, that’s our goal, and we’ll have to trudge through the entire depot to open it.
13) To the Training Wing
Head back up the stairs you came down (the stairs in the south-eastern corner) and up another flight of stairs to a level above the one you entered on. At the top the staircase you’ll find a bookcase with two Pre-War Books on top. Go west through some offices until you find a corridor with turrets at the end. Go south down the corridor and down some stairs. Then head east until you find the door to the Depot Training Wing.
14) A Generous Little Room!
Book - Tales of a Junktown Jerky Vendor
Head north through what’s left of a door to reach a hallway with a turret on the western end. Across the hallway is a room with a terminal [Average] which can deactivate the turret. Go down the tunnel to the east when the turret is dealt with, along with whatever roaming robot that is guarding the chamber. Go up some stairs and you’ll come to a room with a copy of Tales of a Junktown Jerky Vendor on the desk. There is also a locked cabinet [Very Easy], and a wall safe [Average]. Above the safe is a Pre-War Book, and near it is another cabinet with a Scoped .44 Magnum inside. What a generous little room!
The Shocker can dispose of even the strongest of robots with… shocking… ease (left). A fully-stocked firing range is a welcome treat for any scavenger (right).
15) The Firing Range
Head back down stairs and head down the tunnel to the west and go around the corner to the north until you find a door to your right. Behind the desk you’ll find a nice little weapons’ cache, which includes four Combat Helmets, six Assault Rifles, six 10mm Submachine Guns, and a bunch of 10mm and 32 Calibur Rounds. Sure, it’s all in crap condition, but that’s what repair is for. As nice as this cache is, however, it’s nothing compared to the one we’re here for. Head through the door to the north and then through another to the east to find a firing range. There are a few robots here, and a few guns in the shooting partitions. At the far eastern side of the room you’ll find a door leading south. In this room there are a few ammo and grenade boxes worth looting before you head to through the door leading to the Depot Offices.
16) The Northern Cubicles
Through a door to the south will be several offices; two rooms separated by a middle partition with cubicles on either side. Over the elevated central partition near the southern wall are two turrets. There should also be a pair of robots milling about, but sneak attack criticals keep me out of nearly all trouble in this room. Loot the eastern cubicles and explore the ground level until you find a door [Average] leading to a room under the central partition. Inside is the terminal [Average] which controls the turrets. Explore the western cubicles then return to the central partition, head up some stairs to the south, and continue through a door, under where the turrets are (or were).
16) Back to the Beginning
The room behind is pretty boring-a long, curved table with a number of broken terminals on it and some smaller tables off to the sides. Continue up some stairs to the south, then head down a tunnel to the west to find a more intersting area. In this room you’ll find cubicles to the north and south, and a large wooden counter in the middle of the room, upon which is a copy of Duck and Cover! In the far western edge of the room where the roof is collapsed will be a Sentry Bot. Kill it and explore the upper level by climbing a ramp the collapsed roof makes. Notice the square pillar in the middle with the shelves on it? Circle around to the east and on the side opposite the ramp you’ll find three Pre-War Books on a shelf. Hey, that’s 300 Caps from the Brotherhood lady at the Arlington Library. Head up the ramp and continue east, taking the door back to the National Guard Depot.
17) The Unyielding Door Yields
You’re now in an office above where you previously explored. On a wall near the a desk is an electrical switch. Activate it, as this is what we just trudged through robot hell to reach. Security lights will pop on. Head past the desk and other debris onto the ledge to the west to get a better look at what you just did. Go by the surprisingly intact couch and look down over the ledge facing north. The utility door we couldn’t open is, surprise, opened, and a Sentry Bot will be lurking around down there somewhere. Kill it and go into the room you couldn’t previously enter and activate an electrical switch on the wall. Go down the stairs and through a door to reach the National Guard Armory.
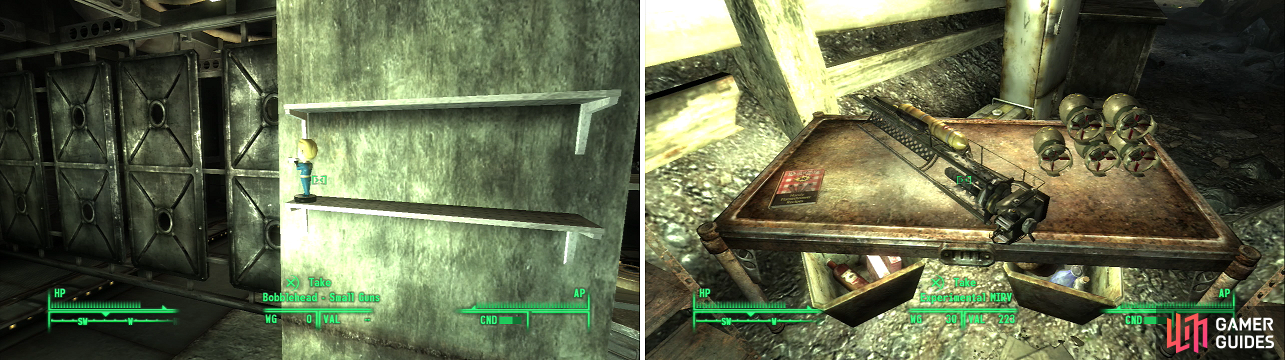
The Bobblehead - Small Guns is your reward for making your way through the National Guard Armory (left). If you collect all the Keller Family Transcripts you’ll gain access to additional goodies, including the Experimental MIRV (right).
18) National Guard Armory
Bobblehead - Small Guns
Go through a door to claim your treasure, a wonderful bounty of glorious guns and goodies. There’s a Missile Launcher, ten Missiles, four Assault Rifles, seven Purified Waters, four Stimpaks, four Police Batons, four Combat Knives, four Pulse Grenades, four Pulse Mines, four Combat Helmets, two suits of Combat Armor, two 10mm Pistols, two Radiation Suits, four Frag Mines, two 10mm Submachine Guns, 84 rounds of 10mm Ammo, four Frag Grenades, two Buffouts, three RadAway, four Rad-X, a Minigun, five ammo boxes, and a number of metal boxes to loot. There is also the Bobblehead - Small Guns on a shelf.
19) The Keller Family Stash
Book - U.S. Army: 30 Handy Flamethrower Recipes
Now head south to find the “Bunker Access Terminal”, which requires the code obtained by the Keller Family to get in. There’s no negotiating, no hacking, either you have the code or you don’t. Inside the bunker will be a Glowing One, the only guardian of the loot within. There are a number of goodies on the shelves, and a locked safe [Average] near them, but the real catch is on a table to the east. You’ll find five Mini Nukes, the Experimental MIRV , a copy of U.S. Army: 30 Handy Flamethrower Recipes , and under the table in a bin, a Nuka-Cola Quantum. Leave, head back to your home and get ready to head west from Megaton. It’s time to get another Bobblehead.

 Sign up
No Comments