

| Important Items in this Area | Enemy Skills in this Area* |
|---|---|
| Ramuh Materia | Laser |
| Matra Magic |
Play Time!
The Gold Saucer marks a distinct contrast between the poverty at North Corel, and the bleakness of Barret’s mood. It’s pretty much the most insanely over-the-top amusement part ever. Ignore the Save Point (which costs Gold Pieces to use, which you don’t have yet) and go to the entrance, where the attendant near the large Chocobo will reveal that the happiest place in the world carries a hefty price tag. Purchase a single pass for 3000 Gil, or the lifetime pass for 30,000 Gil, if you can afford it… you’ll be coming back here again, don’t worry.
After you make your purchase, the attendant will tell you about GP, which can be won at various events in the Gold Saucer, and spent to purchase all kinds of fun things… of course, it costs Gil to play most of the games, so returning here later, when resources aren’t as scarce, is probably a better idea than trying your luck any time soon. Once inside the Gold Saucer Aeris will try to cheer Barret up rather aggressively. She instead succeeds at making him angrier, and he’ll run off. Once you’re back in control of Cloud again, you can talk to your team-mates and pick one to go play with. Whomever you pick will gain disposition (+3 Aeris, +3 Tifa, +3 Yuffie), but if you talk to somebody and don’t pick them, their disposition will lower (-2 Aeris, -2 Tifa, -2 Yuffie)… but you can only shift disposition like this once, so you can’t, say, decline somebody to low theirs, then pick somebody else to raise the latter character’s disposition. In any event, pick your favorite gal… or dog-thing… and turn your attention to the seven areas you can explore.
Starting from the west and moving clock-wise, there’s the Event Square, the Speed Square, the Round Square, the Ghost Square, the Battle Square, the Wonder Square, and the Chocobo Square. Most of these areas aren’t worth visiting at this time (like mentioned earlier, there will be better ways to earn GP later), but there are a few things worth picking up. First head to Ghost Square and make your way up the stairs to reach the Ghost Hotel. Is there some kind of theme here? From the entrance head north-west to find the Turtle’s Paradise No. 3 Newsletter on a wall near a doorway. Once you’ve read it, go through the nearby doorway and investigate the counter to meet Mr. Hangman, who will sell you a nice variety of items. Once you’re done here, leave the inn and return to the Station by clicking on the “Station” gravestone.
Item Shop
| Item | Gil |
|---|---|
| Potion | 50 |
| Phoenix Down | 300 |
| Ether | 1500 |
| Antidote | 80 |
| Maiden’s Kiss | 150 |
| Soft | 100 |
| Echo Screen | 100 |
| Hyper | 100 |
| Tranquilizer | 100 |
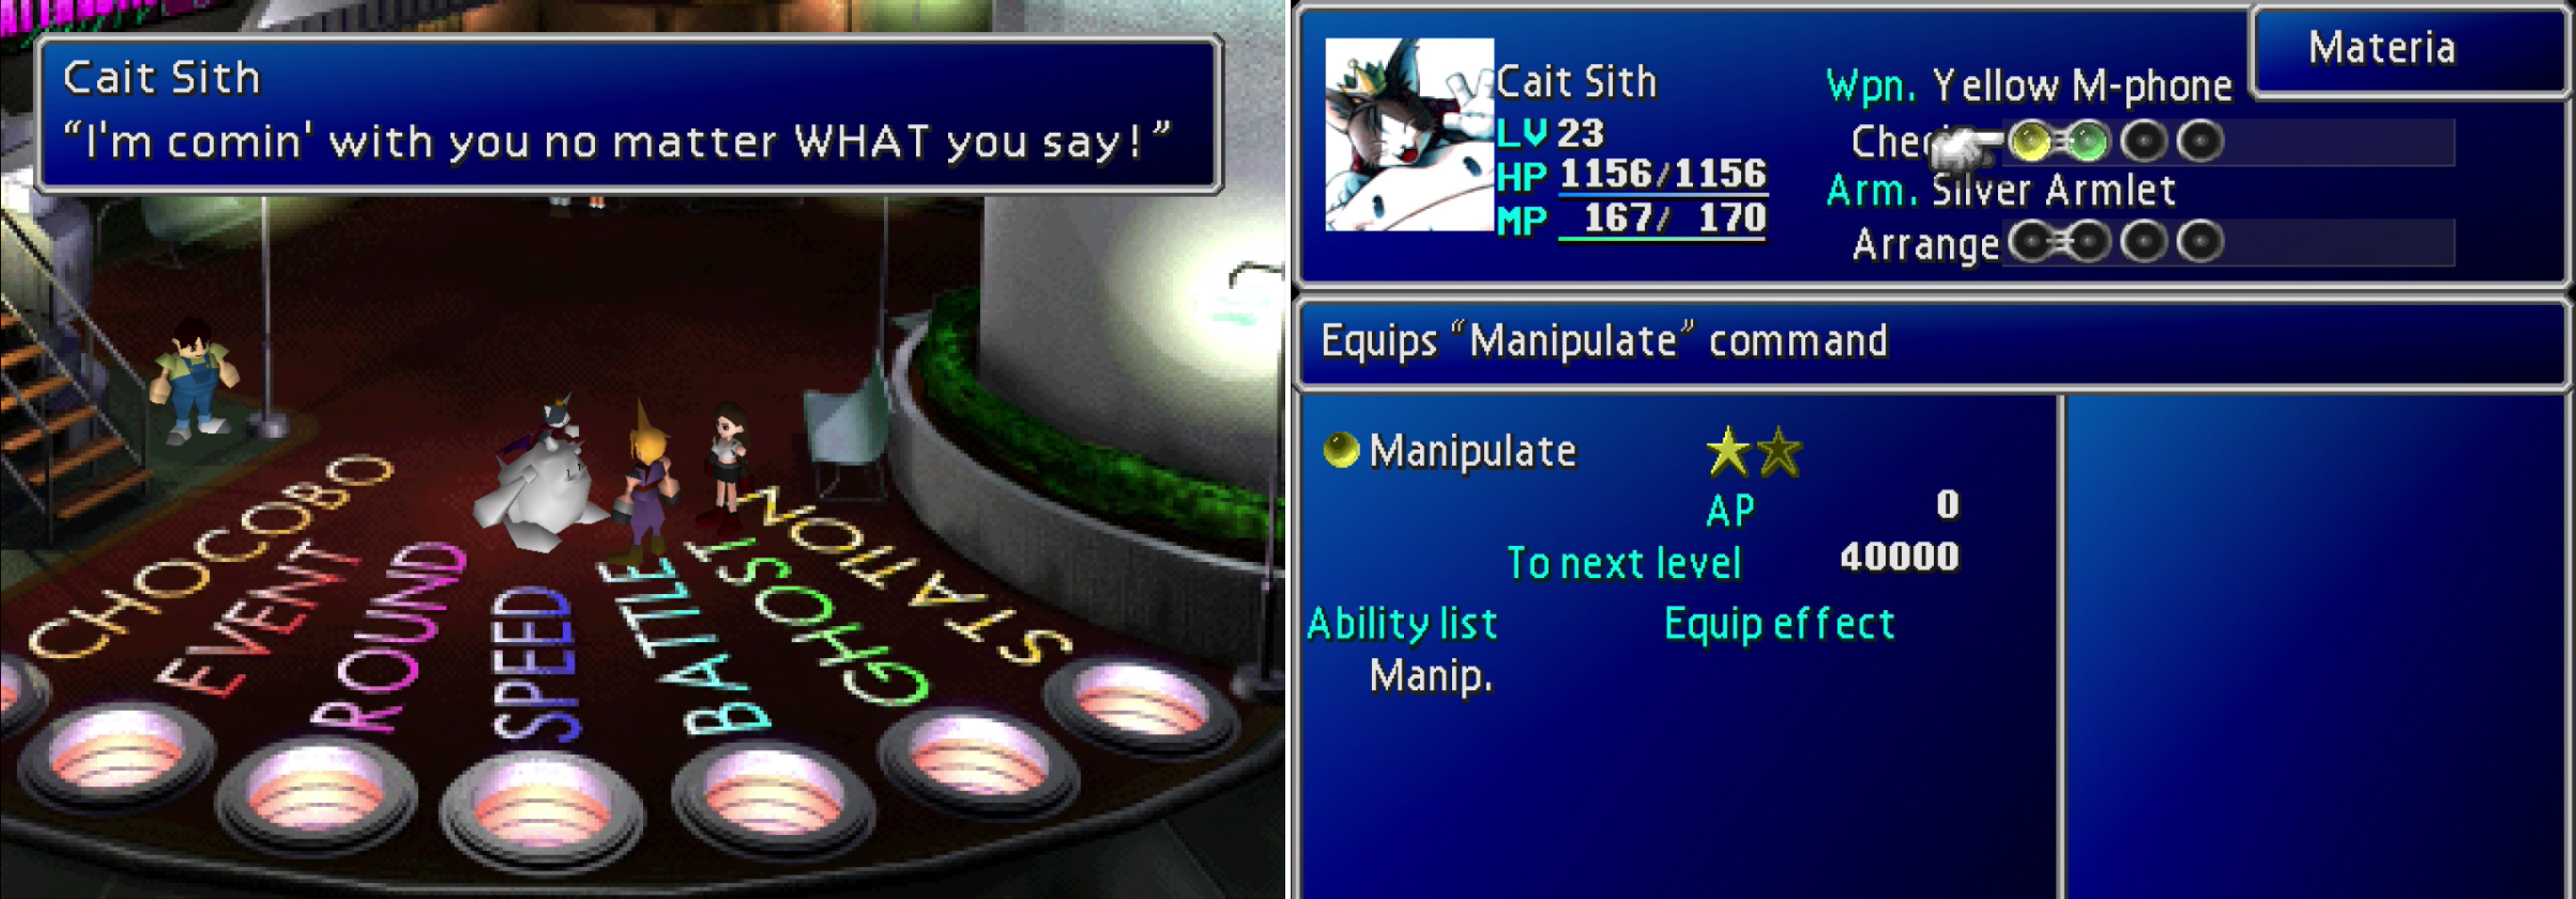
After telling a couple of dubious fortures, Cait Sith will invite itself along (left). On the plus side, this annoying automaton has some Manipulate Materia equipped when it joined (right).
Now visit Wonder Square, where you’ll be bothered by a giant moogle with an obnoxious cat on its back. It’ll read your fortunes, giving you generic woo responses twice, before finally reading you a rather ominous fortune the third time. As a concerned fortune-teller, this unusual companion (who will be referred to by the default name, Cait Sith) will invite itself into your party, over Cloud’s protestations. Too late, dude, he already walked into you and vanished. You’re stuck with it, now. It’s not all bad, though - Cait Sith does come equipped with the coveted Manipulate Materia you’ve been waiting for, as well as a piece of Transform Materia. Score.
Leave the Wonder Square and head to the Battle Square, which appears to have been the site of a… well, a battle. Cloud will investigate and rule Sephiroth out as the possible culprit before a survivor points us in another direction; a man with a gun-arm did it. Before long Dio, the owner of the Gold Saucer… a very, very unbashful man… will show up and question the party. Cait Sith gets us into trouble, and techno-carnie justice is passed without anything even resembling a trial. Bummer.
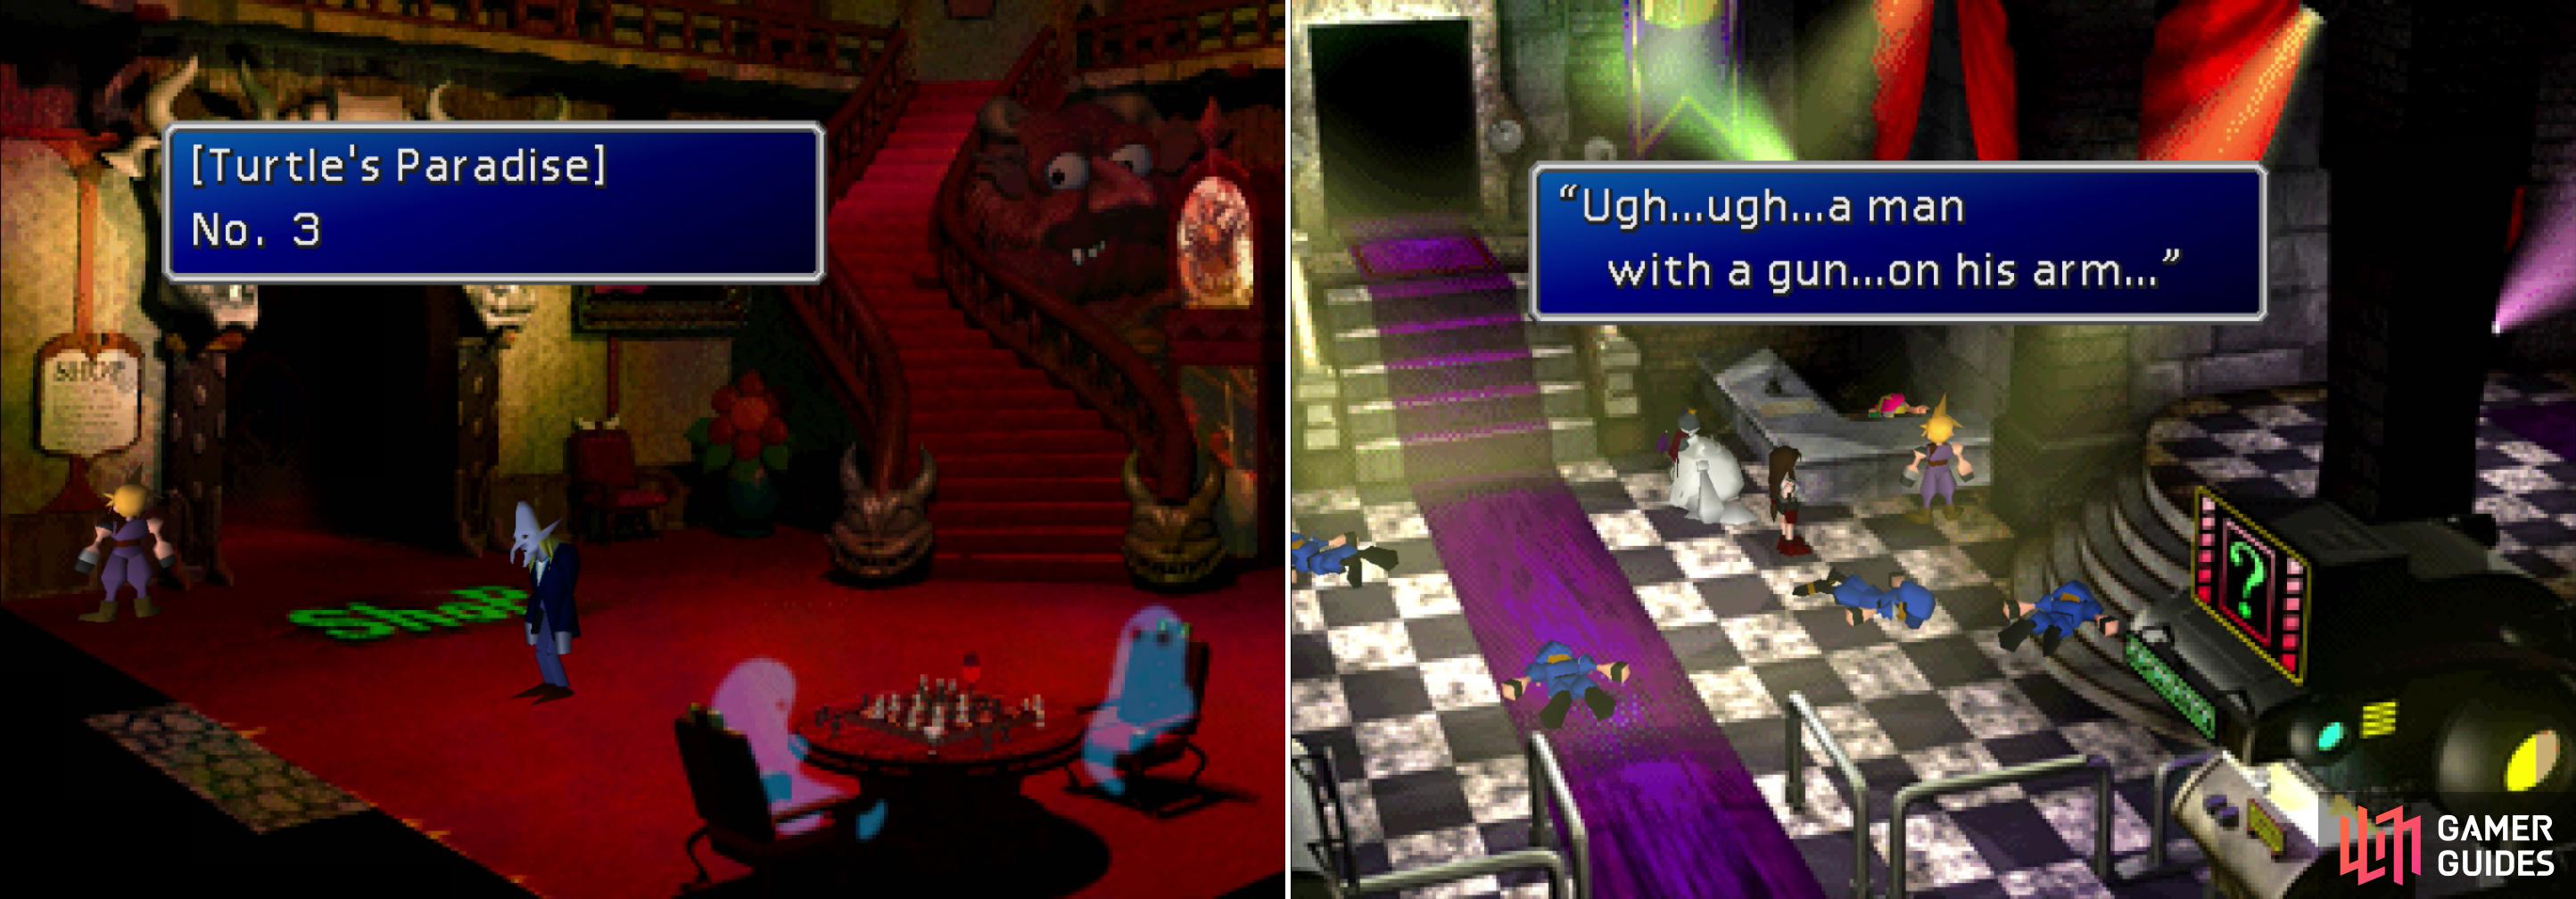
Read the Turtle’s Paradise Newsletter in the Ghost Square (left), thne, after recruiting Cait Sith, head to the Battle Square to make a startling discovery (right).
Corel Prison
In the badlands below the Gold Saucer, surrounded by a desert, is Corel Prison, your new home. Seems anybody who causes serious trouble in the Gold Saucer ends up here, at Dio’s discretion. Thanks, Cait Sith. Speaking of the pest, he’ll start to mention a way out, only to be interrupted by Barret, who apparently has something here he needs to deal with. Head south to reach the next screen, where some punk will follow us around and laugh. Jerk. Continue south to find a Save Point and save your game, then keep heading south to find a Shinra truck near some pipes. Head inside the pipe and talk to Mr. Coates, who will tell us the only way to get back to the surface is to become a Chocobo rider (athletes always get off, don’t they?), but in order to do that, you’ll need to get permission from the boss of this place.
Leave the truck and run north along the pipes to reach a small house, inside of which you’ll reunite with Barret. After some drama, he’ll tell you the rest of his sad story, following which you’ll need to reform your party again; Cloud and Barret are locked, but you get to pick the third character yourself, and whomever you pick may get a disposition bonus which varies wildly in potency (+10 Aeries, +3 Tifa, +2 Yuffie). Obviously you should under not circumstances pick Aeris if you care about “Best Bromance”, and once again Red XIII is athe safe pick. You can talk to your other, unused party members in this house if you want to switch later, which doesn’t affect your disposition any. Only the first choice counts.
When you’re ready, leave out the southern door and continue to another house to the south where you can peruse a small selection of items. If you need to rest, Tents will be your only solution. Before continuing further, let’s discuss the enemies in this area…
Item Shop
| Item | Gil |
|---|---|
| Potion | 50 |
| Phoenix Down | 300 |
| Tent | 500 |
Enemy Info: Corel Prison Area
There are a number of annoying critters in this area. In the southern reaches you’ll encounter Bandits, who can steal pretty much any unequipped item from your inventory, or less threateningly, Gil. If they manage to run off with these prizes, they’re gone for good, so pay especial attention to them. The only other enemy in the south is a bouncing coin-like monster, appropriately called a “2-Faced”. When harmed it has a chance to either self destruct, dealing massive damage to one character, or alternatively it can cast Cure 3 on the whole party. Either way, once it does, it dies.
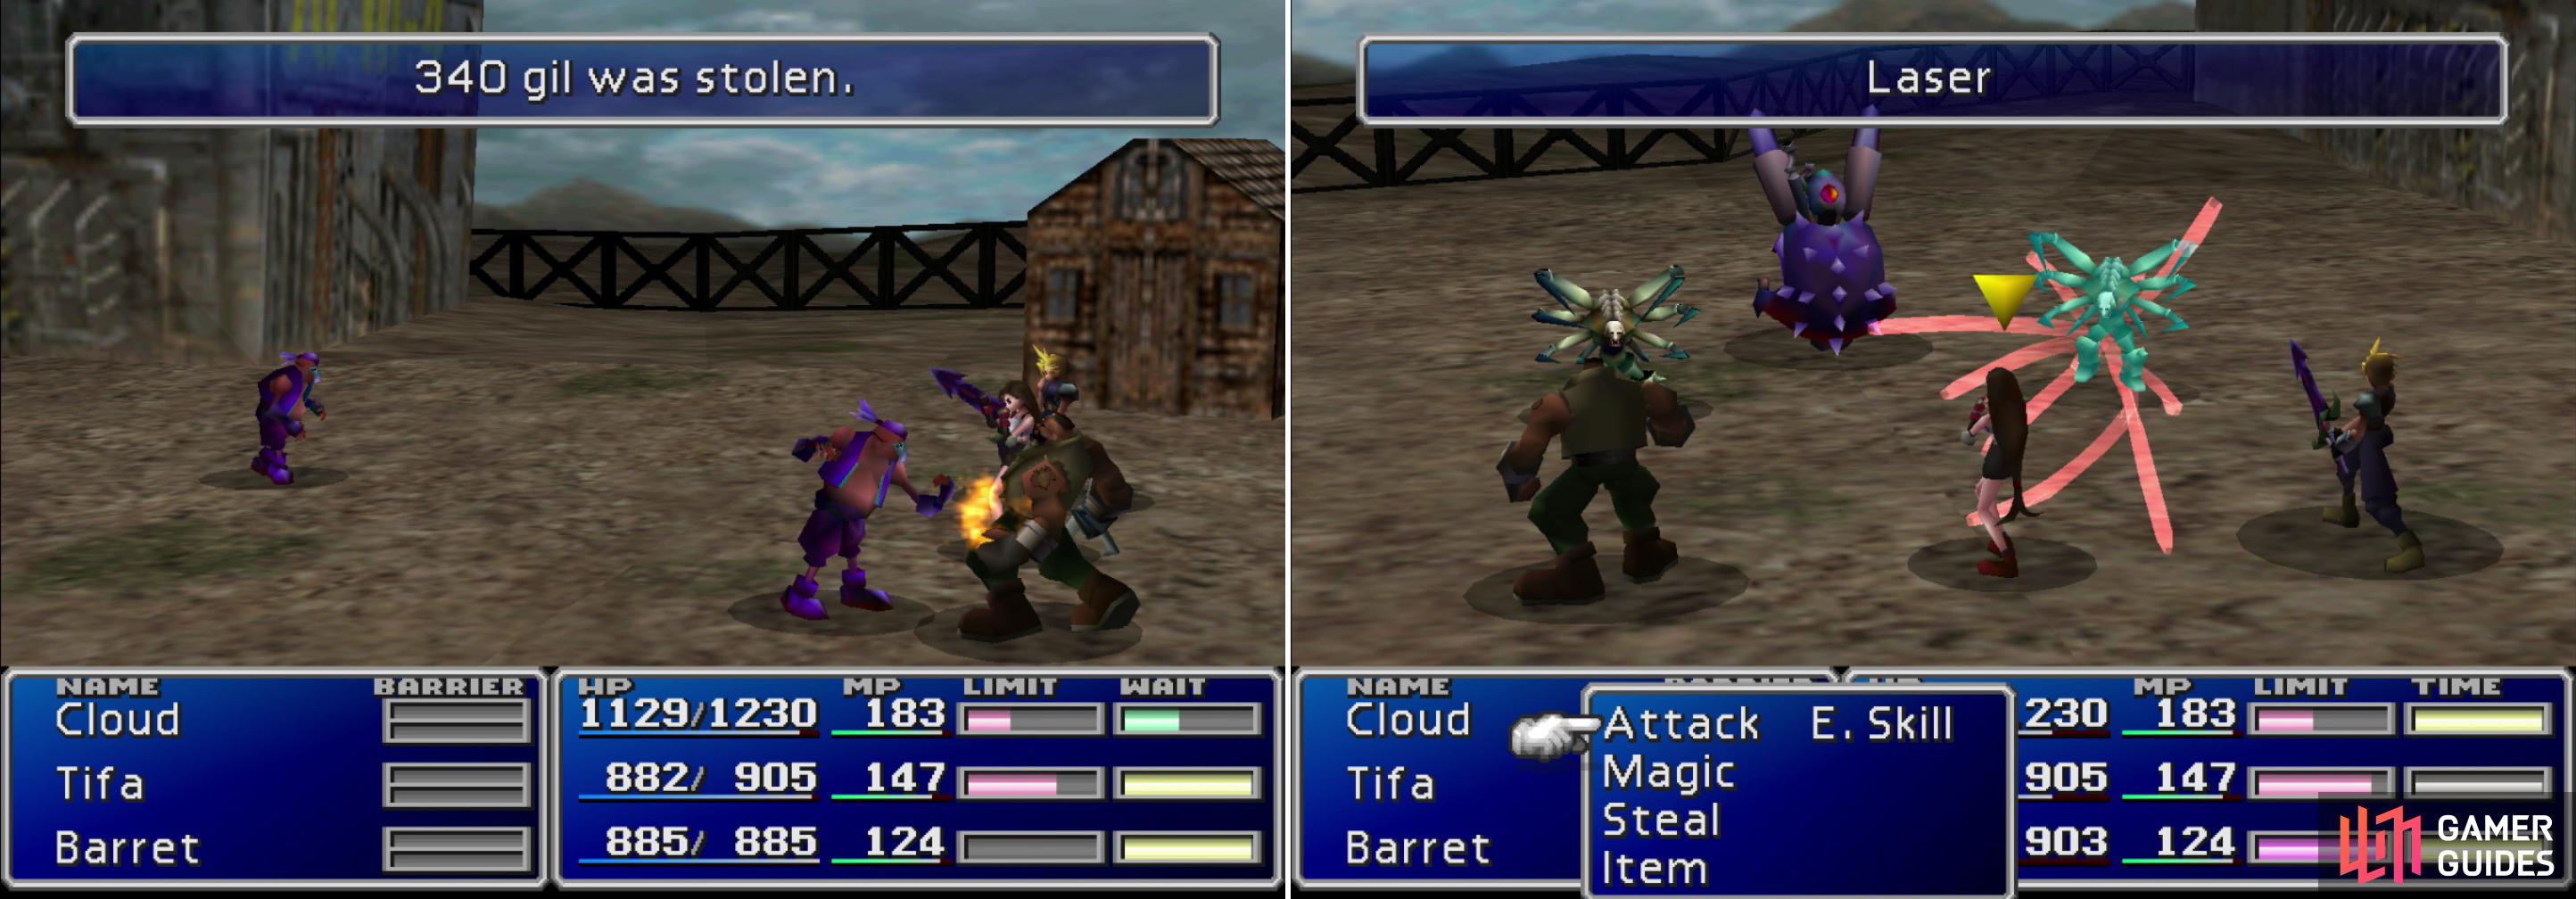
Bandits, while not dangerous, can steal valuable items from you (left). You can try out the newfound Manipulate Mtaeria to learn the “Laser” Enemy Skill (right).
The foes to the north are a bit more interesting. Death Claws will use the “Laser” Enemy Skill on you. If you don’t learn this Enemy Skill now, you won’t get another chance until near the end of the game. They also have an attack called “Death Claw” that can Paralyze their victims. Bullmotors will frequently cast “Matra Magic” , if you missed it earlier, or just need it on that second piece of Enemy Skill Materia.
If you’re extra foolish, or adventurous, you can brave the deserts, where you can meet two foes; Sandworms and Cactuars… Mostly Sandworms. These giant worms have two attacks, “Earthquake” and “Sandstorm”, which deal 100 and 150 damage to all characters. Cactuars are another Final Fantasy staple, typically fleeing from battle quickly, having a high chance to evade attacks, and dishing out nasty damage with their needle attacks. They also tend to be lucrative, if killed. These ones are most of those things, sans the “1000 Needles” attack, which they have, but will never cast. If you kill one of these things, however, you’ll score 10,000 Gil, which… is pretty damn nice at this point in the game. They are immune to all elements, however, and dodge most physical attacks, so either use Limit Breaks or non-elemental spells, like “Matra Magic”.
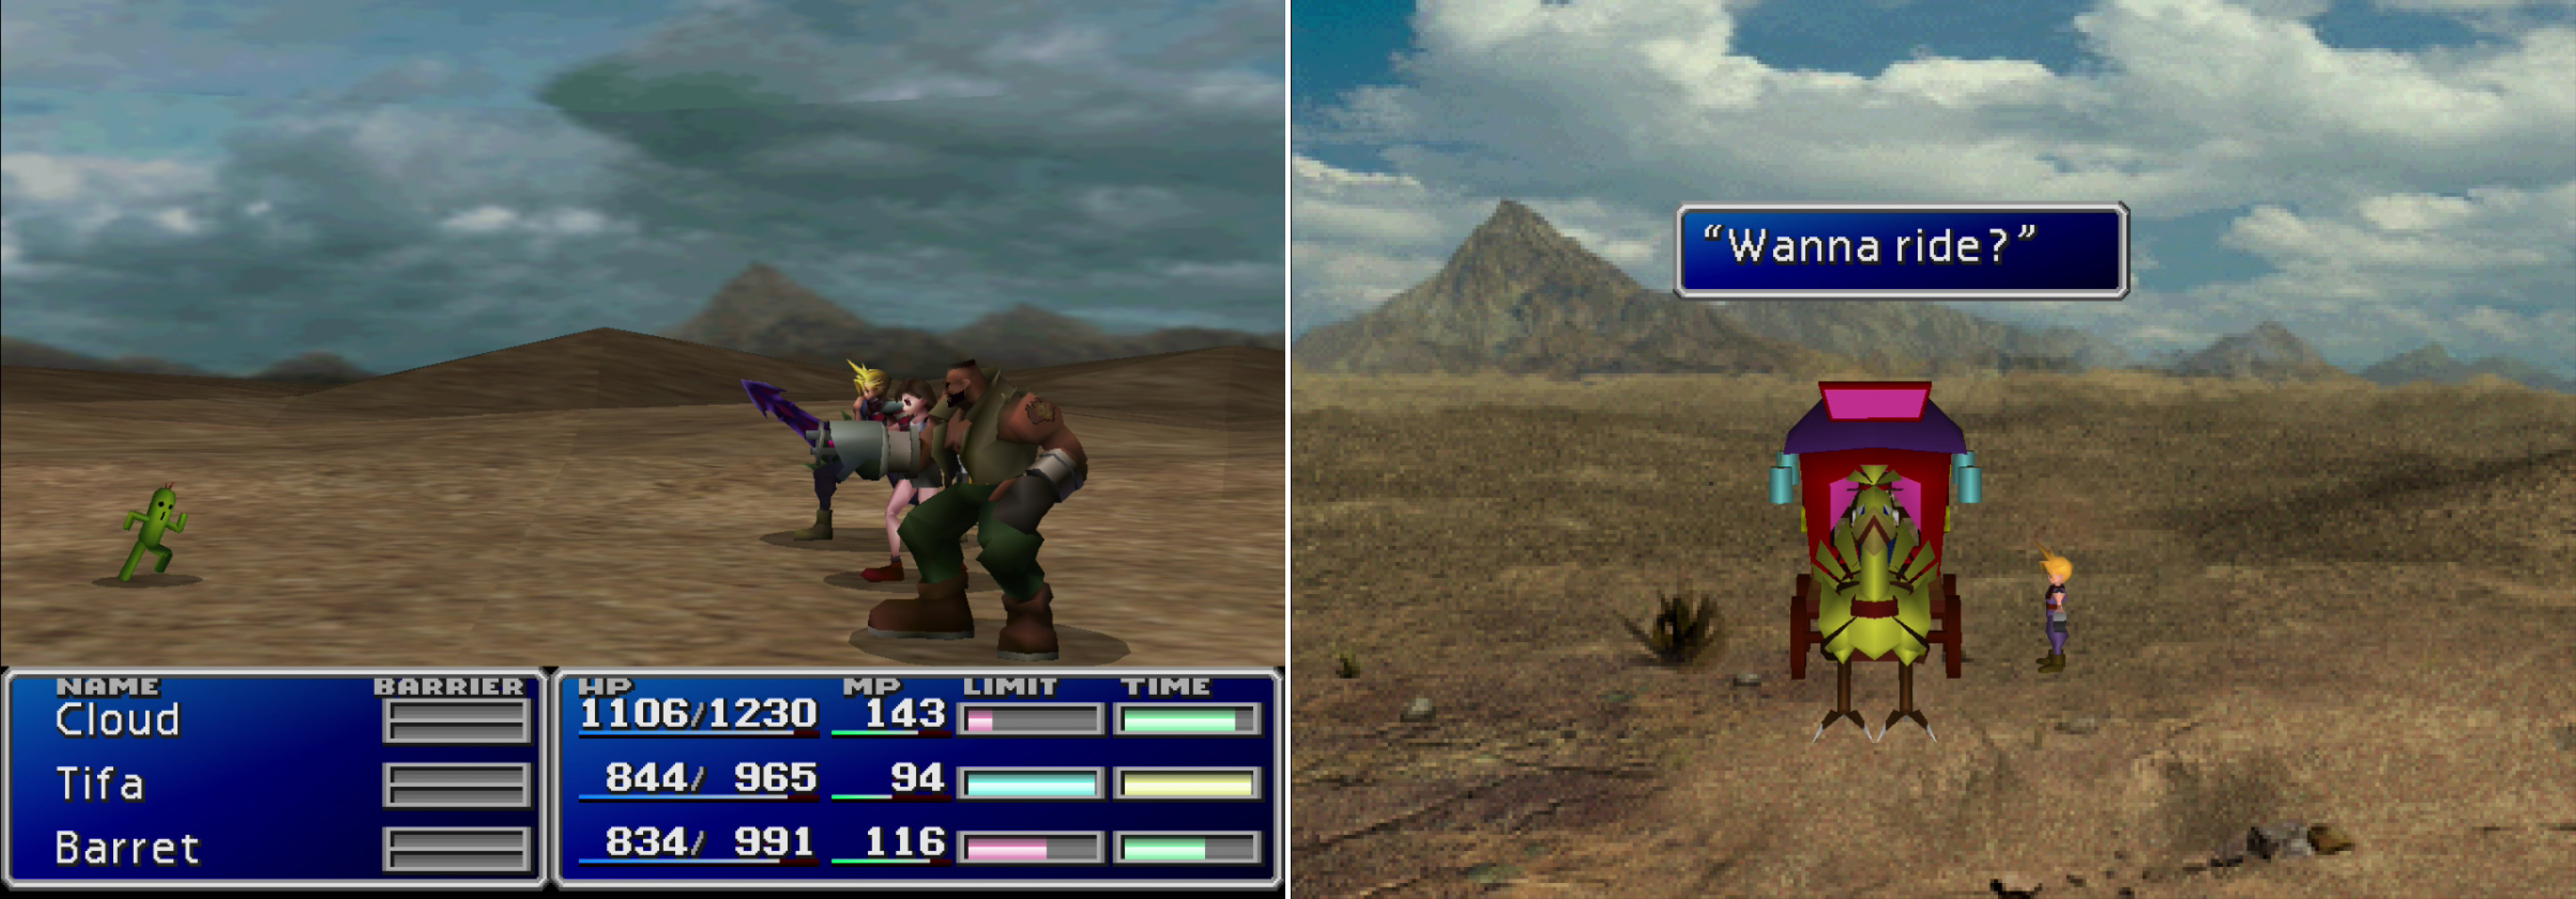
If you brave the deserts and are fortunate enough to encounter a Cactuar, killing one will earn you 10,000 Gil (left). If you get lost in the desert, keep exploring until you find the mysterious Chocobo carriage (right). It’ll take you back to Corel Prison.
Battling the Boss
Return north to the Save Point and save your game, then continue north to reach the screen you started out in. There are two exits to the north, the western one, through a breach in a fence, near a freshly-shot body is where you want to go. The other will only lead you to the wrong side of a chasm, which forces you either into the desert, or to backtrack. In the northern screen, go east through a breach in the fence to reach a junkyard. Head north along some wrecked cars and, before you transition to the next area, make sure Barret has a long range weapon equipped, is in the back row, and is at full health.
Boss Battle: Dyne
In the next screen Barret will encounter Dyne, his past friend, and the only other man with a gun arm that you know of. He is, of course, responsible for the killings; maybe Barret’s return to the area triggered him? What’s clear, however, is that he’s not open to reason at this stage, and Barret will insist on fighting him one-on-one. It’s a classic slug-fest boss battle; making sure your HP stay high is the top priority.
Otherwise, pummel Dyne with physical attacks, Limit Breaks, and whatever magic you care to use. It’s not a tough fight, since you can heal and Dyne can’t. Bio will do some nifty damage if you cast it early, but don’t get clever and try to cast “Laser” on him - he’s immune. It doesn’t matter much what you do; if you’re in the back row, Barret should out-damage Dyne at around a 2:1 ratio. Just be wary, after Dyne drops in HP a bit, he’ll start taking two actions each turn, a normal “Needle Gun” attack followed by either an “S-Mine” or a “Molotov Cocktail”.
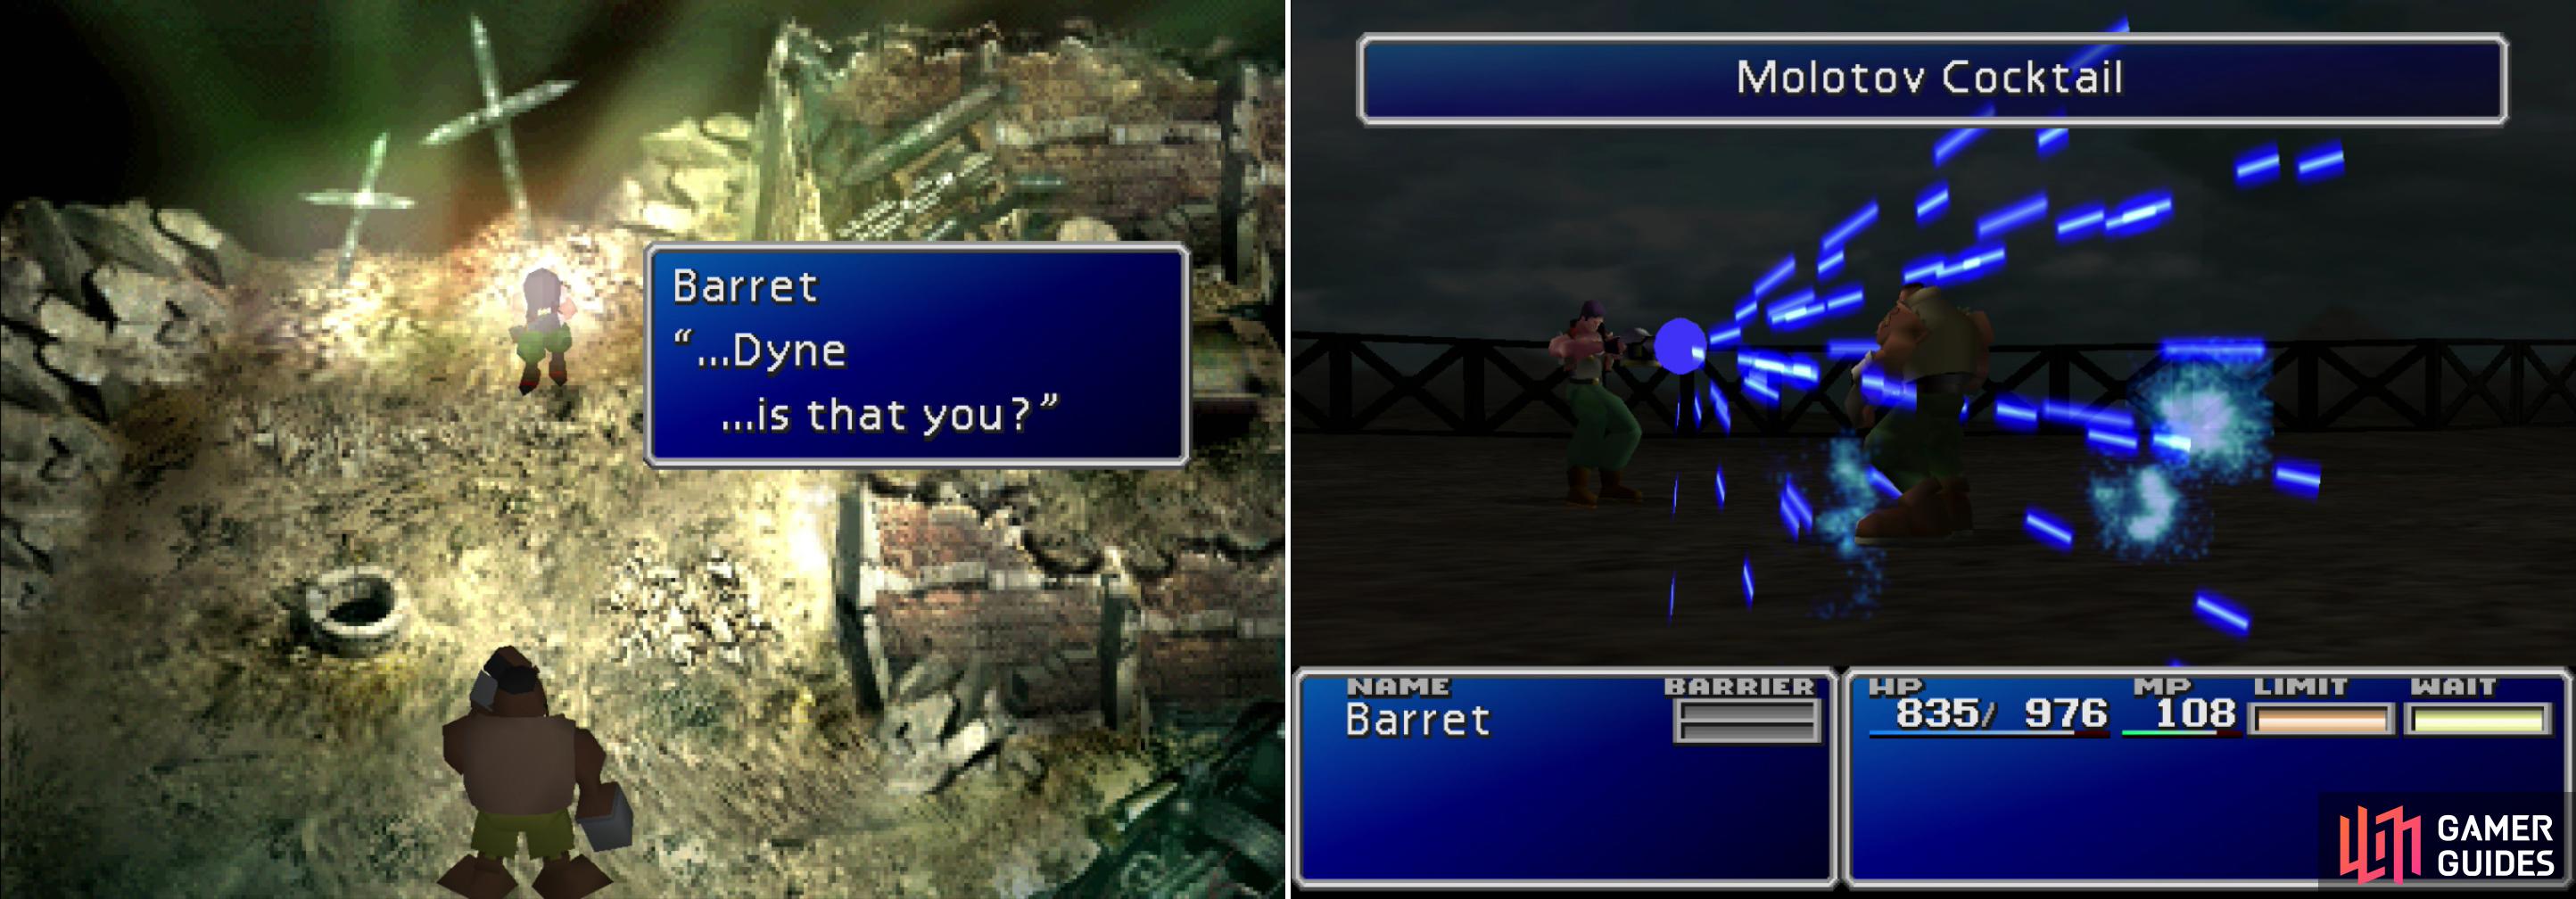
Chase down the boss of Corel Prison, who happens to be a figure from Barret’s past (left). Dyne has few attacks, but he will start taking double turns when he’s injured (right).
| Dyne | Stats |
|---|---|
| HP: | 1200 |
| MP: | 20 |
| Weaknesses: | N/A |
| Resistances: | Gravity (halves) |
| XP: | 600 |
| AP: | 55 |
| Steal: | N/A |
| Drop: | Silver Armlet |
| Gil | 750 |
Chocobo Racing for Freedom
After Dyne falls Barret will play Mr. Coates a visit, and he’s in no mood to put up with any shenanigans. A little force (and Dyne’s amulet) will get you the opportunity to work as Chocobo jockeys… one of the characters, anyways, which, as usual is Cloud. The rules are clear; win a Chocobo race and you’re free to go. Seems like stupid rules, potentially letting a dangerous criminal loose because they rode a bird well, but it’s not like the legal system that put you down here was all the sophisticated, either. A weird lady named Ester will hear our story and elect to take us under her wing, loan us a bird, and teach us the ropes. How fortunate.
As Cloud and Ester ride the elevator up to the Gold Saucer, Cloud will explain what really happened, and Ester will, in turn, tell us about how to ride a Chocobo. Once you reach the jockey locker room, a Chocobo rider named Joe will talk to you. He’ll plague your later races, but for now, he seems amiable enough. After some chatter between Ester and Joe, the two will depart. When you’re finally left to your own devices, grab the Ramuh Materia in the corner of the room, near the stalls. This is your one and only chance to grab it, so make sure to do so. After bit, Ester will return and call you. When you have the Ramuh Materia, go talk to her and she’ll offer to tell you the controls again. IF you decline, you’ll go straight to the races.
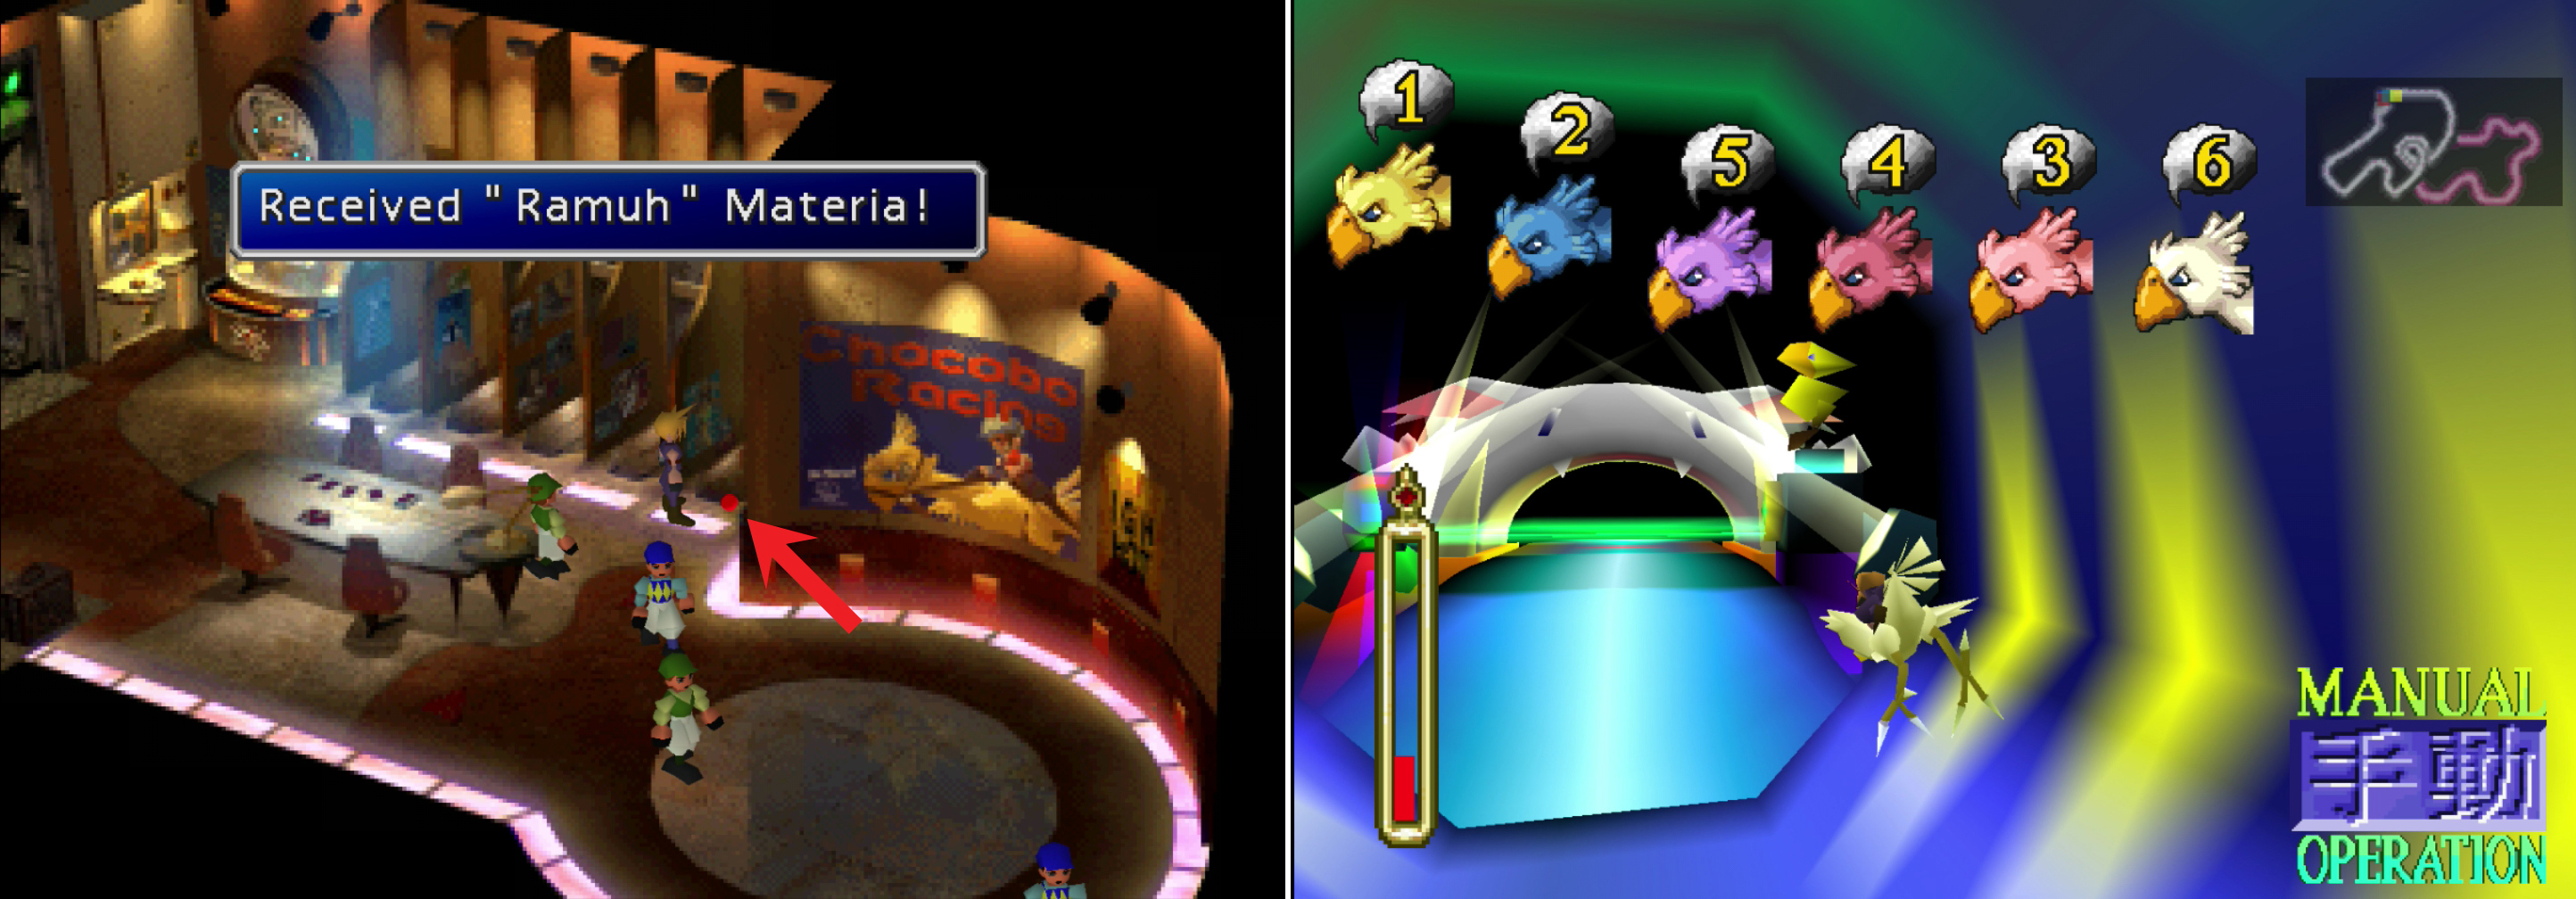
Be sure to grab the Ramuh Materia from the jockey waiting room; you’ll never get another chance to pick it up (left). Win your freedom by being victorious in the Chocobo races (right).
How to win pretty much every Chocobo race? Switch to manual mode, then make your Chocobo go as fast as they can without sprinting. Once done, hold down the R1 + L1 buttons (Page Up + Target on the PC) to regain your stamina. Even if you don’t regain stamina as fast as you expend it, you should still have enough for a final sprint near the end, which should see you to victory. After winning the race, Ester will give you a letter from Dio. Seems the chump couldn’t even be bothered to face us. Anyways, for winning the race and being falsely imprisoned, Dio is giving us a “Buggy”, a car that can cross deserts and the shallow parts of rivers. He’ll also tell us that Sephiroth was heading south, towards Gongaga. All in good time, but first… there were a few Enemy Skills which were pointed out earlier that required the Manipulate Materia to obtain. It’s a fine time to go back and collect them and although this is all optional, if you take the time to gather these Enemy Skills you’ll be much, much stronger than you otherwise would be. If you want to skip the optional stuff, proceed to “Gongaga” , otherwise continue with “Exploring With the Buggy” .


 Sign up
No Comments