Talk to Gadot for a Live Trigger: (Gadot seems concerned for Serah’s safety. How should Noel respond to Gadot’s distrust?). Follow Noel up the slope, and at the U-turn bag Librascope from the treasure sphere. Cross some tree trunks and talk to Yuj for another Live Trigger: (Yuj seems curious about my new attire. What should I tell him?), nab Phoenix Down from the treasure sphere, then talk to Maqui for the final Live Trigger in this area: (After the meteorite hit, different realities started bleeding into ours. Let’s ask Maqui what he thinks.). Go down the slope to the right of Maqui for the first serious boss battle .
Gogmagog Voidborn (Round One)
Switch to RAV/COM, and have Serah pump Gog full of magic until it’s staggered, then switch to dual COM and rip it a new one. Boss shoots you with two rounds of Ruin and then readies giant swipe - to reduce the damage, switch to SEN/SEN.
NEW BODHUM FRAGMENT - Gogmagog Fragment Alpha (01/04) obtained, along with 500CP ! There’s a total of 160 fragments in the game - some are very easy to obtain, some are very hard or annoying. Collecting all of them is required for the secret ending.
A new entry has been added to the main menu - Fragments.
Follow Noel to the fallen meteor, open two treasure spheres for 300 Gil and 2x Gysahl Greens , hop down to the Meteorite Impact Site, then examine the meteor…
Serah wakes up in a new day inside NORA House, with a couple of new additions to the main menu - Party Paradigms and Crystarium.
NORA House 2
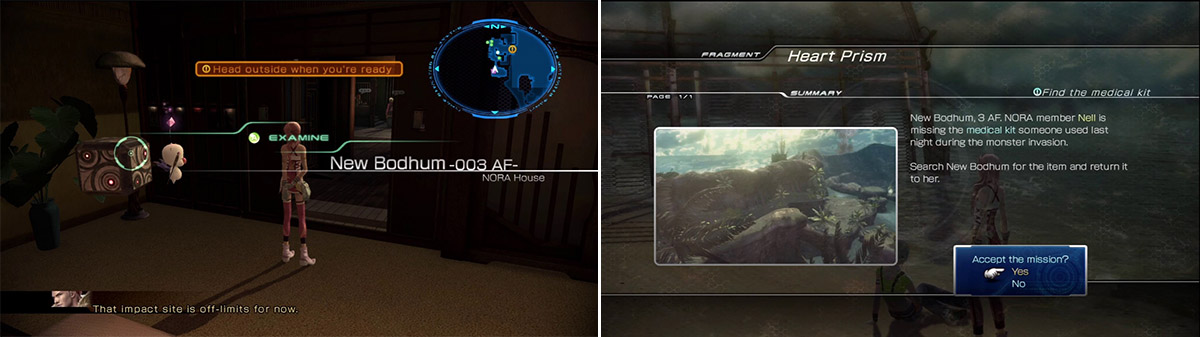
Live Trigger Cube depending on your choices (left). Heart Prism quest information (right).
Next to Serah a LTC (Live Trigger Cube) pops up, containing a Live Trigger reward. Depending on your choices in Live Trigger events, you’re awarded monster items used for adorning them. If you make poor choices or skip Live Triggers, you’ll get a Potion reward. However, Live Triggers have no effect on the overall story at all.
Talk to Lebreau for a Live Trigger (Lebreau was injured saving me yesterday. She looks fine this morning, so how do I respond?), and then head outside.
In the Town Square go South and Mog’s bobble lights up - he darts over to a cat, so talk to it. The cat tries to escape, but Mog keeps up just fine, so follow him to the southwest corner and talk to the cat again for a Live Trigger: (Noel says that my friends have become like family. How do I respond to that?), then talk to Noel for a further Live Trigger: (An artefact is something that doesn’t belong in this time. What else can Noel tell me?). Also in the southwest corner are the remains of a house where some vegetables are being grown - examine those for a Live Trigger: (In the future, Noel said he was the last human left. What do I say to that…?).
A bunch of kids have gathered nearby and they appear quite lively, so have a chat with them for a Live Trigger: (In the future world, Noel’s grandmother was also his teacher. What should I ask him?). After the scene, Maqui accuses Rhett, the kid in the orange vest, of something, so Rhett runs away. Finally, examine the palm tree between the rocks on the beach to find Lightning’s Knife (Serah’s present to Lightning for her 21st birthday in FFXIII) for another Live Trigger: (Only I remember Lightning being there on the plain. Why don’t the others?).
Immediately east of the palm tree is Nell, a girl on the beach sitting down. Talk to her to initiate a quest to find a medical kit.
For this particular quest, a treasure cube has appeared along the northwest edge of the map, containing the Medical Kit wanted by the beach girl - but you cannot get to it just yet.
Now follow Rhett all over Winding Way, until you catch up to him. Approach him for a Live Trigger: (This boy’s hiding something. What approach would work best…? / X) and another Live Trigger: (Maybe if I give it one more shot. I think I can get him talking. / Triangle) so he gives you Snow’s Necklace, and then finish it up with Live Trigger: (Snow has been gone a long time. Noel wonders why I didn’t go after him. How should I reply?). Follow Noel down the ledge and before stepping on the beach, you can talk to him for a Live Trigger: (Noel’s asking me about Snow. How should I answer him? / Triangle for the most hilarious response). Enter the Town Square for a scene at the pier, and then walk into Serah’s room in Nora House. Examine the mirror to obtain Giant’s Artefac t (activates the shiny gate in the Meteorite Impact Site). A Live Trigger cube will appear nearby as well.
Walk outside for a scene and then depart for the Meteorite Impact Site at the far north. Along the east edge of the map a new path, Tidal Shallows, has opened because the water receded - collect Iron Bangle and Phoenix Down from two treasure spheres in this area. At the same spot where you fought Gogmagog, a new, yet familiar face, appears.
Gogmagog Voidborn (Round Two)
A small alteration in his tactics here as he makes himself resistant to both physical and magical damage. Until you stagger it, you deal 10% of your usual damage only. Make the RAV/COM combo and press the attack until Gog is staggered, at which point its shield dissipates and he again takes full damage from all attacks. Combine into COM/COM for a swift dispatch, and heal with Potions if HPs are low.
KWEH! Look, it’s a chocobo, and very soon too! Approach the chocster and press X to ride it. Doing so will expend 1 Gysahl Green from your inventory, and you can ride a yellow chocobo for an unlimited amount of time. There’s also the red version, which continuously drains your supply of Gysahls while riding it. While riding a chocobo, all random battles are avoided (except event battles and fights against enemies that you actually see), you can examine treasure spheres and cubes, talk to people and use shops. Pressing Circle causes the chocobo to jump (hold down Circle for a bit of gliding), and L1 dismounts the bird.
Anyways, mount the chocster and sniff around the northwest edge of Winding Way to find a treasure cube with the Medical Kit. Then ride the bird back to Town Square and give the Medical Kit to Nell. She hands over AF003 NEW BODHUM FRAGMENT - Heart Prism (03/04) + 50CP ! Also ensure that you uncover 100% of the map (needed for a quest later in the game).
Oookay, now head for the shiny gate in the Meteorite Impact Site and use it for a Live Trigger: (If you go through the gate with Noel, you might not be able to ever return. Are you ready to begin your journey? / Triangle). Welcome to the Historia Crux , a time machine of sorts, and AF005 Bresha Ruins is unlocked!
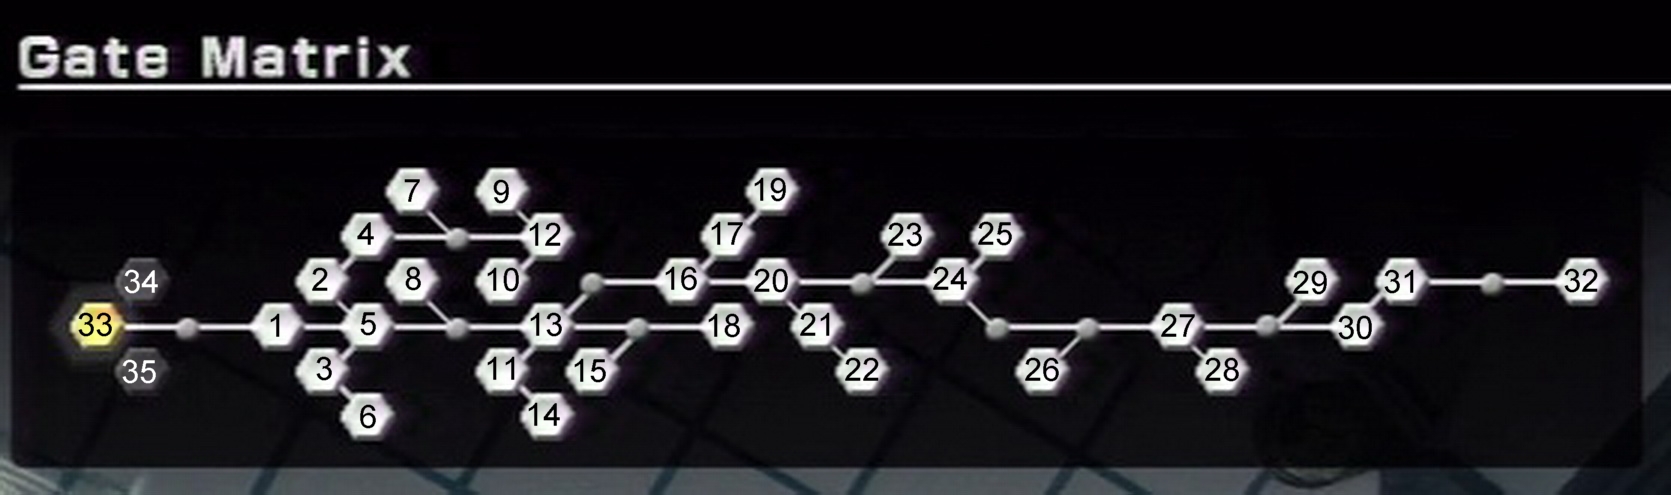
This is the map and timeline of the Historia Crux. Most are greyed out at the moment until you find the relevant artefacts and use them on the gates you find.
There are three types of warp gates:
-
Crystal gate can only be activated by using a Wild Artefact on it. There’s 10 crystal gates in the entire game and just as many Wild Artefacts.
-
The Shiny gate requires a very specific Artefact which is obtained during the course of the game.
-
The Scorched gate is always active, and it’s the gate you use to arrive in a specific timeline.
Gate Matrix Key
- New Bodhum AF003
- Yaschas Massif AF010
- Bresha Ruins AF300
- Oerba AF200
- Bresha Ruins AF005
- Yaschas Massif AF110
- Oerba AF???
- Archylte Steppe AF???
- Augusta Tower AF200
- Serendipity AF???
- Archylte Steppe AF???
- Yaschas Massif AF01X
- Sunleth Waterscape AF300
- Vile Peaks AF200
- Sunleth Waterscape AF???
- Academia AF400
- Yaschas Massif AF100
- Coliseum AF???
- Sunleth Waterscape AF400
- Augusta Tower AF200
- Oerba AF300
- Oerba AF400
- Augusta Tower AF???
- Academia AF4XX
- Vile Peaks AF010
- New Bodhum AF???
- Dying World AF700
- Bresha Ruins AF100
- Dying World AF???
- New Bodhum AF700
- Academia AF500
- Valhalla AF???
- Coliseum AF??? (only via DLC)
- DLC episode
- DLC episode
 Sign up
No Comments