

The ruins of GAIA Prime are located in the dead end area to the east of Pitchcliff in the north, so fast travel to the closest campfire you have there. The path that leads into the mountains is just north of a Charger Site on your map. Once you reach the campfire, find the handholds on the wall and climb it to a ledge, then use the next set to reach higher. This will bring you to some broken down machine parts, where you can find a beam that juts out at the end to climb to a new area. Up here, you will hear Aloy mention some Stalkers doing their best game of hide-and-seek, with Watchers beyond them.
There are three Stalkers here and if you look in the distance, you should see some of their signal flares on the ground. Shoot them to lure the Stalkers out of hiding and nock a triple shot precision arrow, aiming them at a weak spot. For some reason, this will only trigger that single Stalker to investigate, so quickly relocate after hitting one and ready another triple shot at another weak point. With enough damage, you should have the Stalker close to death, so one or two more hits will finish it off for good.
Do this with the other two, or just fight them normally if you have a death wish, then kill the three Redeye Watchers also in the area. Once you’re clear, stay on the eastern side of the waters and head north to find more handholds on the rock wall. Use these and some logs to scale to another area, where you will find more machines waiting for you. This time, you’ll be up against some Glinthawks, Redeye Watchers, and Ravagers. Break the cannon off of the Ravager to make things a lot easier, but two of the three machines are weak to fire.
Follow the waters north/northeast and on its western side, there will be more handholds to climb. As you reach the top, a short scene will happen that will be pitting you against a Stormbird. First and foremost, use Tearblast Arrows to get rid of its Lightning Gun, which will reduce the moves it can use against you by its most annoying ones. From here on out, it’s just a matter at chipping away its health, which fire arrows can do.

The Stormbird is the last defense before GAIA Prime (left). If all else fails, you could always set it on fire (right).
The Stormbird was the final defense between you and GAIA Prime, but there is one short little detour. Head west from your location and find the official path on your map. From where the path crosses the waters at the northern end, go southwest until you see the path continue straight south for a split second before getting very thin on your map. At this point, look to the west to see a rappel point, along with some handholds underneath it. These will go up and around to the top, where you’ll come across the King’s Peak Vantage Point . With that out of the way, use the path to go east/northeast to the entrance of GAIA Prime.
Exploring GAIA Prime
Thanks to Sylens, you have a pretty set path ahead of you to reach the ruins. You will want to be a little careful here, as the ledges are thin and falling will most likely spell your death. After some climbing and a ladder, you’ll officially reach GAIA’s Prime, so head on inside. Speak with Sylens, then activate the scan on the door to open it. Inside, go straight northwest/north to a small room with a supply crate and the GAIA Prime Arrival Log Datapoint . Take the other path and climb down to reach another outside area with a rappel point.
Go west and then south to a zipline to fall to some handholds, which you can use to get to another path that leads inside again. Drop down in the shaft for a supply crate, then return and climb up to the next area. In the small room off to the side is the Log: Margo Shen Datapoint , then there will be another on the story path ( Log: Charles Ronson ). Follow the path down to reach some stairs and eventually, Elisabet’s room. You’ll come across five files here from Sobeck, but they are damaged and will take time to recover.
There will be a smallish hole just beyond there that leads to a room with a holo projector. Access it to learn some more story bits, which you can’t skip, so you have to sit there and listen to them until it’s over. This will net you the Elisabet Sobeck Memorial Datapoint , and three more will appear on the table afterwards - Rest in Peace , Log: Travis Tate and Log: Charles Ronson (2) . Speak with Sylens after the fact, then go south into another room to find the Core Control Log Datapoint . Back in the room with the holo projector, take the door in the northeast to a hallway.
Follow this hallway shortly to another elevator shaft, where there will be The Future Datapoint on the ground, so scan it and climb to the next area. Back outside, be careful of the slight gap in the path and climb to another ledge, where you will find The Solution Datapoint . There will be a handhold you can reach right next to that Datapoint, which will eventually bring you back inside of the facility, into a room where you learn the fate of the people inside of GAIA Prime. Talk with Sylens after it’s over, then grab the Master Override and it’ll be back to Sylens’ Workshop.
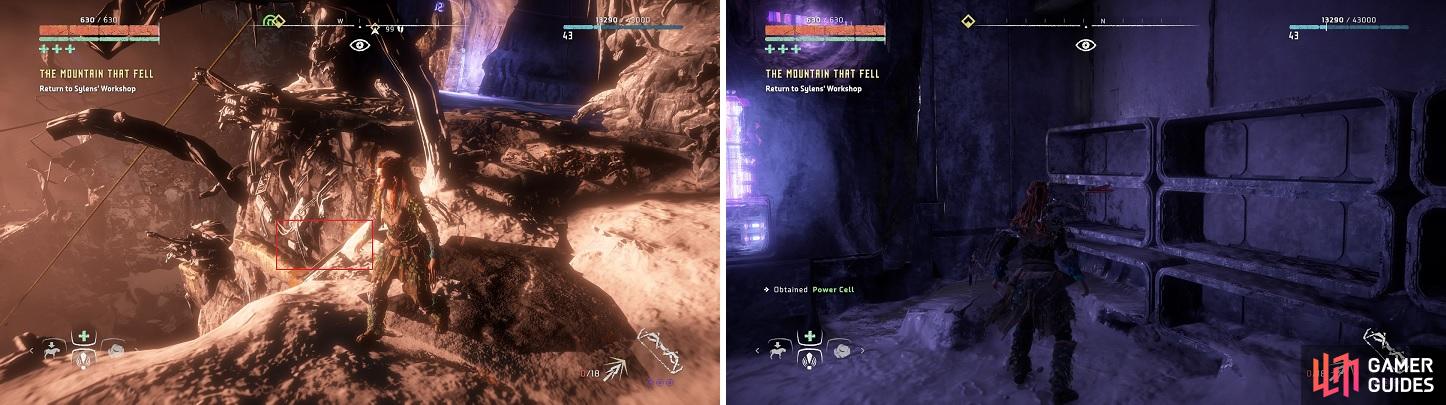
After grabbing the Master Override, use the left shown (left) to reach a room with a Power Cell (right).
Of course, getting back there in one piece is a different story. Exit the room and go northwest to some dilapidated stairs, bringing you to a zipline that you shouldn’t take right now, especially if you want to get the best armor in the game. There is a handhold you can find right before the zipline that you can use to climb/drop down to an area that leads to a small room, where you should find the final Power Cell . Return outside and drop down to a ledge you can use to climb up and eventually reach Sylens’ Workshop. Here, you can learn a lot more story from Sylens, including HADES target. Once you’re free, scan the room for three more Datapoints, Intercepted Transmission , First Meeting and Buried Shadow , then go and attach the Master Override to Sylens’ spear to finish this quest.
| Objective | Reward |
|---|---|
| For acquiring the Master Override | 14,000 XP / +1 Skill Points |


 Sign up
No Comments