To those who are religiously following this walkthrough (thank you!), you lack one more world in the circular trio: the Prankster’s Paradise with the highest Combat Level thus far: 18.
Well, let’s go.
On your Dive down, you’ll need to pop 150 or more balloons by running into them by the end of 1 minute and 45 seconds. Though running into them seems to suffice pretty well, using Laser Spin in front of big groups of balloons helps a bit.
Pranksters Paradise
Seems like Sora likes the amusement park-themed place as he arrives! We suddenly hear Jiminy Cricket, our journal-keeper through Kingdom Hearts II, speak about Pinocchio. Jiminy suddenly seems to have forgetten about Sora…
And then we get an explanatory flashback.
Flashback: When Worlds Dream
In Sleeping Worlds, time doesn’t flow at all until the world is awakened by sealing the Sleeping Keyhole. Thusly, familiar faces will have no memories of you.
But in the case of Jiminy? (Remember, he was employed by King Mickey.) Well, the dreaming worlds fill in the voids of the dream – missing things, including beings both malign and benevolent.
Pranksters Paradise
Back to business - we realize that this Jiminy is a sort of fake. We learn that Jiminy told Sora to leave because of the horrid behavior of the people here, and Pinocchio is here, too.
Another flashback?
Flashback: Pinocchio Lies
We simply watch what happens when Pinocchio lies: his wooden nose lengthens. Heh. But there is some truth in the story, apparently. A black-clothed man came to him and told him to play a trick on Sora, a person unknown to either of them.
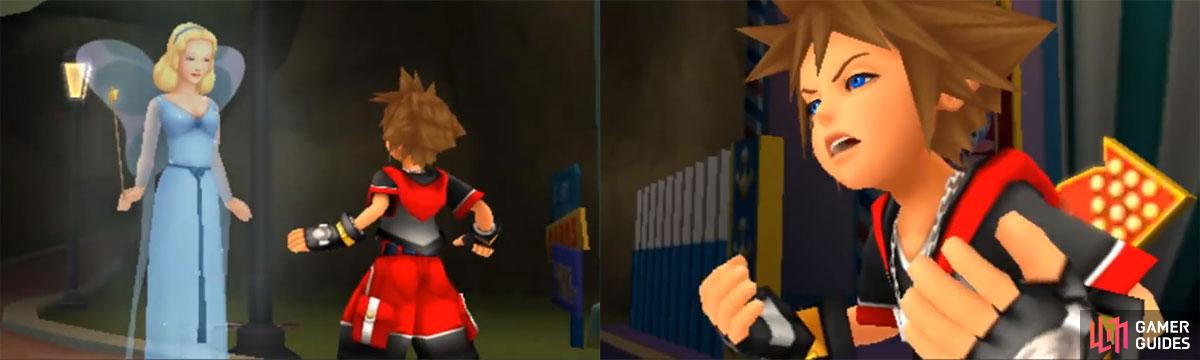
Suddenly, the Blue Fairy (the one who made Pinocchio half-real-ish) decides to help him out, for the last time supposedly.
Pranksters Paradise
Once you regain control of Sora, you’ll learn of this world’s Reality Shift, Bubble Burst. You’ll sort of do a Slingshot thing, aiming bubbles at the enemy; the less you pull back, the more powerful they are. If you succeed, the enemy becomes a bubble which can be popped with the A Button to damage it and nearby enemies.
After this, go east and open the chest for a Hi-Potion , then go west. Open the trapped chest and go north for a chest with a Balloon . Then go northeast and open Squall’s (Final Fantasy VIII character) Portal if you want to borrow some Spirits.
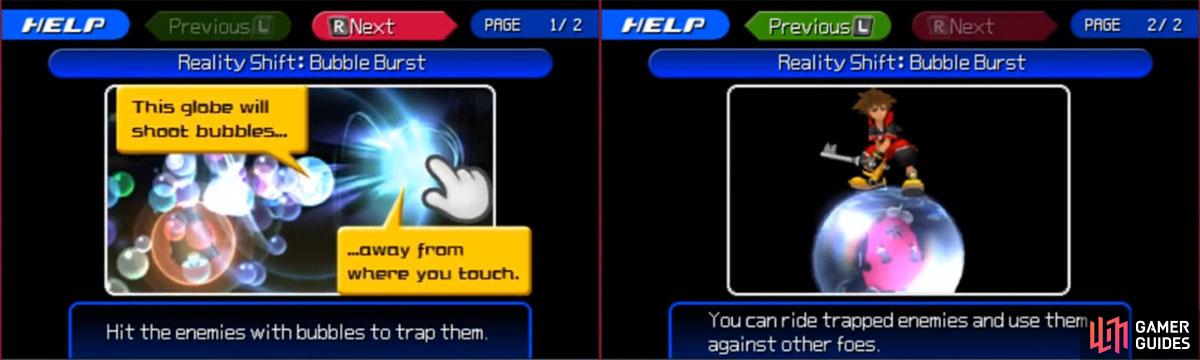
Bubbles aren’t normally dangerous, but in this world the baddies had better watch out.
Now, northeast of the entrance is a loop in some path coming from the west and turning north-northeast. Go there and open a nearby chest for an Ice Dream Cone 2 . Go northeast and to the northwest side of the red thing to find a Drop-Me-Not ; do this again in the northwestern area for a Shield Cookie 2 .
Go south and onto the platform there to meet up with Pinocchio; or so we think: he transforms into a Nightmare! You’ll end up fighting them all; I found using wide-range attacks (Dives, Raids) to be useful. After the fight, Sora’s HP will increase and you’ll get a Jestahocky recipe .
Afterwards, we find Pinocchio atop a tower. But how to get there?
Well, first, go southwest and under that structure for a Paint Gun (Yellow x10) and ride one of the Ferris Wheel carts to find a Malleable Fantasy . In another of the Ferris Wheel carts, you’ll find a chest with some Treasure Goggles . Go southeast from there for a Block-it Chocolate 2 .
Now return to where to met the fake Pinocchio and Flo-mo along the nearby rails southward. As you pass a tower, get on it and open the chest for a Blizzara spell. Continue onward. At the next tower further on down the line, you’ll meet Pinocchio when you land - NOT! Another Nightmare imposter, but this one flees.
We suddenly spot Pinocchio walking on ground level, perhaps. To follow him, hit the ground and go east and northeast to the next area.
At Windup Way, go forward, then right to find a chest with Block-it Chocolate 2 inside. Go along the linear, windy path for a bit. At the second battle, you’ll find a nearby chest with a Drop-Me-Not . At the end of the path, north of the Save Point, is a Hi-Potion . Grab it, use the Save Point, and continue to the next area.
There, you’ll find Pinocchio - the real one this time! - being attacked. Sora saves the donkey-eared puppet and prepares for battle. His Spirits won’t be in the fight, but it is pretty easy anyways - use a lot of Dives and jump around a bunch (you jump pretty high here) and you’ll be okay.
Afterwards, you’ll expectedly obtain the High Jump ability.
As we try to leave, Xemnas and the unknown black-clothed man appear (and you get the Kingdom Hearts II Chronicle entry). Xemnas notes how Pinocchio has a heart, and Sora mentions that that means Xemnas should be able to have one. Then the two leave with a parting comment that suggests Sora is like a Nobody.
You’ll get a Glossary entry on the Nobodies and Organization XIII, then get to read the Kingdom Hearts II summarization. After you regain control, go southeast and use Zack’s Portal to fight; if you win without using the X Button, you’ll get 15 DP , a Vibrant Fancy , and a Royal Cake .
Open the nearby chest for Confetti Candy 2 , then go clockwise around the area for a Balloon and a Drop-Me-Not . Use Flowmotion in the big bouncy area to reach a Rampant Fancy chest. Leave the area to the south.
In Windup Way, go back along the path. In the big room with the gears, use Flowmotion to get to the top of the area and open up some chests for a Royal Cake and Aerial Slam .
Then use the northern Special Portal - if you do three or more Flowmotion attacks in the following battle, you will get 45 DP , a Dulcet Fantasy , and some Treasure Goggles .
Hmm… It’s not like Sora hasn’t heard of crazier things.
At the other end of the path, you’ll suddenly find the Blue Fairy. Apparently, Geppetto went to look for Pinocchio and got swallowed by the big whale Monstro. (Remind anyone of Kingdom Hearts I?) She told Jiminy and Pinocchio about this and they are looking for a way to the bottom of the sea. As Sora puts it: “That’s crazy!”.
We also get a flashback.
Flashback: In Search of Monstro
We see Jiminy telling Pinocchio is crazy for wanting to go find Geppetto. And Jiminy goes with him into the ocean.
Seriously?
Pranksters Paradise
Well, back to business. Go east and south to find a chest with a Hi-Potion in it, then go north along the linear path. As you enter the tunnel, you’ll find a Portal from the Final Fantasy III Onion Knight - if you win the fight using at least three Flo-mo attacks, you’ll get 15 DP , a Rampant Fancy , and an Ice Dream Cone 2 .
Continue along the newly-dubbed Path of Linearity until you come across a frog in a pool of water. Challenge him and I guess try to beat him… He teleported out of the fight entirely and I got nothing (he left with around 1.5 bars of HP left).
Continue northeast and open the chest for an Ice Dream Cone 2 , then use Flowmotion to scale the large wall to the southeast for a Water Barrel . Leave this area to the east.
At the Ocean Floor (I should be drowning or crushed by the pressure…) you can jump higher than before, so use that to some kind of advantage. Go north and you’ll find a Portal from Vivi - win without taking damage more than twice for 15 DP , a Noble Fantasy , and something else.
Afterwards, go along the lower path northeast of the Portal to find a Panacea in a chest. Go along the path you fought along until you see a ledge off in the distance. Use dual-air slides or Flowmotion to get over there, use the geyser, and, on the other side of the ledge, grab the Lofty Fantasy . Heh.
Go back to the geyser’s source and face north-northwest to find a pillar with a chest atop it. Get over there with some air slides to reach a Paint Gun (Sky Blue x10) . Get on the manta ray to the east and ride it to a not-yet-looted ledge with a geyser.
Use said geyser to reach a ledge, then go northwest to reach a Zero Gravira chest. Then head into the next area.
At the Ocean Depths, use the nearby Moogle Shop and Save Point, then go along the path. At the whirlpool, get around behind it and open the chest for a Rampant Fancy . Use the whirlpool.
When you land, scale the southwestern wall with Flowmotion to reach a chest with some Treasure Goggles . Go to where you began and defeat some enemies, then repeat at the bottom. Go southeast and use the Portal to borrow some Spirits, if you want.
Use Flowmotion to scale the nearby walls and face southeast to find a chest. Go to it for a Royal Cake . Hit the ground and go south and around the central structure in this area to find a big chest with a Tatsu Steed Recipe . Head to the northeastern portion of this open area to find a Shield Cookie 2 chest.
Then you should use the nearby geyser and go on up, then west and along the wall path to the next area. There, firstly you’ll find a paradoxical idea where Sora can freakin’ breathe underwater .
You’ll then find Pinocchio and Jiminy doing the same while chased by Monstro, who causes the entrance to this area to be blocked.
Monstro opens his mouth, causing a huge whirlpool to appear and suck in Pinocchio and Jiminy as a Nightmare appears, turning Monstro into ice.
Boss: Chill Clawbster
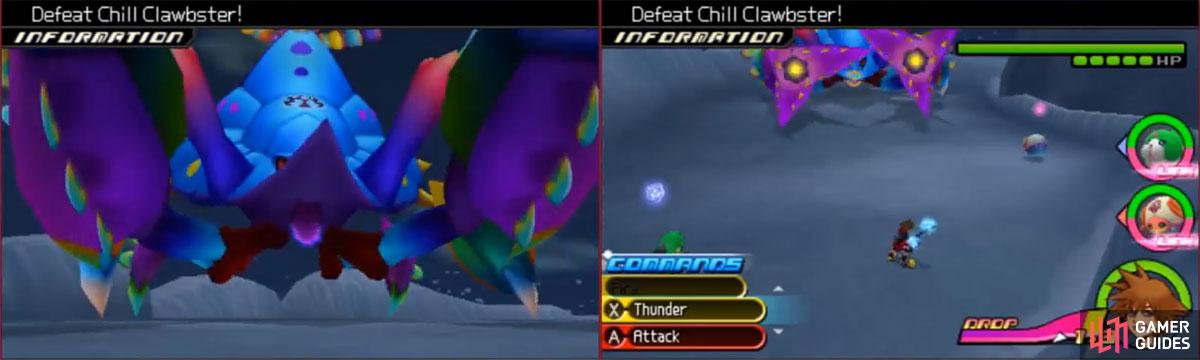
| **Max HP** | **Strength** | **Magic** | **Defence** |
|---|---|---|---|
| 428.7 | 17.0 | 13.5 | 6.6 |
Resistance
| **Fire** | **Blizzard** | **Thunder** | **Water** | **Dark** | **Light** |
|---|---|---|---|---|---|
| 20% | 20% | -30% | 60% | 20% | 20% |
After gaining your Deck Capacity increase , you’ll see Monstro reawaken and swallow Sora, almost. Sora awakens on the beach, alone. He suddenly figures out what happened. After that point, Pinocchio and Jiminy had their world dragged into darkness, leaving them and Geppetto cast in the void between the worlds along with Monstro.
Then Jiminy becomes the King’s journal-keeper, and the other two are swallowed within Monstro. You meet Jiminy when you meet Donald and Goofy, and the others when you go inside Monstro, in Kingdom Hearts I.
Soon, the Sleeping Keyhole appears and Sora seals it, gaining the Ferris Gear Keyblade .
 Sign up
No Comments