
December 8th
There isn’t really much else you can do from now on, as you should have finished all Confidants that require you to hang out, as well as all books and video games. You can use the time from today onward fix any Confidants you may not have finished yet, grab any trophies you may not have acquired (the miscellaneous ones that aren’t story related or must be done in NG+, such as Bookworm, Golden Finger or catching that stupid Guardian of the Pond). There will be a few tidbits here and there included in the game, like a certain story bit later this month. You can check out the TV for a trivia question, with the correct answer being “Attempted murder,” netting you a point in Knowledge.
December 9th
Today is Flu Season once again and the last day for it and considering you have two requests, you’re going to be visiting Mementos. So, gather everyone at the hideout, view the requests to get the scoop on them, then travel to Mementos. If this is your first time visiting Mementos during flu season, it basically means that enemies can start with the Despair ailment whenever you begin a battle. This is easily abusable for a certain powerful foe that appears if you wait too long on a single floor.
Yep, the Reaper is susceptible to this Despair trick and it’s the easiest way to actually get the trophy associated with it. However, this can take a while, as getting Despair to appear on the Reaper is totally random. If you go for this, wait on a lower floor, as this seems to make the Reaper appear quicker. Get into a battle with it and if it doesn’t have Despair, flee, move away a bit to make it respawn and try again. Once you manage to get Despair on the Reaper, do whatever you want in battle and wait for it to perish, netting yourself a nice trophy and a lot of levels.


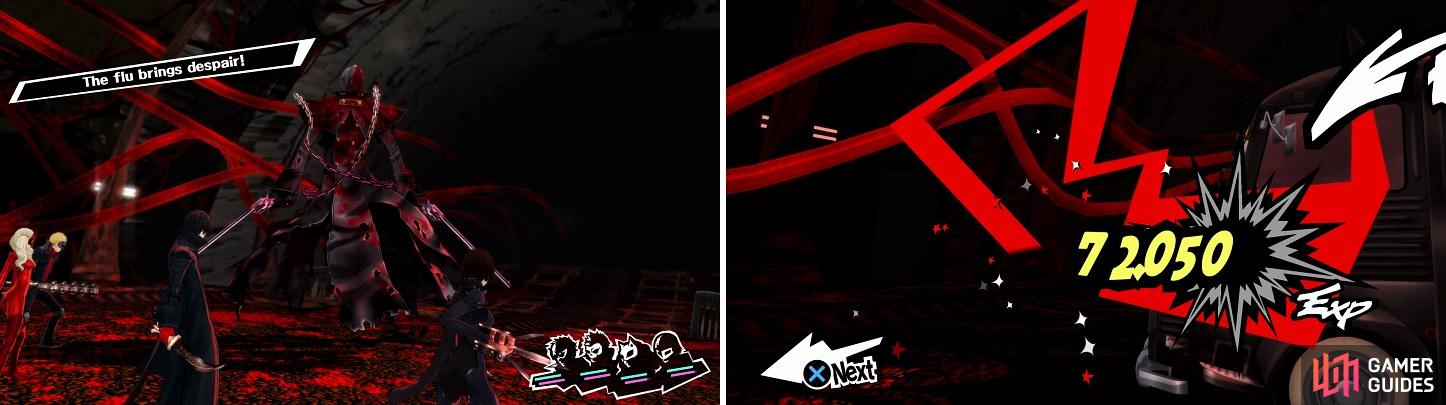
Even The Reaper is susceptible to the mighty flu (left), making it an easy kill for a boatload of experience (right).
Now, it’s on to the main event for Mementos, the two requests. Your first target is located at the end of the Adyeshach area, so if you were there already, just travel to the end. Shadow Wakasa is a pretty easy fight at this point, but he is the last Mementos boss that is susceptible to confusion, so if you need money, this will be the last opportunity to get easy yen. As far as the boss is concerned, he only knows three moves, Heat Wave, Brave Blade and Diarahan. Naturally, you’ll want to quickly finish the boss off before he has a chance to use Diarahan to completely heal. The only element you can’t use is Curse, as Wakasa drains it. You’ll receive a Haten Robe as a treasure from winning.
After finishing off Shadow Wakasa, open the door behind him and you’ll be in a new area, Sheriruth. The other Mementos request boss is in this section, but not until the very end, so you have quite a trek ahead of you. You will encounter enemies from Sae’s Palace throughout the area, with enemies from the subsequent Palace towards the end. There’s a total of 14 floors to this area, with Rest Areas on floors 6 and 10, so make sure you use them to your advantage, if you happen to need them.
For being the last request in the game, Shadow Asakura is surprisingly easy and you can trick the boss into basically not attacking at all. Asakura will usually use Tarukaja on his first turn, Charge on the second and then Lunge once he’s all buffed up. However, if you happen to use Dekaja or Tarunda to counter the Tarukaja, then Asakura will try to apply Tarukaja again. So, you can basically cycle through this every turn (debuff/remove it after he casts Tarukaja to be on the safe side) to easily win. Note that he drains fire and is weak to nuclear attacks, so that makes things even easier. Your reward is an Immortal Vest, along with the A Perfect Job trophy if you’ve finished all other requests. Take heed of the note below and when you’re finished in Mementos, go back to the entrance and leave.

December 11th
There are two things that happen on this date, one unimportant and one that deserves a lot of attention. The first is that the TV shopping channel today is selling a Hunger Charm for 19,800 yen, if you wish to purchase it (the SP Adhesive 3s you likely have been using up until now still work well enough). The more important thing is that Tanaka’s Shady Commodities have upgraded their stock to include two new pieces of dirty armor, Unholy Armor and Desecrated Gear. These have the potential to become the best armor in the game, so it’s definitely worth purchasing them today when they first become available.
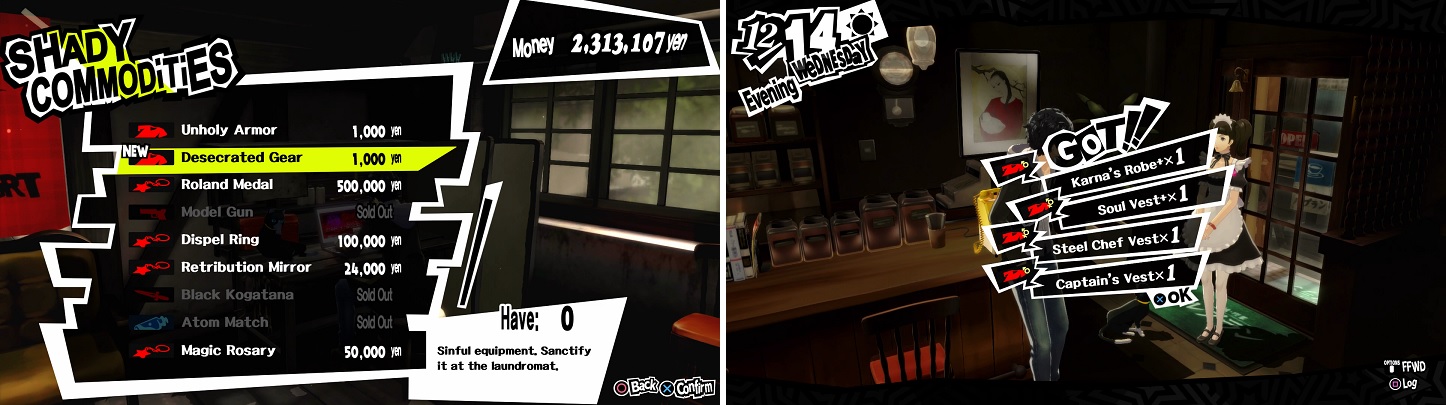
Tanaka sells some of the best armor in December, but you’ll have to get it washed.
| Dirty Armor | Actual Armor | Stats |
|---|---|---|
| Desecrated Gear | Silver Vest+ (Unisex) | 236 DEF, 16 EVA |
| Desecrated Gear | Karna’s Robe+ (Male) | 273 DEF, 20 EVA, Reduce Phys DMG (Med) |
| Desecrated Gear | Titanium Set+ (Female) | 247 DEF, 24 EVA, Resist Hunger |
| Desecrated Gear | Glorious Collar+ (Cat) | 258 DEF, 28 EVA |
| Unholy Armor | Soul Vest+ (Unisex) | 263 DEF, 16 EVA, +40 HP |
| Unholy Armor | Demon’s Jacket+ (Male) | 304 DEF, 21 EVA, +5 STR |
| Unholy Armor | Haten Robe+ (Female) | 275 DEF, 25 EVA, +5 MAG |
| Unholy Armor | Nekomata Coat+ (Cat) | 287 DEF, 29 EVA, Evade Psy (High) |
December 14th-19th
You will receive your items from Shady Commodities at night and before you go to wash them, order another round of the dirty laundry. Whenever you go to the laundromat, save your game in case you get something you don’t want. At the moment, the two best pieces of armor is the Karna’s Robe+ for males and the Haten Robe+ for females (Nekomata Coat+ for Morgana isn’t bad if you use him). If you don’t get want you want, then you can reload your save to try again.
On the 15th, you can see another trivia question on the TV in Leblanc, with the correct answer being “Can’t be done by wanted men,” earning you a point in Knowledge. When you get to the 17th, you will receive your second order from Shady Commodities, so do the same thing as before to get your desired armors from the washing machine (and make one more order). You will finally witness the change of heart for the final culprit on the 18th, which gets you another trophy. When the 19th rolls around, you will finally be able to go back to school, but you learn that exams are coming up. This leads to a study session with your friends, netting yourself three points in Knowledge.
December 20th-23rd
Today will be the start of your final set of exams, which might prove a little more difficult because of all the recent happenings and lack of knowledge about some questions, but that’s what this guide is for, right? The setup is the same as always, with you having to answer some questions the first few days, then there being a Knowledge check on the final day .
- First Day - D; Not their real voice; They speak the same; Supplement the voice
- Second Day - Hearts; It includes a number
- Third Day - Japan; Dreadnought

You should recognize most of the exam questions (left), but the final two are from something you never learned (right).
The Knowledge check will occur on the third day, after which, you will be free to do whatever you want. If you haven’t finished all of the requests for Mementos, it might be a good idea to go ahead and do that now, as this will be your final chance. However, you don’t need to do this, as no new areas will open up for finishing up the last Palace, so you can go do anything you want if you’re already done everything up to this point. You will see a bunch of scenes on the 23rd, where your party will plan their final mission. At night, Morgana’s Confidant will finally reach its max rank, where Futsunushi, the ultimate Persona of the Magician Arcana, will become available for fusion. Additional, Zorro will change to Mercurius, learning Evade Elec and changing some of its resistances.

 Sign up
No Comments