
Path to the Holy Grail
In this area, you have access to the Velvet Room and Lavenza can heal you if you talk to her. One thing you should have before leaving is a Persona with access to Curse skills. There isn’t much else to do, so go ahead start your trek to finally end things. The first area doesn’t really have much of anything, but you can find two chests here. You will find the first chest to the east just after ascending a little bit (it contains an Over Guard ). Right across from that chest is a spot where you can jump a gap. Do that and follow the trail to the second chest, which has a Kongou Ofuda inside. Return to the main path and get to the top to fight a boss.
BOSS - Herald of Death
This fight can be a little annoying, as the boss will summon Zealous Messengers into the battle, which are basically just Angels. If you remember, these things are weak to curse skills, so use that to your advantage to knock them down. Naturally, the boss is not weak to anything and only resists bless, but critical hits can still knock him down. The Messengers will use Sukukaja on the boss, as well as Recarmdra to reduce their HP to 1, while healing the others for a lot. It’s imperative that you get rid of the Messengers quickly, so they don’t outheal any damage you’ve done on the boss.
Speaking of the boss, he will use mostly physical skills on you, such as Bloodbath (can inflict Fear), Myriad Slashes, and Deathbound, as well as Megidola. He can also resummon the Messengers, which is the whole reason why this fight is annoying. If you can manage the Messengers, then you should be more than fine with the boss himself.

The Zealous Messengers can not only buff the Herald of Death (left), but they can also heal him back to full health (right).
After winning, return to Lavenza and use her awesome healing powers, then go to the second area. Unlike the first area, the second one will have enemies patrolling the place. There are no treasures here and all paths will lead you to the top. You can use this opportunity to grind or try to get some more Personas in your inventory. When you get to the top, it’s time to fight another boss.
BOSS - Cleanser of Heaven
Thankfully, this boss doesn’t summon any helpers and is very strict in what he does. He’ll spend his first whole turn casting Heat Riser on himself, followed by Charge. On his next turn, he will use Sword Dance on someone, which can hurt really bad, especially with the prior buffs. After doing that, he’ll start over from the beginning. Having a Persona that repels or blocks physical attacks is ideal here, plus you might want to have someone with Dekaja to remove Heat Riser’s buffs. Other than that, this fight is pretty straightforward.
The third area will have more enemies and nothing else important, so make your way to the top to fight a third boss.
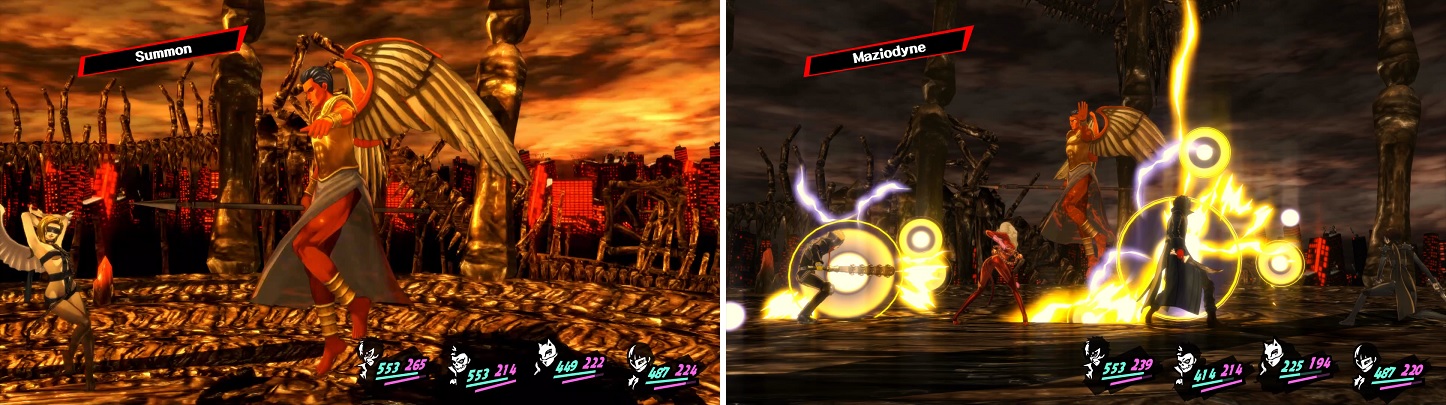
BOSS - Declarer of Anguish
This boss is another one that seems to follow a set pattern for her moves. On her first turn, she will use Divine Judgement twice, which is a skill that reduces the target’s health by 50% (meaning it cannot kill you). On her second set of turns, she’ll tend to use Maziodyne and Mabufudyne, so watch your characters’ weaknesses to make sure they don’t suffer too much damage. Because of her script, she’s not too hard and will go down easily, just like the previous battle.
The fourth area isn’t too big, but it does have two chests, both guarded by a single enemy. Clear the enemies and grab the chests to get a Soma and Empathy Cape , then get to the top to fight one more boss before the final.
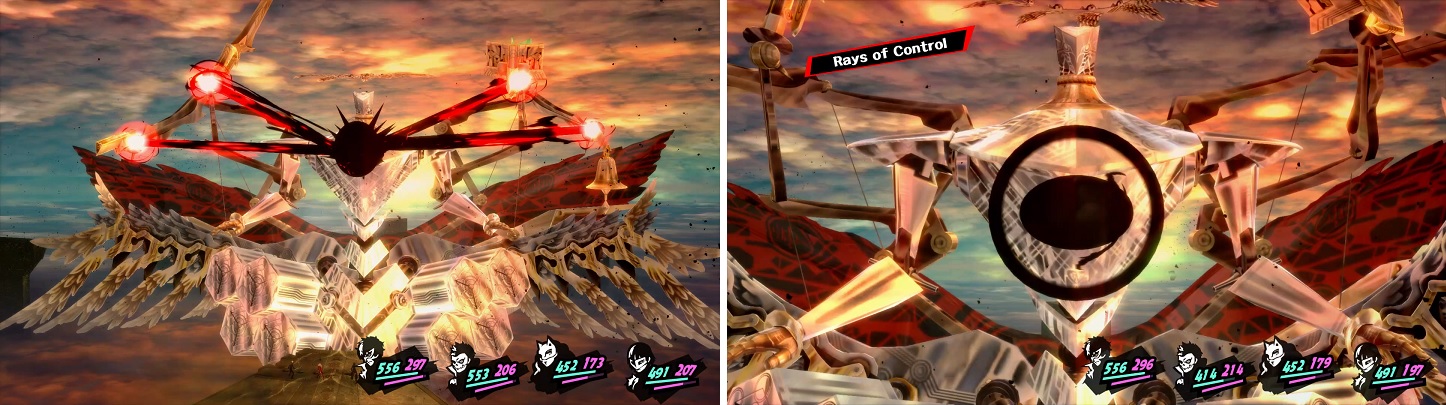
BOSS - Apocalyptic Guide
You could think of this boss as a mix of the other three, as you will see him using moves from them. On his first turn, he will summon two Zealous Messengers, so try to take them out before they can do anything. On his second turn, he will use Charge and then Sword Dance on someone and on his third turn, he will use Divine Judgement, followed by Maziodyne. Depending on how the battle is going, he can use Debilitate (debuffs attack, defense and accuracy/evasion) and follow it up with Megidolaon.
After the above, the boss will start over from the beginning, usually just attacking normally if there are Messengers still alive or he happens to get a critical hit on Sword Dance. If you have Ryuji and/or Ann in the battle, have them use Charge and/or Concentrate, respectively, as their follow-up moves will deal some major damage. This boss is harder than the others, but he’s not that much more challenging.
The Apocalyptic Guide is a mix of the other three Archangels you fought on your ascent.
You’ve finished off the last mini-boss and see the end in sight. Before you go diving into confronting the final boss, the platform where you fought the Apocalyptic Guide is a safe room. Use it to travel back to the beginning to get a nice heal from Lavenza and do any last-minute fusing for new Personas. Once you’re ready, travel back to the top and enter the area at the end to fight the final boss.
BOSS - The Holy Grail
The refight against the Holy Grail will play out similarly to earlier, although it will have an expanded repertoire. Also, at the beginning of the battle, you will need to send someone to cut the lines at the top, so the boss doesn’t get healed by Will of the People. While the person you send (send someone like Ryuji and not the healer), begin your assault on the Holy Grail to distract it from noticing the person you sent. You already know about Arrow of Light, and Light Edge is more or less a party-wide version of that.
Another new move is called Diffraction Arrow, where the boss will hit two or three characters for some damage, which can also inflict the Forget ailment. If you don’t know what this is, it basically means you can’t use your Persona, so if someone gets it on them, heal it immediately. Note that the Holy Grail will use Will of the People throughout the first part of this battle, so you won’t be making too much progress on depleting its health. If you keep distracting it with damage, though, your party member will eventually cut the lines at the top, allowing the true battle to take place.
The Holy Grail still has the same moves as before once the lines are cut, plus you don’t have to worry about any weaknesses or strengths. Ryuji and Ann come into their play here, since they should have both Charge and Concentrate, respectively, in their skillsets. Ann, especially if she still has Fire Boost and Amp, will do a lot of damage with something like Agidyne. One thing you do have to watch out for is the Holy Grail’s ultimate move, which will only occur when you finally cut the lines. It will use Gathering Light first, then Eternal Light on its next turn, so make sure you guard once you see Gathering Light.

You won’t be able to progress in the fight until you cut the lines (left). Make sure to guard when the Holy Grail is charging for its ultimate attack (right).
Once you finally fell the Holy Grail, there will be a bunch of scenes, introducing the true final boss.
BOSS - God of Control, Yaldabaoth
This god is huge and while the battle might appear to be rather simple at the beginning, it will begin to get a little more complicated. The main boss only has a few moves, mainly Arrow of Light for the majority of the battle, but it seems it can also use Dekaja to remove your buffs. Not that far into the battle, Yaldabaoth will summon the Gun of Execution, one of his hands. Its first move will be Distorted Lust, which charms a character, usually costing you a turn. There’s nothing you can do about it, since it is a special ailment.
Each arm that Yaldabaoth brings out has a special ailment that usually can’t be healed, so you will need to wait until they go away on their own.
Other attacks for the Gun of Execution include Capital Punishment and Shoot Up, which are single-target and party-wide gun attacks. You will want to get rid of the arm as soon as possible, but be aware that it repels both Gun and Wind skills. The next arm that Yalda pulls out will be the Bell of Declaration, which begins by using Distorted Vanity, a skill similar to Madarame’s Artist’s Grace skill, where the character will become weak to everything (you can’t do anything about this).
The Bell of Declaration’s other attacks include Gospel, a single-target attack, and Frail Law, which is just Marakunda, as well as Tough Law, which is Marakukaja. This arm repels fire attacks. The third arm that Yalda will summon is the Sword of Conviction, which will use Distorted Vanity right away, doubling the cost of all skills, both physical and magical. It’s best to just use normal attacks on Yaldabaoth to avoid wasting too much SP or HP. This arm repels both physical and electrical attacks, essentially making Ryuji useless.
You might see some other moves from this arm, which include Wind Cutter, a physical attack to one party member and Sword of Judgement, which physically hits everyone. There is one more arm that Yaldabaoth can summon, which is the Book of Commandants, which begins by using Distorted Wrath. This works similarly to the berserk condition earlier, where your attack will increase, but your defense will drop. In addition to this, this arm can use both Agidyne and Bufudyne, as well as Wrath of God (a single-target attack). This arm will repel both ice and nuke attacks.
After you defeat the arms, Yaldabaoth can resummon them, but with half health. Three of the four will use a new ailment move, so be on your guard. Gun of Execution uses Distorted Avarice (damage and inflicts Hunger), Bell of Declaration uses Distorted Envy (inflicts Jealousy, which makes that character attack another if they help someone else), and the Book of Commandants will use Distorted Pride (will counter any attacks focused on the boss, including debuffs). The last one will counter with Divine Judgement, which takes away some of the attacker’s SP. You’ll want to destroy each of the arms again, so as not to give the boss too many attacks.
When Yaldabaoth brings out all four arms at once, he will unleash his ultimate move soon.
Once you attack Yaldabaoth and get his health low enough, he will summon all four arms back with full health. As soon as he does this, he will use Divine Apex, which will be in preparation for his ultimate attack. Luckily, it will take two turns before the attack is unleashed, so you have a free turn to buff, debuff, and heal. Use this opportunity to do stuff like cast Tarunda on Yaldabaoth and use Marakukaja on your party. On your next turn, guard to minimize the damage as much as possible. Continue attacking the main body after and it will look like you have won. Some scenes will occur and when you finally regain control, use Sinful Shell to finally put down Yaldabaoth for good.


The Ending
You’ll witness a bunch of scenes happen after vanquishing the God of Control, and it doesn’t really matter how to respond to any questions asked of you. Since tomorrow will be Christmas, you will get a text from your girlfriend (or girlfriends), asking you to hang out with them tomorrow. You’ll get a gift from whoever you hang out with, then more scenes will happen. Eventually, you’ll get a chance to hang out with someone on February 14th, Valentine’s Day, although if you romanced more than one girl, things won’t look too good (you’ll receive a gift either way).
The game will skip ahead to March 19th, where you will be getting ready to leave to return home. Before you do that, Sojiro says to go around and say goodbye to everyone. Basically, you will go around and talk to the people who you’ve maxed Confidants with, and they will hand you an item that will carry over into New Game+. These items will let you benefit from some of the Confidant abilities once you re-establish them. For example, upon start Kawakami’s Confidant again, you will instantly have her massage ability at rank 1 (all other abilities will still unlock at their normal ranks). Here are the following locations of each maxed Confidant, what item they give and the abilities you gain. If you maxed Futaba’s and Sojiro’s Confidant, make sure you talk to them before leaving.
| Confidant (Location) | Item (Description) |
|---|---|
| Sojiro (Inside Leblanc) | Recipe Notes (Can make Master Coffee/Curry from beginning) |
| Futaba (Inside Leblanc) | Promise List (Mementos Scan/Treasure Reboot) |
| Sae (Backstreets) | Business Card (Does nothing) |
| Takemi (Clinic) | Dog Tag (Have access to all items at clinic) |
| Makoto (Aoyama-Itchome Station) | Buchi Calculator (Shadow Factorization) |
| Kawakami (School Gate) | Unlimited Service (Can use Special Massage from beginning) |
| Ryuji (Shibuya Arcade) | Sports Watch (Harisen Recovery) |
| Ann (Underground Mall) | Fashion Magazine (Sexy Technique/Crocodile Tears) |
| Yusuke (Underground Walkway) | Desire and Hope (Can make Skill Cards of all levels) |
| Haru (In front of Big Bang Burger) | Dyed Handkerchief (Soil Improvement) |
You can talk to each of your maxed out Confidants (left) to receive an item that will help you on New Game+ (right).
| Confidant (Location) | Item (Description) |
|---|---|
| Iwai (Untouchable Shop) | Gecko Pin (All gun customizations) |
| Lavenza (Outside any Velvet Room door) | Cell Key (All Velvet Room facilities) |
| Yoshida (Station Square) | Fountain Pen (All speech bonuses) |
| Chihaya (Shinjuku) | Fortune Tarot Card (All fortune readings) |
| Ohya (Inside Crossroads) | Interview Notes (Legendary Scoop) |
| Shinya (Akihabara Arcade) | Gun Controller (All gun techniques) |
| Mishima (Akihabara) | Documentary Plans (All EXP bonuses) |
| Hifumi (Kanda) | Kosha Piece (Touryou) |
| Morgana (After returning to Leblanc when finished) | Morgana’s Scarf (Pickpocket) |
Once you’re talked to everyone and have gone home, Morgana will give you his item, then there will be more scenes. This will bring you to the end of the game, where you will be able to save your game as a Clear Data file after the credits. Loading this up will allow you to begin New Game+, where you will have the benefit of carrying over some things, which is as below. Also, you will finally be able to go after a few trophies, which are only achievable in NG+ ( One Who Rebels Against a God , Mask Collector , and Beyond Rehabilitation ).
- Money
- Social Stats
- Equipment
- Skill Cards
- Max Confidant Items
- Christmas and Valentine’s Gifts
- Persona Compendium


 Sign up
No Comments