
| Important Items in this Area |
|---|
| Young Berserker Card |
| Skellige Storm Card |
| Anseis’ Letter |
| My Manifesto - The life of Jacques de Aldersburg |
| Letter to Tailles |
| Invitation to the Hare Hunt |
| Noble Alondra |
| Guillaume’s Scrap of Paper |
| Letter of Condolence to Horn |
| Short Letter to Horm |
| Information for Tournament Participants |
| Skellige Storm Card |
| War Longship Card |
| Deed to Corvo Bianco |
| Key to Corvo Bianco |
| Gwent Players in this Area |
|---|
| Blacksmith - Young Berserker Card |
| Armorer - Skellige Storm Card |
| Barber - Skellige Storm Card |
| Innkeep - War Longship Card |
Tourney Grounds
Time to rendezvous at the tourney grounds and hopefully gain an audience with the duchess. Make your way southwest from Corvo Bianco to reach your destination, you’re supposed to track down Palmerin. Don’t bother him just yet, however - first continue south, past the arena until you find the Tourney Grounds signpost. Discovering it now will may spare you some running around later on.
You can also indulge in a bit of Gwent with a local Blacksmith and and Armorer. The Blacksmith possesses a rather mundane Skellige deck only noteworthy for the “Skellige Storm” cards he likes to play (works like a combination of “Impenetrable Fog” and “Torrential Rain”). The Armorer, however, has an almost Sasha-level Nilfgaardian deck full of “Medic” cards and “Spy” cards, and isn’t above using “Decoy”, “Scorch”, “Villentretenmerth” and cards with the “Tight Bond” ability to harass you - he can be one of the more difficult opponents in the game, but a good (and lucky) Northern Kingdoms deck can win a shoot-out if properly played. The Blacksmith will cough up a Young Berserker card when defeated, while the Armorer will part with a Skellige Storm card.
Not enough Gwent, you say? Good news! Head west from the Tourney Grounds signpost to find a Barber. This guy is armed with a Skellige deck that can really show off the faction’s power, complete with three “War Longship” cards (6 Strength, “Tight Bond” ability), two “Young Berserkers” which he’ll transform by playing the “Ermion” card (8 Strength Hero Card, “Mardroeme” ability) and the devastating “Cerys” card (10 Strength Hero Card with “Muster”). The “Cerys” card’s “Muster” ability summons up “Clan Drummond Shield Maiden” cards (4 Strength, “Tight Bond” ability), which means simply playing “Cerys” could put 46 points on the board, after the “Tight Bond” effects take place. On top of this, the Barber isn’t shy about using the “Draig Bon-Dhu” card (2 Strength, “Commander’s Horn” ability) and the “Dandelion” card to further boost these power-plays. He also somehow possesses at least two “Villentretenmerth” cards, which is frankly shenanigans, but if you best him he’ll cough up another Skellige Storm card.
Lastly, there’s the Innkeep, who possesses a mediocre Scoia’tael deck. You’ll see a few “Muster” combos, some Hero Cards and a few “Medic” cards, but all in all, a halfway decent deck played properly should rout her, earning yourself a War Longship card (6 Strength, “Tight Bond”) in the process. Beat these four players and you’ll be a quarter of the way through the quest “Gwent: Never Fear, Skellige’s Here” and hopefully a few hundred Crowns richer.
After you’re done with Gwent, turn your attention to looting… although you’ll mostly find junk, there are the odd bits of gear, crafting components and consumables lurking around that make it worthwhile, as well as perhaps a few bits of cosmetic armor dye, which are new to Blood and Wine. More importantly, perhaps, are a few notes scattered around which will glow red when observed via your Witcher Senses. Follow the road running northwest from the signpost, past the screeching doomsayer and turn west when the road does to find Prince Anseis’ tent. He has little to say right now, but you can loot his tent for the note “Anseis’ Letter” . Across the road to the southwest you’ll find Count Tailles of Dorndal, near which is the book “My Manifesto - The Life of Jacques de Aldersburg” and the “Letter to Tailles” .
You can also scour Guillaume de Launfal’s tent, which is just west, southwest of the arena where Palmerin awaits. In this tent you’ll find, among other things the note “Invitation to the Hare Hunt” , the book “Noble Alondra” and the note “Guillaume’s Scrap of Paper” . Not much of a poet, this guy. North of Guillaume’s tent you’ll find Prince Horm Akerspaark of Maecht, in whose tent lies the note “Letter of Condolence to Horm” or the “Short Letter to Horm” , depending on the outcome of the quest “Reason of State” in the main game. Finally, on a table south of the Blacksmith you’ll another copy of the note “Information for Tournament Participants” , which will start the quest “Gwent: To Everything - Turn, Turn, Tournament!” .
There Can Be Only One
Now, it’s time for a brief diversion… a diversion not just from the task at hand (like all the looting and Gwent was earlier) but a bit of a geographical diversion. Don’t fret, it’s quick, not terribly involved, there’s some great gear you’ll gain from it (albeit, in the long term), and it’s ultimately more helpful to start this now than wait. Open your map and look northwest of the Tourney Grounds to spot a lake/island recursion - an island within a lake, with a body of water on the island, in this case. Or, to be crude, a donut-shaped island. Put a quest marker ([Square]/[X]) on the body of water on the island in the lake and make a beeline there. You shouldn’t come across any monsters, map markers or special events along the way.
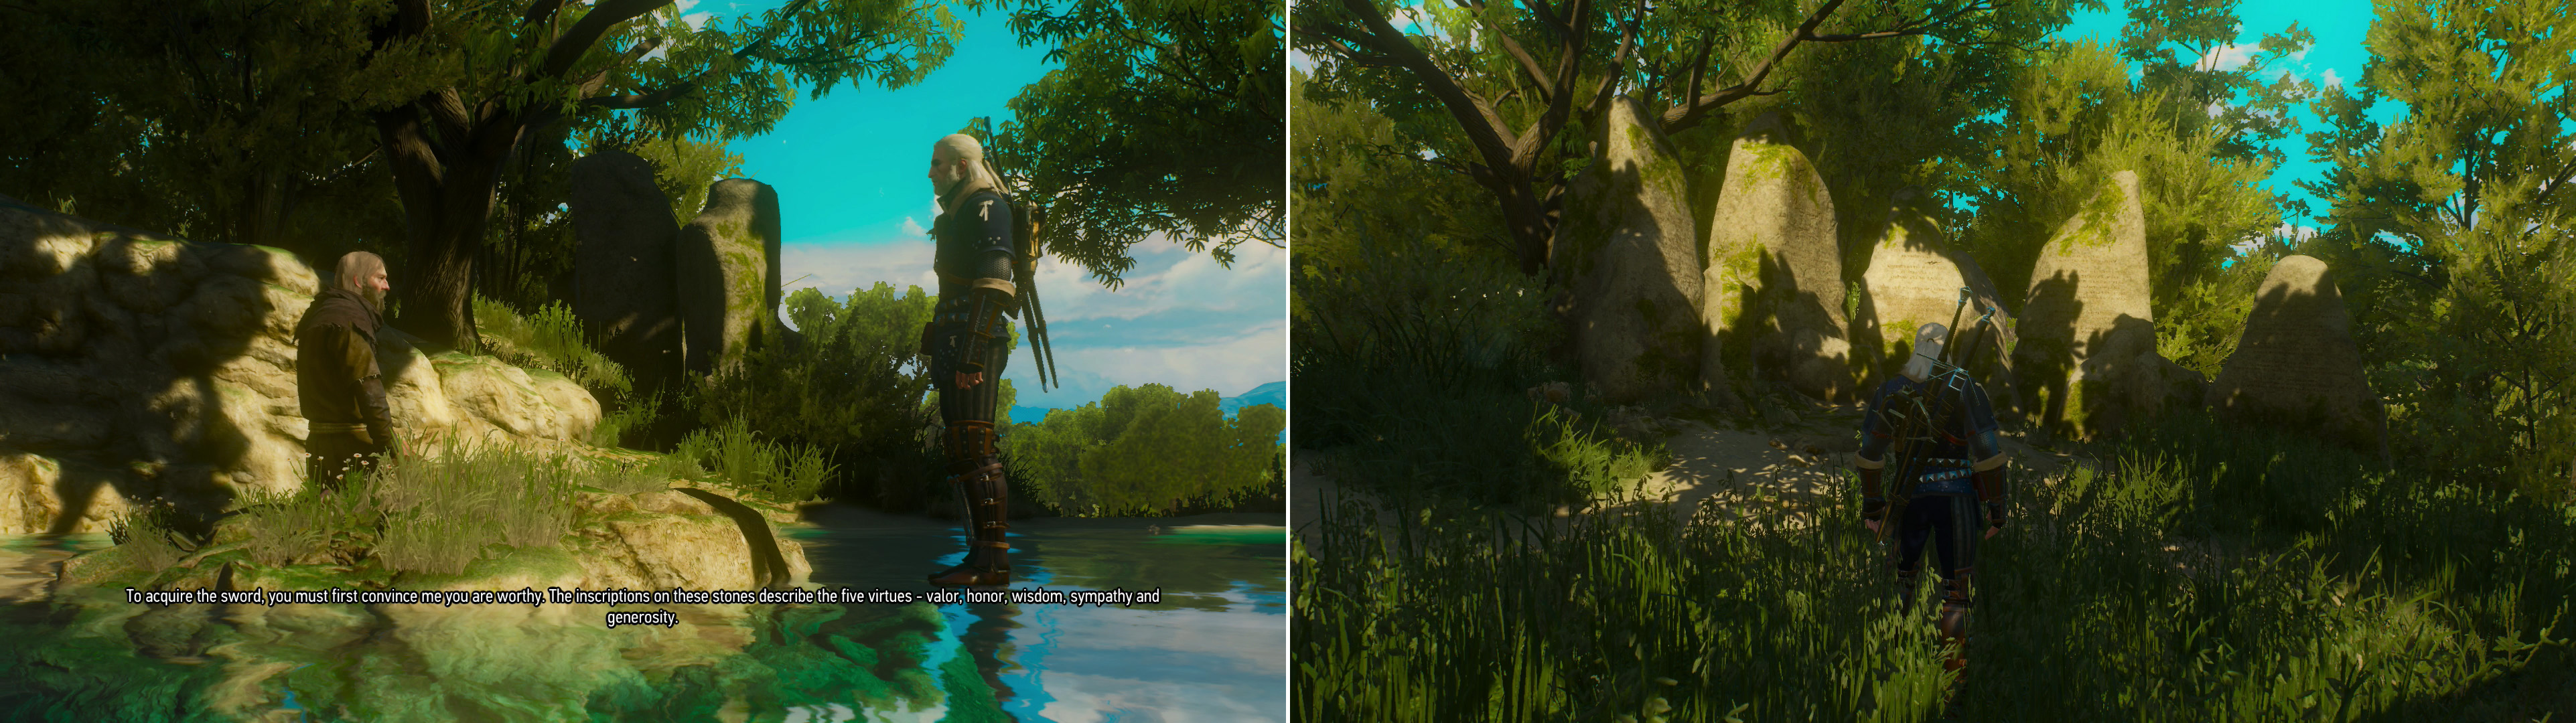
Talk to the druid at the unusual lake to learn about a most potent treasure (left), then search some stones to learn about the five knightly virtues (right).
Once you reach the island, walk out onto the pond in the middle of it. Yes, you read that right - walk ON the water. After a bit of religious humor, head over to the hermit who is sitting on a small fleck of land in the middle of this pond (an island in a pond in an island in a lake on a continent surrounded by the sea? That’s a lot of recursions…) and talk to him to learn about the lake and the prize it holds. All you need to do is prove that you possess the five chivalric virtues of Generosity, Valor, Compassion, Honor and Wisdom. To learn a bit more about them, you can consult some stones north of the lake. The point of this endeavor? Simple - now that you have this quest, you’ll be able to keep track of your actions more easily and ensure you prove your virtue. Opportunities to do this will arise - and will be pointed out - as you complete quests in Toussaint.
| Objective | Reward |
|---|---|
| For learning about the five chivalric virtues | 50 XP |
Scrap with the Shaelmaar
Time to get back to business. Return to the Tourney Grounds and find Palmerin who, depending on what time it is, may be resting in Guillaume’s tent or will be near the arena, talking to a group of children. In the latter case, one of the brats will ask you if “virtue always trumps villainy” (answer however you please, it really doesn’t matter) while in the latter case you’ll have to pass time talking to Palmerin until it’s a proper hour for you to be bothering the Duchess. Either way, you’ll eventually head off to the arena, where the Toussaintois have decided to entertain themselves with a bit of sport. You’ll get a chance to have Geralt weigh in on the morality of this matter, too, but there are again no consequences either way, so respond as you will. Unfortunately, some bells aren’t quite enough to tip the scales in Guillaume’s favor, so Geralt and Palmerin leap to the rescue… again.
The Shaelmaar is an annoying armored monster that you can’t defeat through swordplay alone. Even your Quen sign is unlikely to be sufficient protection against it’s rolling attack, as it can strike multiple times in a single charge and knock you down. When it’s hurt, it also has a habit of burrowing into the ground and start spinning, resulting in an area-of-effect attack, which you’ll just have to distance yourself from and wait it out. Note that Palmerin has a life bar in this fight, but if it’s depleted you’ll just lose his services (meager at they are) for the rest of the fight - there’s no dire consequences if he falls.
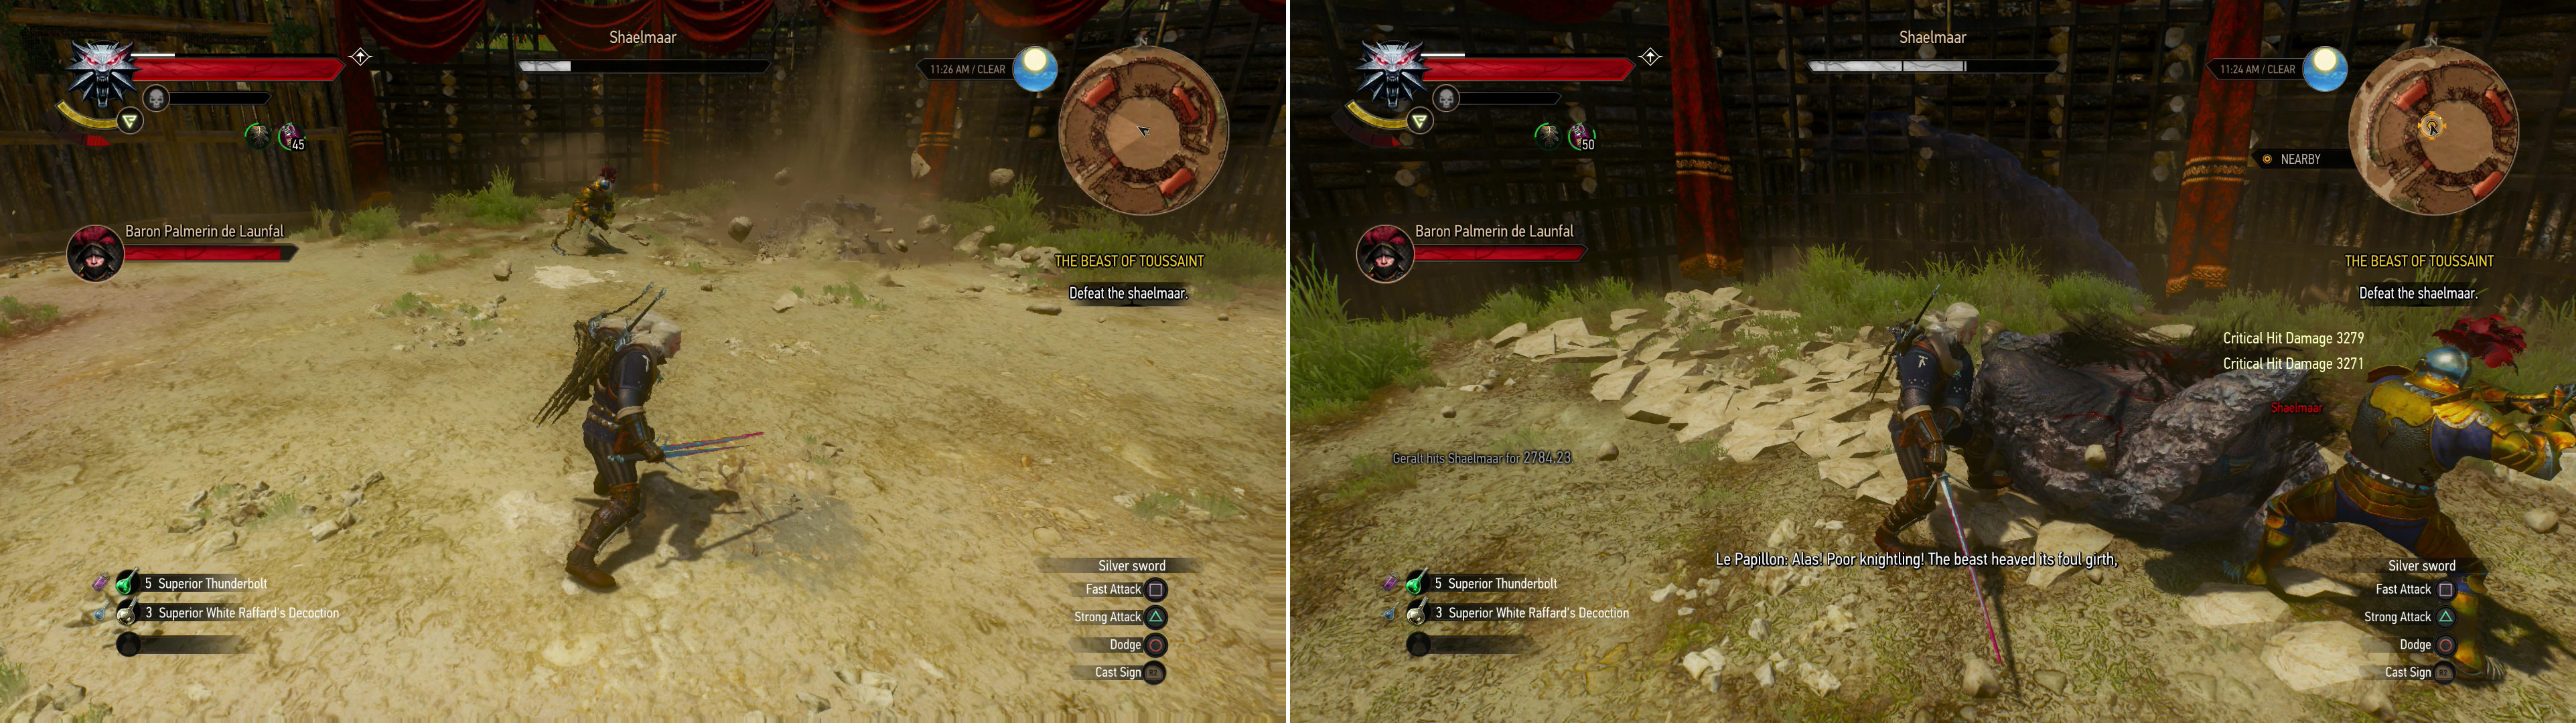
When pressured, the Shaelmaar may burrow and spin, dealing damage to anything nearby (left). Stand near the arena walls and dodge when it charges you. The resulting impact will stagger it and leave it vulnerable (right).
So, how to defeat the monster, then? Well, frontal assaults as ill-advised, due to its armor, but the Shaelmaar isn’t exactly lacking in ranged options, either. First, it can roll surprisingly quickly, sometimes for quite a long time - certainly enough to cover the span of the arena. It can also perform a shockwave attack, sending a line of force at you, buckling the ground in its wave. This attack, however, is easily dodged. It also has some close-ranged attacks, but it’s the roll that’s the most dangerous, and also the attack that provides the most opportunity…
Apply Relict Oil to your silver sword and stand along the edge of the arena opposite the Shaelmaar and wait for it to roll at you, at which point roll out of the way. If you’re lucky, it’ll ram into the side of the arena, stun itself, and flip onto its back, leaving it vulnerable for a few moments. You can use Quen to protect yourself (the normal cast-and-forget version, not the “Active Shield” version) or Aard to knock it out of its roll, or you can cast Aard at an adjacent section of wall and hope it confuses the beast into rolling at where you cast the sign, but simply rolling out of the way is arguably simpler and more reliable.
| Objective | Reward |
|---|---|
| For defeating the Shaelmaar | 300 XP |
The Fourth Victim
When the Shaelmaar is defeated you’ll get a timed decision to put the beast down or spare it. Sparing the Shaelmaar will prove you possess the virtue of Compassion - advancing the quest “There Can Be Only One”, although honestly, it could be argued it’s more humane to put the beast out of its misery.
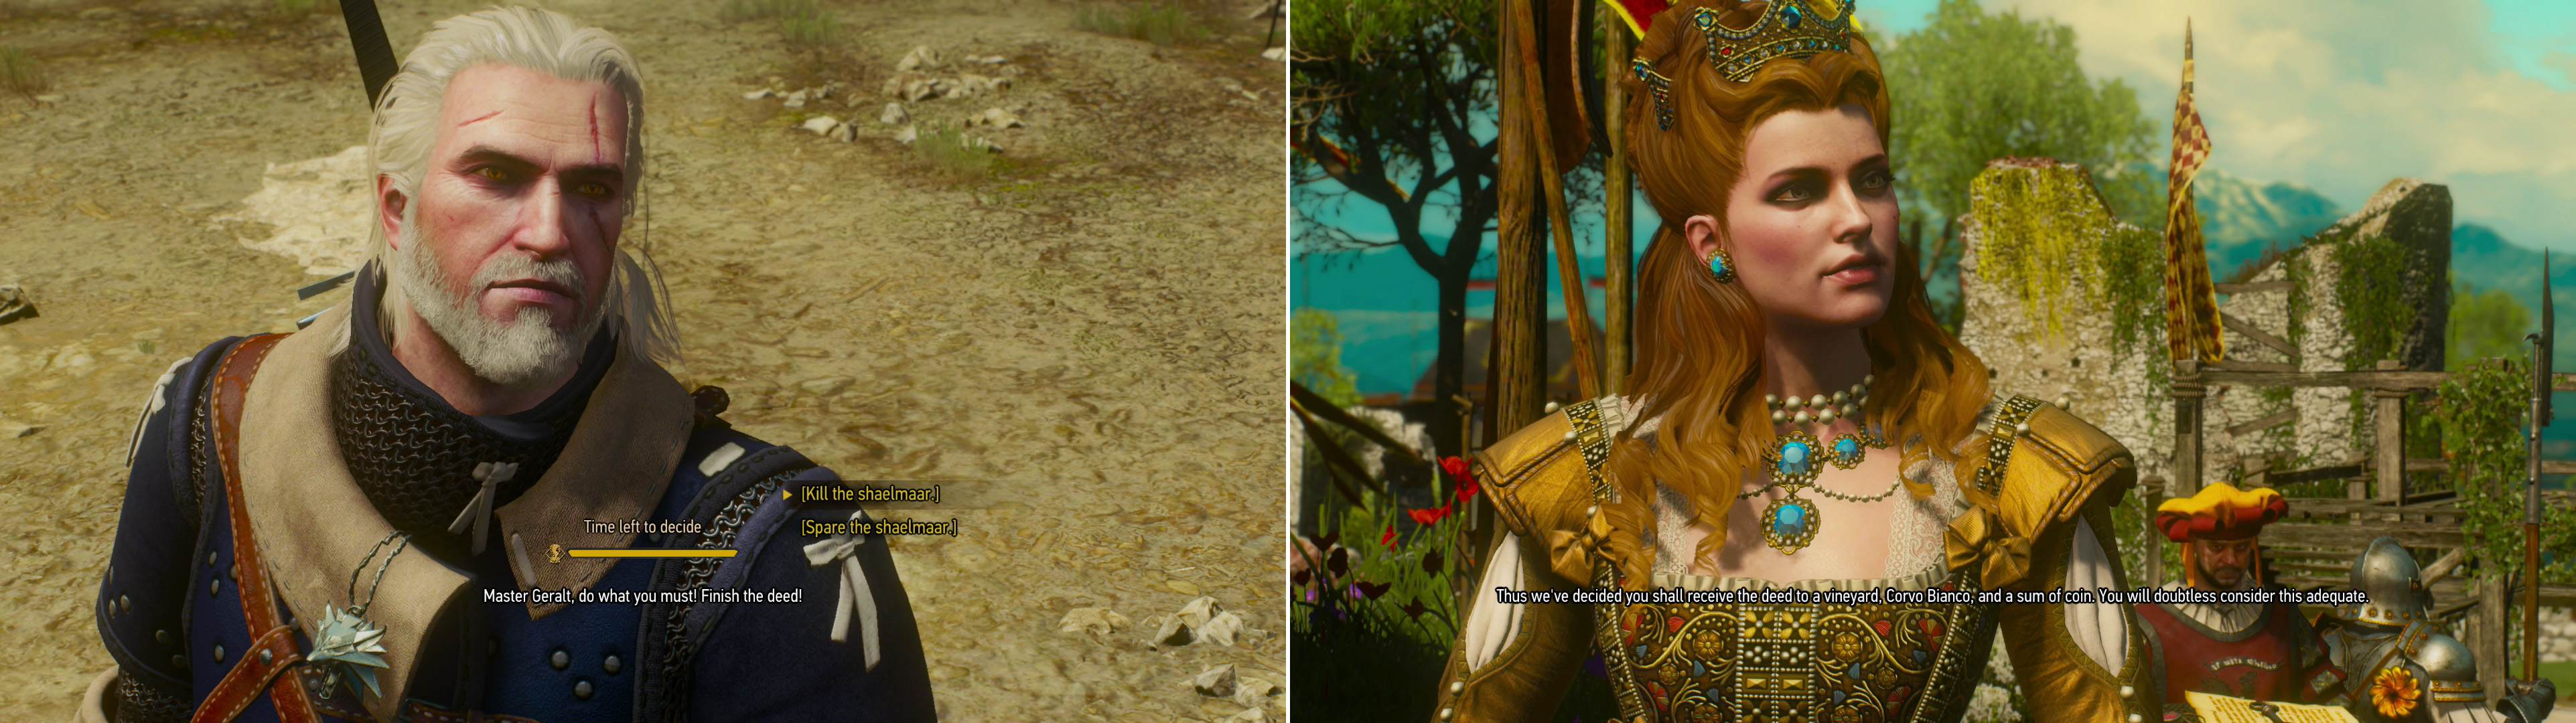
After beating the Shaelmaar, you can spare it to prove your COMPASSION (left). After the fight, Anna Henrietta will provide details on the beast, and provide a generous - and ingenious - reward (right).
After you make your decision, Anna Henrietta will come greet you in person… along with Guillaume’s “heart’s champion”, for whom he’s nearly gotten himself killed twice over. After some chatter the Duchess will take you to meet Damien de la Tour, captain of her personal guard, who isn’t shy about expressing his professional rivalry with Geralt. Guy must be stung he wasn’t good enough to stop this murderer himself.
Fortunately, his whining doesn’t come to much, and after Anna questions Geralt about the sort of reward he’s after, she’ll make an advance by offering the deed to the Corvo Bianco Vineyard, with the monetary reward due after the beast is slain. What seems like insane generosity is actually pretty shrewd business on Anna’s part - what better to keep a Witcher in her lands longer by offering him a reward that can’t travel? This starts the quest No Place Like Home , which will have to wait until your current quest is resolved.
| Objective | Reward |
|---|---|
| For acquiring the deed to Corvo Bianco | 100 XP |

 Sign up
No Comments