
Despite its rather unfriendly name, the next dungeon isn’t that bad. To get there, you need to first locate a doorway to Lorule in the Eastern Palace or Zora’s Domain area. Warp to the Witch’s Hut and dive into the water above, then swim left to the next screen. Climb up the nearby stairs, back up to dry land. To the left is a large waterfall and, if you stare hard, you should see a doorway to Lorule behind the waterfall. Merge into the wall above and walk left, into the waterfall and through the doorway to Lorule. In Lorule, dive just ahead to rescue submerged Maimai #77 .
From here, we could head directly to the area with the Dark Palace, but why not take the time to explore the area? Who knows, you might get a laugh or two. Swim right to the shallow water and, while on it, merge into the nearby wall. From here, walk all the way right, past the next screen, over the gaping chasm, and emerge just before the exit to the next screen. Dive right before the river plunges left into the chasm to rescue submerged Maimai #78 . Now isn’t that a dangerous place to be hiding?
$$$item 3933
Swim right to the next screen; at the end, there’s a waterfall and a cave behind it. Go inside the cave to find a cowardly Hinox; he will give Link a blue rupee to try and shoo him away. Keep pestering Hinox to receive more rupees, but take care not to push him too far.
Once you’ve tipped Hinox over the edge, he’ll go on an unstoppable rampage, dealing damage to Link. All you can do at this point is leg it outside the cave; even if you return, he’ll continue to rampage at Link. Should you stop before Hinox gets angry, he’ll mention a classic Zelda reference.
Back outside, merge onto the nearby wall and return the way you came–all the way left. This time we’re heading to where Zora’s Domain is in Hyrule. From the doorway where you started, swim left and down. At the end, climb up the stairs to land on the right, then head right to the next screen. Here, there’s a bunch of trees and a massive chasm ahead.
Head to the bottom-left corner and merge into the wall below, then walk all the way left across the chasm. It’s a fairly long trek and whatever you do, don’t look down! On the other side, emerge and head right for the next screen.
This area looks a bit more like the road to Zora’s Domain back in Hyrule Follow the path right and down to find another doorway to Hyrule–ignore it and go left, up the stairs. Atop the hill, merge into the nearby wall and walk left. Emerge on top of the next hill and mow down the grass to find Maimai #79 . Merge back into the wall and continue left to the hill on the right, then head up to the next screen. Here, head left toward the water. Watch out for a mob of Kus coming to assault Link. When the coast is clear, dive into the bottom-left corner to rescue Maimai #80 .
$$$item 3935
Now return to the screen with the first doorway to Hyrule (go down one screen, left one screen; cross over the giant chasm and go left one more screen); this time go down to the next screen. Continue down the narrow road, minding the Moblins and go down to the next screen. In this screen, there are a lot of rock pillars, not dissimilar to the area in the same location in Hyrule.
There’s also a doorway to Hyrule behind the tall pillar, should you wish to return. To the right and bottom of the tall pillar is a rock with Maimai #81 on top–dash into the rock from its front to dislodge the Maimai.
Next continue down to the next screen. Here, watch out for the unfriendly Hinox and head for the bottom-left corner; dash into the lone tree with the Pegasus Boots to knock out Maimai #82 . From here, go right, past the line of statue pillars, and exit the screen to the right. In the next screen, dash into the left-most tree to dislodge Maimai #83 , then make your way to the exit in the bottom-right corner.
At the end; open the chest to score yourself 100 rupees . In the previous screen, head for the top and bomb the cracked wall to reveal a secret cave–inside are fairies. From the cave, head left and go up to the next screen.
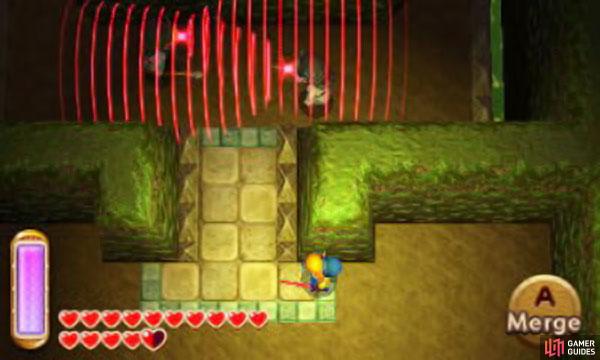
You will now be in the main Dark Palace area, where Hilda’s ex-soldiers diligently patrol; get caught by one and you’ll be thrown into a prison cell. Basically the obligatory stealth mission; we’re pretty sure we didn’t have these back in the days of A Link to the Past. To make things easier, the vision of each patrol is shown as a red wave pattern.
If you get caught; just merge through the prison bars to escape. Anyway, head up to find Maimai #84 stuck obviously on the wall. From the Maimai, go right, then down at the junction and all the way right. At the end, head down into the next screen.
$$$item 3939
Here, head left and at the cliff edge, merge into the nearby wall and walk all the way left. On the other side, emerge and follow the rupees right, then prise off Maimai #85 on the cliff wall. Drop down right and enter the cave to find a Great Fairy to replenish your health. Back outside, drop down left and climb up the nearby stairs; then make your way back to the entrance in the top-right corner and return to the main area. If needed, before the stairs, turn left and go up; bomb the cracked wall ahead to reveal a doorway to Hyrule.
In the main area again, head all the way left, then at the end, go up a few paces. To the right is a patrol watching the entrance carefully without rest. No normal human could sneak past, but luckily Link is no ordinary man. Merge into the wall facing opposite the patrol and walk toward the direction of the patrol and then emerge past it. A few paces ahead, two patrols pace around, looking for intruders. As the patrols move towards each other, merge into the wall in the centre and walk around to the other side. When the patrols have their backs to you, emerge and head up through the arch.
From the arch, head all the way left. At the end, there’s a tricky patrol below, who searches around in a sweeping pattern. Wait for the patrol to look ahead after sweeping, then walk down and merge into the wall left of its vision; be warned that it’s finicky trying to merge into this wall.
Head right, past the vision, then wait for the patrol to finish sweeping again before emerging and going right. Up the stairs is a chest containing a 20 rupees- -hardly a prize worthy of your stealth skills. From the chest, go left and drop down above at the end.
$$$item 3931
Next, it’s time to head up; here, two patrols pace up and down the passageway. Wait for a patrol to move toward the bottom-most point, then merge onto the wall to the left and walk right past the patrol. Continue up a few paces and merge into the next wall to the left, then walk all the way right to sneak past.
After this point, if you get caught, you will restart from the prison cell nearby instead of the beginning. At the end, to the right is a patrol circling a pillar upstairs. Wait for the patrol to go past the stairs, then go up the stairs and head down to the pillar and merge into it.
Emerge below the pillar and stop in your tracks. To the right is another patrol circling a pillar; wait for the patrol to look left, then as it turns away, go right and follow the patrol clock-wise. At the top-right corner, quickly head up, across the narrow path to claim a Piece of Heart .
From your dangerous position, wait until the patrol passes before heading down and down the stairs. Immediately to the right of the stairs is Maimai #86 stuck to the wall. Go down, past the skulls and green torches and stop a few paces down. Just ahead is another patrol; merge into the wall on the right and walk right to sneak past it.
Continue down, then turn right at the corner. At the end, there are three patrols up ahead. Again, wait for the first two patrols to cross ways, before merging into the central wall ahead. Emerge from the left or right side of the wall, then merge into the wall above. Walk in the direction of the third patrol and emerge past it. From here, walk up and stop at the end of the stairs. Waiting just ahead is the final patrol. Walk left, down the stairs, then merge into the wall on the left and walk all the way right to avoid the patrol.
At the very end is a ruin not dissimilar to the Eastern Palace and a weather vane beside it. Bomb the cracked wall ahead to reveal the entrance to the Dark Palace dungeon. Don’t worry about alarming the patrol with your explosion; it seems their hearing isn’t quite as good as their vision…

 Sign up
No Comments