
Welcome to the “Water Temple” of this game; here, you’ll need to play with the water level to progress through the dungeon. Before entering, be sure to blow up the giant cracked rock right outside the dungeon (refer to the previous page) or you’ll immediately be stumped by the water in the first room. Also, if the wooden stumps outside the dungeon weren’t an obvious enough clue, bring along the Hookshot–you’ll need it a lot. Anyway, in the first room, head down the stairs and go through the door leading up, which will take you to the dungeon for real.
In the dungeon’s first room (1F south), fire the hookshot directly ahead to latch onto the pull switch and then pull backwards. Water will start flowing from the menacing faces beside the pull switch, filling the chasm and allowing you to move on. Go left or right, then up the stairs and head through the door going up. In this room (1F centre), there’s a water level control switch and a big chest, but you can’t reach either right now. For now, take the right exit.
Gyorm are swordfish-like monsters that protect themselves with a tough shell. Pull off their shell with the Hookshot, then dice them when they’re exposed. Their shell can also be picked up and thrown.
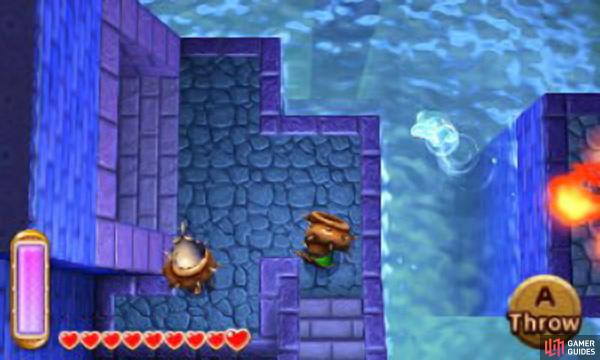
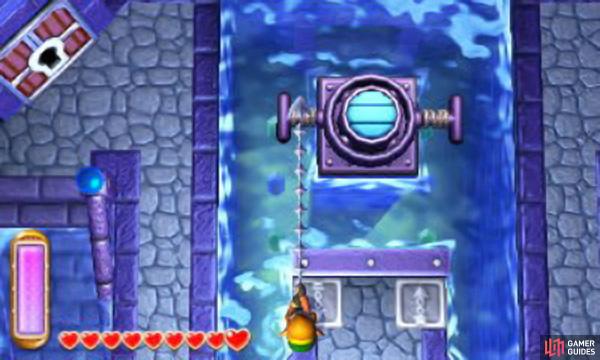
In the right-hand room (1F east), slay the Water Tektikes from afar, then swim up and avoid the water Gibos. On the other side, head up the stairs and go through the door going up, which will take you downstairs to Floor B1. Head down and stop right before the rapid water, then hookshot the pole below to get across. Mind the yellow Bari–these ones are sturdier than the previous ones and split into two like the red version. Next, continue downward and, at the end, hookshot the round switch to the left.
Water will stop flowing in the room. Head left and, from the round switch, go up to claim a Small Key . When it’s safe, drop down left; then take the door in the top-left corner. In the next room, avoid the skating Water Gibos and open the chest in the centre for the Compass . Next, head left to the next room (B1 west). Go all the way left and step on the raft. While on the raft, hookshot down and you’ll pull the raft down with you. Hookshot left for a chest containing 20 rupees . Fire the hookshot or arrows to kill the white Bari in the way.
Next, hookshot down, then right, up and right again. Carefully approach the chest from the bottom-right corner of the raft to open it and claim one Monster Guts . From here, abandon the raft and swim all the way to the bottom-left corner of the room and take the door going down. In the next room, dispose of the Gyorm; when it’s dead, pick up its shell with A. Head right, up the stairs and stop before the shooting arrow. Wait till the arrow stops, then quickly throw the shell right at the edge to hit the round switch. A chest will appear to the left containing 300 rupees .
Use the wall merge to ensure you don’t walk into any rapidly moving water (taking away precious health in the process).
Go back to the previous room and head for the top-right corner, then take the door back to the room with the Water Gibos. Head through the locked door going up. In the next room (B1 north), head left and hookshot the round switch near the top of the room; the rapid water flow to the right side of the room will change direction.
Go all the way right and leap into the rapid water. Next, swim back to land and hookshot the round switch to the right to create a new water flow. Go up along the stairs to the right and, at the end, merge into the wall and walk right.
Emerge behind the skulls and walk down to ride the water flow left. Go up the stairs, then drop down to the left and smack the round switch, generating another flow of water that will fill in a chasm. Merge into the wall to the left and walk left to cross the nearby chasm. Then head all the way right and go through the door going up and leading upstairs back to Floor 1F. The doors will lock and Link will be stuck with a Gigabari.
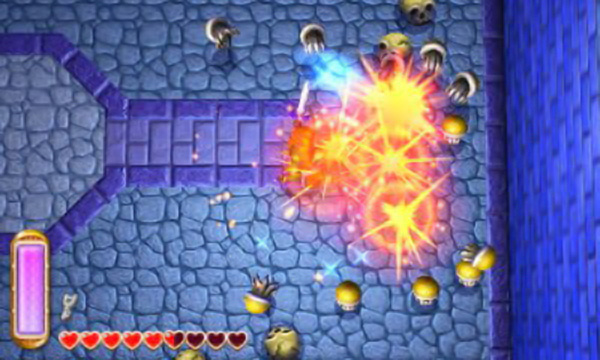
Gigabari is a gigantic Bari, but it’s really no different from the regular size versions. Hookshot to stop it charging electricity, then slash it. Rinse and repeat. After it dies, it will split into loads of small Bari; stun them with the Tornado Rod and finish them off with a charges spin attack.
Once all the tiny Bari are gone, the doors will unlock and a warp zone to the entrance will appear in the centre, up the stairs. Head for the bottom-left corner and take the door to the next room (1F west). Step on the nearby switch to reveal a platform, allowing for easy access back here.
Then; head down and plant a bomb on the cracked floor; if you don’t have bombs, hit the Bawb and carry it (or lure it) to the cracked floor. Jump down the new-revealed hole. Downstairs in B1, hookshot up to snag the Small Key . Go down and right, along the wire mesh path and through the locked door.
In the next room (B1 centre), there’s a water control switch in the middle. At the moment, it will be at two bars. Stand before the switch and to the left, then hookshot up and pull back. The water level will lower and the display will show one bar, which is the lowest level.
Drop down ahead and swim through the door going up. Continue swimming up, diving to avoid the spiked roller. At the end is a big chest containing the Blue Mail , which cuts damage you receive in half. Now your Lorule journey will become slightly easier!
Bawbs are walking bomb monsters that want to explode in Link’s face. Hit them to make them still and you can pick up and throw them like a normal bomb. After they blow up, another will come to take its place, so best you avoid them.
Return to the water control room and head for the bottom-left corner, passing under the central platform; then swim through the door. The doors will lock in the next room (B1 south-west). When ready, swim left and the Beamos will fire a laser in your direction.
Move anti-clockwise around the platform to avoid the laser. Once you’ve done a full loop and the laser is to your left, hookshot the pull switch to the left and drag it down to open the door in the top-left corner. Head on through the new door.
Upstairs in 1F is a room with another water control switch. Drop down right and step on the switch to open the door further ahead; next, you need to reach there. Swim down and left and head back to where you started. Next, step directly on top of the floor tile with a hookshot symbol and fire the hookshot up at the wooden frame.
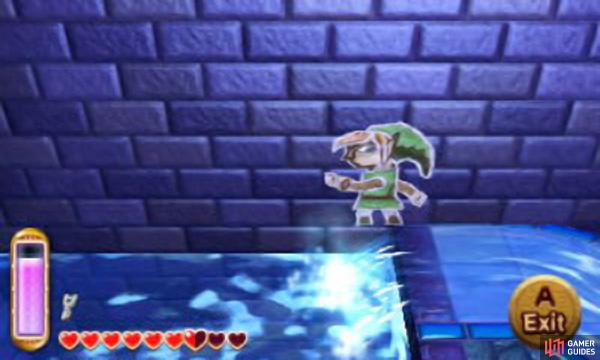
Wait for “Merge (A)” icon to appear in the bottom-right of the top screen and immediately press A to merge; the timing can be tricky to master. While merged, walk all the left until you reach the stairs, then emerge.
Head right, up the stairs and stand opposite the water control switch, this time on the right side. Hookshot up and pull back to raise the water level to two bars, then do it again to raise it to three bars. Next, swim right and onto the raft to collect a Small Key from the chest. Swim back and stand opposite the water control switch, to its left. Hookshot up to lower the water level back down to two bars. Leave the room through the door in the top-right corner. The next room (1F centre) should be very familiar.
Carefully approach the centre, where the big chest is, and use the Tornado Rod or Ice Rod to put out the flames. Open the chest to claim the Big Key . Next, swim left through the door to return to another familiar room (1F west). Swim up and open the chest to claim another Small Key . Take the door in the top-right corner to return to the mini-boss room, then head right and through the door to the room on the right (1F east). Swim across to the chest to obtain one Monster Guts . When ready, bomb the cracked floor near the door and drop down the newly-revealed hole.
Walk down and left along the wire mesh path and pass through the locked door. Stand in front of the water control switch, to its right, and hookshot up to raise the water level to two bars. Repeat to raise the level to 3 bars. Now head for the bottom-right corner and pass through the locked door with your final key .
The next room (B1 south-east) will lock itself; when it’s safe, drop down to the right and fish the four Gyorm with your Hookshot. Once all four are disposed of, new water will flow, moving a hookshot pole along the bottom of the room.
Pull the left-hand lever with your hookshot to lower the water level and pull the right-hand leverl to raise the water level in any given room.
Go up and through the menacing face to reach a secret room with fairies inside. Back in the previous room, hookshot the pole further down to cross the chasm. Then head right and up; take the door leading up and upstairs to 1F. In this final room (1F south-east), swim for the bottom-left corner and head up the stairs, going left.
At the end; hookshot the wooden frame to the left and merge as soon as Link slams into the wall. Then walk all the way left to reach a water control switch. Hookshot the water control switch from its left side to lower the water to 1 bar.
Now, drop down and swim for the floor switch to the right of the entrance; step on the switch to open the door going left. Next, swim down and then right to find a second water control switch. Hookshot the switch from its right side to raise the water level back up. Then swim left and return to the first water control switch. This time, hookshot it from its right side to raise the water level up to 3 bars. You can now leave the room from the door in the top-left corner.
Finally, you’ll be back in the second room of the dungeon (1F centre), at its highest water level. Swim up toward the big door and then go right. Smash the skulls to reveal a hidden floor switch–step on it to raise a platform in front of the big door. You can now access the big door, plus a water control switch that you can use to lower the water level, should you wish to return to any of the previous rooms of the dungeons. When you’re ready, open the big door to face the dungeon’s boss.
Boss: Arrghus
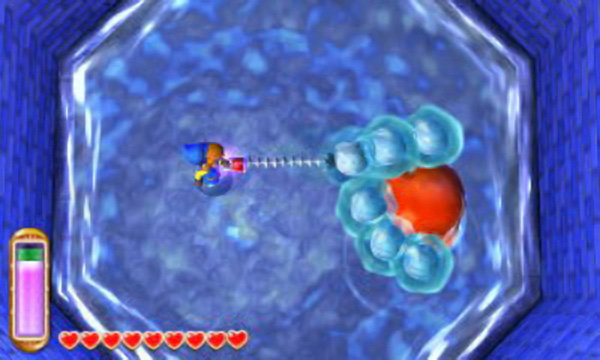
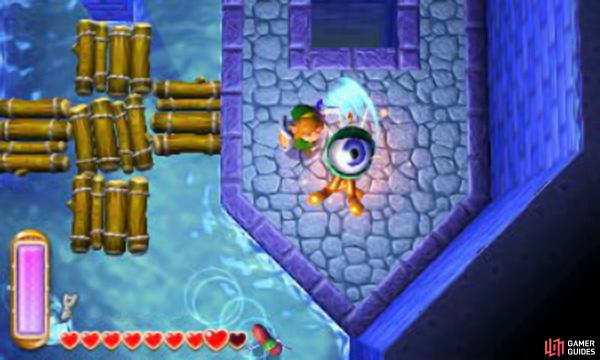
To begin with, the boss will surround itself with small jelly-like eyes. Have your hookshot ready; stand a good distance from the boss and fire the hookshot to pull an eye away and then hack at it. The eyes you hookshot off will try to return to the boss, so it’s a good idea to stay distant, leaving them with a longer journey back.
Repeat until you’ve eliminated all of the eyes around the boss. While you do this, the boss will often alight one of its eyes and fire it at you, sometimes two. If you want, you can hookshot the flaming eyes in the same way, but keep an eye out for a second one coming.
Once all the eyes are gone, the boss will leap into the air and pound the ground over and over. Run around to avoid it, then slash it when it’s on the ground. After a while, the boss will charge its eye to ready a laser attack. The boss will shoot many lasers in a row, aimed at Link, then it will pause and repeat twice.
Run around in big circular movements or merge into the wall to avoid its lasers; take care not to run into the boss! If you want, shoot an arrow at the boss while it pauses. After a lot of running and slashing, the boss will fall. Grab the heart container and go through the door ahead to claim Oren’s Painting .

 Sign up
No Comments