
One of the more technical mechanics of the game revolves around Fluxation, which will require two things before it can happen. The first thing is a Talisman, something that every character has equipped, but just not any normal Talisman will do. Every Talisman in the game has three different “stats” on it, which include the number of Spritnite slots, the Bonus Effect and the Flux Bonus. The first two are pretty self-explanatory, with you gaining more slots to equip Spritnite and gaining that effect when the Talisman is equipped, respectively.
However, the Flux Bonus might be a bit confusing. Looking at one of the first Talismans with a Flux Bonus on it, the Chaos Orb Bracelet (something you find in a chest in Serendale), it has two bonuses, Critical Hit Rate and Support Bonus. The second thing you need in order to use this mechanic is any Spritnite, although Command and Support Spritnites work differently. For Command Spritnite, use that skill in battle with Momentum and there is a random chance it will gain the appropriate Fluxes after battle.
There is no way to know if a Flux occurs or not until the end of the battle, as there is no sign when it actually triggers. At the end of the battle, a window will show up that lets you decide to keep the Fluxes that occurred or not. Support Spritnite work a bit differently, as the above method doesn’t work as straightforward as that. In order to put Fluxes on them, you will need two compatible Support Spritnites, as well as a single Command Spritnite and a Talisman with the “Support Bonus” flux bonus on it.
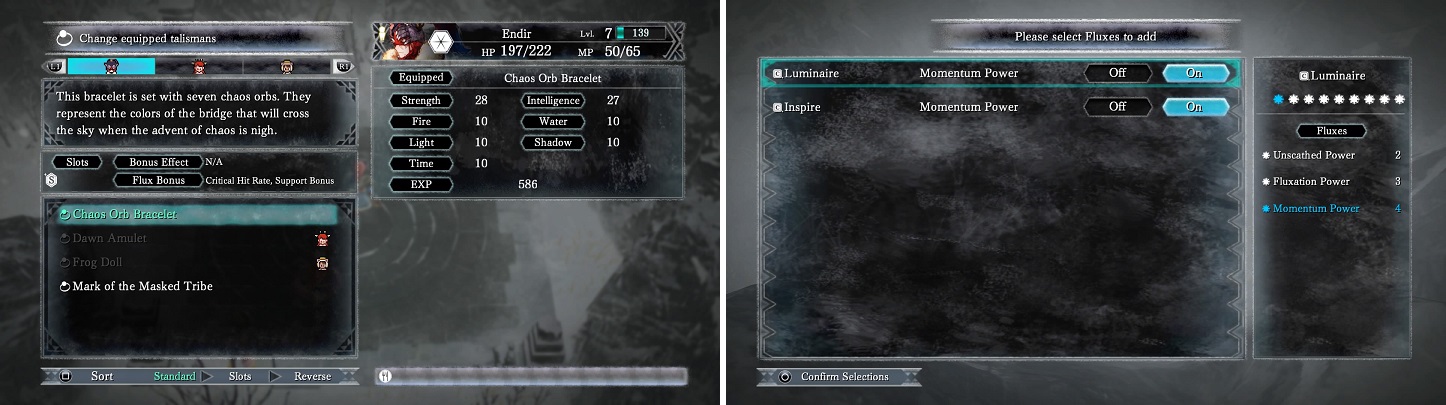
You need a Talisman with Flux Bonuses (left) in order to apply fluxes to Spritnite, which you won’t know happened until after a battle’s end (right).
The reason “compatible” is mentioned is that not all Support Spritnites will work. Basically, with all of the above equipped on a character, trigger Momentum with that skill as usual and if the Fluxation occurs, the bonus effect of one Support Spritnite will transfer over to the other. As an example, you equip Physical Pride and Commanding Wave and do the process. If Fluxation occurs, then you might get a Speed Up flux to appear on the Physical Pride Spritnite. Note that you can only put two fluxes from one Support Spritnite onto another before having to switch it out for another (ex. two Speed Ups from a single Commanding Wave before having to use a different one).
Using the Fluxation System
Since this entire mechanic is somewhat random and isn’t really needed to finish the game, it might not be a good idea to concentrate on it at all and just equip Talismans with more slots so you can equip more Spritnites. Some decent flux bonuses that might be useful during the main story are Combo Power, Momentum Power, Critical Hit Rate, Tech Power, and Unscathed Power. The biggest reason to not concentrate on these is that you don’t get a very good method of obtaining fluxes until late in the main story.
There are certain Talismans that open up much later in the game that have the Boosts Fluxation Rate bonus effect on them. In addition to that, once you have access to the airship, you can get the Fried Dumpling Eggplant food, which helps boost fluxation rate as well. With both of these combined, it’s a lot easier to get fluxes to appear on Spritnite. Note that the Talismans mentioned usually only have a single flux bonus on them, which also helps when going for a particular flux.
So, you have everything above and want to get ridiculously stronger. For Command Spritnite, good fluxes include Fluxation Power (4), Momentum Power (4) and Unscathed Power (2). Note that you want all ten flux slots filled to benefit from the first one mentioned. For Support Spritnite, Mental Emancipation will add Flux Bonus onto other Support Spritnites (it requires all Spritnite to be filled with fluxes to be effective). To fill something like Light Bit with 10 Flux Bonuses, you will need five Mental Emancipations, since you can only get two fluxes from one onto the Light Bit.
| Fluxation | Description |
|---|---|
| ATB Bonus | Increases the level of the ATB gauge immediate after using the corresponding tech. |
| Combo Power | Increases the power of corresponding combos. Each combo will change in different ways. |
| Combo Release | Combos can be used when only one character has a full ATB gauge. However, combos used in this way cost more MP. |
| Critical Hit Rate | Increases the critical hit rate of the tech or combo. |
| Critical Hit Power | Increases the power of the critical hit. |
| Defense Power | Increases the tech or combo power after you get hit. |
| Dying Power | Increases power of the tech or combo at 30% or less HP. |
| Fluxation Power | Increases the techs power when Fluxation happen in-battle. If the tech is maxed on Fluxes, power will be added when Momentum is used. |
| Momentary Boost | Boosts Strength and Intelligence immediately after using the corresponding tech. This boost stays in effect until another action is performed. |
| Momentary Defense | Reduces incoming damage until next action after entering Momentum Mode. |
| Fluxation | Description |
|---|---|
| Momentary Recovery | Recovers HP after entering Momentum Mode. |
| Momentum Effect | Increases the power of the additional effects generated using the corresponding tech/combos in Momentum mode. |
| Momentum Power | Increases the power of the tech or combo when used in Momentum Mode. |
| MP Consumed | Reduces MP Cost. |
| Singularity Power | Increases the power of the tech or combo when a Singularity is active. |
| SP Accumulated | Increases the amount of SP accumulated when the corresponding tech is used. |
| Support Bonus | When Fluxation occurs in one Support Spritnite, the effect of another equipped Support Spritnite will be added to it. |
| Tech Power | Increases the power of the corresponding tech. Each tech will change in different ways. |
| Unscathed Power | Increases the power of the tech or combo at 80% or more HP. |

 Sign up
No Comments