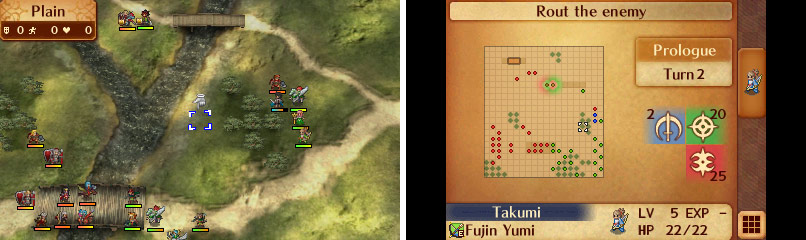
Map of the Prologue.
After the starting cutscene showing the major theme of the game ends, you’ll start the first map being tutored by a redhead mounted on a pegasus. Neat. While you’re distracted, a Nohrian soldier will get your attention by lovingly smacking you with his axe. Ouch! Time to get into the tutorial, then.
You will see a series of tutorials show up in the touch screen, which are optional to read through, but chances are, if you’re using this guide, you probably want to learn a thing or two about the game. The first tutorial (5. Combat) teaches you the basics of combat. Select your character with the (A) button and note the colored grid that shows up. Blue squares denote tiles you can currently move to, while red squares are either impassable, outside your current range, or occupied by an enemy. It’s the last one you’re currently interested in.
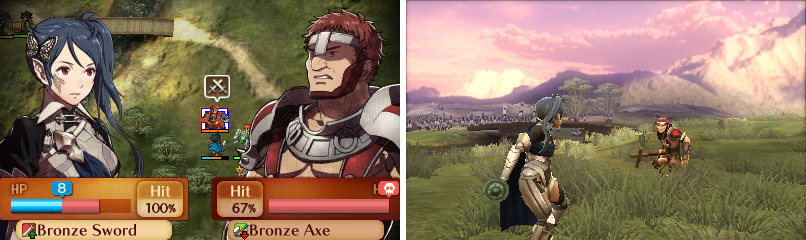
Pay attention to how the combat forecast can help you predict the outcome (and make smart decisions).
After selecting your character Hinoka will urge you on (so pushy!). Focus on the action in front of you. This is your phase, the “Player phase”. You and the units you can control have blue life bars and name tags, neutral characters have green bars and hostiles have red bars. Select an enemy in your range (how about that jerk who just axed you?) and press the (A) button to attack. You will notice flashing bars to indicate how much damage you will do to the enemy, and how hard they will hit you. That’s right, there are no freebies in Fire Emblem; you attack, you get attacked. It appears that no matter what you do, you have a 100% chance to hit them, and they can’t defeat you, so go for it! Enjoy the battle cinematic and you will gain some experience as well.
After all the brutal death-making, your turn will be over and the The “Enemy phase” will now begin, which will prompt another tutorial, this time about phases (4. Switching Phases). Pretty self-explanatory; there’s the “Player phase” where you control your units and after they’ve all gone (or you skip to the end of your turn) the “Enemy phase” begins, followed by an “Ally phase”, if applicable.
Anyways, back to the battle. Two mighty warriors representing both sides of the conflict; Ryoma (Hoshido) and Xander (Nohr) will square off, talk at each other, and ultimately find common ground in their desire to kill each other. After their attacks resolve, Xander’s Nohrian siblings will express concern at a collapsed bridge before discussing a mysterious Dragon Vein , which dries up the rivers and allows them to cross. Apparently nobles share command of this enviable talent, and Hinoka doesn’t fail to notice this and how it impacts the battle. The rest of the turn will then play out before more Norhian reinforcements arrive. Fortunately for the Hoshidans, they too find their numbers bolstered, and you’ll be healed by Sakura. Score.
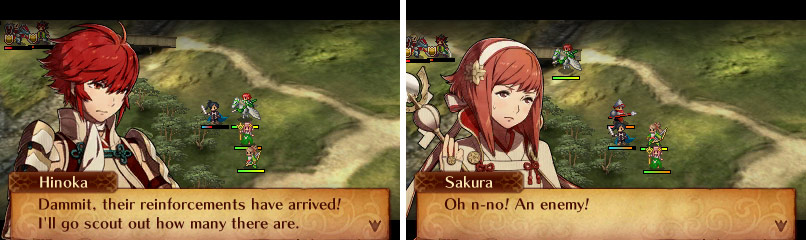
Yowch! Ambush!
Your second turn will begin with a Nohrian breaking the rules of the game and appearing right in front of you. Shenanigans! The two allies who stayed nearby, Sakura and Takumi, will warn you to the obvious danger and Hinoka will tell you not to botch things. Anyhow, onto your turn: Takumi is now under your control, so select him and he’ll start to babble, helpfully explaining two more combat subjects for you. The first one, which you do not get a tutorial for yet, is combo attacks. If you attack a foe who is in the attack range of another adjacent character, you’ll both get to attack in that action. Case in point, if you attack with Takumi, your protagonist will also attack, and since Takumi is out of the Nohrian’s range, no counter-attack is possible. Using ranged characters paired with melee characters to avoid counters is good, basic strategy, but keep in mind that if a melee foe gets within range of some ranged foes, they themselves will not be able to counter, as they can’t attack adjacent enemies, as is explained in the current tutorial (6. Combat (Bows)).
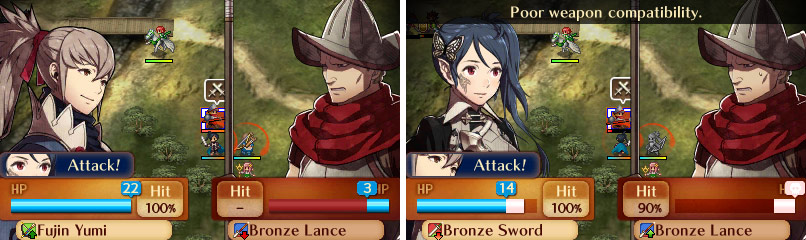
Takumi will help you succeed…and make it out alive!
Attack with Takumi and your protagonist should jump in. After this, have you protagonist attack if necessary, and Takumi will assist you (although he almost certainly won’t need to land a hit). At this point notice one more thing, which will be explained again later: Fire Emblem: Fates operates on a rock/paper/scissors mechanic in that certain weapons have advantages over others. Red weapons (swords/spellbooks) are strong versus green (axes/clubs/bows), but weak versus blue (lances, spears, throwing weapons). Green is strong versus blue, but weak versus red. Blue is strong versus red, but weak against green. This will become very important when you actually get to the meat of the game. For now, however, finish off your Nohrian foe and this stage will end. Huzzah! At least, the combat part where you actually have to do something will end, there’s a fair bit of chatter to sift through, but surely you don’t need a guide for that?
No Comments