
| Yokai | Rank | Location |
|---|---|---|
| Abodabat | A | Entry Hall, Hooligan Road and Liar Mountain |
| Belfree | A | Rarely at Hooligan Road |
| Bruff | A | Hooligan Road |
| Impass | A | Hooligan Road |
| Komane | A | Entry Hall |
| Lamedian | A | Entry Hall, Hooligan Road and Liar Mountain |
| Noko | E | Rarely at Liar Mountain |
| Pinkipoo | B | Entry Hall |
| Yokai | Rank | Location |
|---|---|---|
| Pookivil | A | Rarely at Entry Hall |
| Reuknight | A | Hooligan Road |
| Reversa | A | Entry Hall and Liar Mountain |
| Reversette | A | Rarely at Liar Mountain |
| Rollin | A | Liar Mountain |
| Slitheref | A | Entry Hall, Hooligan Road and Liar Mountain |
| Timidevil | A | Entry Hall, Hooligan Road and Liar Mountain |
| Walldin | A | Rarely at Hooligan Road |
At the beginning of this chapter, your friend visits you and questions you about Yokai, saying he knows about them and has a key that will lead to the Yokai World (all of the locations listed above are in the Yokai World). It seems the entrance to the Yokai World is located at the sacred tree at Mt. Wildwood, which is where you first met Whisper. When you get close, you’ll find out the tree actually has an elevator that will take you to the Yokai World. Once you’re there, head through the first set of doors (you can’t activate the Mirapo, but you can use the Eyepo to save).
Go forward a little more and you’ll see that same Yokai who has helped you before, whose name is Venoct. He will attack you, so take him down and after some revealing conversation, he will give you his Yokai medal. Go forward, talking to the friendly Yokai if you want and grabbing the one chest you see on the way ( Staminum Alpha ). When you get to the end, you’ll see the large oni that chases after you during Terror Time. In order to get past him, you need to pass his test…well, his test simply involves you having completed at least 20 Requests. If you haven’t then you’ll be thrown down to Hungry Pass.
The exit back to the bridge is located to the far north, but if you got thrown down here by Gargaros, then you’ll need to play a little mini-game of sorts, with a Grubsnatch. He will hide and you will need to find him, with there being a slight problem, since there will be many other Yokai that look like him around the area. Since the minimap denotes the location of the Yokai as the purple icons, it shouldn’t prove too difficult to find the Grubsnatch the six times you need to win his little game. This will allow you to climb up the rope to return to the bridge, and get past where the first Oni was located.
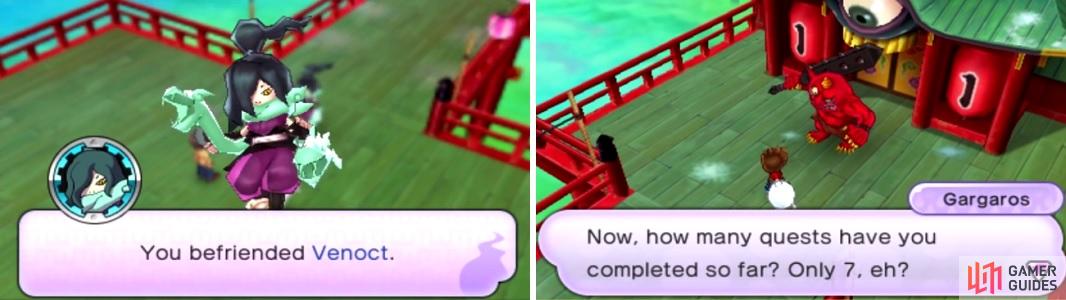
Venoct (left) can be a powerful ally for your team. If you pass the Oni’s test (right), you can go past the first gate. If not, down to Hungry Pass you go!
Anyway, once you’re past the first gate, you’ll encounter some white Yokai that will come after you like normal enemies. These ones cannot be befriended, so you can’t do anything but fight them if you run into them. There will be two more chests along the way, containing a Dancing Star and Getaway Plush , as well as a break in the railing in the one part. This leads to Hungry Pass, which doesn’t have any enemy Yokai, but it does have A LOT of treasure chests (15 in total; contents listed below), so it’s worth exploring. Note that you can’t get two of the chests yet, since they are in an area only accessible by breaking the Rank S Watch Lock in the Entry Hall (Everything Ramen and Marbled Beef are their contents).
Hungry Pass Chests
| Location | Content |
|---|---|
| Top Half | Chili Shrimp, Choice Tuna, Amazing Milk, Deluxe Ramen, Baguette, Curry Bread, Crab Omelet |
| Bottom Half | Double Burger, Giant Cracker, Everything Ramen, Beef Tongue, Matsutake, Fresh Urchin, Marbled Beef, VoltXtreme |
Liar Mountain Chests
| Chest Contents |
|---|
| Hidden Hits, Support Special, A Serious Life, Silver Doll, Use Karate, Skill Encyclopedia, Bye Li’l Angel, The Perfect Pest, Guard Gloriously |
Hooligan Road Chests
| Chest Contents |
|---|
| Mighty Medicine, Mega Exporb, Soul Secrets, Brute Bracer |
If you dropped down, head to the top part of Hungry Pass and you’ll find a rope you can climb near the Eyepo to reach the Entry Hall again. Go all the way to the end of the path to find another large oni blocking the next gate. He will ask you a question and if you answer incorrectly, then you will be tossed down below to Liar Mountain. Unlike Hungry Pass, there will be enemy Yokai here, and not as many treasure chests (listed above). If you paid attention to one of the first things he said, the oni likes honesty, so answer with “I’m a kid” to pass.
There will be two more chests in this next section ( Top Techniques and Speed Talisman ), then another oni guarding the third gate. He will tell you how many battles you have fought and if it’s less than 150, then you will be tossed to Hooligan Road. Once again, there are two chests in the next section ( Large Exporb and Strength Talisman ), then an Eyepo and Mirapo (can’t activate the latter) before the final door.
BOSS - McKraken
The first thing you will likely notice is that McKraken has two things on his hands, making them actual targets in addition to his main body. Each one functions on its own and has their own attacks. You will want to concentrate on the hands at first, as they will deliver annoying attacks, such as inspiriting your Yokai or even draining their entire Soul Meter. Also, if his hands are left alone, then he can charge up his ultimate move, which takes three turns to activate.
For attacks, he has a normal physical attack that hits a single Yokai twice, as well as another called Tentacle Trample , hitting your entire front row once. Evil Right Hand can inflict an inspirit on one of your Yokai, in addition to draining their Soul Meter. Great Left Hand can also inspirit and it is similar to a drain move, dealing damage to one of your Yokai and healing McKraken a tiny bit. Element Ball hits a single Yokai with a random element, so you’ll never know which one it will be. Squid Ink is a move that doesn’t do any damage, but can inspirit your front row.
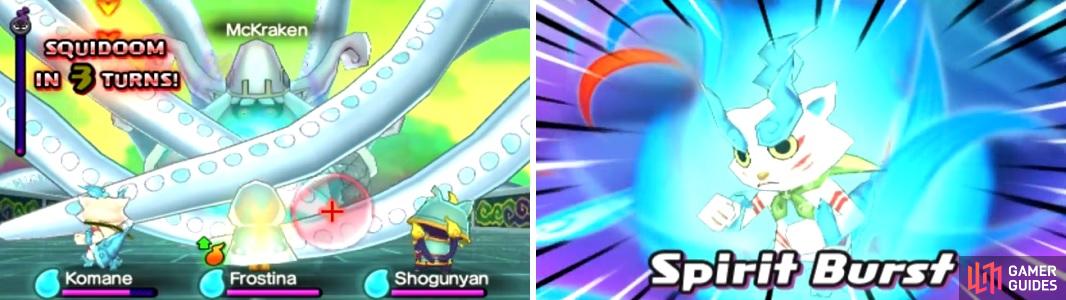
Attack the tentacles when McKraken is charging his Soultimate (left). Your own Yokai’s Soultimates that hit all enemies are a great way to do this (right).
When you see McKraken use Soul Charge, that will be the time he retreats behind some tentacles and there will be a countdown timer. In three of his turns, he will use his Soultimate attack, Squangry Blast , hitting all of your front row for some heavy damage. If you hit the tentacles enough, they will retreat and you can attack McKraken to stun him for a few turns. One of the easier ways to deal with McKraken is to take out his right hand to avoid the Soul Meter drain, as his left hand doesn’t do much.
If you feel confident enough in your Yokai’s damage, you can actually solely concentrate on McKraken’s main body and forgo hitting the hands. Of course, this gives him the opportunity to use his Soultimate, but having the ability to stun him while he’s charging it can be a great opportunity for yourself to recoup or add even more damage without fear of retaliation. Also, funny enough, McKraken can be inspirited, but he does have the ability to Purify himself of it. It’s amusing watching McKraken hit himself if you manage to confuse him.
With victory in hand, you can use the Mirapo to warp back to the Yokai World entrance, then talk to Insomni to go back to the human world. Your next objective is to go check back with Lucas, who’s at the school. Well, trouble sure has been brewing and a familiar face has showed up again!
BOSS - Slimamander (2)
This is the exact same battle as the first time you fought it, except it has a lot more health and does more damage. However, you are also stronger yourself, with more tricks and moves at your disposal. If you don’t remember how to do this battle, you need to damage each neck in order to reveal the eyeball, which is Slimamander’s weak spot. All of the boss’ moves are the same, including its Soultimate, so just concentrate on exposing the eye and then solely focusing on it when it has appeared.
With the looming threat of the Yokai coming from Yokai World and McKraken’s return, you’ll have to remake Springdale’s seals and close the Yokai Elevator. To help with the former, Whisper hands over some Blossoming Powder to help with the cherry blossoms. There are three spots where you need to defeat a Yokai, then sprinkle the powder to make the cherry blossoms grow. The first is to the left of the school’s main entrance and has you fighting Impass. The second will be on the western riverbank and has you fighting Rollen. The third spot will be to the east of your home and will have you fighting Bruff. The final showdown is approaching, so head back to the sacred tree on Mt. Wildwood and get ready!
FINAL BOSS - McKraken
Yep, this is the final showdown and McKraken can be quite annoying in this form. His weak spot is an orb in his mouth, but you need to do some work to get it to appear. See those two tentacles coming out of his nose? Do enough damage to those and they will retreat into his nose and reveal another spot you can attack, which will glow purple, like when an inspirit is afflicted. Once you hit that enough, the bottom of his body will open and reveal the weak spot.

It’s a good idea to take out the nostril tentacles (left). McKraken’s weak spot will be the orb in his mouth (right).
McKraken likes to inspirit your Yokai, with Feeling Dizzy? and Squeeheehee! both trying to inspirit your entire front row. Squid Ink returns, but it’s just a physical attack that hits all three Yokai. In addition to that, he can do a normal physical attack against one Yokai, and Tentadrill will hit all three Yokai. One of his more annoying skills is called White Impact , which will remove all of the good status effects on your Yokai.
At around 50% health or so, McKraken’s face will turn red, where he’ll begin using Tentyphoon , dealing wind damage to your front row, as well as You’re Calamari , a fire attack that hits the front row, and Inkredible Shock , an electric attack. He will also use Soultimate Vibe, leading to his ultimate attack called Possquidle End , which is similar to his Soultimate in the last battle, dealing heavy damage to your front three Yokai.
This can definitely be a challenging battle, particularly because you will likely be needing to deal with inspirited Yokai a lot. Thus, it helps to have some Yokai who cannot be inspirited, such as Betterfly, Enefly, Enerfly, Spenp and Almi. Betterfly is ideal here, as she makes a great healer, as well. Once McKraken goes into his second form (with the red face), he’ll get more aggressive, so you’ll need to keep an eye on your Yokai’s health and top it off if they ever get too low with items.
No Comments