Following the main quest Poison and Lies you’ll have to hone your skills to match the tricks of The Kitsune, an endeavor that plays out during the quest The Tale of the Kitsune. Following this, the final quest in The Kitsune questline will begin, The Kitsune’s Fate. This page will provide a walkthrough for this quest in Ghost of Yotei, with an emphasis on solving the puzzles.
Page Breakdown
| Quick Search |
|---|
| Search the Red Crane Inn |
| Cast Light Lantern Puzzle |
| Ambush the Nine Tails |
| The Gauntlet |
| Defeat The Kitsune |
Search the Red Crane Inn
Before we get to the business end of this quest, we’ve got some busywork to do. Make your way back to the Red Crane Inn for a scene, and when you’re back in control search some vomit on the floor, the hanging corpse shortly beyond, and examine some blood-writing on a partition. Next head to the stairs and examine a bloody hand print, then use your “Listen” ability and look upstairs and to the right to find a figure hiding. Go upstairs and into the second room on the left to trigger a scene after which the quest will officially start.
Leave the inn, mount up, and follow Oyuki to a cave near a frozen waterfall, beyond which you’ll find an obstruction you can remove with your grapple. The Kitsune’s demesne lies beyond.

Light the lanterns and the cast light will reveal symbols.

Rotate the statues fruitlessly until Oyuki suggests using teamwork to make the dream work.
Cast Light Lantern Puzzle
Remove the obstruction and head into the chamber beyond to find… a sealed door with two lantern-bearing fox statues near it. Light each lantern a lovely shade of blue and note that at the foot of each statue you’ll find some symbols - at the foot of the left statue is the symbol for “left” 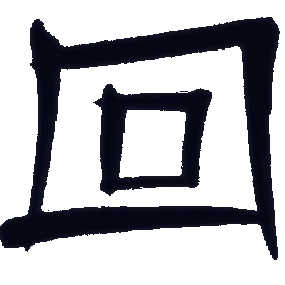 and at the foot of the right statue is the symbol for “right”
 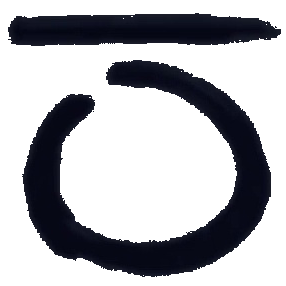 . Try to rotate the statues a few times and Oyuki will suggest turning them together, since they rotate out of position shortly after being set - what you have to do is turn them to face the marked location so they’re both facing the correct location at the same time.

(1 of 3) After the cast light puzzle, head upstairs and Oyuki will point out a hidden passage.
Ambush the Nine Tails
Pass through the door and head upstairs until Oyuki stops you and points out a secret passage to the left. If you continue forward, you’ll reach a large chamber where a mob of Nine Tails await, but if you heed Oyuki’s advice and go through the secret passage you’ll reach the same chamber, but elevated and behind the enemies. Use your “Listen” ability to scope them out and assassinate them in tandem with Oyuki - done right and you won’t have to fight any of them fairly.
When the slaughter is over, search the chamber for some scrolls and a map, then find the symbol for “up” 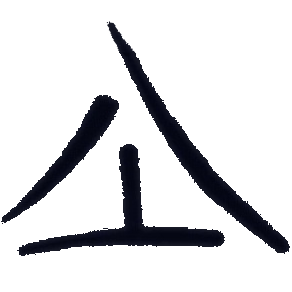 on the wall, indicating a spot where you can boost Oyuki up, then climb up the ladder she knocks down for you. Head up a ramp and through a door marked with the symbols for “engage” and “forward”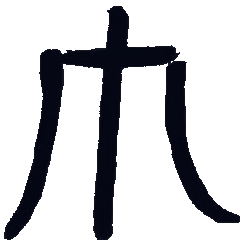
 , climb a ledge, then slide through a cleft outside to reach an outdoor area.

Once outside, be wary of Nine Tails emerging from snow banks to attack you,

then defeat a gauntlet of foes in an icy passage.
The Gauntlet
You were able to sneak your way through an encounter last time, but not so here - even the “Listen” ability won’t reveal the ambush ahead, as Nine Tails emerge from the snow banks while some archers attack from platforms on trees. Fend off your assailants, up some stairs and through some doors to reach a long, frozen hallway where more Nine Tails await - a numerous and diverse bunch, at that! Carve your way through them and pass through the doors they guarded to reach the lair of The Kitsune.

Use your “Listen” ability when The Kitsune uses a smoke bomb to thwart his upcoming assault.

After besting The Kitsune the first time, pursue him and take him down with the aid of Oyuki.
Defeat The Kitsune
Although this page was designed to get you through the puzzles found in this quest - such as they are - we’d feel a bit remiss if we didn’t offer some advice on defeating The Kitsune. This is a multi-phase fight, the first of which will see you squaring off against The Kitsune who initially wields a kusarigama. After taking some damage he’ll use smoke bombs and you’ll have to quickly listen ( ) and search around to spot him coming. Intercept his attacks in this manner and be wary, as he can switch to a sword-and-shield between smoke bomb uses, and when he’s almost dead he’ll flee. Chase him through some doors to start phase two.
This second phase is actually easier than the first, as The Kitsune’s flight will have shaken off his minions, not his pursuers, and you’ll instead enjoy a two-on-one advantage against him with Oyuki at your side. Keep up the pressure and try to land some strong strikes to break his guard if he’s not attacking, and parry when he does and he should fall before long.
Once The Kitsune is defeated you’ll be treated to some scenes and this questline will end!


Nathan has been working at Gamer Guides since 2014 where he started as a contributor. He came on as an editor in 2020 where he continues to put his excellent knowledge of most things RPG to use. More about Nathan Garvin

No Comments