Now for the most important part of the first chapter… assembling your party. Remember, you’re going to want a Mage, a Cleric, and a Thief. This is the minimum, and you won’t suffer by having, say, Viconia and Jaheira in the same party, but if you fail to have one of the classes, you’re in for a tough time… and of course, with them, you’ll need some warriors to keep them safe.
Some characters you can recruit at this time are fairly far afield, but… well, let’s be honest, not all the characters you’ve met up until this point are winners. Worse yet, the combo of Khalid and Jaheira and Xzar and Montaron won’t endure each other’s company for long, as previously mentioned. Suffice to say, the sooner you get rid of the dead weight and assemble your ideal party, the better, and this section of the guide will… well, guide you to those characters. We may be visiting new areas and covering quite a bit of ground, but we’ll largely be avoiding all the encounters we can and just focusing on finding our chosen characters.
A list of the characters you may have already met - and ones that can be recruited at this point in time - are as follows:
| Character | Role | Alignment |
|---|---|---|
| Ajantis | Warrior | Good |
| Dorn | Warrior | Evil |
| Kagain | Warrior | Evil |
| Khalid | Warrior | Good |
| Kivan | Warrior | Good |
| Minsc | Warrior | Good |
| Rasaad | Warrior | Good |
| Shar-Teel | Warrior (and/or Thief) | Evil |
| Branwen | Cleric | Neutral |
| Jaheira | Cleric | Neutral |
| Viconia | Cleric | Evil |
| Imoen | Thief (and/or Mage) | Good |
| Montaron | Thief | Evil |
| Safana | Thief | Evil |
| Dynaheir | Mage | Good |
| Edwin | Mage | Evil |
| Neera | Mage | Neutral |
| Xan | Mage | Neutral |
| Xzar | Mage | Evil |
| Garrick | Miscellaneous | Neutral |
Now, you might look at the above list and balk at the amount of work, but fortunately we can trim that down a bit. You’ve already met Imoen, Montaron, Xzar, Khalid, Jaheira, Neera, Kagain and Garrick by now, which accounts for a third of the early-game characters. Three more - Edwin, Minsc and Rasaad can be found in Nashkel, Branwen can be found in the carnival adjacent to Nashkel, Dorn will be encountered as you travel to the Nashkel Mines (whether you actually intend to do anything there or not at the time is another story!) and Dynaheir is the subject of a quest you’ll need to carry out to keep both Edwin and Minsc loyal. Since you’ll be going to Nashkel as part of the main story, there’s no need to rush on and recruit any of these characters just yet, so you can safely postpone another four. If that’s not enough, Xan is found at the end of a dungeon you’ll need to explore to finish a story quest, so while he’s technically an early-game character, he’s not exactly somebody you can rush to.
That leaves Ajantis, Kivan, Safana, Shar-Teel and Viconia as the characters you’ll want to consider venturing forth and recruiting. We would break this down even more, but frankly every one of these six characters are potent enough to fit into an evil or good party, depending on your protagonist. In case it matters, here’s a list of the characters that will ultimately end up in the guide’s suggested good and evil parties:
| Good Party | Evil Party |
|---|---|
| Ajantis | Dorn |
| Jaheira | Kagain |
| Viconia | Jaheira |
| Minsc | Viconia |
| Imoen | Edwin |
Yes, Viconia is an evil character. Yes she ends up in the good party. Nostalgia, and she’s just more fun than the alternatives. If you want to be a stickler to the good/evil thing, replace Viconia for Branwen, although this is something that honestly matters more in the sequel. Jaheira is neutral-aligned, so she fits into either party just fine.
With that out of the way, let’s go recruit some new allies!
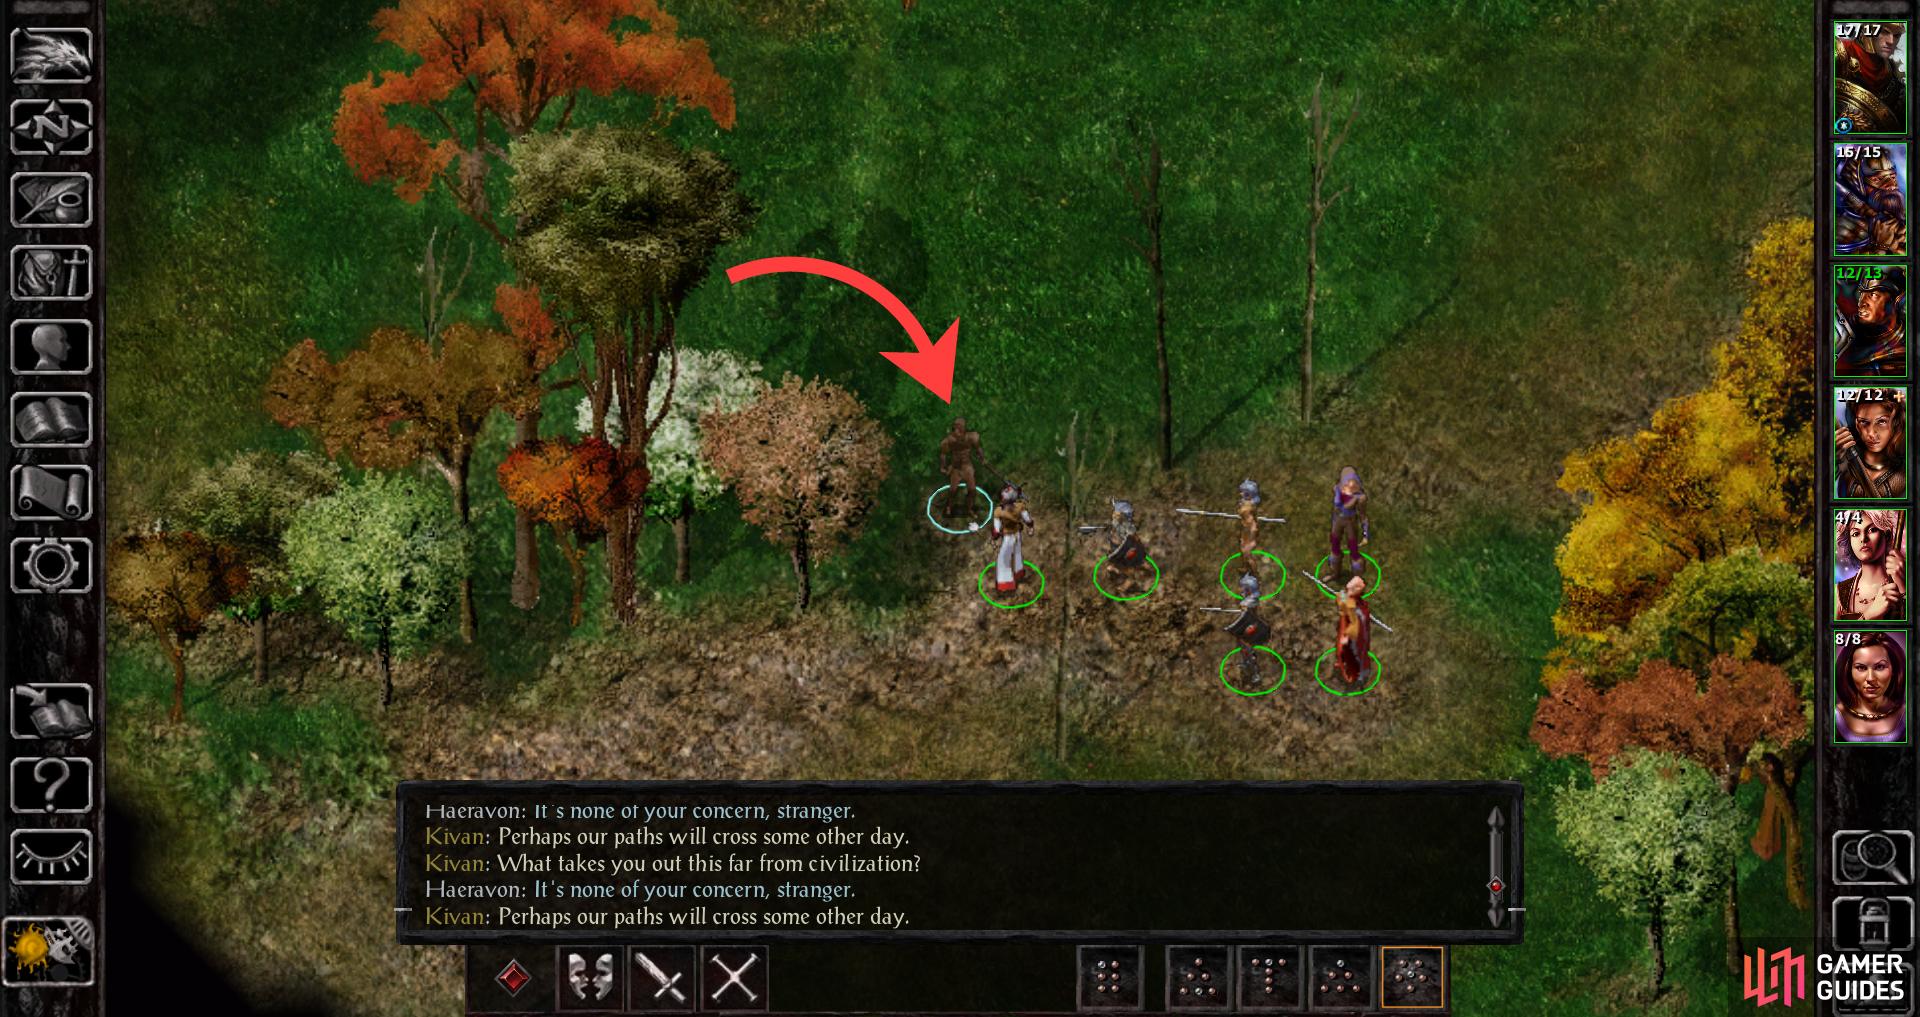
Recruiting Kivan
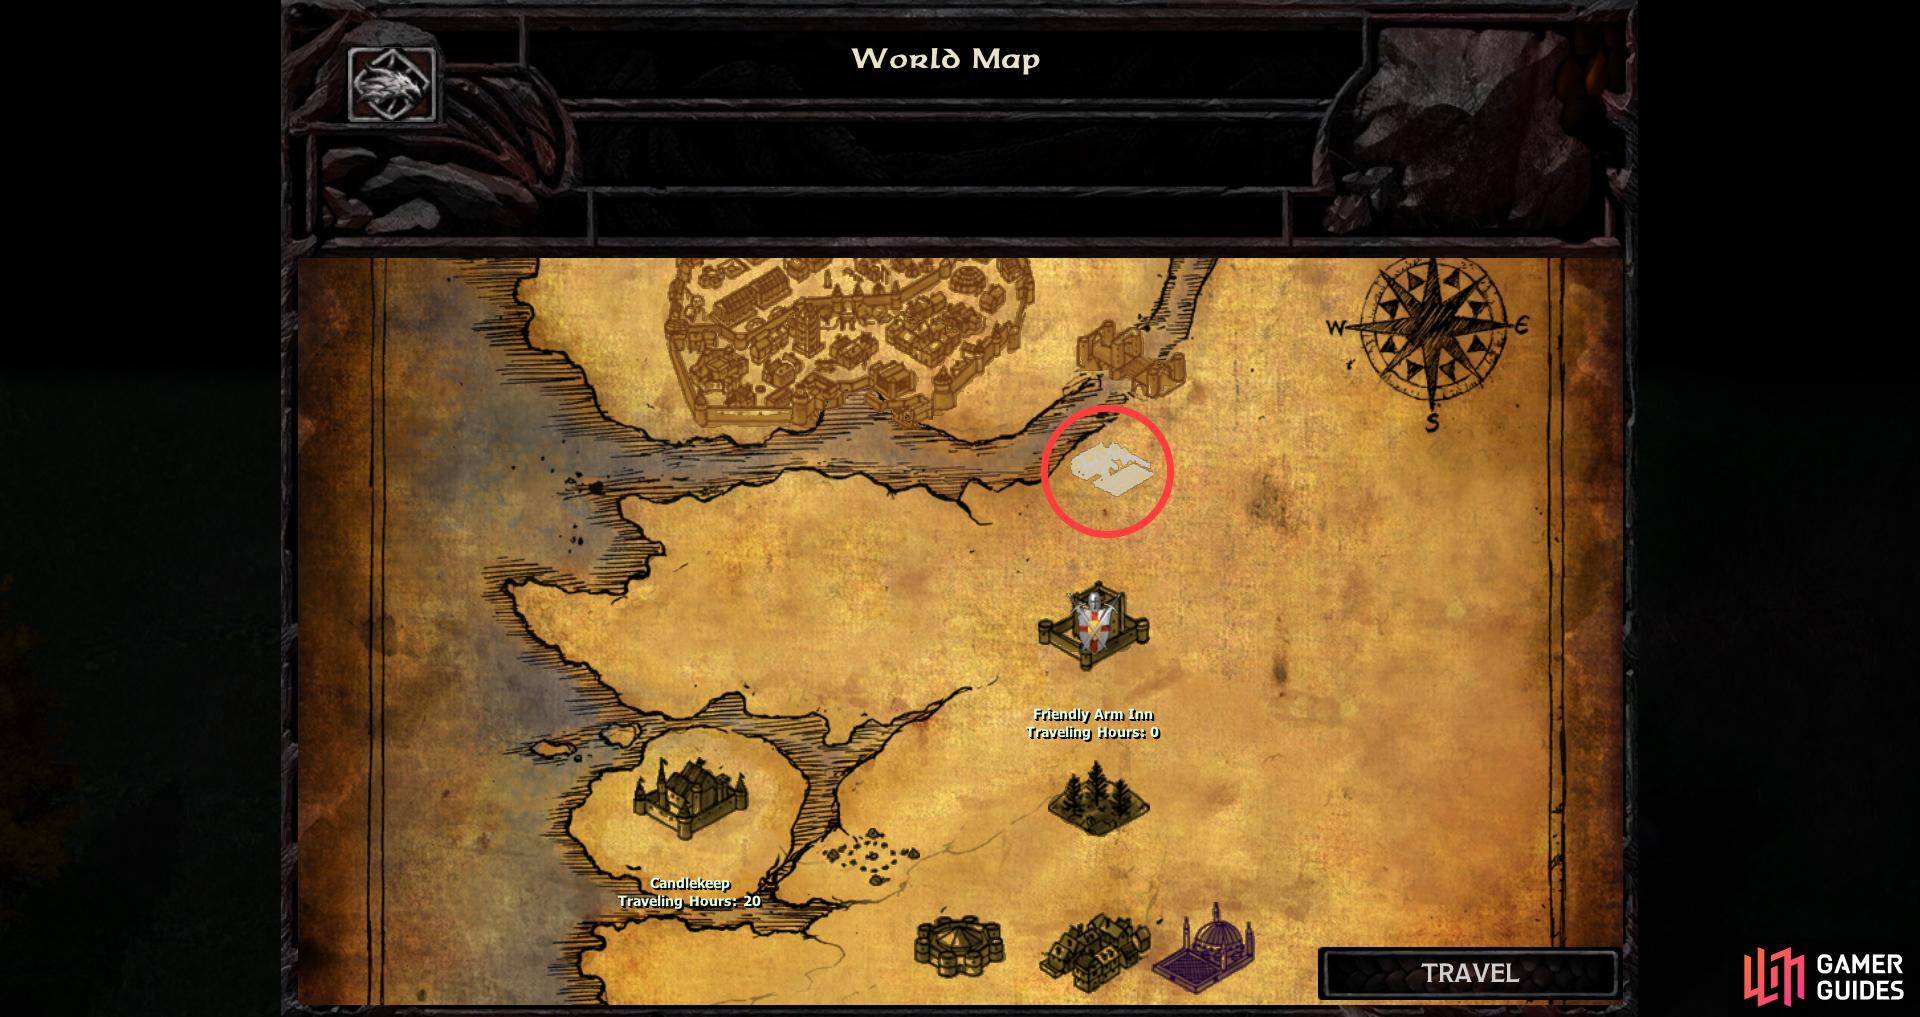
Might as well start with the easiest character to recruit. Exit Beregost via the western edge of the map and you’ll reveal High Hedge on the world map. Travel there and assuming you traveled from Beregost you should appear on the eastern end of the map. Venture southwest to find Kivan chilling in some shade at (x=3650, y=1470).
Talk to him and pick the following options to recruit him:
- “We’re adventurers, ready to smite any evil that darkens our path.”
- “Go ahead, we’ll follow to wherever you take us.”
| STR | DEX | CON | INT | WIS | CHA |
|---|---|---|---|---|---|
| 18/12 | 17 | 14 | 10 | 14 | 8 |
Voila, you now have a pretty potent Ranger on your team. Kivan will join at Lv.2, giving him a good number of Hit Points right the gate. In addition he’s got 18/12 Strength and 17 Dexterity, giving him significant boosts to his THAC0, Armor Class and damage. That said, if you want to use him as a Ranger you’ll need to keep him in light armor, which precludes his role as a front-liner. Just as well, as he comes with a Longbow and Halberd, allowing him to attack from afar with arrows or from behind your front-liners with his polearm. Aside from possibly your protagonist, you’ve not recruited a more combat-competent character.
As he advances, consider getting him ranks in Two-Handed Swords, as there are at least two good ones in this game. While that’s all well and good for attacking from a distance, Kivan will mostly be an archer, but the ability to change focus as the situation demands will prove useful.
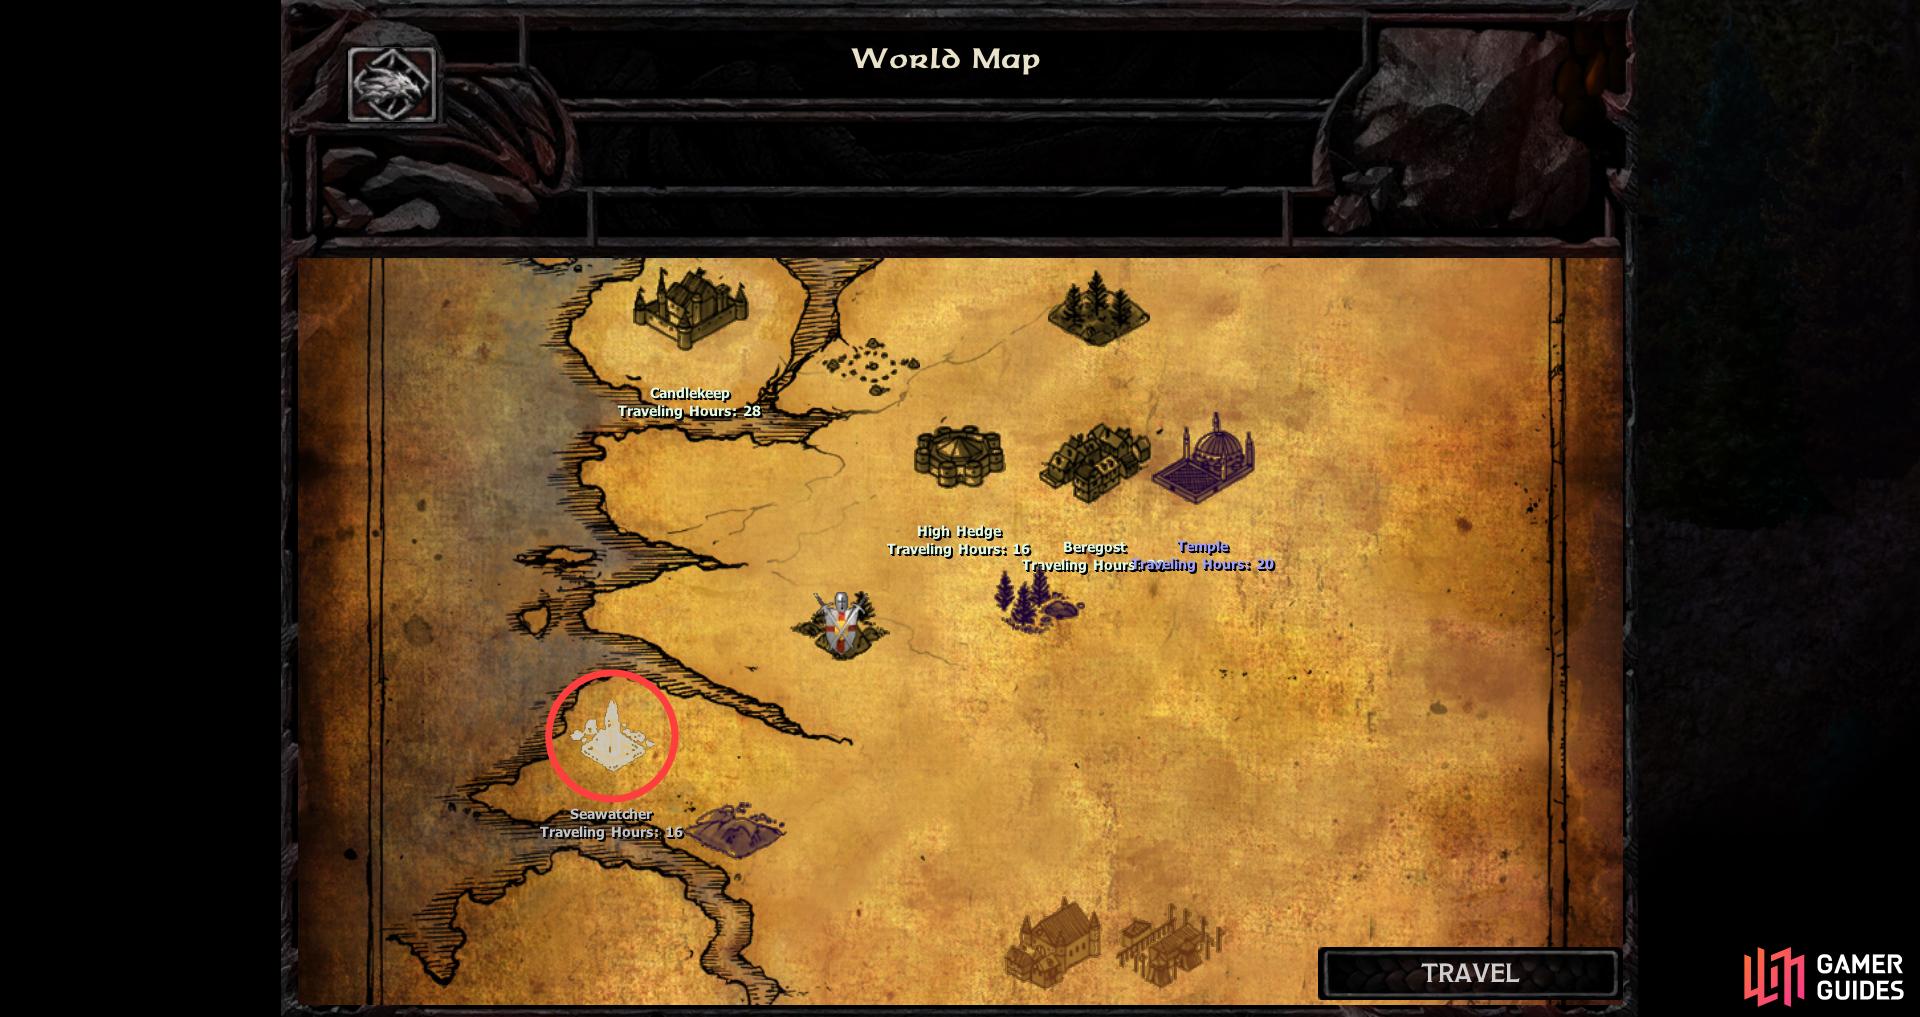
Travel to AR3600, which is marked on your map as a seaside tower.
In this area you’ll find Safana, who will join you if you promise to help her plunder some treasure.
Recruiting Safana
Your next target, Safana, lurks in the coastal area depicted on your map as a tower (AR3600). There are numerous ways to reach this area, but the safest (and arguably most convenient if you just recruited Kivan) is by exiting the southern edge of High Hedge (AR3200) and traveling south to another wilderness area (AR3700). Stay along the northern edge of this area and head west, eventually exiting by the western edge of the map and traveling to the aforementioned wilderness area marked by a tower on the world map (AR3600).
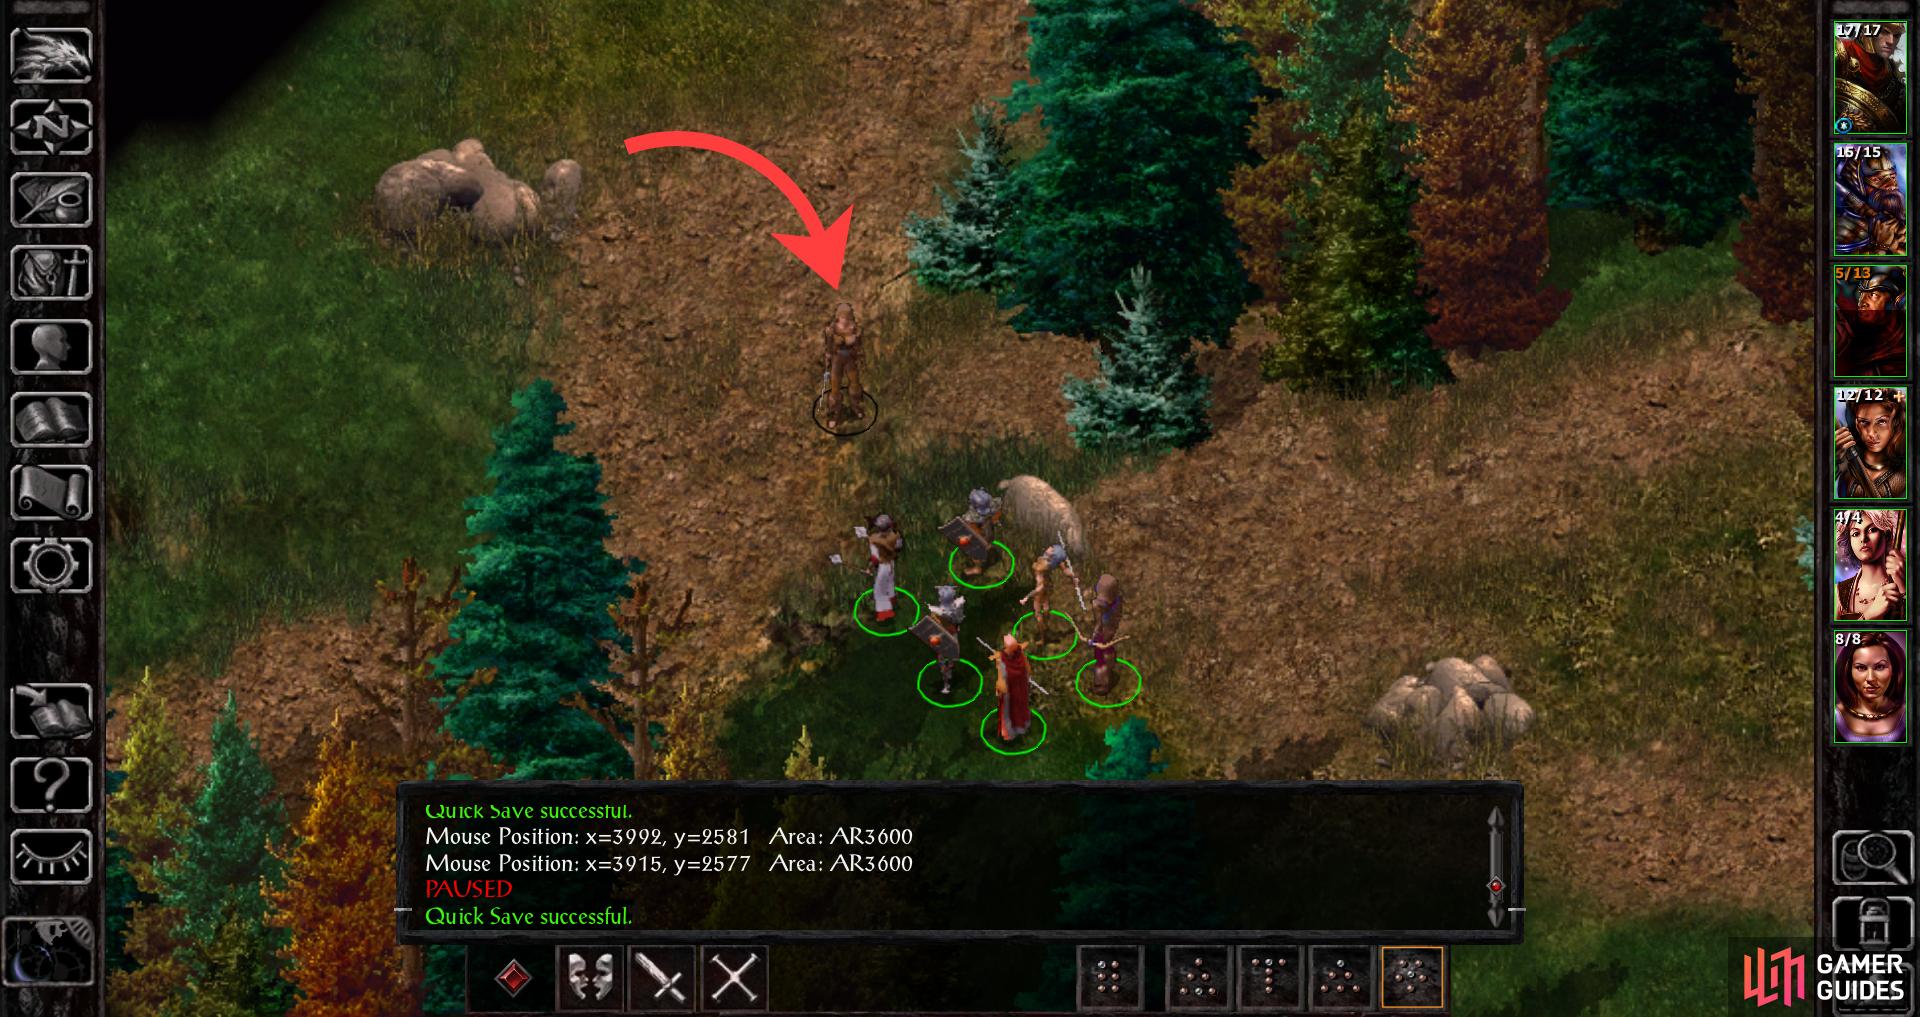
Safana is standing at (x=3750, y=2400), and you’ll want to hug the eastern end of the map as you head south before going west to find her. Talk to her and she’ll agree to join you if you help her score some treasure. This is a time-sensitive quest, and while it’s not as bothersome to complete as Kivan’s quest, it does require you to either sneak past or kill a half-dozen Sirines and a trio of Flesh Golems, which is a bit of a long-shot for a low-level party.
There is a way to cheese it, if you need to have Safana immediately. Give Safana a Potion of Invisibility (Jaheira started with this) and walk her to the northwestern end of the map. Use stealth to avoid enemies (save frequently, mark enemy locations, reload if attacked, and when you finally succeed at sneaking, rush past the enemy) and enter a cave at (x=430, y=900).
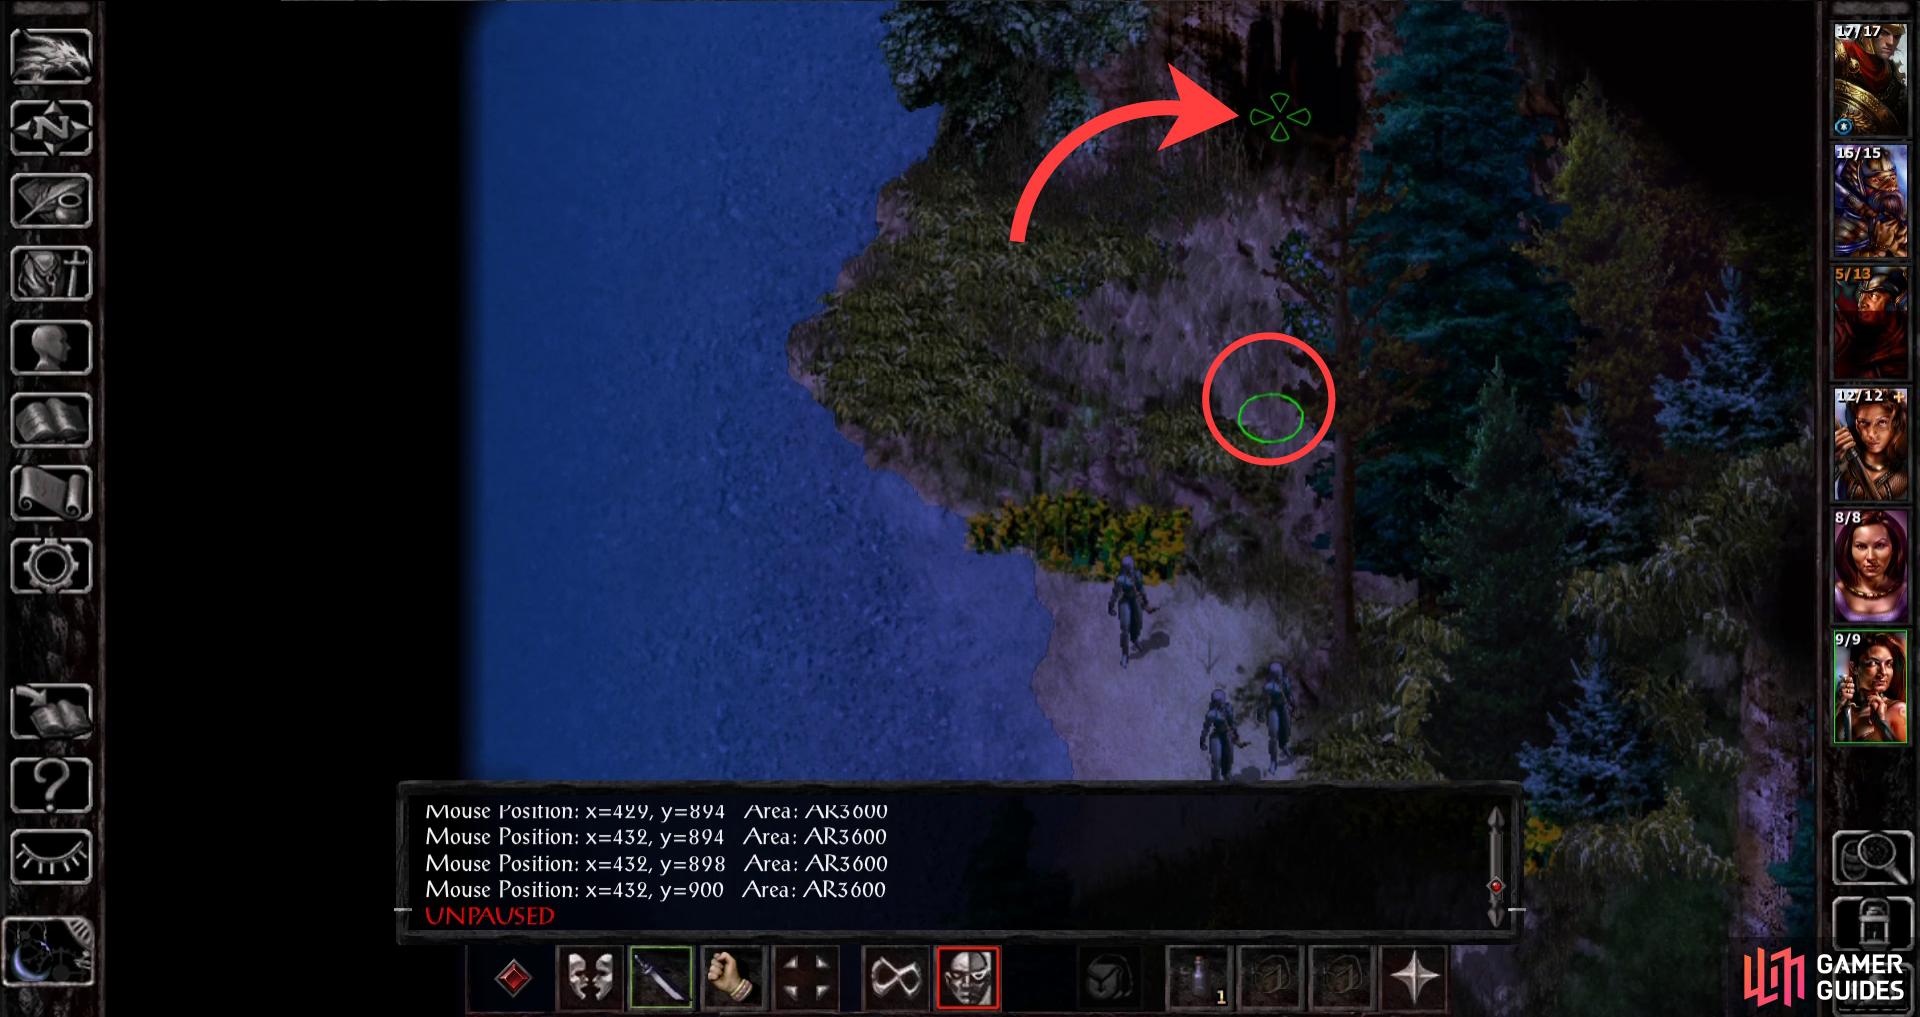
(1 of 3) With much trial and error you can sneak past Sirines and into the Pirate’s Cave
So far tedium has been your worst enemy, but inside the cave it’s a bit trickier. The treasure Safana seeks is in this cave, and to get it you need only get past some Flesh Golems and traps. The former are quite difficult to beat at this point in time, and the latter will make things difficult, but with enough save/loading it can be done. Try to sneak until Safana succeeds, then head north and west. The first trap is at (x=450, y=850), and when triggered you can try to pull Safana back east before it hits, but ideally you’ll resist it. Just beyond the trap, in the chamber to the west is a Flesh Golem, which will gleefully pummel you to death if it catches you… especially if you’re held by the trap and can’t defend yourself. Try sneaking and tripping the trap until she resists it, draw back east, save your game, re-enter steal if necessary then continue into the room with the Flesh Golem and from there head north into a tunnel.
Here another trap awaits at (x=300, y=550), but it’s not quite as bad as the last one. If Safana can’t resist she’ll be Dire Charmed, turning hostile to the party… who should be nowhere nearby. That being the case you can just wait out its effects (it can take a few real-life minutes. Ugh.); the golems should ignore you since you’ve been charmed to “their” team. Once the charm wears off you’ll need to hide in these tunnels to avoid sight from both a golem to the south and north.
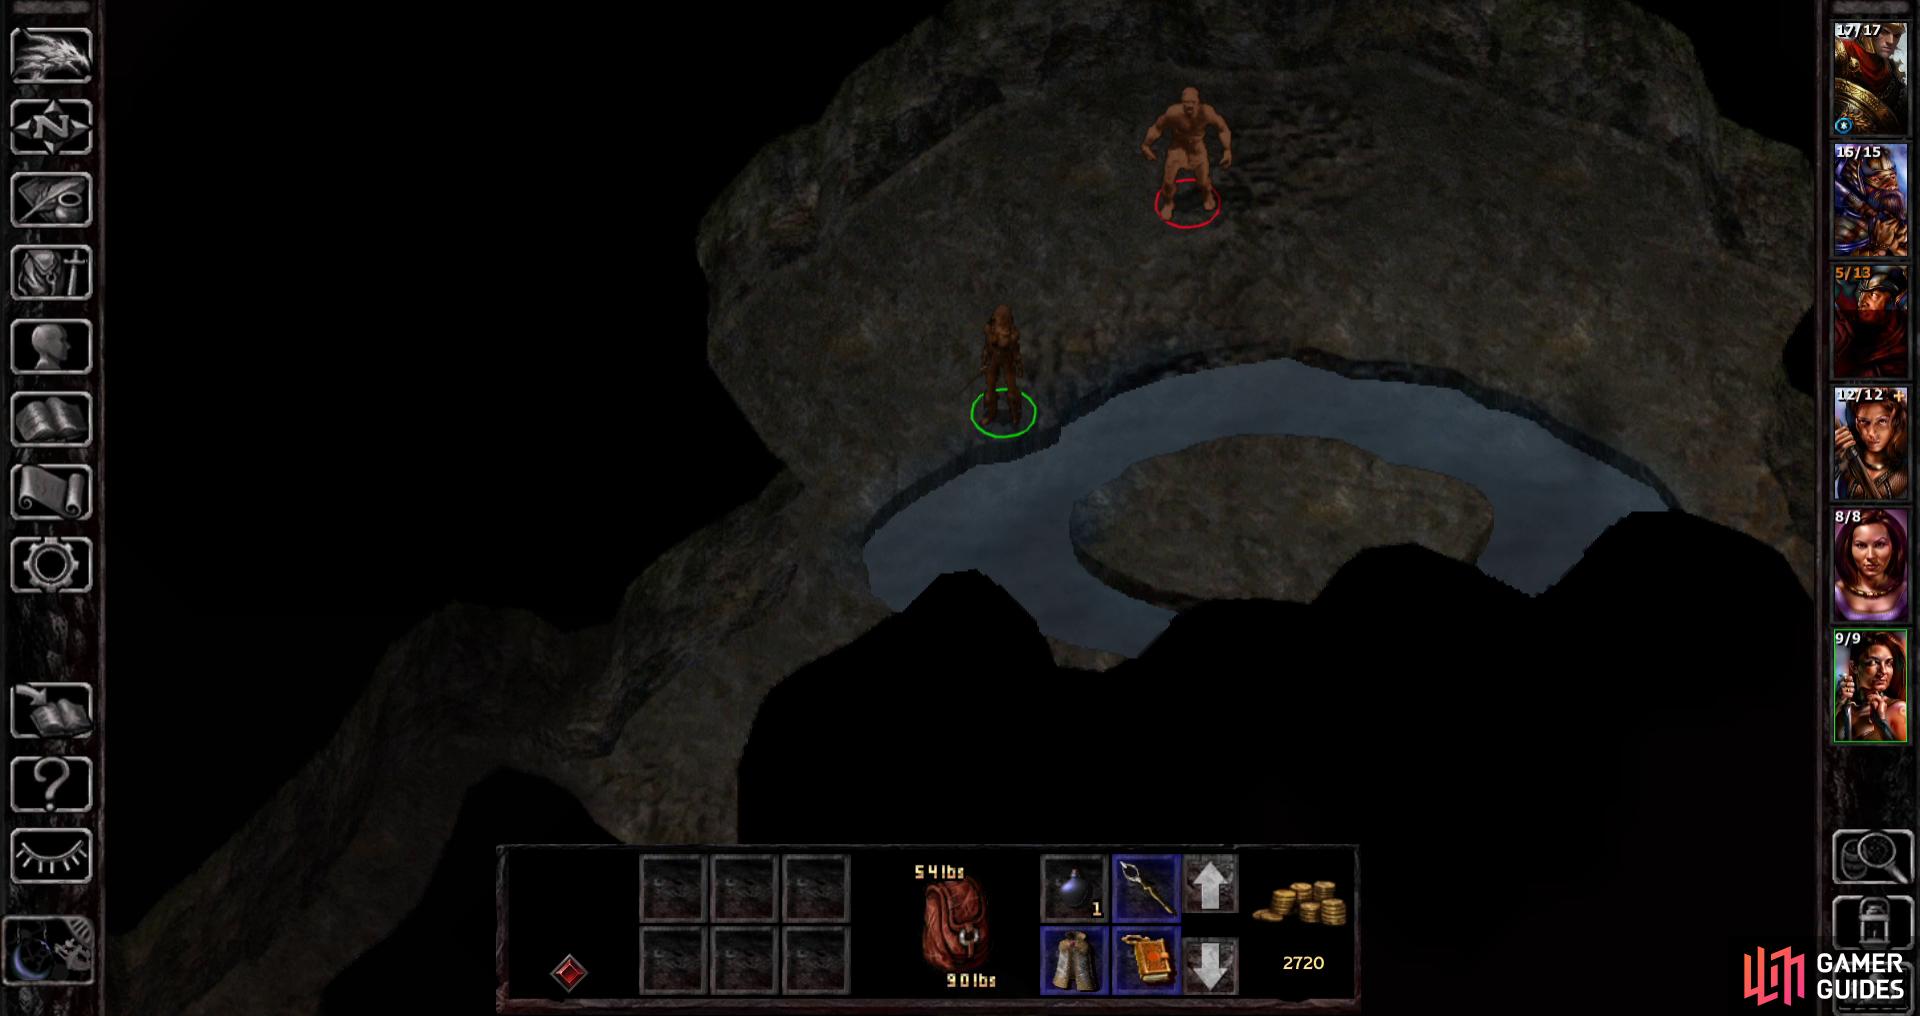
Once you successfully re-enter stealth, save your game one most time and head north into a watery chamber where you’ll find a mighty cache of loot at (x=700, y=350). This is the haul Safana is after, but a Flesh Golem lurks in this chamber, and looting the treasure here will end your stealth prematurely. Still, there’s a trick you can play. Loot the treasure, pause your game as soon as the loot menu pops up, which will pause the game while still allowing you to pocket the treasure. Once you have the loot, unpause the game and immediately drink the Potion of Invisibility you brought along. This will last for twelve hours (in-game), which is plenty of time to return to your party - so long as you don’t loot or attack anything you’ll be fine. Leave the cave, walk back to your party, and Safana should join permanently.
| Items (AR3601) |
|---|
| x=700, y=350 - Dart of Wounding x10, Antidote, Potion of Infravision, Elixir of Health, Potion of Absorption, Wand of Paralyzation, Relair’s Mistake, Manual of Bodily Health, 312 gold |
So, yeah, it’s possible, but by no means necessary to go through all this trouble. Honestly it’s probably best to wait and do this quest properly at a later date, and that’s what the guide will assume you’ve done.
| STR | DEX | CON | INT | WIS | CHA |
|---|---|---|---|---|---|
| 13 | 17 | 10 | 16 | 9 | 17 |
Whether you went through the trouble of sneaking your way to treasure beyond your means, or you waited to recruit Safana, you’ll find… well, okay, she’s Imoen-lite. She’s got a high Dexterity score and a high Charisma score, but the latter is merely vanity - unless you make her your party leader, but there are doubtlessly better characters for that role (Ajantis and Dorn come to mind). Still, her Dexterity score gives her a appreciable bonus t o her THAC0 with ranged weapons and her Armor Class, which is all you really need in a Thief. That said, that’s all Safana is - a Thief, which is useful enough when there are traps around, but it’s a damn shame to waste a party slot on such a one-dimensional character.
Fortunately like Imoen, Safana can dual-class into a Mage… with a little help. To dual-class she needs a score of 15 in her currently class’s primary attribute (as a Thief, that’s Dexterity - check) and a 17 in the class she wants to dual-class into. As you can see, her Intelligence is one point shy of that mark. Get her a Tome of Clear Thought and it’ll permanently boost her Intelligence by one, allowing her to dual-class into a Mage and filling a role in the evil party normally reserved for Imoen in the good party.
That’s all well and good, but there are some catches. First, the Tome of Clear Thought is quite a ways into the game. Fair enough, you don’t want to dual-class until 6th level anyways, so just… play through the game normally and don’t level Safana up past 6th-level as a Thief until she gets the tome and can dual-class. Of course, using the Tome of Clear Thought on Safana means you can’t use it on your protagonist, and since your protagonist is the only character who keeps their stat boosts when imported to the sequel, it’s essentially a wasted stat point for your protagonist. Perhaps not a big deal if you’re not a Mage, but worth mentioning anyways. If those hangups aren’t enough to dissuade you, by all means, plan on dual-classing Safana to a Mage.
Other than that, keep a Short Bow on her and limit her to ranged combat, where she’ll contribute well enough. Invest her Thief skills into Find/Remove Traps until it’s 100 (or rather, you hit 6th Level as a Thief - whichever comes first) and she’ll be good to go.
Head north of the Friendly Arm Inn (AR1400)
and locate Ajantis.
Recruiting Ajantis
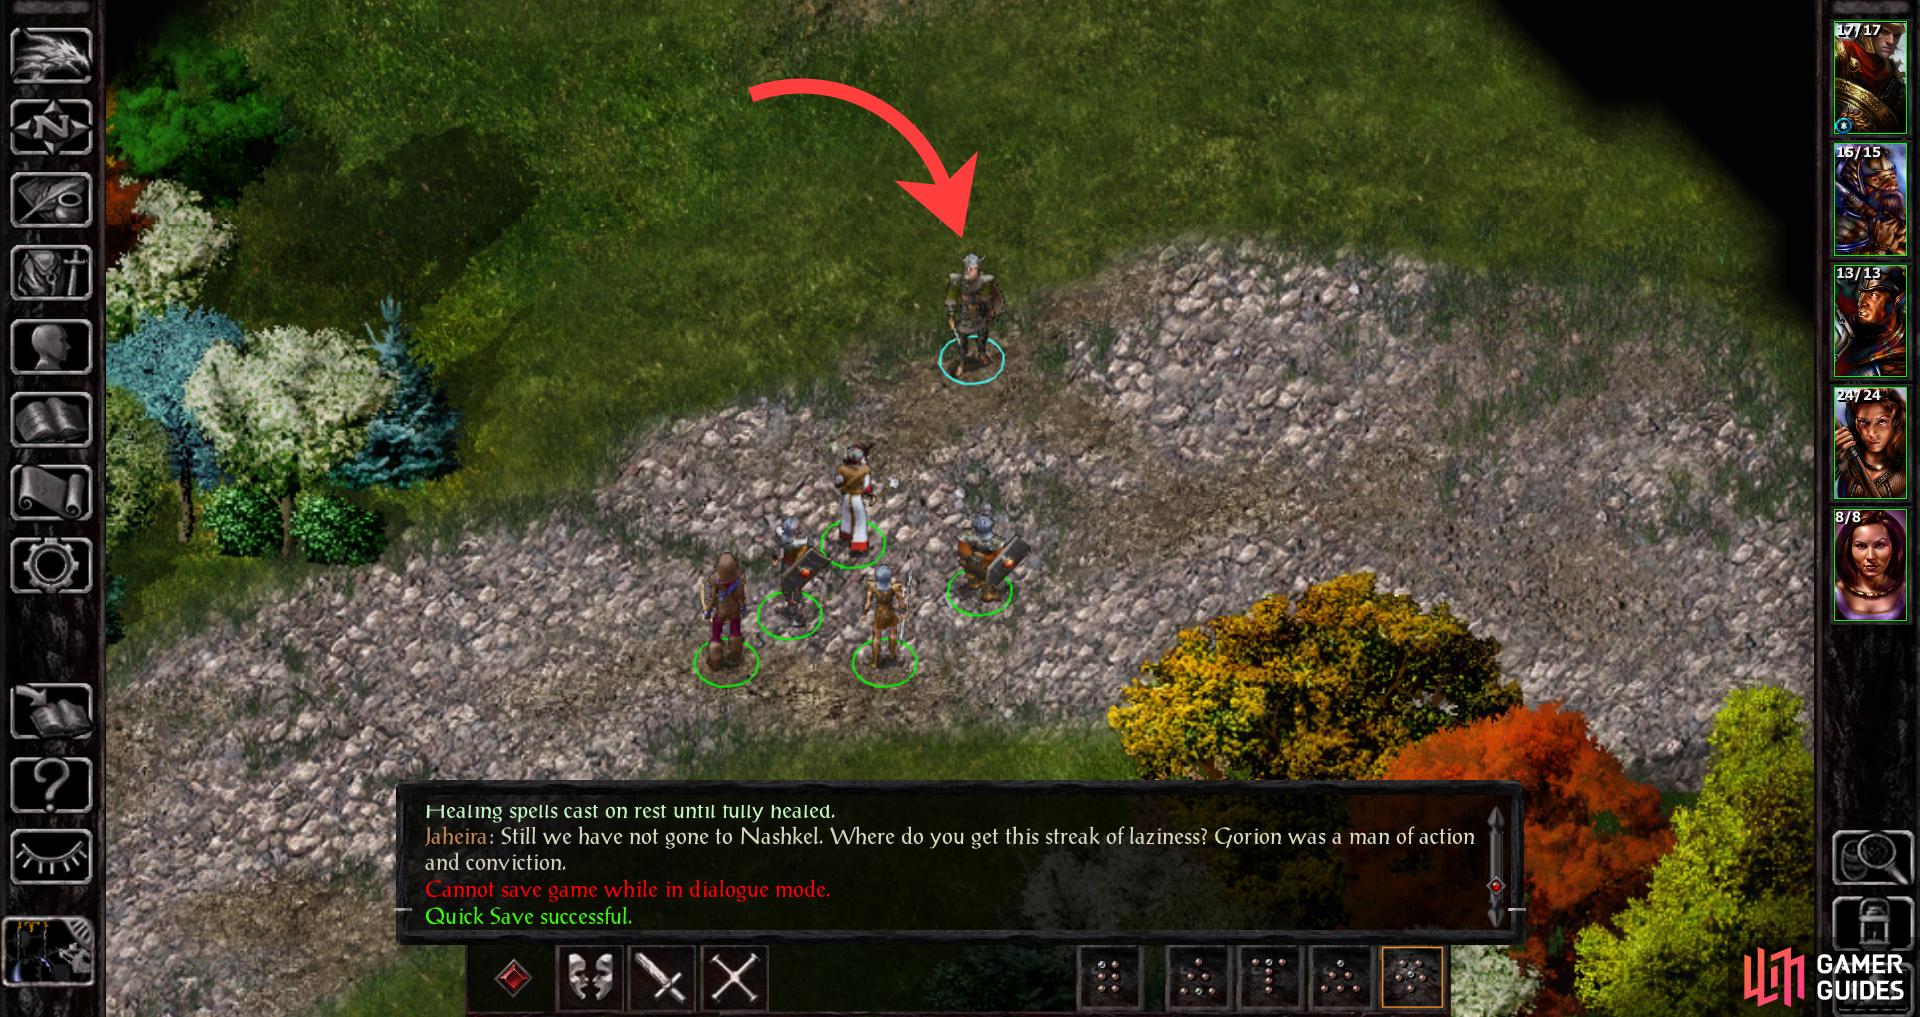
Now it’s time to recruit Ajantis, who can be found north of Beregost, rather than south. Travel back to the Friendly Arm Inn and exit via the northern edge of the map to reveal a farm area to the north (AR1400). Travel there and look for Ajantis at (x=1500, y=3130). Talk to him and pick the following dialogue options to recruit him:
- “We’re friends. Who are you?”
- “We share a similar goal. We too are after the bandits who have been raiding along the Coast Way. Why do you fight against these brigands, Ajantis?”
- “Why not? We could use another warrior.”
| STR | DEX | CON | INT | WIS | CHA |
|---|---|---|---|---|---|
| 17 | 13 | 16 | 12 | 13 | 17 |
A bonafide front-liner, Ajantis’s Strength is a healthy 17, which isn’t quite all it could be for a warrior, but it’s still better than most. His Dexterity leaves much to be desired, but he’s got a fair Constitution score of 16, which will boost his Hit Points gained per level by +2. Sadly, he’ll join at 2nd level, and in the will already be four points off his maximum potential Hit Points. His penchant for heavy armor and high Charisma (17) will make him a natural party-leader, and he’ll take the leading role in the good party from hereon out.
He starts out proficient in Bastard Swords, meaning you can just hand him that +1 specimen you may have found in Beregost, setting him up for quite a while. Have him become proficient in Long Swords next, then dump any other proficiency points he may get in Axes, which will give him a ranged options… albeit very, very late game.
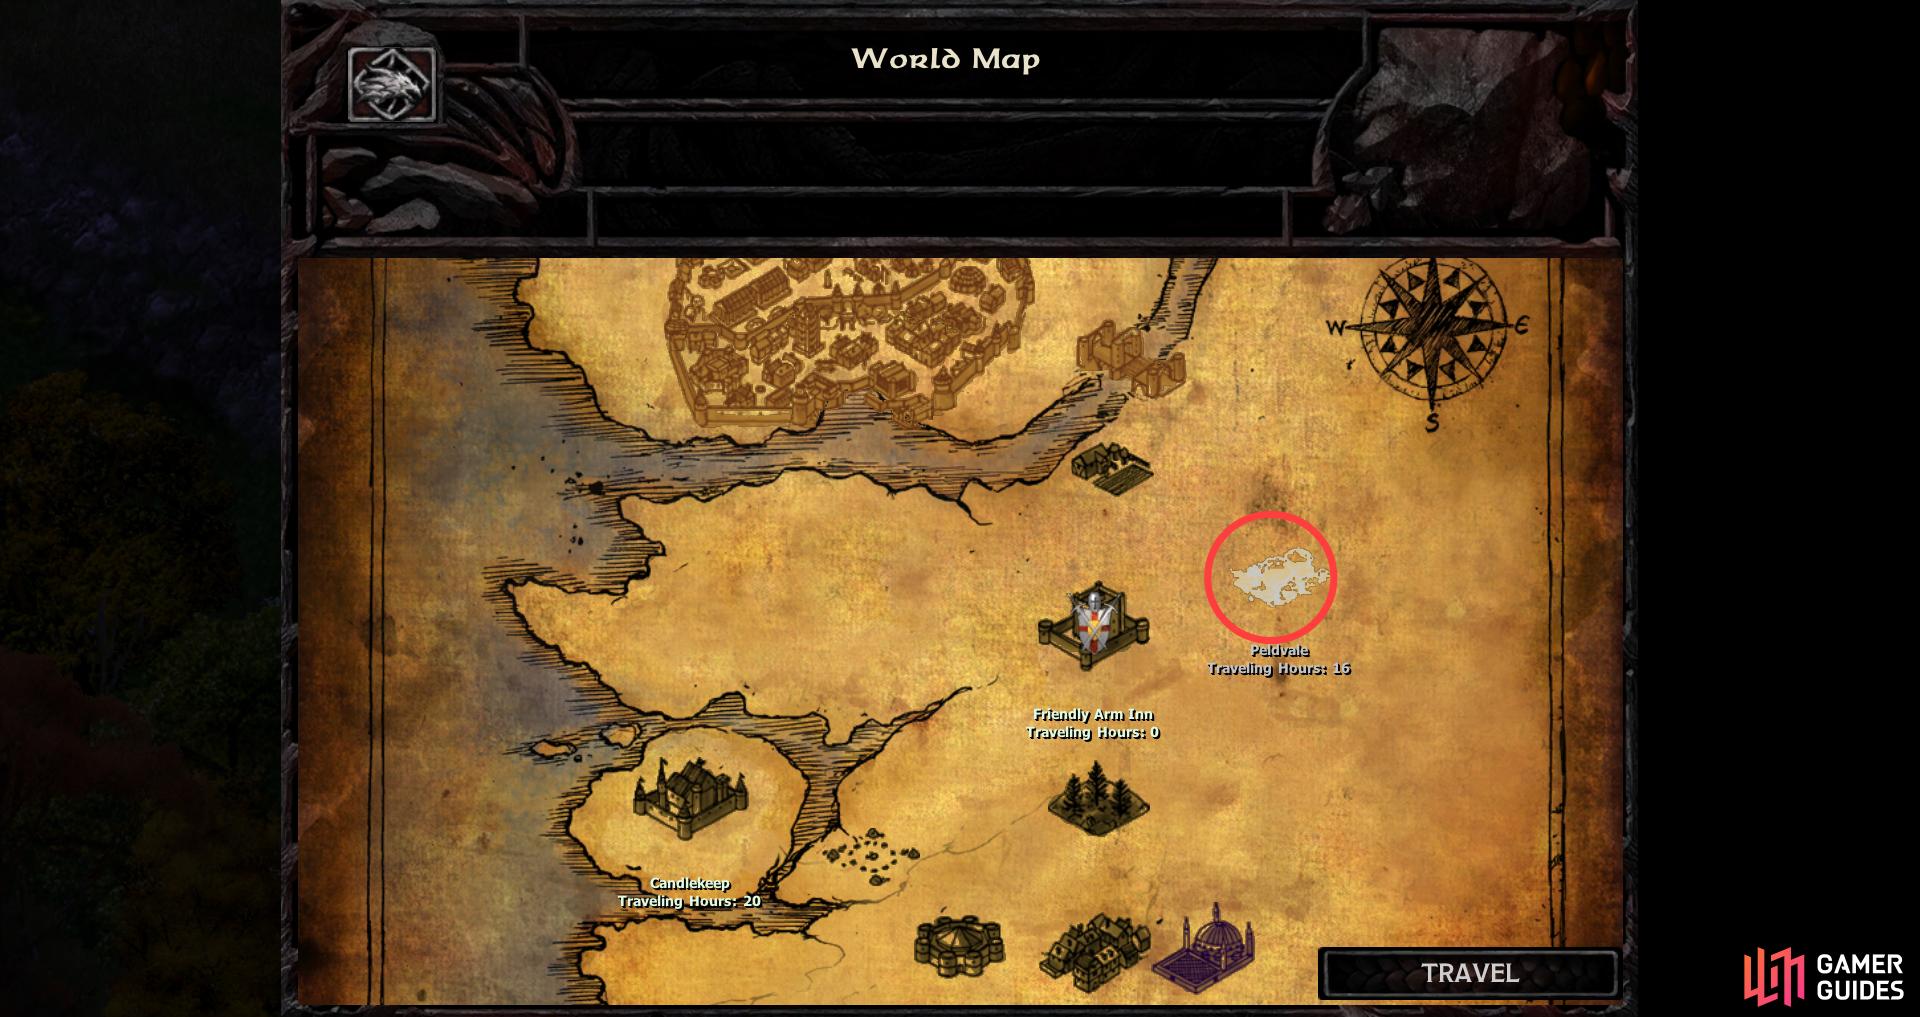
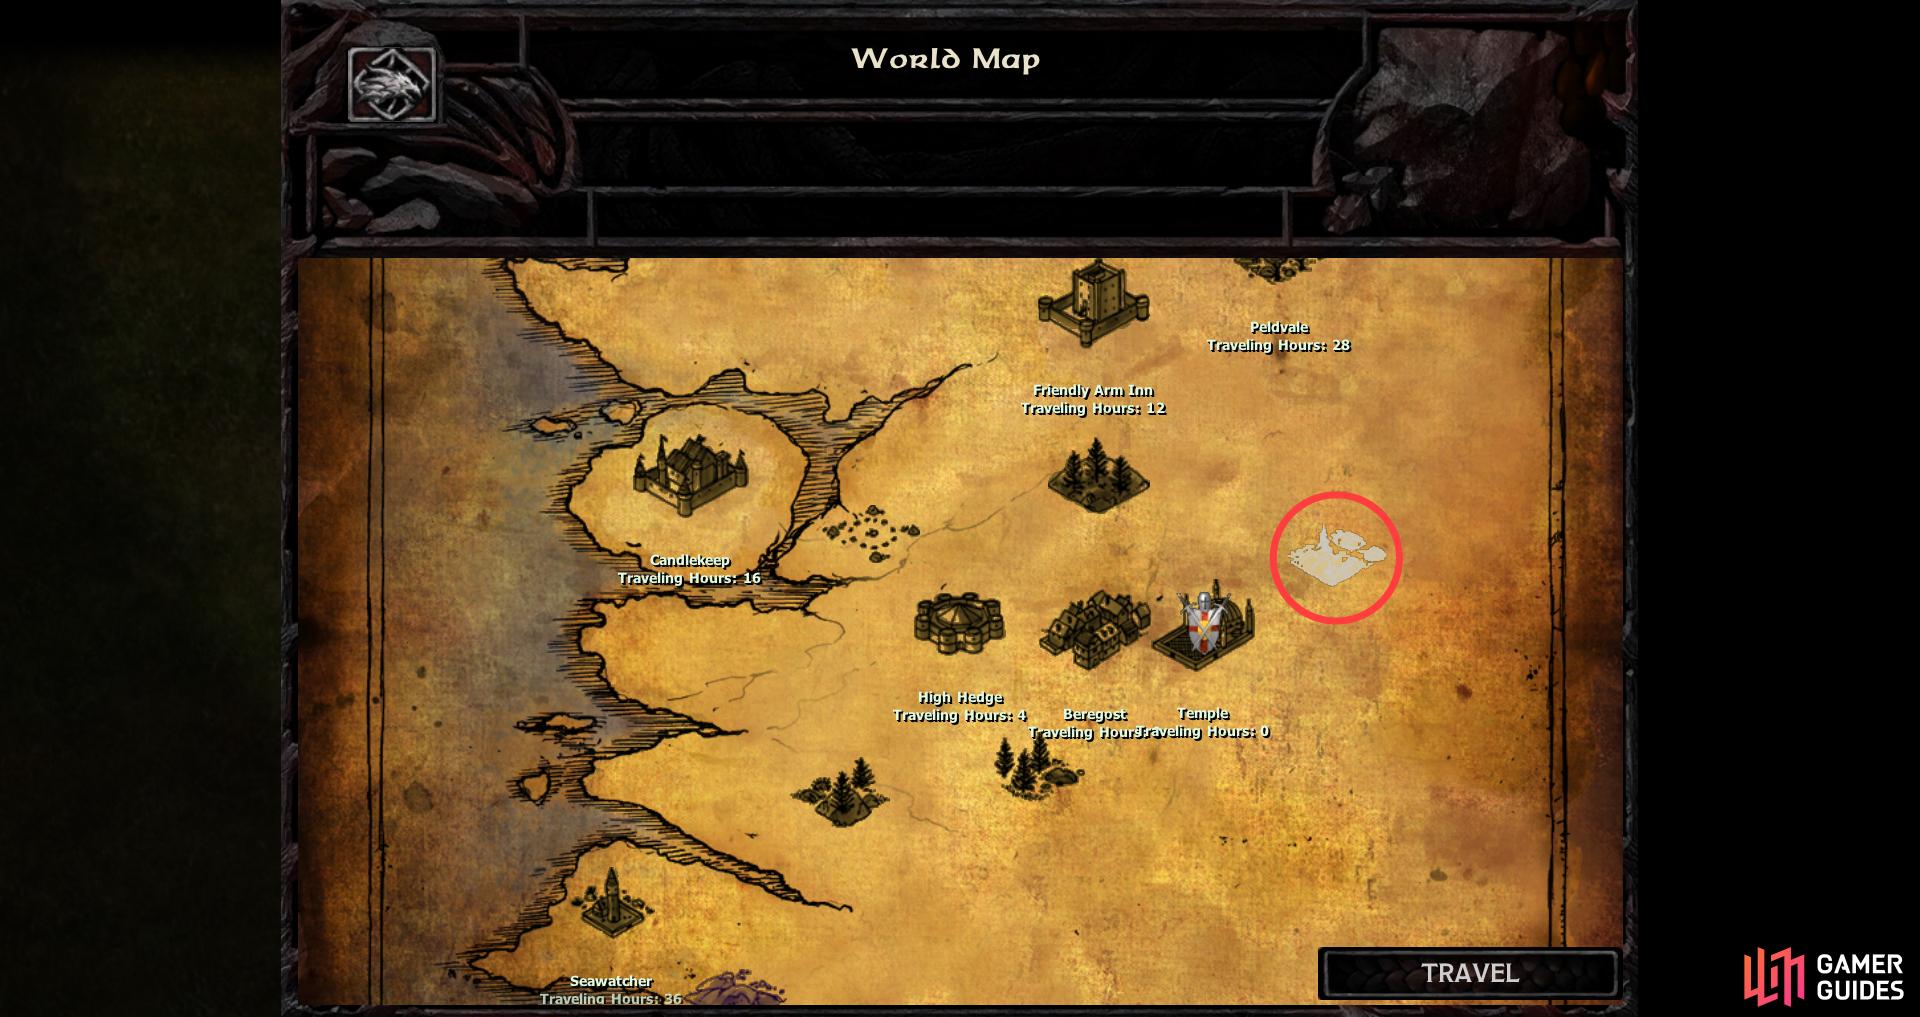
East of the Friendly Arm Inn you’ll find Peldvale
Where Viconia is being accosted by a Flaming Fist Mercenary.
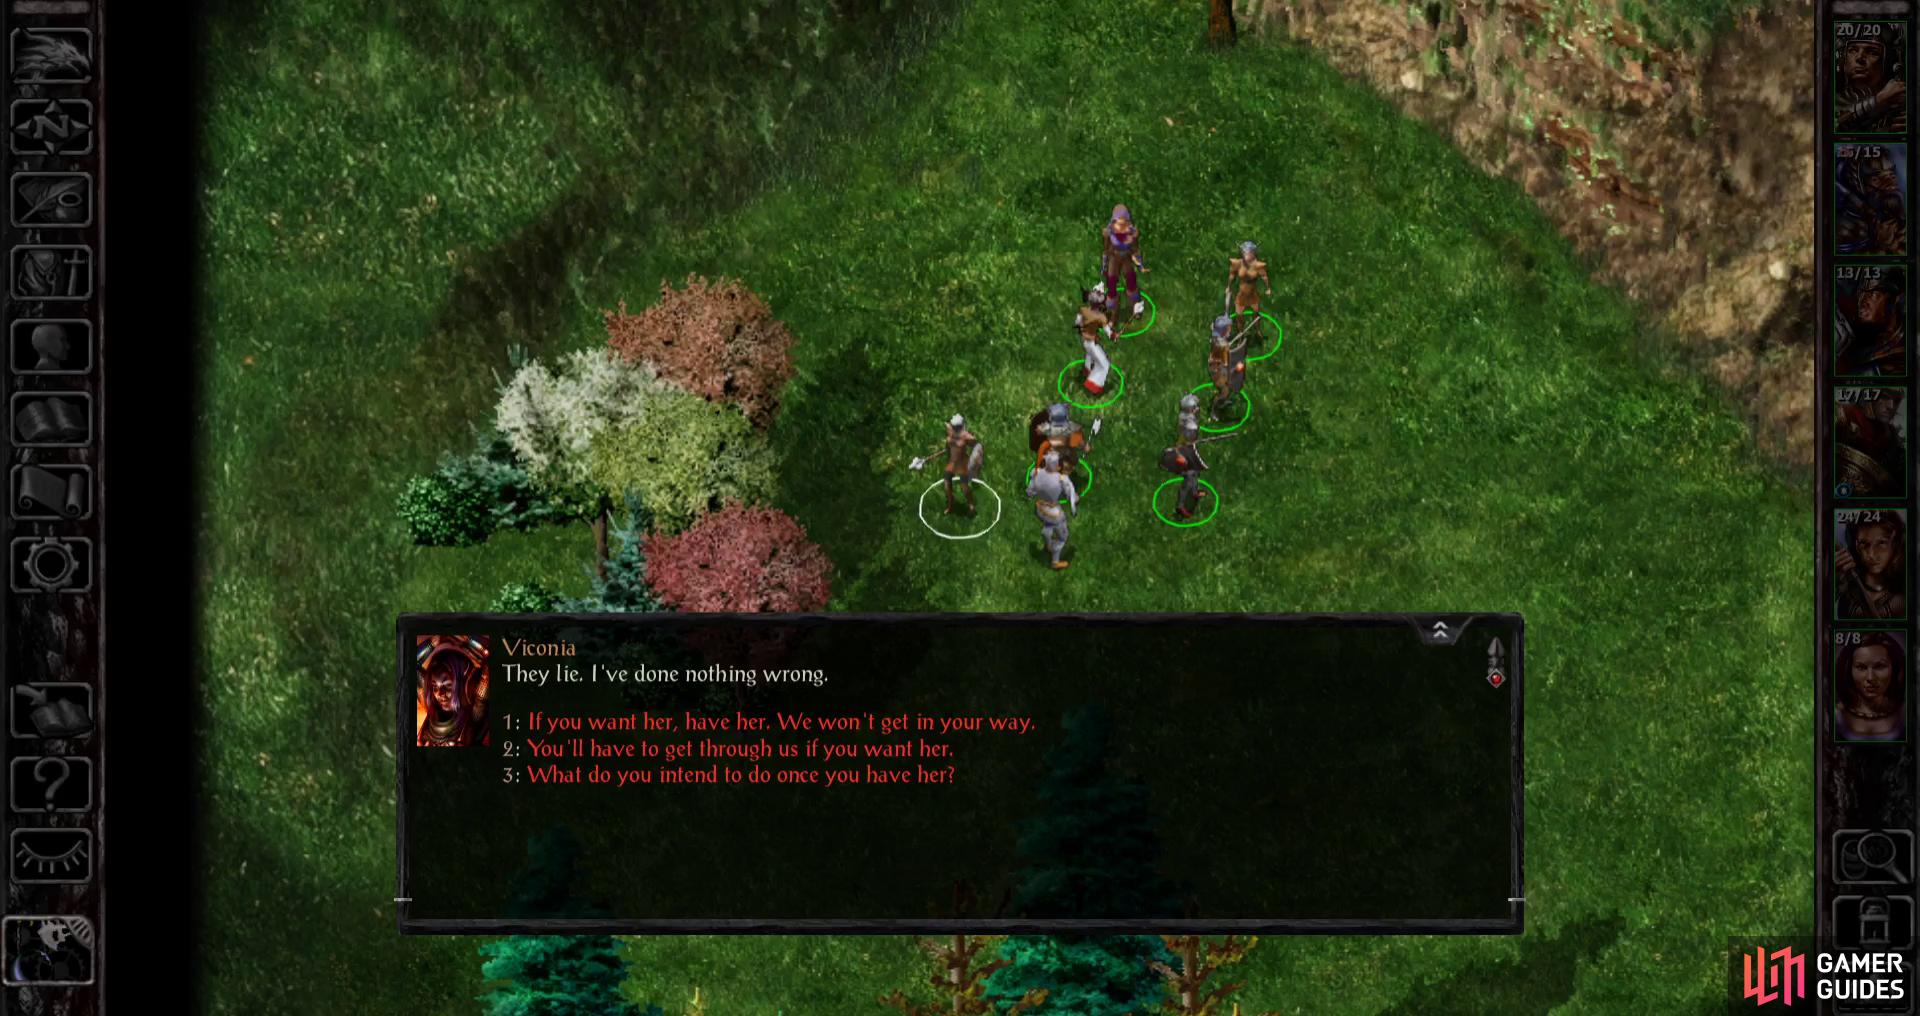
Recruiting Viconia
Next up is Viconia, and to reach the area she’s in, Peldvale (AR2400), simply exit the Friendly Arm Inn area (AR2300) via the eastern edge of the map to reveal Peldvale, then travel there. You’ll appear along the western edge of Peldvale, and from here you’ll want to head north to find Viconia (x=450, y=740) who will try to talk to you when she sees you. Apparently “they” are trying to kill her. Respond with “xxx” and sure enough, a Flaming Fist Mercenary will show up and condemn Viconia as a murderer, which Viconia denies.
Regardless of the truth of the matter, to recruit Viconia you’ll need to help her here, so respond with “You’ll have to get through us if you want her.” followed by “I guess that’s too bad for us.” to pick a fight. The Flaming Fist Mercenary has Cleric levels, and will use Hold Person if you let him, so do your best to disrupt any casting he attempts - Magic Missile or Spook both work well, and Viconia will help by casting Command, which can functionally win the fight outright by leaving him helpless for a round.
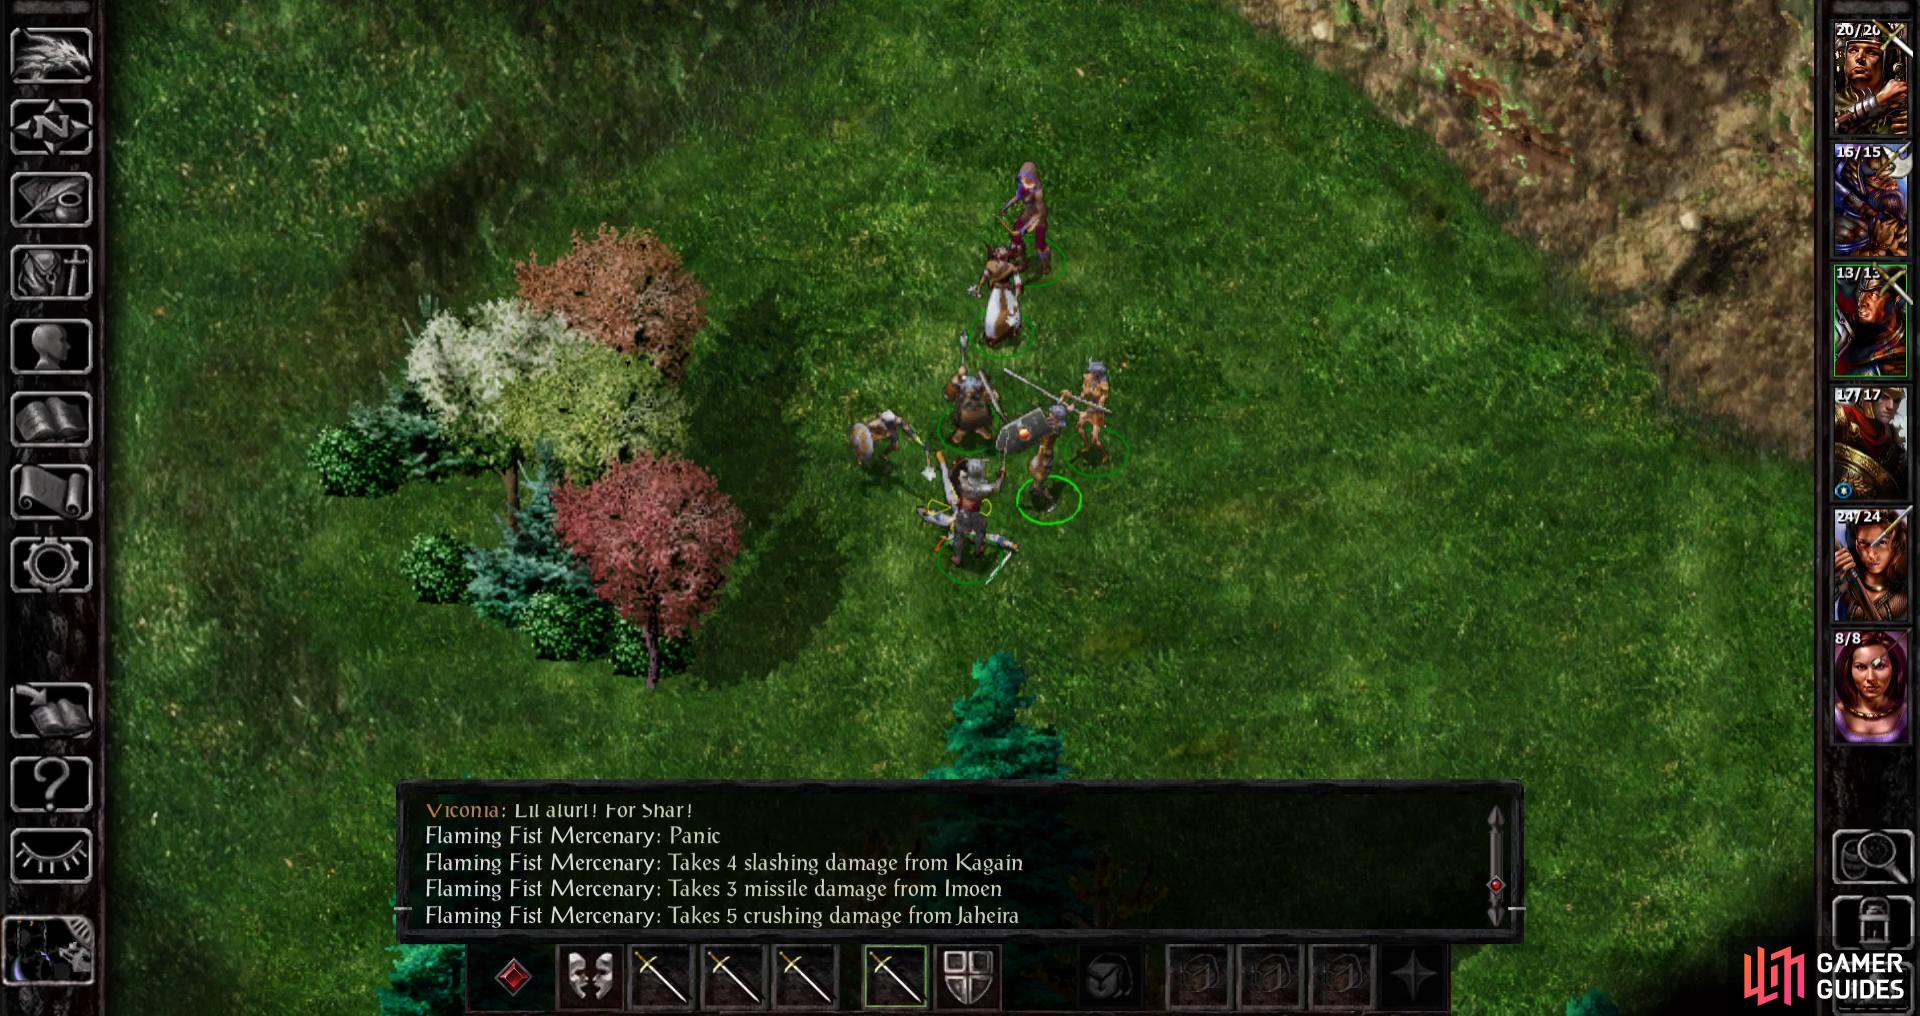
When The Flaming Fist Mercenary is dead, Viconia will offer to join your party. Accept by saying *“We need the extra help, so of course we’ll take you in.” and your reputation takes a two-point hit… but you’ll get one of the best Clerics in the game, not to mention a character who will appear in the sequel. Also be sure to loot the fallen Flaming Fist Mercenary to score a suit of Plate Mail, which should adorn one of your front-liners.
| STR | DEX | CON | INT | WIS | CHA |
|---|---|---|---|---|---|
| 10 | 19 | 8 | 16 | 15 | 14 |
Viconia is perhaps the best defensive Cleric in the game, assisted by her high Dexterity score (19) and Magic Resistance (50%), the latter of which will cause her to ignore 50% of enemy spells that target her. She does have some obvious liabilities, though, namely her Constitution (8) which will ensure her Hit Points remain low and her Strength (10) which may hinder what gear she has access to. As you can see by looking at, say, the Plate Mail you got while rescuing her, she simply cannot wear some heavier armor, but fortunately lighter alternatives exist. Despite these scores being less than ideal, neither are lower enough to impose penalties, though she’ll start out down four potential Hit Points.
She’s primarily a caster, but her high Armor Class means she can occupy space in combat, just don’t expect her to smite too many foes. As she levels up, invest in War Hammers, as you’ll get your hands on a great War Hammer quite earlier into the game. In the meanwhile, give her The Stupefier +1 and a Sling and she’s good to go.
(1 of 4) Make your way east of the Temple to find a Basilisk-infested wilderness area (AR3500)
Recruiting Shar-Teel
Shar-Teel could prove to be very troublesome to recruit if you’re not careful, so be sure to follow the directions given. Head to the Temple area east of Beregost (AR3300), and hug the northern edge of the map. You’ll probably get bothered by some drunkard pretending to be a Lich, but he’s harmless. Exit via the eastern edge of the map to find a wilderness area (AR3500) to the east. You’ll need to avoid going too far south along the eastern edge of the Temple area, as Vampiric Wolves dwell there… quite ironic, but also dangerous, as these beasts require magical weapons (+1 or better) to hit and can paralyze characters, putting them safely in the “don’t mess with them yet” category of beasties.
Things aren’t any better in your target destination (AR3500), as Basilisks roam about, which can petrify characters at a glance. The odds of you killing one without losing a character are slim, and although hit and run potshots with a sufficiently stealthy character will work (Kivan works well for this), we’re not here to harvest XP cows, however lucrative they may be. Go east a bit to around (x=1100, y=2000), then turn north until you hit the northern edge of the map, from which point venture west to find Shar-Teel at (x=270, y=300). Talk to her and she’ll challenge your best male fighter to a duel, which probably means Kagain or Ajantis. Save before you accept her challenge and if you win she’ll offer to join you. If you lose, reload. After you claim victory she’ll join your party.
| STR | DEX | CON | INT | WIS | CHA |
|---|---|---|---|---|---|
| 18/54 | 17 | 9 | 14 | 7 | 11 |
Shar-Teel is an interesting character. Her Strength is outstanding, and her Dexterity ensures she’ll have a decent Armor Class. Her only real downside is her low Constitution, but even that’s not enough to penalize her, just enough to keep her Hit Points in the good range, instead of great. She’ll do well as a front-liner for the evil party, but well enough to replace Dorn or Kagain?… eh, that’s doubtful.
She does have another thing going for her, though - the potential to dual-class. Dorn might be a better party leader and brute and Kagain might be a better tank, but Shar-Teel can serve double-duty as the Thief for the evil party. Unlike Safana, Shar-Teel requires no tomes to do this, either, her natural Dexterity score is sufficient for such an endeavor. If you want to get the most out of the character as possible, you’ll wait until she hits 7th-level as a Fighter, then dual-class her to a Thief. It may take a while, but she can ultimate hit 8th-level as a Thief, hence gaining back all her Fighter proficiencies. What you’ll get is a very melee-competent Thief with more Hit Points than normal, a better THAC0, more developed proficiencies and the ability to wear heavy armor, if need be.
She’ll get two more Proficiency Points as she levels up as a Fighter, so dump them in Long Swords to get the mastery bonus (+3 To Hit, +3 damage, 3/2 Attacks per Round), which is better than what you’d get from a third point in Two-Weapon Style. As a Thief, it doesn’t matter too much what you invest your points in, just avoid Long Sword, Dagger and Two-Weapon style, if possible, as these points will be lost when you finally hit 8th-level as a Thief, hence gaining your Fighter proficiencies back.
Recruit who you wish, then, then, with your more complete party, head on back to Beregost, exit via the western edge of the area, and travel to High Hedge. Time to head to Nashkel, and we’ll explore our way there in a somewhat meandering way.
No Comments