| Collectables | # |
|---|---|
| Runes | 5 |
| Bone Charms | 8 |
| Blueprints | 3 |
| Sokolov Portraits | 3 |
You’ll awaken in another prison of sorts. When you regain control, grab some of the bricks nearby and hurl them at the wooden boards on the roof to break them. Blink out of the area. Check out the nearby desk for an assassin’s blade and some elixirs .
You’ve got two options, you can either climb to the top of the building to deal with the pair of assassins guarding here and use the balcony to blink down away from the building, or alternately you can head down the stairs and possess a fish and have it swim through the small hole in the wooden boards here to exit the building.
Check out our objective markers. Swim up the river in their general direction and exit out to the left using the slanted planks when you get the chance. Ignore the gear indicator for now and climb the chain. At the top blink up onto the roof nearby and turn on your heart. Work your way across the rooftops until you are directly above it. Look over the side and drop down to the lower roof here and pop in the window to grab a Bone Charm (1/8) .
Climb back to the roof and look over the main river area. On the opposite side, you’ll see an open balcony. If you have blink 2, you should be able to blink from one of the rooftops here across to the vent running along the wall below that aforementioned balcony. Once across, wait for the weeper to retreat back inside and then follow him in to choke him out. Then look in the corner and grab the painting for a Sokolov Portrait (1/3) . Return to the top of the chain.
Now we can forget Corvo’s gear altogether and head straight for Daud’s location or we can go and retrieve Corvo’s gear. I would recommend the latter as although it is possible to make your way through the next few areas without and collecting bits and pieces as you go, it is much easier to collect it now.
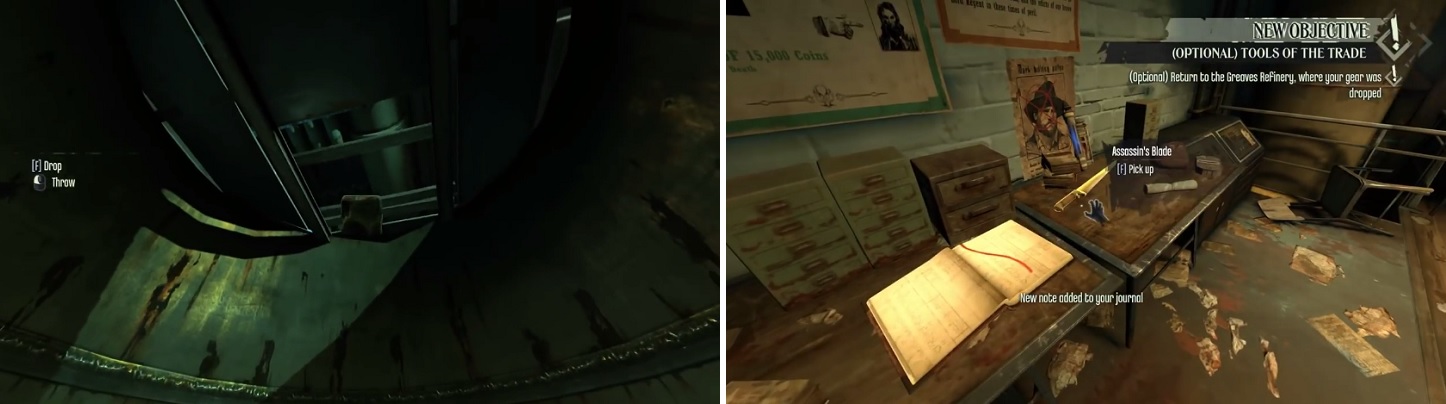
To escape your imprisonment, pick up the bricks and toss them at the wooden panel (left). Make sure you pick up the Assassin’s Blade and other items on the table after escaping (right).
Retrieving Your Gear
Climb the chain and blink up to the roof opposite Daud’s marker and drop down through the opening inside to find a large number of bodies with lots of ammo and grenades to collect. Enter the door indicated by the marker for Corvo’s gear here to enter the next area to find your equipment.
Blink up to the top of the gate in front and note the weepers wandering about in the fenced area below. Turn to the left and blink up onto the silo here and then to the angled roof nearby. Head to the far side and look across at another roof at a roughly similar height (note if you wish you can blink here and drop down inside to find a room full of lootables if you wish).
Look below and to the left of this structure to see some stairs and three oil pumps. Blink down here. In the vegetation near the stairs you’ll find an empty tank. Take it over to the nearby dispenser and fill it up.
Climb the nearby stairs and enter the room at the top. Insert the whale oil tank into the receptacle and then pull the lever to the left to raise stairs on the building opposite. Climb the stairs to the top and when you reach the point at which the walkway is positioned at an odd angle; drop down the gap to find a Bone charm (2/8) .
Continue along the pathway and climb the chain around the corner. Hop off at the top and continue onwards, drop down to the pipe and cruise around the corner to the left. You’ll hear a pair of assassins chatting about you above. After a short conversation (its good information about accessing the next area), they’ll disappear allowing you to blink up to the platform they were on.
Enter the building to the left. You’ll find an empty power receptacle. Continue up the stairs to the right of this, turn the corner to see another row of oil dispensers. At the far end you’ll see a door with a boarded up opening above it. Jump onto the nearby crates and break down the boards before dropping down into the room beyond. Grab an empty tank here and return to the dispenser to fill it. Go stick that in the receptacle. Pull the nearby lever twice.
This will lower the drawbridge and give Corvo access to a chain which will allow you to climb down below. As you descend, be sure to note the Weepers walking around the area below. There will be two on the raised catwalks and a further one or two patrolling the ground floor where your gear is (note that if you chose the non-lethal option to dispose of High Overseer Campbell, you will find a weeper version of him down here). Use your Blink to sneak up and knock each of them out and then retrieve your gear.
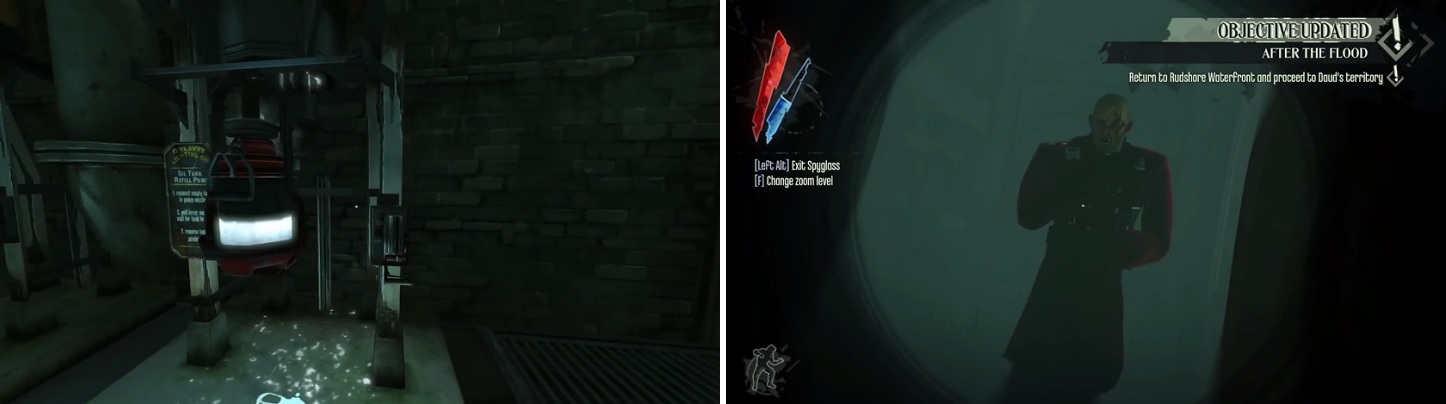
You’ll need to fill up some empty oil tanks (left) in order to gain access to where your equipment is. Be on the lookout for Weepers in said area (right).


Climb the nearby stairs and use the valve to open the roller door nearby. Pull out your heart and you’ll see a rune sitting down in the water below and to the right, also note the group of river krusts ready to shoot at you if you get to close to them on the left. Blink down and grab the Rune (1/5) and then blink past or destroy the river krusts. Backtrack back to where we entered the area.
Rudshore Waterfront
Inside the building here, climb the stairs to the left and use the crank to open the door. On the roof opposite one of the assassins from the refinery area will appear, wait for him to come down to your level and then hit him with a sleep bolt (if you shoot him whilst he’s on the roof there is a good chance he could fall down and be killed, voiding your no-kill run). He will drop the key to central Rudshore. Note that the other assassin will spawn on the roof directly above you and to the left. So be vigilant when leaving to avoid being spotted.
Head across the bridge and blink up to the roof in front. Note that throughout the next few areas you’ll be seeing patrolling assassins. They will blink between different locations when they patrol, usually from the ground to a rooftop or between rooftops. So you will need to try to identify their patrol patterns before moving and be extra careful that you are not spotted.
Cross the bridge and blink up to the roof above. I counted four enemies in the area below. Note that if you did not retrieve your gear, one of the assassins in this area will hold the key for opening the door to the next area. Take them all out, or use the rooftops and vents to the right to make your way to the door at the far end.
Central Rudshore
As you enter, look inside the little open cart here for some pistol ammo and a blueprint for a pistol upgrade (the blueprint will only appear if you missed it in an earlier mission). Turn right and drop down into the water, blink swim to the far side of the water here, hop out and tranquilize the two wolfhounds here with sleep bolts. Continue up to the very end of the alley and up the stairs here to find an overturned cart, inside you’ll find a Bone Charm (3/8) .
Turn around and look up, see the main building ahead with the wooden platform overlooking the alley we are in to the left? We’re heading up there next. Instead of cruising all the way back to the start, climb up on the raised sign at the bottom of the stairs. From on top, blink up to the light fitting nearby and from here up to the wooden platform in front. Note, occasionally an assassin will be keeping watch here, if so wait for him to move on before you attempt to climb up.
Once you are on the platform, you’ll be able to see that the wooden construction here has a makeshift bridge leading to an open window of a building across the other side of the water. Wait until the coast is clear and blink over to and through the window to enter Daud’s base.
As soon as you are in the window, continue straight ahead and into the shadows behind the furniture ahead. Wait for the pair of conversing guards in the immediate area to separate and then take them down. Note the locked door to the left of the window. We’re going to use that as our escape route in a couple of minutes. Loot the rest of the room if you like, you’ll find some additional sleeping bolts if you need to refill and some elixirs too.
Continue to the next room, here you’ll see a guard training another colleague. Take them out if you like or alternatively, blink up to the top of the bookcase between you and them and from here, blink over to the opening to the right with the makeshift wooden ramp leading out of the room. Drop down into the courtyard. Use the vents to blink up and through the higher open window opposite.
As you enter an assassin will spawn in front of you and enter the next room. Here you will see him talk to Daud, our next target.
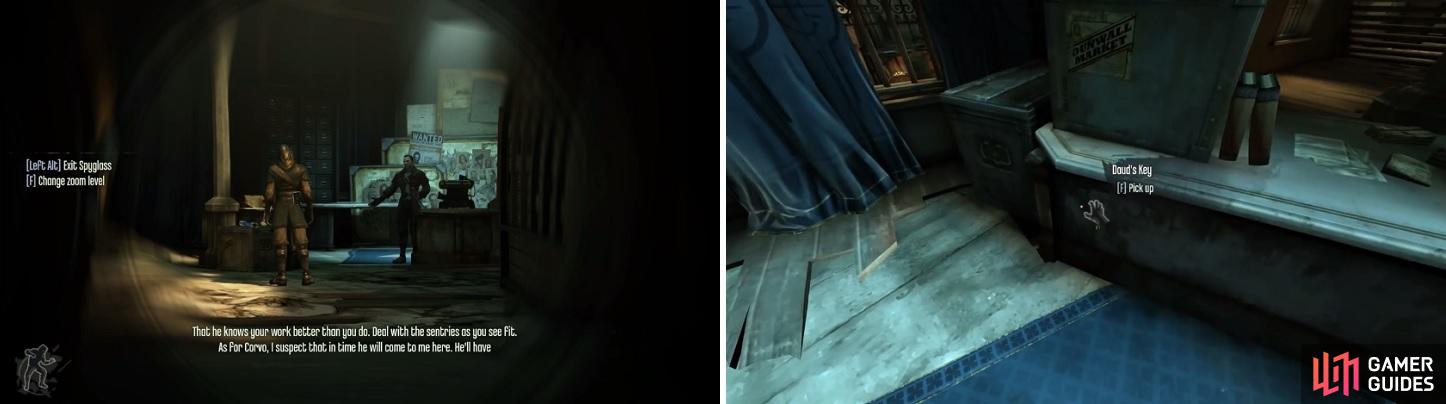
Daud will have an Assassin (left) in the room with him. Make sure you steal Daud’s Key after knocking him out (right).
There a couple of options here:
- Lethal : Open the door and go after Daud. He will call a couple of friends and he can use a few Outsider powers too, so try and assassinate him rather than taking him head on, if possible.
- Non-Lethal: Send Daud a message by picking his pocket and then leaving him alone.
The first option is pretty self-explanatory; the second however, is a little trickier. Open the door to Daud’s room and blink up on top of the bookcase next to the stairs. From here sleep bolt the other guard in the room, then use slow time and blink to get down behind Daud and pick his pocket, you’ll get a Bone Charm (4/8) and some money for the effort.
Whilst you are here, also quickly take his key from the nearby table and then blink back up to the book case again before time goes back to normal. Blink up to the floor above for a chest and back out the door you entered. Now that we have Daud’s key we can open some chests around this building for two Blueprints (Folded Galvani Resin and Bonded Galvani Weave) . Again it should be noted that they will not appear if you have previously picked them up.

Hop back out the window and return to the locked door I highlighted earlier. Be vigilant as there may be a guard or two back down here even if you put them all to sleep before. Inside the locked door, grab the chain and climb down. About halfway there you’ll see a semi-collapsed floor, you’ll be able to see a painting on the back wall.
Blink on over to this and grab it for Sokolov Portrait (2/3) . Continue down the rope and at the bottom grab the Rune (2/5) off of the table. Use Daud’s key on the locked chest in the room we entered the building from. Afterwards open the locked gate nearby to enter the next area.
Exit the tunnel and turn to the right, blink over to the stone debris here to find a Bone Charm (5/8) . Now do a 180 degree turn and head back past the tunnel exit. Use the wreckage here to blink up and into the next area on the left.
Optional: Blueprint Spiky Grenade Casing
From here you’ll be able to see a train coming into this area to drop off bodies and then return to another area further on. On this side of the tracks, you’ll see a pit full of metal girders and other debris below it. Cross this to the other side to find some non-hostile thugs wandering around outside and in the building to the right.
As you enter the building, look down a collapsed hallway to the right to find the blueprint. You can also climb upstairs and pick the thug here’s pocket for a key to open a nearby storeroom. Return back across the debris and climb back up to the ledge indicated before.
Enter the first building here and use the planks to climb up to the next one. From here turn around, there is another window to blink up to above, head inside and the woman here will give you a hint as to what to do next. Return to the window and again blink up to the next building above.
Climb the stairs to the top and exit through the left hand window when you reach the main room. Follow the vent across to the next rooftop and then blink up to the next, slightly higher adjacent roof. Pick up the Rune (3/5) here. Head over to the metal railing.
From here look down, you should see a metal support structure situated directly over the train tracks just to your left. Blink over to this. Note that the train continuously comes from the next area, stops below to dump bodies and then returns again.
When the train is below, wait for it to dump the bodies and then when it’s about to return blink down on top of it and use it to ride to the next area. Just before the train stops, it will go through a wall of light, so you’ll want to avoid this. As it approaches the building that it enters, blink to the balcony just to the left of the entryway.
Once you are here, pull out the whale oil canister to disable the wall of light and proceed inside. Drop down to the ground after the first wall of light and enter the door to the right marked ‘service exit’. Continue through the back alley here and use the door at the end to enter the next zone.
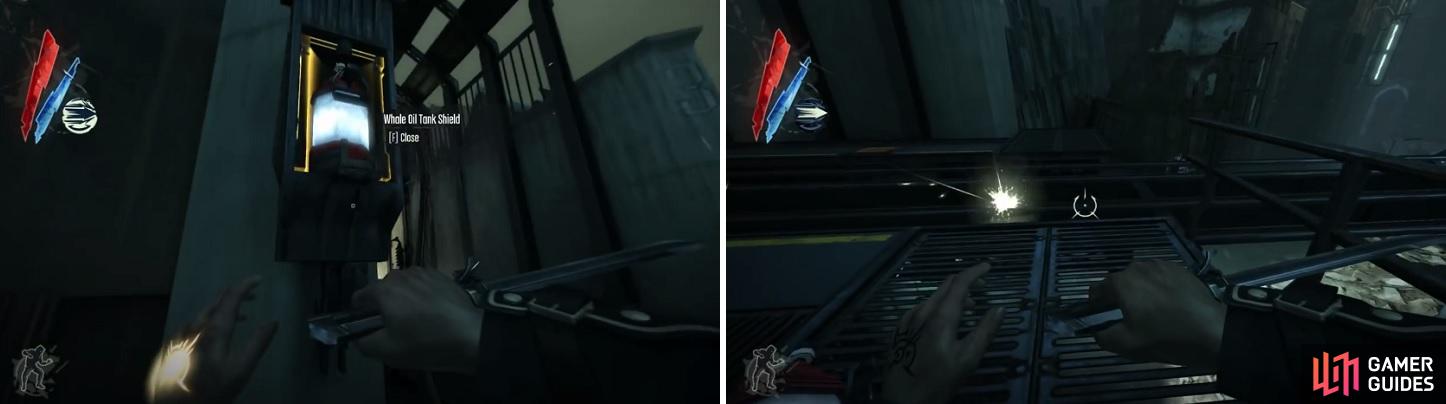
Remove the whale oil tank (left) to disable the Wall of Light, allowing you to proceed. Be careful of stepping on the train tracks, as they are electrified (right).
Old Dunwall Sewer
Proceed around the corner and into the open building on the left. Climb the stairs and in the next room look beneath the debris for a Bone charm (6/8) . Climb the debris and drop down from the window. Move forward and enter the door to the left. Drop down to the floor and rotate the crank to open the hatch. Drop down into the sewers below.
Continue along the path until you reach the cistern. Note that if you have completed any optional tasks for Granny Rags and Slackjaw, the gate at the end of this path will be locked. Follow the Optional: the Master Key guide below to get through!
The Master Key
Once in the cistern, Walk along the right hand ledge here and talk to the thug on the ground. He’ll tell you where to find the sewer master key. Look over to the other side of the cistern and you’ll see an opening above some pipes. Blink up here and continue on through the tunnel to the left. In the next main room, kill the two river krusts on the ceiling and then drop down into the lower section of room in the center. Bash down the boards at the end.
Blink up to the ledge on the right and exit the door. Take out the three river krusts opposite (there is also one behind the large pipe to the right that will attack us when we proceed). Before heading down the stairs, check out the room to the left.
You’ll find a safe here with a note next to it giving you a hint as to how to open it. Note the names of the three months mentioned. Read the book behind the note and match the name of the month listed in the note with the number of the month for your combination ( 5-2-8 ). Inside you’ll find a Bone charm (7/8) .
Exit the room and drop down into the cistern. Follow the path down until you reach the water and then cautiously lean out from the corner to take out the three krusts on the wall to the right. At the far end of the water dive underwater and follow this tunnel to the end. Surface and climb the stairs here to the very top and enter the gate.
Once you reach the main room, you will see Slackjaw and Granny Rags having a confrontation. There are three options here. Before making your decision, climb the stairs to the left and look above the bed for a painting you can grab for Sokolov Portrait (3/3) . Head down stairs and make your choice.
Here are your four choices, note that the third and fourth options are the only way to get past this section without killing anybody (if you wish to successfully complete a no-kill run):
1) Help Granny Rags by killing Slackjaw, Kill slackjaw, grab the key from Granny and then place Slackjaw in the boiling sludge. Talk to Granny again and then pick up the Rune (4/5) from the nearby Outsider Shrine.
2) Help Slackjaw by killing Granny Rags: Go up to Granny rags room, grab her cameo off of the bed, use the switch to open the furnace, place her inside and then hit the switch again to close the furnace. Then just damage Granny Rags until she dies.
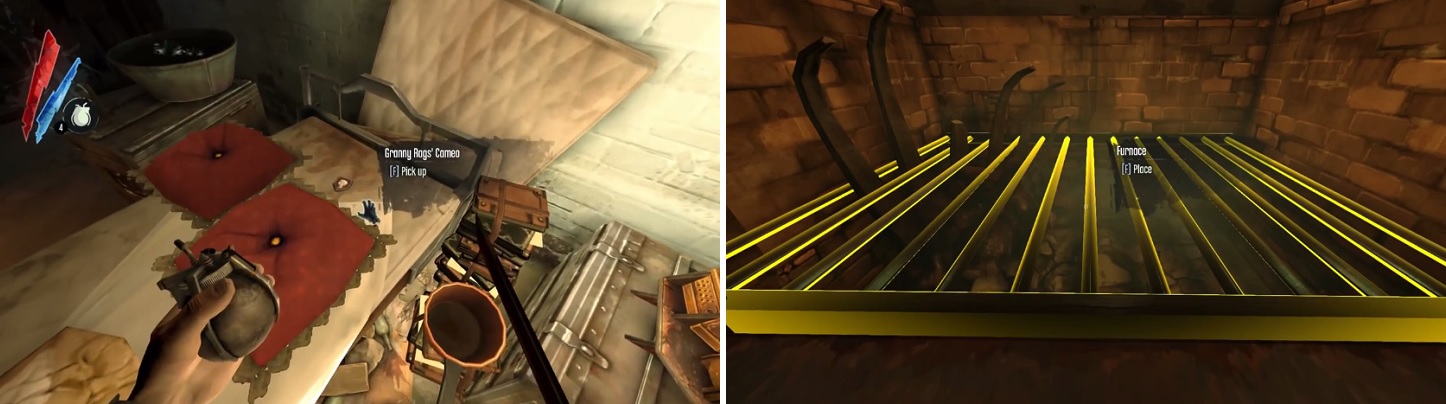
In order to take down Granny Rags, you’ll have to grab her cameo off of her bed (left) and place it on the furnace nearby (right).
3) Pickpocket the key from Granny Rags. Use the slow time ability then blink behind her, grab the key and then blink your way up the stairs nearby. Open the door at the back of the room and then close it behind you to prevent her from following you. Note you will not earn either achievement/trophy for completing all of the side-quests for either character if you escape this way.
4) Another strategy is to sneak up choke Granny out whilst her back is turned at her cauldron, then quickly run up the stairs, grab her cameo off the bed, stick it in the furnace to destroy it and then shoot her with a sleep bolt to take her down.


Either way you grab the key from Granny Rags, head up the stairs and open the door to the left of the furnace. Close it behind you. There is a Rune (4/5) to grab from the nearby Outsider Shrine up the stairs at the back of the room. Loot the desk and then find the wooden planks on the floor. Destroy these and then hop into the hole that opens up for the water to carry you away. Eventually, you’ll end up in the room with the wounded bandit we talked to earlier.
Blink up to the side of the cistern and open the locked door at the end. Head through and down the stairs. As you do, watch out for the river krusts to the left. Continue onwards until you reach the group of survivors. Drop down into the lower area here to find a Rune (5/5) and then climb out and continue to the right.
After the stairs, when you reach the dead end pop up into the hole in the wall on the left, destroy the board blocking the path and continue along until you reach the next room. Destroy the three krusts opposite and another in the corner to the left. Afterwards swim over to where the three krusts were and look in a small drain to the left of their platform for Bone Charm (8/8) . Smash the boards at the opposite exit from the entry and follow the passage to the end. Enter the door at the far end to complete the mission.
No Comments