| Collectables | # |
|---|---|
| Runes | 5 |
| Bone Charms | 5 |
| Blueprints | 0 |
| Sokolov Portraits | 3 |
After disembarking, continue along the docks, until you reach the stairs. Wait for the guard to start relieving himself over the water and then take him down. Climb up the stairs he descended from and like the previous mission, turn right towards Granny Rags apartment and at the dead end, cut left into the alley. You’ll notice that the thugs are friendly now and they’ll let you know that their boss Slackjaw wants a chat. You’ll get an objective marker for the Distillery if you want to undertake an optional task.
Street Conspiracy Part 1 - Slackjaw
Enter the Distillery door there and work your way back through to where we poisoned the still before (if you did the optional side-mission). After a chat with Slackjaw, chack out the room to the left of the entrance in the main area to find a valve, turn this to lower a door. Inside you’ll find a Blueprint: Incandescent Paste (1/3) return outside, turn to the right as you exit and you’ll see the door at the bottom of the stairs is now open. Look on the bed in here to find a Bone Charm (1/5) .
You’ll notice a few weepers running around now, so to avoid them blink up to the rooftops and make your way back to the entrance, wait out of sight for the thugs to finish off the nearby weeper and return to the distillery district.
Distillery District
From the door to the distillery, blink up to the roof opposite and to the right. From here, look back towards the Distillery entrance and slightly above to see a balcony with an open door beyond. Pull out a sleep bolt and shoot the assassin that is patrolling here when he comes out on the balcony and then Blink up.
Inside you’ll see a boarded up room to the right, inside you’ll see a weeper - aim between the boards here and hit it with a sleep bolt to knock it out and then bash down the door to find a Rewire Tool and a Bone Charm (2/5) . Return back to the roof opposite and continue into the open window nearby. Take care of the assassin in here.
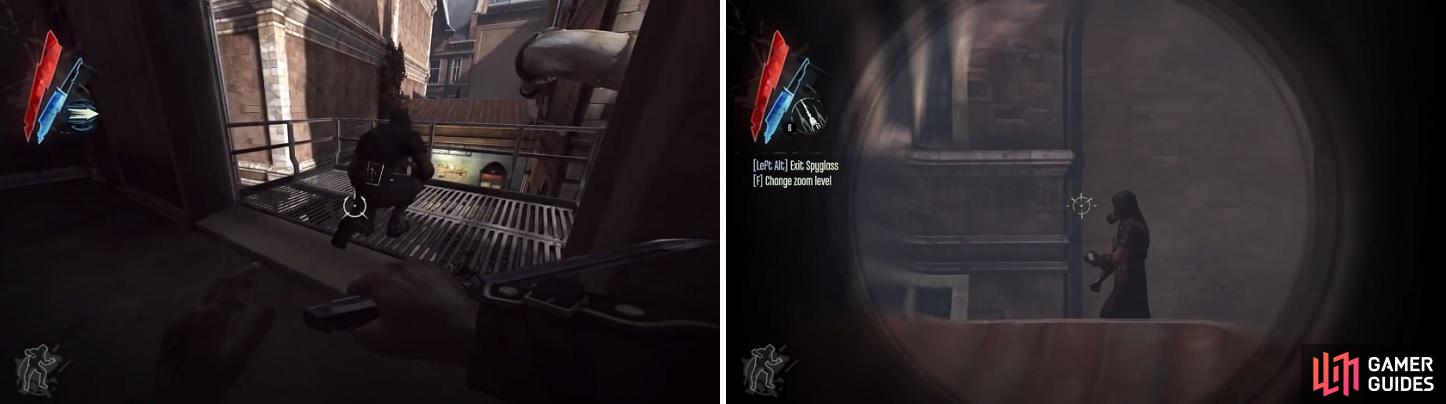
Be careful of the alley right outside of the distillery, as there are Assassins lurking about. You’ll have to stick to the rooftops to avoid being spotted by them.
Exit via the opposite door and blink to the next room to find yourself overlooking Clavering Boulevard. From our current location, you’ll see the marker pointing to Galvani’s Flat on the opposite side of the boulevard. Still up on the roof, drop down to the vent and follow it left and all the way around to the balconies in front of Galvani’s place. Jump up onto the balcony and take out the guard here. You can head inside if you want to continue Slackjaw’s mission.
Street Conspiracy Part 2 - The Informant! (Galvanis Office)
As you enter, you’ll see two guards on the far side of the room. Climb under the table in front and wait for them to split up. Take them down individually. There is a safe to the right, you can explore the apartment for a note that will indicate its combination or you could just pop in 2-8-7 to open it.
Exit the door and climb the spiral stairs. At the top, you’ll see an open door. Inside Slackjaw’s informant is on the table being guarded by a pair of baddies. Wait in the shadows to the right of the door and when the guards separate, one will walk out the door past you. Grab him and deposit him nearby before taking out his friend. Check out Slackjaws informant on the table and grab the note from his hand .
Check out the rest of the floor to find a spiritual elixir beneath a pigeonholed shelf and a health elixir in a glass case. Finally, check out the secret room behind the bookshelf at the back of the room with Slackjaw’s Informant for a Rune (1/5) . Exit through the door nearby to a balcony overlooking the boulevard. Backtrack to Slackjaw.
Street Conspiracy Part 3 - The Deal
After a chat with Slackjaw, he’ll give you a new objective. We need to pay the Art Dealer a visit in the Golden Cat, if we can bring his safe’s combination back to Slackjaw, he’ll deal with our two targets (so we won’t need to kill them - note that this is essential to complete a no-kill run) . Return to the Distillery District and all the way back to the balcony outside Galvani’s office.
When you are ready, blink down to the alley below Galvani’s Flat and as with the previous mission, make your way down the stairs at the end. Head left along the road at the bottom and up the stairs to the right of the dead end. You’ll see a pair of guards mugging a woman to the left.
You can save her if you like, and will be rewarded with a backdoor key to the Art Dealer’s Apartment, but this is very difficult to do without being detected (best to avoid this if you are trying to complete the game without being spotted). Blink across to the cover in front and again to the safety of the wall on the far side. Climb the stairs here.
There are a couple of options as to how to enter the Golden Cat:
1) If you completed the tasks for Slackjaw, you’ll have a key for the Captain’s Chair Hotel . This will also give us an easier entry. Blink to the top of the guard post here and you’ll find yourself opposite the door to the Captain’s Chair Hotel (it’s just below and to the left of the R.Williams’ sign). Wait for the guards to move on and whilst they are not looking, blink down to the door and head inside. Make your way to the end of the corridor and when you reach the stairs, look in the room to the left for a Bone Charm (3/5) . Climb the stairs and at the very top to find a door leading to the Golden Cat. Once inside, You’ll be up on the rooftops, head forward and around the corner.
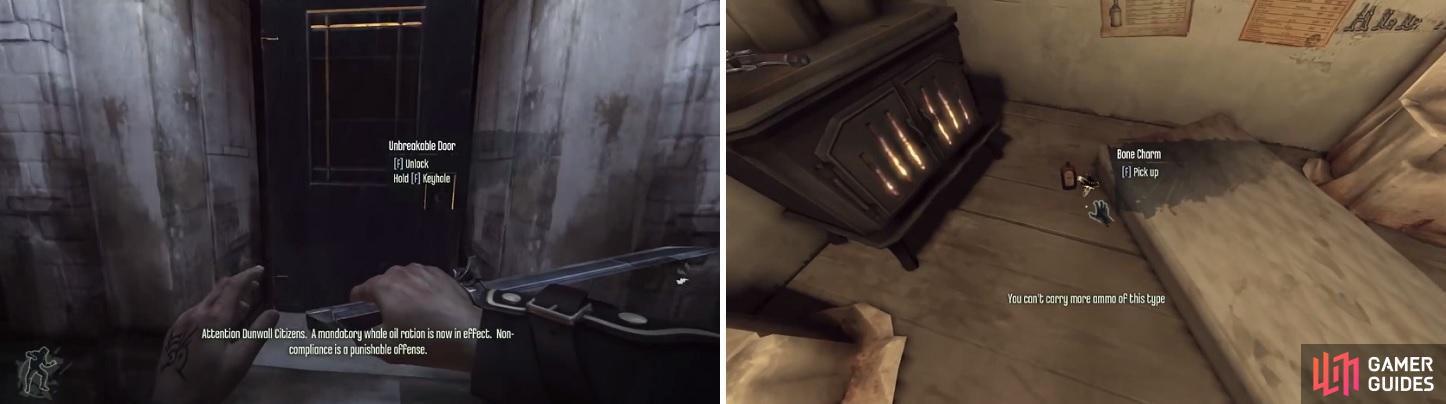
Finishing up Slackjaw’s first side mission will get you a key that unlocks this door (left). Inside this building will be a Bone Charm for you to pick up (right).
2) Blink to the top of the guard post here and you’ll find yourself opposite the door to the Captain’s Chair Hotel (it’s just below and to the left of the ‘R.Williams’ sign). Wait for the guards to move on whilst they are not looking, blink up to the balcony to the right of the ‘R.Williams’ sign. walk around the corner and when the guard tower is not looking, blink around the corner to the left and enter the door. Once inside blink up onto one of the nearby rooftops.
The Golden Cat
Continue on and you’ll find yourself overlooking a courtyard in front of the Golden Cat in the distance. Before hopping down, pull out your heart. The objective markers will indicate the location of a pair of runes and a bone charm in the main building and a third rune in the building below and to the right. Let’s grab that last one first.
From the edge of the roof, you’ll be able to blink across to either the vent or the balcony of the building containing the rune. Once here, look inside and on the desk you’ll find the Rune (2/5) . Exit onto the vent and make your way along it towards the main house. When the vent ends, blink up to the roof.
From here continue onwards to find another vent jump on this and head around the corner, to find a guard on a balcony below, put him to sleep. Blink up to the platform above the balcony and enter the open window here.
As you enter, turn right and follow the platform to the opening on the right to exit into a stairwell. Cautiously go down the first two flights of stairs, and wait for the woman to enter the door on the left. This is the Madame. Follow her in and choke her to sleep to obtain the Golden Cat master key . Hide her body under the table and loot the room for some elixirs . Exit her office and enter the door opposite. Move forward and before you reach the door, hopping through the open window to the left.
As soon as you enter, look up and blink up to the platform lining the top of the room. Pull out your heart and find the nearby Rune mounted on the wall (3/5) . Once the guards are clear, from the room blink down and grab it. Return through the hole to the previous room and continue along the skirting to the right. Once you reach the next opening, you’ll be overlooking a large room. Just below and to the left you’ll see a girl trying to wake a guard in a chair. There are two guards patrolling the room and there are two people in the center of the room dancing.
When the coast is clear, With master key in hands, and from this vantage point its time to make our decision as to how to deal with our targets. There are a few options. Note that to complete a no-kill run, you will have to choose option four in order to eliminate them without killing them.
Morgan - Lethal (Steam)
From the balcony blink down and to the right of the two people dancing in the center of the floor. There is a set of spiral stairs here leading down. At the bottom, wait for the conversing guards to separate and take them out. Use the Golden Cat master key on the locked gate directly across from the bottom of the stairs (or alternatively, climb up through the opening above the door and drop down into the room). Inside, grab the valve from the crate on the right and then place it on the pipe opposite the gate. Hit the action button on the now functioning valve to kill Morgan.
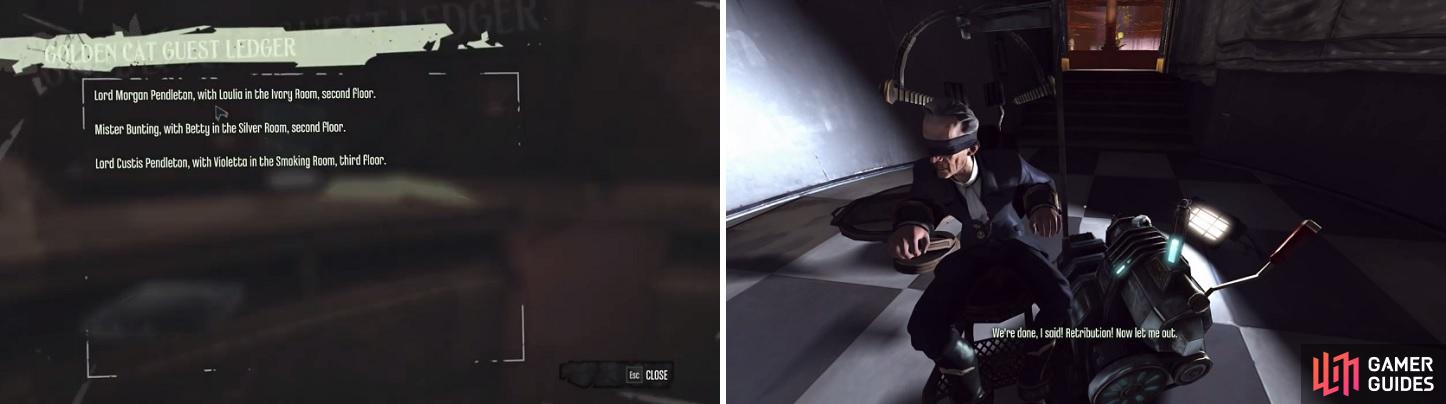
If you’re going after the Pendletons, find the ledger at the front desk (left) to find out which rooms they are in. If going the nonlethal method, then you’ll have to “coerce” the safe combination out of the art dealer (right) by shocking him a total of five times.
Morgan - Lethal
From the balcony blink down and to the right of the two people dancing in the center of the floor. There is a set of spiral stairs here leading down. At the bottom, wait for the conversing guards to separate and take them out. Use the Golden Cat master key on the door in the circular room to find your target, slice him up to kill him.
Curtis - Lethal
From the balcony note the hanging circular ornament above the center of the room. Blink up on top of this and then up to the floor above. Take out the guards here or avoid them and look to the left of the door to the gold room. Grab the guard on the balcony and put him to sleep. Hop over the railing to the right. The circular room here contains our target and a friend. Get on the skirting, crouch and follow the platform around to the opposite side. Enter the door here to enter the room from behind the head board unnoticed. Kill him any way you like!
Non-Lethal
Follow the Optional: Street Conspiracy Part 3 guide below. Note, you will not need to approach either brother, only the Art dealer.
Optional: Street Conspiracy Part 3 - The Deal …Continued
Just below and to the left you’ll see a girl trying to wake a guard in a chair. There are two guards patrolling the room. When the coast is clear, drop down and sneak past the girl and the guard in the chair. Afterwards, enter the door to the left. Close it behind you.
We’ve found the Art dealer. Go down and pull the lever when possible. After he says his safe word, zap him again until he gives you the safe combination. This changes every time you play so unfortunately you can’t jot it down for your next playthrough.
Any way you decide to deal with the brothers, when you are done, backtrack the same way we came through the previous rooms and back to the madam’s office.
Climb up the next flight of stairs and enter the door on the left. Inside you’ll find some stuff to loot and a Bone Charm (4/5) hanging on the wall. Exit and climb the stairs again to the top level. Here you’ll find three rooms branching off from the hallway here. In the first room you’ll find a courtesan, so put her to sleep and then grab the Rune (4/5) off of the nearby dresser.
The third door has more lootable stuff in it. Our goal though is in the middle door. Enter this and you’ll find Emily. After a short scene escort her down the stairs and to the exit. Unlock the door for her using the master key and then use it as a short cut back to the distillery district.
In the room in front you’ll find Granny Rags again, check out the table opposite the entrance for a Bone Charm (5/5) . Head down the tunnel towards the exit. There is a group of four weepers outside, so use dark vision to keep an eye on them and when it’s clear, step outside and quickly blink up to the metal girder below the stone arch to the right. From here blink over to the pipes and work your way up to the higher pipes. Follow them around until you reach the balcony.


We can enter the door here to the Art Dealer’s apartment. Inside we can loot 3 Sokolov Portraits and a rune, but there are a few enemies patrolling around to watch out for. If that doesn’t interest you, skip past the box below to continue.
Optional: Street Conspiracy Part 4 - The Art Dealers Apartment
As such, lets enter the door here to go into the Art Collectors apartment. Hide under the table directly in front as you enter and wait for the guards to separate. Grab the one that patrols by you and then get his friend. Go check out the painting they were looking at and grab it for Sokolov Portrait (1/3) . Climb the stairs here and at the top, you’ll see a pair of thugs checking out the safe in the far right of the room. Again, when they split take them down.
In the side room opposite the safe, you’ll find a Sokolov Portrait (2/3) above a bed. Grab that and return to the safe. Plug in the combination that the art dealer gave you to open it. Grab the Rune (5/5) and the Boyle Party Invitation off the desk (getting this will make things a little easier in a future mission so its a good idea to get it) and then grab the Sokolov Portrait (3/3) off the wall.
Exit to Clavering Boulevard via the door nearby and work your way back to Slackjaw. Give him the combination to the safe and He’ll now deal with our targets for us.
You should note that if you go back to loot the safe after giving Slackjaw the combination, you will encounter three of his thugs inside and they will attack you. Therefore, grabbing the loot before returning to Slackjaw is preferable for a no-kill/no-detection run. Return back to Samuel at the dock to complete the level.
No Comments