| Collectables | # |
|---|---|
| Runes | 1 |
| Bone Charms | 0 |
| Blueprints | 0 |
| Sokolov Portraits | 0 |
Kingsparrow Island
After you get off the boat, you’ll see a set of raised stairs on a rock in front, blink up to these. From the top, you’ll see the fort in front. On both sides, you will see a wall of light that will block your entry. We have a couple of options here:
1) Blink to the rock that the rotating guard tower is situated on. Look to the platform over the water to the left. Note that there is a space beneath the platform that we want to get to. Wait for the tower’s search light to rotate away and when it’s safe, jump down and blink across to the ground beneath the platforms her. Head to the back, right of the area. In this location, you will find a hatch you can open to access the platform above. In this location, possess one of the nearby rats and pilot it through the hole in the grating nearby.
2) Blink to the rock that the rotating guard tower is situated on. Look towards the wall in front. Look out for a circular opening in the center. Drop down to the ground when the tower’s searchlight is looking away and head over and blink up and into the entrance here. Climb to the room at the top and incapacitate the guard at the top. Now we can re-wire both walls of light. Drop back down and out of the circular entrance we came in from and work your way over to either wall of light to enter the fort.
Once past the wall of light, climb over the low wall leading inside. Drop down into the fort and hug the left hand wall in the shadows. As you round the corner look up to see a rocky ledge here. Blink up on top of this. Now wait for the guard above to patrol away and double jump and blink up onto the wall above.
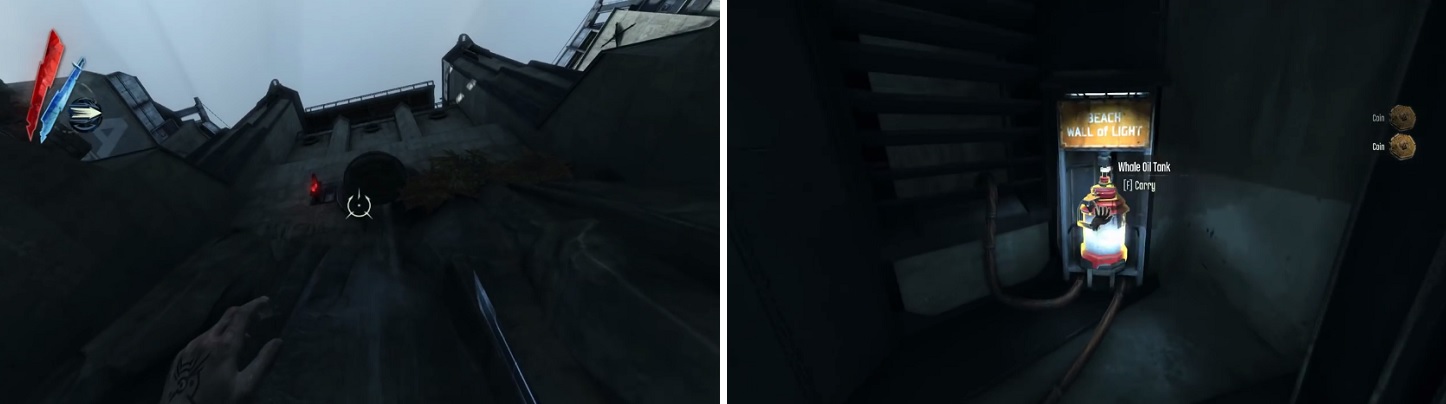
Blink up to this grate (left) to get inside to where you can disable the two Walls of Light by removing their whale oil tanks (right).
Optional: Collect the Rune
Once you are up, turn right and follow the path, shooting sleep bolts at anyone that gets in the way. When you reach the stairs leading down to the courtyard below, drop over the side and enter the door beneath them. Tranquilize the two guards inside and drop down into the lower area. Enter the circular tunnel, follow it through and drop down into the next room, pick up the Rune (1/1) from the floor. Return back outside and when it is safe to do so, blink up the stairs and return back to where we first climbed up to the wall.
Follow the wall to the right and when you reach the next structure blink up on top. Move to the side overlooking the courtyard and blink to the nearby balcony to the left. From the balcony, face the wall it is attached to and double jump and blink up on top.
Now that we are up top, look towards the lighthouse. See the stairs leading up from our platform? To the left of these, you will see a lower platform. Blink to this and continue to the far end to avoid the electric col. When there are no guards in sight, blink further up the next set of stairs and across to the lighthouse itself. There is a lift here we need to activate.
To get into the lift however, we’ll need to pickpocket the key from one of the nearby guards (alternatively we can climb the nearby stairs until we find the top of the lift and drop down the open hatch to get inside). After grabbing the key, knock the guard carrying it out so he doesn’t spot you and return to the lift head inside and hit the switch to climb to the next area.
Burrows Lighthouse
When the lift reaches the top, exit it and then blink up on top of it. Use the conveniently placed metal girders in the shaft here to climb to the very top of the tower. Once on top blink across to the slanted roof next door. Climb up onto the vent and then double jump and blink up to the glass platform above. Make your way across the glass roof to the far side of the structure from the lift we came up from and drop down to the platform below. Enter the door here.
Approach the desk in front and hop up on top. You will be able to see the Loyalists below. Havelock will stay in the same location, so blink down and choke him out. Grab the key off the table to his left and then head over and open the door to the right of the fireplace to find Emily and complete the game!


No Comments