
There are six crafting lives in Fantasy Life i: The Girl Who Steals Time, and they all share a similar minigame, the fundamentals of which are explained on the page Crafting Minigame Explained. The aforementioned (and linked) page will help you get your grasp of the basics, but quick reflexes and good performance at the minigame will only get you so far - this page will describe in more detail how the crafting minigame works and how to ensure you craft perfect quality endgame items every time!
Page Breakdown
| Quick Search |
|---|
| Crafting Minigame |
| Crafting Outcome and Crafting Ability |
| Boosting Your Crafting Ability Scores |
| Life Tool Ranks and Crafting Ability |
| Tool Skills and Crafting Outcomes |
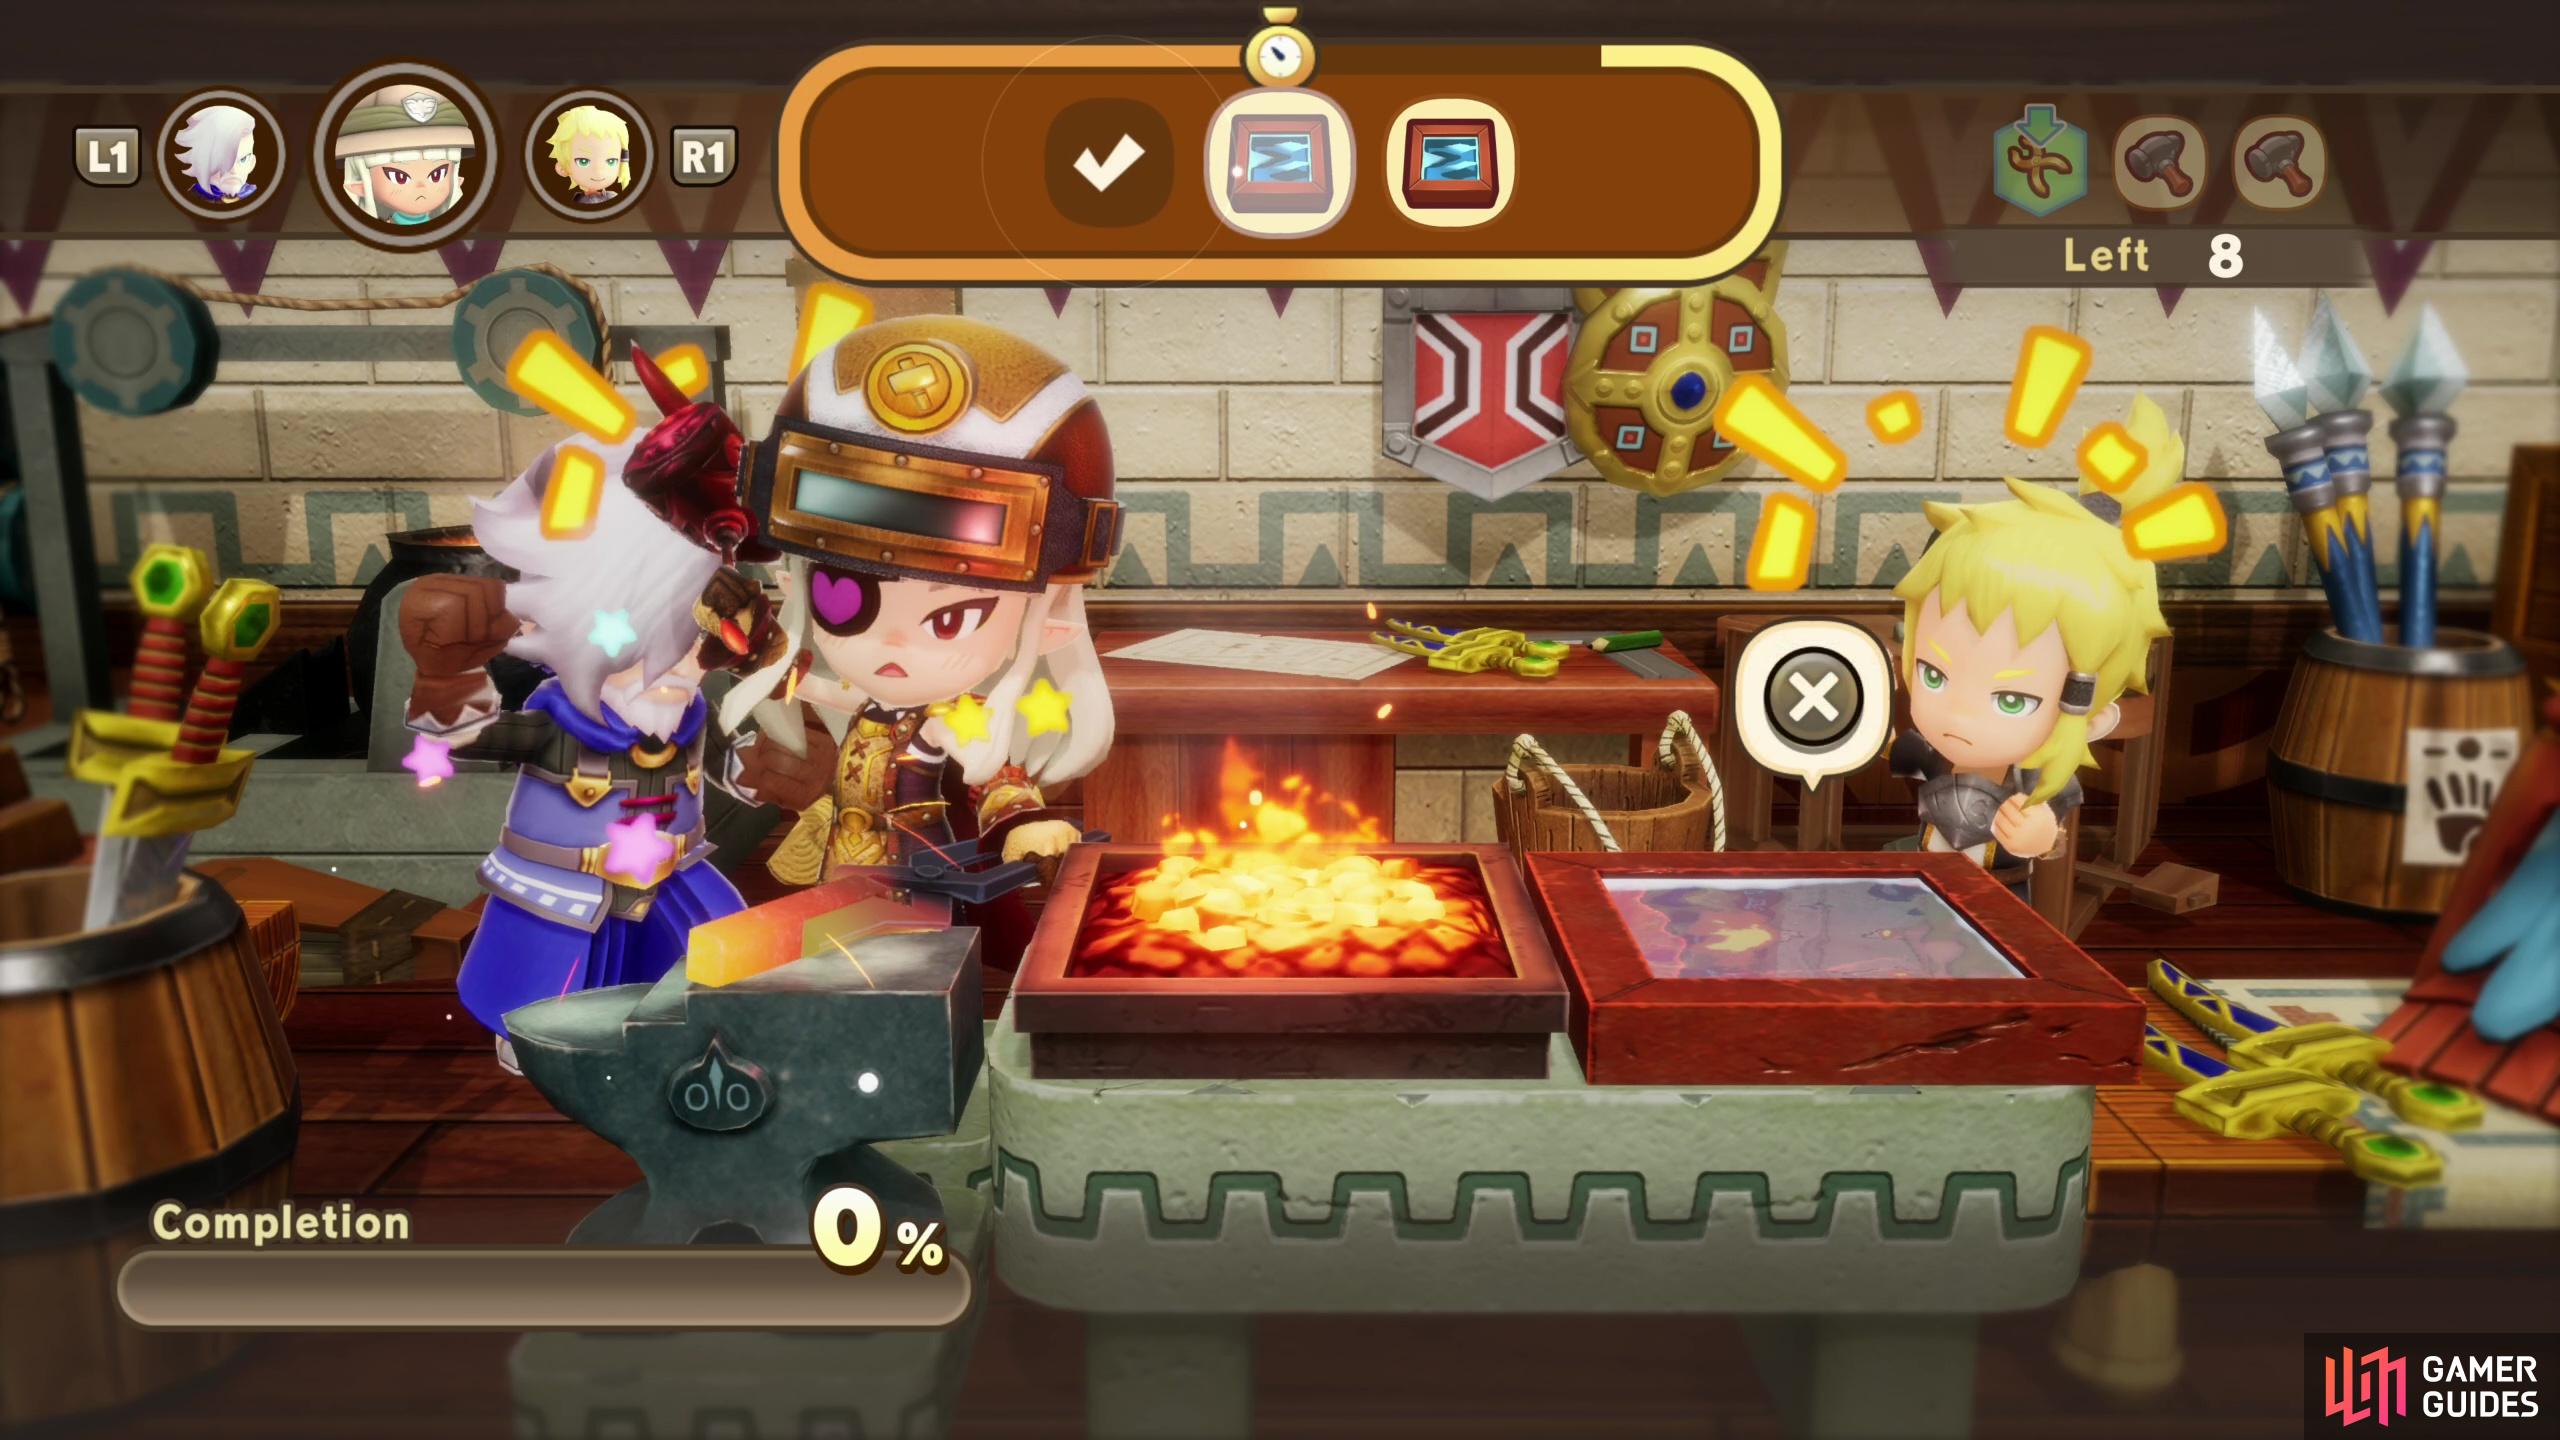
(1 of 3) During the crafting minigame - which is shared by all crafting Lifes - you will have to move between stations and put in certain inputs.
Crafting Minigame
When you craft you’ll play a minigame - it doesn’t matter if it’s cooking, blacksmithing, carpentry, tailoring, alchemy of artistry, the minigame is the same either way. Your protagonist will be stationed in the center of the screen with three tools in front of you, and at the top of the screen a random number of icons will appear, usually 2-6 at a time. Not only do you have to mov between each tool station and use the one corresponding to the icon, but sometimes you have to perform special actions like rotating the  stick, mashing a button or holding a button down. These inputs are also timed, but the more actions you have to complete and the more complicated they are, the more time you get. A two icon objective with no special conditions will give you very little time while a five icon objective where you have to rotate, mash or hold a button will give you more. This is generally weighted in favor of longer, more complicated sequences, which can make the shorter objectives harder to complete quickly.
The sooner you complete each objective, the better your result will be - you’ll get an “Excellent”, “Great” or “Good” rating if you complete the objective at all, and doing so will increase the completion of whatever you’re crafting, as indicated by a meter on the bottom left of the screen. To help you plan out your next inputs, you will also get a preview of the next objective on the top right of the screen. Finally, it’s worth noting that you only get so many objectives during a crafting session - if you can’t finish the project before all your objectives are complete, you’ll fail to craft the item in quest, losing some of the materials you spent.
All six crafting jobs share this minigame, the only real differences are the Life Tools you’ll be equipped with, the exact icons and their corresponding minigame stations, and generally only the Alchemist and Cook minigames require you to rotate the . Once you get the hang of it for one Life, the others should be easy, once you get used to the icons… again, this is all explained in greater detail on the Crafting Minigame Explained page… but there’s a dark secret the game hides from you at the beginning: your performance at this minigame is of marginal importance.
Crafting Outcome and Crafting Ability
Okay, that last sentence might have been somewhat hyperbolic - if you fail the crafting mingame you won’t actually create the item(s) you set out to create. That’s pretty important inasmuch as you actually have to do SOMETHING to actually craft an item, and to be fair your performance at the minigame can influence the resulting quality of the item you’re trying to craft - if you get nothing but “Excellent” results you may get a “Perfect” grade at the end as opposed to a “Great Work” or lower, which affects the overall quality or quantity of the item(s) crafted. That said, there’s one thing that overwhelming determines the outcome of this crafting minigame more than what buttons you press during said minigame, and that’s your Crafting Ability.
Your Crafting Ability is basically your “attack” value for Crafting Lifes. Equip a hammer as a Blacksmith and your Crafting Ability is what increases, same for needles and the Tailor Life, saws and the Woodcutter Life, and so on. You can further increase your Crafting Ability by purchasing certain skills and by assigning Buddies to help you during crafting. The first Buddy assigned will add half their Crafting Ability score to your own while the second Buddy will only add a quarter. Your Crafting Ability determines just about everything when it comes to the crafting minigame, including:
- How much completion you get from completing an objective.
- The overall results of the minigame.
Each item you craft has its own recommended Crafting Ability score, and this isn’t a hard limit - you can craft something above your own score, but you may not get enough completion from each objective to create said item even if you get an “excellent” result on each objective. Furthermore, the outcome of the minigame has a ceiling depending on your Crafting Ability in relation to the item’s recommended Crafting Ability. If your Crafting Ability is around twice the recommended, getting a “Perfect” result becomes somewhat easy provided you get mostly “Excellent” and “Great” grades during the minigame. Lower than that, however, and even an “Excellent” performance might keep you from getting a “Perfect” result, through no fault of your own. If you want to craft faster and get the best results, there’s just no substitute for a high Crafting Ability score.
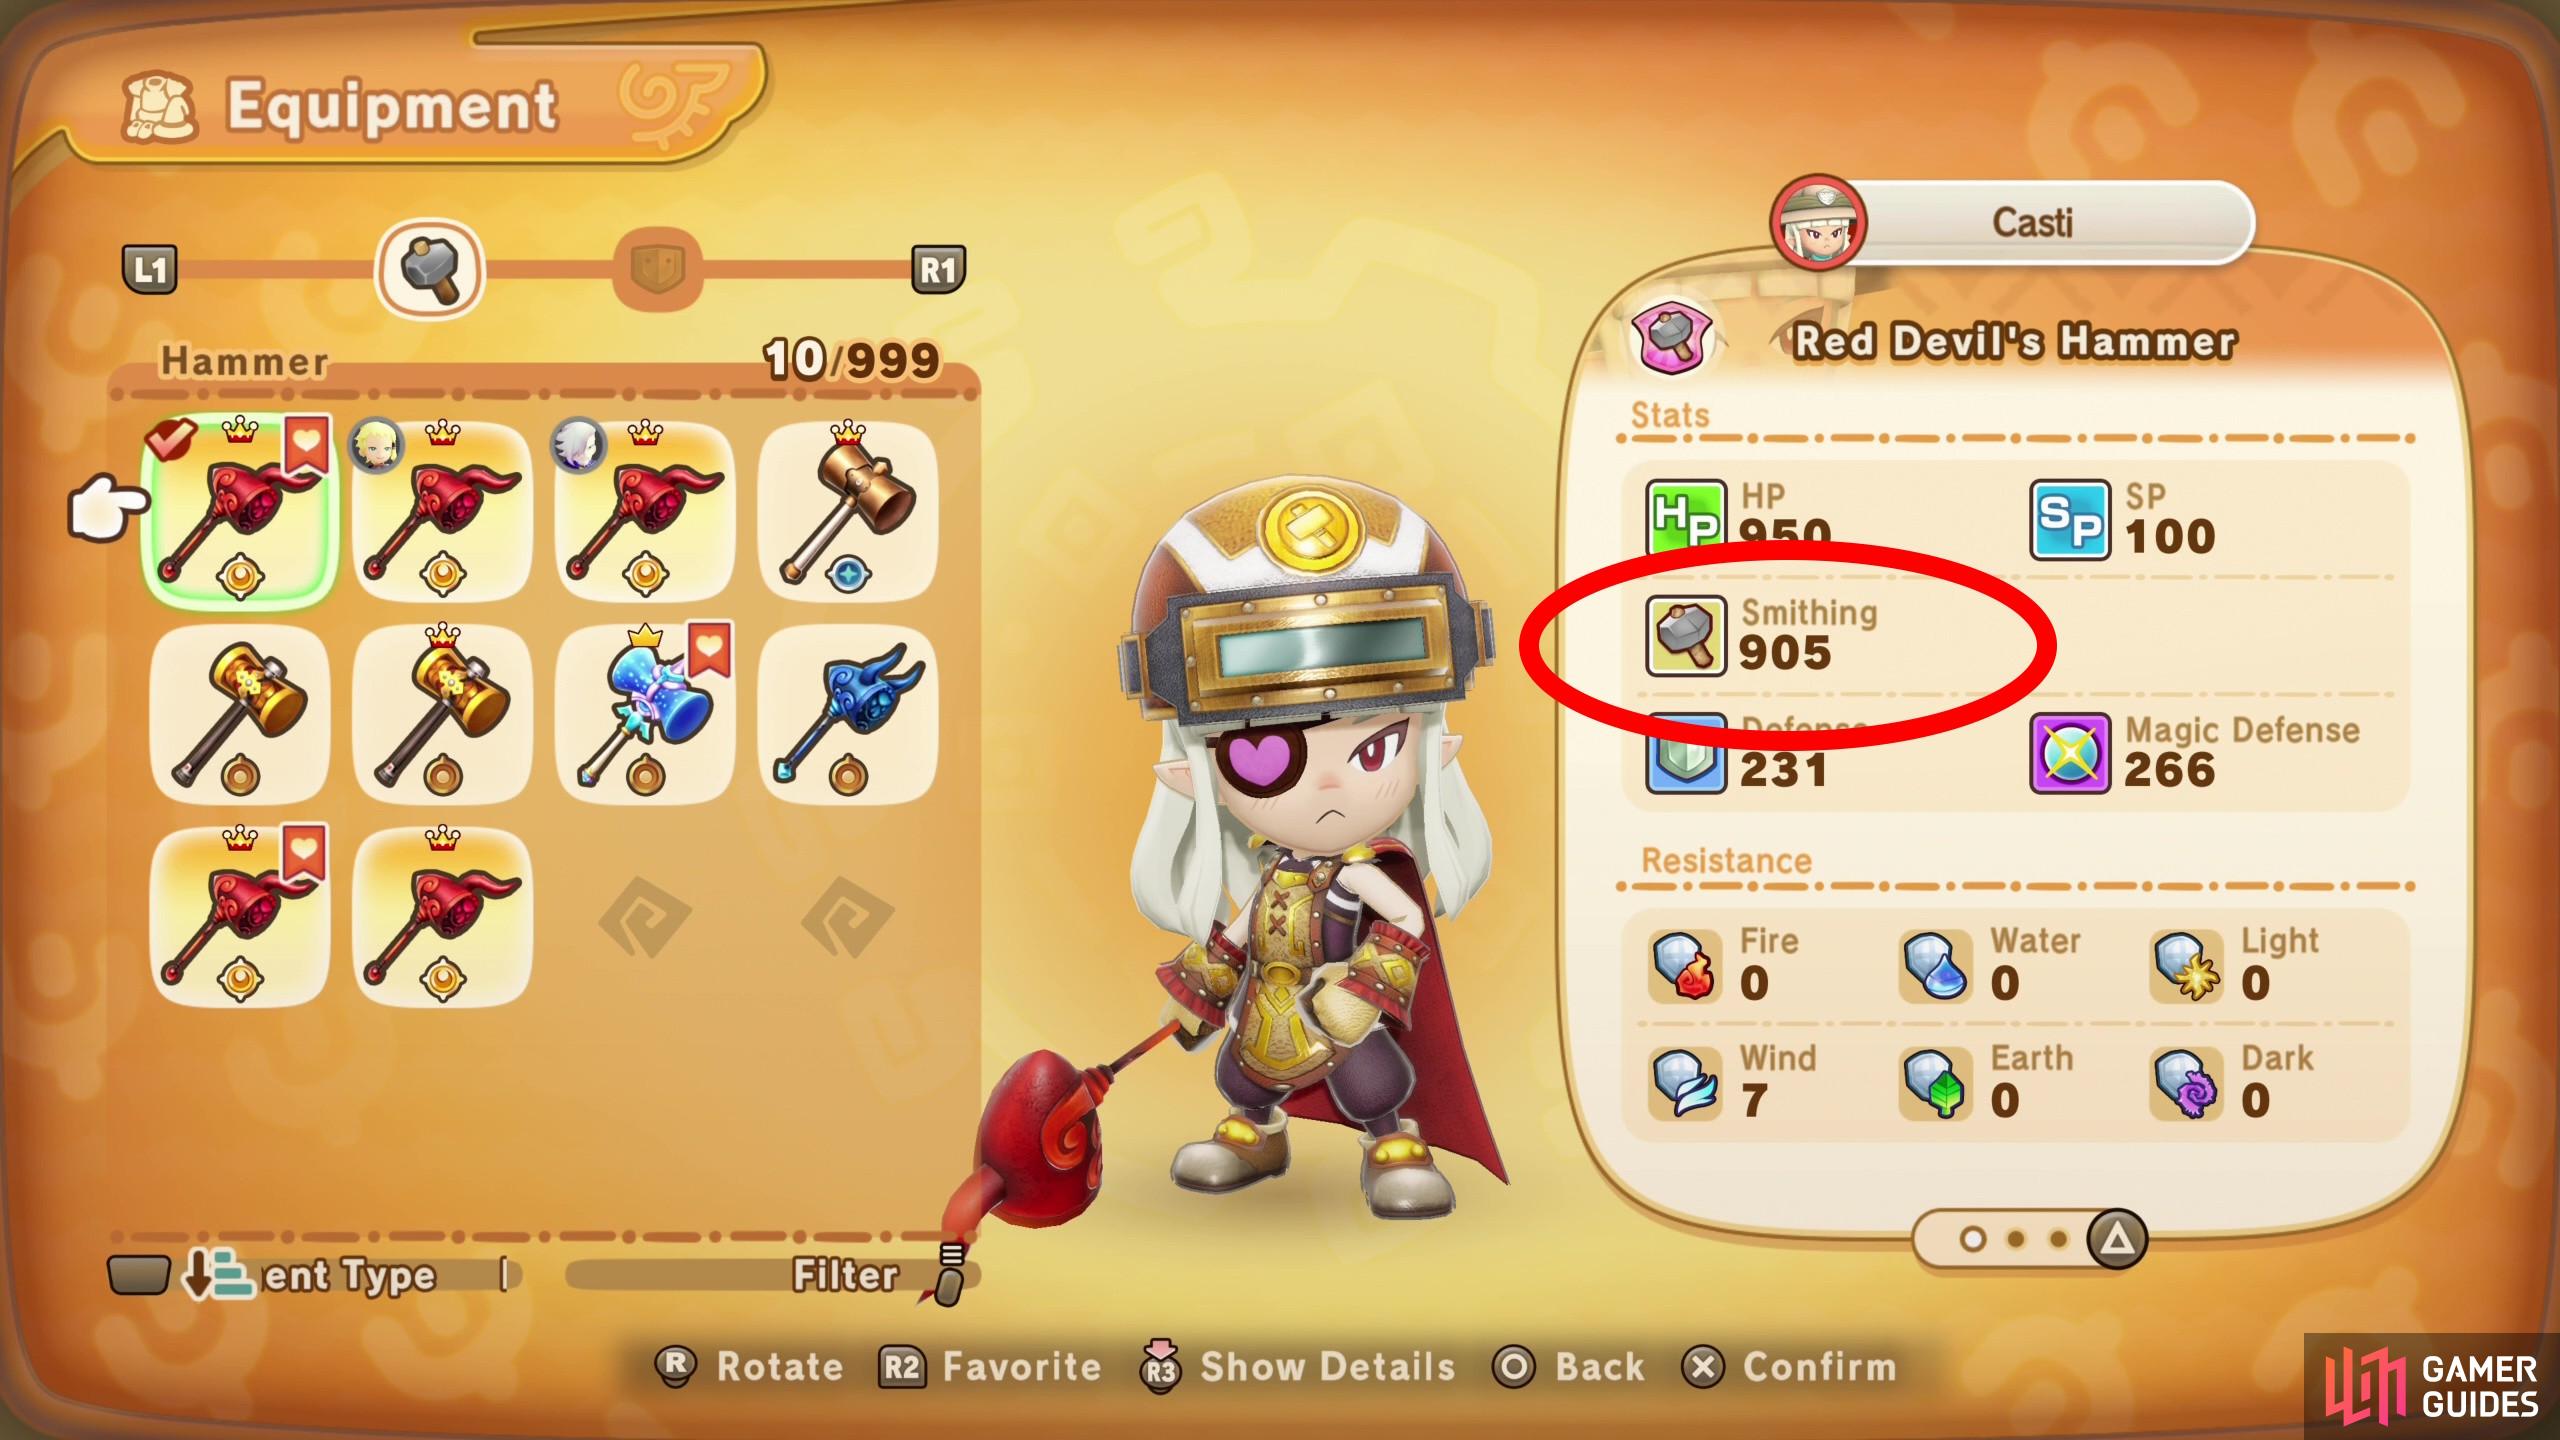
(1 of 5) Your Crafting Ability score determines quite a bit about how your crafting will turn out, minigame performance being a decidedly secondary factor.
Boosting Your Crafting Ability Scores
As mentioned before, each crafting Life’s Life Tool boosts their Crafting Ability, and like proper weapons, higher tier Life Tools boost your Crafting Ability even more. A Bronze Hammer is better than a Gold Hammer (mostly, most of the time…), for example - video game logic. Most of your Crafting Ability will come from what Life Tool you have equipped, which is exacerbated even more when you consider that your Buddies also give a substantial boost to your effective Crafting Ability and their own Crafting Ability will in turn be largely determined by what Life Tool they have equipped! All this to say, your Life Tool is super important and you’ve no choice but to advance the story, reach new areas, get access to new materials, advance your Life Rank and generally climb the ladder to get access to better Life Tools to increase your Crafting Ability.
There is something of a cyclical quality to this in that you need better Life Tools to boost your Crafting Ability and you need a higher Crafting Ability score to create better Life Tools, but early in the game, progression is what matters - you need to rescue Strangelings to get crafting Buddies and you need to keep pushing your Life Rank to get access to new recipes and advance the main questline to access new materials.
(1 of 3) Don’t always be obsessed with “upgrading” to equipment made of new materials - rank matters, as well!
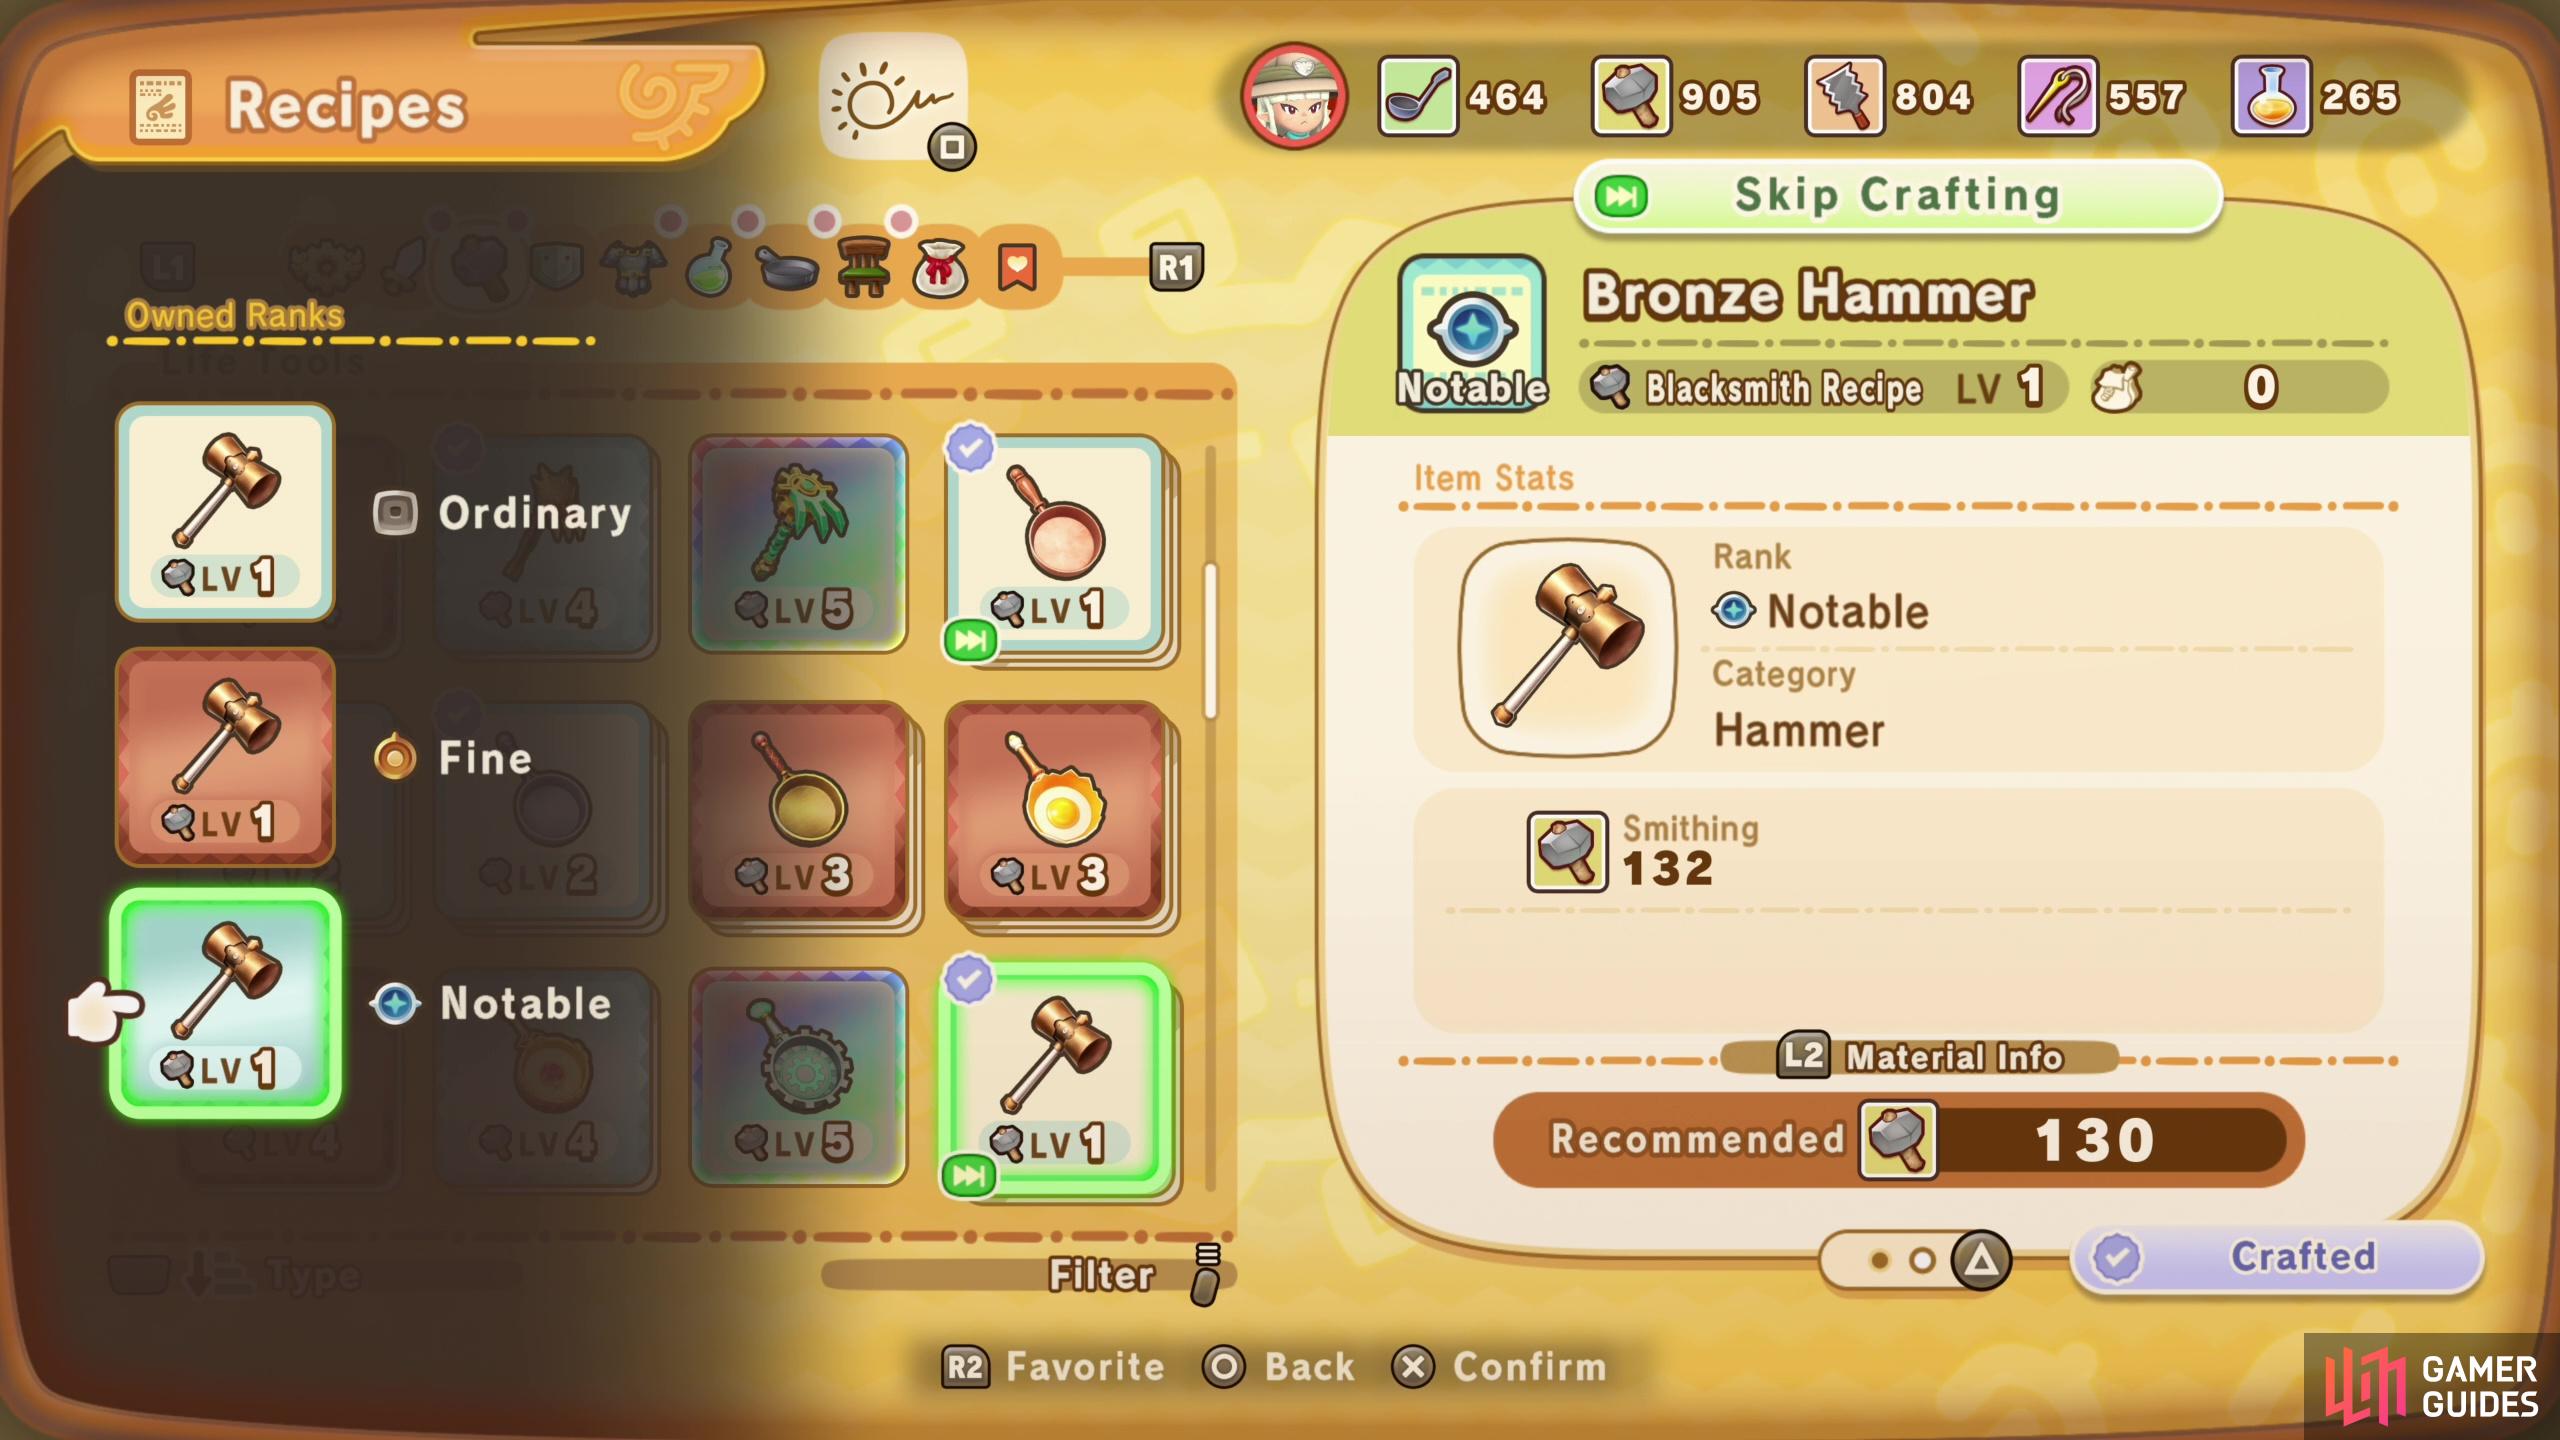
Life Tool Ranks and Crafting Ability
One mid-game trick that’s worth keeping in mind is that there are actually two different ways to get better Life Tools. As mentioned earlier, you could wait to get a Silver Hammer to replace your Bronze Hammer, but when you go to craft a Life Tool you’ll also get three quality ranks you can shoot for: Ordinary, Fine and Notable (higher-end Life Tools may have even more potent ranks you can craft). Attempting to craft a Silver Hammer will give you a Life Tool that has 151 Smithing (Crafting Ability score) but recommends a Smithing score of 260. Meanwhile the rank 3 (Notable) Bronze Hammer has a respectable Smithing score of 132 and its recommended Smithing score is only 130. If you can create a “Perfect” quality Bronze Hammer of Notable rank, it’ll almost certainly exceed a Silver Hammer of Ordinary rank, and if you’ve the materials and Smithing score to craft a higher-rank but lower-tier Life Tool, you may end up with a significantly better tool.
Of course, the end goal is to create high-rank and high-tier Life Tools, but you’ll need to climb the ladder to get there - don’t neglect rank when determining what to craft next and keep your own Crafting Ability score in mind as it relates to the recommended score of the item you’re crafting. A Bronze Life Tool that you craft well and get a good grade on will probably give you more Crafting Ability than a Silver or Gold Life Tool you barely manage to craft. That “Perfect” result is, as it turns out, super important!
Tool Skills and Crafting Outcomes
Your Crafting Ability score does much to determine the outcome of what you’re crafting, and better crafting results means more or better creations. Again, because it’s important, getting a “Perfect” result gives some pretty potent stat-boosts to crafted Life Tools, but there’s yet another factor involved: Equipment Skills.
When created, equipment can have certain skills on them - boosting your Crafting Ability stat, charging your Special Skill faster, giving you more time on the crafting minigame, and making it easier to craft certain categories of item are all instances of Equipment Skills that can appear on Life Tools. The one that’s really interesting when it comes to crafting higher-quality gear, however, are the “Tool Crafter” skills. Hammers can have the “Metal Tool Crafter” skill and saws can have the “Wooden Tool Crafter” skill, which “improve ability to craft Metal/Wooden Life Tools”. What this doesn’t explicitly say is that it drastically improves the crafting outcomes when creating Life Tools, making it much, much easier to get a “Perfect” result even if your Crafting Ability score is only a bit higher than the item’s recommended Crafting Ability. This is frankly essential to crafting potent end-game items to the point where a midgame hammer with two instances of “Metal Tool Crafter” is going to give you better crafting results than another hammer that has 100+ more points of Crafting Ability (Smithing).
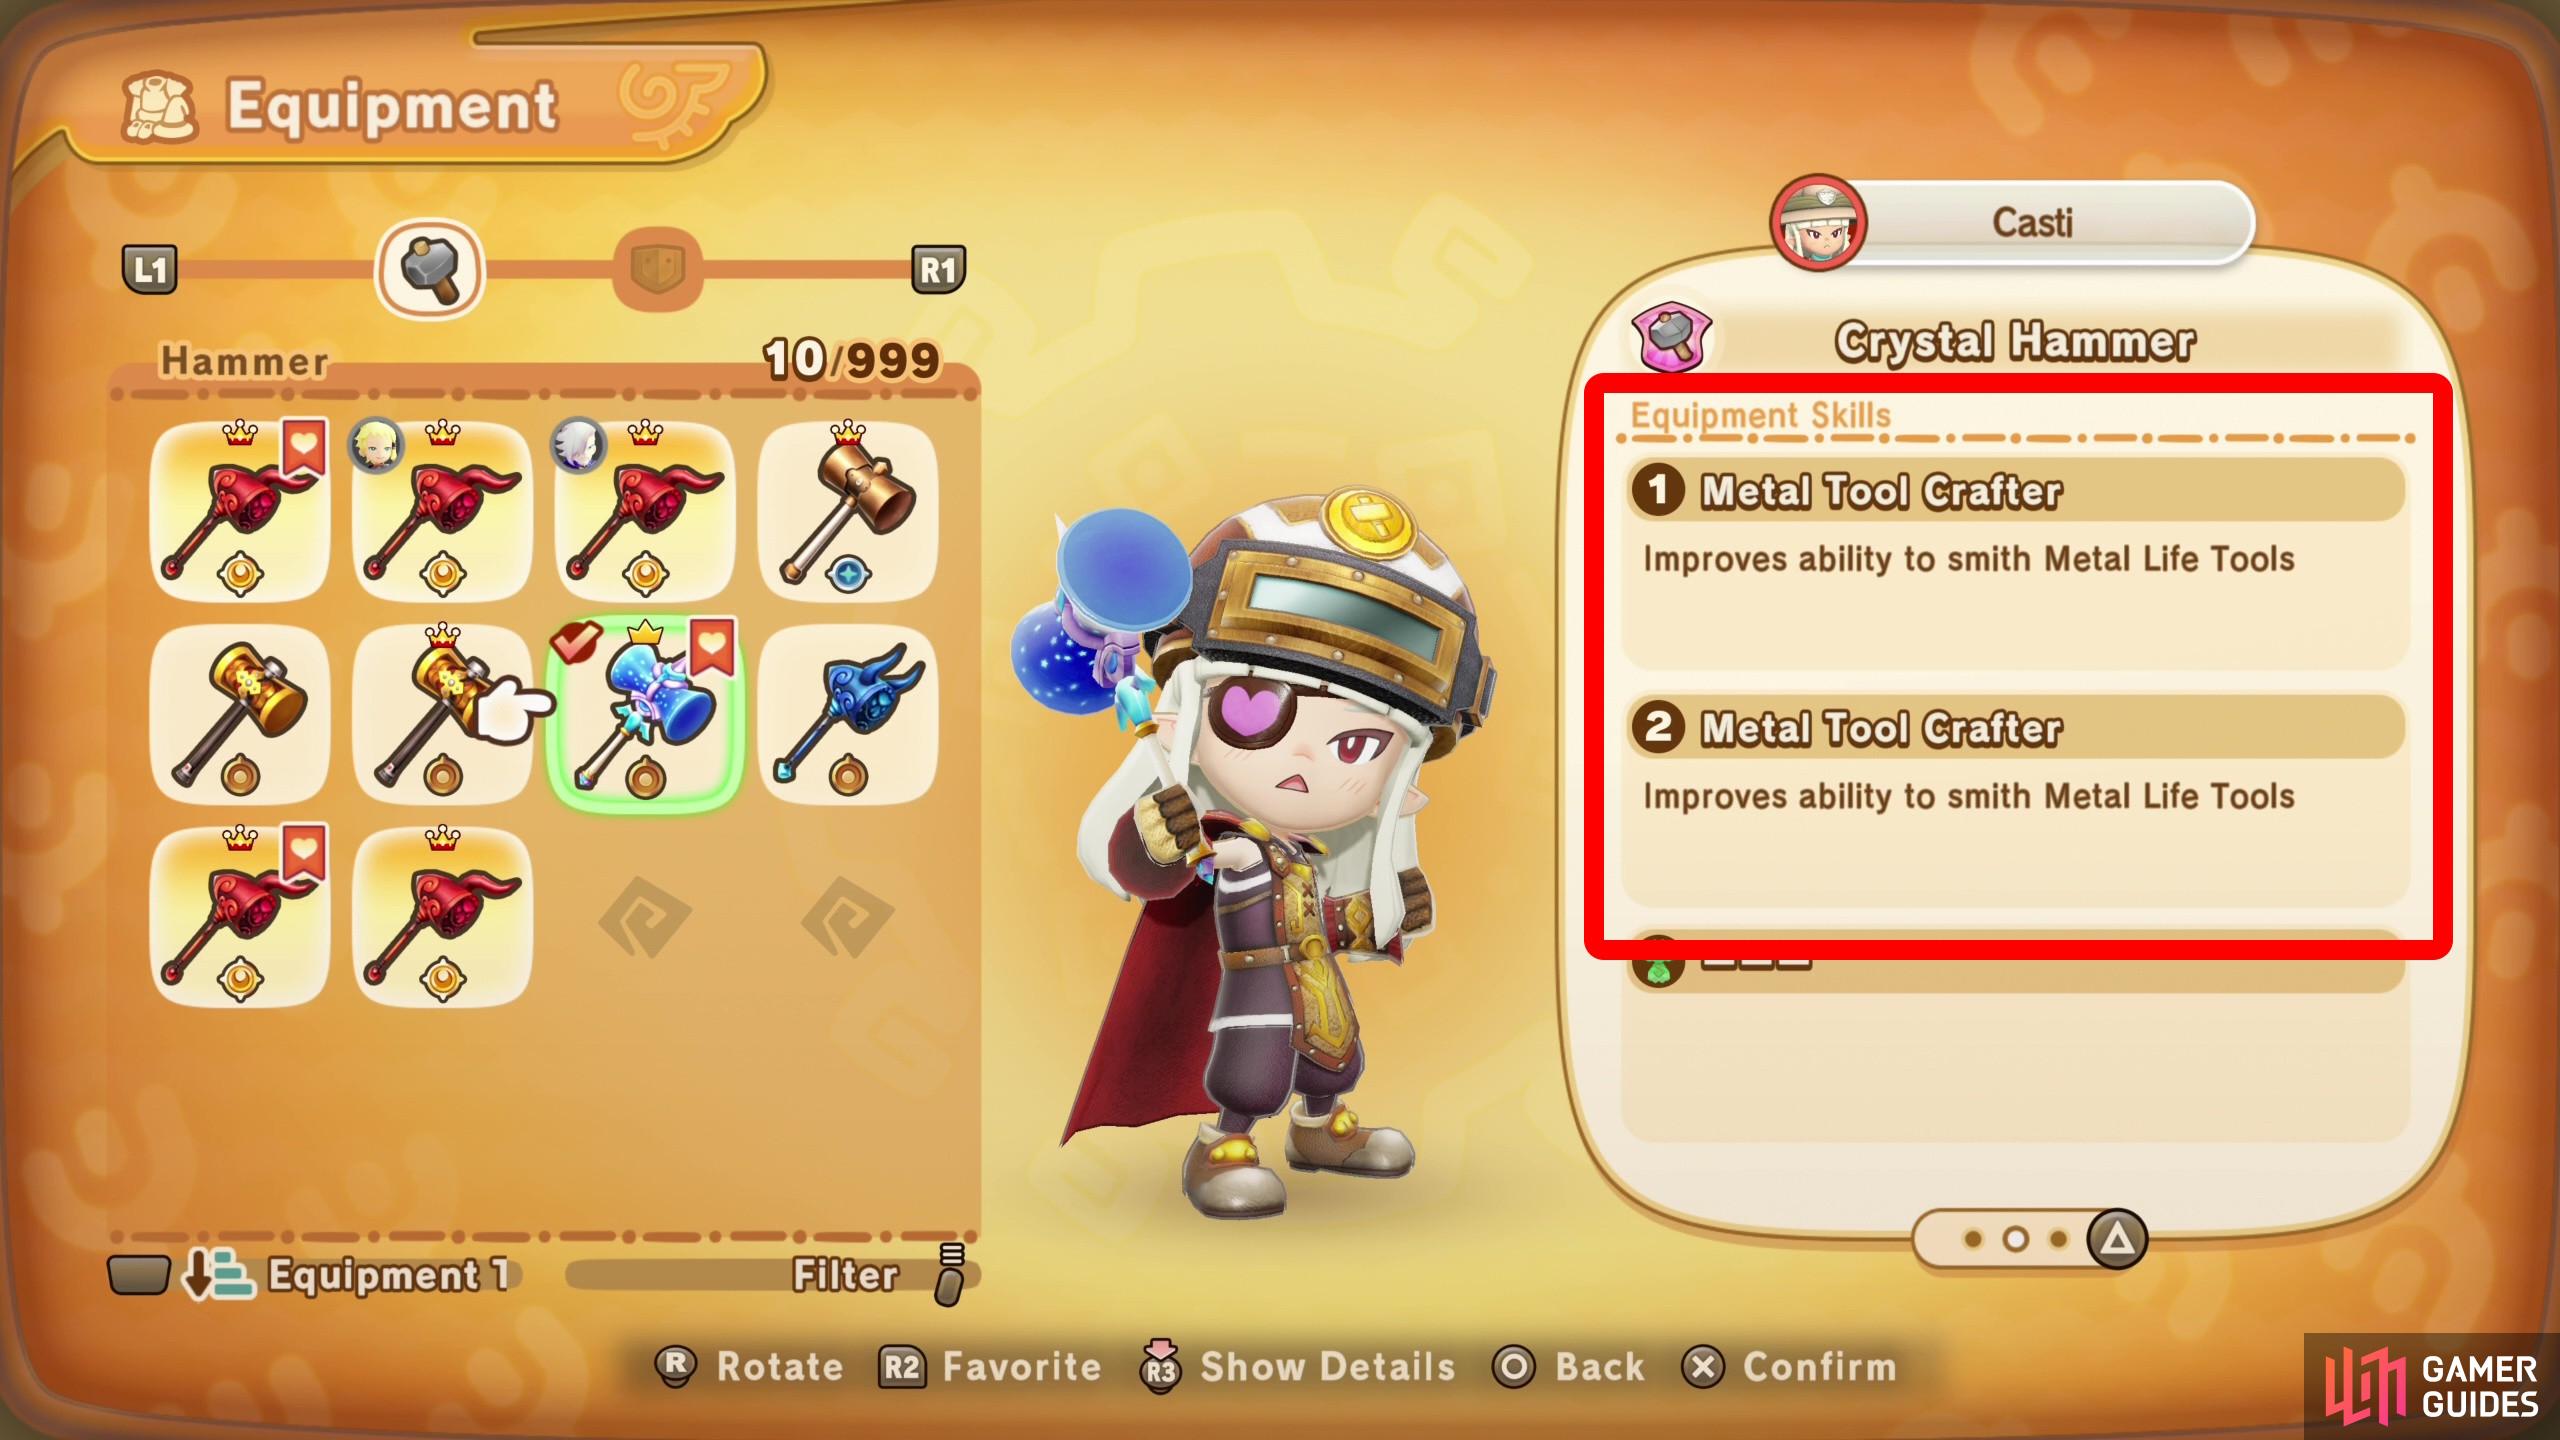
(1 of 3) Shoot for hammers and saws with the “Tool Crafter” skill to boost the quality of Life Tools you craft,
Now that you know how all these components work, let’s put it together: Early on there’s not much you can do but advance normally, craft what’s necessary to go from Novice, to Fledgling to Apprentice and Adept. As you eye Master rank, things get interesting - it’s this time you should find the best Life Tool you can craft that 1) has readily available materials and 2) has a recommended Crafting Ability around half of your own. Craft it until you get a specimen with at least one of the “Tool Crafter” skills, then use this Life Tool to craft progressively superior Life Tools. You may go from a Notable Bronze Hammer to a Notable Silver Hammer to a Fine Crystal Hammer before eventually ending up with a Supreme Red Devil’s Hammer, from which you can make attempts to craft just about anything in the game, including your endgame Life Tool. It should be noted that we’re looking exclusively for “Perfect” results here - if you can’t get a “Perfect” result no matter how well you perform at the crafting minigame, it’s because your Life Tool and/or Crafting Ability aren’t up to snuff, and further attempts won’t likely change this. You’ll just have to level up your Crafting Ability or try to create a better Crafting Tool.
Once you’re creating “Perfect” Life Tools at will, keep a lookout for high-tier Life Tools that boost your ability to craft weapons and armor and keep those handy. Favorite them in your inventory so you don’t accidentally sell them! You need different tools for different jobs, and with these high-end Life Tools with the correct Equipment Skills on them you can create equally potent weapons and armor for you and your companions!
No Comments