
You’ll be back at the Odyssey and the weather will be beautiful, with a large portion of New Donk City being open to you now. Remember that painting behind the Odyssey that was mentioned at the beginning of this kingdom? Well, it’s not blank anymore, so use it to travel to the Wooded Kingdom (if Lake was chosen first; otherwise, it will send you to the Lake Kingdom). Grab the Power Moon there and return to the Metro Kingdom (Secret Path to the Steam Gardens!) . Before diving into the heart of New Donk City, look for the secret girder tunnel right by the Shock Pylon, where you’ll find another Power Moon (Secret Girder Tunnel!) .
Jump Rope Hijinx
Take the Spark Pylon down to the main area and touch the checkpoint flag. Metro Kingdom is one of the more annoying kingdoms, simply because it is quite large and there is a lot of verticality and hidden areas, resulting from all of the buildings. One of the first things you will see is two people with a jump rope in the grassy area, with some kind of board next to them. The jump rope challenge is one of a few in the game that has online leaderboards, which lets you compete for the top spot with both the world and your friends list.
As for the actual jump rope, there are two moons attached to this little activity and it can prove troublesome to some people. To start, simply hop in and begin jumping, which will start a counter at the bottom right of the screen. Your two goals are getting to 30 and 100, but the catch is that after every five jumps, the rhythm will get faster, with it reaching its peak at 50 jumps. The first thing you should do is practice a few times to get the hang of jumping, as it gets faster, you will want to start lightly tapping the jump button.
It appears one of the simplest ways to continue the rally is to listen to the one woman, who will constantly be shouting “Hey” before the rope touches the ground on every turn. This is a good way of doing things in the beginning, but the fast pace might be a little much to keep up with at some point. There are two surefire tips to get better at this, the first of which is to establish a rhythm. Without a good rhythm, you’re going to have trouble getting to 100 consecutive jumps. The other tip is that the longer you hold the B button, the higher Mario’s jump will be, thus tapping the B button will make Mario do shorter hops. Get to both 30 and 100 to receive two Power Moons, (Jump-Rope Hero) and (Jump-Rope Genius) .
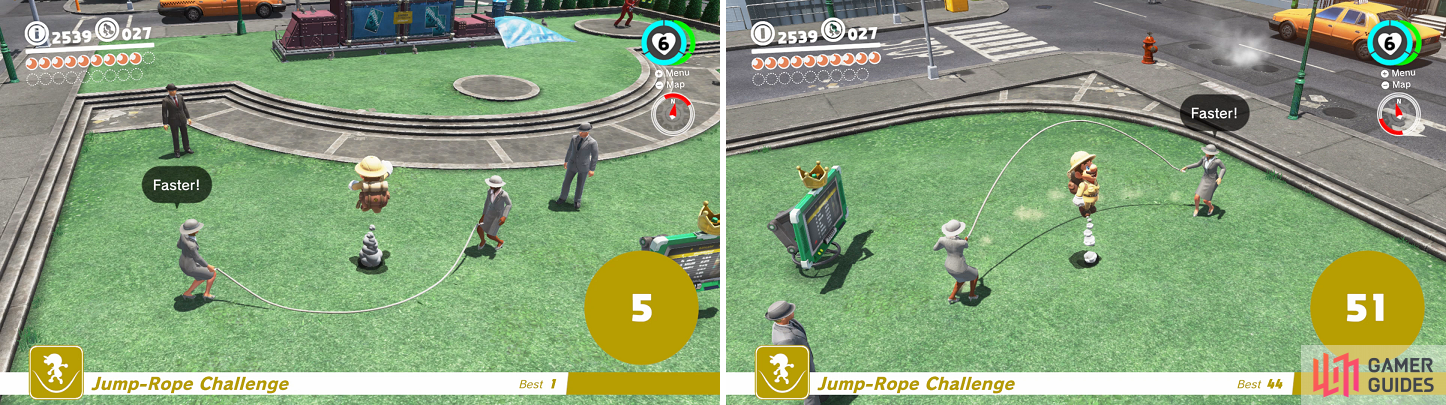
The pace will quicken after every five jumps (left) and you’ll have to adjust the height of your jumps once it reaches the maximum speed at 50 jumps (right).
Main Street Mayhem
Return to the Main Street Entrance flag and go north until you spot a man controlling a remote-controlled car to your west. Capture the man and you’ll be controlling the car now. The left stick accelerates the car (up and down), while the right stick will steer it (left and right). Navigate the little course and grab the Power Moon under the cage at the end (Remotely Captured Car) . Continue north on the same street as before and you’ll run into a taxi with a familiar thing on its roof, meaning you can capture it. Do that and hold down the left stick in any direction to be brought to a new area.
It seems this new area has the old weather and some Sherms will be present straight ahead. Capture one of them and shoot the destructible box holding up a girder, which will cause it to fall, revealing a Moon Shard that is connected. Collect it and use the stairs on the one side to get into the next area. There are a lot of taxis in this section and only one is hiding a shard; it’s located opposite of where you entered and in a corner. If you don’t have a Sherm anymore, head up the stairs to find one perched on a ledge, where there is another shard next to it.
Collect that one and the other shard hidden within the taxi, then look next to the one tank mentioned previously (next to the second shard) to spot another girder behind held up by a metal box. Pay no mind to the glowing spot on the ground up here, as it’s just coins. Keep ascending, knocking down another girder, until you get to some destructible boxes near the end, which is hiding the fourth shard. While you’re up here, find the spot with the Sherm that was on a small ledge, with the second shard. You should be able to faintly see some more destructible objects, one of which will be glowing, so shoot them to make a Power Moon appear.
To reach that moon, you can use your hat to reveal some hidden blocks, which will form a bridge to it (Sharpshooting Under Siege) . For the final shard, it’s a little hidden and will require you to shoot it, as it’s out of reach. Drop down to the blue tarp below you from the moon you just gathered and move in the opposite direction from the taxi you can see. Face away from the taxi and don’t drop to the ground below, then look up and to the right to see the shard in an obscure location under the girder. Shoot it to collect it, which will make the Power Moon spawn on the blue tarp (Moon Shards Under Siege) . Use the taxi to return to the main area.
Seeds in the City
In the little park area with the jumping rope NPCs, you will find Talkatoo perched on a bench. Near him are three seeds laying on the ground, which means you will have to locate three pots to plant them. It’s best to get them out of the way now, as you will have to give them time to grow into the lovely Power Moons they cough up. The first planter is easy to find, since it’s in the same area. Look for the guitarist playing some music to the north of the seeds and you’ll spot the planter in the corner near him.
The second planter can be found on a rooftop of a building south of the Crazy Cap store. To make it easier to get on top with the seed, jump on the taxi on the main street to get a nice bounce up to the stairs on the side of the building. From there, it’s simple to reach the rooftop, where you’ll find not only the planter, but three purple coins (30) . For the final one, open up your map and look for the trophy icon on the western side, which is the slots building.
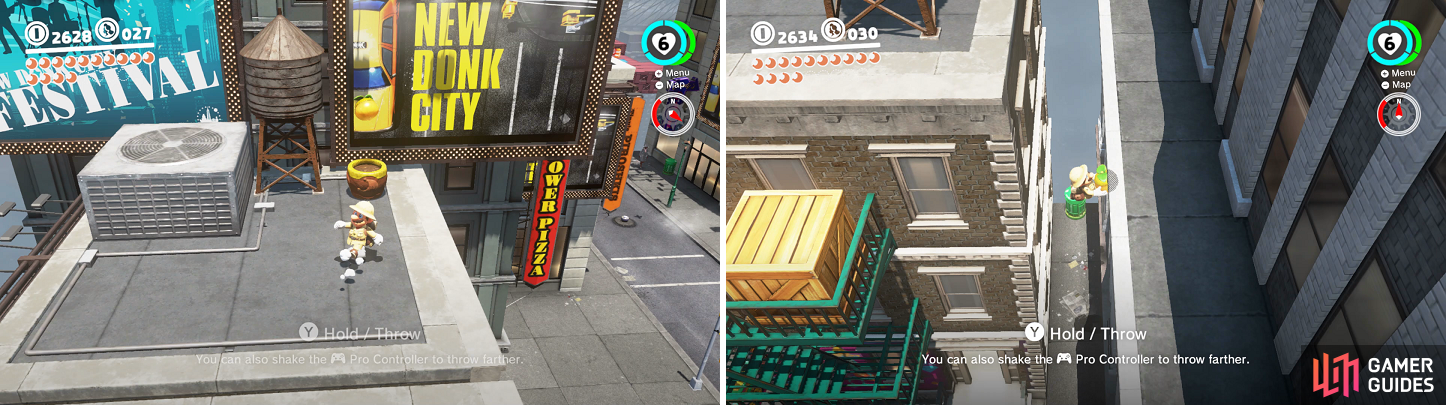
The locations of the two seed planters on top of the rooftops in New Donk City.
This building isn’t hard to find, but getting on top of it will be a little tricky, but thankfully, it’s not too bad if you use your brain a bit. The alley here is quite narrow, so you can wall jump to the top with the seed in your hand. Note that the planter isn’t actually on the roof of the slots minigame, but rather the building next to it. Plant the seed, then head inside to play some slots. It still takes 10 coins to play, but unlike the previous one in the Sand Kingdom, you have four options to match. You can still use the prior trick, but it will only stop three of them, so you’ll still need to hit the fourth individually. Line up all moons to receive a Power Moon (Metro Kingdom Slots) .
The A-maze-ing Sewers
Return to the Crazy Cap store and look across the street to find an open door by the RC car course. Enter it to find an actual RC car course, complete with a leaderboard. The same controls apply here and you’ll need to capture the gentleman standing by the podium to begin. You will need to complete three laps on the track and finish in under 30 seconds to get the moon here. You should never let go of the acceleration, as speed is important and the car doesn’t move too quickly that control is compromised. The other important tip is to not hit the walls, which is easier said than done, as the controls take a while to get used to. Keep practicing and you’ll have the Power Moon in no time (RC Car Pro!) .
Exit the track area and venture west a little bit, on the street, to spot a manhole cover with the telltale sign that you can capture it. Do such a thing and move it out of the way, hopping with reckless abandon into the sewers below - only it’s not really the sewers, but a maze with Moon Shards in it. First things first, jump on top of the maze and head to the opposite end to find a ledge with a hidden Power Moon (Outside the Rotating Maze) . While on top, look down to locate all five shards easily.
To move around in the maze, you can toss your hat at the yellow pieces, which will turn in that direction. You will want to be careful with the four-way ones, as you don’t want to get stuck (you won’t really get stuck), so make sure you toss your hat outside of the range of being moved with the walls. Gather all five shards, while trimming the Piranha Plants down to their roots, or at least the bothersome ones, and the Power Moon will spawn back near the entrance (Inside the Rotating Maze) .
Inspector Mario
Exit the “sewer” and head back to the purple coin shop, where you will want to purchase the Builder Helmet and Outfit (make sure to equip them). Return to the previous sewer entrance and look north along the nearby intersection to see a lone man sitting on a bench. Hop on the bench and Mario will sit down, which will prompt the man to hand over a Power Moon for your kindness (Bench Friends) . Continue north, all the way to the end, where you can talk to a man next to the entrance of the building with the “Banana Bagels” sign. If you’re wearing the Building outfit, then he will open the door for you, allowing you to enter.

“Sitting“ on the bench next to the lonely guy will reward you with a moon (left). Only an inspector can get into the building (right).
This sub-area will be filled with Spark Pylons, with Burrbos and Fuzzies populating it. The first obstacle is an H-shaped spark pylon with two Fuzzies going along the side pieces. Start on one side and cross through the middle to avoid the Fuzzies. The shorter pylon on the second platform just leads to a dumpster with some coins in it, while the longer one lets you go further. When you get to the building, use the pylon there, but release the capture when you’re on top of the building.
Doing this will allow you to drop to the adjacent building and break open the middle wooden crate to get a Power Moon (Off the Beaten Wire) . Drop down to the next area and you’ll be tasked with collecting five Moon Shards on a series of spark pylons, although you’ll need to dodge the four groups of Fuzzies while doing so. Try and make the one at the last node before going to the pipe your final one, just for easiness. It shouldn’t prove too troublesome to get them all without getting hit and once you do, grab the Power Moon on the final platform (Rewiring the Neighborhood) .
Swinging in the Sky
Return to the main area and you should see a checkpoint flag nearby, as well as a small building with an open door. Enter it to find a large crowd of people filing through an alley of some kind. There will be a switch on the wall near where you entered and using your hat on it will spawn a moon on the far side. Getting through the crowd can be a bit of a task, and the best way to do this before the timer runs out is by rolling (hold down ZL/ZR, then press the hat button). Nab the Power Moon before it disappears (Pushing Through the Crowd) , but don’t leave yet.
There is another Power Moon in this small area and you will need to utilize the awning hanging over the entrance the people are using. Jump on it to be sprung high into the air, where you will find a small platform. Land on this and hop on the next awning to spring up to a pole that you can swing on. From there, it’s just a matter of swinging from pole to pole to get to the platform with the Power Moon (High Over the Crowd) . Drop back down and use the pipe there to appear on the isolated island, where you will see a rocket. This rocket will bring you to another sub-area.
If you enjoy the swinging from poles, then this area is for you, as it’s entirely made of it. The only difference with these sets of poles is that some of them will be on tracks, so you might need to wait until they get into position. Once you get to the end of the first set, don’t go right just yet, as you should be able to spot another pole above you. Use the wall to your left to wall jump up, where there will be a platform with a Power Moon on it (Vaulting Up a High-Rise) .
The second set of poles will be a little trickier, as there will be four poles connected to a rotating girders. On the second set of four poles, you will see three purple coins in the middle of the girders; you can simply stop moving when you’re at the top, then press jump to just drop down and collect them (33) . Get to the end to find a Power Moon waiting for you (Hanging from a High-Rise) and a rocket to bring you back to New Donk City. Before you return to the proper city area through the pipe, don’t forget to collect the two purple coins by jumping from the top of the tree here (35) .
The Dinosaur Chase
Return to the entrance of the big building you entered earlier (the one that needed the outfit) and run east this time, going in between the buildings. At the end here, there will be a big stack of brown boxes. Knock them out of the way with your hat, then carefully get to the end of the nearby girder to find Captain Toad, who will hand over a Power Moon as always (How You Doin’, Captain Toad?) . Double back to where the boxes were located and head in the other direction, where you’ll find a spark pylon in the little dead end.
Hop onto the slightly taller building at the top and use the umbrellas to collect three purple coins in the air (38) . Get back on the other building and if you stay far enough away, you should see some pigeons gathering in a single spot. Approach this spot and you will feel your controller rumbling, which means you can unearth a Power Moon by ground pounding that spot (Left at the Cafe?) . If you look to your south, there will be a triangular-shaped building and on the rooftop is a musician (make a mental note for later). Forgo trying to get on top of this building right now, as there will be an open door at its base that you will be going in next.
There will be nothing but a lone motor scooter inside, so get on and start driving towards the screen. Once you get a little ways in, a T-Rex will appear and begin chasing you. Periodically, it will charge forward a bit and try to take a bite out of our friendly Italian plumber (well, former plumber). Simply move out of the way to dodge this lone attack. It should be said that this chase sequence is a bit hi-octane, so you don’t have much room to backtrack. That being said, the yellow markings on the ground will guide you to what you want to collect.
The first two markings will be right in the middle, then there will be one to the left and one more to the right, where there will be three purple coins (41) . Not long after that, you will find two wooden boxes in the middle that you can jump over, with three more purple coins right after them (44) . Keep driving forward and when you spot a big bunch of boxes on the right side, you will want to stick to the left. This is because there will be a bunch of boxes on the left and you’ll want to be on top of them, as a Power Moon will be two-stack high box (Big Jump: Escape!) . After that, ride to the end to grab another Power Moon (Motor Scooter: Escape!) , then exit to the south of that.
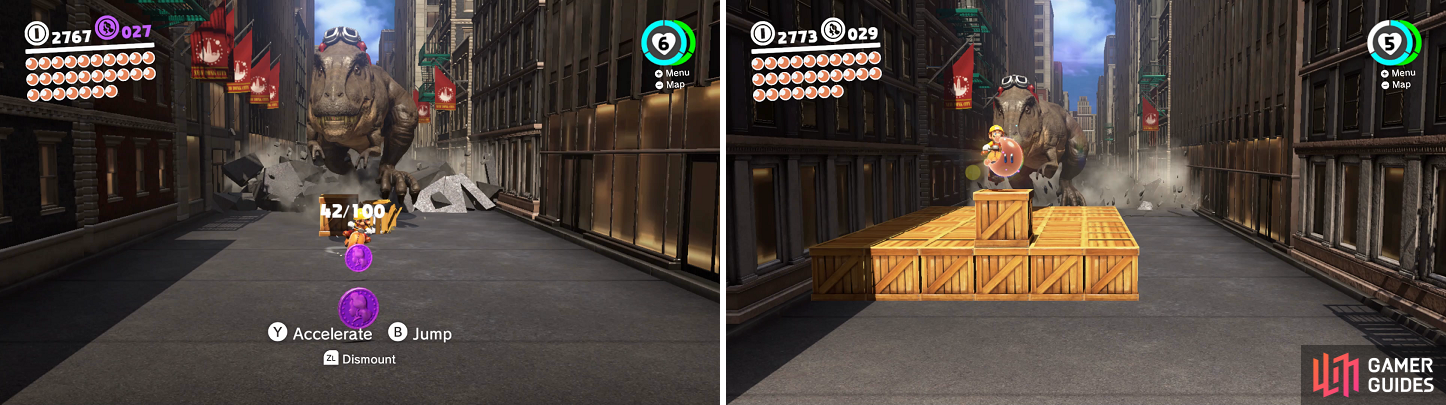
Since you’ll be moving towards the camera, you need to keep an eye out for purple coins (left), as well as the moon in the middle of the track (right).
Forming a Band
Pauline is close by, easily findable by the rainbow beam coming out of her head. Speak with her and she will task you with putting together a band for some upcoming festival she is planning. There are four musicians on the map, all highlighted with the same beam as Pauline, and you should be able to see three of them from your current location. To make things super easy, one of the musicians is literally next to where Pauline is standing. Talk to the drummer and he’ll hand over a Power Moon (Drummer on Board!) , and you’ll appear inside the auditorium afterwards.
Back outside, head east from the entrance to the auditorium, past the scaffolding and stairs, to spot a spark pylon in the corner. This will lead to the isolated platform nearby, which has a chunk of the Mechawiggler. Get on top of it and do a ground pound to make a moon appear (Hidden in the Scrap) . Once this is done, collect the two purple coins on top of the one tree (46) , then speak with the musician to get another Power Moon (Bassist on Board!) . Return to the little park area near the beginning of the Metro Kingdom, grab the moon from the seed you planted (City Garden: Plaza Planter) , then talk with the musician for another Power Moon (Guitarist on Board!) .
That leaves one more musician for the festival and if you remember, he was on the roof of the triangular building near the auditorium. Warp to the Outdoor Cafe flag and look for the parked taxi near it. There’s something that should be talked about real quick, though, which is a capture. You’ve probably noticed little orange poles with white rings on it. You can capture these and use them to fling yourself forward, up or whichever way, depending on the location of the pole. With that out of the way, jump on top of the taxi parked near the previously mentioned flag. Use the poles to get to the top of the building, stopping on the one ledge to grab three purple coins (49) .
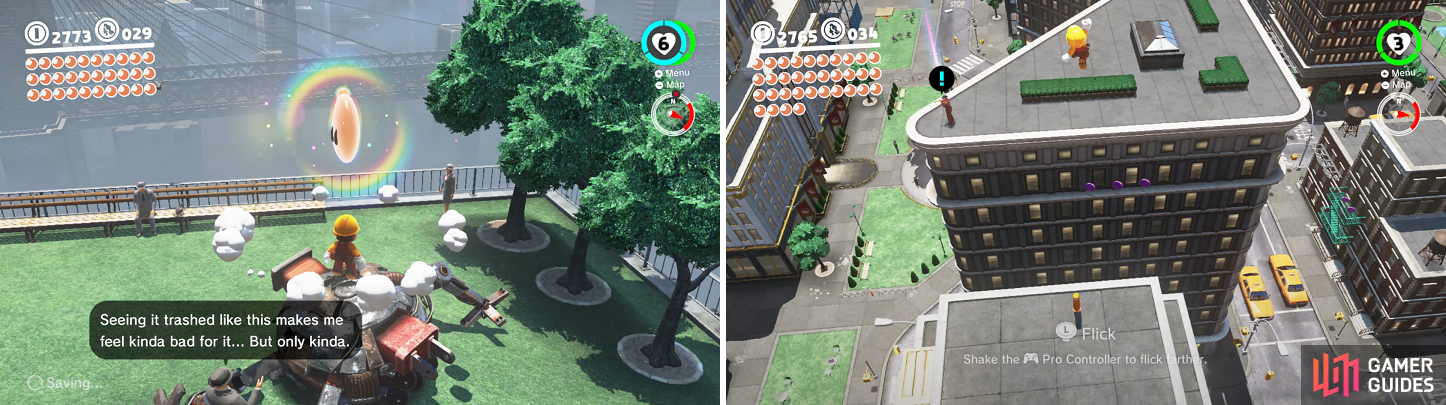
Ground pound the remains of the Mechwiggler to get a moon (left). You can fling yourself to the Trumpeter with a pole from a nearby building (right).
At the very top of the building, there will be another pole you can use to fling over to the building with the last musician. Before you speak with him, though, you can do two things on this building. As you probably saw prior to flinging over, there are three purple coins on a ledge just below the roof. You can do a small hop off the roof and toss your hat to gain that little bit of movement to get on the ledge and grab those purple coins (52) . On the ledge on the opposite side of the same building is some art, which depicts Poochie in the Lake Kingdom. Look and save a picture of it, then do a backflip, wall jump and do a dive to get back on the roof. Speak with the musician to get a Power Moon and finish up this portion of the walkthrough (Trumpeter on Board!) .
No Comments