
Sand Kingdom is a large place and there are a lot of Power Moons you can gather here. When you first arrive, though, the desert is a little bit colder than it should be, as evidenced by all of the ice around the whole kingdom. Despite the ice blocking off some of the Moons, you can get a large number of them right off the bat. The Sand Kingdom is also the first area that has 100 purple coins in total, so that should tell you how large it is. Start off by going towards the town, where you should see two purple coins on a small hill (2) . Grab the checkpoint flag, then get the three purple coins on top of the umbrella nearby (5) .
The umbrella will bounce you, where you can get on top of the roof near it to find six purple coins (11) . To the east of those are three more purple coins on a balcony of sorts (14) . On the eastern side of this little town will be three purple coins in a little alcove (17) . Head down the middle side of the town and look for a door to enter a minigame of sorts. The game is slots and it costs 10 yellow coins, with the ultimate prize being a Power Moon. You just need to toss your hat at each slot when the moon shows up, which is easy enough to do, as it will appear just after the heart. You can easily get all three by going on the left side and when the first one turns into a moon, toss your hat to the right, which should make all moons instead of doing it one-by-one (Sand Kingdom Slots) .
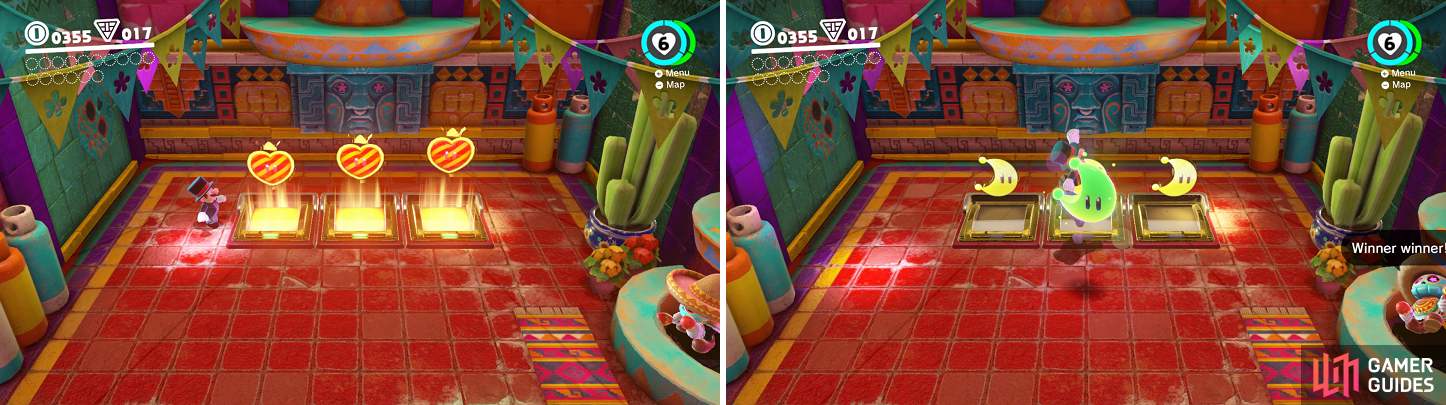
Stand on the left side of the slots to easily hit all three and get an easy moon.
Exit the slots room and head west, where you should spot three pots and a seed on the ground. Pick up with seed with the Y button and use the same button to toss it into one of the pots. A plant will start growing and once it matures enough, you’ll be able to hit the bulb at the top to produce another Power Moon. However, this can take a while, so it’s best to go do other things and come back later. Since there are three pots, it’s a good deduction to think there are three seeds, so let’s go ahead and get them now to avoid having to wait later for the plant to grow.
Planting Some Seeds
While in the middle of the town, look into the air to the northwest to spot a tower of sorts, which is housing a Power Moon. You can use the flower launchers to get up there and nab the Power Moon (Overlooking the Desert Town) ; there are three purple coins on the ledge just below this moon (20) . There is also a pipe up by the tower, so go down it to appear in a room with one of the citizens of Tostarena. He says there’s a prize in the room, but you’ll have to feel the rumble in order to get it. This feature is in the options menu (+ button, then Options), under Controls (Use Rumble is the name of it). If you don’t feel like doing it, the moon can be found by ground pounding three whole red blocks from the left side and two rows down (A Rumble from the Sandy Floor) .
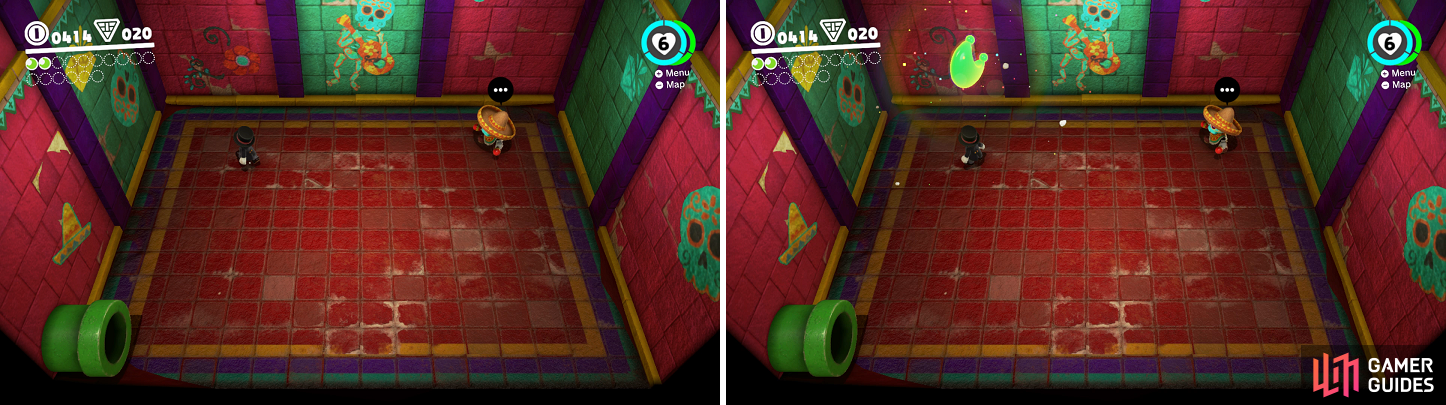
Ground pound the spot shown in the screen above to get a Power Moon.
You probably saw the shop, so go ahead and enter it, purchasing the moon there for 100 yellow coins (Shopping in Tostarena) . You should also notice another moon behind the counter, but you can’t get it from this side. Exit the shop and follow the western walls around until you notice a small vent. Crawl through and go to the right to enter the shop, but this time behind the counter. Grab the Power Moon (Employees Only) and leave the way you came in.
Leave the town to the west until you get to the kingdom’s edge, then follow it north, keeping an eye out for some purple coins along the edge. You can slowly approach the ledge until Mario grabs it, then shimmy over, or do a ground pound and immediately press Y to toss your hat, which is a downward throw. This will go over the edge and grab the coins if you want to do it that way (23) . Continue follow the edge to the north until you see a lower ledge, which is where a second seed will be located. Drop down, grab it and use the flower spring to get it back to the town, where you will plant it.
The third seed is located next to the ruins, which is to the north of Tostarena. Don’t worry about entering it, as the seed is in a little alcove on the eastern side of the ruins, close to three large pillars sticking out of the sand. Grab it and plant it back at town in the final pot. Feel free to grab the moons if the plants are mature enough, but they will all be mentioned by name later on in the walkthrough, just to things easier.
Exploring the Desert
Head out northwest from the town and you should spot another of those mysterious white cubes, but beyond that is a pretty tall sand dune. Get on top of it and if you picked the right one, then you should feel a rumble in your controller, which means another Power Moon, so ground pound to nab it (Top of a Dune) . Return back to town and head east from the flag, where you should find an oasis, although it’s a little frozen at the moment. You should notice a musical note on top of one of the trees, so go ahead and climb the tree. Touch the note and it will scatter into tinier notes, two sets of three on the current tree and one nearby. Collect all of the notes within the time limit to get a Power Moon (Taking Notes: Jump on the Palm) .
Jump down to the oasis and hit the checkpoint flag here, then look for a small mound with a bunch of birds on it. Stand on top of the mound and you should feel another rumble, so pound the ground to get another Moon (Where the Birds Gather) . Stay still on the same mound and wait a minute or so, as a sparkly bird will come flying by. When it gets close enough, toss your hat at the bird and then collect the Power Moon that comes out of it (Bird Traveling the Desert) . Get back to the desert proper and travel north/northwest to find a lone Koopa Troopa wearing a sombrero.
Speak with him and he’ll offer up a challenge. The test he’ll provide is called Trace-Walking and he’ll put up a circle of blue arrows if you accept the challenge. Just follow the arrows on the ground and despite the game telling you to walk, you don’t really have to do that. The catch is that after a few seconds, the arrows will disappear, so study the path and trace it as best as you could. The score you need to beat is 80 points, but the pathing you do doesn’t have to be exactly perfect, as there is some leeway. It may take a try or two, but once you beat the score, you will receive a Power Moon (Walking the Desert!) .
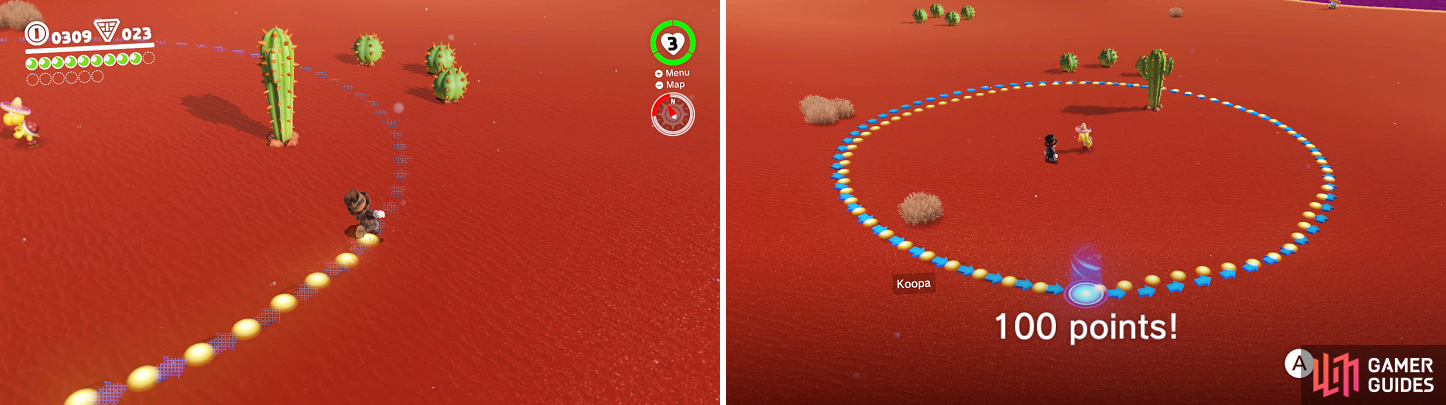
Walking the line might seem simple at first, but the arrows will soon disappear (left). The circle you need to walk is shown on the right.
Travel east of the Koopa Troopa to find a large cactus and some small cacti. The large one seems to have something on top of it and if you rotate your camera, it is a question mark. Toss your cap at it to capture it, then move it out of the way and pound the ground where it was to reveal a Power Moon (Wandering Cactus) . See that inverted pyramid to the north? Run up there and go to the west side to spot a taxi stuck in some ice. That’s not important right now, as you should see a glowing spot on the ground. Perform a ground pound on it to reveal another Power Moon (Lost in the Luggage) .
North of that spot is a slanted tower in the sand, which has three purple coins on it (26) . Look to the north, along the edge, to see a sparkly cactus, although you can’t do anything with that right now (make a mental note of it for later). Return to the iced taxi and head southwest to find a Tostarenean in a circular enclosure. Speak with him and he’ll mention his three sheep are missing. Luckily for you, they are all close by and they are wearing sombreros on their head. One is directly to the east, another by the luggage moon and the last one is just over the dune to the north. Just get behind them and they’ll start moving on their own, although you can give them a “little nudge” by striking them with your hat. Once you’re returned all three, you’ll receive a Power Moon (Herding Sheep in the Dunes) .
Bullet Bill Maze
In the northwest corner of the desert is a building and if you head to the back of it, you will find three purple coins in a little alcove (29) . Head up front to find both a checkpoint flag and a door you can use to enter the building. Inside will be a maze, along with some Bullet Bill launchers. Naturally, you can capture them and fly the Bullet Bills, either normally (slow) or by holding down Y (fast). Unfortunately, you cannot fly indefinitely, as the Bullet Bill will start flashing red after a few seconds and then explode.
Capture the first Bullet Bill and go through either hole (left is bigger), then release it when you’re over the platform. There are two paths here, with the narrow one leading to a small platform with six purple coins (35) . Use the launcher there to get back to the previous platform and take the larger path, leading to another fork in the road. The southern of the two leads to a Power Moon (The Bullet Bill Maze: Side Path) , while the northern one has you dodging spinning walls to get to another Power Moon and a pipe that leads you back to the desert (The Bullet Bill Maze: Break Through!) .
The Icy Underground
Back in the desert, head back to the iced taxi and go south to find a sphinx sitting next to the ruins wall. Stand on the stone slab in front of it to be able to speak with it, who will ask you a riddle. The answer is “Ring,” so pick that and Sphynx will move out of the way, revealing a doorway. Before passing through it, go to the other stone slab and speak with Sphynx again. It’ll ask you some more questions, with the answers being:
- 30
- Ice
- 5
- Sphynx
Answer all questions correctly and Sphynx will hand over a Power Moon (Sand Quiz: Wonderful!) . Head through the door now to find a golden glittering room, with a lot of yellow coins, as well as a chest that contains another Power Moon (Sphynx’s Treasure Vault) . Next to Sphynx, there are some short walls that you can jump over to get inside of the ruins area, but you’ll be in quicksand. Just keep jumping and you won’t be in trouble, although you’ll want to go under a little bit in one spot. Look at the western wall just inside where you jumped in and you should notice two faint white markers on the wall. You can go underneath them, in the quicksand mind you, to access a hidden room with a Power Moon (Hidden Room in the Flowing Sands) .
Opposite that is a whirlpool, but it actually leads somewhere, so go inside of it. You will be inside of an icy area and the paths are a bit thin, so watch your footing. Note that you can crouch and move without slipping on the ice here, but that’s not exactly quick. Move to the first crossroads and collect the two purple coins at the one dead end (37) , then quickly move underneath the two pillars moving up and down. There’s a flower spring here, so use it to get on top of the pillars and onto another icy path.
Continue your ascent and collect two more purple coins that are precariously hanging over nothing (39) , then get in between the first two pillars up there. This next part is a bit tricky, as you will want to wall jump all the way up to the very top here, but the moving section of the pillars will make that a little difficult, since you will likely land on top of those portions. Once you manage to get to the top, you can jump across the rest of the way to reach a Power Moon (Ice Cave Treasure) . Hop down now to where the pipe is and use it to reach a tall platform you couldn’t reach normally outside.
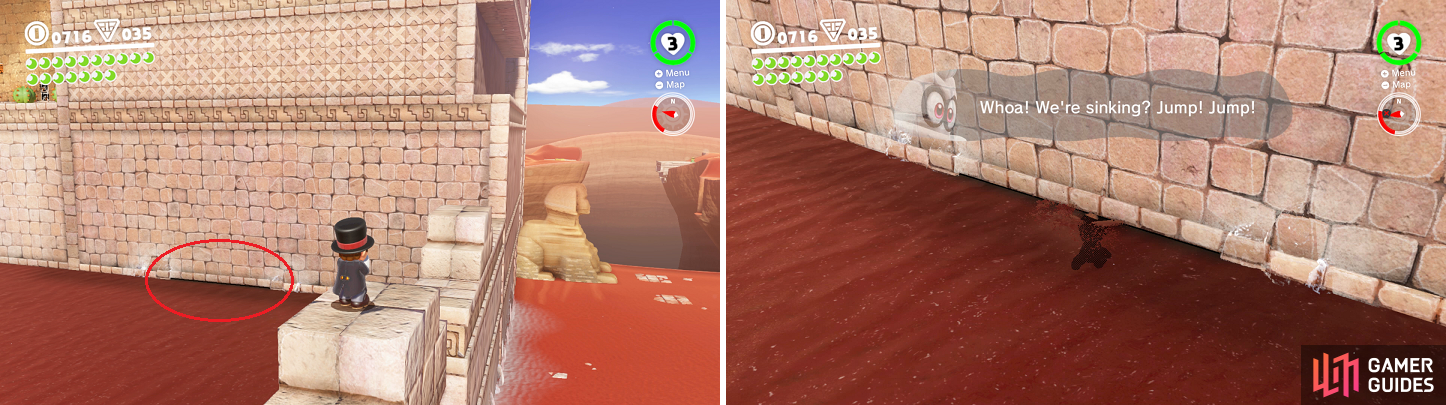
It might not be too obvious, but you can head underneath the wall (left) to reach a secret area with another Power Moon.
Jaxi the Taxi
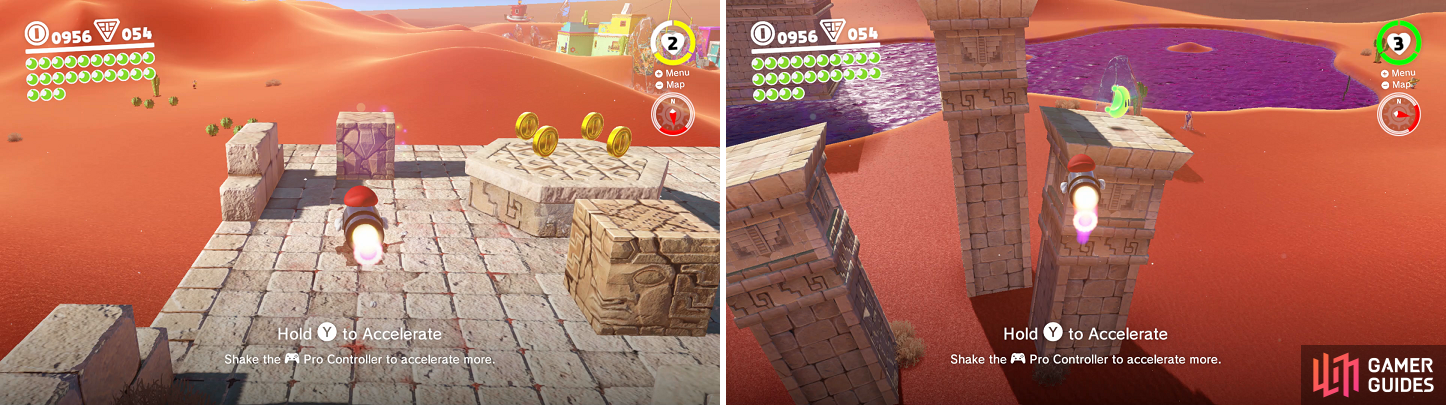
Make sure you touch the checkpoint flag, then open the chests for some yellow coins and a Power Moon (The Treasure of Jaxi Ruins) . Speaking of Jaxi, that is the name of the statue-looking thing with a “!” near the chests and bench. Speak with it and it’ll ask you to hand over 30 coins if you want a ride. Do that and you’ll be able to hop on its back to ride it around the town. Jaxi is able to run on the purple liquid just below you and is able to destroy those big cacti throughout the desert. It should be said that Jaxi is a bit hard to control normally, but you can hold down the B button to brake, although this only lasts a few seconds before he’ll start running normally again.
Jump on Jaxi’s back and ride down into the purple liquid below you. There are four purple coins spread across two tiny islands in the middle of the poison lake, so use Jaxi’s ability to not be hurt to get them (43) . There’s another thing you can do here, which is nab the Moon from the one large cactus that was pointed out earlier. It’s located along the edge in the north, slightly northwest of the inverted pyramid. You will want to be careful here, as the cactus is right next to the ledge, so use your brake quite vigorously. Once you hit it, grab the Power Moon that comes out of it (Among the Five Cactuses) .
There is one more thing you can do with Jaxi right now, which is back at the poison pond. The building in which you first talked to Jaxi has an entrance on the poison pond itself, which means you will need Jaxi to enter. It’s not too difficult to get inside and once you do, you’ll find an obstacle course of sorts. The path straight ahead has a moving platform, but you should see some purple coins off to the side, so you’ll need to head on over there first to grab them (46) . Continue until you reach a large safe area in the middle.
Look around to see there are a few ways to go, with a very narrow path and a wider path in one direction, then a dead end with a musical note in another direction. Before you do anything else, pick up the two purple coins near the ledge (48) . Next, you want to go after the musical note, which when picked up, will spawn two rows of notes. It may take a few tries to get them all, seeing as you will need to brake and line up for the second row. Once you get it, the Power Moon will spawn back at the central platform (Jaxi Stunt Driving) .
This next part is a little bad, as you need to go up the narrow path previously mentioned, simply because there are three purple coins on it (51) . After that, it will be another narrow path to the end, where a Power Moon will be waiting (Jaxi Driver) . Take the pipe back to the main desert area.
Searching the Ruins
You remember where the entrance to the ruins are, right? Head on over there, minding the Micro Goombas, and touch the checkpoint flag before anything. Before jumping up to where the Bullet Bill launcher is, there is a thin ledge behind a small cactus near the question mark block, where you’ll find three purple coins (54) . Continue on the main path, either using the Bullet Bill to cross the gap or the moving platform. You will be in a small area with another launcher, which you’ll want to use on two things. First, there’s a box with a familiar glow emanating from it in the southeast corner, so use a Bullet Bill to blow it up and grab the Power Moon (Inside a Block Is a Hard Place) . After that, you can use another Bullet Bill to fly over to the Moon on one of the pillars in the sand (On the Leaning Pillar) .
You not only need the Bullet Bills to break open the stone blocks (left), but to also fly over large gaps (right).
Return to the previous area and hop up to the next, touching the checkpoint flag. Three sand geysers will need to be crossed in order to get to the 8-bit mural, but don’t go in there yet. Instead, drop down the stairs nearby and into the quicksand, looking towards where the entrance to the ruins was. There should be a ledge here that has a lever, which will open a gate and a shortcut. Head back up to the mural and enter the pipe, going to the bottom left corner for three purple coins (57) . You can break the brick on the far left to get to the next 3D section, where you’ll have another launcher.
There is yet another Moon here, hidden in one of the crates just behind the Bullet Bill launcher, but you can break it with Mario’s ground pound. The moon skips over to another archway, so you can either jump over to it or if you want to be safer, use a Bullet Bill to get it (From a Crate in the Ruins) . Get onto level ground with the launcher in the distance and coax another Bullet Bill over, which you can capture and use to fly to the top of the big archway at the entrance to the ruins, which has another Power Moon (On Top of the Stone Archway) . Return to the same spot as the launcher and look over the edge, near where the first moving platform touches to see an alcove in the quicksand. Go ahead and drop down to find another moon in that alcove (Alcove in the Ruins) .
Ride the platforms to get to the stairs that will lead you to another 8-bit mural, which is much larger. As soon as you reach the top of the stairs, peek over the edge straight ahead to find an alcove with some purple coins in it. You can easily drop down to grab them, then wall jump back up to your previous spot (60) . Find the pipe and enter the mural to find alternating Bullet Bills firing at you on the first level. On the second level, drop down into the hole and walk left to find four more purple coins (64) , then go back up and continue right to reach the third level.
Here, you’ll have to time your movement left, onto moving platforms, to avoid the triple launcher on the right side (they’re shooting left). Ride the platforms to the end, but don’t jump up to the top yet. When the left moving platform hits its farthest point on the left, drop down onto it and run left to open a hidden area with a Power Moon (Secret of the Mural) . Make your way to the top, touching the flag and then finally grabbing the Power Moon (Atop the Highest Tower) .
No Comments