

This page offers a guide on how to find all treasure maps and keys in ![]() Tchia. You’ll get the first treasure map from
Tchia. You’ll get the first treasure map from ![]() Gaby in
Gaby in ![]() Weliwele, and from there, you’ll need to use the maps to find the next treasure chests which will contain various cosmetics, big stamina fruit and more maps and keys to continue the treasure hunt! There are 21 treasure maps and keys to obtain in this hunt!
Weliwele, and from there, you’ll need to use the maps to find the next treasure chests which will contain various cosmetics, big stamina fruit and more maps and keys to continue the treasure hunt! There are 21 treasure maps and keys to obtain in this hunt!
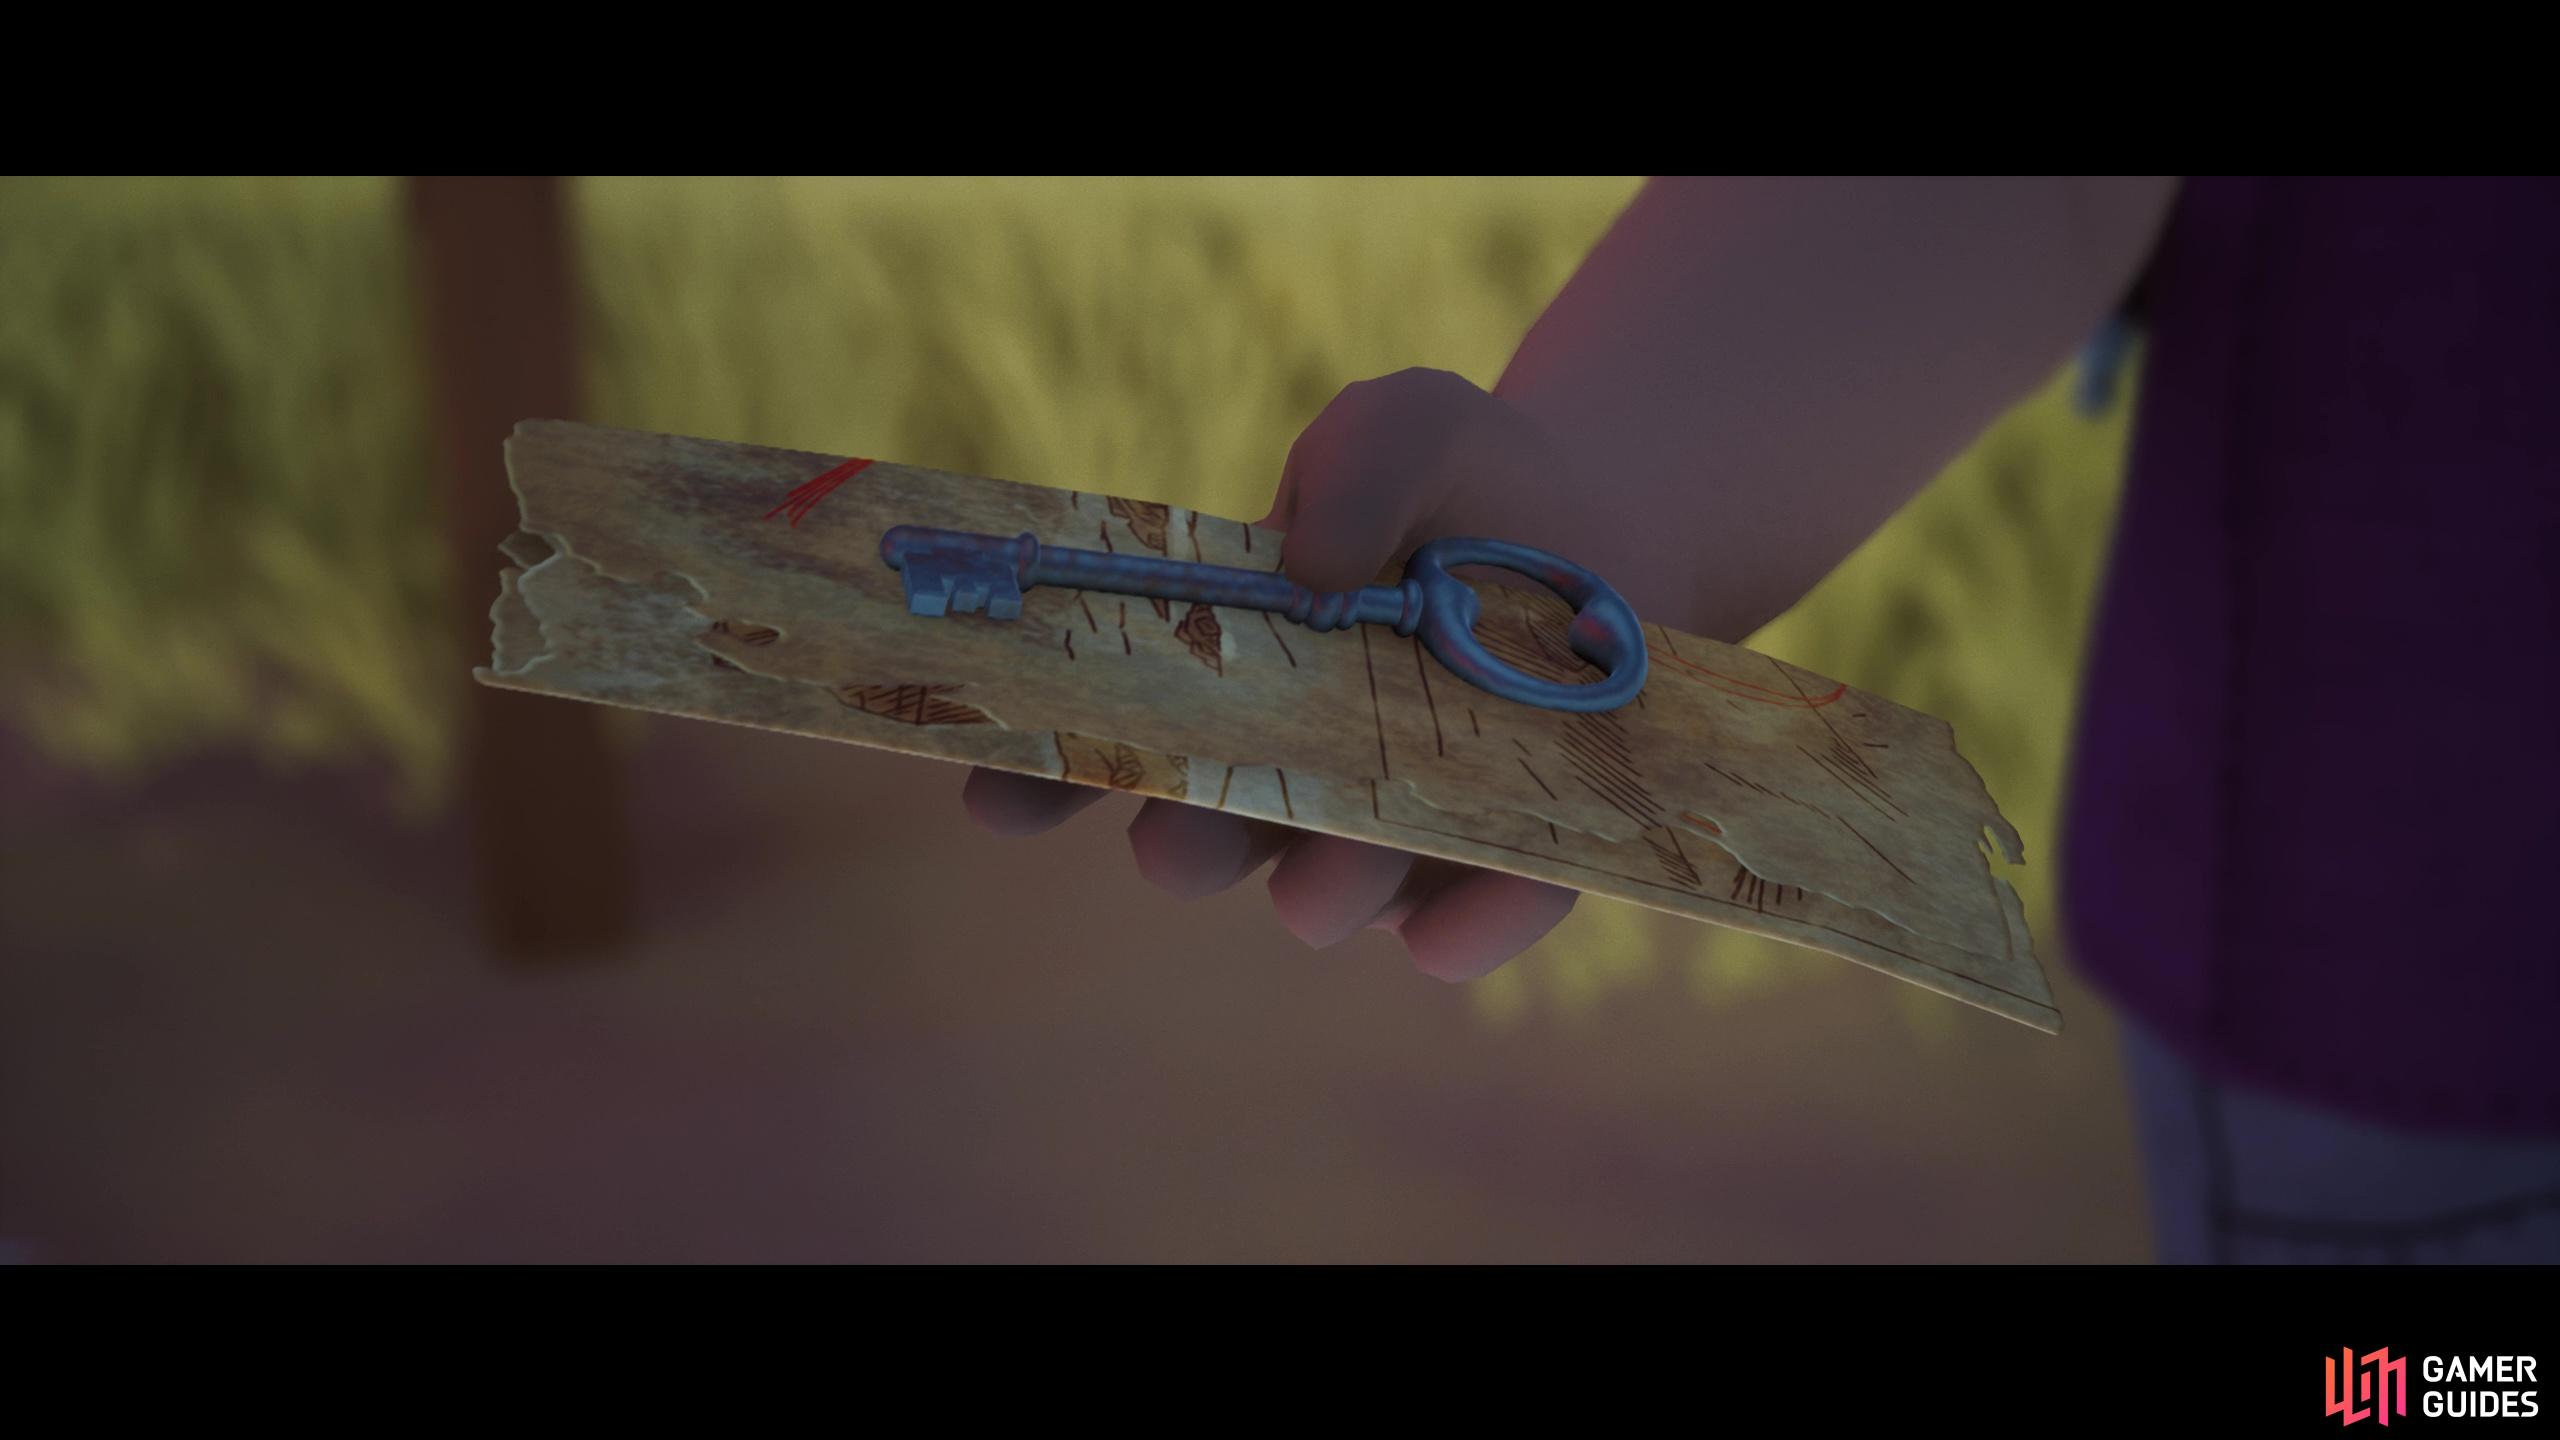
Gaby gives you the first treasure map and key to begin the hunt!
Treasure Chest #1: Gaby’s Old Key
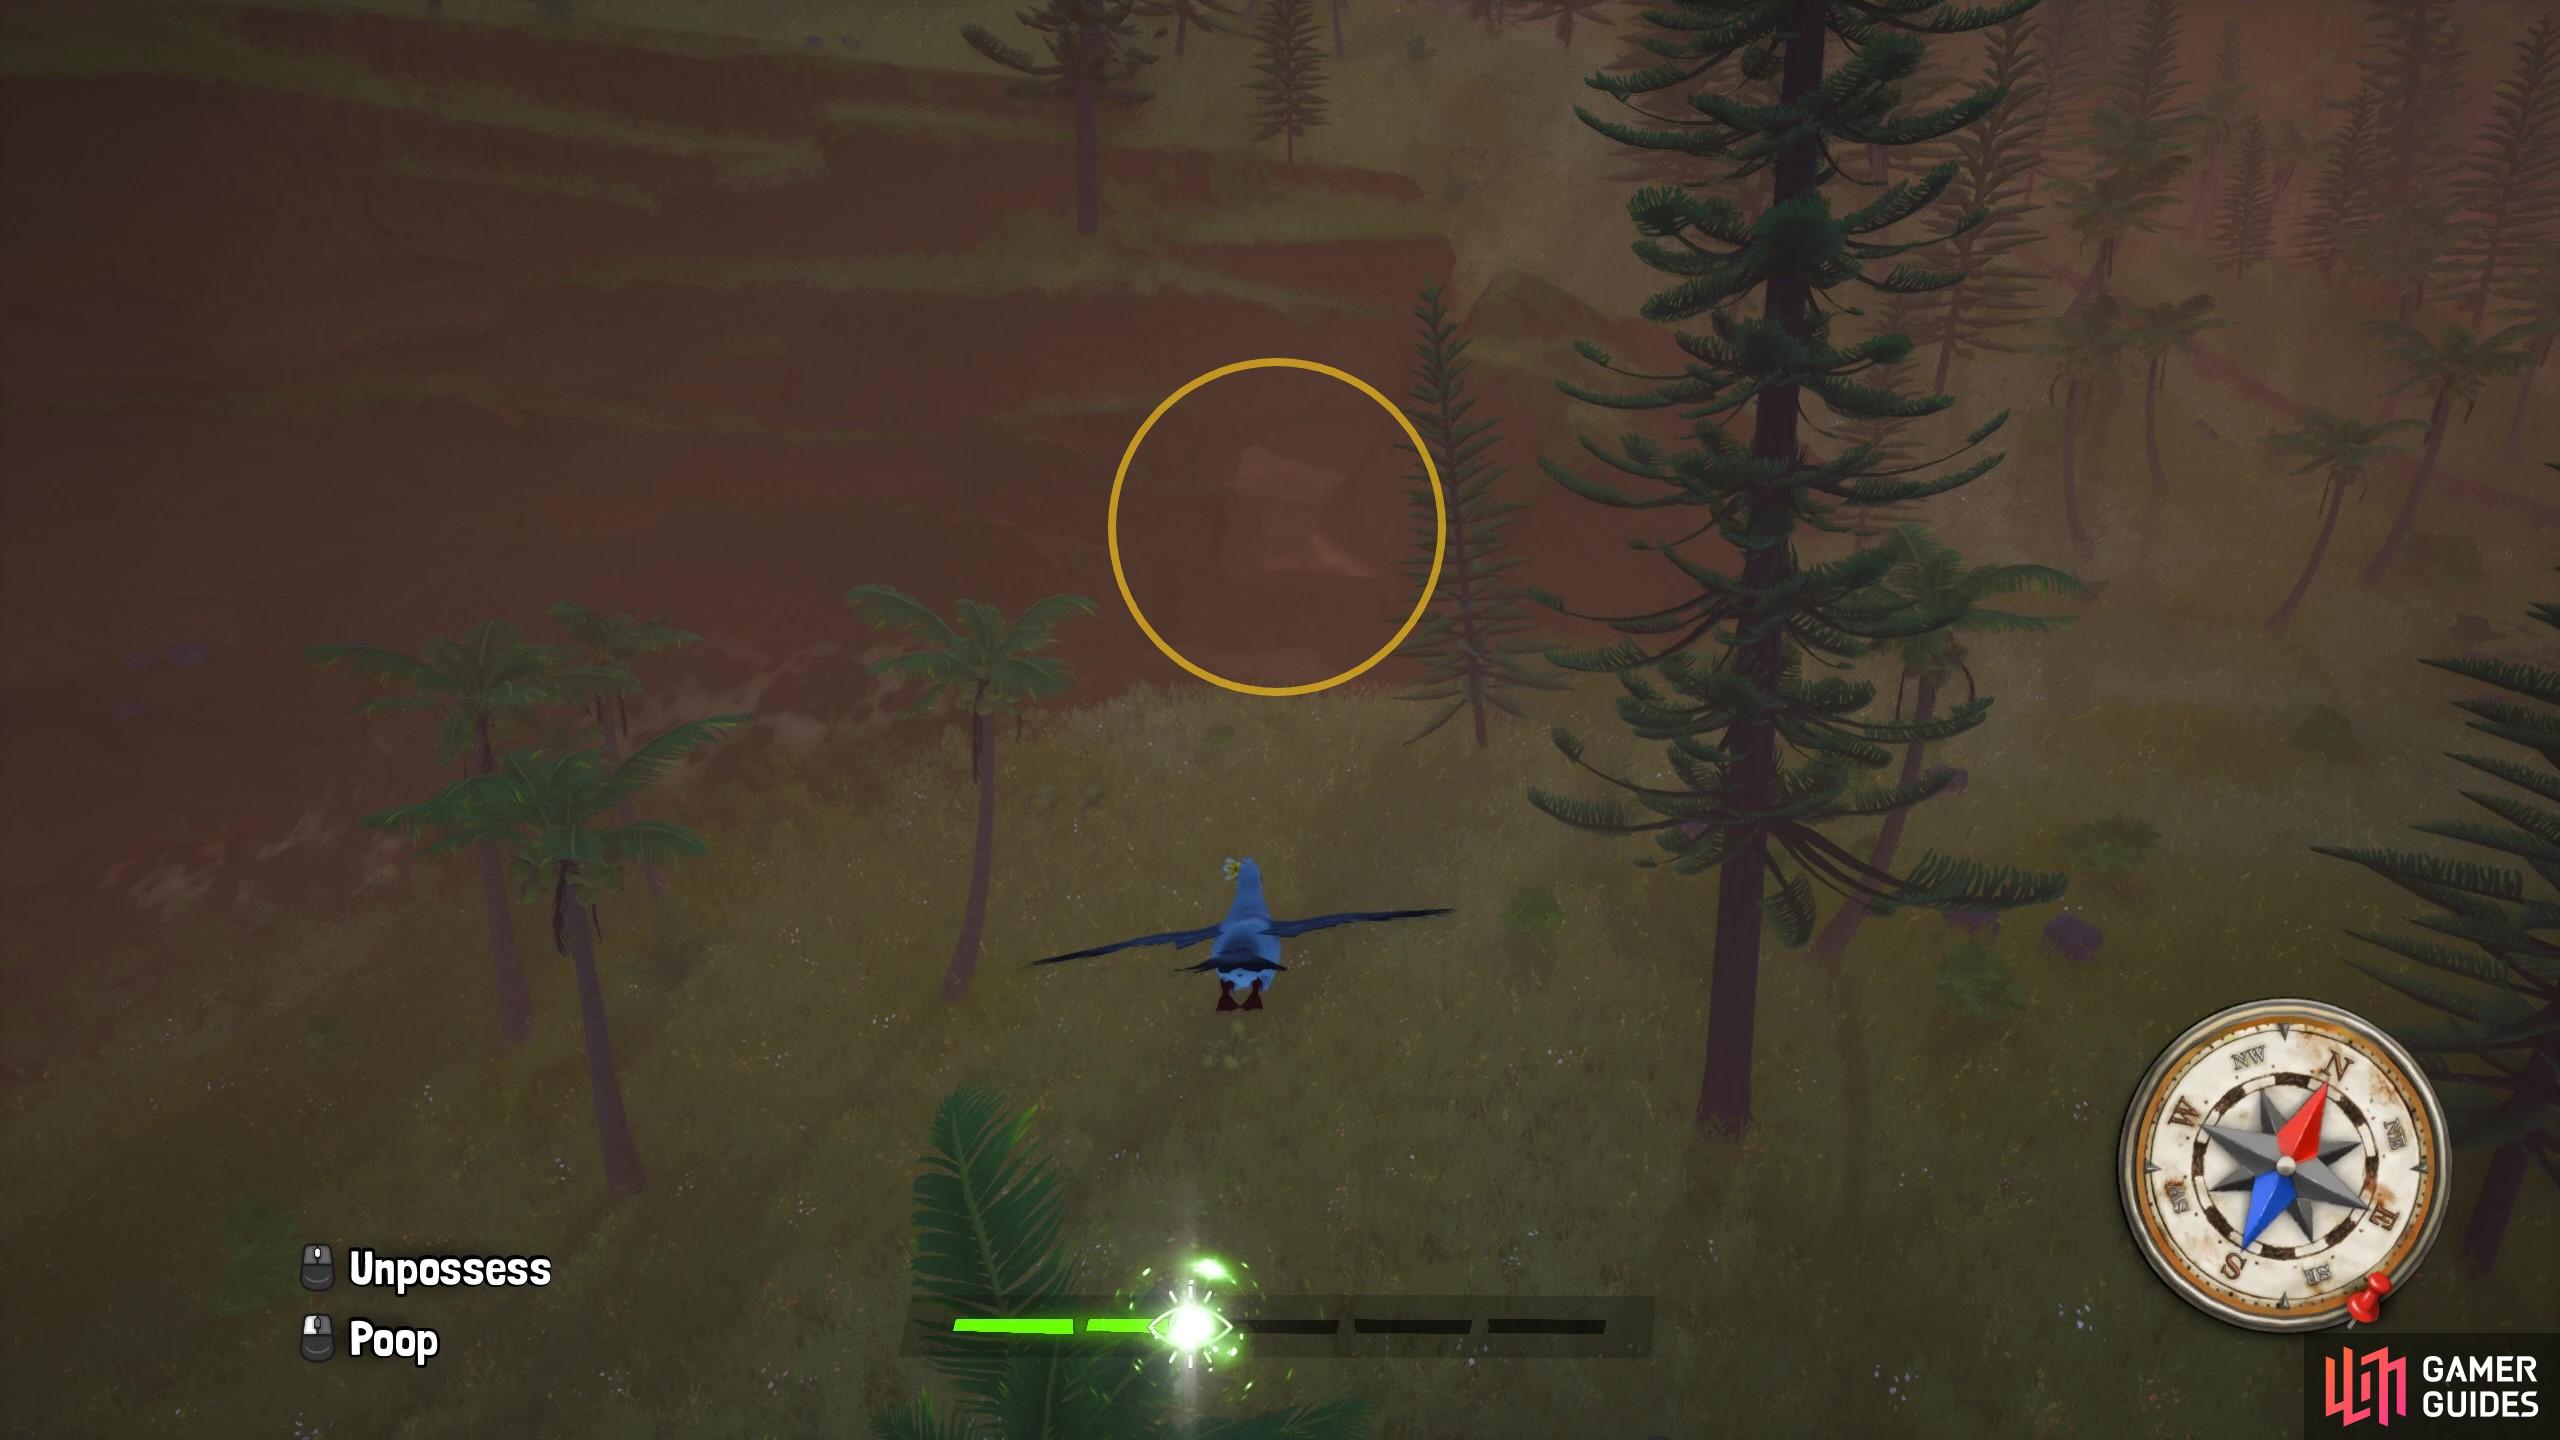
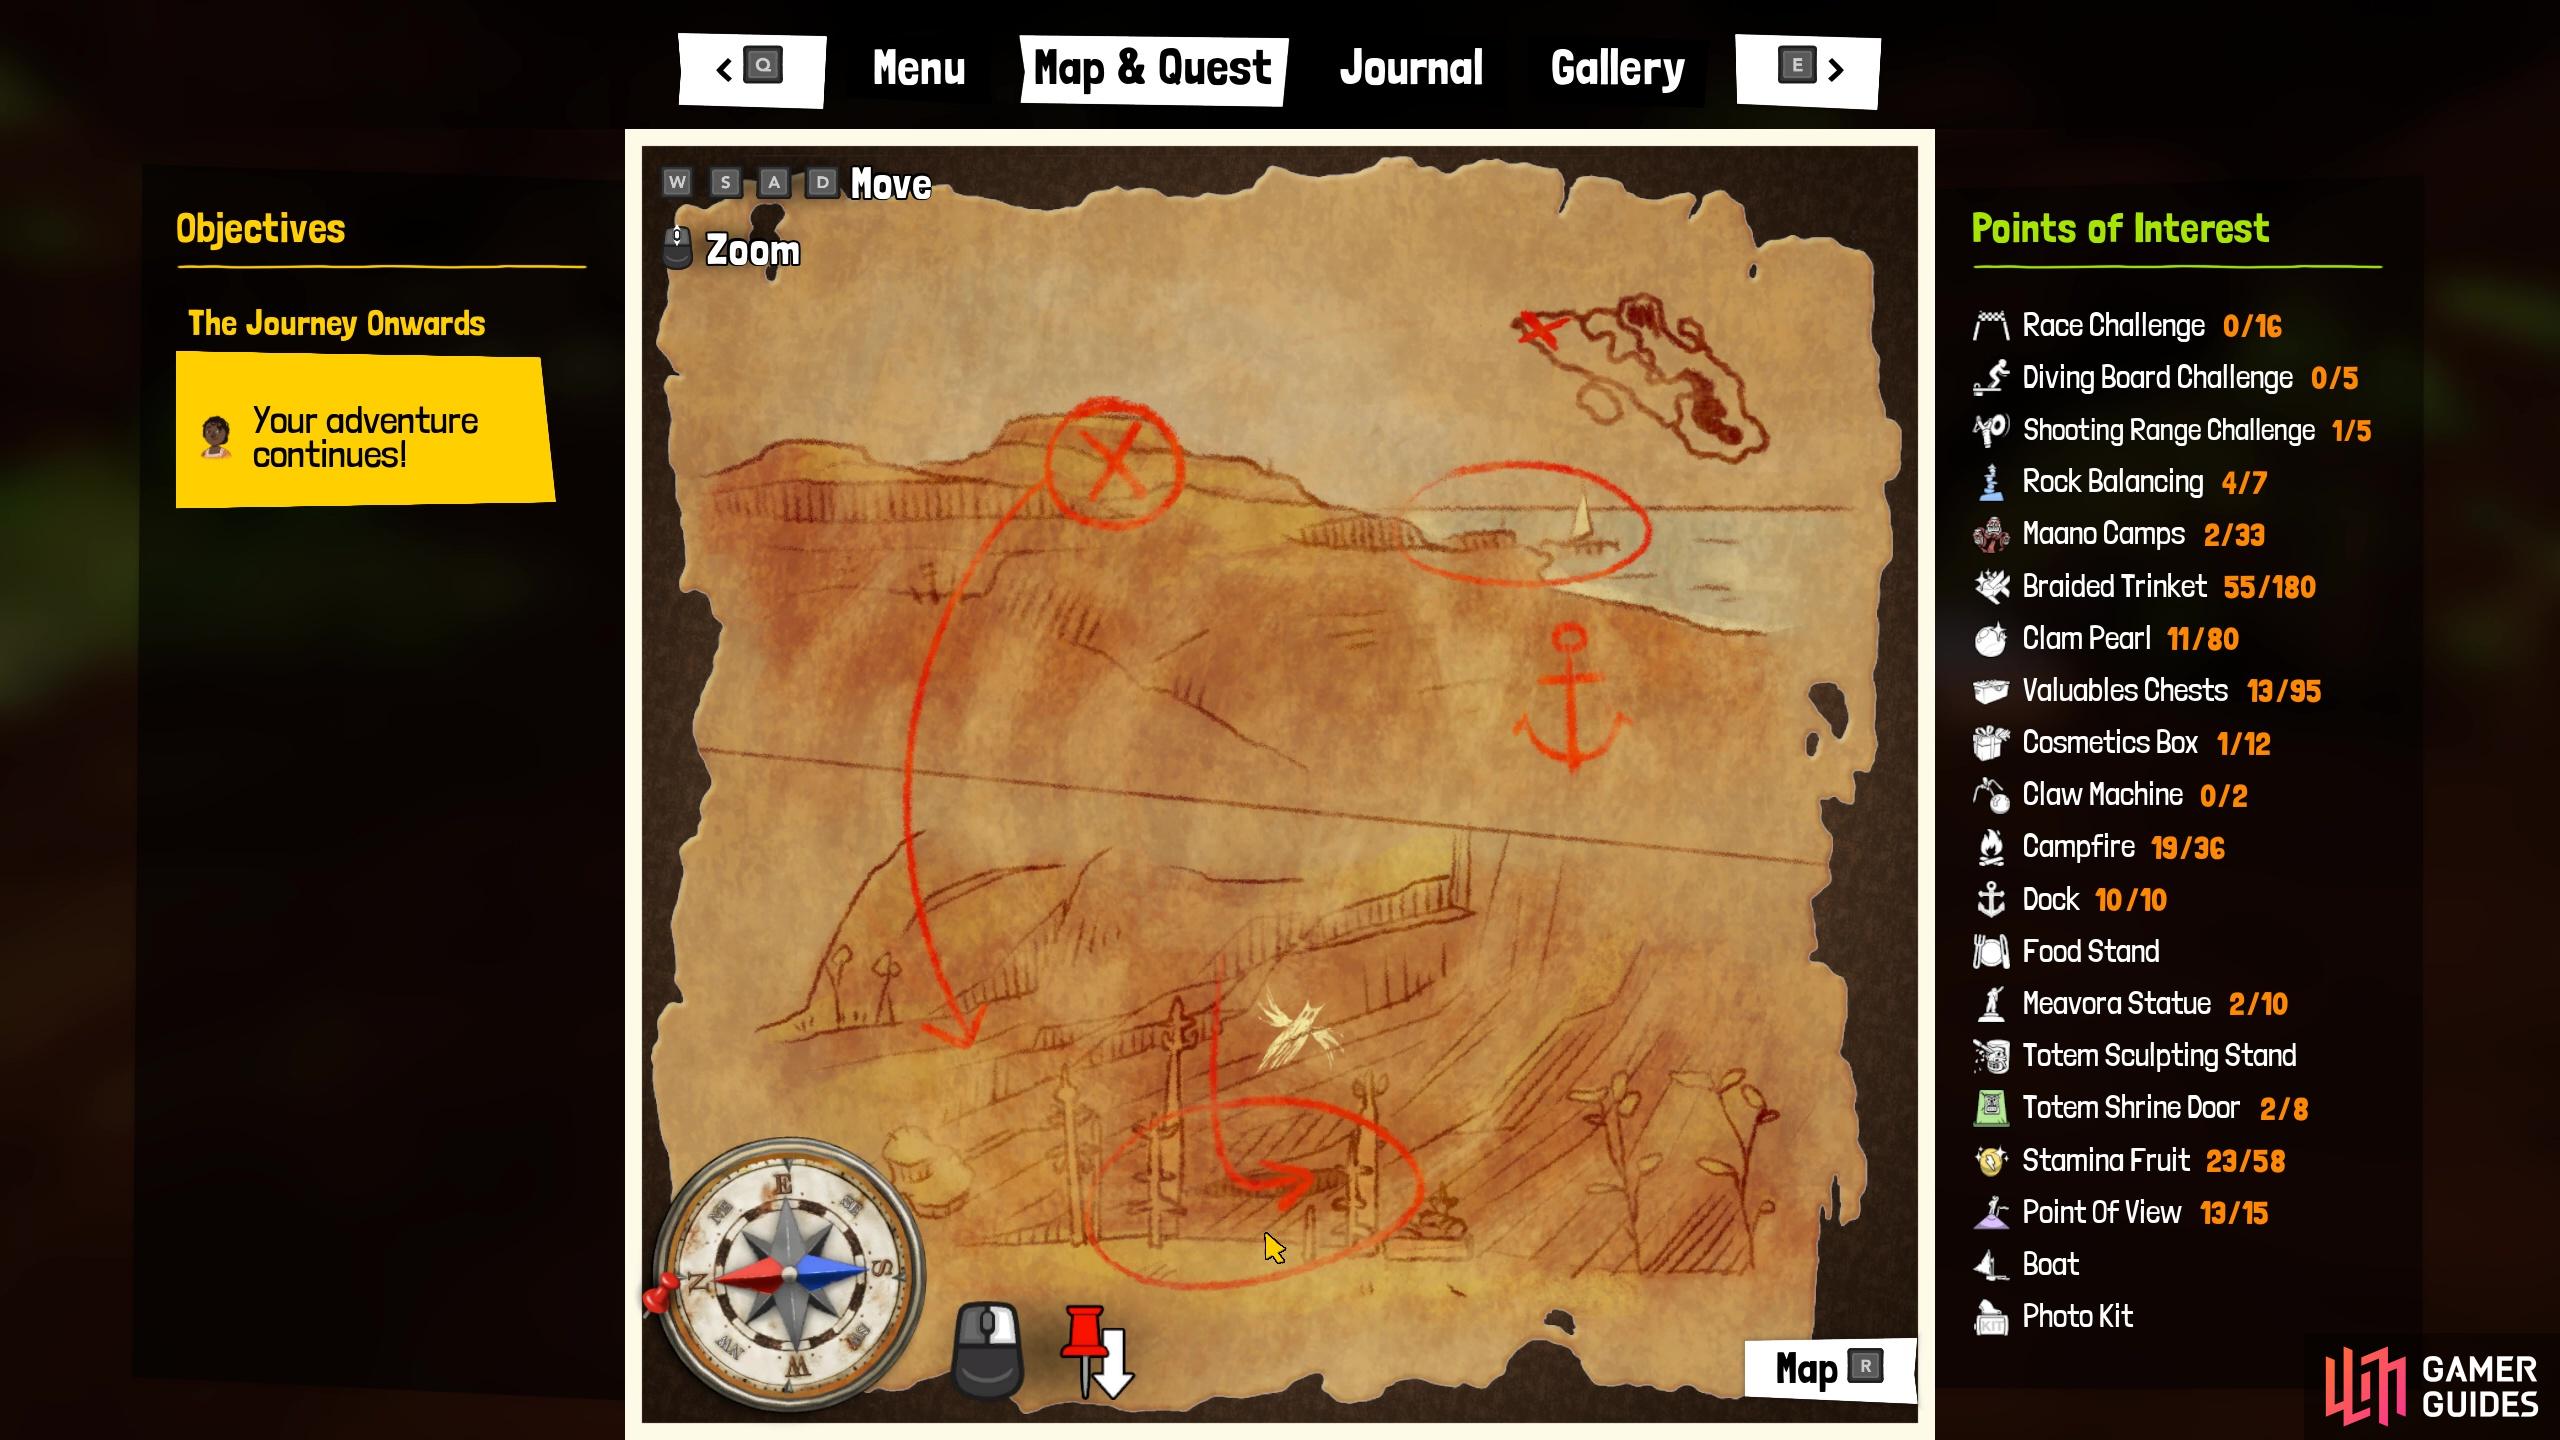
After Gaby gives you the first map and key, you’ll want to head to ![]() Dopwa, the rock formation on the southern coast of
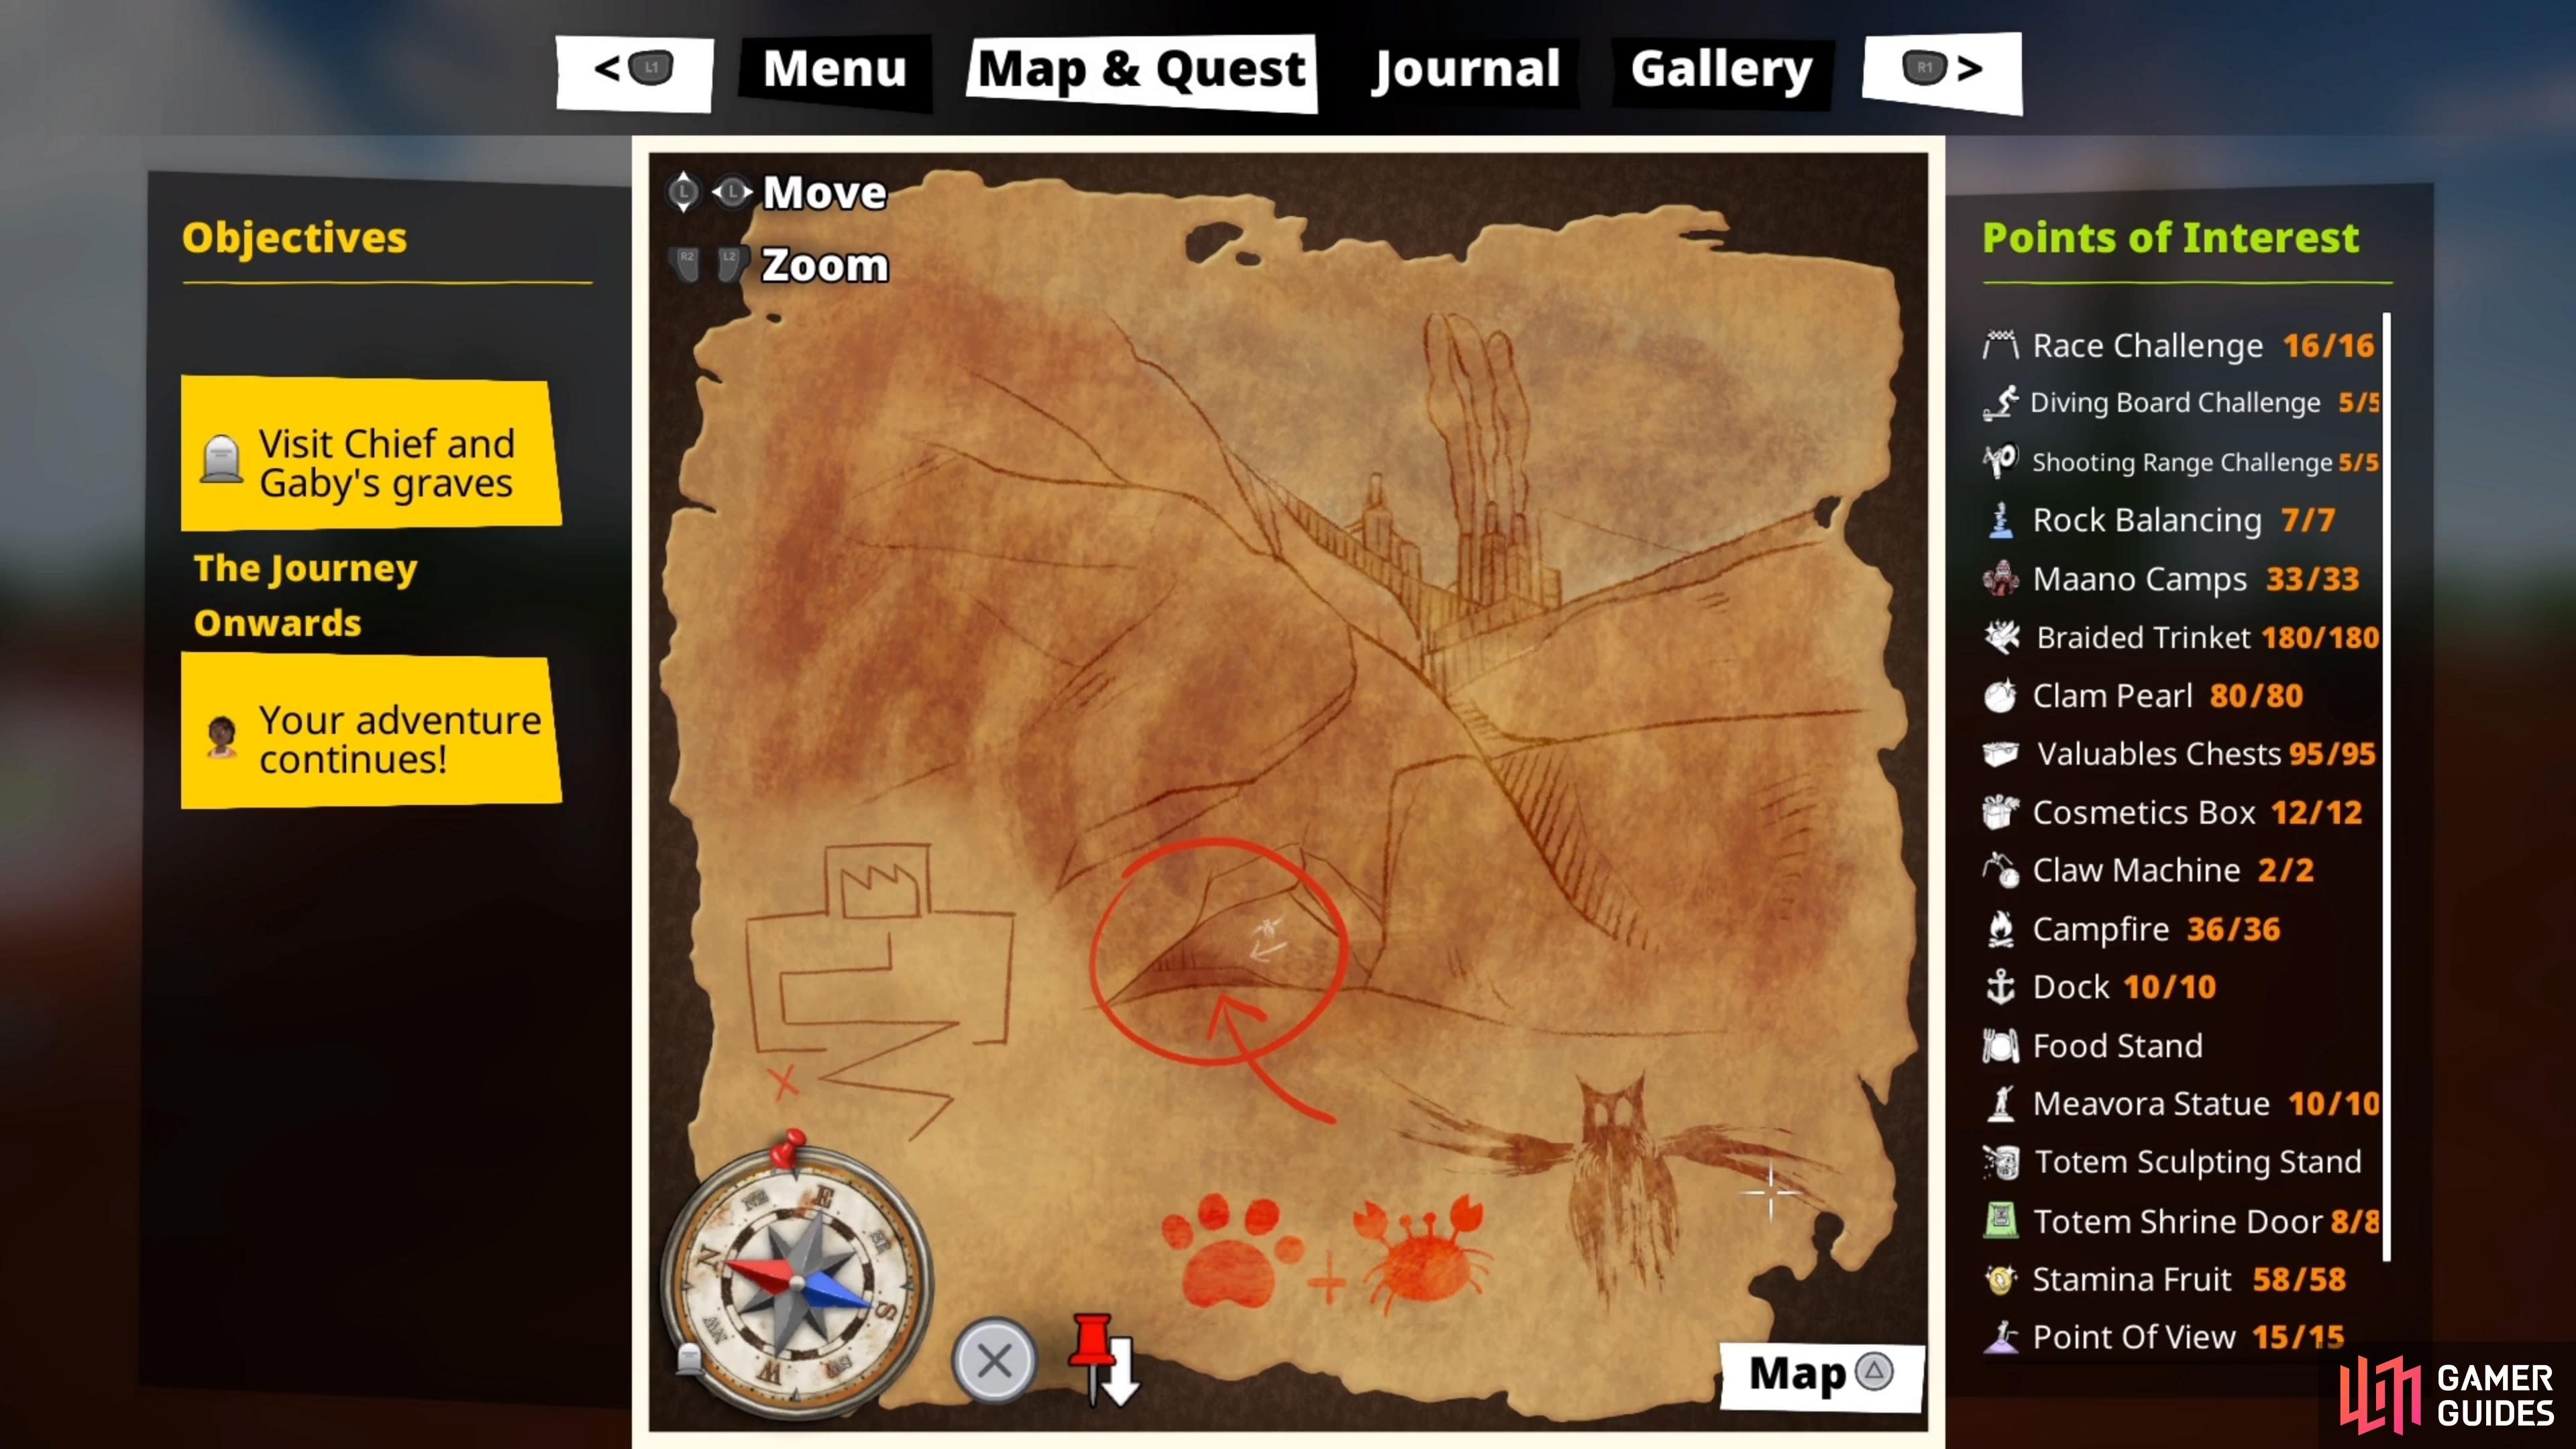
Dopwa, the rock formation on the southern coast of ![]() Ija Nöj. You’ll find the treasure map beneath the rock formation. In this chest, you’ll get the Red Key and Map, as well as a Mask with Cloth cosmetic.
Ija Nöj. You’ll find the treasure map beneath the rock formation. In this chest, you’ll get the Red Key and Map, as well as a Mask with Cloth cosmetic.
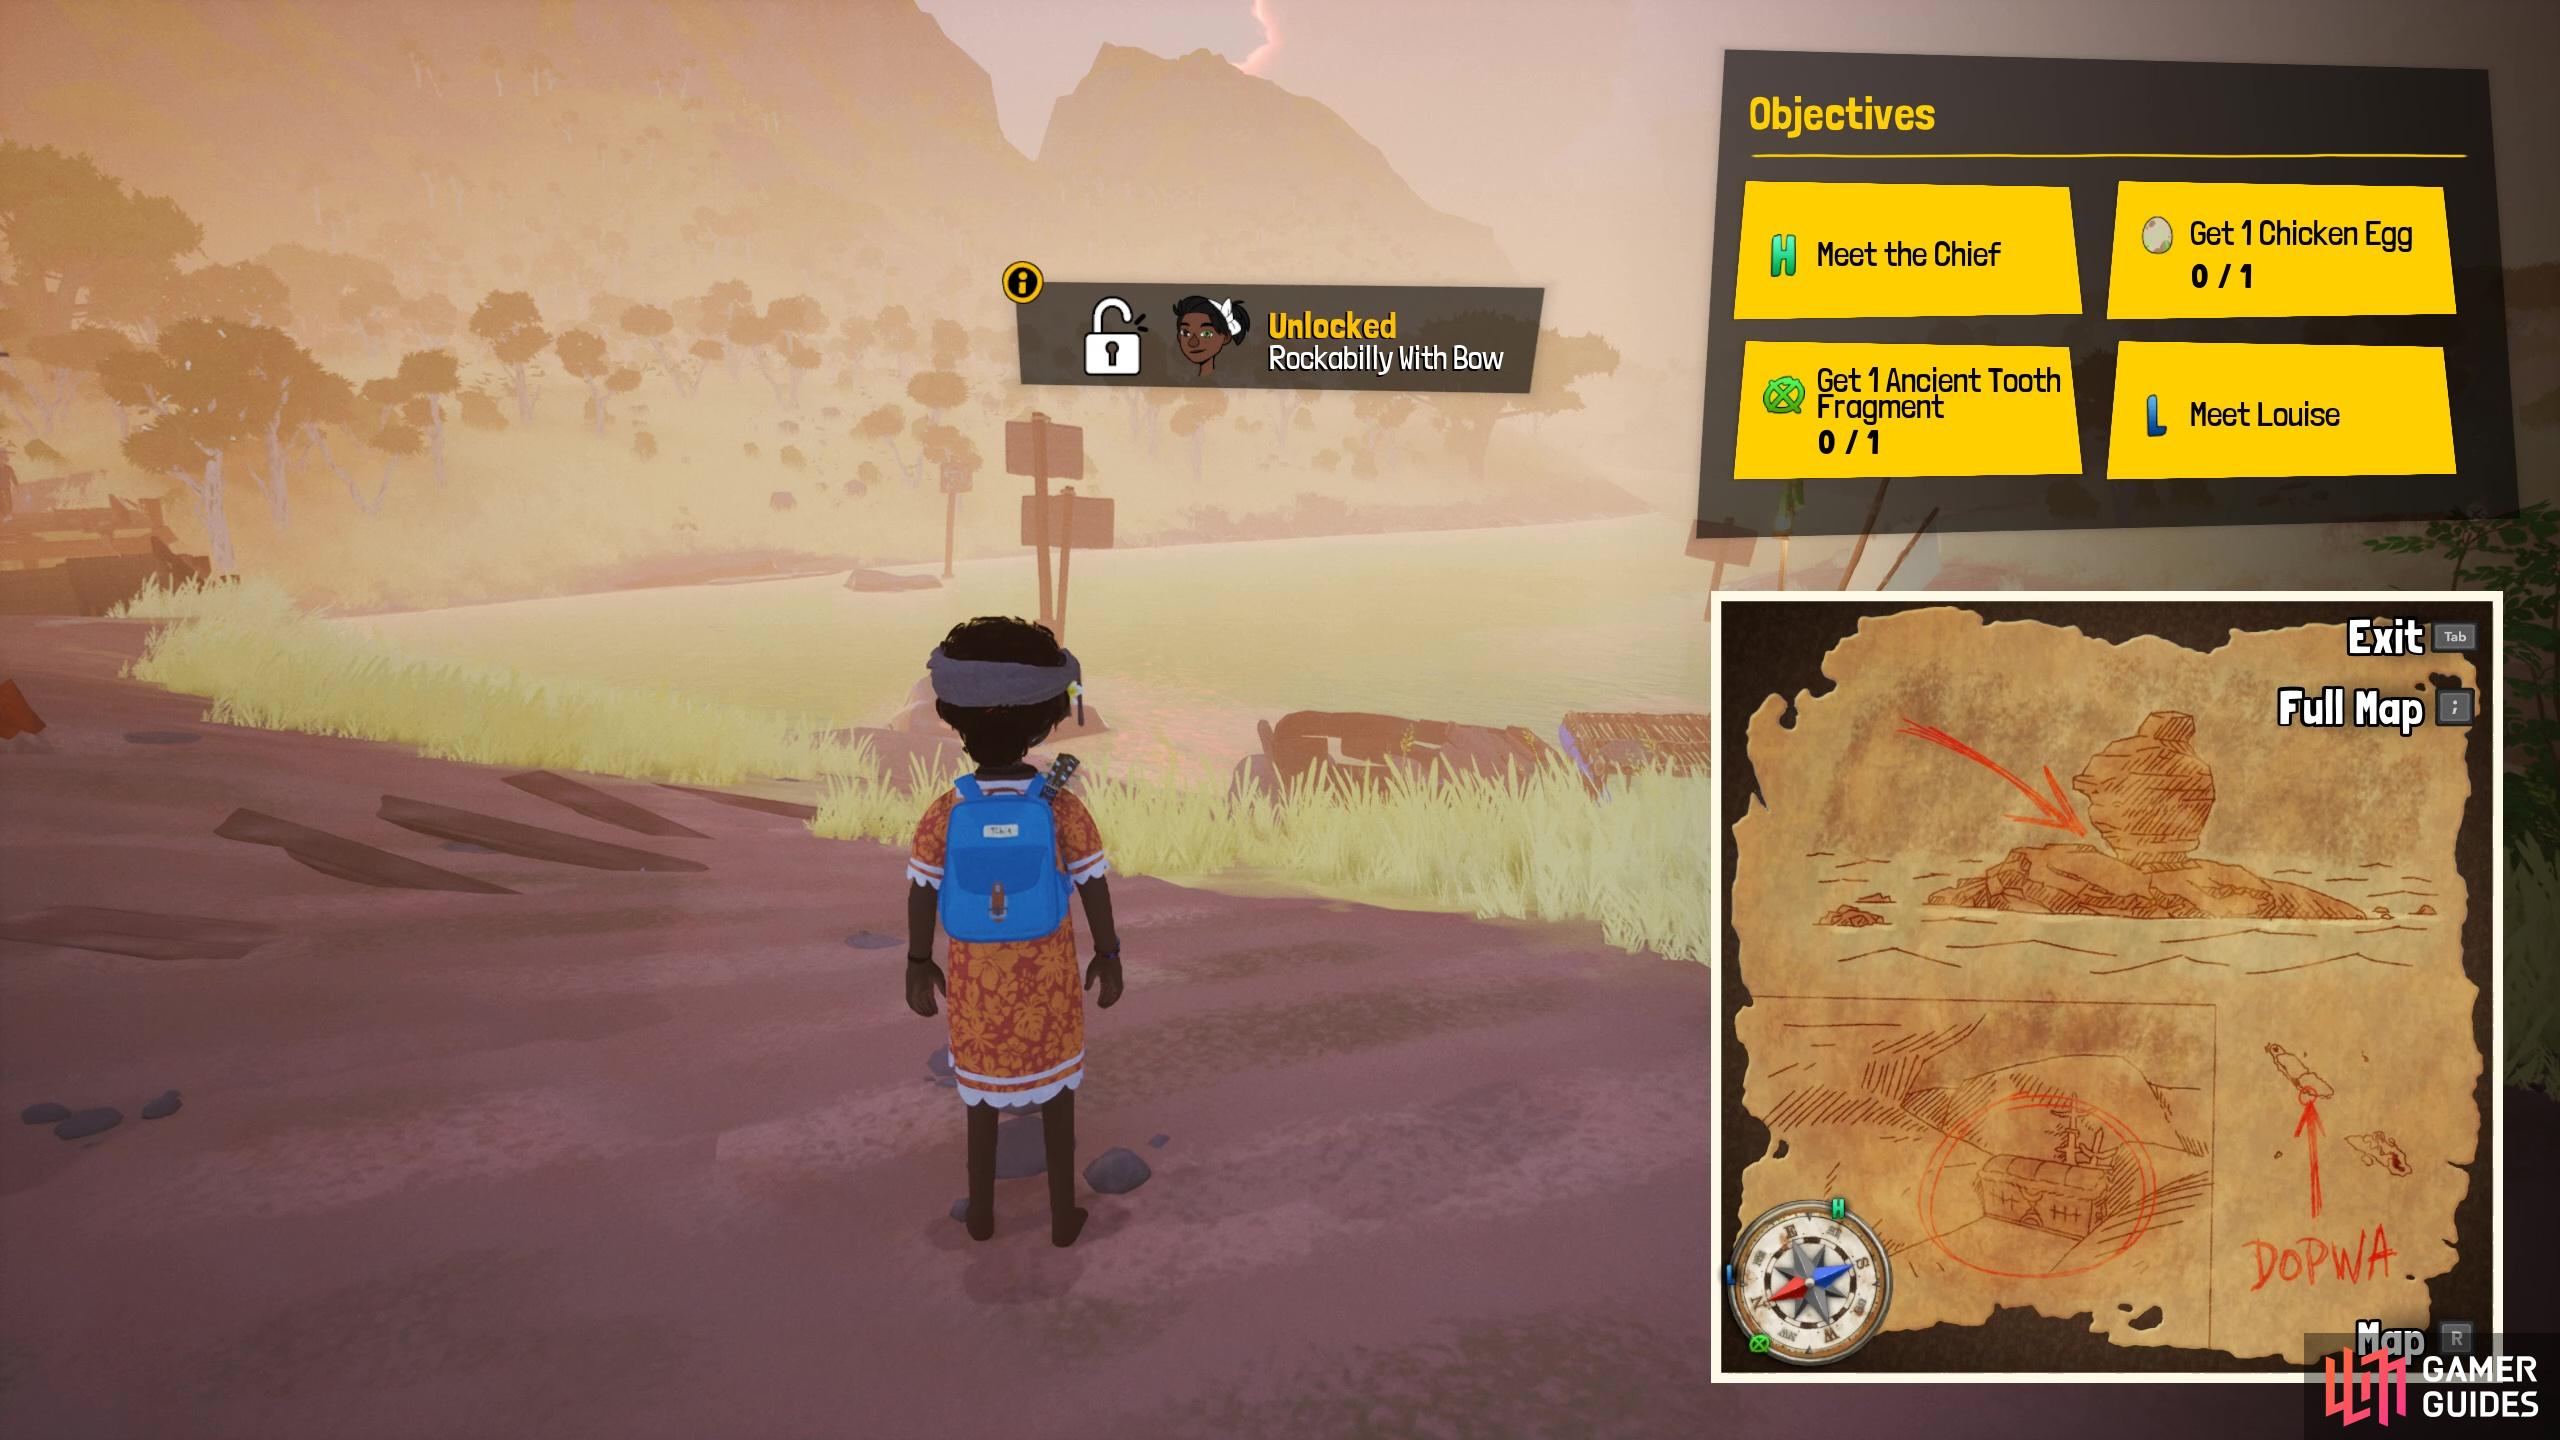
The treasure map points at Dopwa and depicts a strange rock formation
Dopwa is found on the southern coast of this island.
Treasure Chest #2: Red Key
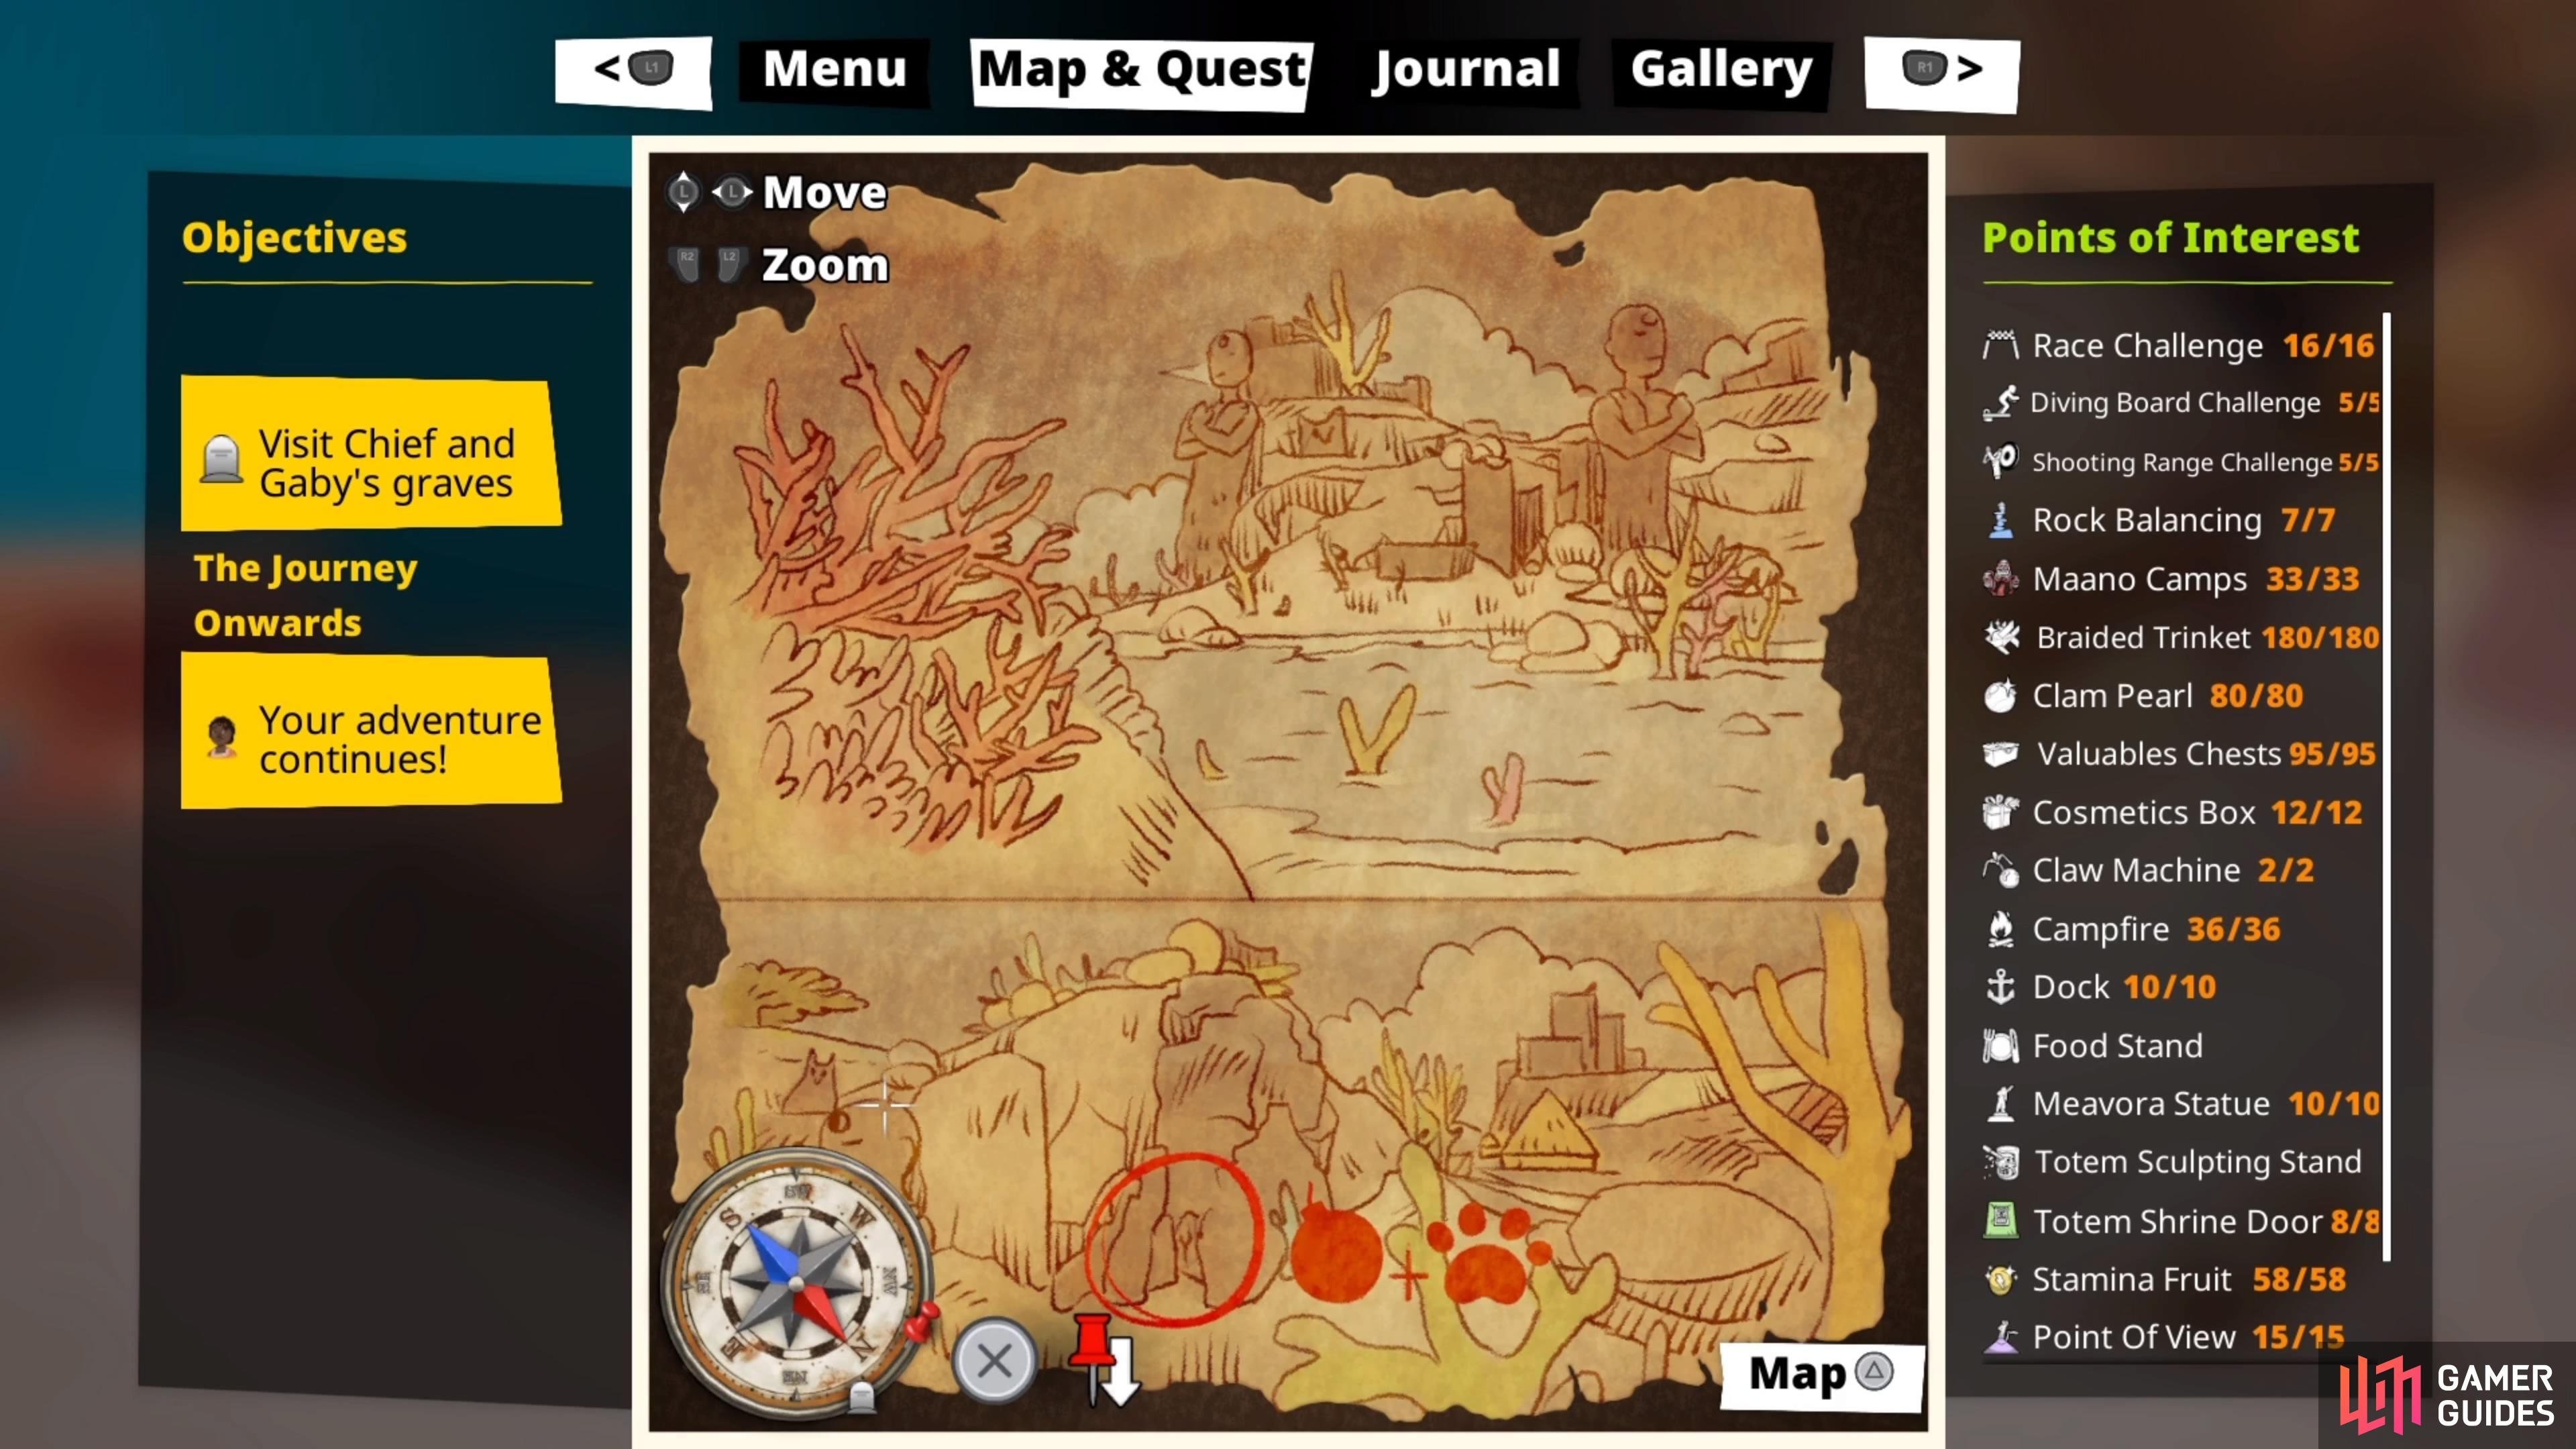
This next treasure chest location is easy to locate. Head northeast up the hill from Dopwa formation to find a small cave entrance on the left hand cliff. Head inside to find the chest that’s unlocked by the red key. In this chest you’ll find the map and orange key and a ![]() Henchman Vest cosmetic.
Henchman Vest cosmetic.
The map shows a cavein the cliff up the hill from the Dopwa rock formation.
head into the cave to find the next chest.
Treasure Chest #3: Orange Key
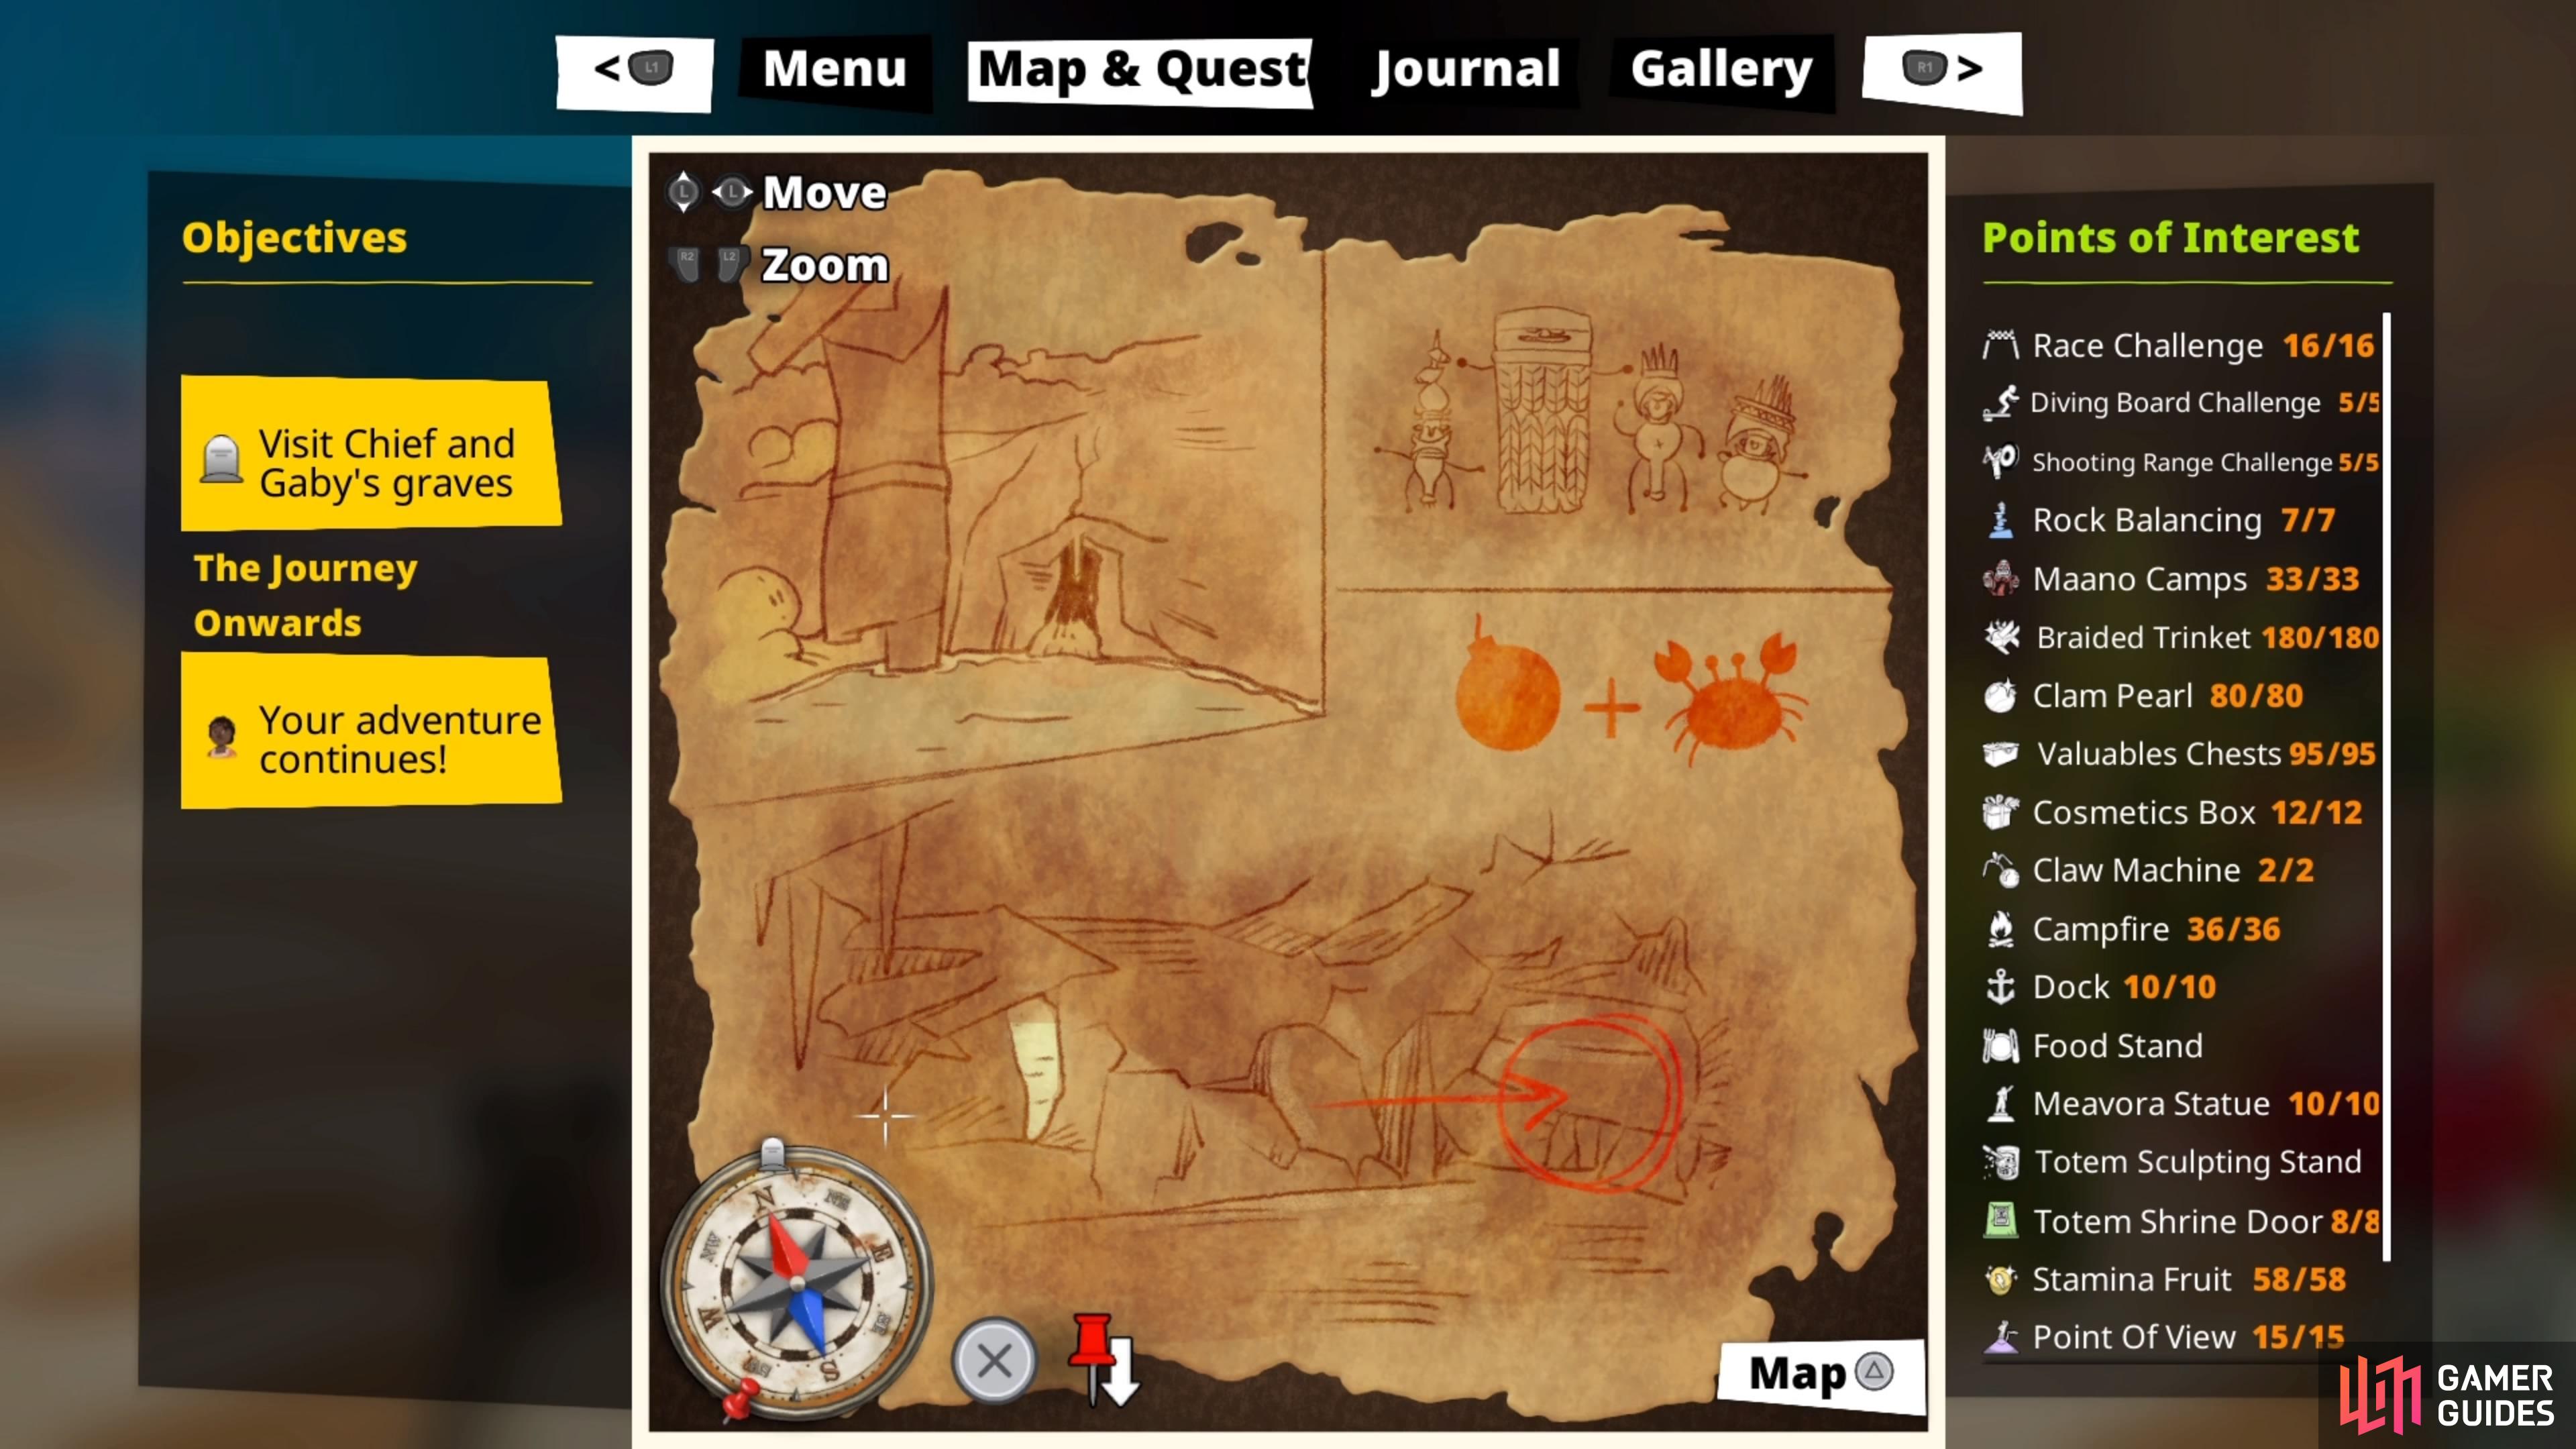
This chest can be found on a small islet at the center of a small lake called ![]() Hua, which is found further up the hill northeast of Dopwa and the cave. When you arrive on the island, you’ll need to soul-jump into a crab - you can find one nearby or evoke one using the soul melody (if you’ve unlocked it). Use the crab’s powerful pincers to break off the chains wrapped around the treasure chest. Once the chains are gone, you can unlock the chest using the orange key. Inside this chest you’ll find a map and yellow key and an Ancestral Top.
Hua, which is found further up the hill northeast of Dopwa and the cave. When you arrive on the island, you’ll need to soul-jump into a crab - you can find one nearby or evoke one using the soul melody (if you’ve unlocked it). Use the crab’s powerful pincers to break off the chains wrapped around the treasure chest. Once the chains are gone, you can unlock the chest using the orange key. Inside this chest you’ll find a map and yellow key and an Ancestral Top.
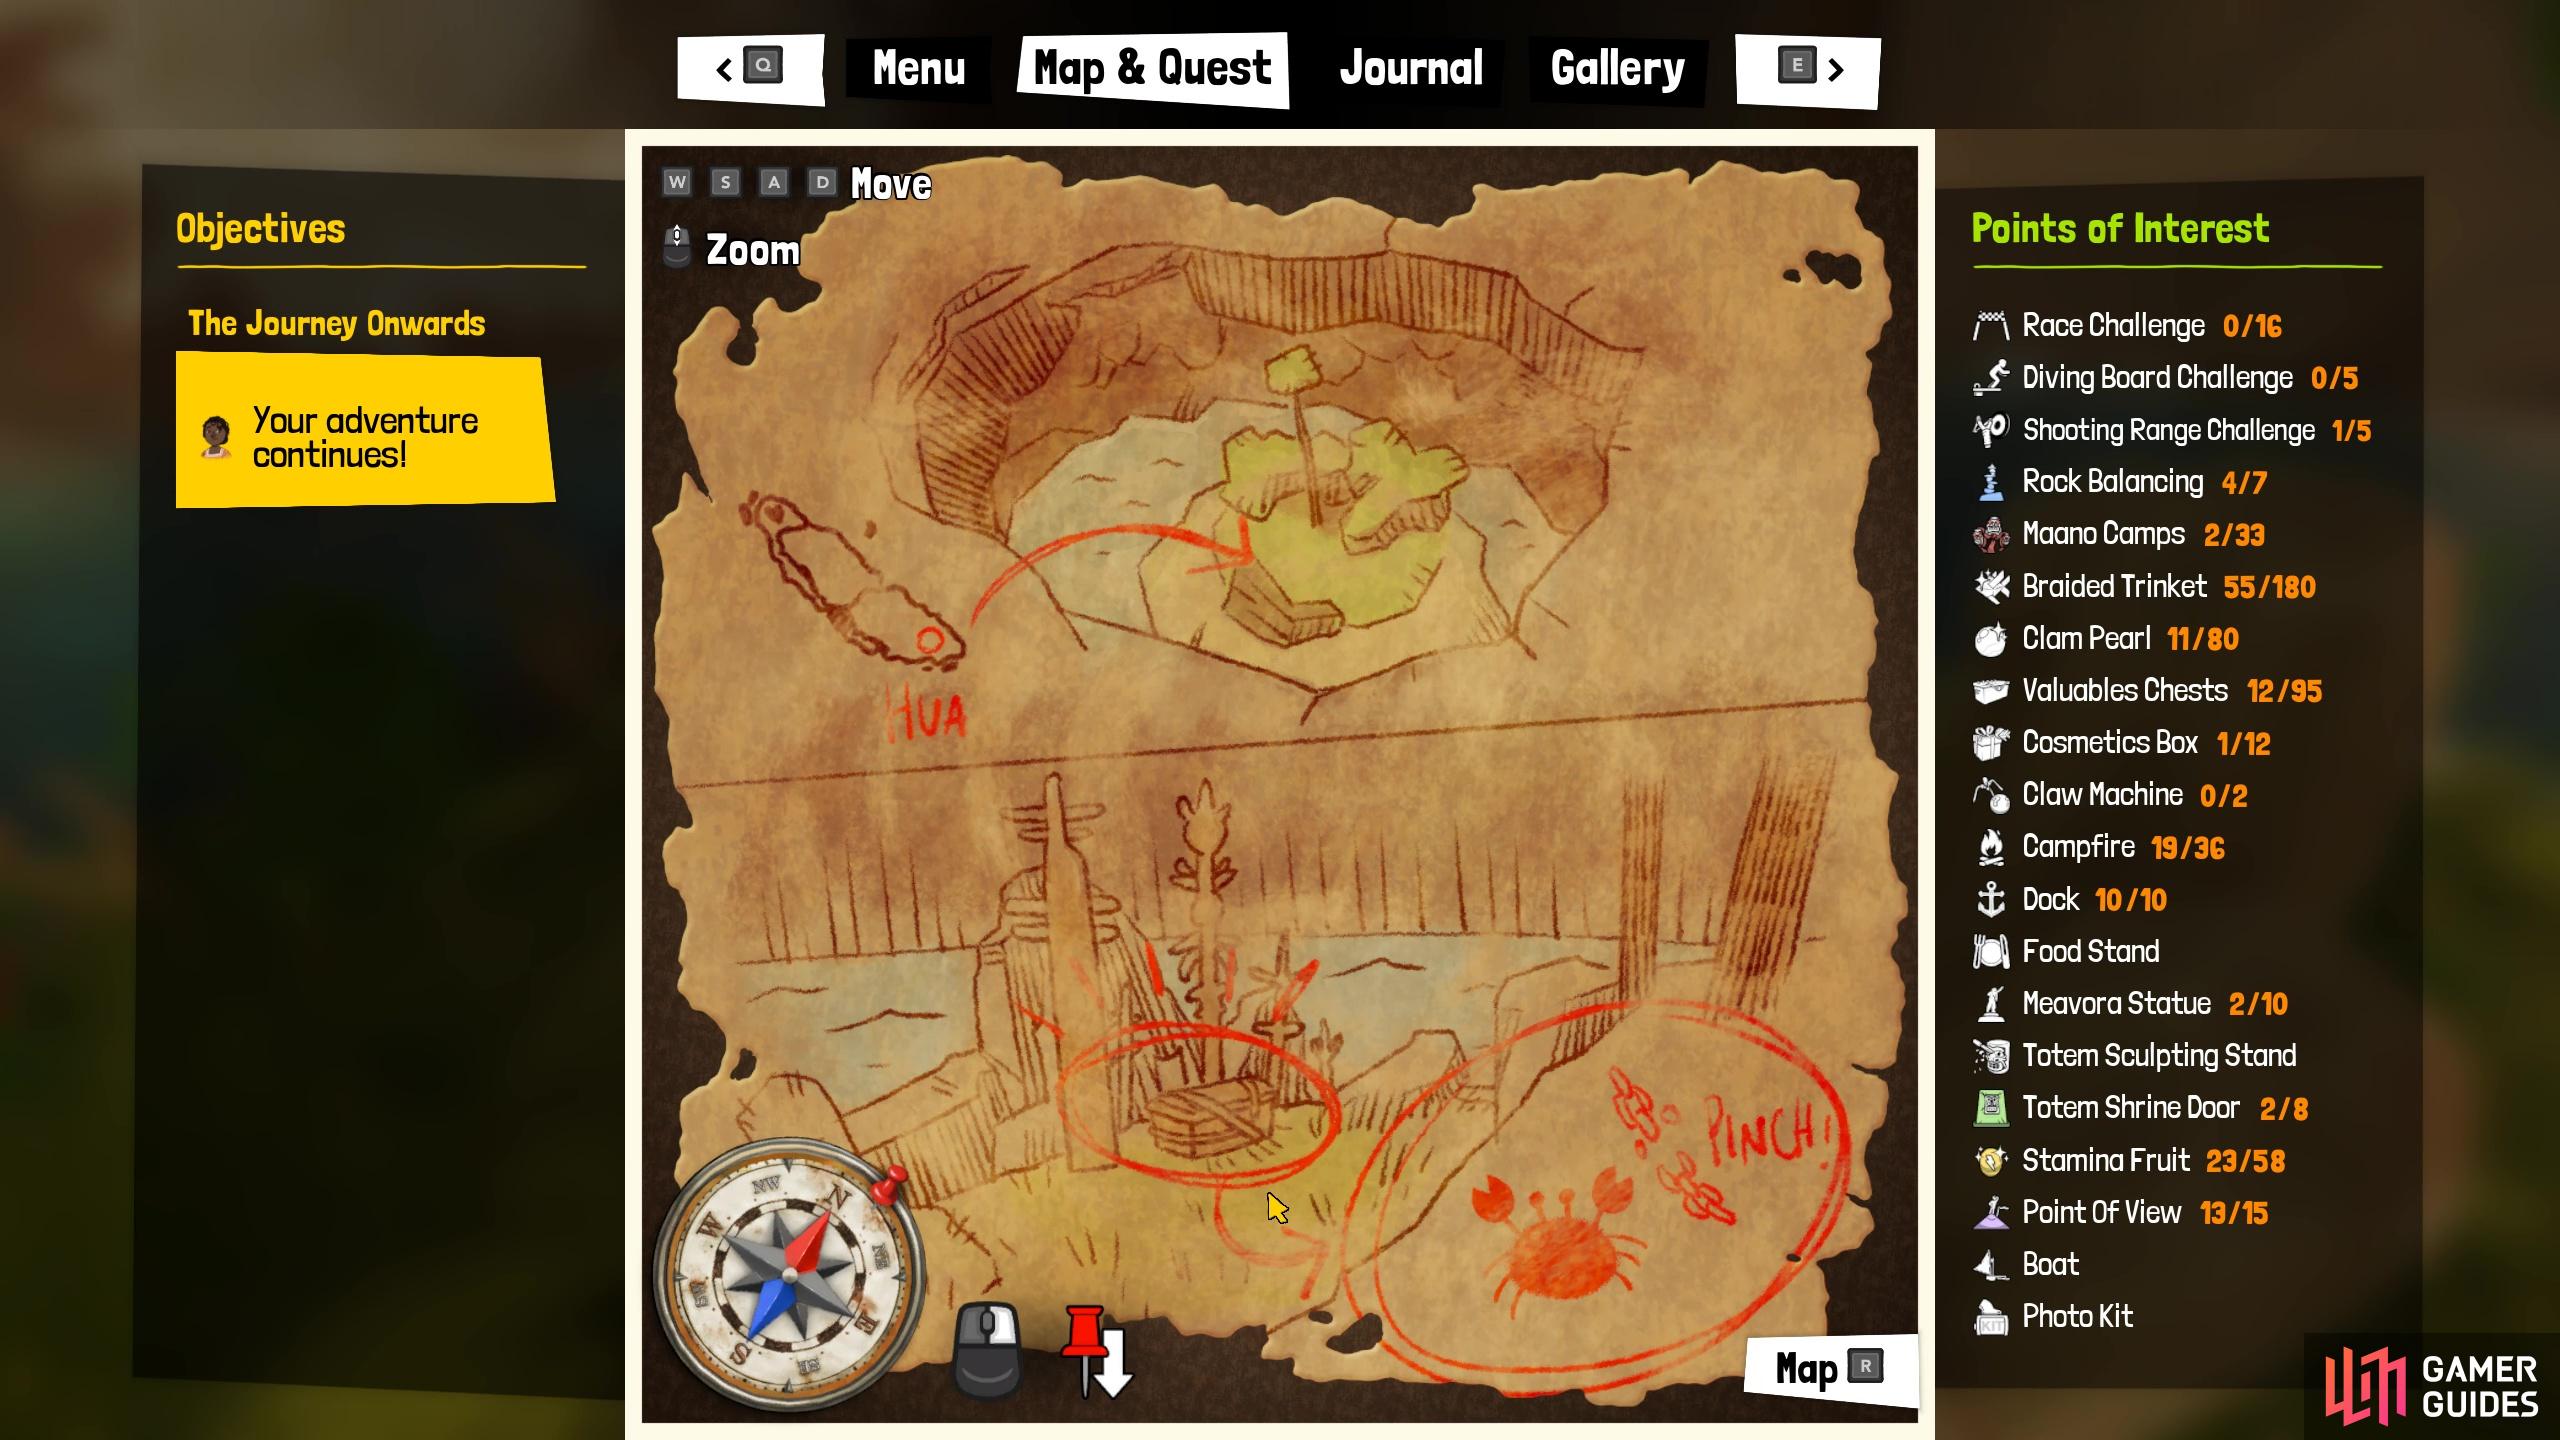
Your next stop is Hua Lake!
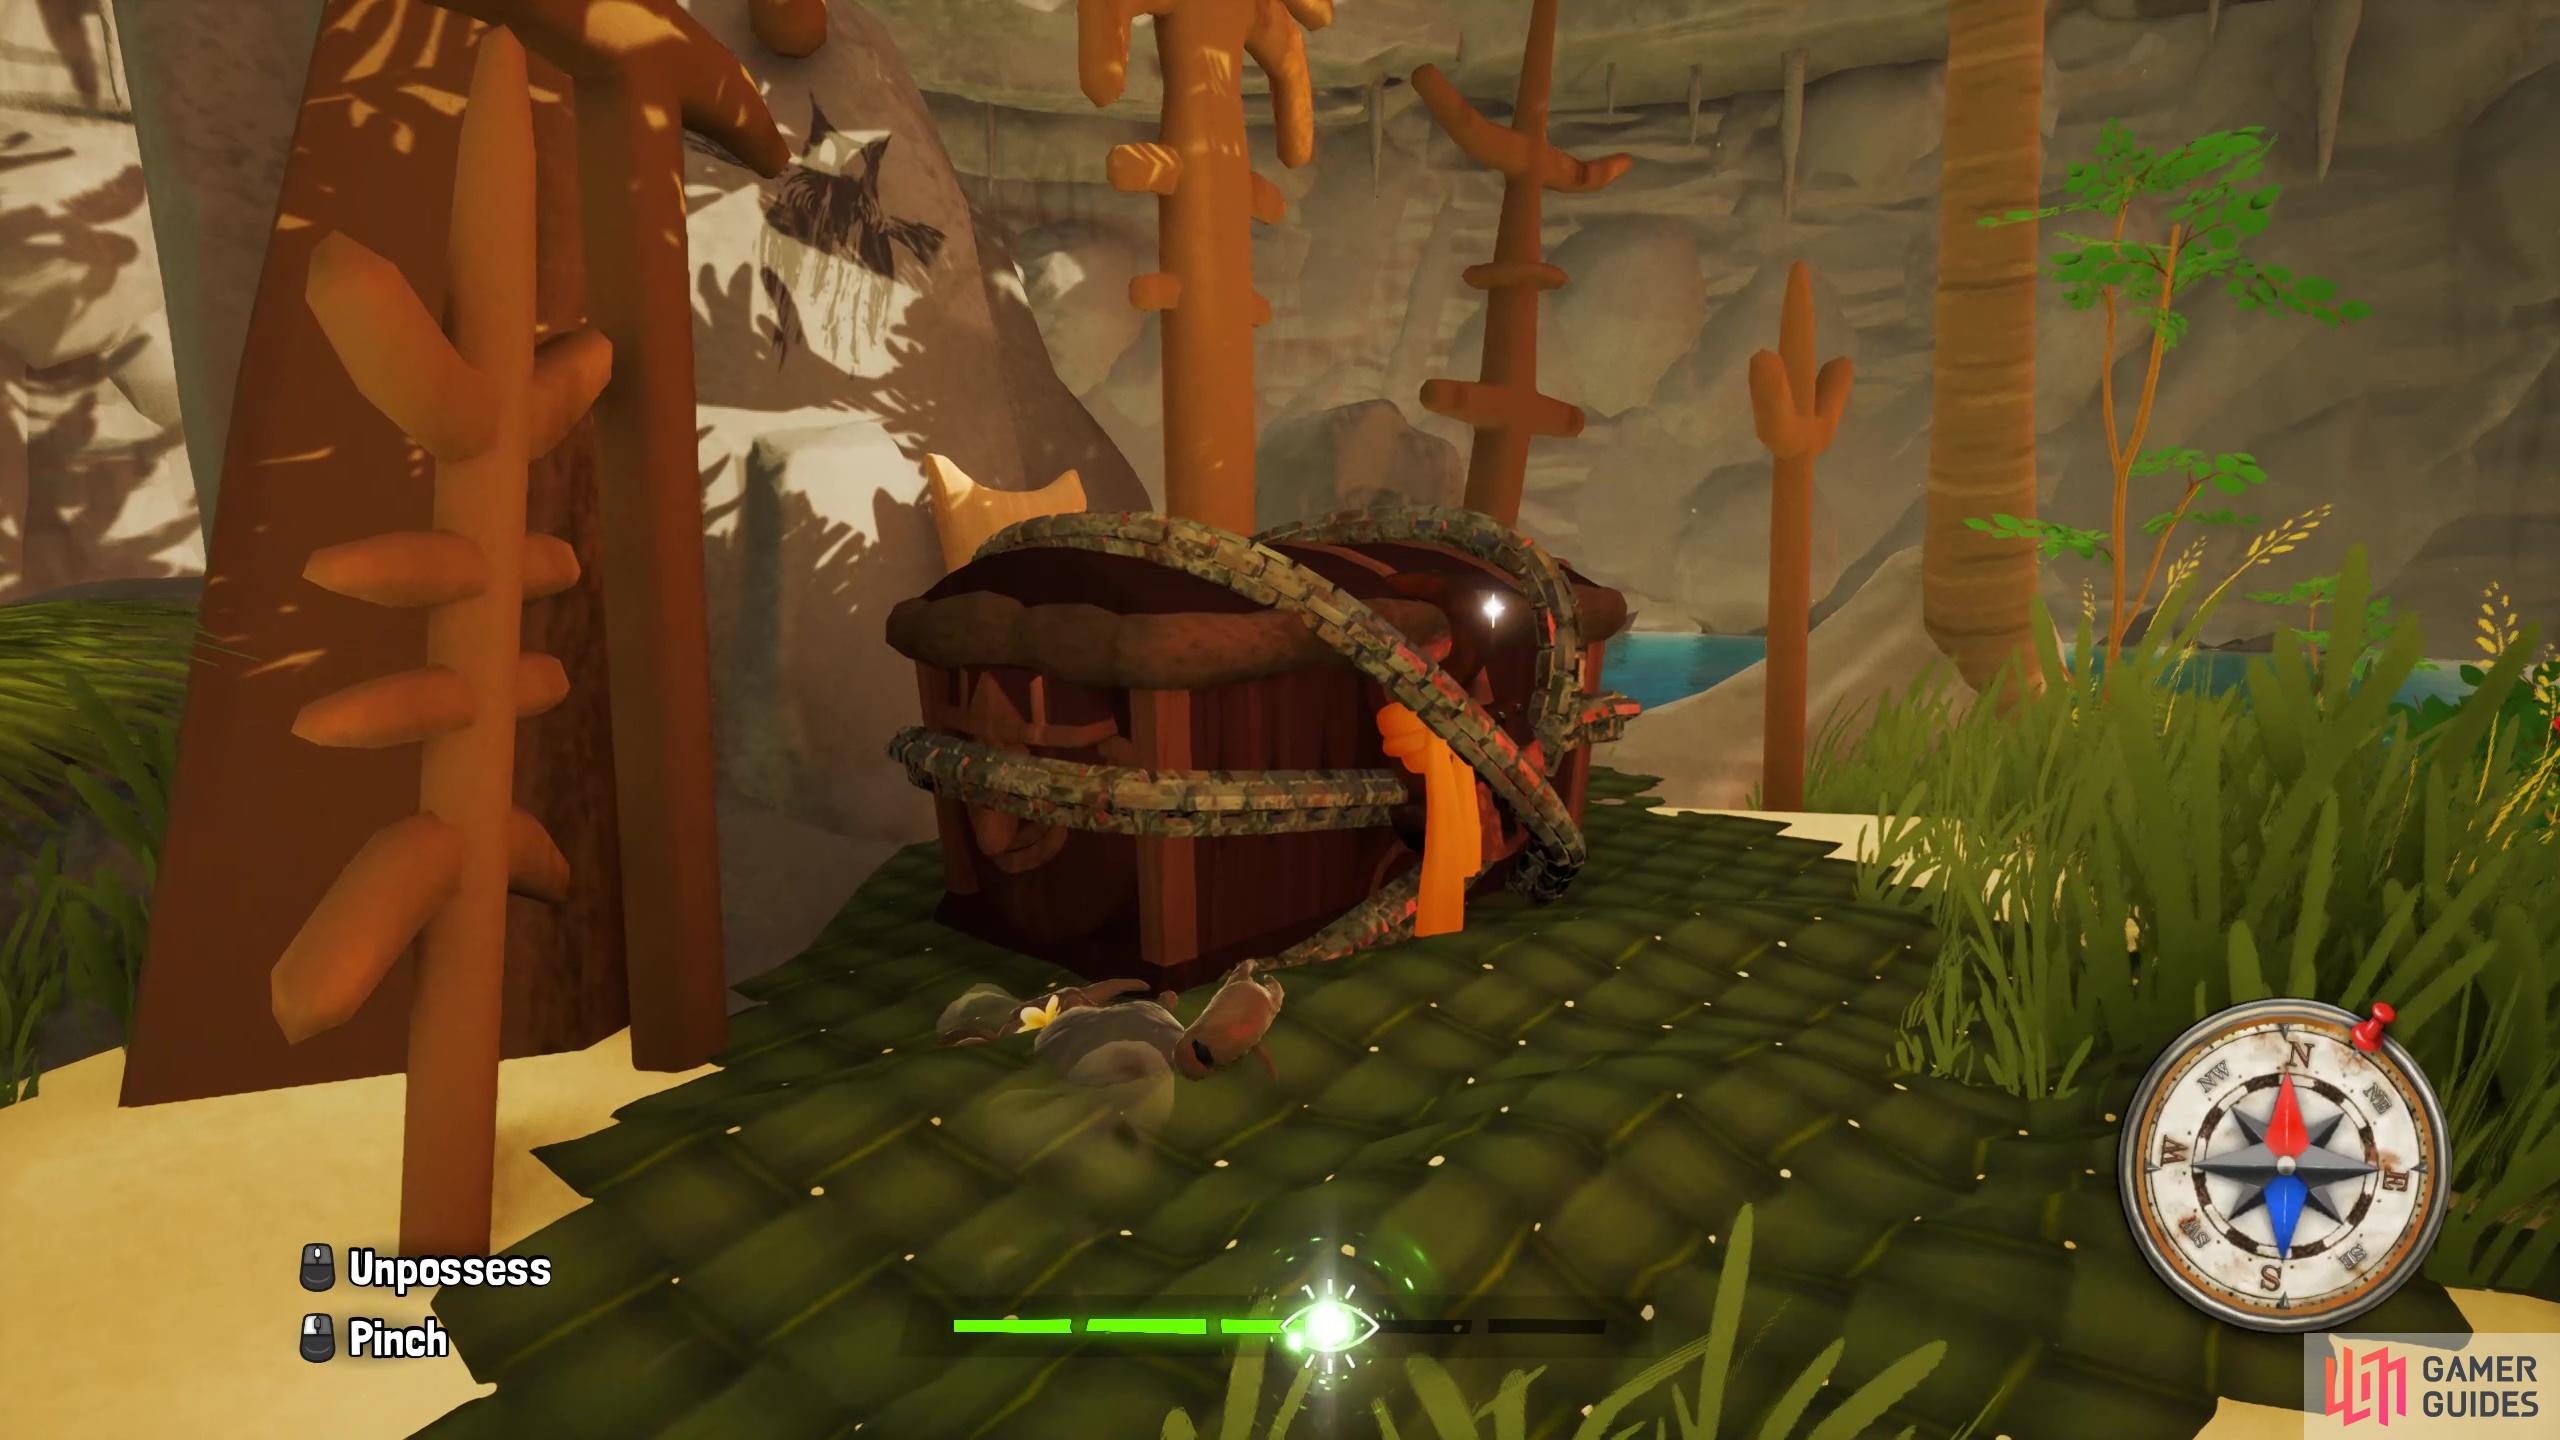
Use a crab to pinch away the chains.
Treasure Chest #4: Yellow Key
The next chest is closer than you think, but will still be a little tricky to reach. If you’ve unlocked the air bubble soul melody, play that to trigger it so you can swim beneath the water for longer. If you don’t have it, you can soul jump into a fish nearby. Dive into the lake to locate a small tunnel that goes into the cliffside. It’s quite the swim, but it luckily isn’t all under water so once you’re past the first bit you can head to the surface to take a breath if you need. You’ll reach a fork in the water, take the left path to find the chest at the bottom of the water.
This chest contains a map and light green key and Big ![]() Stamina Fruit. This fruit will increase your max stamina by 3, but will not contribute to the overall Stamina Fruit collectible count. To exit this cave, you can either go back the way you came, or follow the arrow signs to pop up on a small beach island on the southern coast of Ija Nöj.
Stamina Fruit. This fruit will increase your max stamina by 3, but will not contribute to the overall Stamina Fruit collectible count. To exit this cave, you can either go back the way you came, or follow the arrow signs to pop up on a small beach island on the southern coast of Ija Nöj.

Treasure Chest #5: Light Green Key
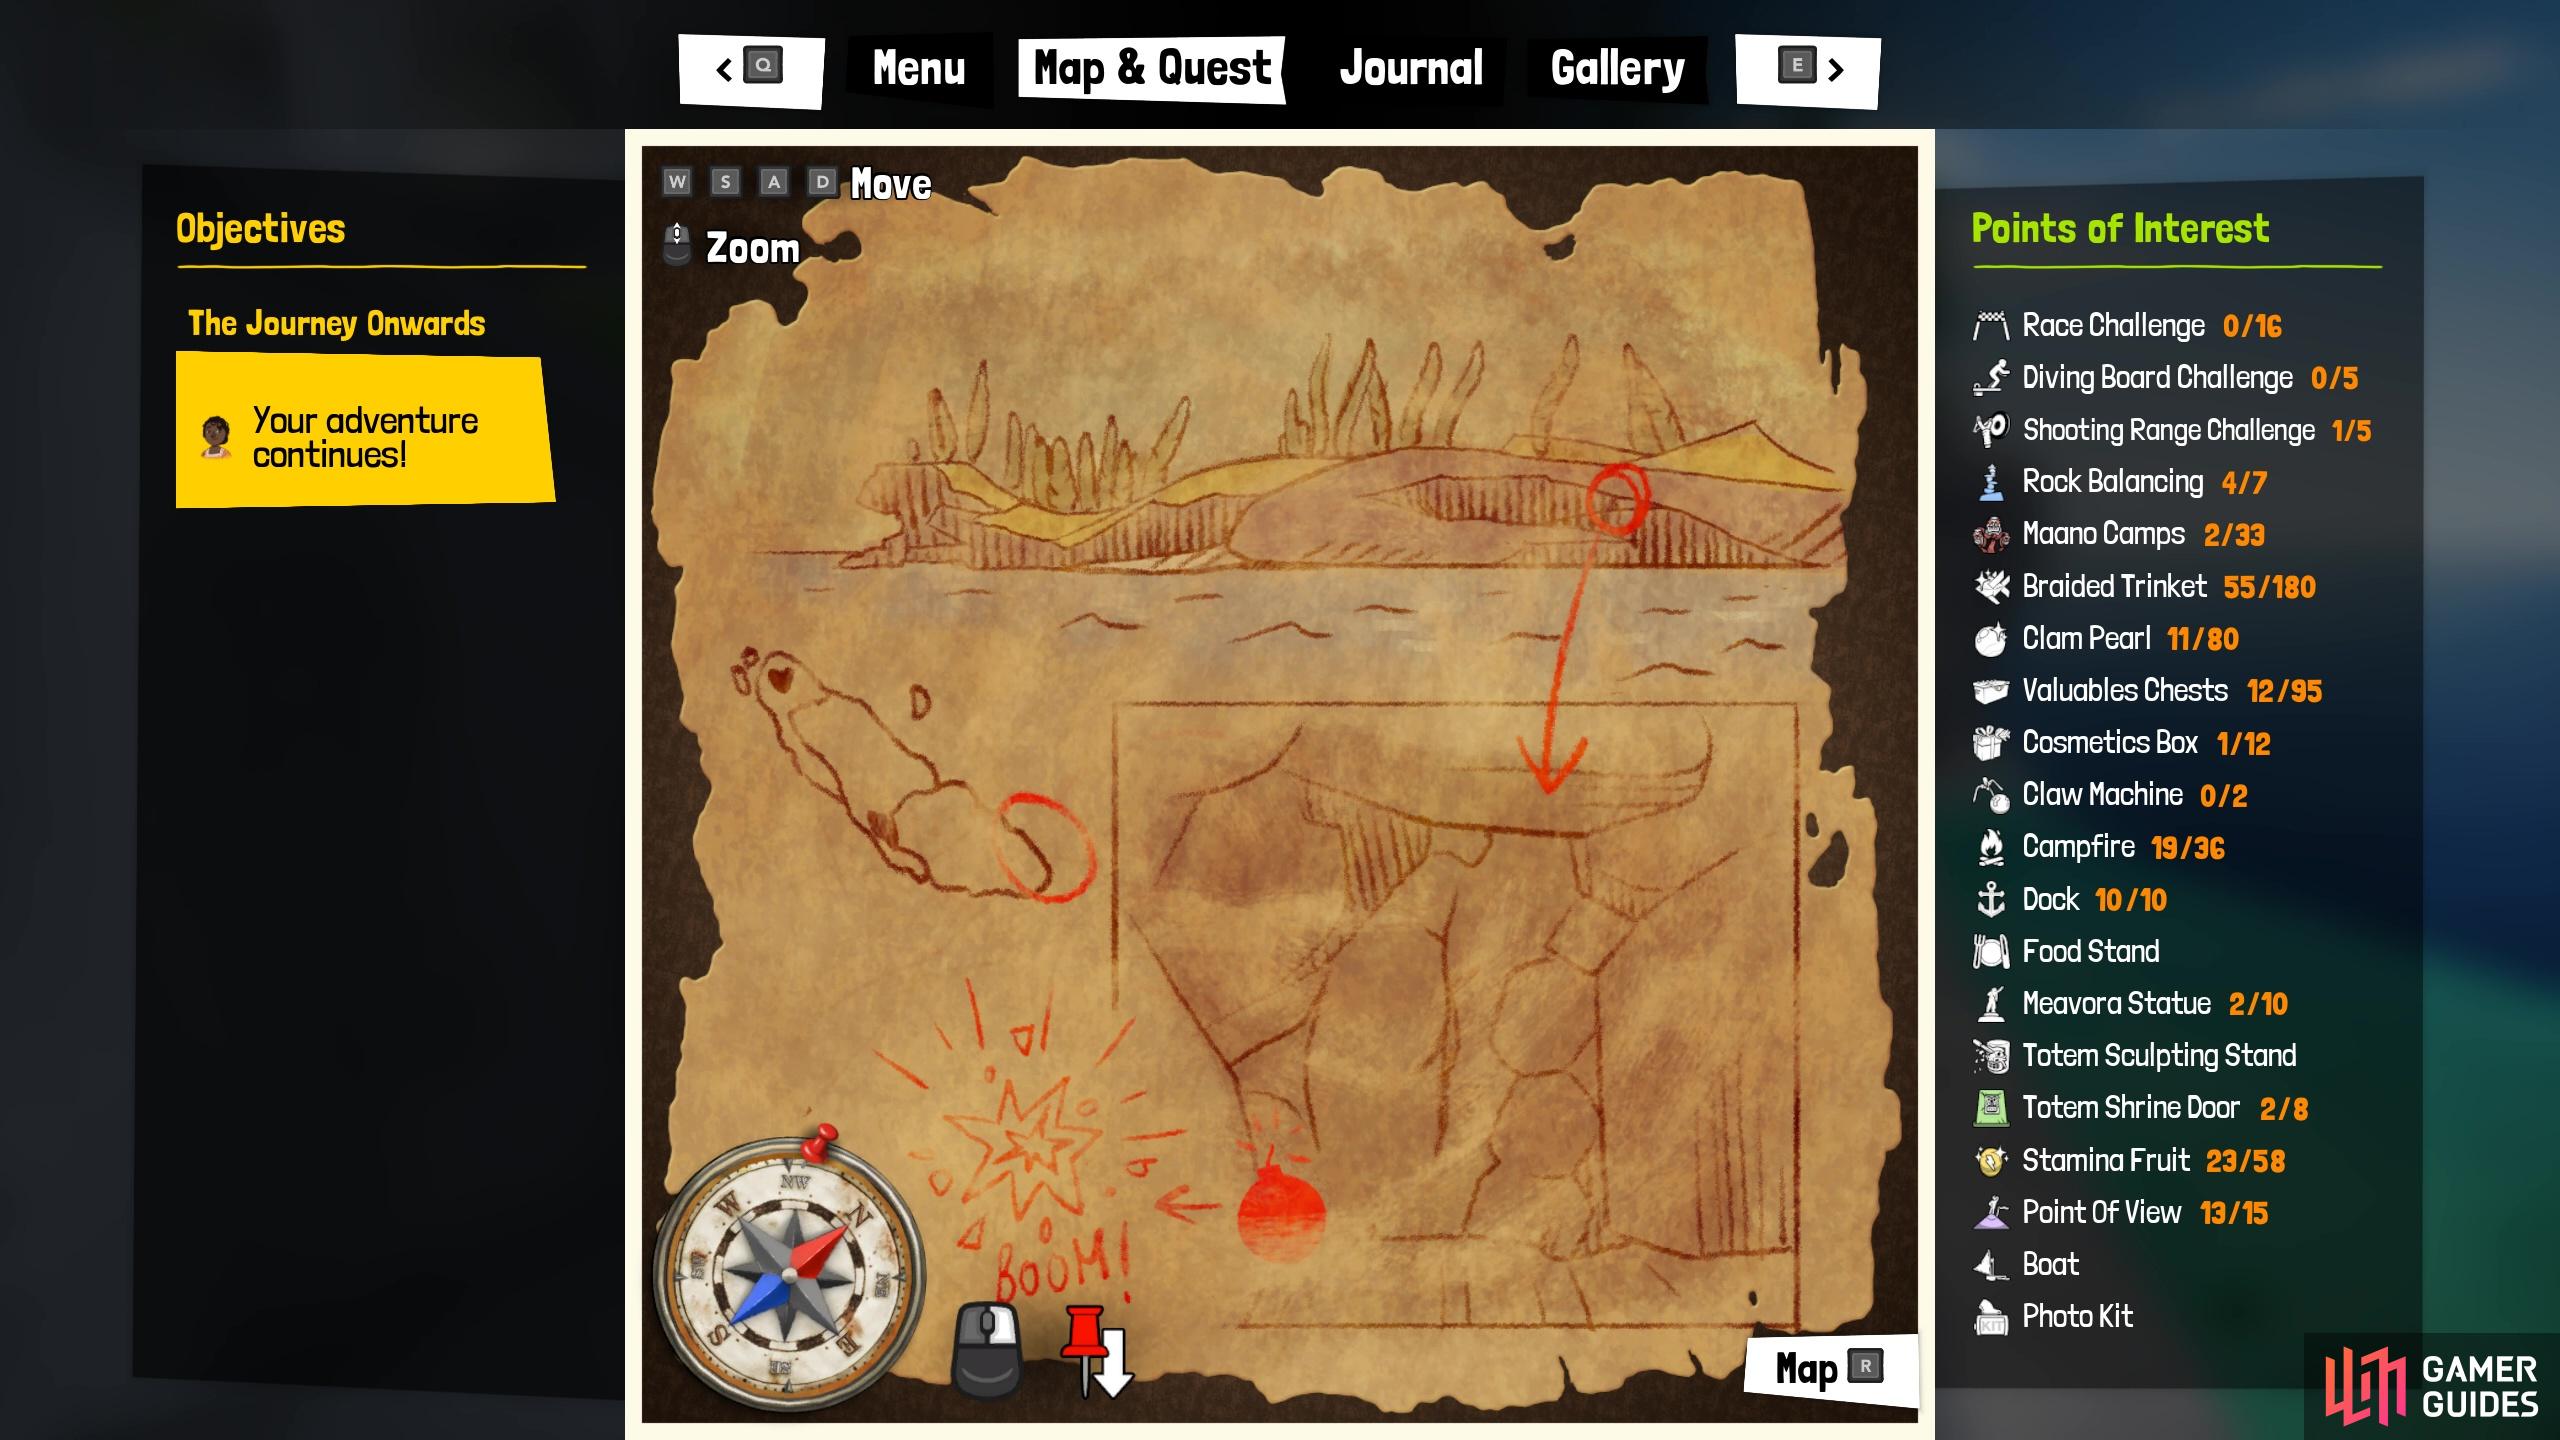
The next stop on this tresure hunt is the south east coast near Dok. To get to this chest, you’re gonna need an explosive of sorts. Luckily, its just north of a ![]() Maano Camp, so you could pick up an oil lamp or a jerrycan if you don’t already have an explosive in your inventory. Head into the small alcove in the cliff face to find the cave entrance. It’s indicated by a large crack and a bird symbol to the right of it. Use your choice of explosive to blow up the entrance. Equip your torch head deep into the cave to locate the next chest. This chest contains a map and dark green key and a mask with feathers.
Maano Camp, so you could pick up an oil lamp or a jerrycan if you don’t already have an explosive in your inventory. Head into the small alcove in the cliff face to find the cave entrance. It’s indicated by a large crack and a bird symbol to the right of it. Use your choice of explosive to blow up the entrance. Equip your torch head deep into the cave to locate the next chest. This chest contains a map and dark green key and a mask with feathers.
Treasure Chest #6: Dark Green Key
This next chest is not on Ija Nöj, but can instead be found on ![]() Madra Nöj. You’ll want to take the boat over to
Madra Nöj. You’ll want to take the boat over to ![]() Gwâ or fast travel to Gwâ dock. From there, head northeast towards the slight hill and you’ll see a small cave entrance and the indicative white bird symbol to show you’re on the right track. To get through the small cave entrance, you’ll want to soul jump into a small rock from the crate nearby. Inside the cave you’ll find the chest containing a map and turquoise key and a henchman pants.
Gwâ or fast travel to Gwâ dock. From there, head northeast towards the slight hill and you’ll see a small cave entrance and the indicative white bird symbol to show you’re on the right track. To get through the small cave entrance, you’ll want to soul jump into a small rock from the crate nearby. Inside the cave you’ll find the chest containing a map and turquoise key and a henchman pants.
Treasure Chest #7: Turquoise Key
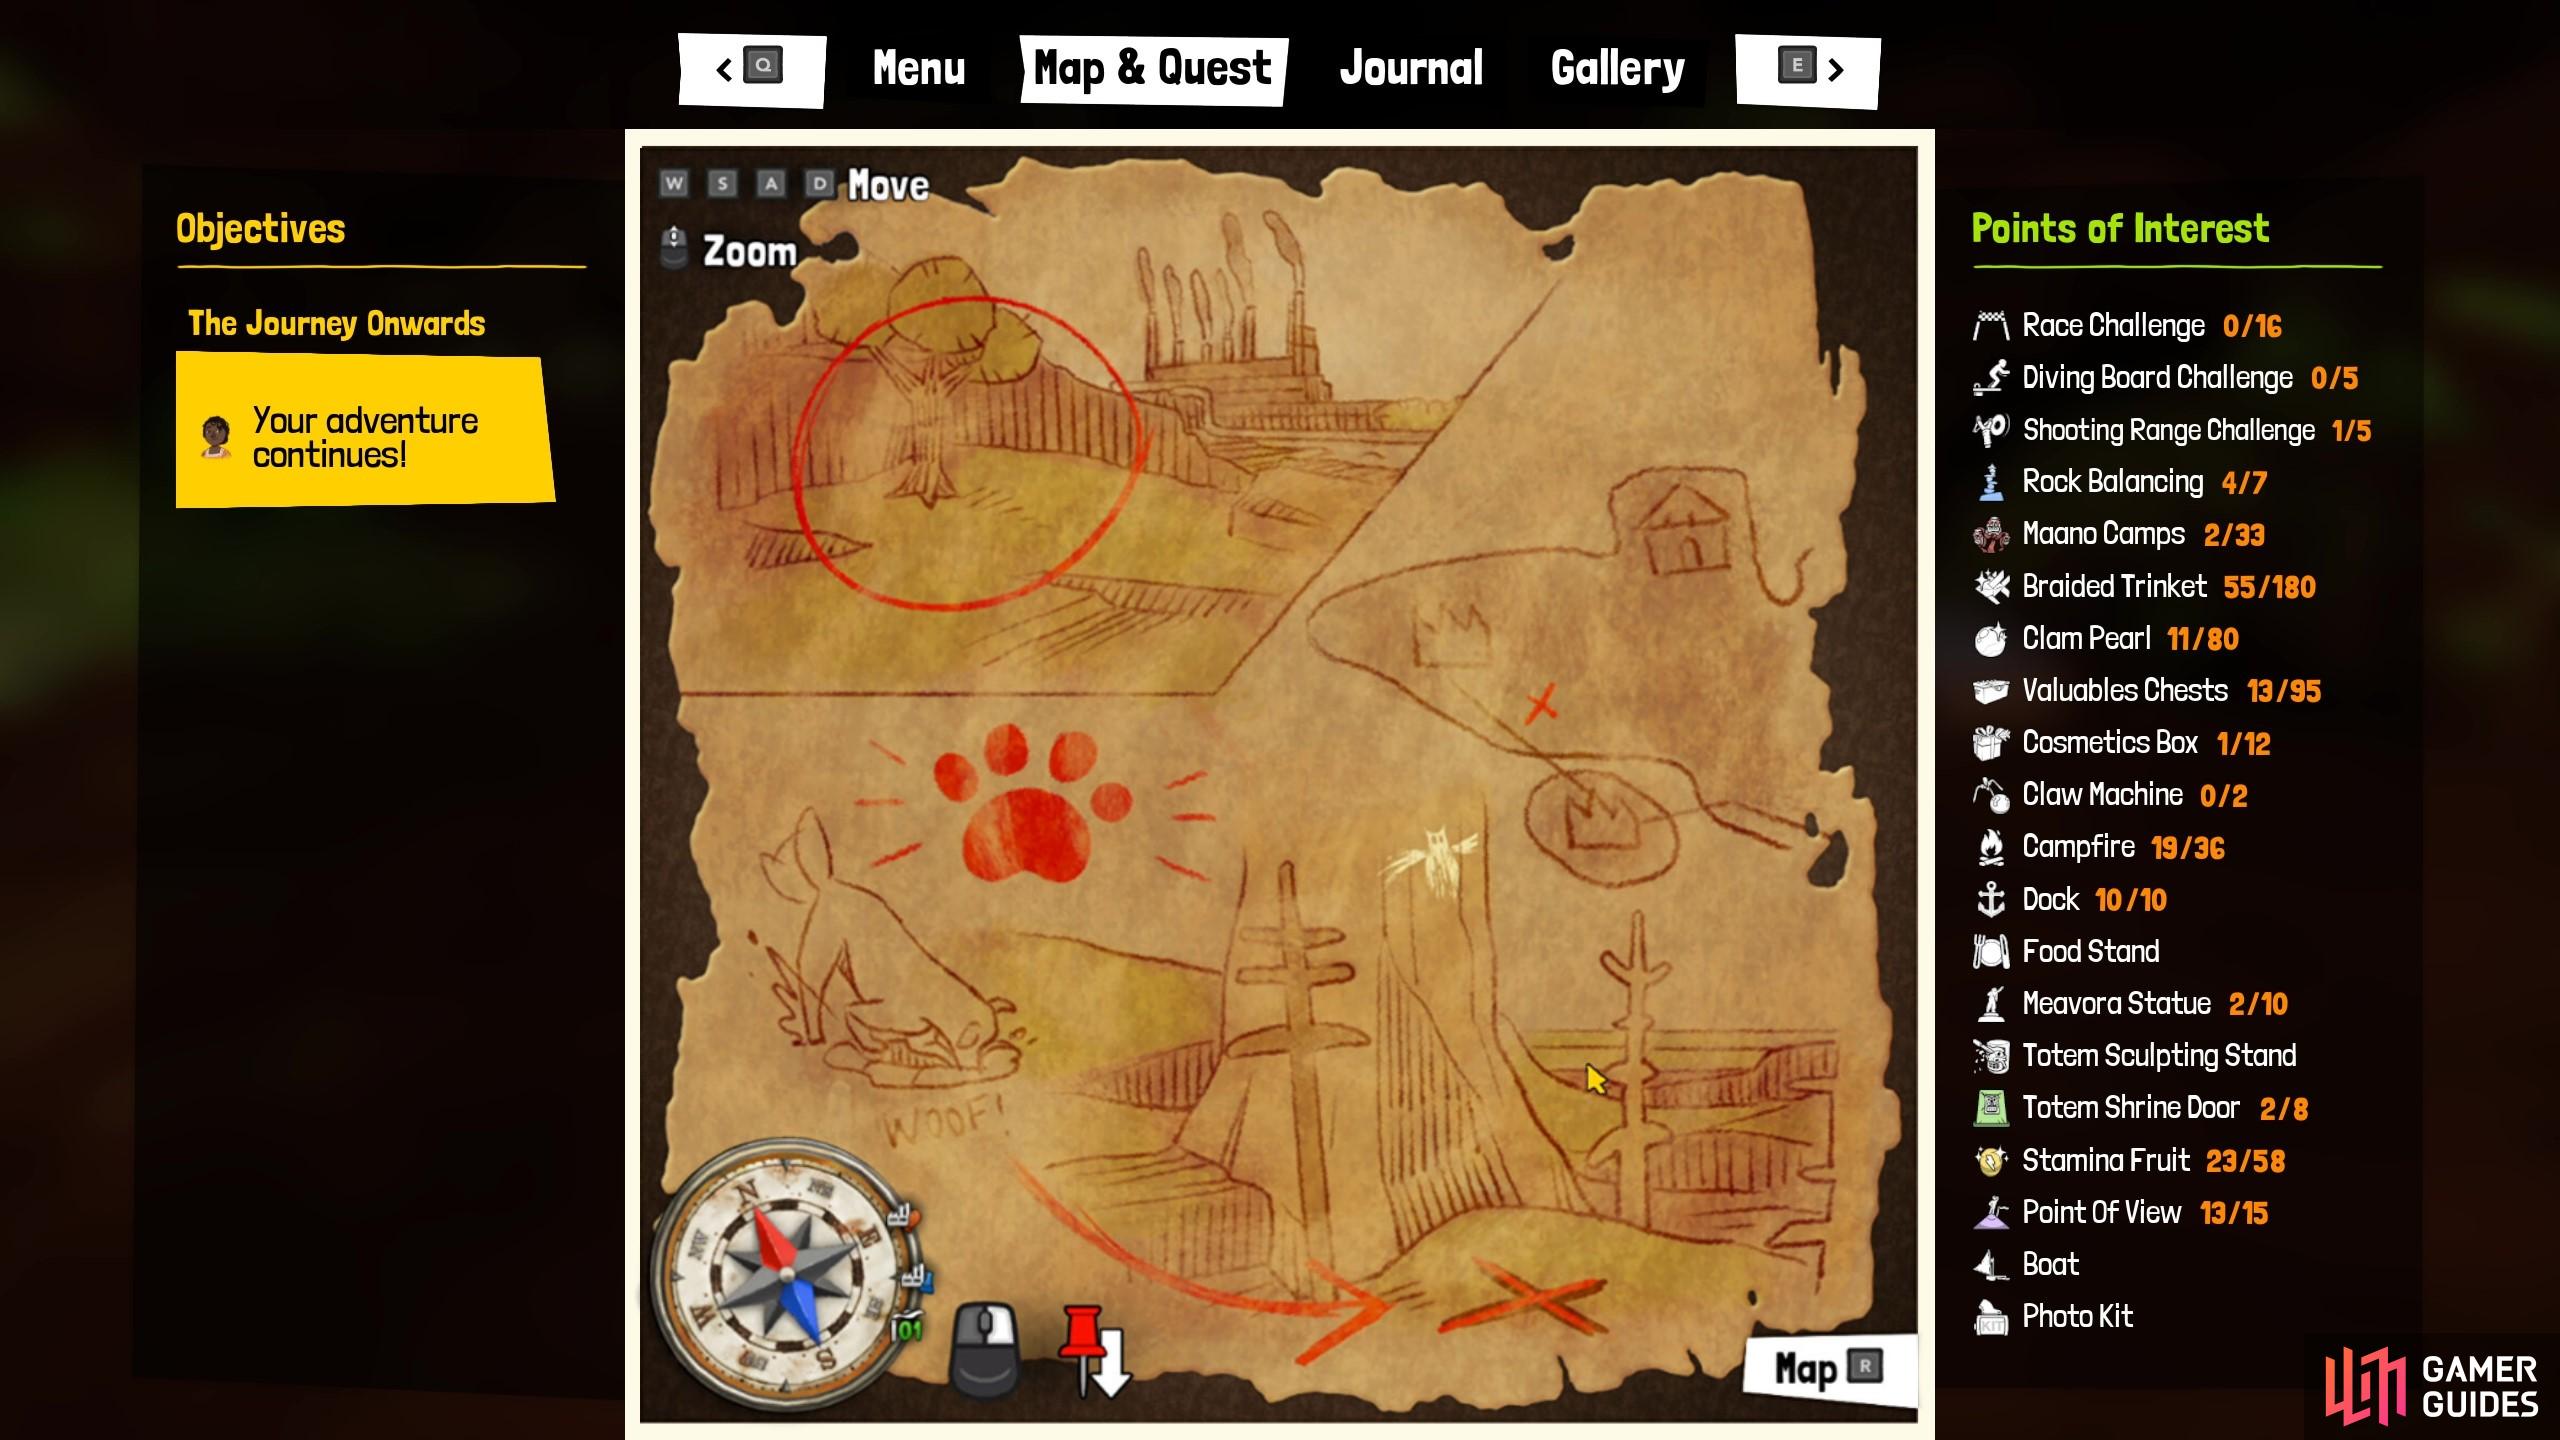
This next chest is not too far. You’ll need to head west from the cave to find a large tree, which is south of Ita. You’ll need to find yourself a digging animal to soul jump into. You can either find a boar, which can be found semi-nearby, or if you have the soul melody unlocked you can evoke a dog. When you’ve soul jumped into a digging animal dig up the treasure chest beneath the tree. Inside you’ll find a map and light blue key and Ancestral Pants.
Treasure Chest #8: Light Blue Key
You will be journeying close to Aemoon for this chest. Specially, west of Aemoon is Pwara Nyaa, with a small, little island that has a ![]() Campfire on it. Head to the Campfire and look to your south, while trying to keep
Campfire on it. Head to the Campfire and look to your south, while trying to keep ![]() Ga Ngazo just in your view on the left side. You will be going southeast from the little island, up the hill, and look for the familiar totems marking your destination. There will be a cracked wall here, so use an explosive to blast it open and reveal the chest. Of course, you also need a crab here, so break the chains on the chest. You will receive a Big Stamina Fruit and the next map, as well as the dark blue key.
Ga Ngazo just in your view on the left side. You will be going southeast from the little island, up the hill, and look for the familiar totems marking your destination. There will be a cracked wall here, so use an explosive to blast it open and reveal the chest. Of course, you also need a crab here, so break the chains on the chest. You will receive a Big Stamina Fruit and the next map, as well as the dark blue key.

Treasure Chest #9: Dark Blue Key
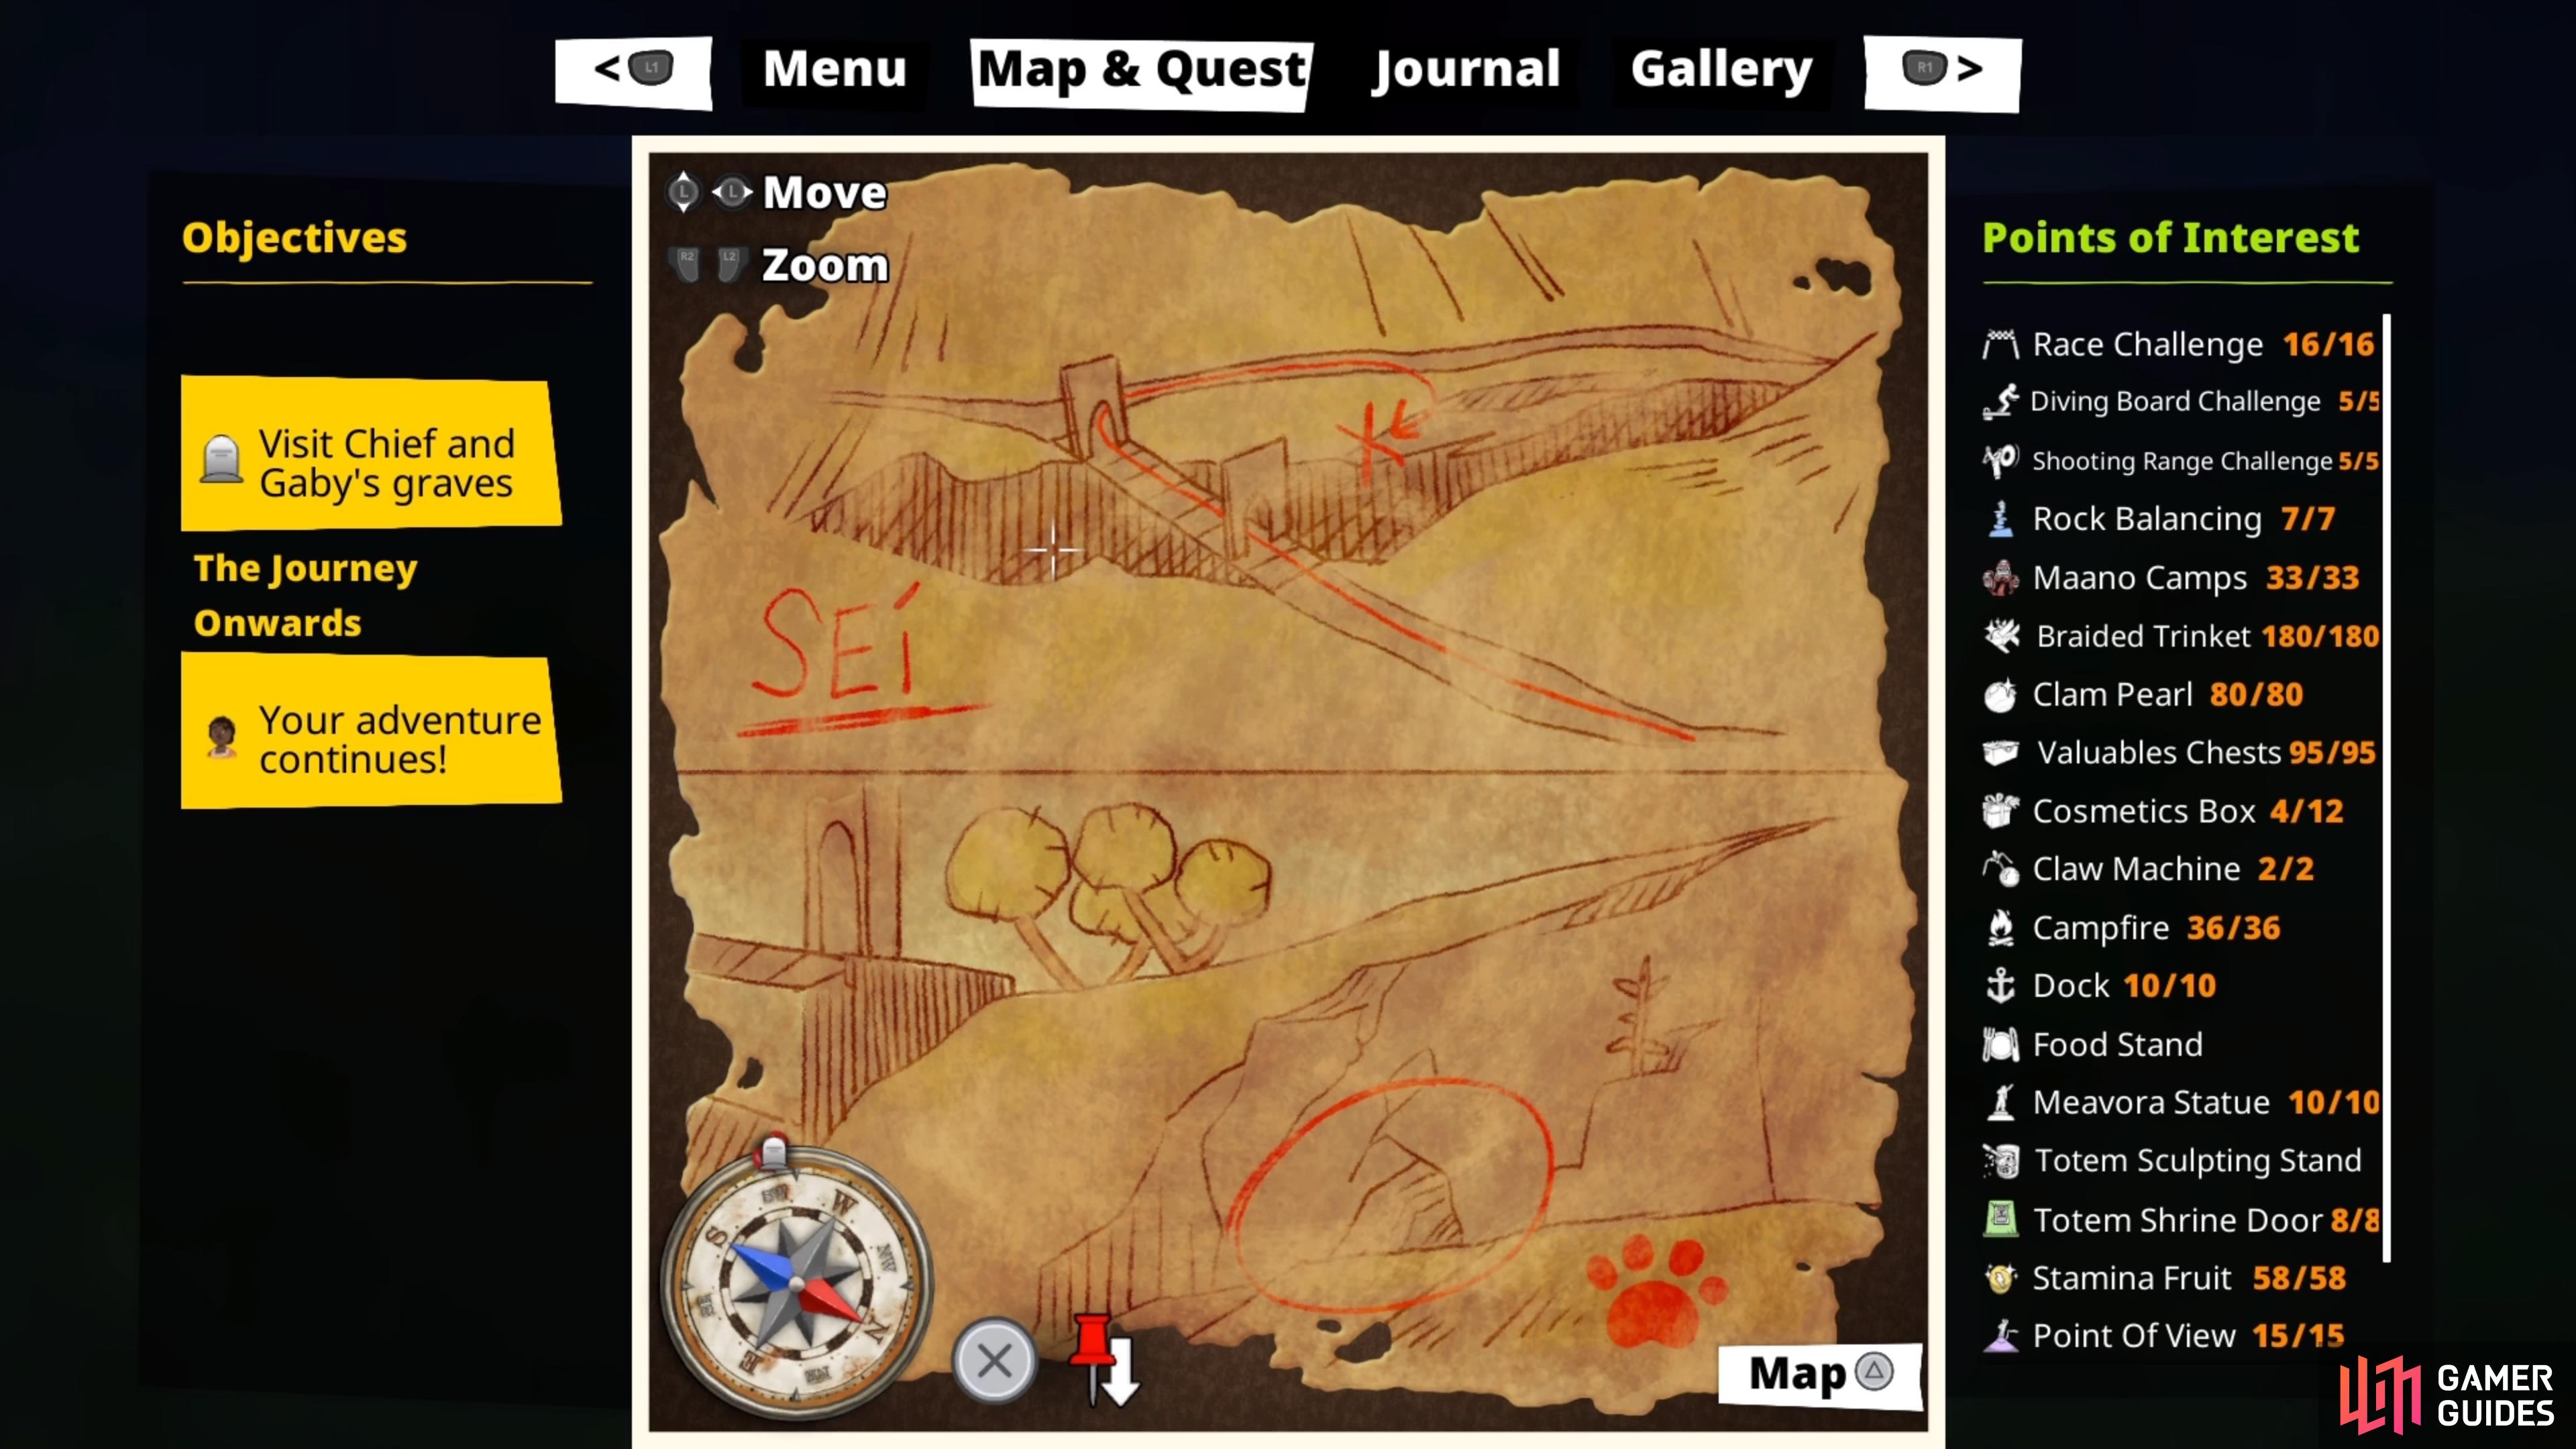
The next chest will be located on Ija Noj again, in the middle of the two islands there. You will be looking for the area named Sei, which is just southwest of ![]() Tingeting, so fast travel to there first. When you arrive at Sei, look for the small bridge that extends across the river there. You want to be on the eastern side of the bridge, then look northwest. If you can see it, there’s a small opening in that direction, which is where you want to go. You either need a dog (can use a Soul-Melody) or boar here, so grab one before heading inside the opening. Upon doing so, use the animal to dig at the X-mark to reveal the chest, so open it for a Mask with Coconut Fibers and the map, as well as the purple key.
Tingeting, so fast travel to there first. When you arrive at Sei, look for the small bridge that extends across the river there. You want to be on the eastern side of the bridge, then look northwest. If you can see it, there’s a small opening in that direction, which is where you want to go. You either need a dog (can use a Soul-Melody) or boar here, so grab one before heading inside the opening. Upon doing so, use the animal to dig at the X-mark to reveal the chest, so open it for a Mask with Coconut Fibers and the map, as well as the purple key.
Treasure Chest #10: Purple Key
The next chest will be located at Jawe Do, which is north-by-nortwest from Sei. It’s on the northern side of Ija Noj, and is fairly easy to spot, as it’s marked on your map. This is a little pond, and you will need to do some diving, so you’ll hopefully find some fish there. If not, then having the Soul-Melody for Infinite Breath will also help. However, the cave at the bottom is kind of small, so you will likely need to a fish to squeeze through it.
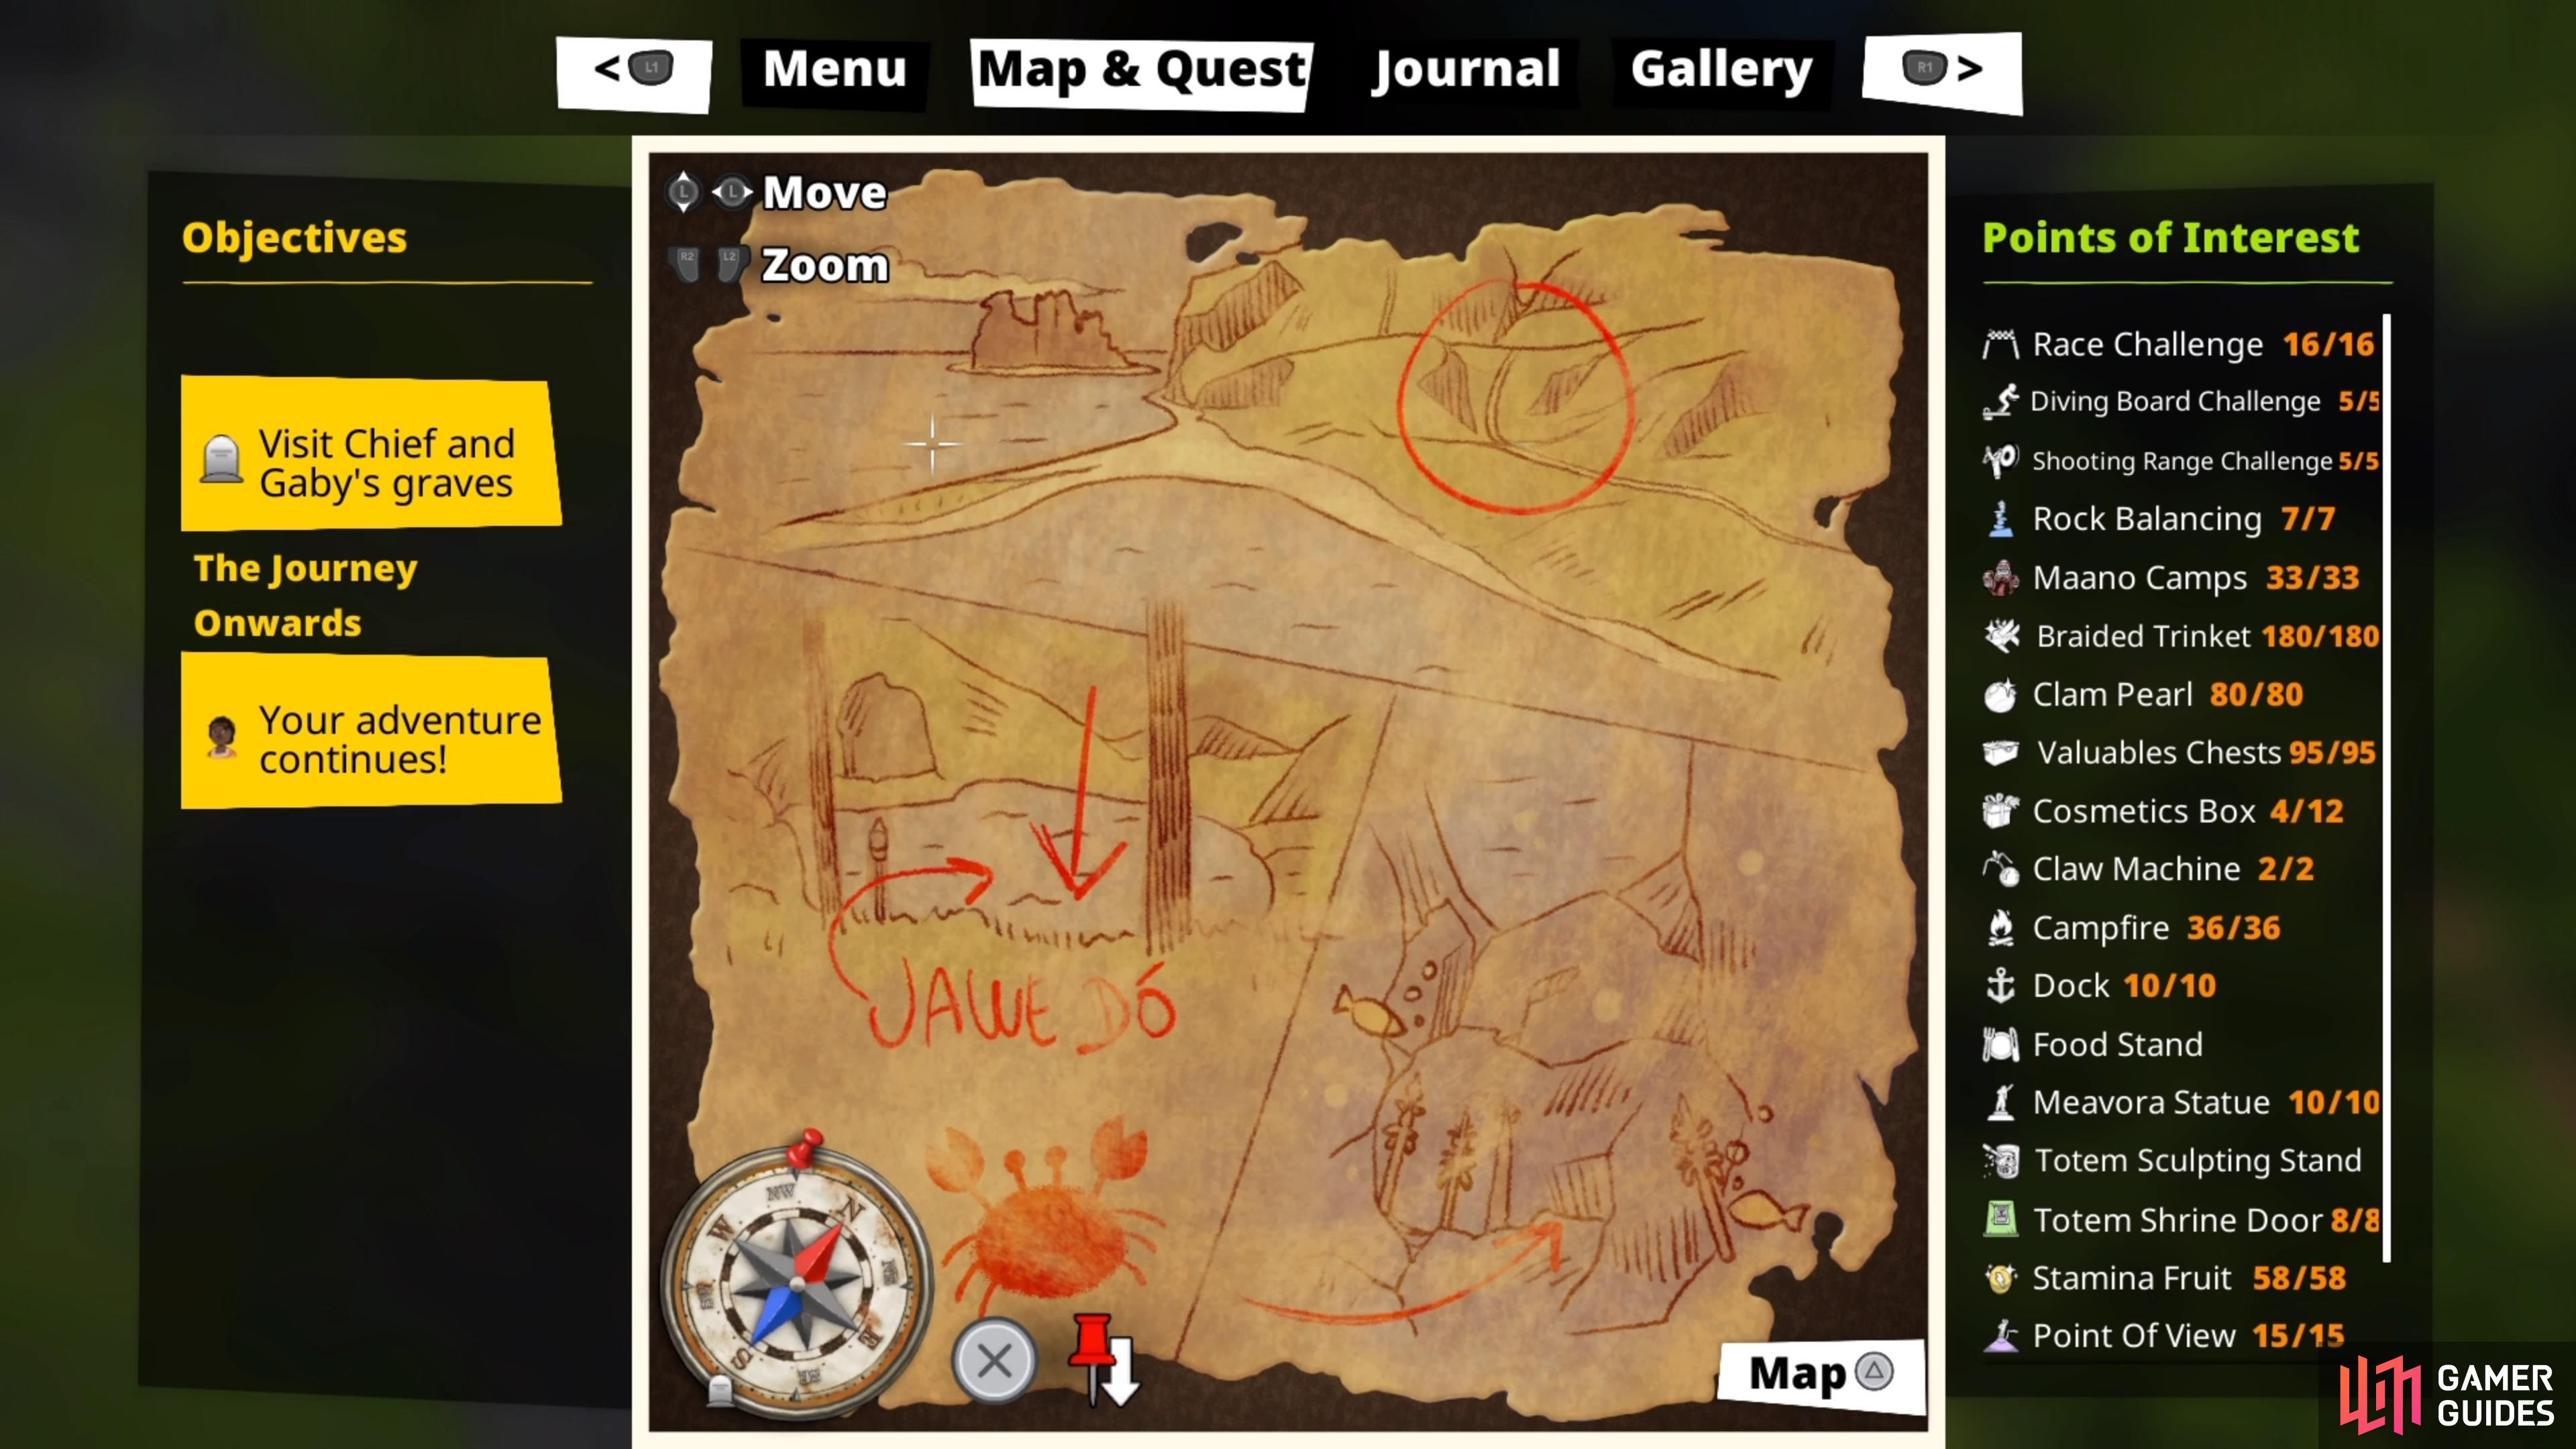
Note that you will also need a crab, so if you can find one on the shore before diving, that might be more useful, although it’s a little challenging to get it up on the other side of the cave entrance. Once you pass through the opening, go up and have your crab break the chains on the chest, netting you a Henchman Balaclava, the next map and the pink key.
Treasure Chest #11: Pink Key

On the southern of the two islands for Ija Noj, there is an area called Leboo Hau, where you will find a very large tree. Once you find the large tree, head straight west from it and go over the ridge. As soon as you cross over to the other side, you should see the markings where the chest should be located. You will need an explosive to blast open the wall here, as well as an animal that can dig, once the wall is open. You will receive the Ancestral Headband, as well as the next map and fuschia key.
Treasure Chest #12: Fuschia Key
This treasure chest will be located at the ![]() Shipwreck, which is located a little northwest of the northwestern tip of Madra Noj. Before going there, you will likely need to have the Soul-Melody that summons a crab, as it is needed to break the chains on the chest. If you can get the Infinite Breath Bubble Soul-Melody, that could also help, in terms of scouting where the chest is located. All you should really need, though, is a crab.
Shipwreck, which is located a little northwest of the northwestern tip of Madra Noj. Before going there, you will likely need to have the Soul-Melody that summons a crab, as it is needed to break the chains on the chest. If you can get the Infinite Breath Bubble Soul-Melody, that could also help, in terms of scouting where the chest is located. All you should really need, though, is a crab.
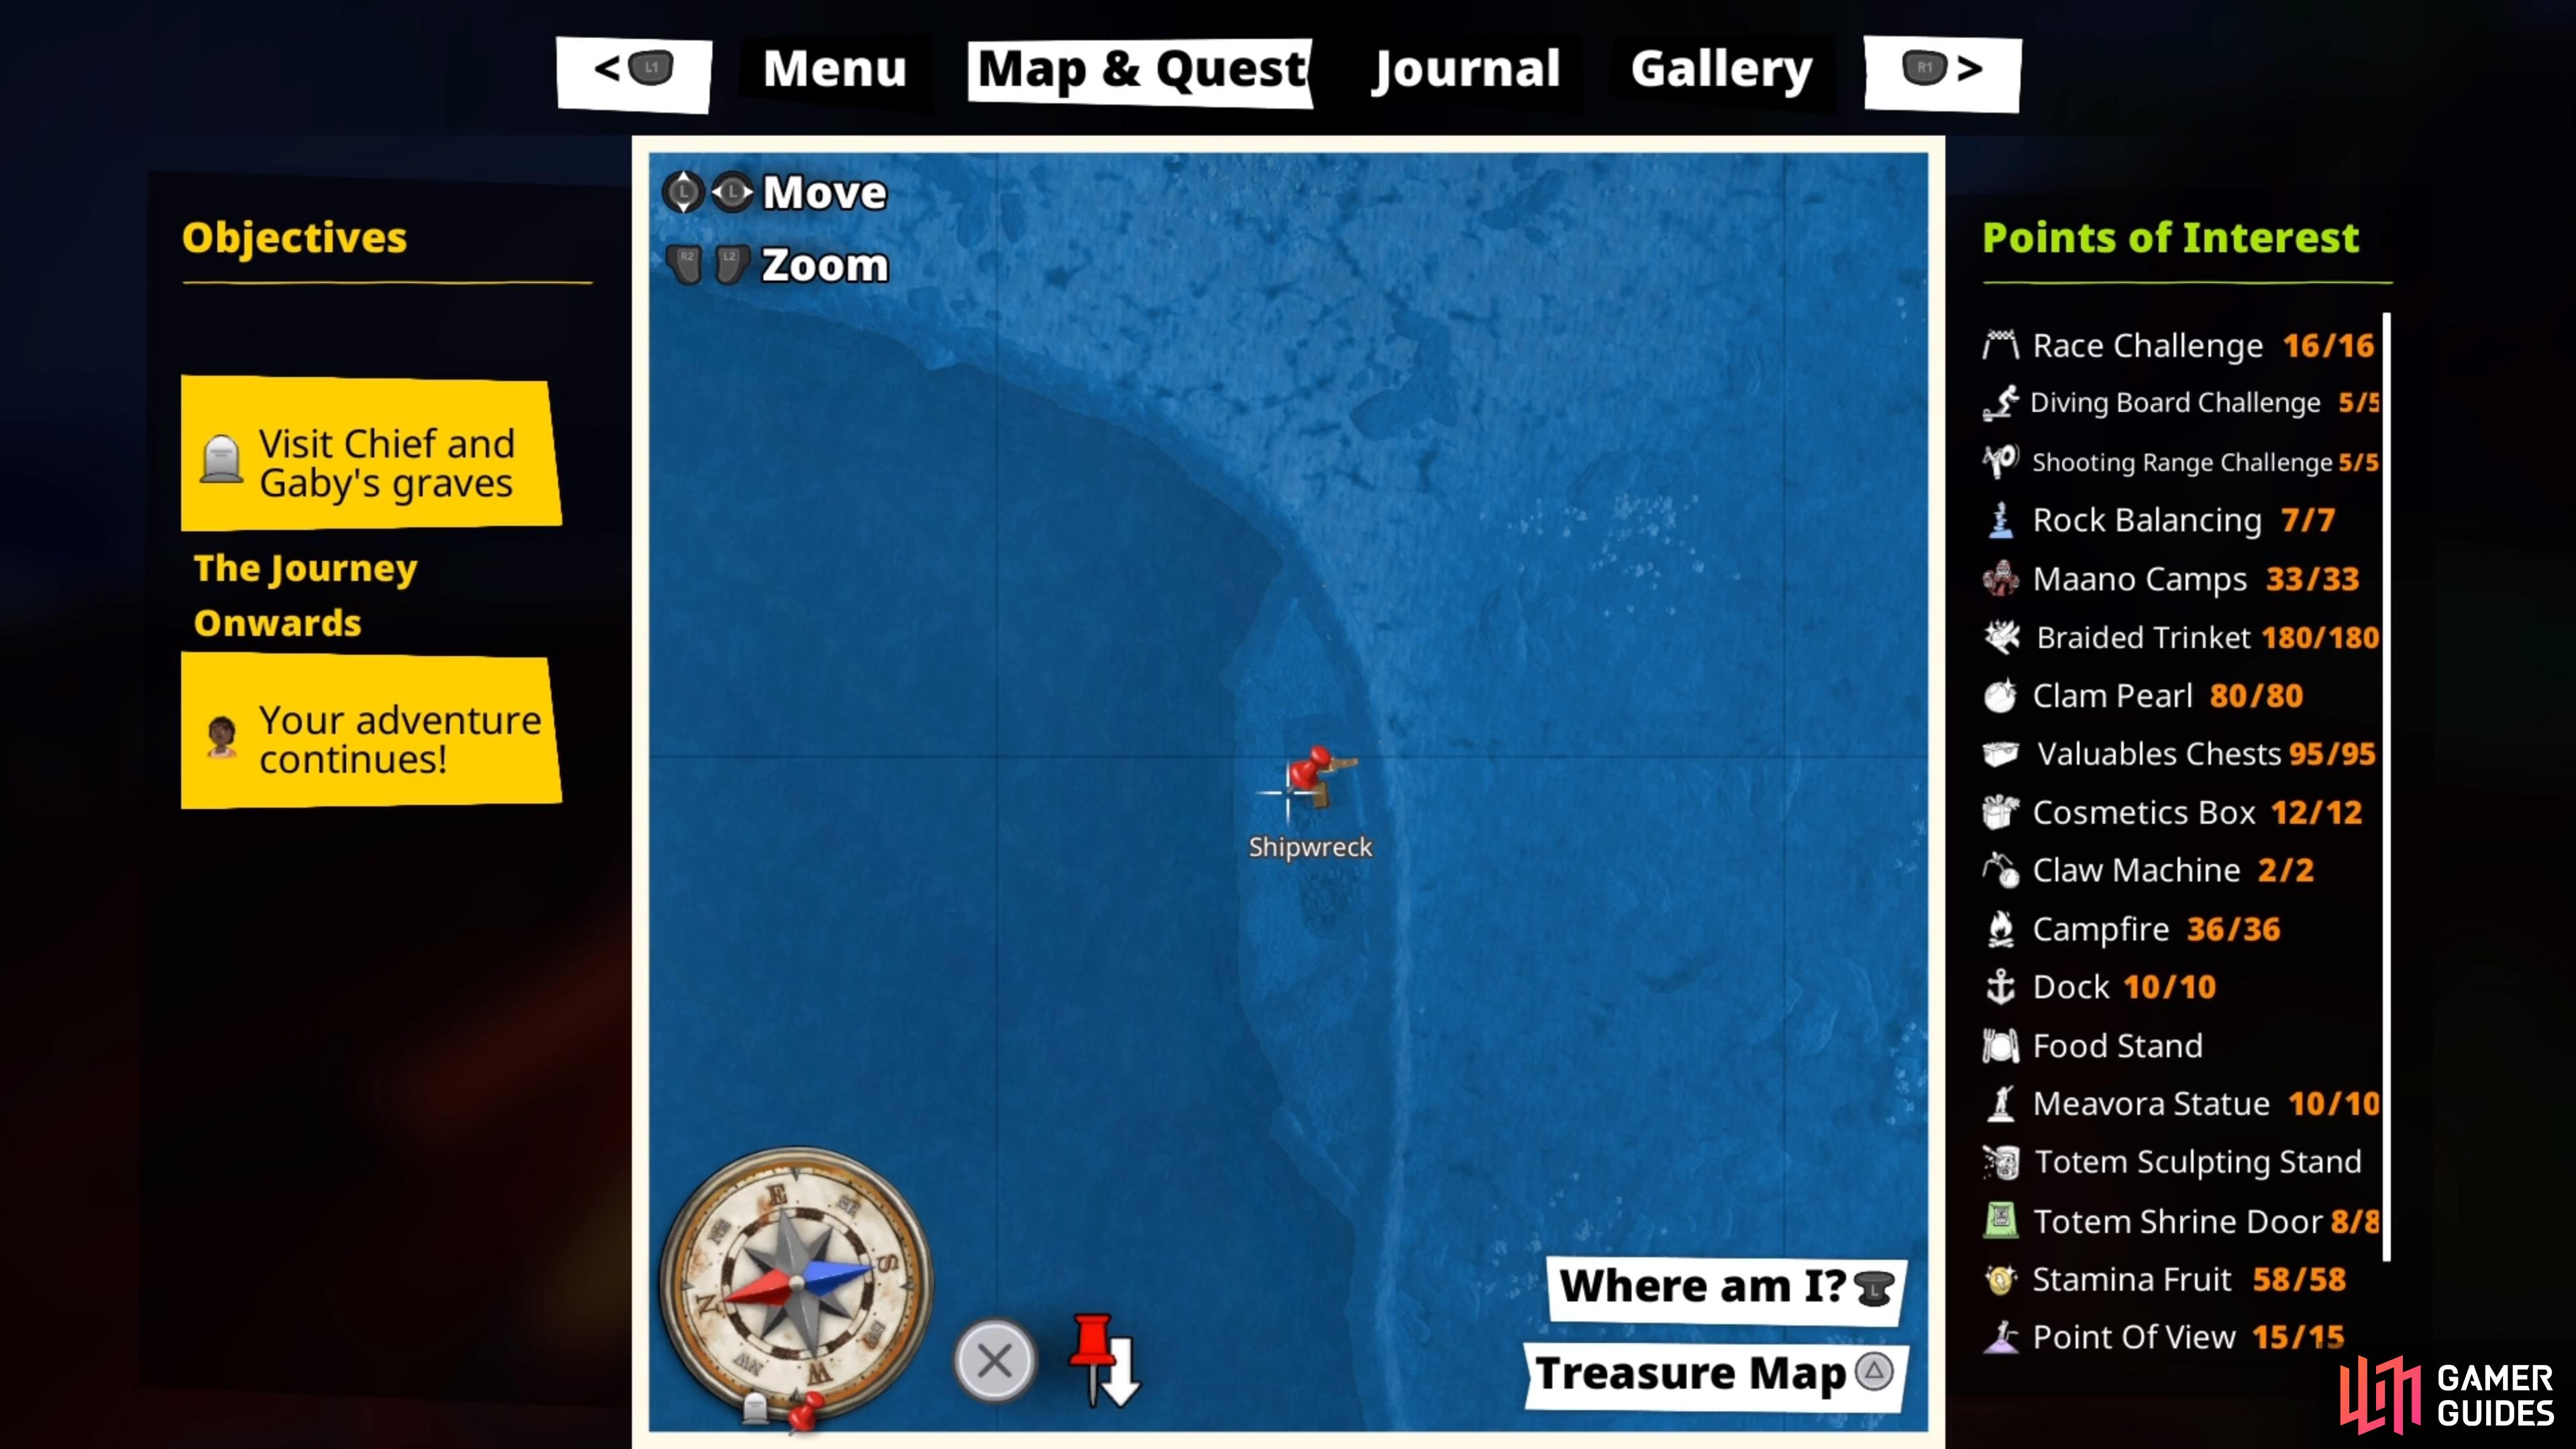
Head on over to the Shipwreck and get on the western side of it. To do a little reconnaissance, use Infinite Breath Bubble and dive down into the water, where you want to look for a huge hole on the side of the ship, allowing you to go inside. Once you find this opening, the chest should be on the one side, right inside the ship (you can see the sparkle a little bit). Now, the goal is to go back above, summon a crab, possess it and drop down. There is a little snag, though, as sometimes you will land on the ground and the game will instantly respawn you, saying you “got lost in the void.”
So, you will summon a crab on stable ground above, then drop down and hug the side of the ship. You want to land the crab inside the ship, to avoid the little issue above, which will force you to respawn and try again. Once you get it right, use the crab’s pincer claws to destroy the chains on the chest, then open it for a Big Stamina Fruit, the next map and the black key.
Treasure Chest #13: Black Key
After the previous chest, make your way to the Gwa Dock on the northwestern side of Madra Noj, then fast travel to the Meelo Dock on the opposite side of the island. From the dock, head southwest and up the hill you see a little in the distance. If you are in the right spot, you should notice a lone tree on this hill, which is a little larger than the others in the area. Take a glance at the base of this tree to see an X-mark, so get an animal that can dig and use their ability to dig up the chest. Once you’ve done that, get a crab to break the chains, then open it for a Mask with Rope, the next map and the white key.
Treasure Chest #14: White Key

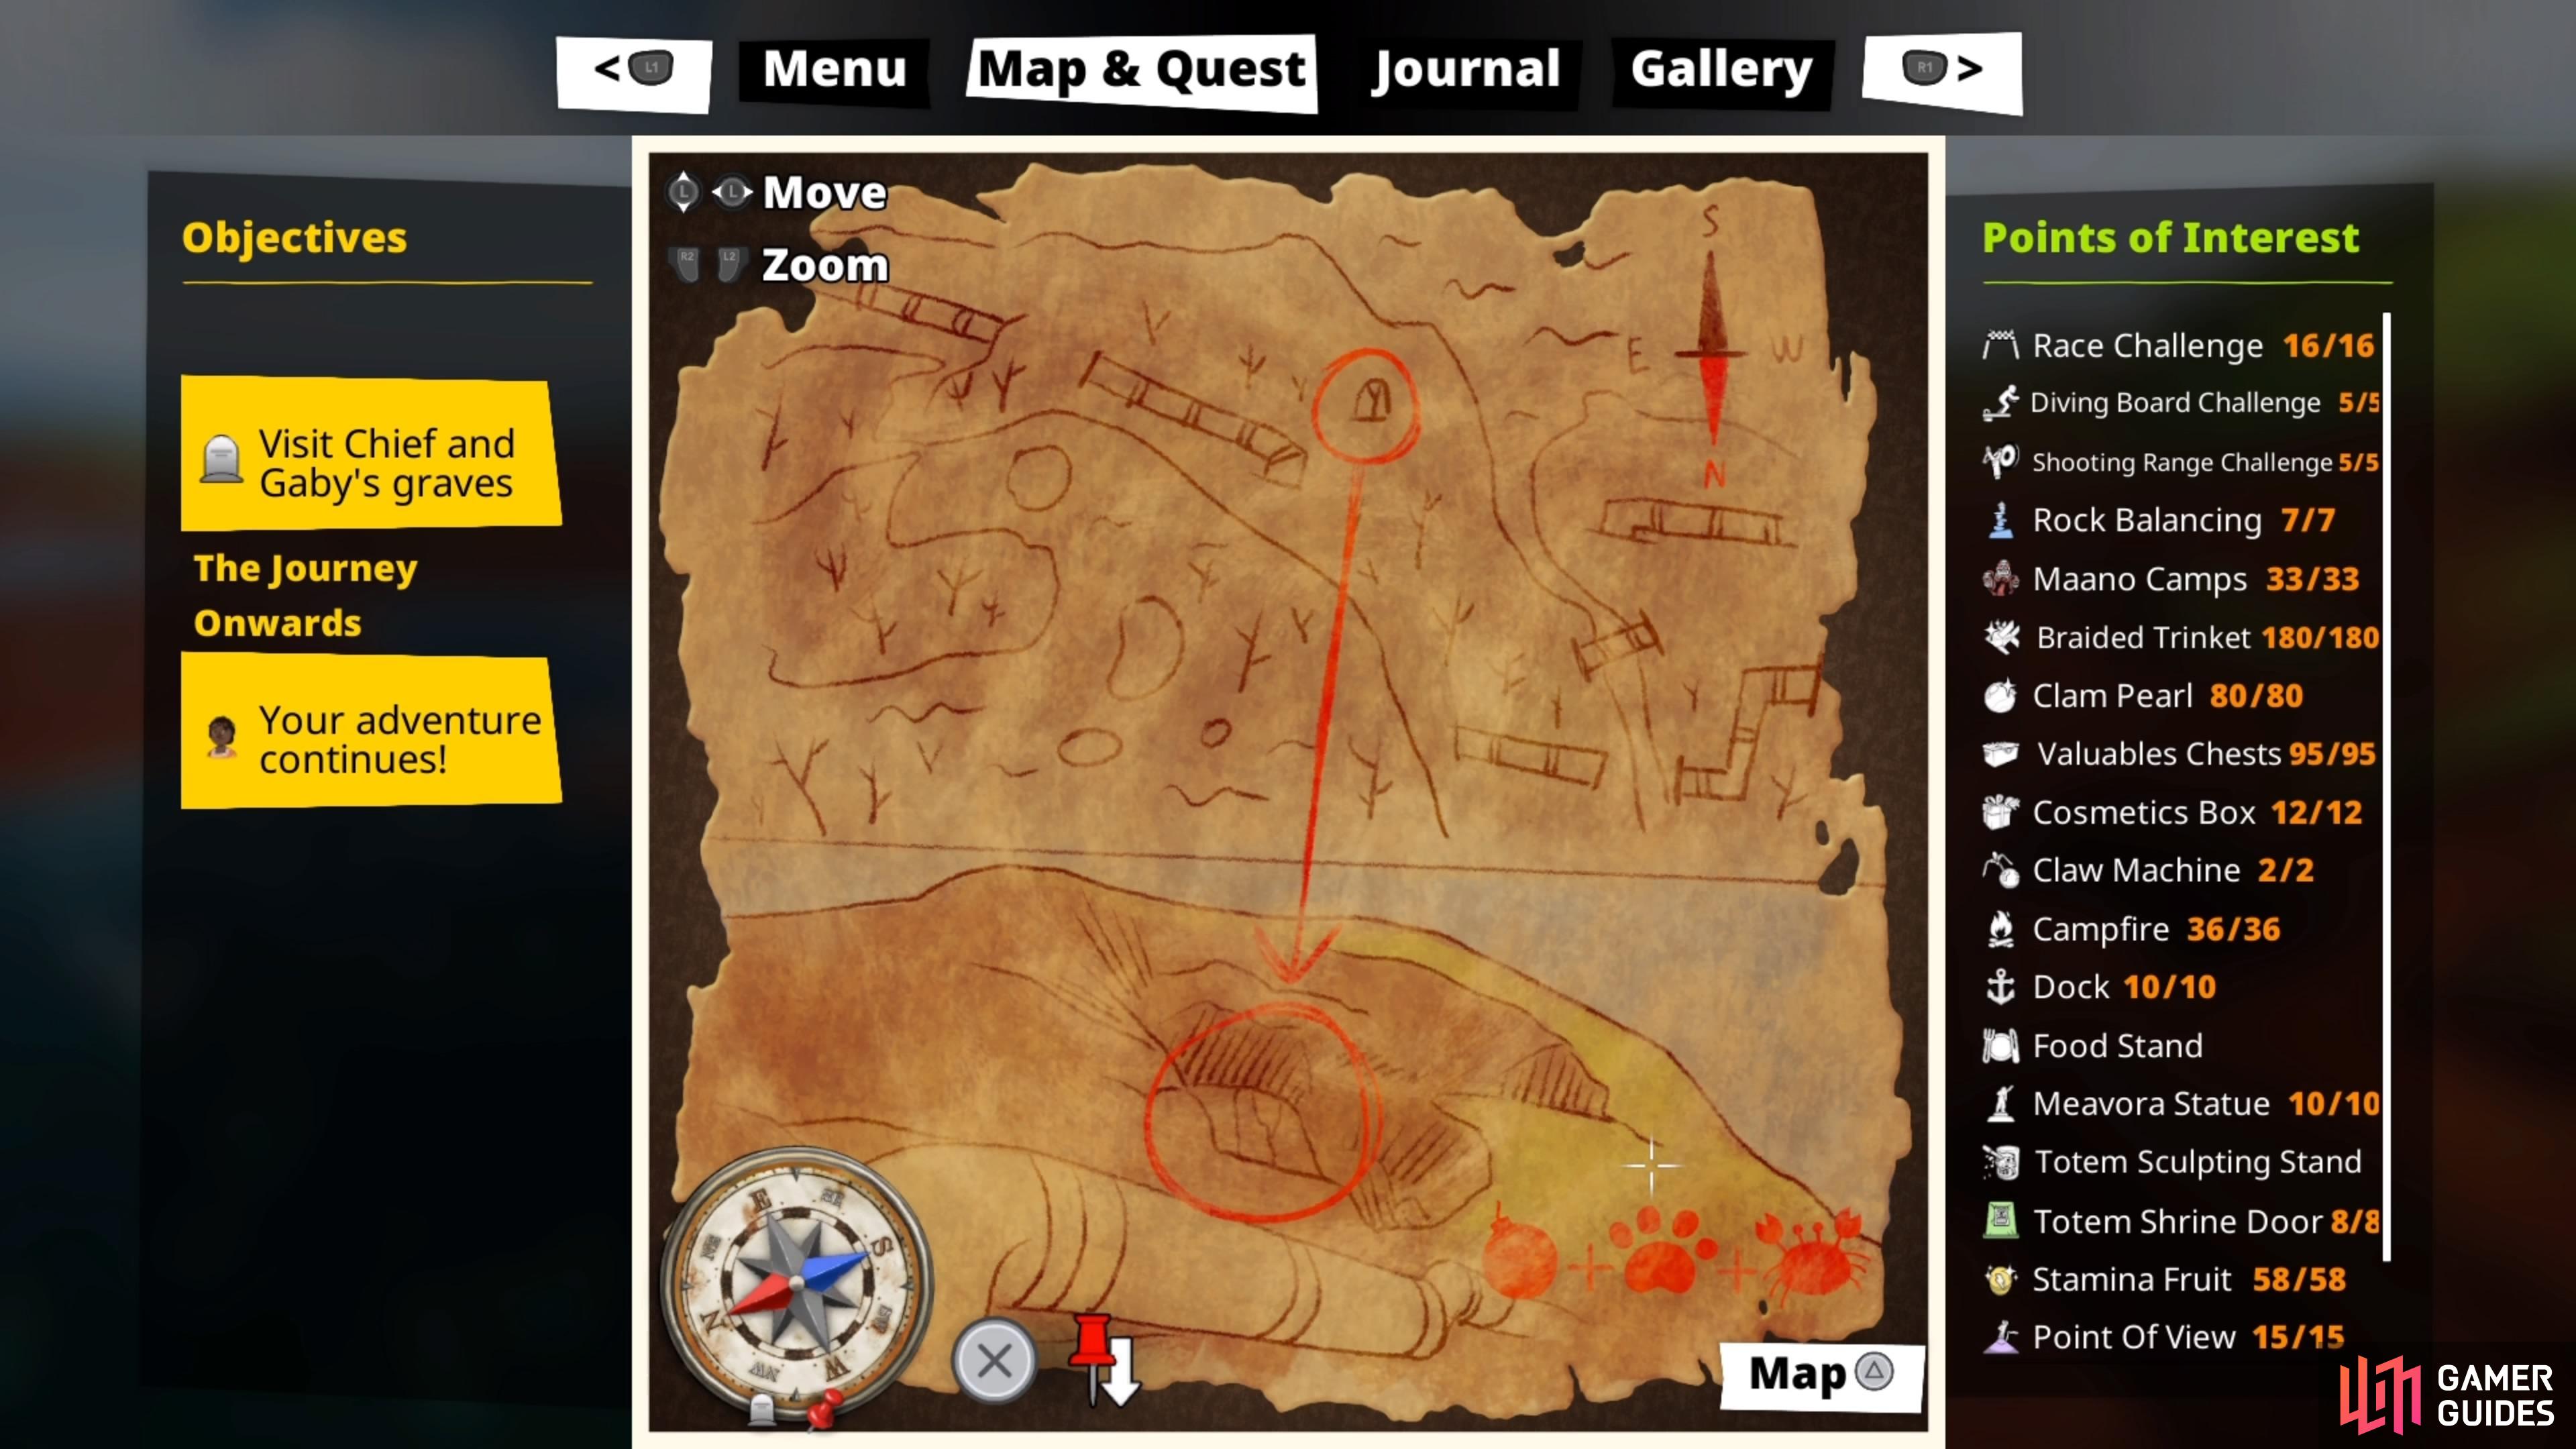
The next treasure map will lead you to Puru Mii, an area just outside of Aemoon on Madra Noj, a little south-by-southwest of it. Where its name is on the map, you should see a Campfire there, so head to it. Nearby, look for the plethora of wooden platforms that would bring you up to this campfire, then go to the bottom of them. While facing the wooden platforms, you should see some rocky cliffs to the left of them, which is where you want to go. While going that way, you should see the familiar white marker on the wall, which marks the entrance to a small cave. You will likely need a small animal (or a small object) to get into the cave, then you’ll need an explosive item to destroy the cracked wall. The treasure will be right behind this wall, which will net you the Spider (face paint), the next map and the red stripes key.
Treasure Chest #15: Red Stripes Key
You won’t have to go too far to get this treasure chest, as it’s located in Hunye, which is northeast-east of Puru Mii. Specifically, you’re looking for the broken bridge on the eastern side of the island with the campfire. The broken piece of the bridge is underwater and the chest will be underneath that. You will need a crab to break the chains on the chest, though. It will contain some Ancestral Wristbands, the next map and the yellow stripes key.
Treasure Chest #16: Yellow Stripes Key
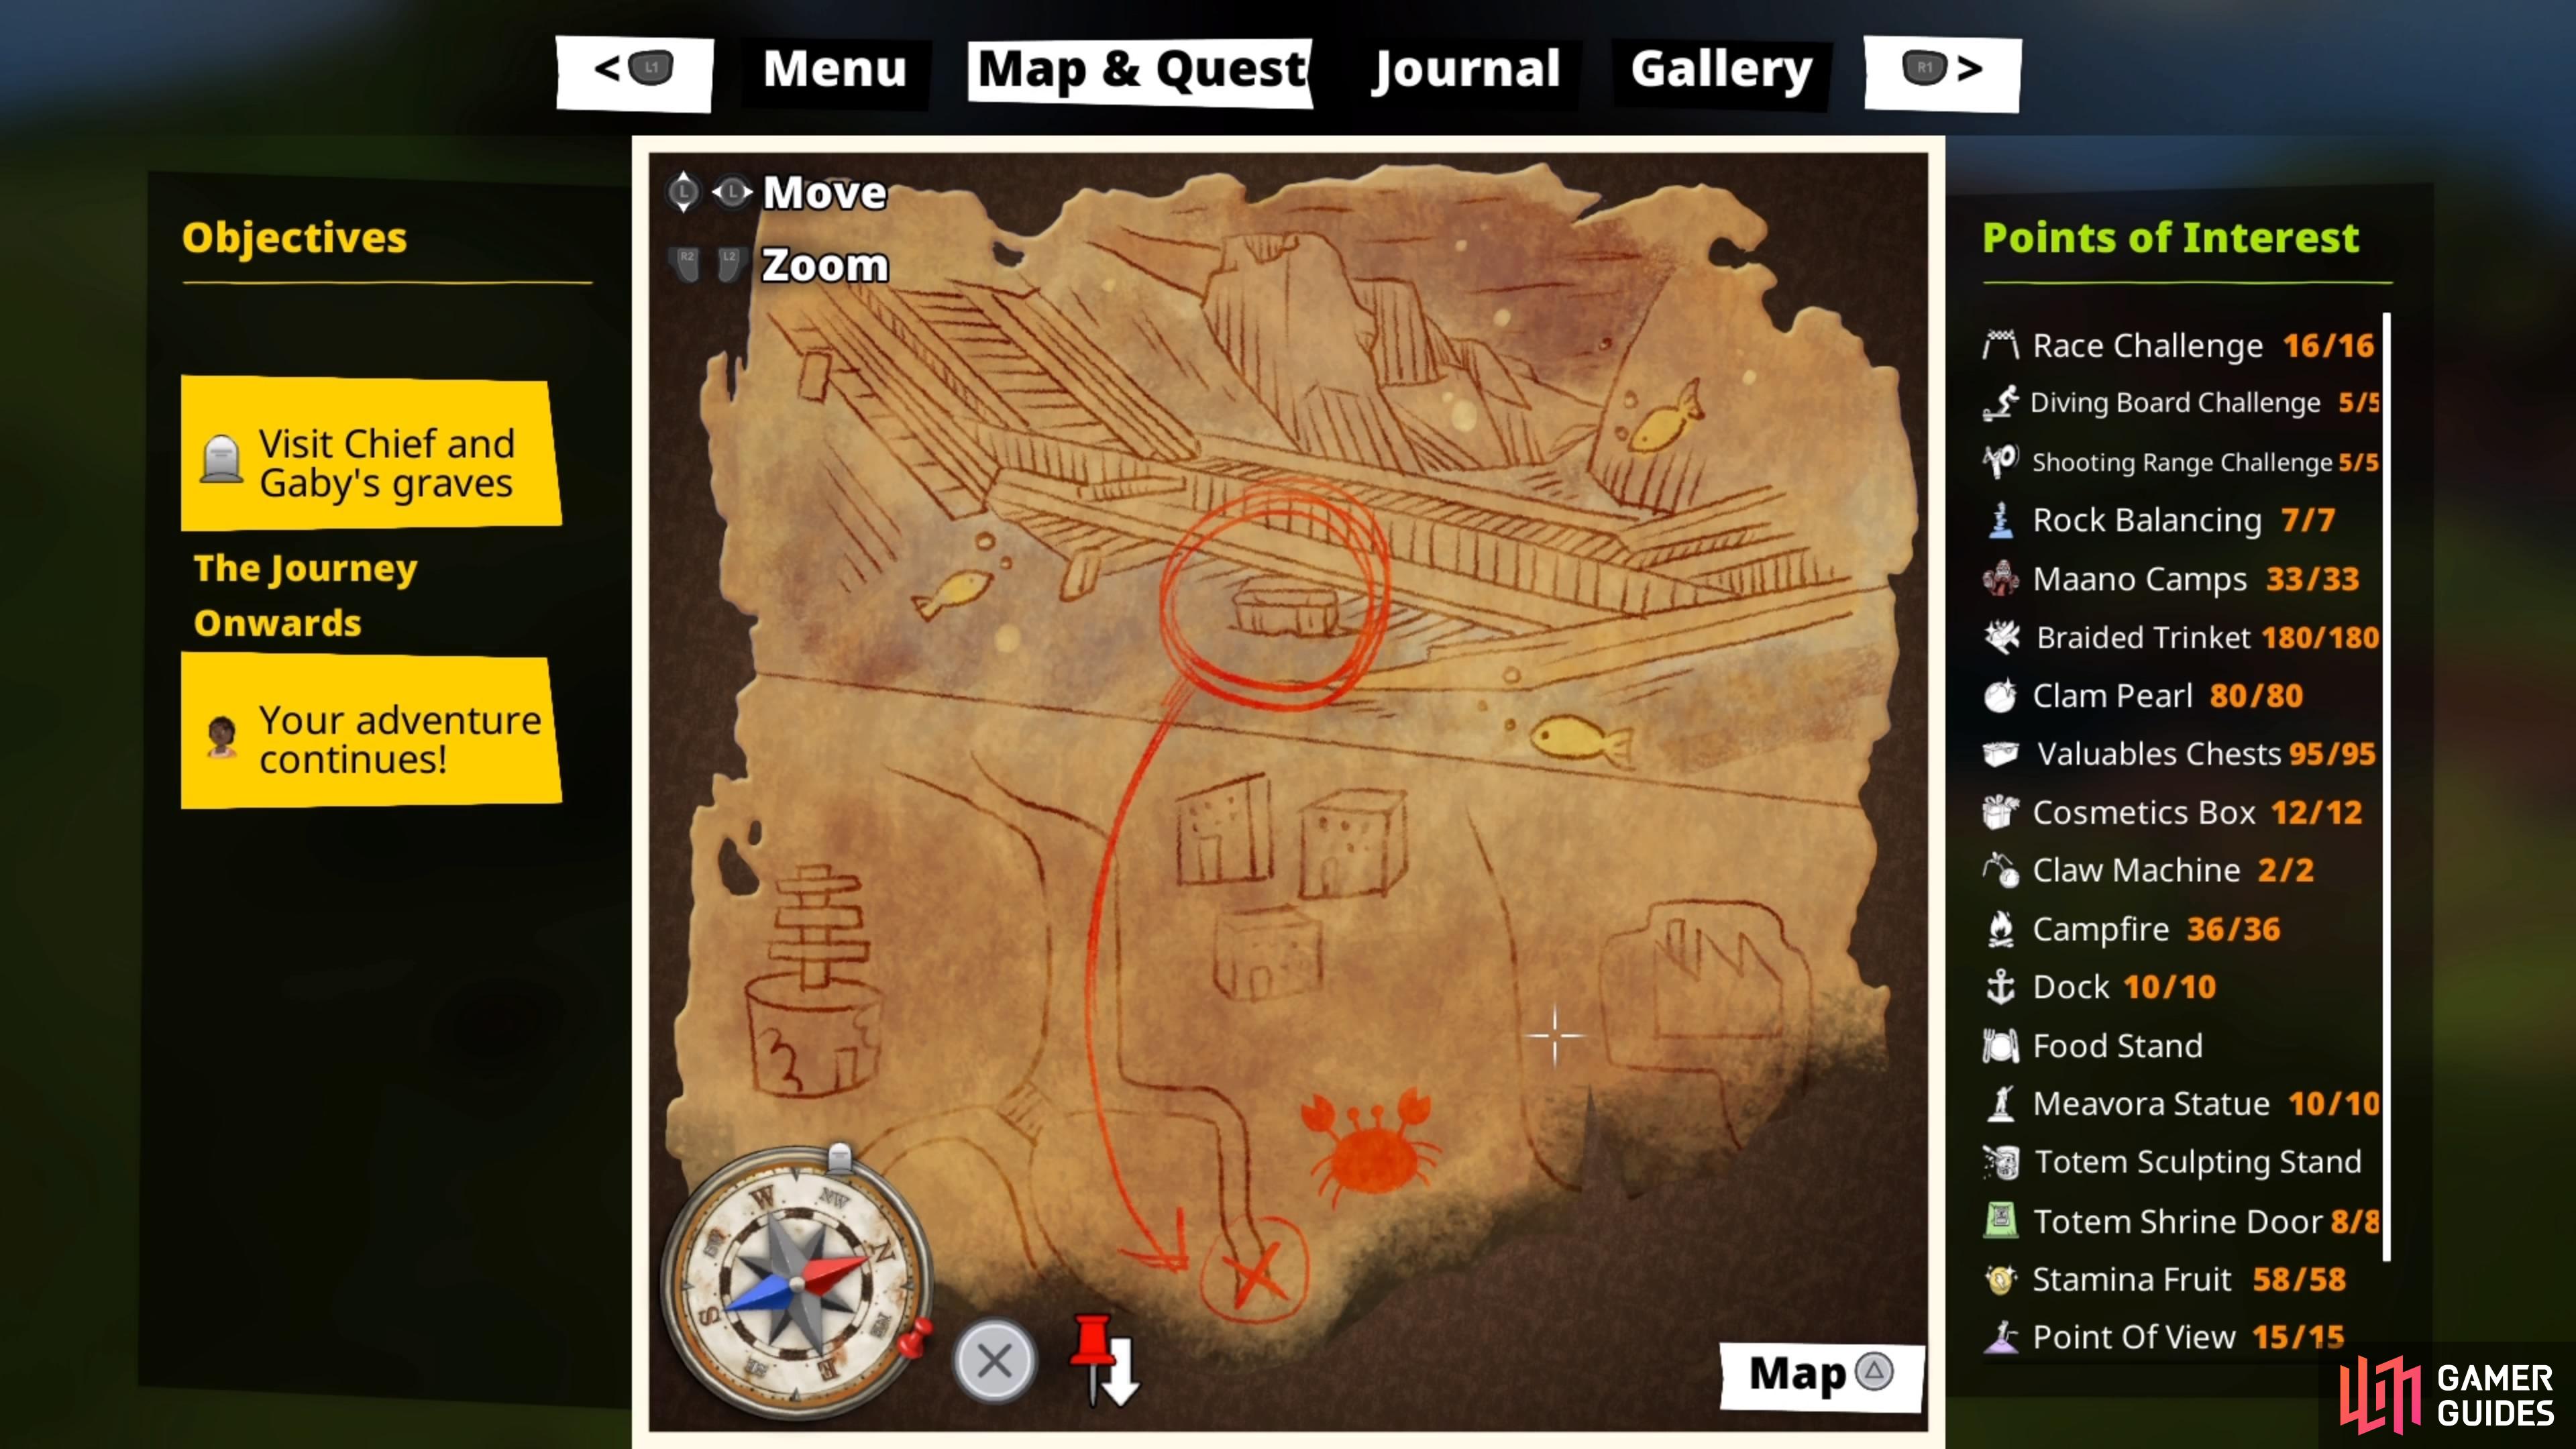
This one can be a little tricky to find, but it’s not too far from the previous one. Southeast of Hunye on the map, is a big lake-like area, called ![]() Tru Tim. Where it’s marked on the map, look southwest to see Pwara Caa and Kolio, which is where you want to go. Just north of where Kolio is marked, you should see some pipes running through the ground. Follow the pipes northbound, until you reach the ones on the hilly portion.
Tru Tim. Where it’s marked on the map, look southwest to see Pwara Caa and Kolio, which is where you want to go. Just north of where Kolio is marked, you should see some pipes running through the ground. Follow the pipes northbound, until you reach the ones on the hilly portion.
The cracked wall that leads to the cave with the chest is about due west from the pipe on the hill; look for the familiar white marking on the wall. Blast the cracked wall with an explosive, then get an animal that can dig to make the chest appear, on the X symbol. From there, you will need a crab to break the chains on the chest, allowing you to open it for the Big Stamina Fruit, the next map and the pink dots key.
Treasure Chest #17: Pink Dots Key
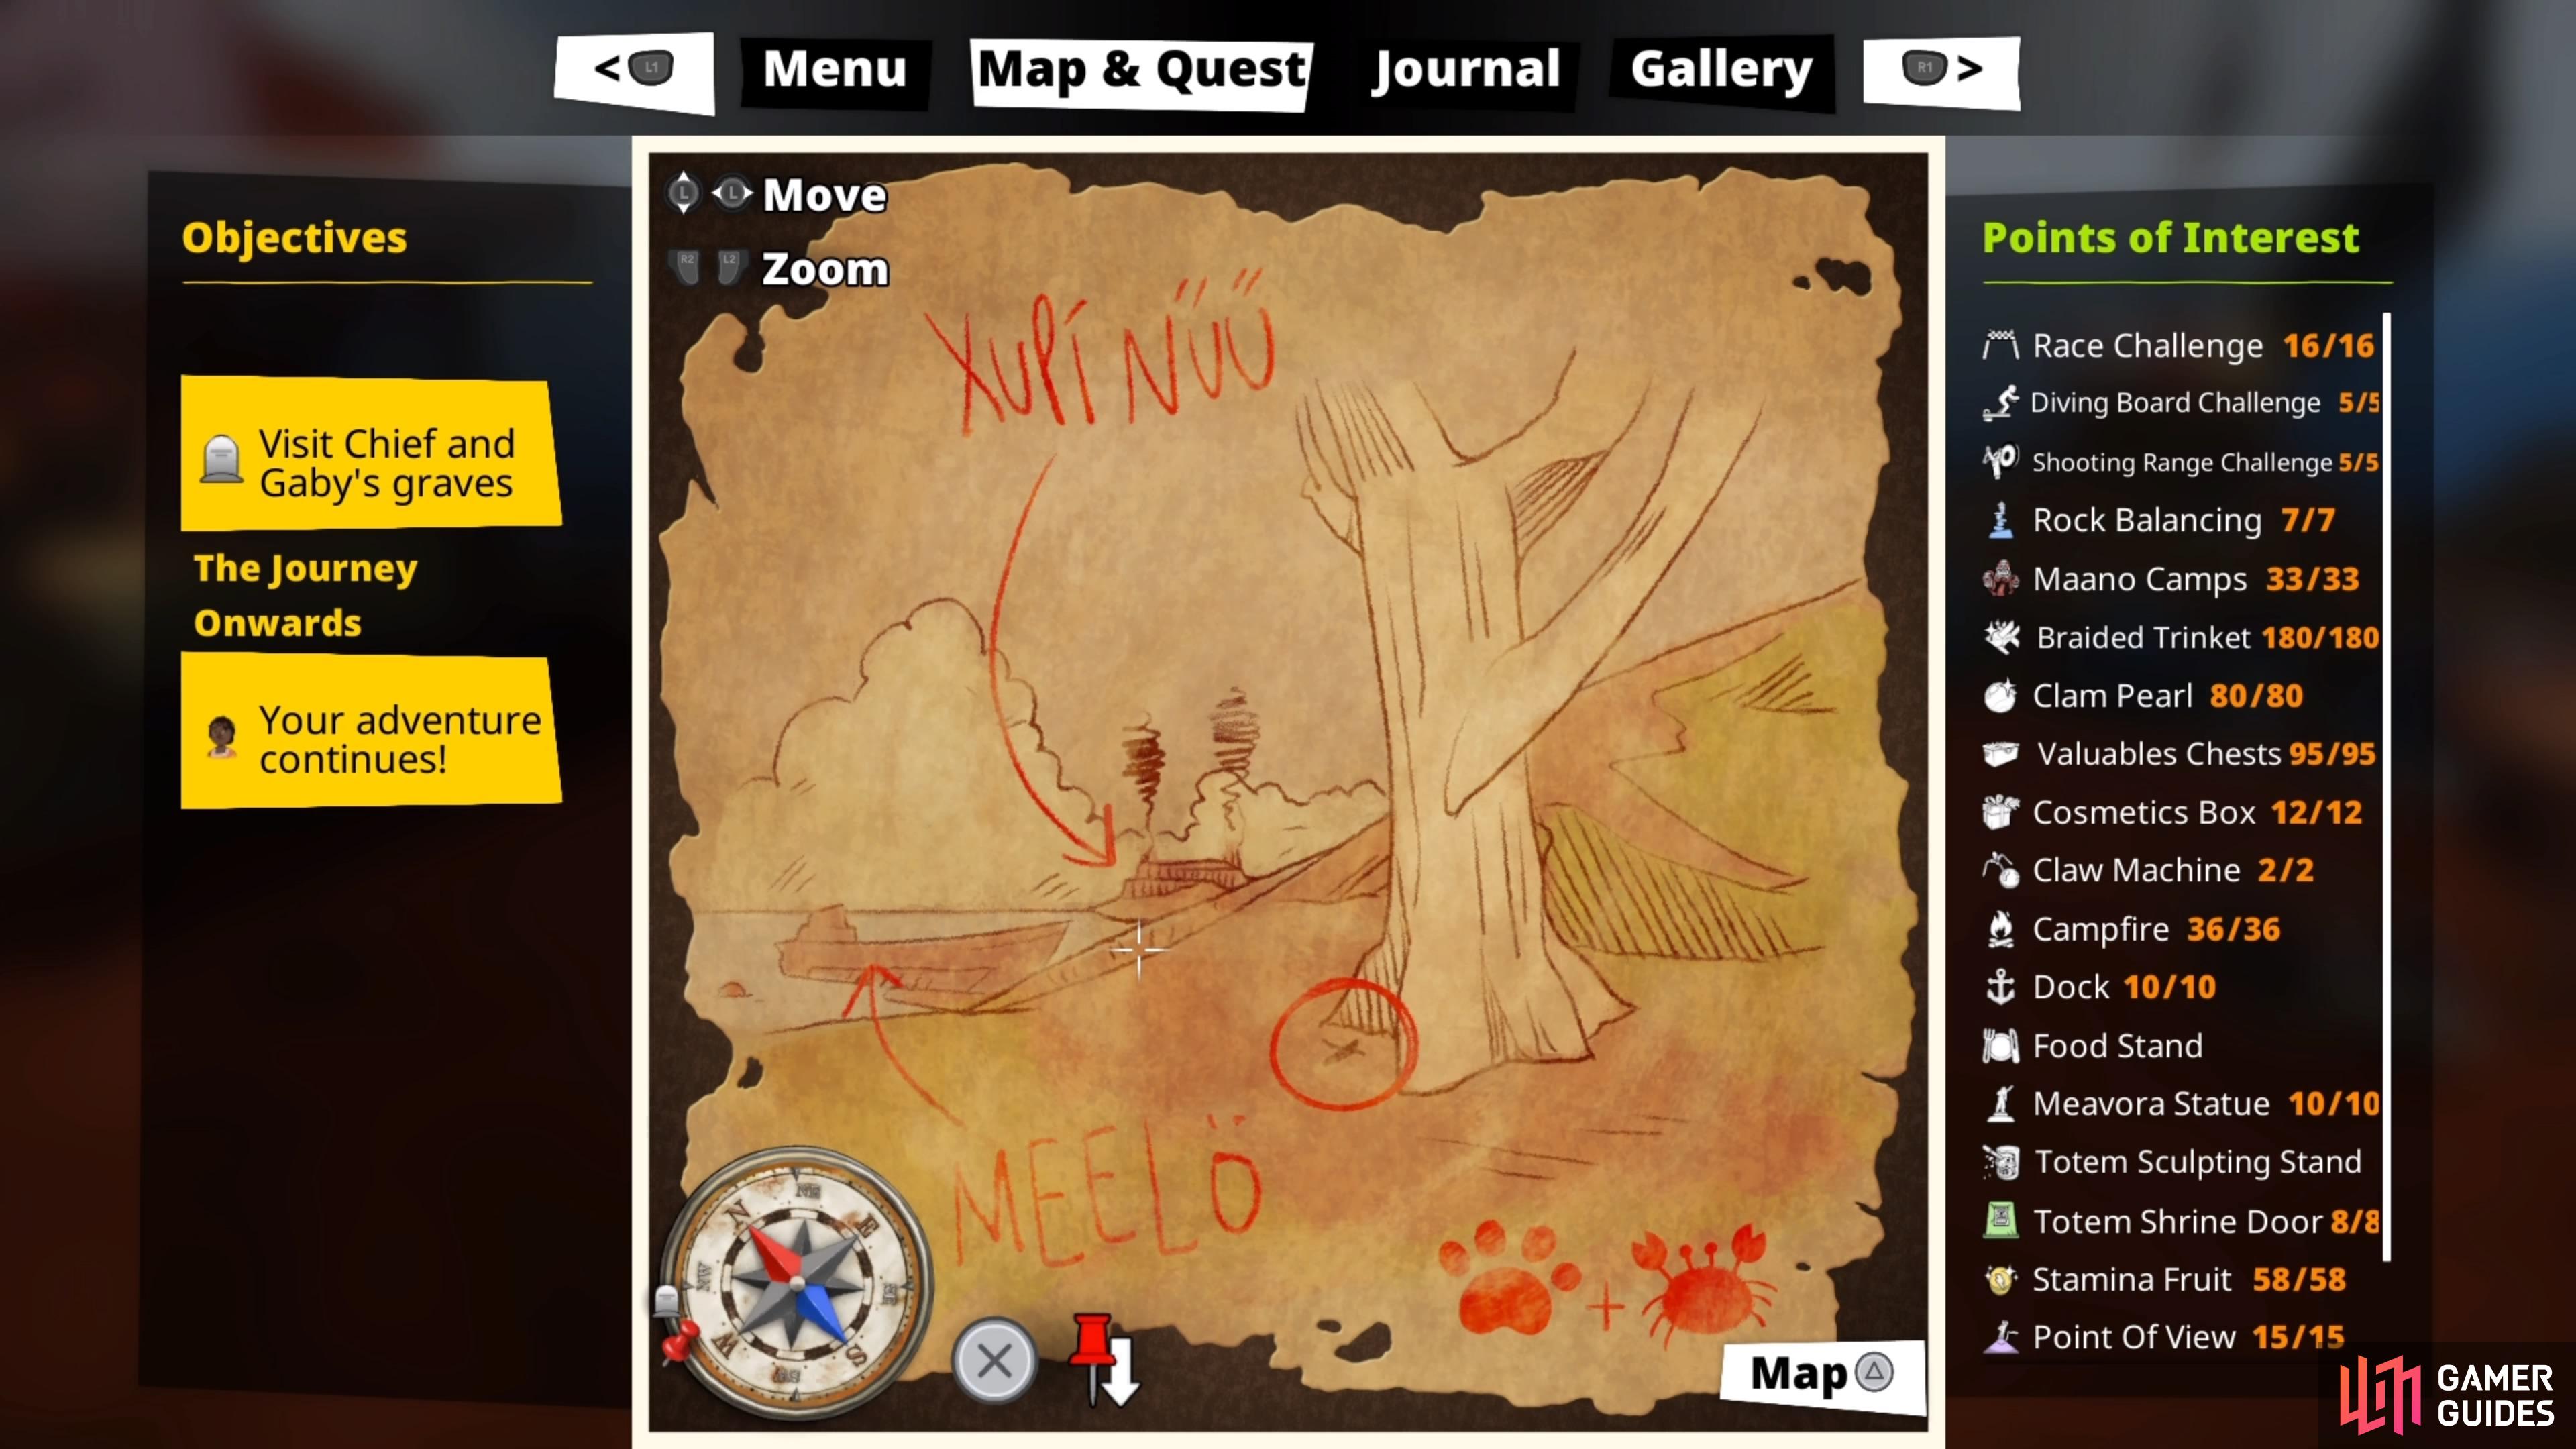
You will be taking a little journey to Xupi Nuu, the factory place in the southeastern corner of Madra Noj. Thankfully, you won’t need to do anything too crazy to get to this chest. On the northern side, look for the beaten up truck on the outside of the fort. On the short ledge right next to it, you should see a small cave. Get a small animal or object, go through the opening, then summon a dog to dig up the chest at the X-mark. Summon a crab after that, cut the chains, then open the chest for a Cloth - Spider Logo (glider), as well as the next map and the green dots key.
Treasure Chest #18: Green Dots Key
The next two chests will be located in ![]() Ieji Sinoe, an island that becomes available during the main story (Chapter 5). You won’t be able to visit it until then, so make sure you’re far enough in the story to make it available. Unfortunately, there’s no option to fast travel there, so you will have to do it the normal way (take the boat, to make things easier). When you first dock at the eastern end of the island, you should see two large statues, which will become important for the second chest.
Ieji Sinoe, an island that becomes available during the main story (Chapter 5). You won’t be able to visit it until then, so make sure you’re far enough in the story to make it available. Unfortunately, there’s no option to fast travel there, so you will have to do it the normal way (take the boat, to make things easier). When you first dock at the eastern end of the island, you should see two large statues, which will become important for the second chest.
For the first chest, make your way to the ![]() Mwaken Village and go straight south from it. You want to look for an off-beaten path that will bring you to the cliffside here. You’ll know you’re in the correct spot whenever you pass between a large blue piece of coral, and a mushroom-looking one. This will bring you to a cracked wall, so you’ll need an explosive item to blast it open. Once you do, you’ll need a small animal/object to get into the cave, then summon a dog so you can dig up the chest.
Mwaken Village and go straight south from it. You want to look for an off-beaten path that will bring you to the cliffside here. You’ll know you’re in the correct spot whenever you pass between a large blue piece of coral, and a mushroom-looking one. This will bring you to a cracked wall, so you’ll need an explosive item to blast it open. Once you do, you’ll need a small animal/object to get into the cave, then summon a dog so you can dig up the chest.
Treasure Chest #19: Bronze Key
The second chest on Ieji Sinoe (look above for more info on the island’s location) is back towards the eastern end. The two statues mentioned above is where you want to go. Specifically, when facing west and looking at the two statues, you will want to go underneath the northern of the two. You should be brought to a cave, where you can find a ![]() Braided Trinket. Look for the familiar marking and wooden statues on the one side, which is also where you will find a cracked wall. Blow it open with an explosive, then get a small animal/object to get through the opening. Preferably, you’d summon a crab, since you need to break the chains on the chest to get its contents.
Braided Trinket. Look for the familiar marking and wooden statues on the one side, which is also where you will find a cracked wall. Blow it open with an explosive, then get a small animal/object to get through the opening. Preferably, you’d summon a crab, since you need to break the chains on the chest to get its contents.
Treasure Chest #20: Silver Key
You’re done with Ieji Sinoe, so it’s time to make the long trek back to the main islands. For this chest, you will be venturing to the northern side of Ija Noj. Specifically, head towards the little island of ![]() Gutu. Looking at your map, you should see a faint crater-like bit in the water to the northwest of Gutu. Head to that crater-like area in the water and try to find a fish or crab. There will be an area you can go under in this section, where you should see some wooden totems.
Gutu. Looking at your map, you should see a faint crater-like bit in the water to the northwest of Gutu. Head to that crater-like area in the water and try to find a fish or crab. There will be an area you can go under in this section, where you should see some wooden totems.
Those wooden totems are marking the entrance to another cave, which is where you will find the chest. It’s a good idea to use a fish to scout it out first, then go back above the water to summon a crab, as the chest has some chains on it. Break the chains, then open the chest as Tchia to get
Treasure Chest #21: Gold Key
This is the final chest and it will be located on ![]() Uma, which is the starting island at the beginning of the game. If you look at your map, you should see two smaller islands just off the coast of Uma. Go to the northern of the two smaller islands and on the one side, by the tree, will be an X-mark. So, you will need to summon/find an animal that digs to bring up the chest. From there, get a crab and break the chains on the chest, so you can open it and receive your goodies. Your reward is the Owl Hat, as well as the Historian trophy/achievement.
Uma, which is the starting island at the beginning of the game. If you look at your map, you should see two smaller islands just off the coast of Uma. Go to the northern of the two smaller islands and on the one side, by the tree, will be an X-mark. So, you will need to summon/find an animal that digs to bring up the chest. From there, get a crab and break the chains on the chest, so you can open it and receive your goodies. Your reward is the Owl Hat, as well as the Historian trophy/achievement.
No Comments