Season 1 - Diablo IV Database
| Icon | Title | Category | Subcategory |
|---|
Season 1
| Icon | Title | Details | Screenshots | ||||||||||||||||||||||||||||||||||||
|---|---|---|---|---|---|---|---|---|---|---|---|---|---|---|---|---|---|---|---|---|---|---|---|---|---|---|---|---|---|---|---|---|---|---|---|---|---|---|---|
|
|
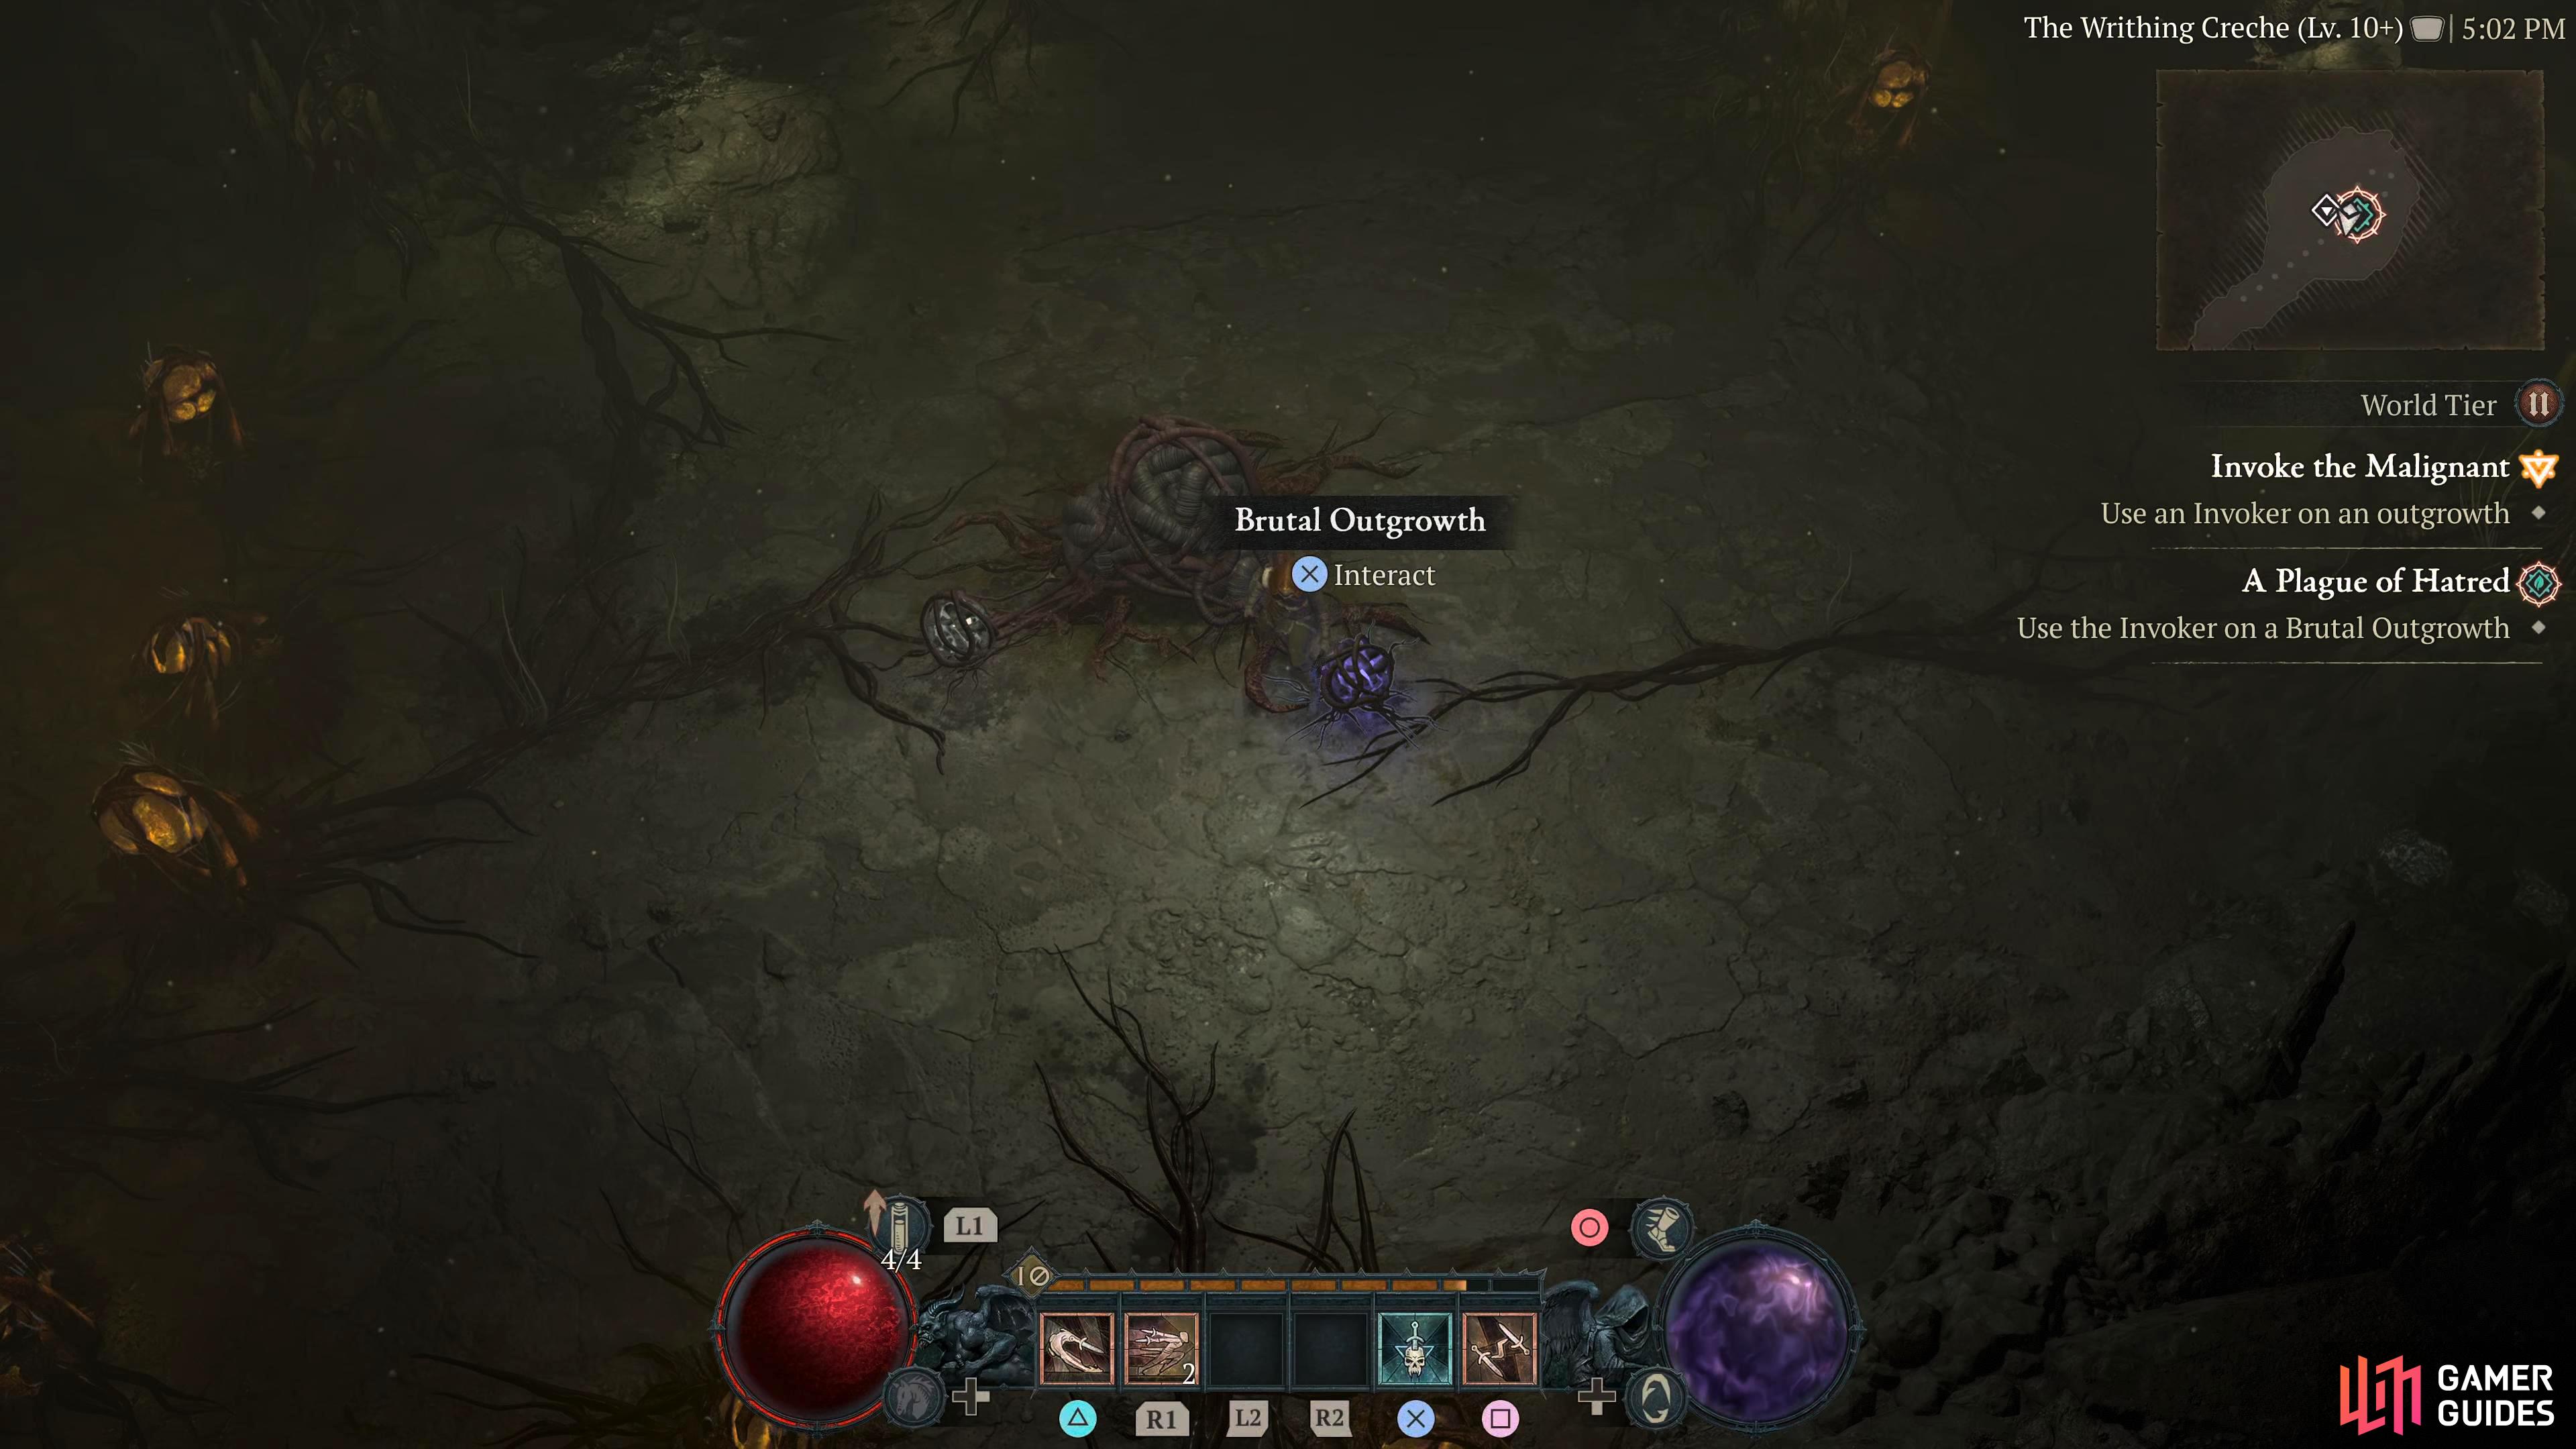
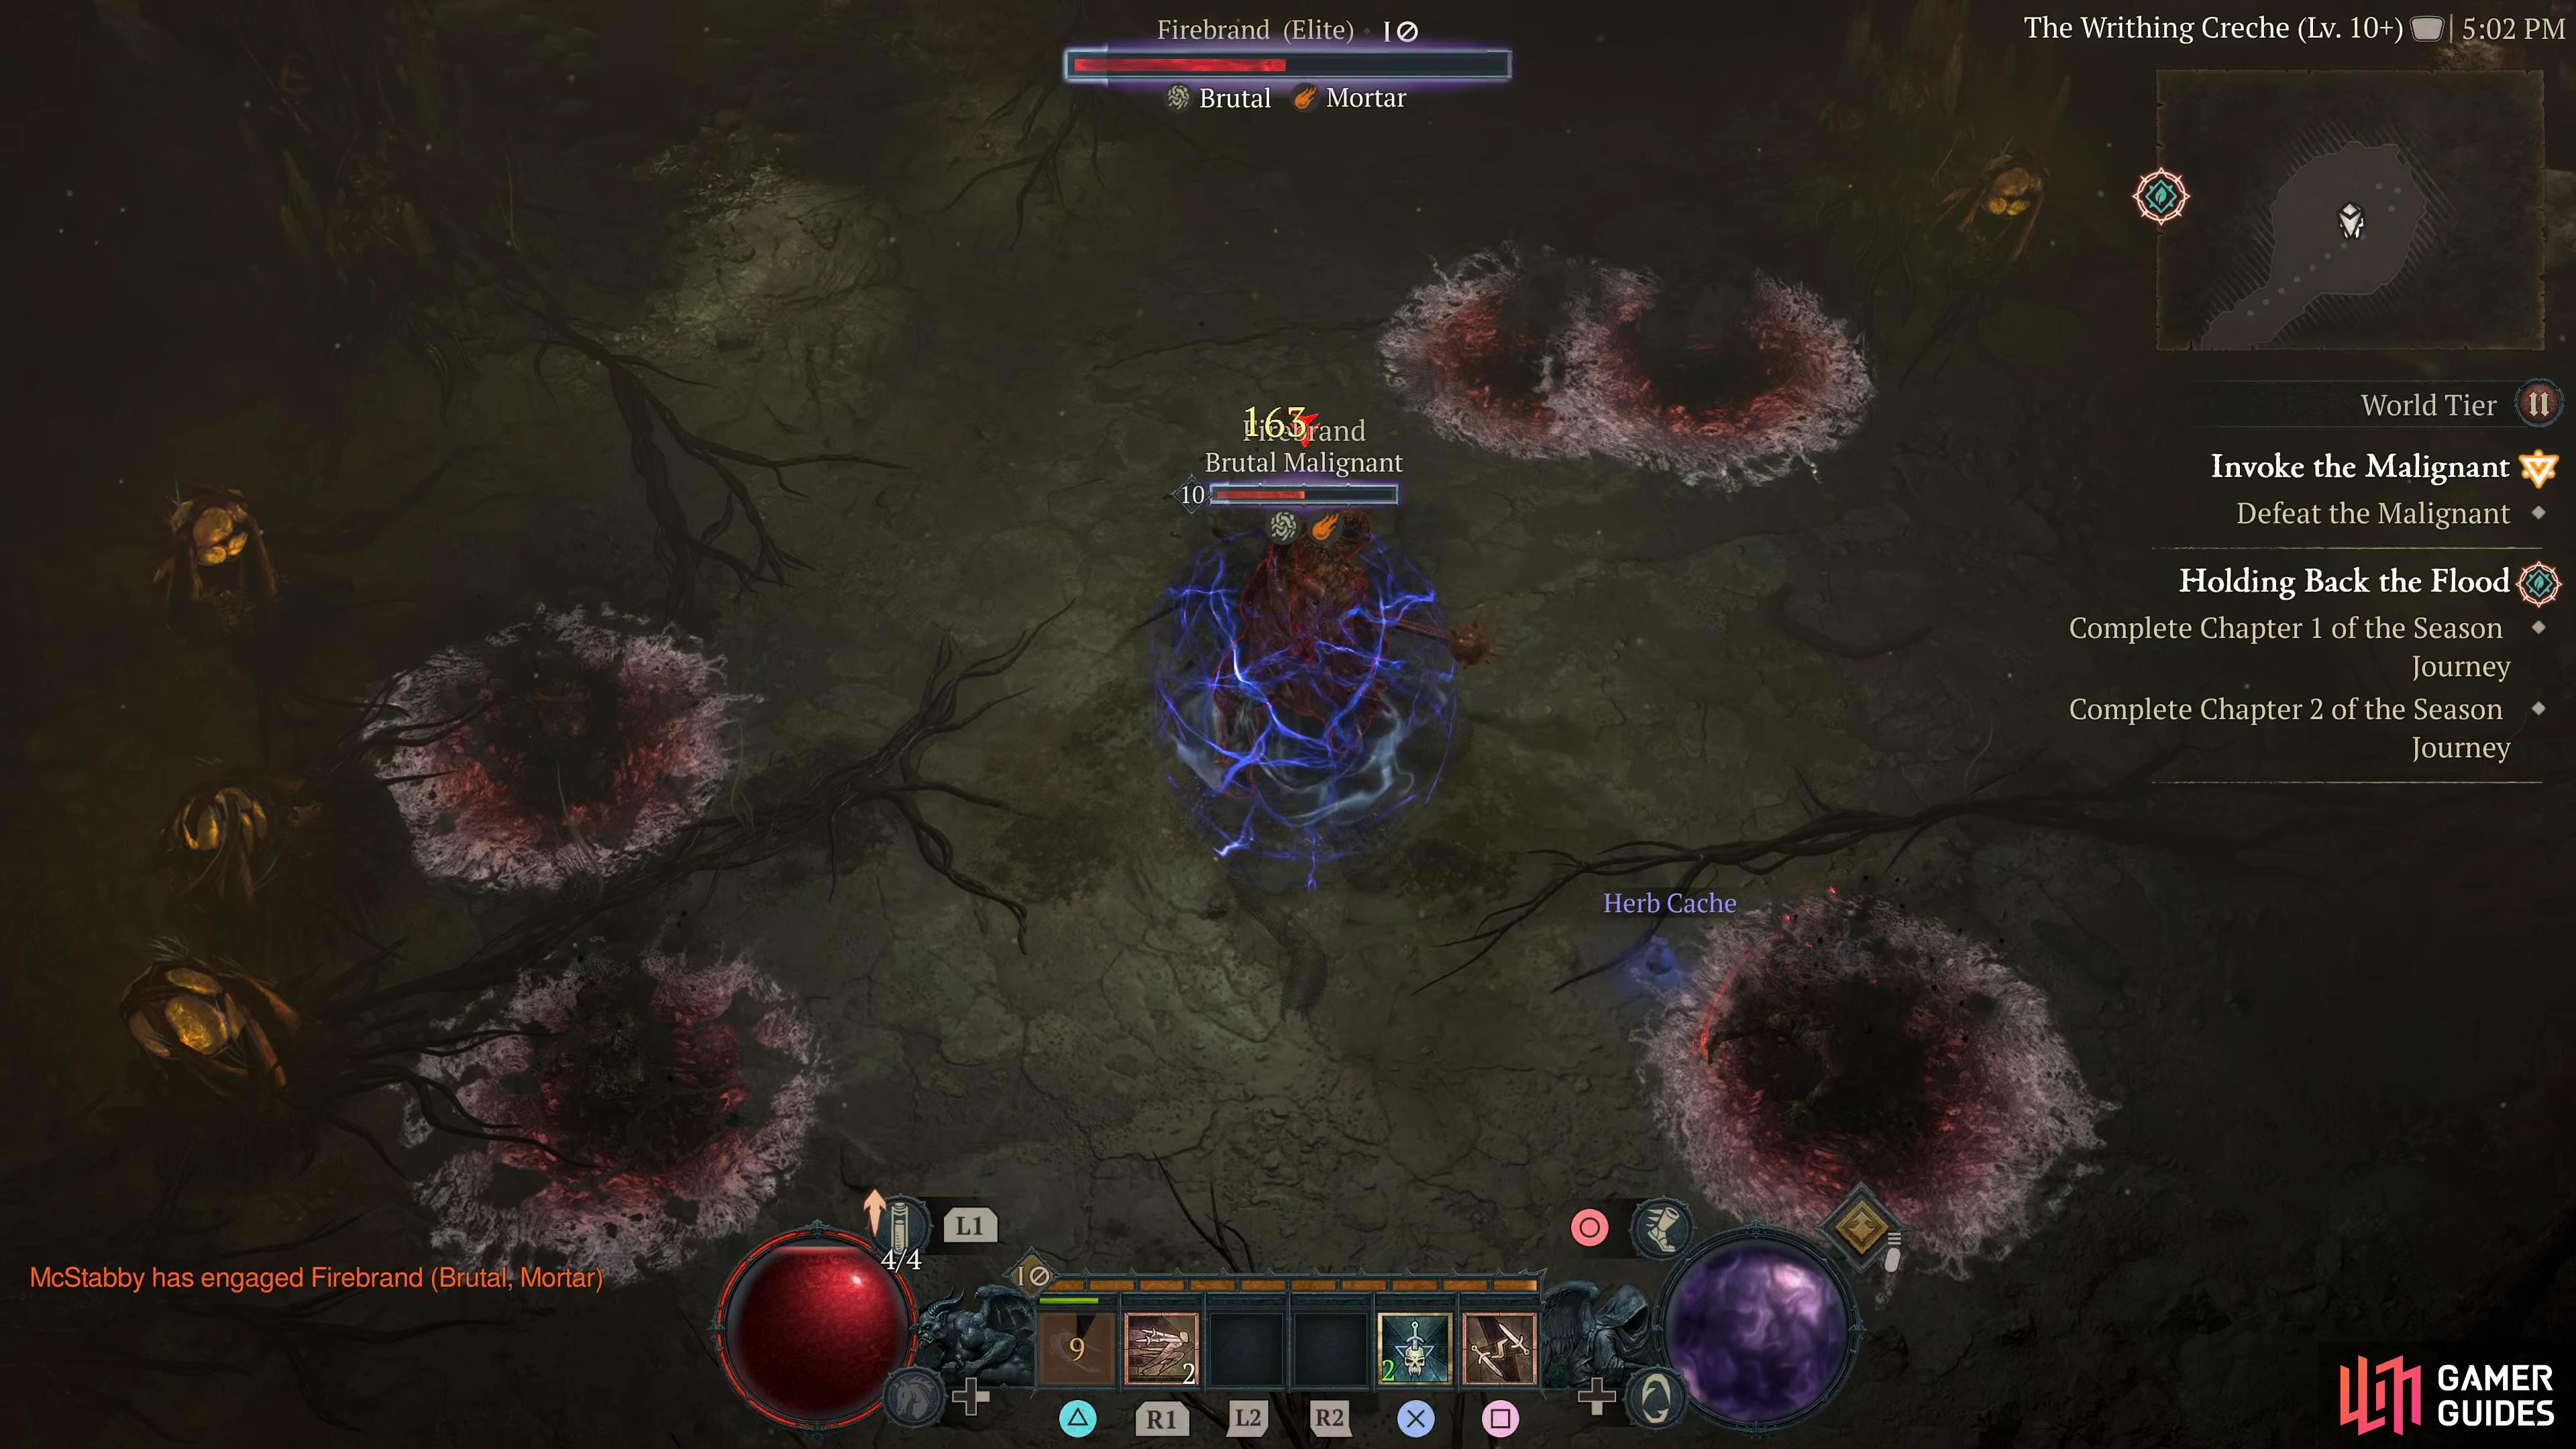
A Plague of Hatred |
Detailed Location
This quest follows the “Burning From Within” season 1 quest and can be accepted from Cormond at his workbench in the Khurel Passage, Dry Steppes. Teleport to Ked Bardu in Kehjistan and follow the winding road southwest until you cross the bridge into Dry Steppes. Continue southwest until you can head north where you’ll find Cormond and his Workbench overlooking the cliff. After speaking to him, he’ll tell you to revisit a Malignant tunnel to find an outgrowth now that you have the Malignant Invoker which allows you to deal with them. You’ll need to head to the Enter the dungeon, and you’ll need to slay all the enemies in there for the dungeon objective, but for the quest, you’ll need to find the Brutal Outgrowth, and then use your Malignant Invoker on it to destroy it which will complete the quest. Although the quest is complete, you’ll still have an event resulting from destroying the outgrowth, but it’s not needed for the quest.
In-Game Description
Region
General Reward
XP and Gold
Item Reward
1×
|


|
||||||||||||||||||||||||||||||||||||
|
|
Holding Back the Flood |
Detailed Location
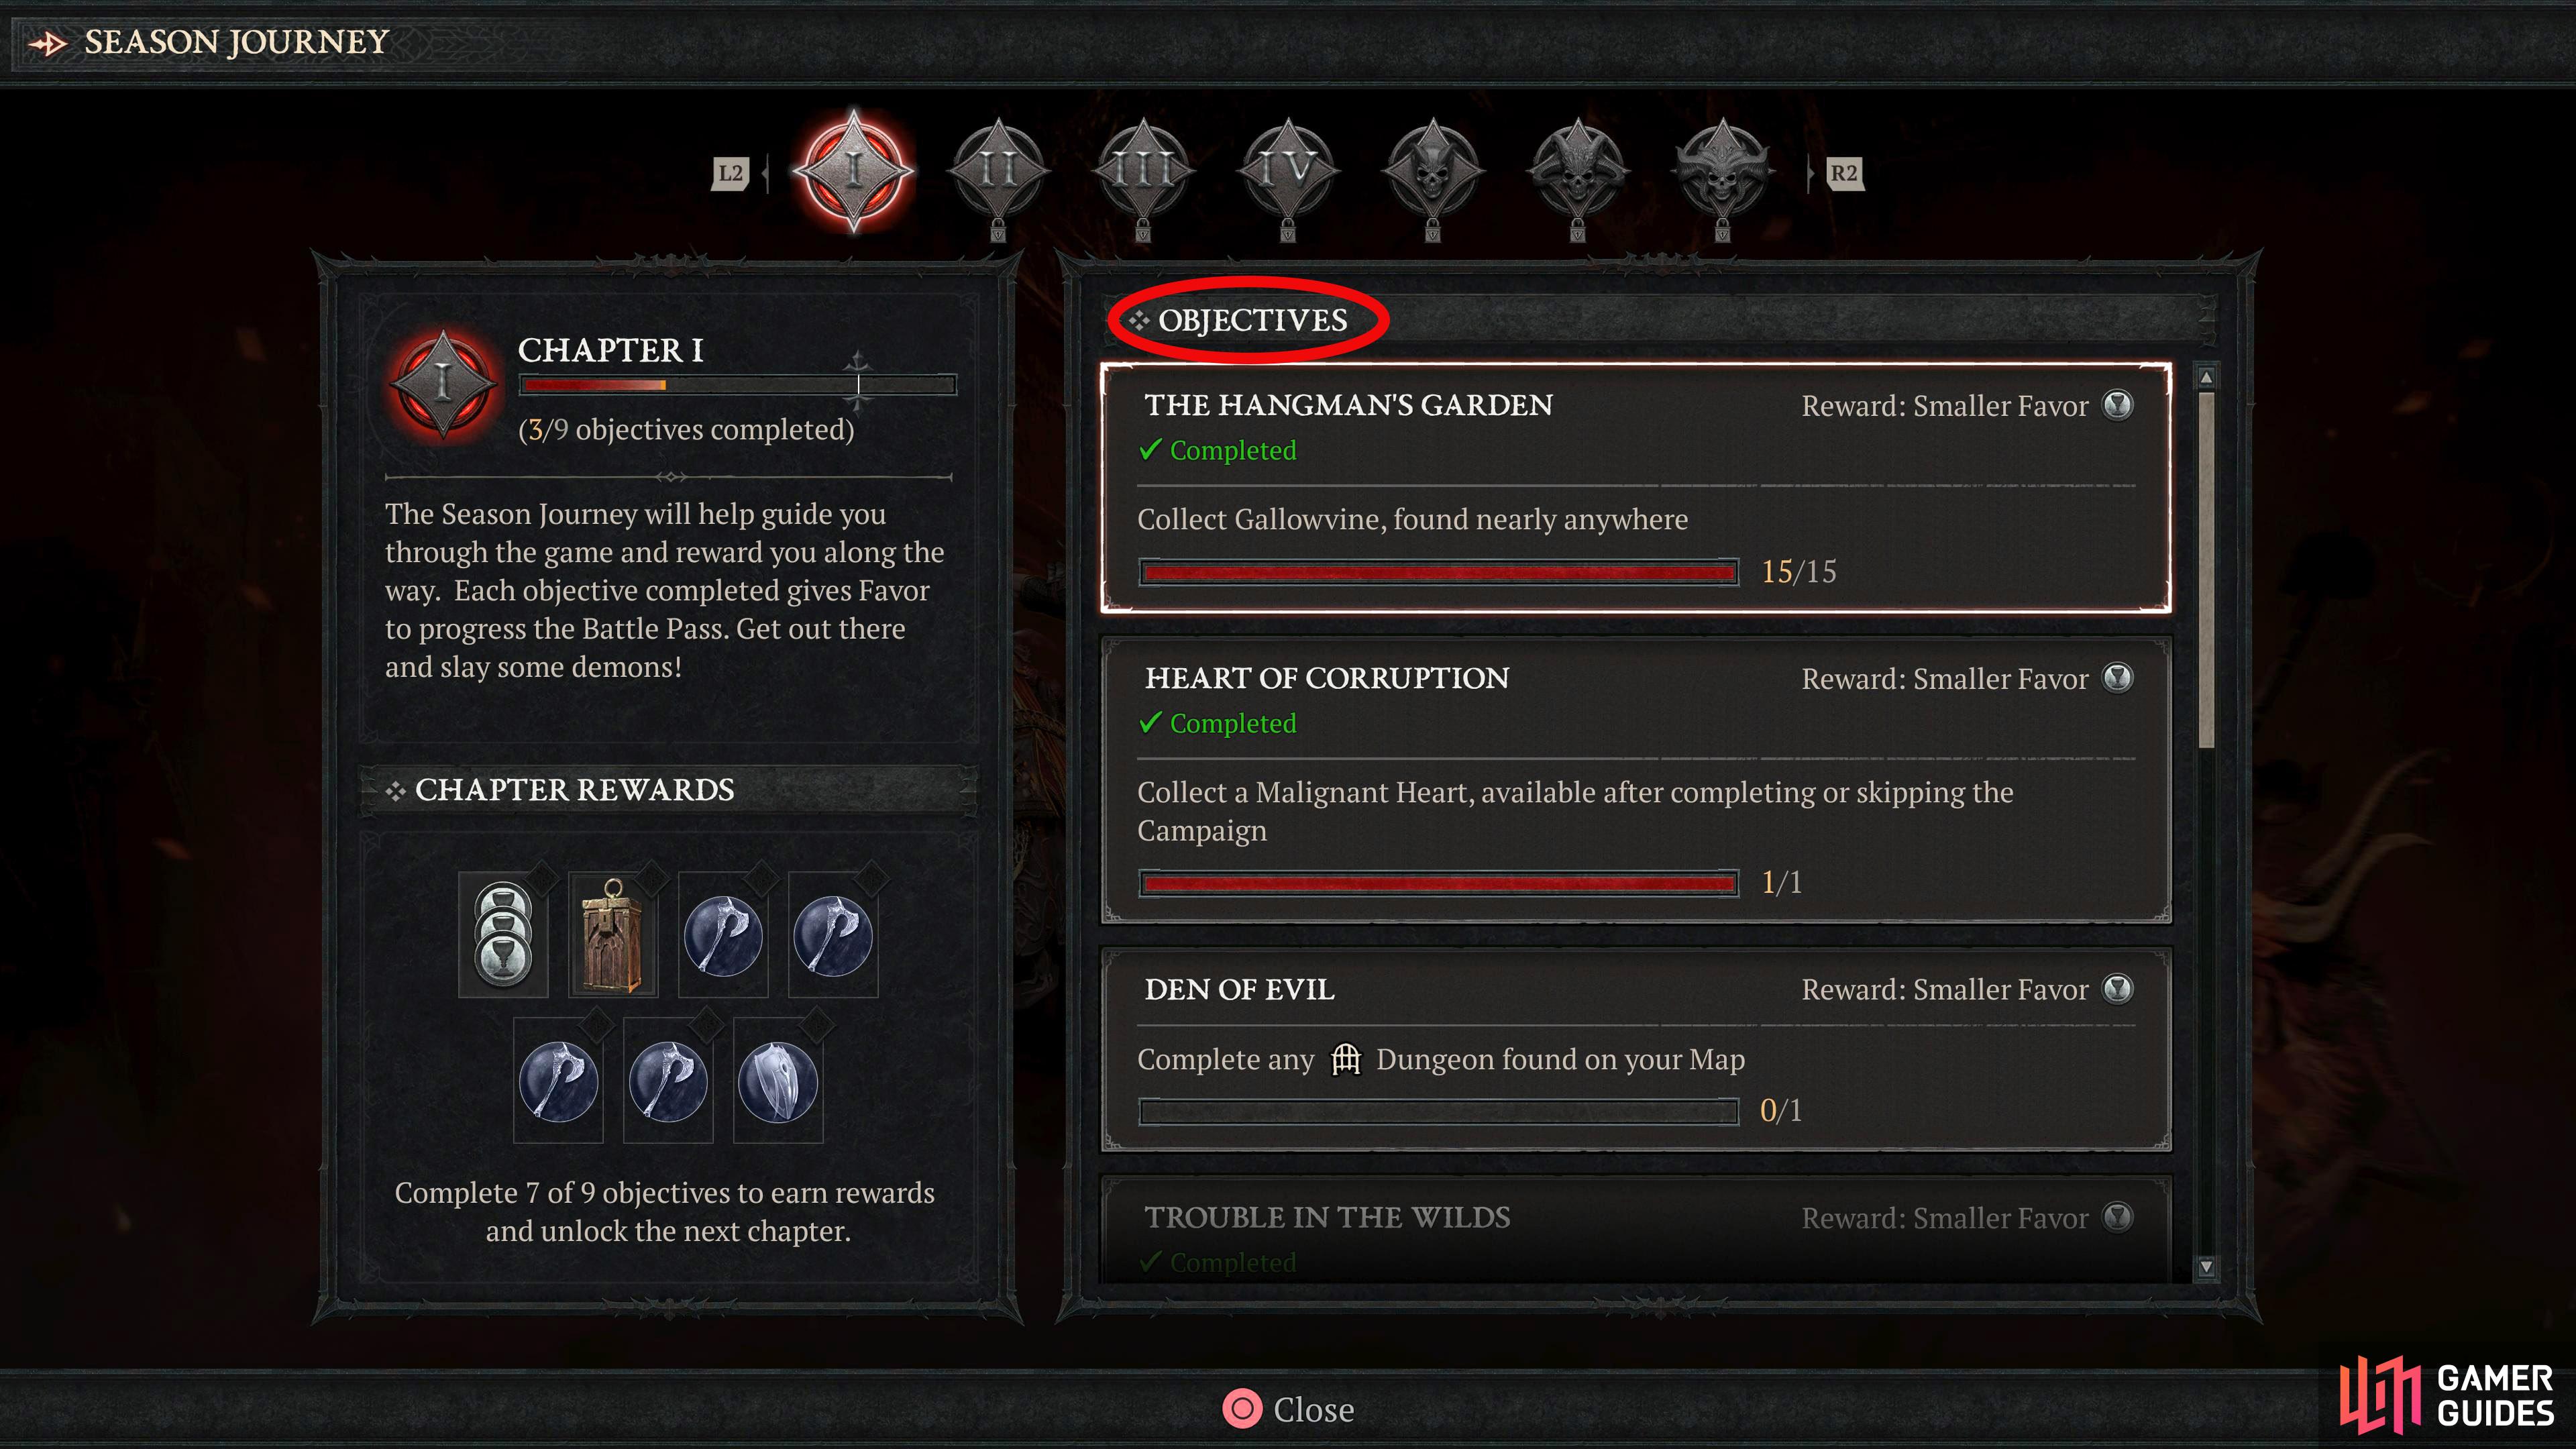
When you get the quest, you’ll notice that there aren’t any markers on the map leading you to a specific location. That’s because you need to go to the Season Journey section under Season on the map screen. This will display numerous objectives for you to complete before any future journey chapters become available. Here’s a list of the objectives you need to complete for Chapter 1 and 2: Chapter 1 of Holding Back the Flood
Chapter 2 of Holding Back the Flood
For a full guide on this quest, visit the Holding Back the Flood Walkthrough.
In-Game Description
General Reward
Various Season Rewards. |

|
||||||||||||||||||||||||||||||||||||
|
|
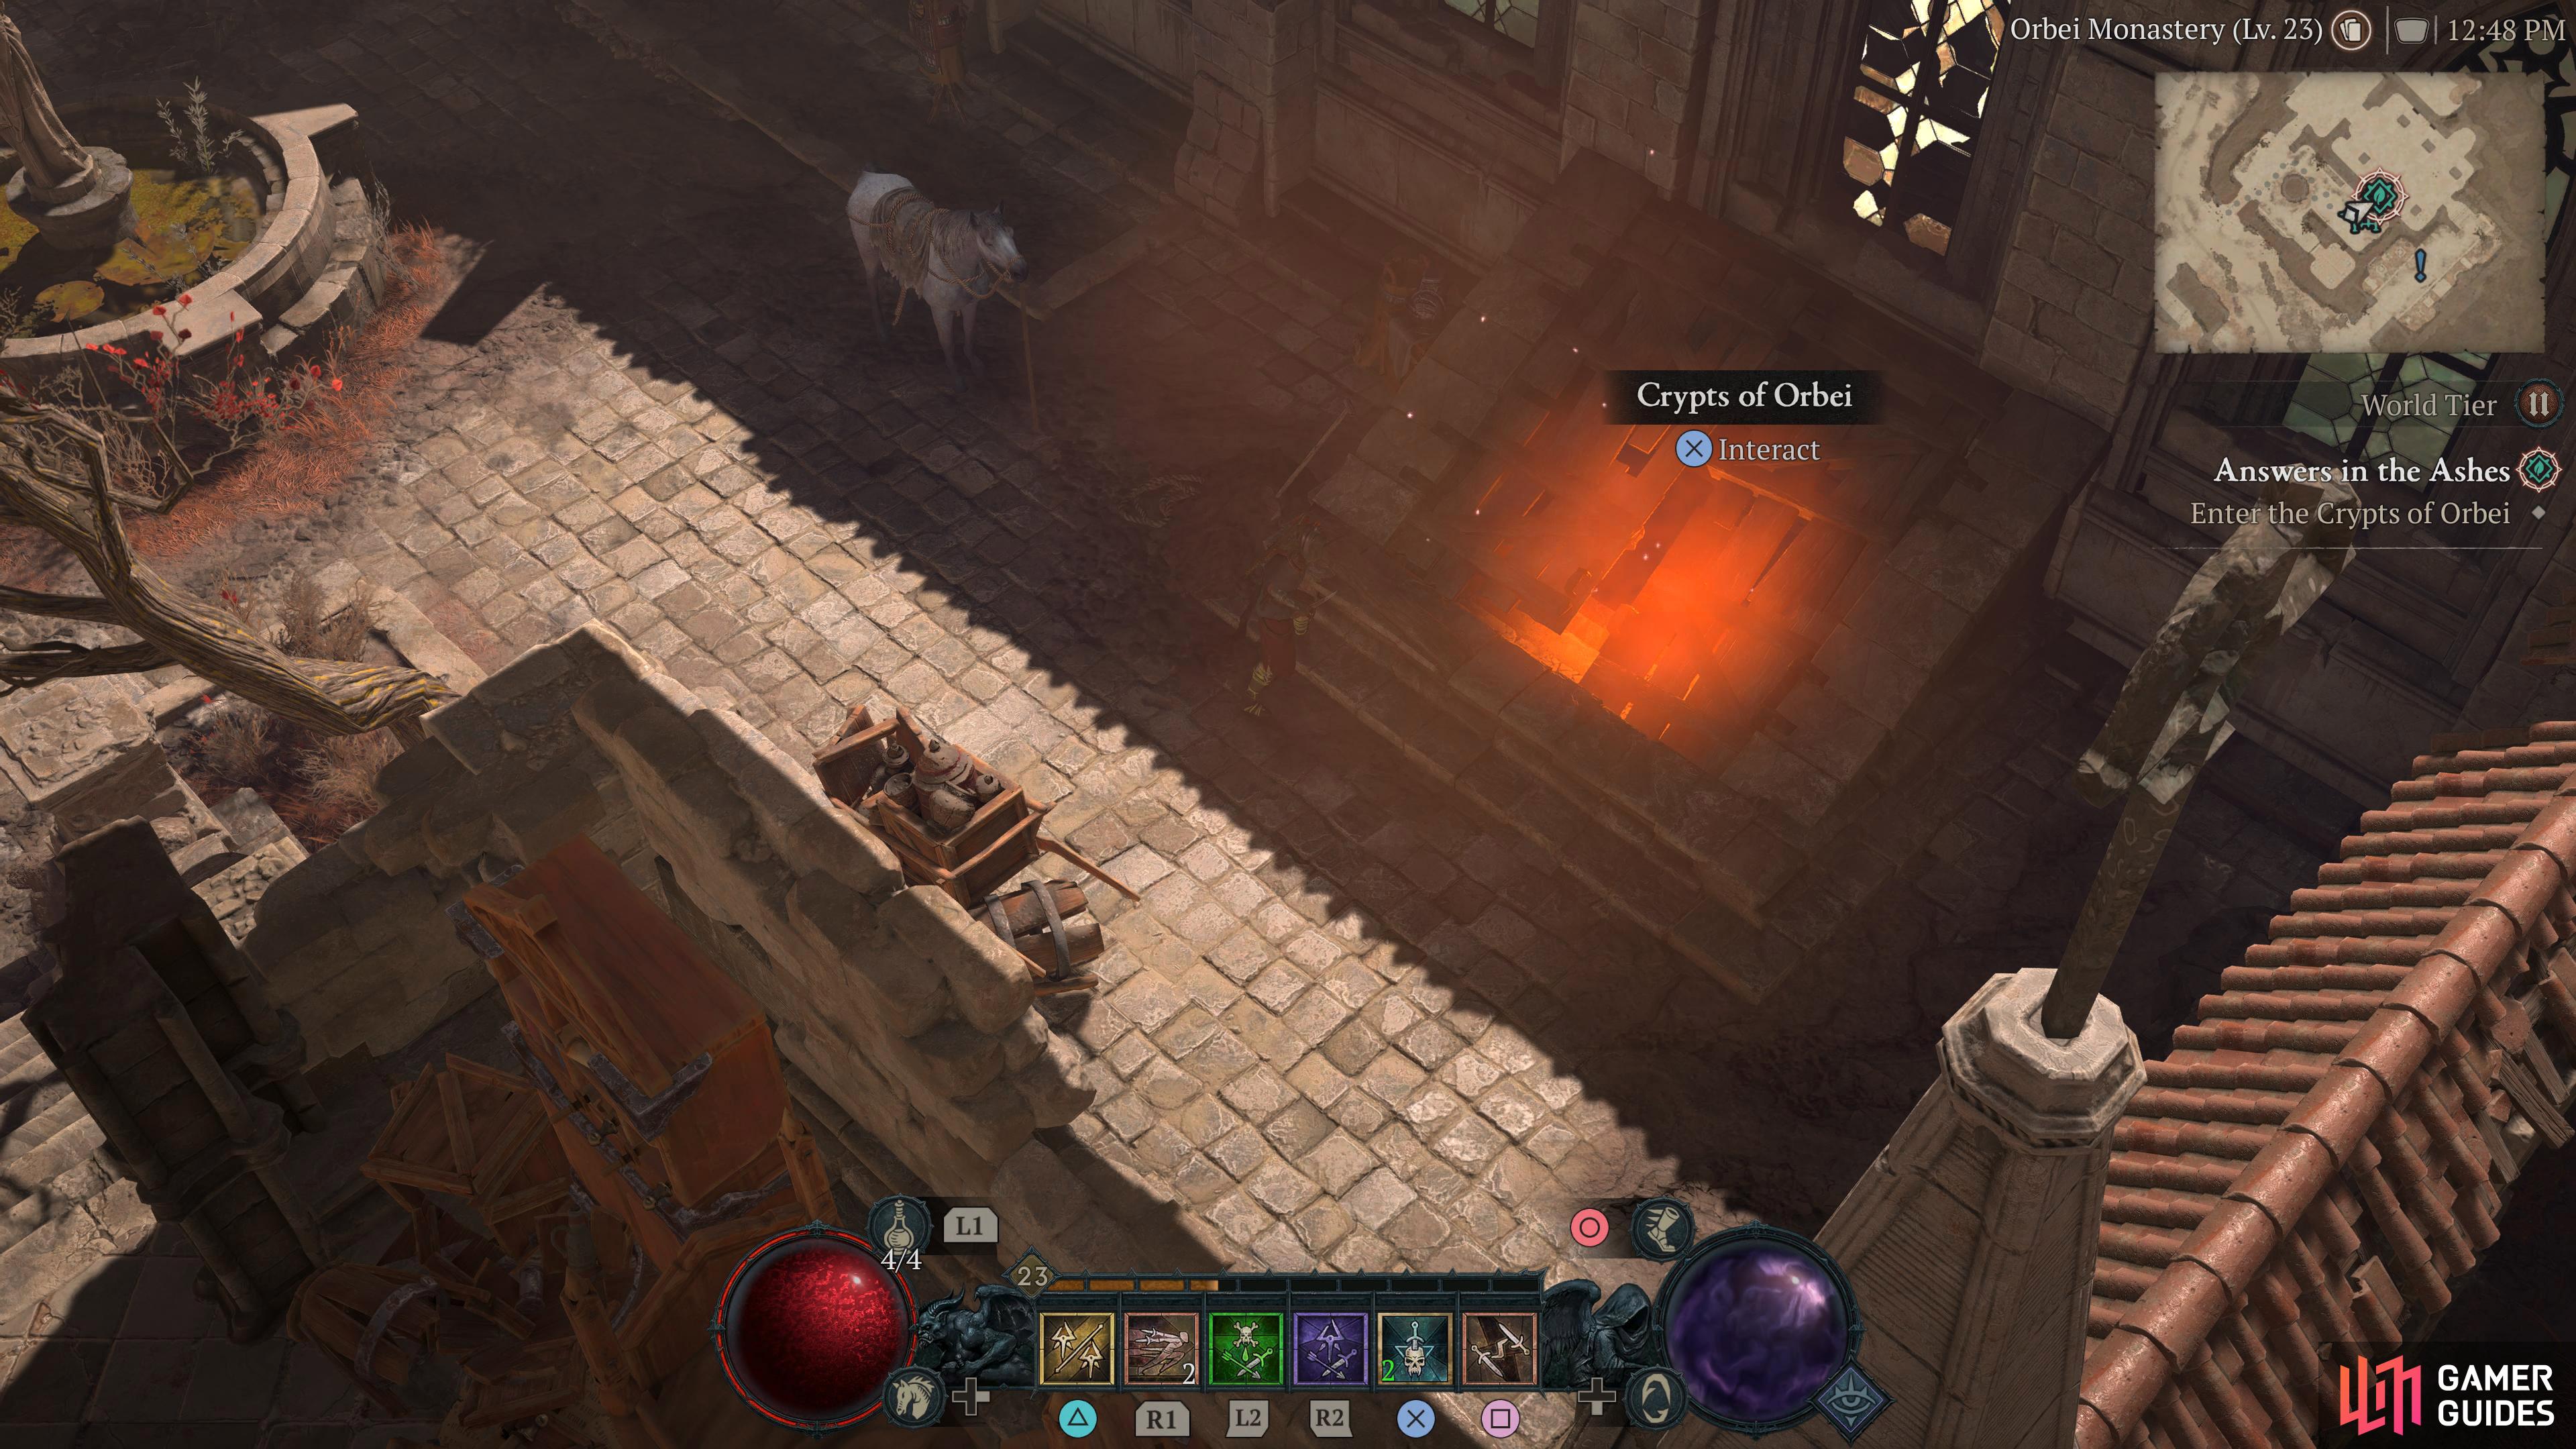
Answers in the Ashes |
Detailed Location
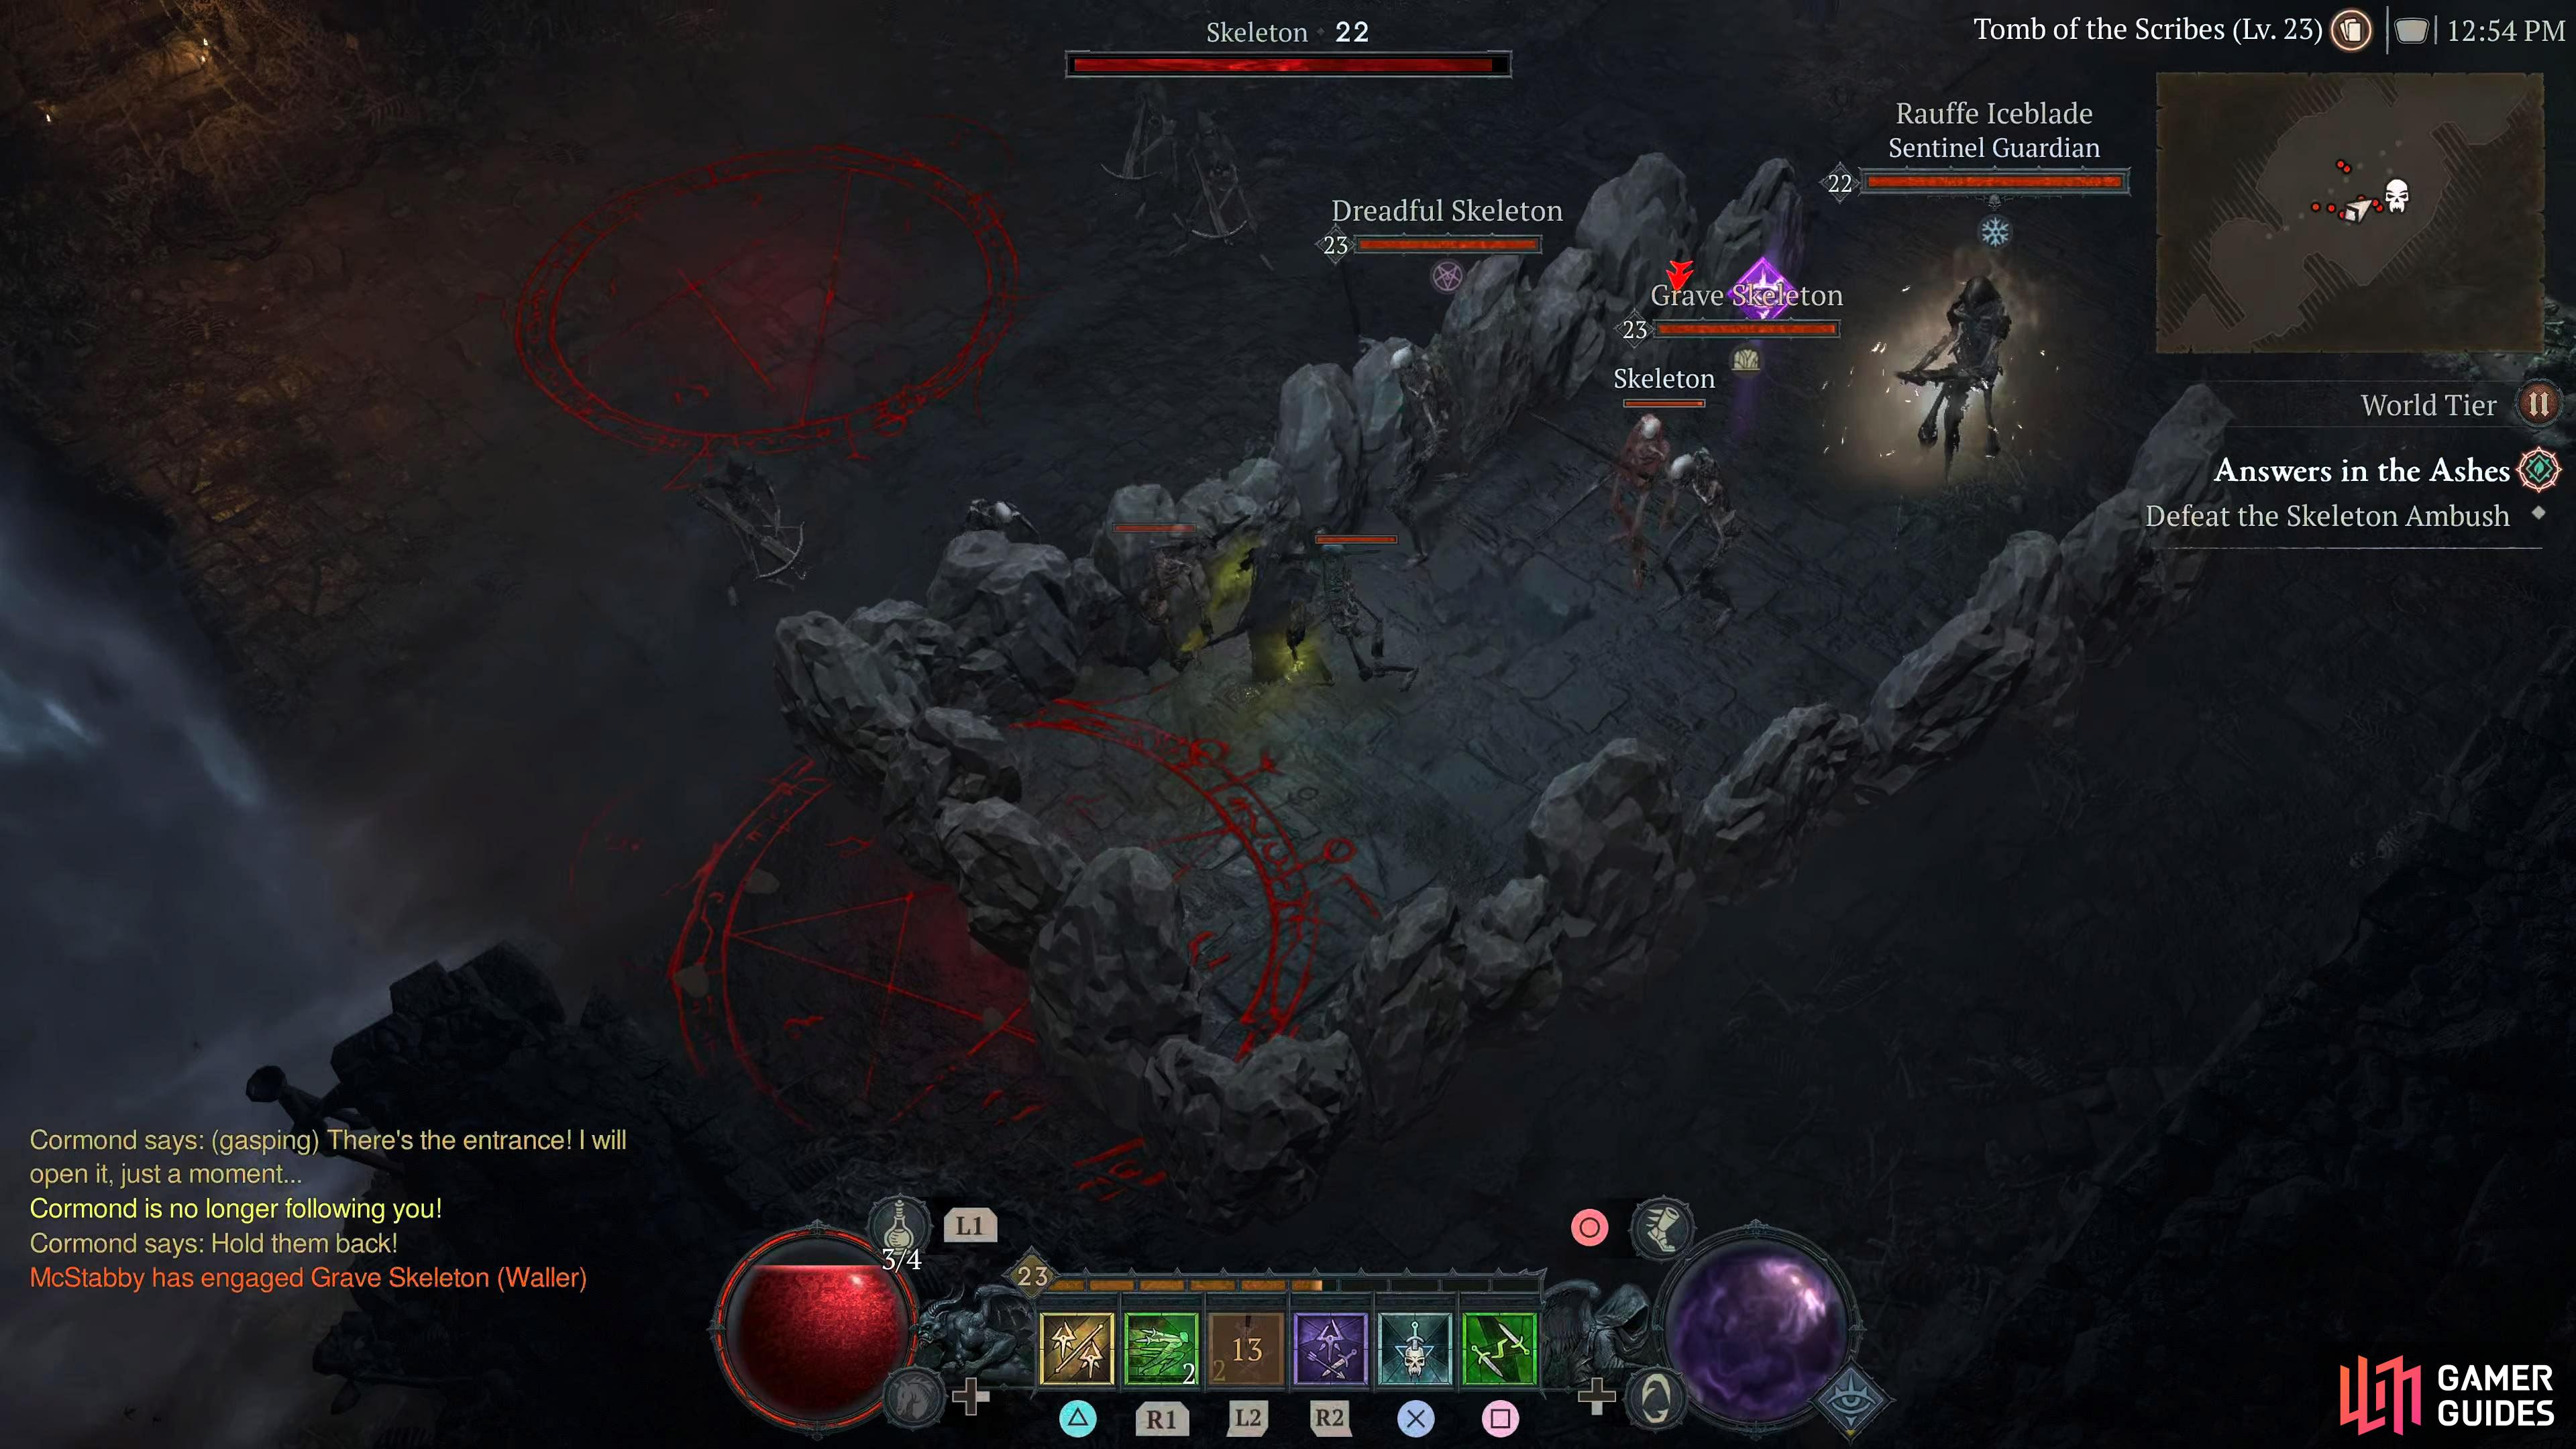
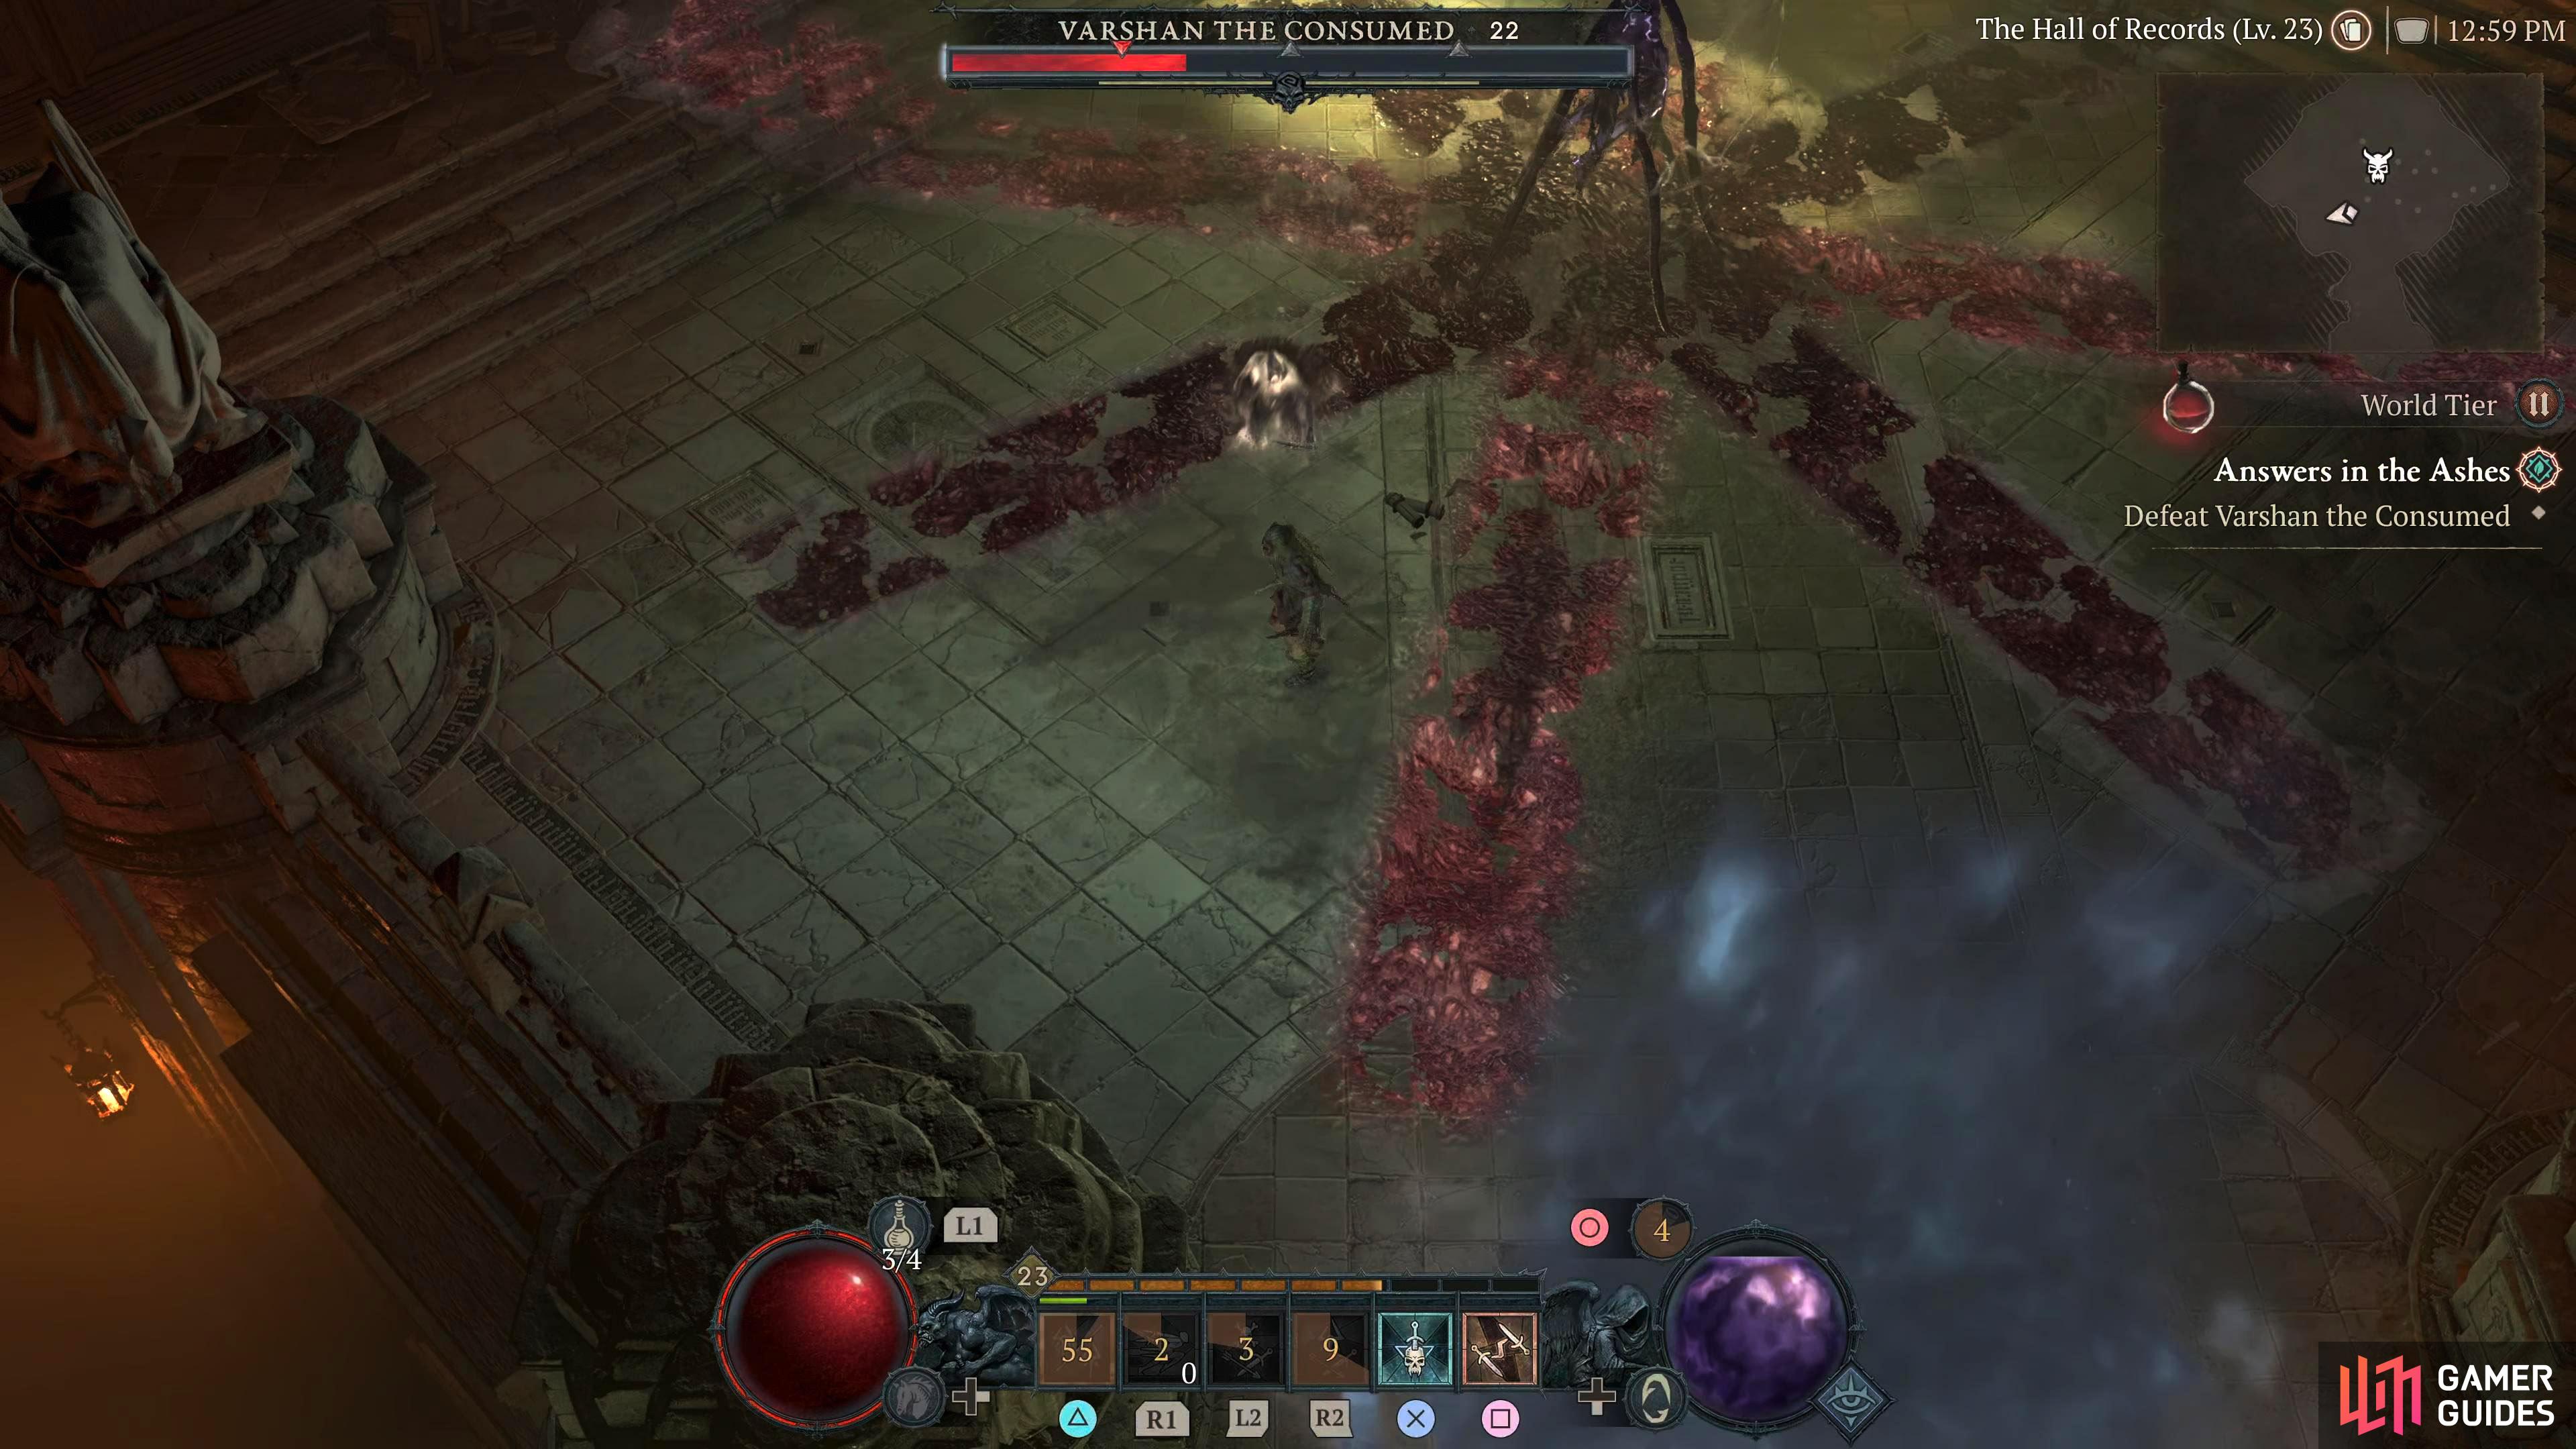
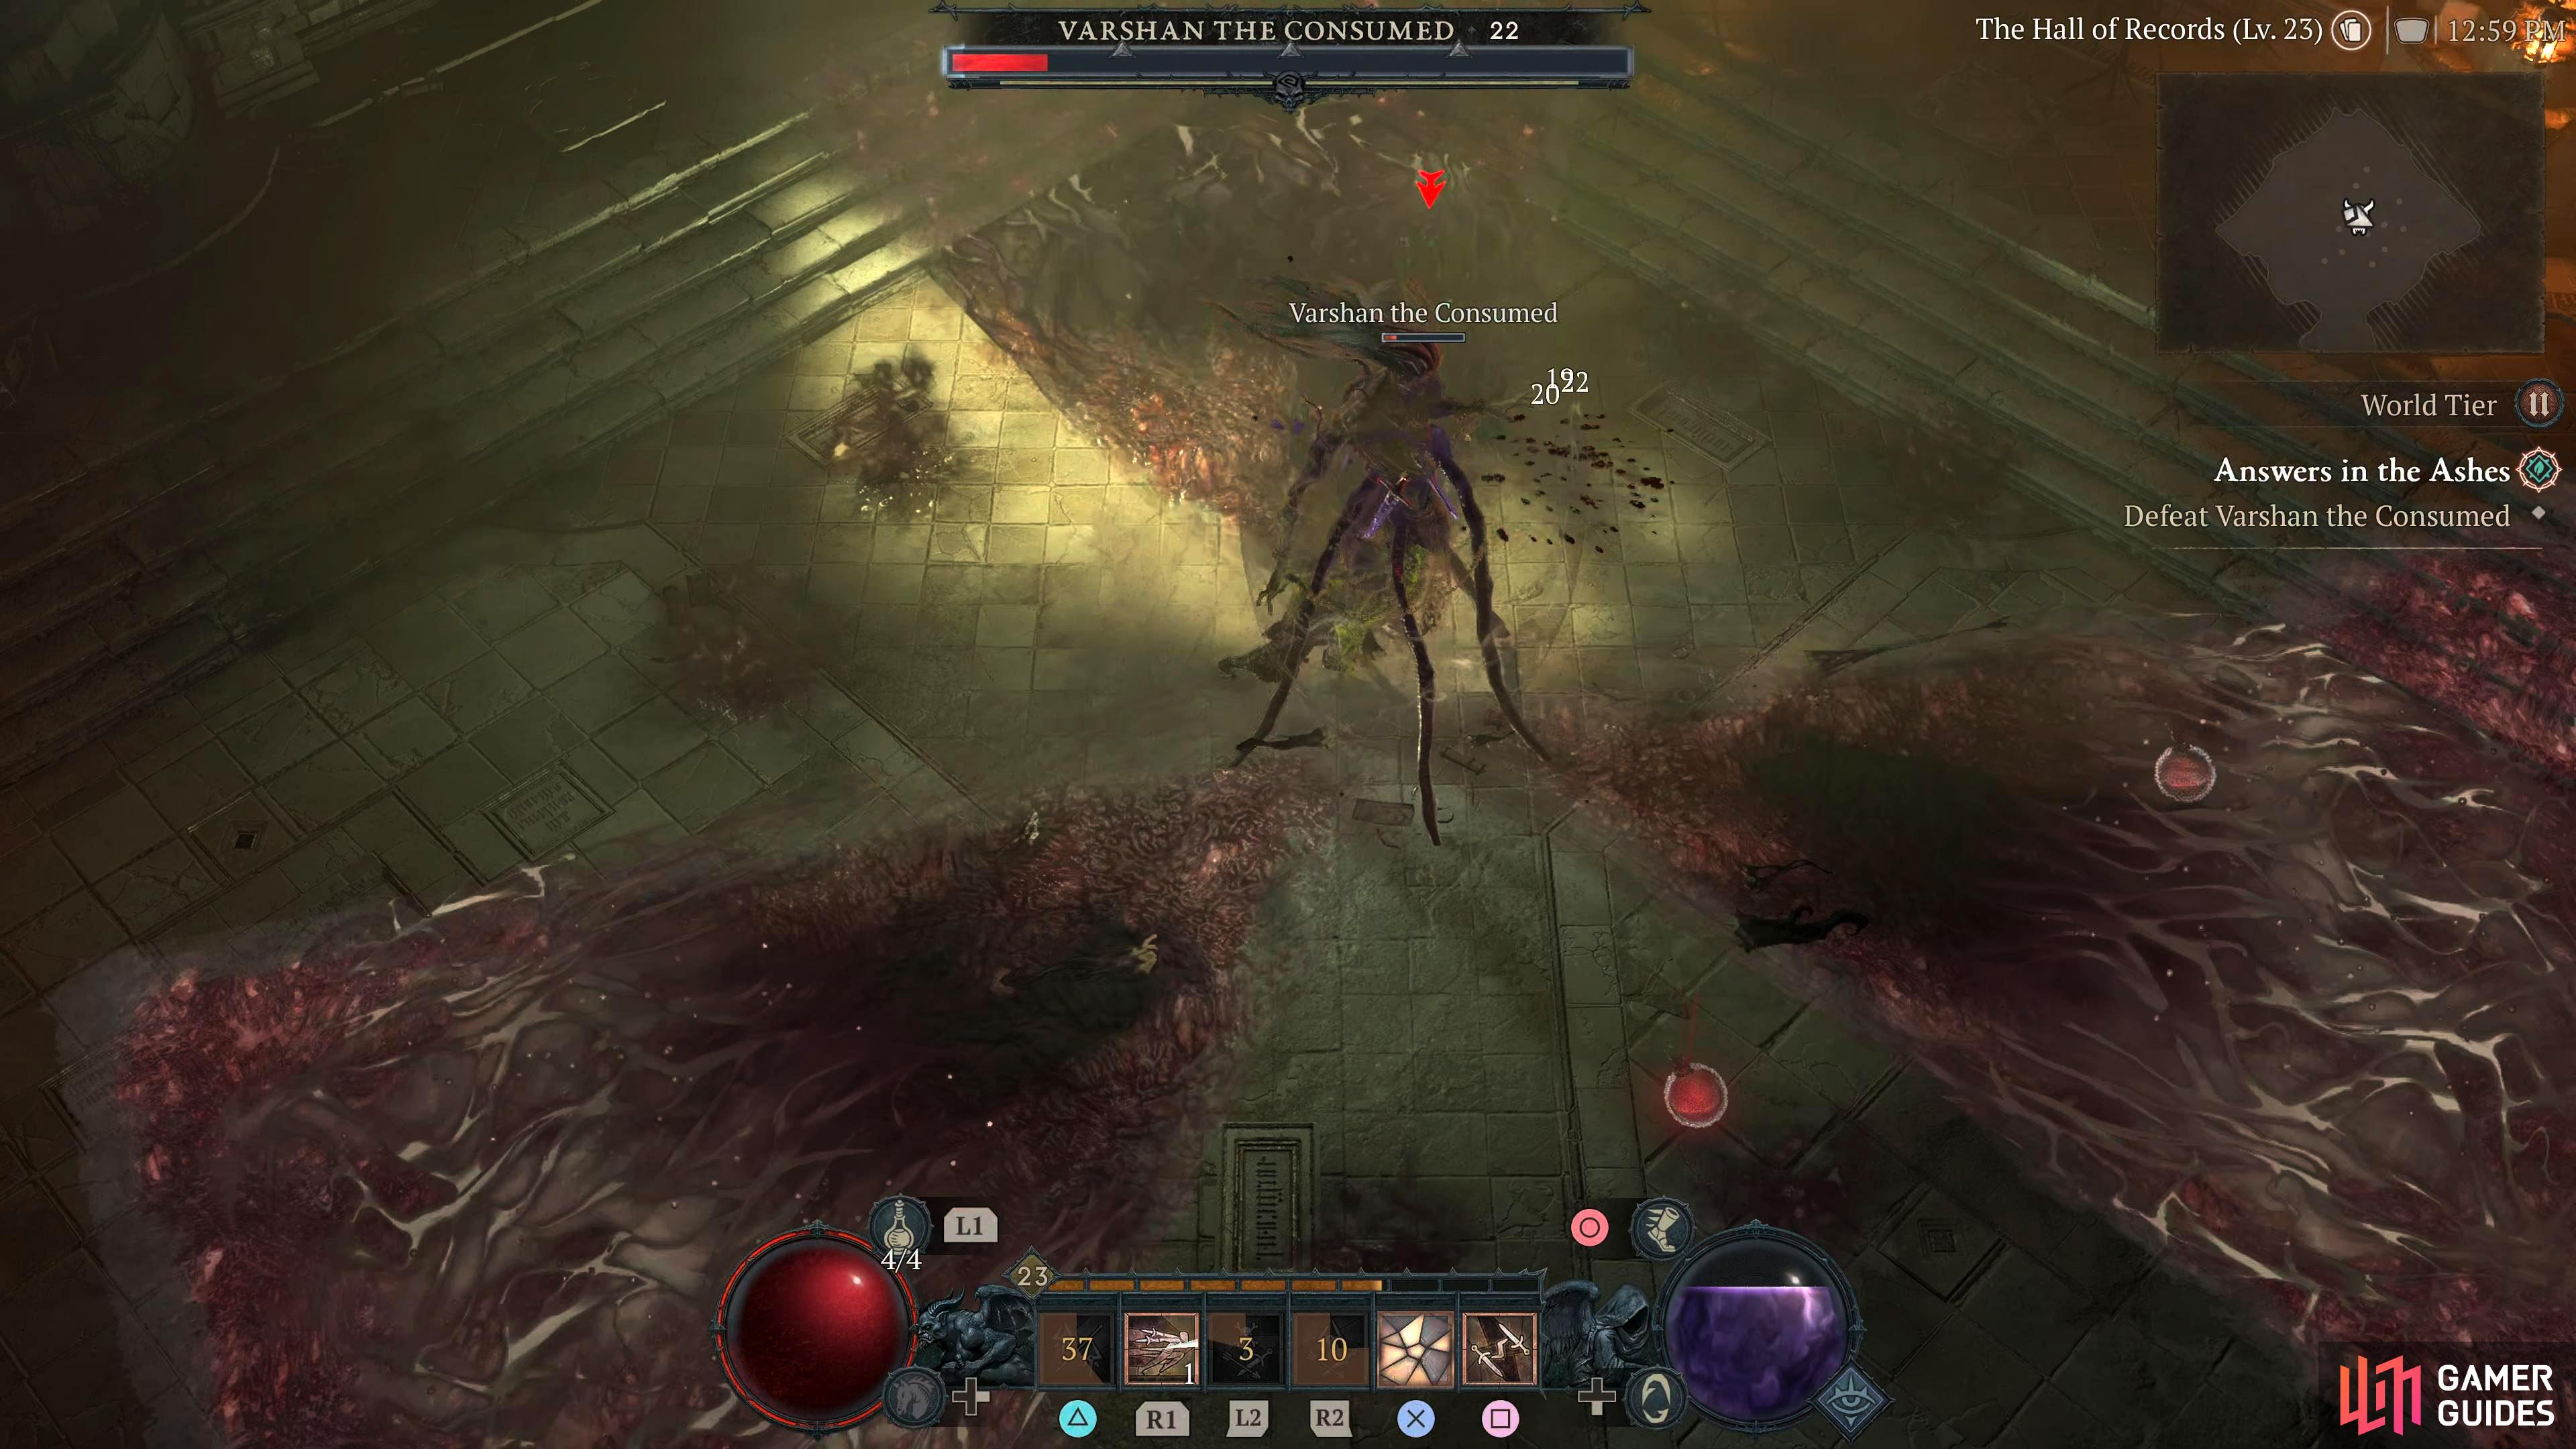
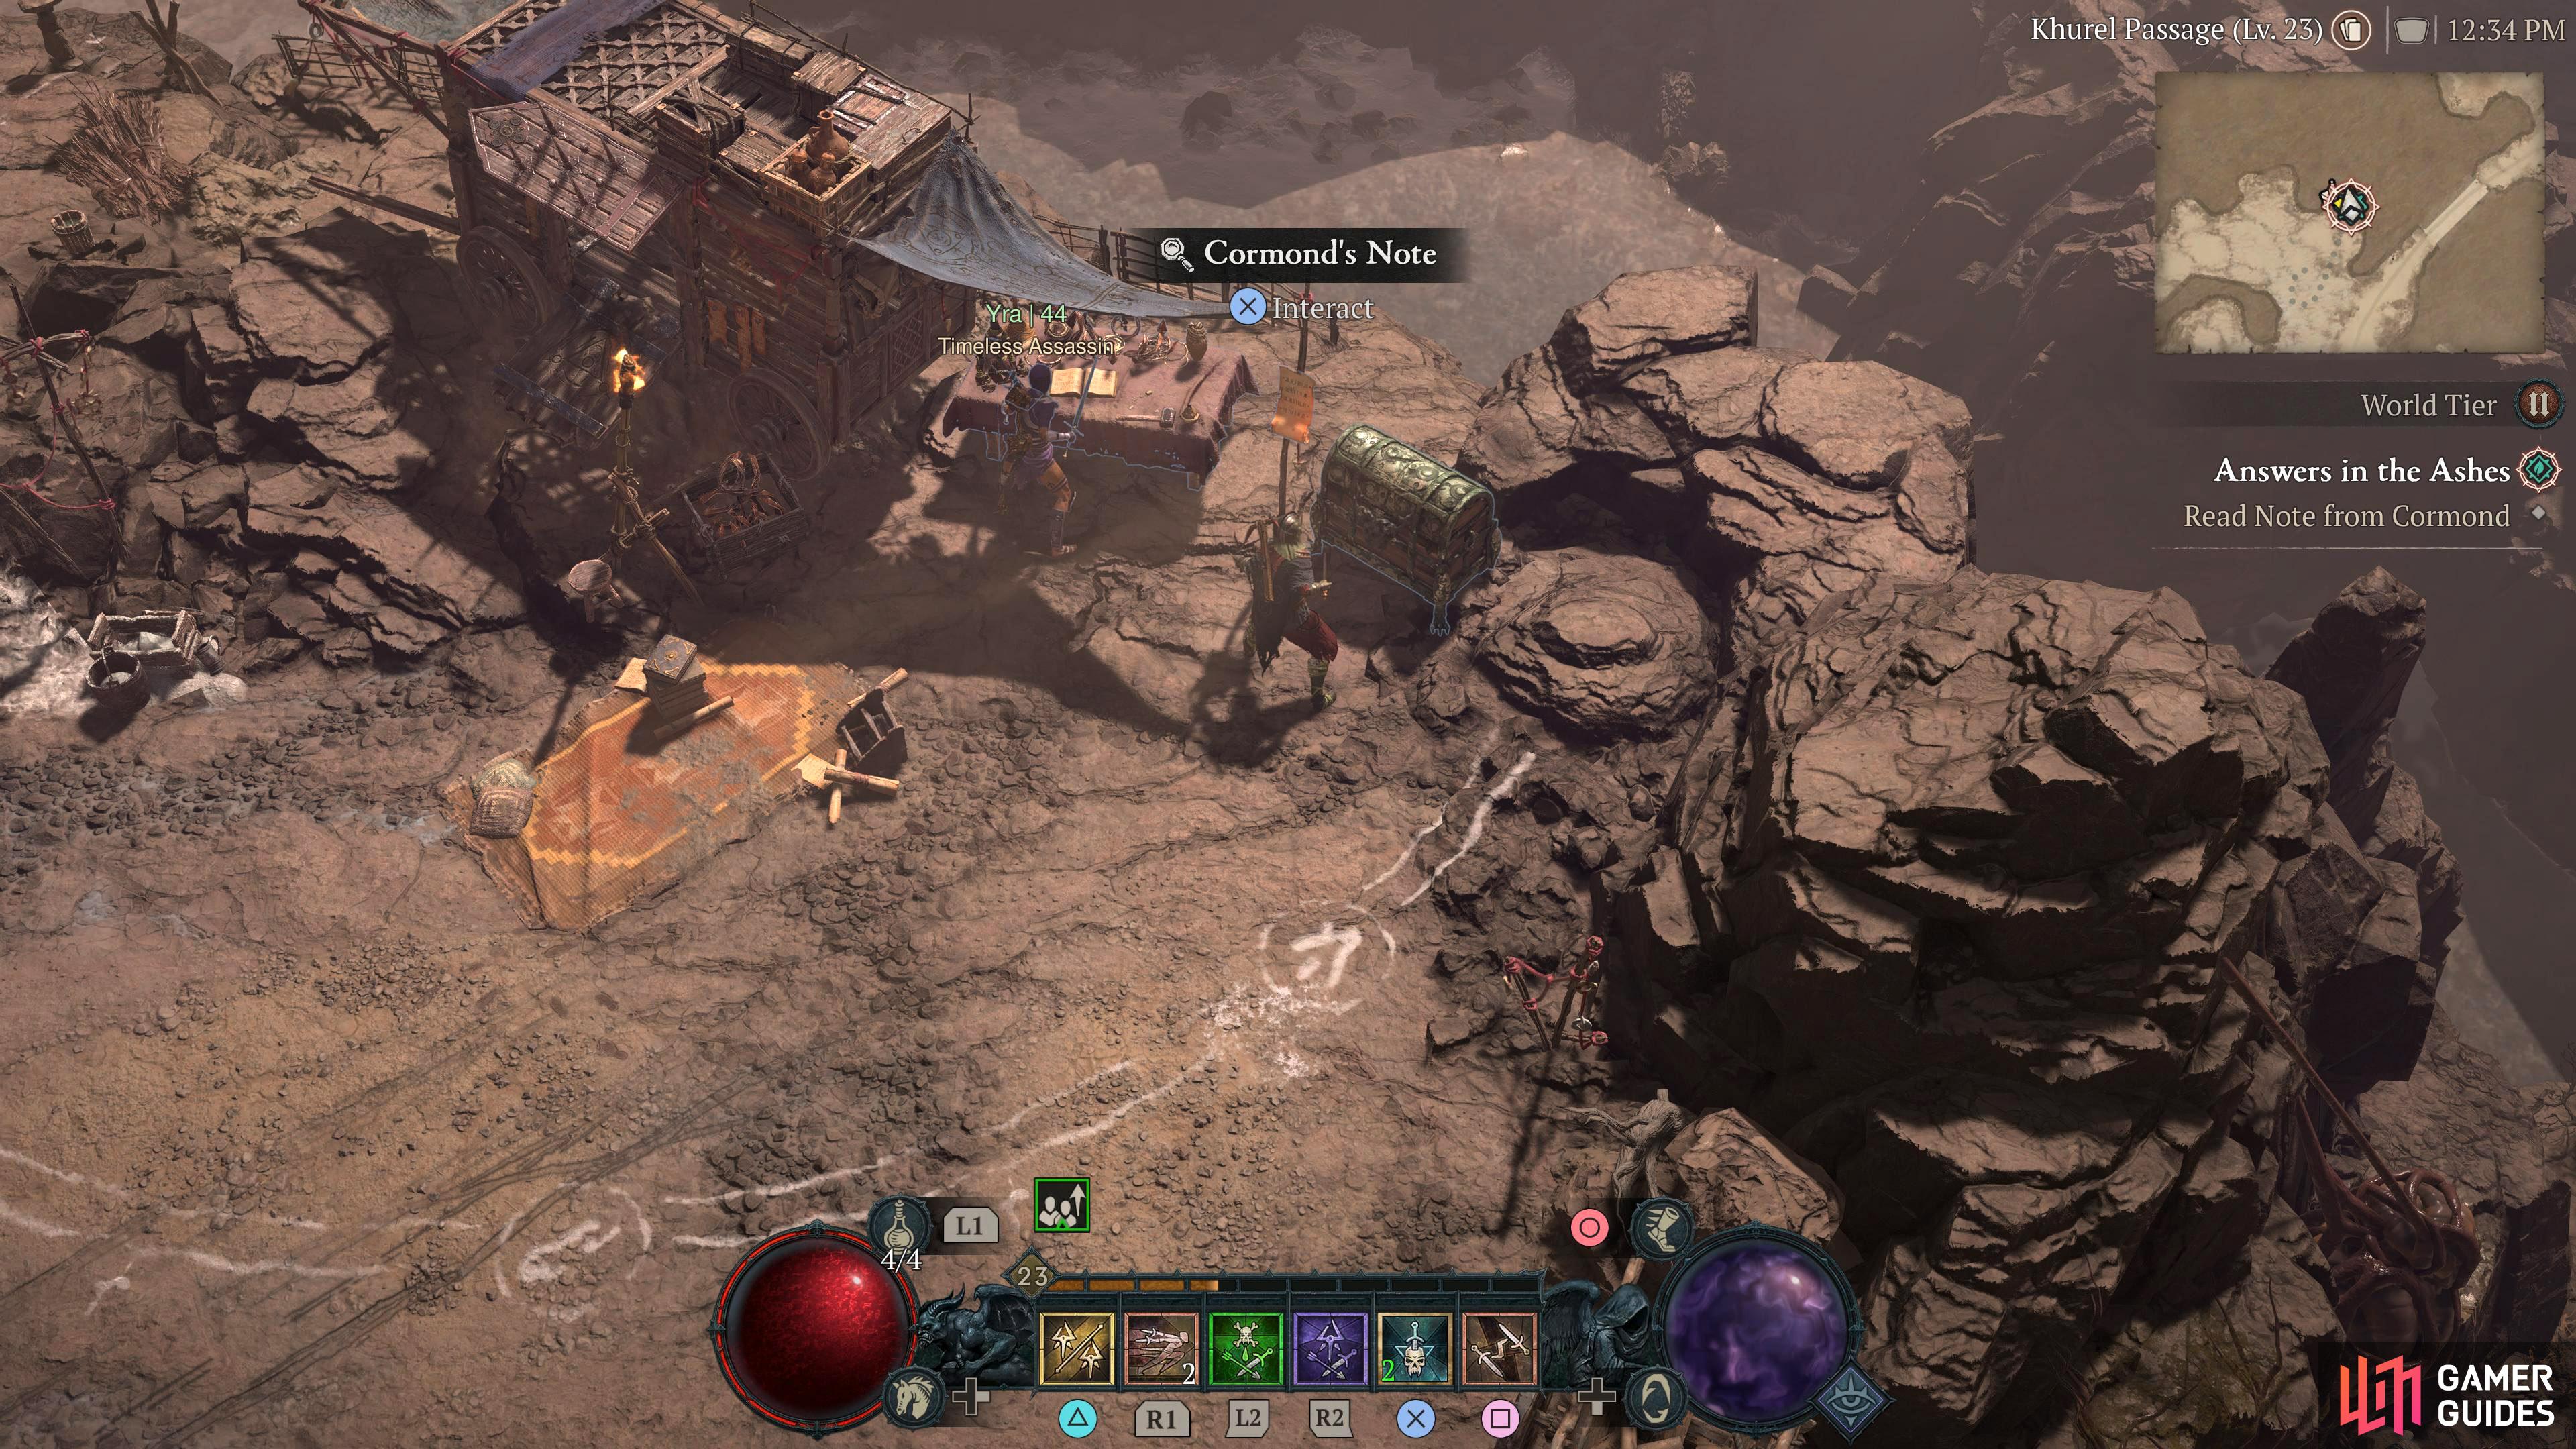
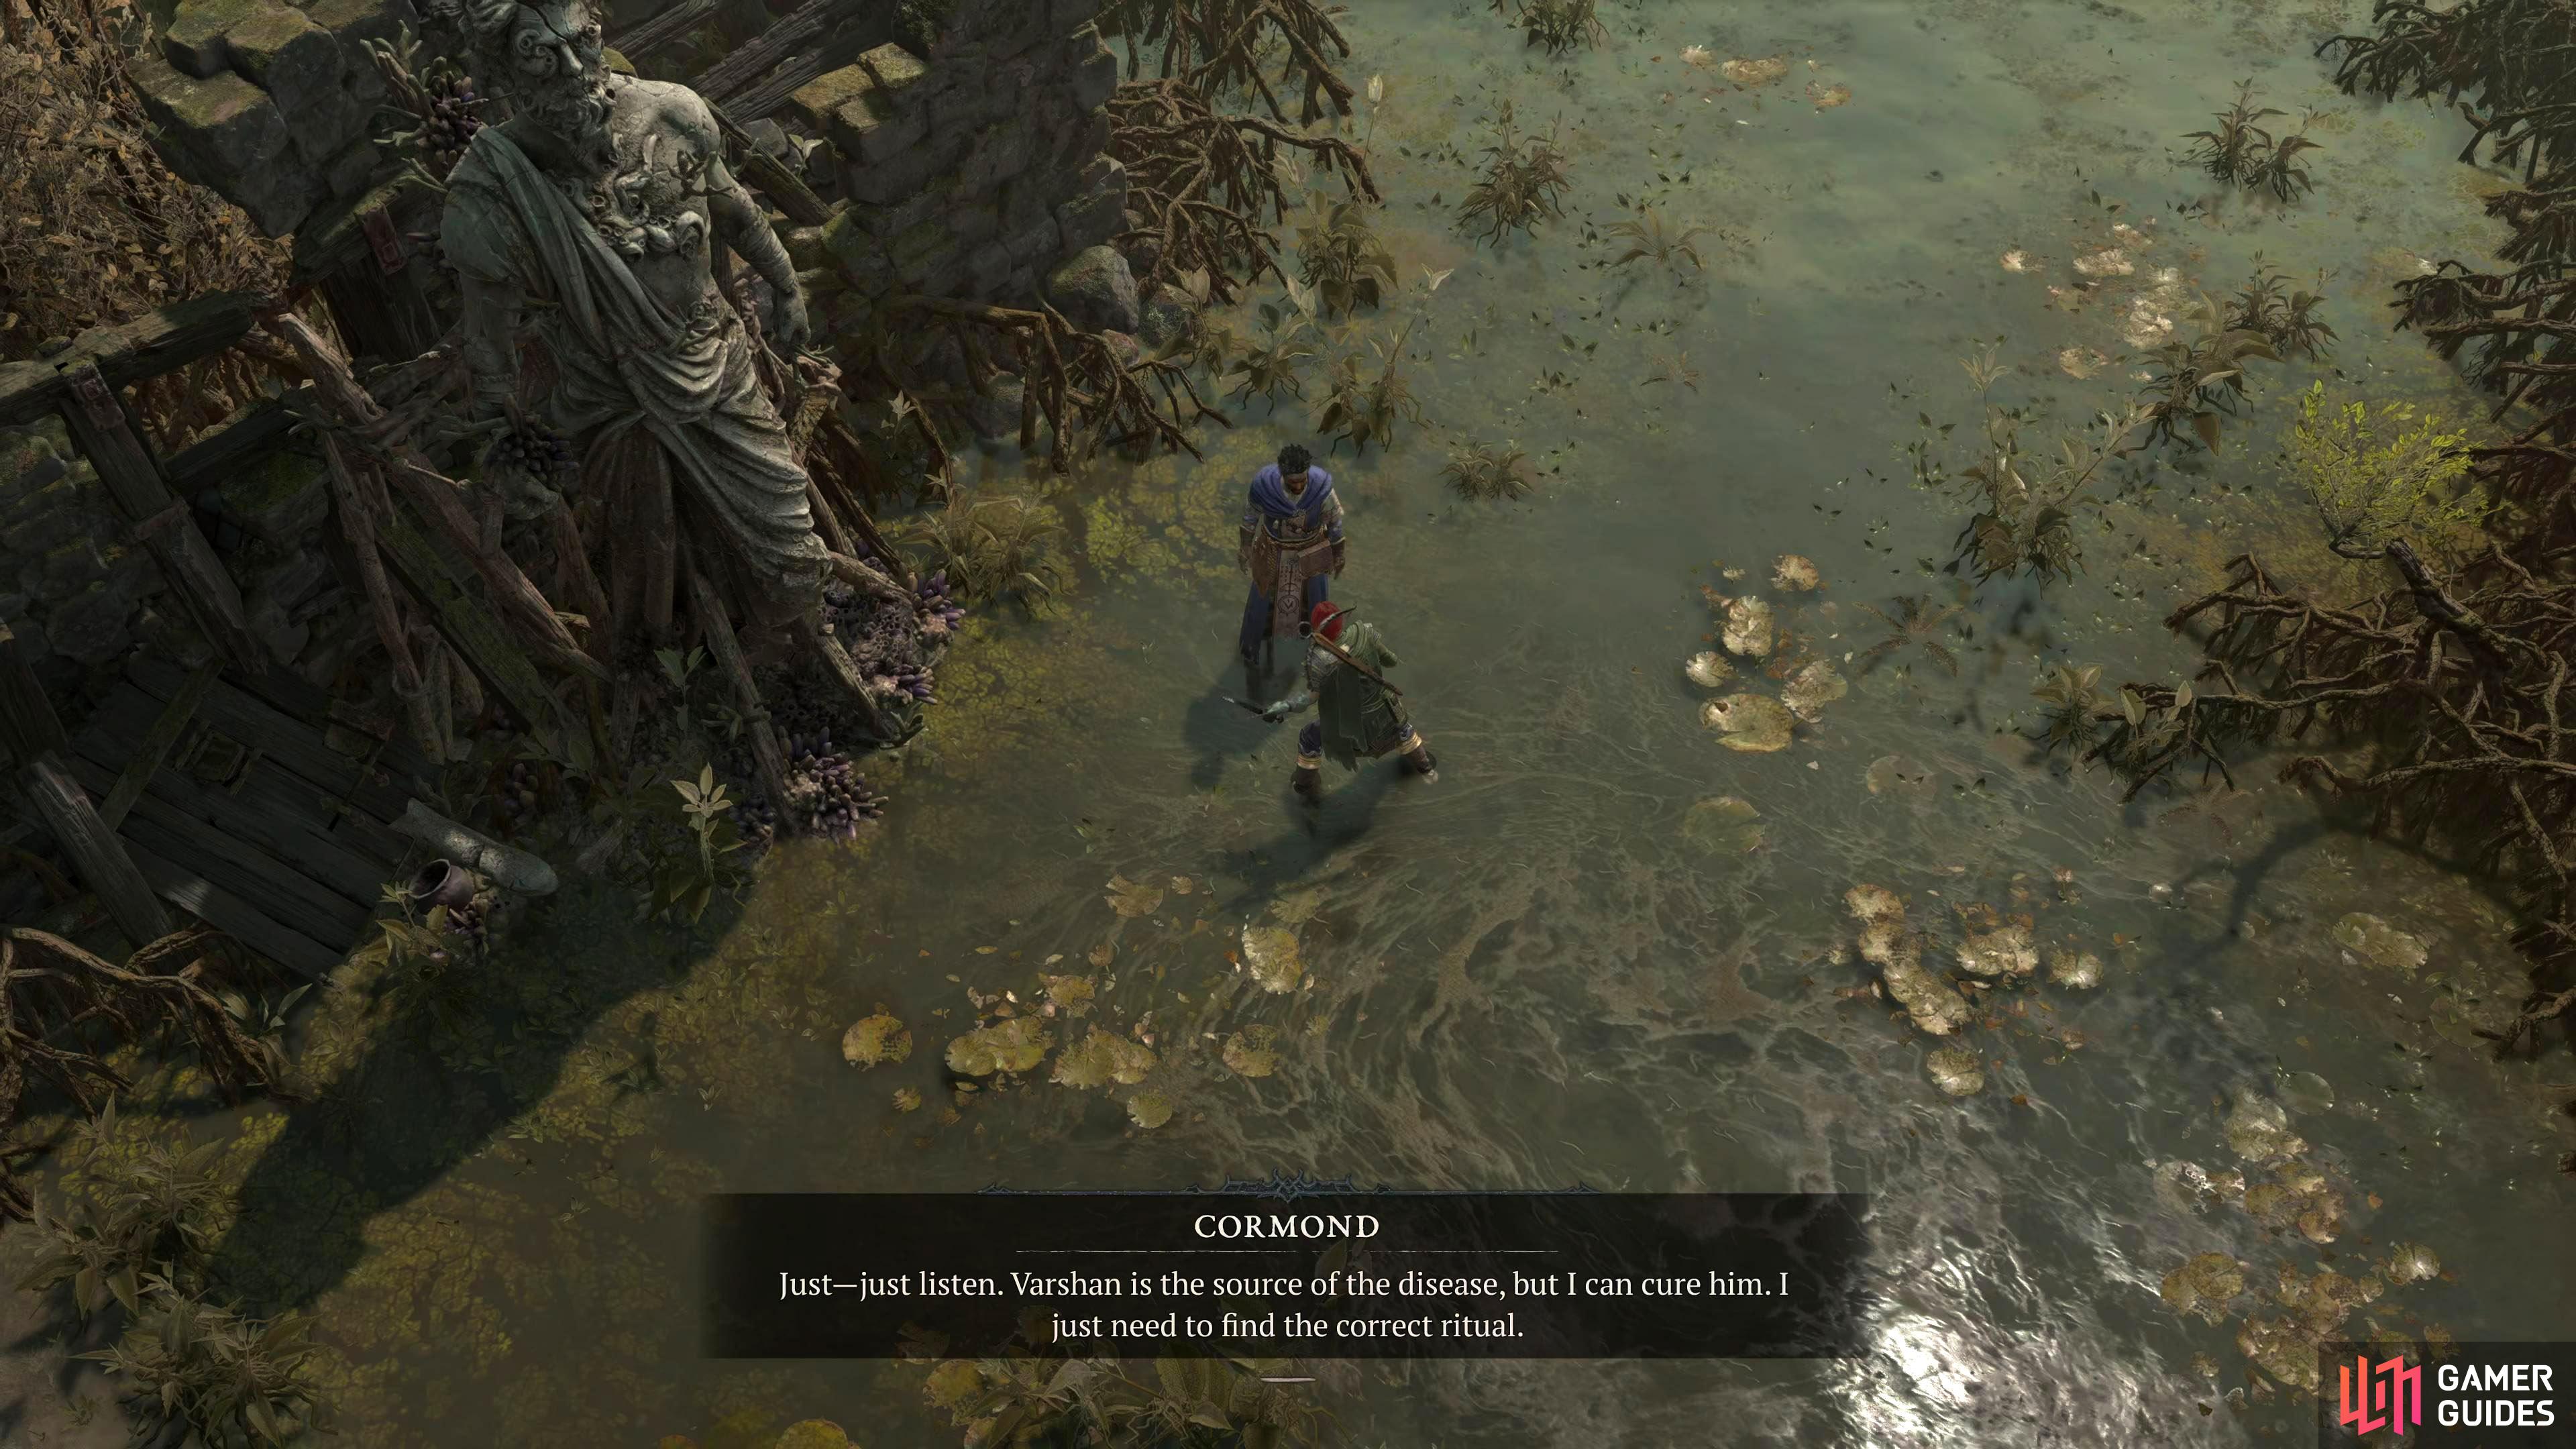
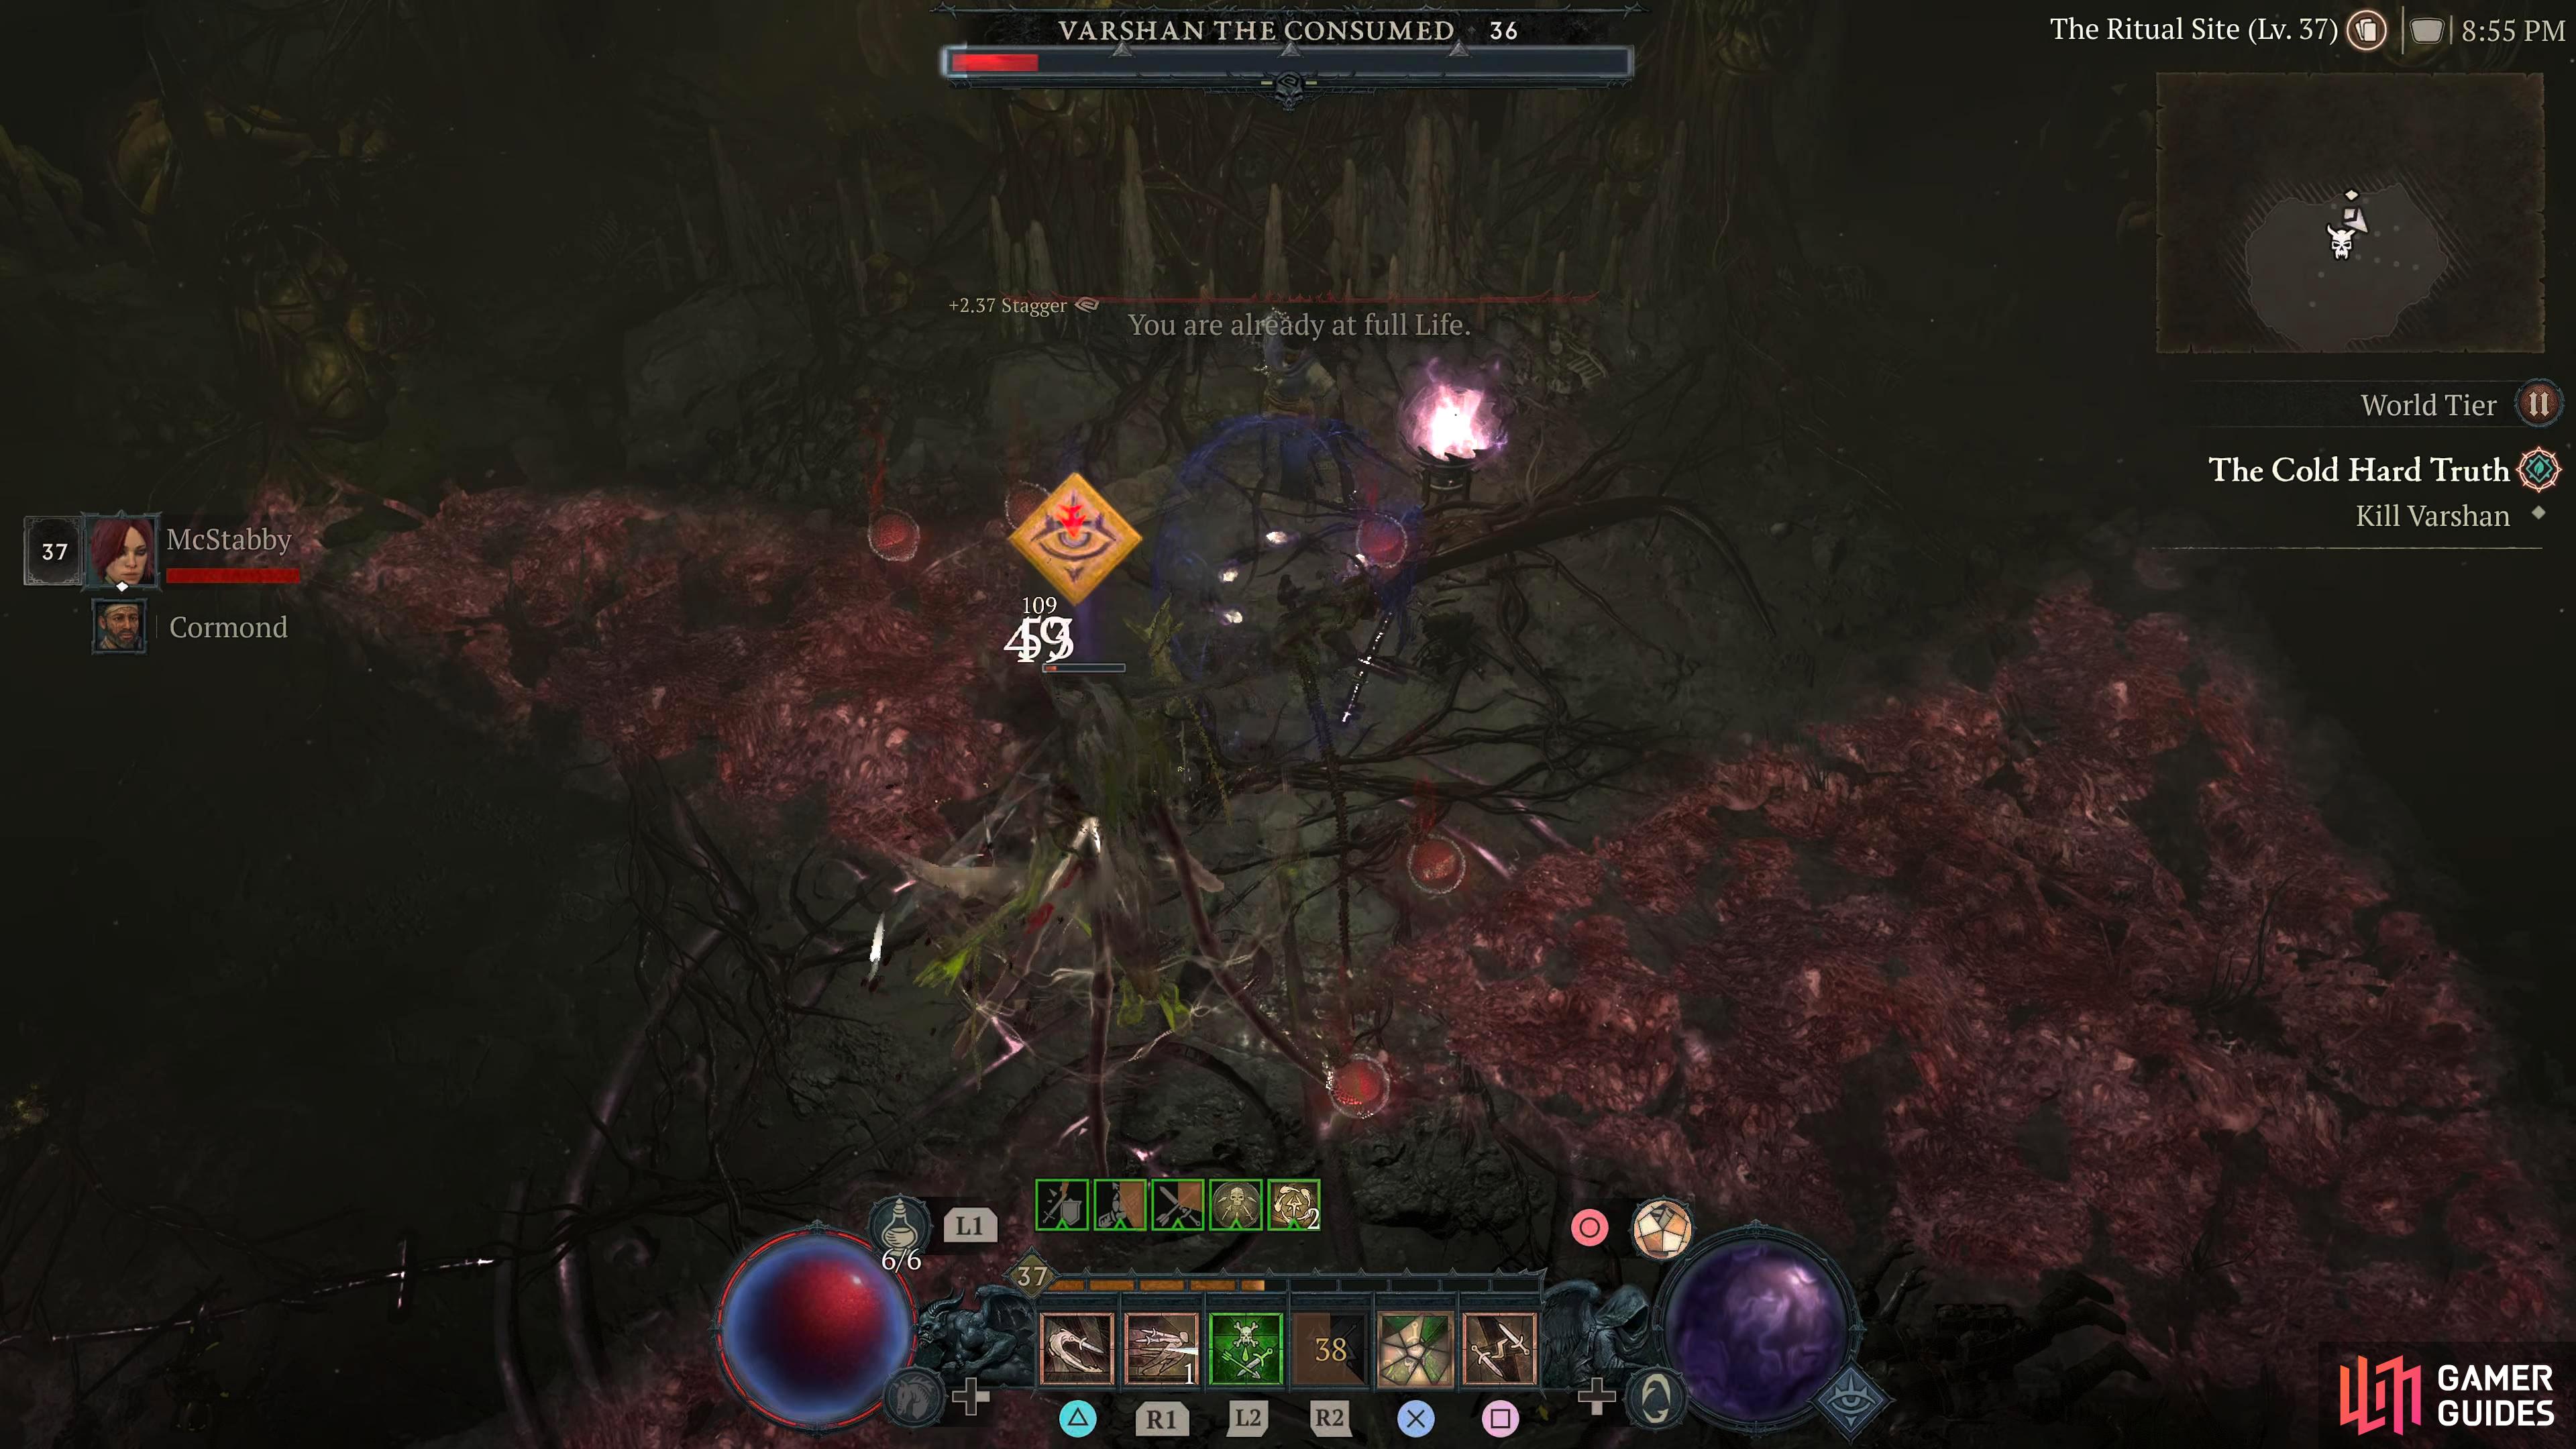
This quest will appear once you’ve completed the Chapter 1 and 2 objectives of the Season Journey. Head back to Khural Passage, Dry Steppes where Cormond’s workbench is. As you approach the bench, you’ll be waylaid by numerous Malignant enemies, defeat them, and read the note that Cormond left behind. The note reads: “I’ve found something! Meet me in the courtyard of Orbei as soon as you can!”, so you’ll want to head to the Orbei Monastery located in the southeast of Dindai Flats. Follow the road southeast, and you’ll reach the Monastery before long. When you enter the monastery, you will see Cormond by the water fountain. Speak to him, and he’ll mention the Hall of Records and a crypt. Enter the nearby Crypts of Orbei dungeon, and you’ll have a small dungeon to complete. Make your way through it until you reach the Sealed Door, and you’ll get ambushed by three elite skeletons, defeat them, and head through the door which Cormond has now opened. Continue through the dark narrow corridors until you reach the Records Room. Here, you’ll need to check two bookcases in the top-left, and top-right corners, with the final object being a stack of books in the lower-left corner. Once you read them all, a Malignant entity will find its way into the room who goes by the name of Varshan. It seems that it’s intimately acquainted with Cormand. After a brief bit of dialogue, you will need to defeat Varshan the Consumed. This isn’t a particularly challenging fight, but Varshan does have a couple of attacks to watch out for. One of the attacks it has will place damage markers in three segments of the arena, one behind, and one on either side of itself. Then it’ll have several more smaller circular markers appear around the edge to make a larger circle. For this attack, you’ll want to stand in between the markers but stay close to the boss to avoid the attack. The second attack will have Varshan cast two X-shape markers, one after the other where they will form an asterisk. They will explode one after another in the order they were cast, just make sure you stand in between the lines to avoid taking any damage. Other than that, it’s your regular tank and spank fight. Once you’ve defeated Varshan, attempt to pick up the Malignant Heart from the floor, then leave the dungeon. Once you’re back outside, head out of the Monastery altogether, and you’ll find Cormand sitting on the steps in front of the entrance, feeling sorry for himself. As another piece of dialogue goes by, the quest will end.
In-Game Description
Region
General Reward
XP and Gold
Item Reward
1×
|
|
||||||||||||||||||||||||||||||||||||
|
|
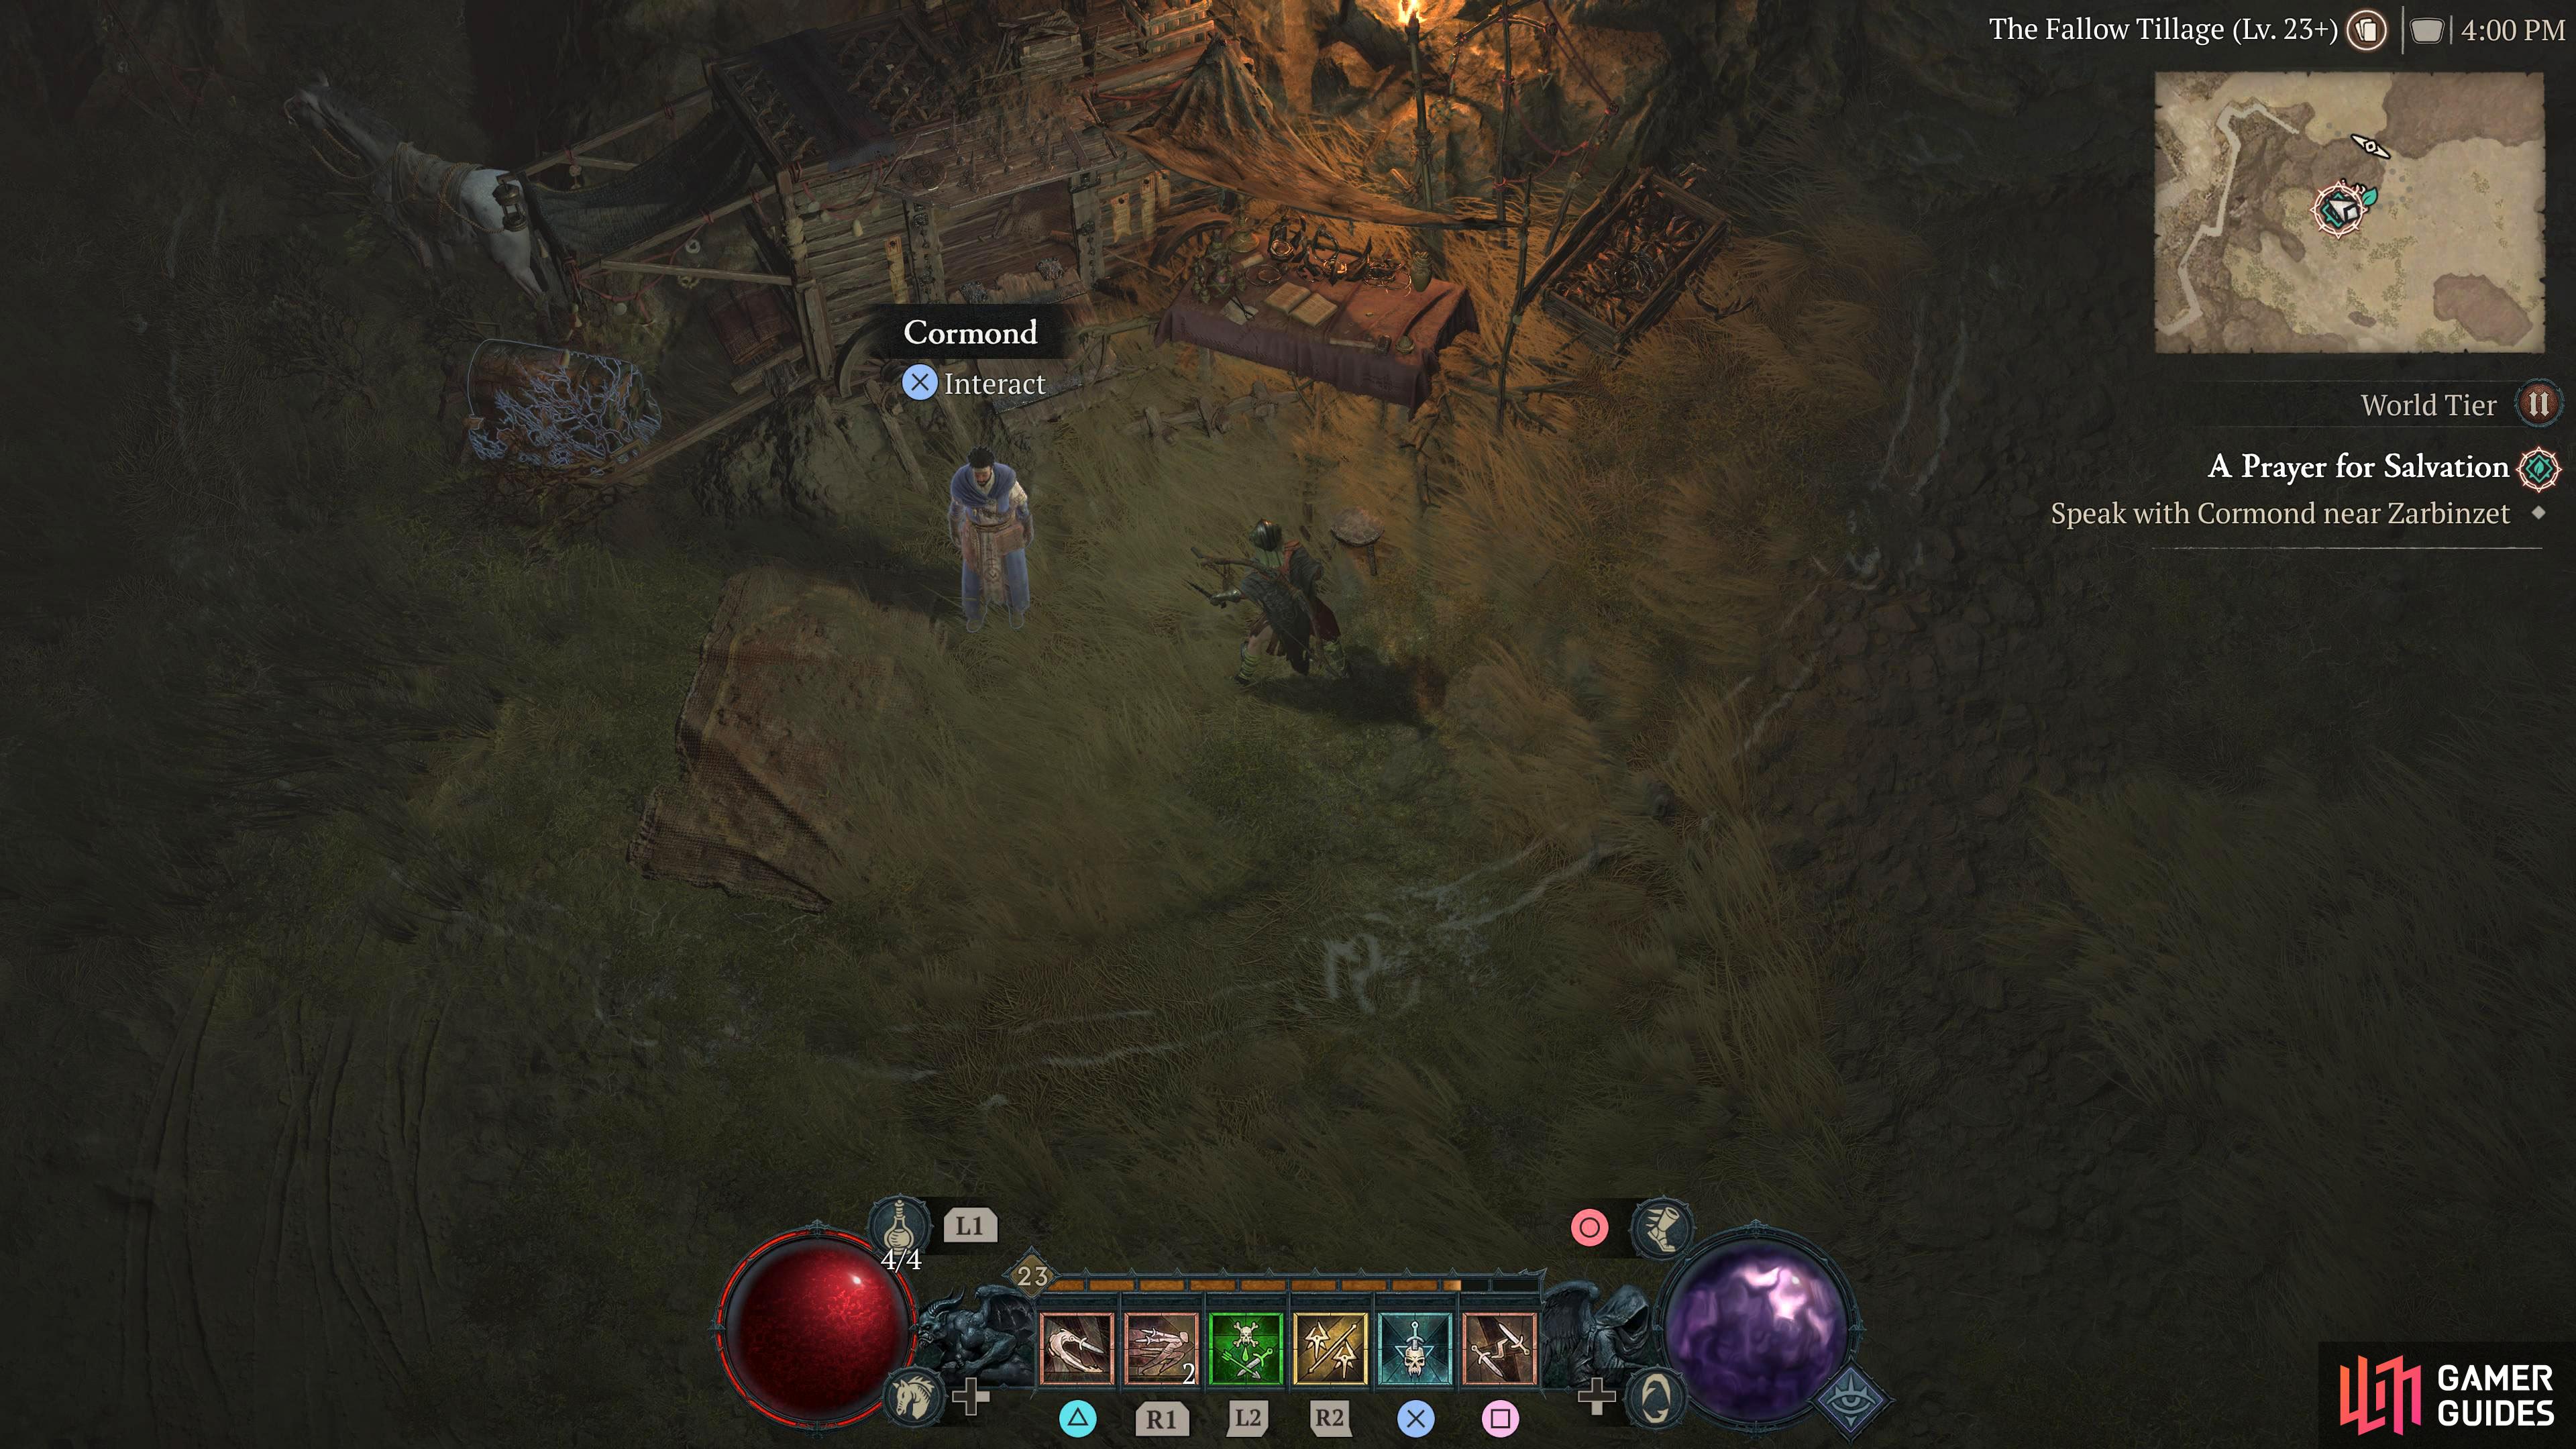
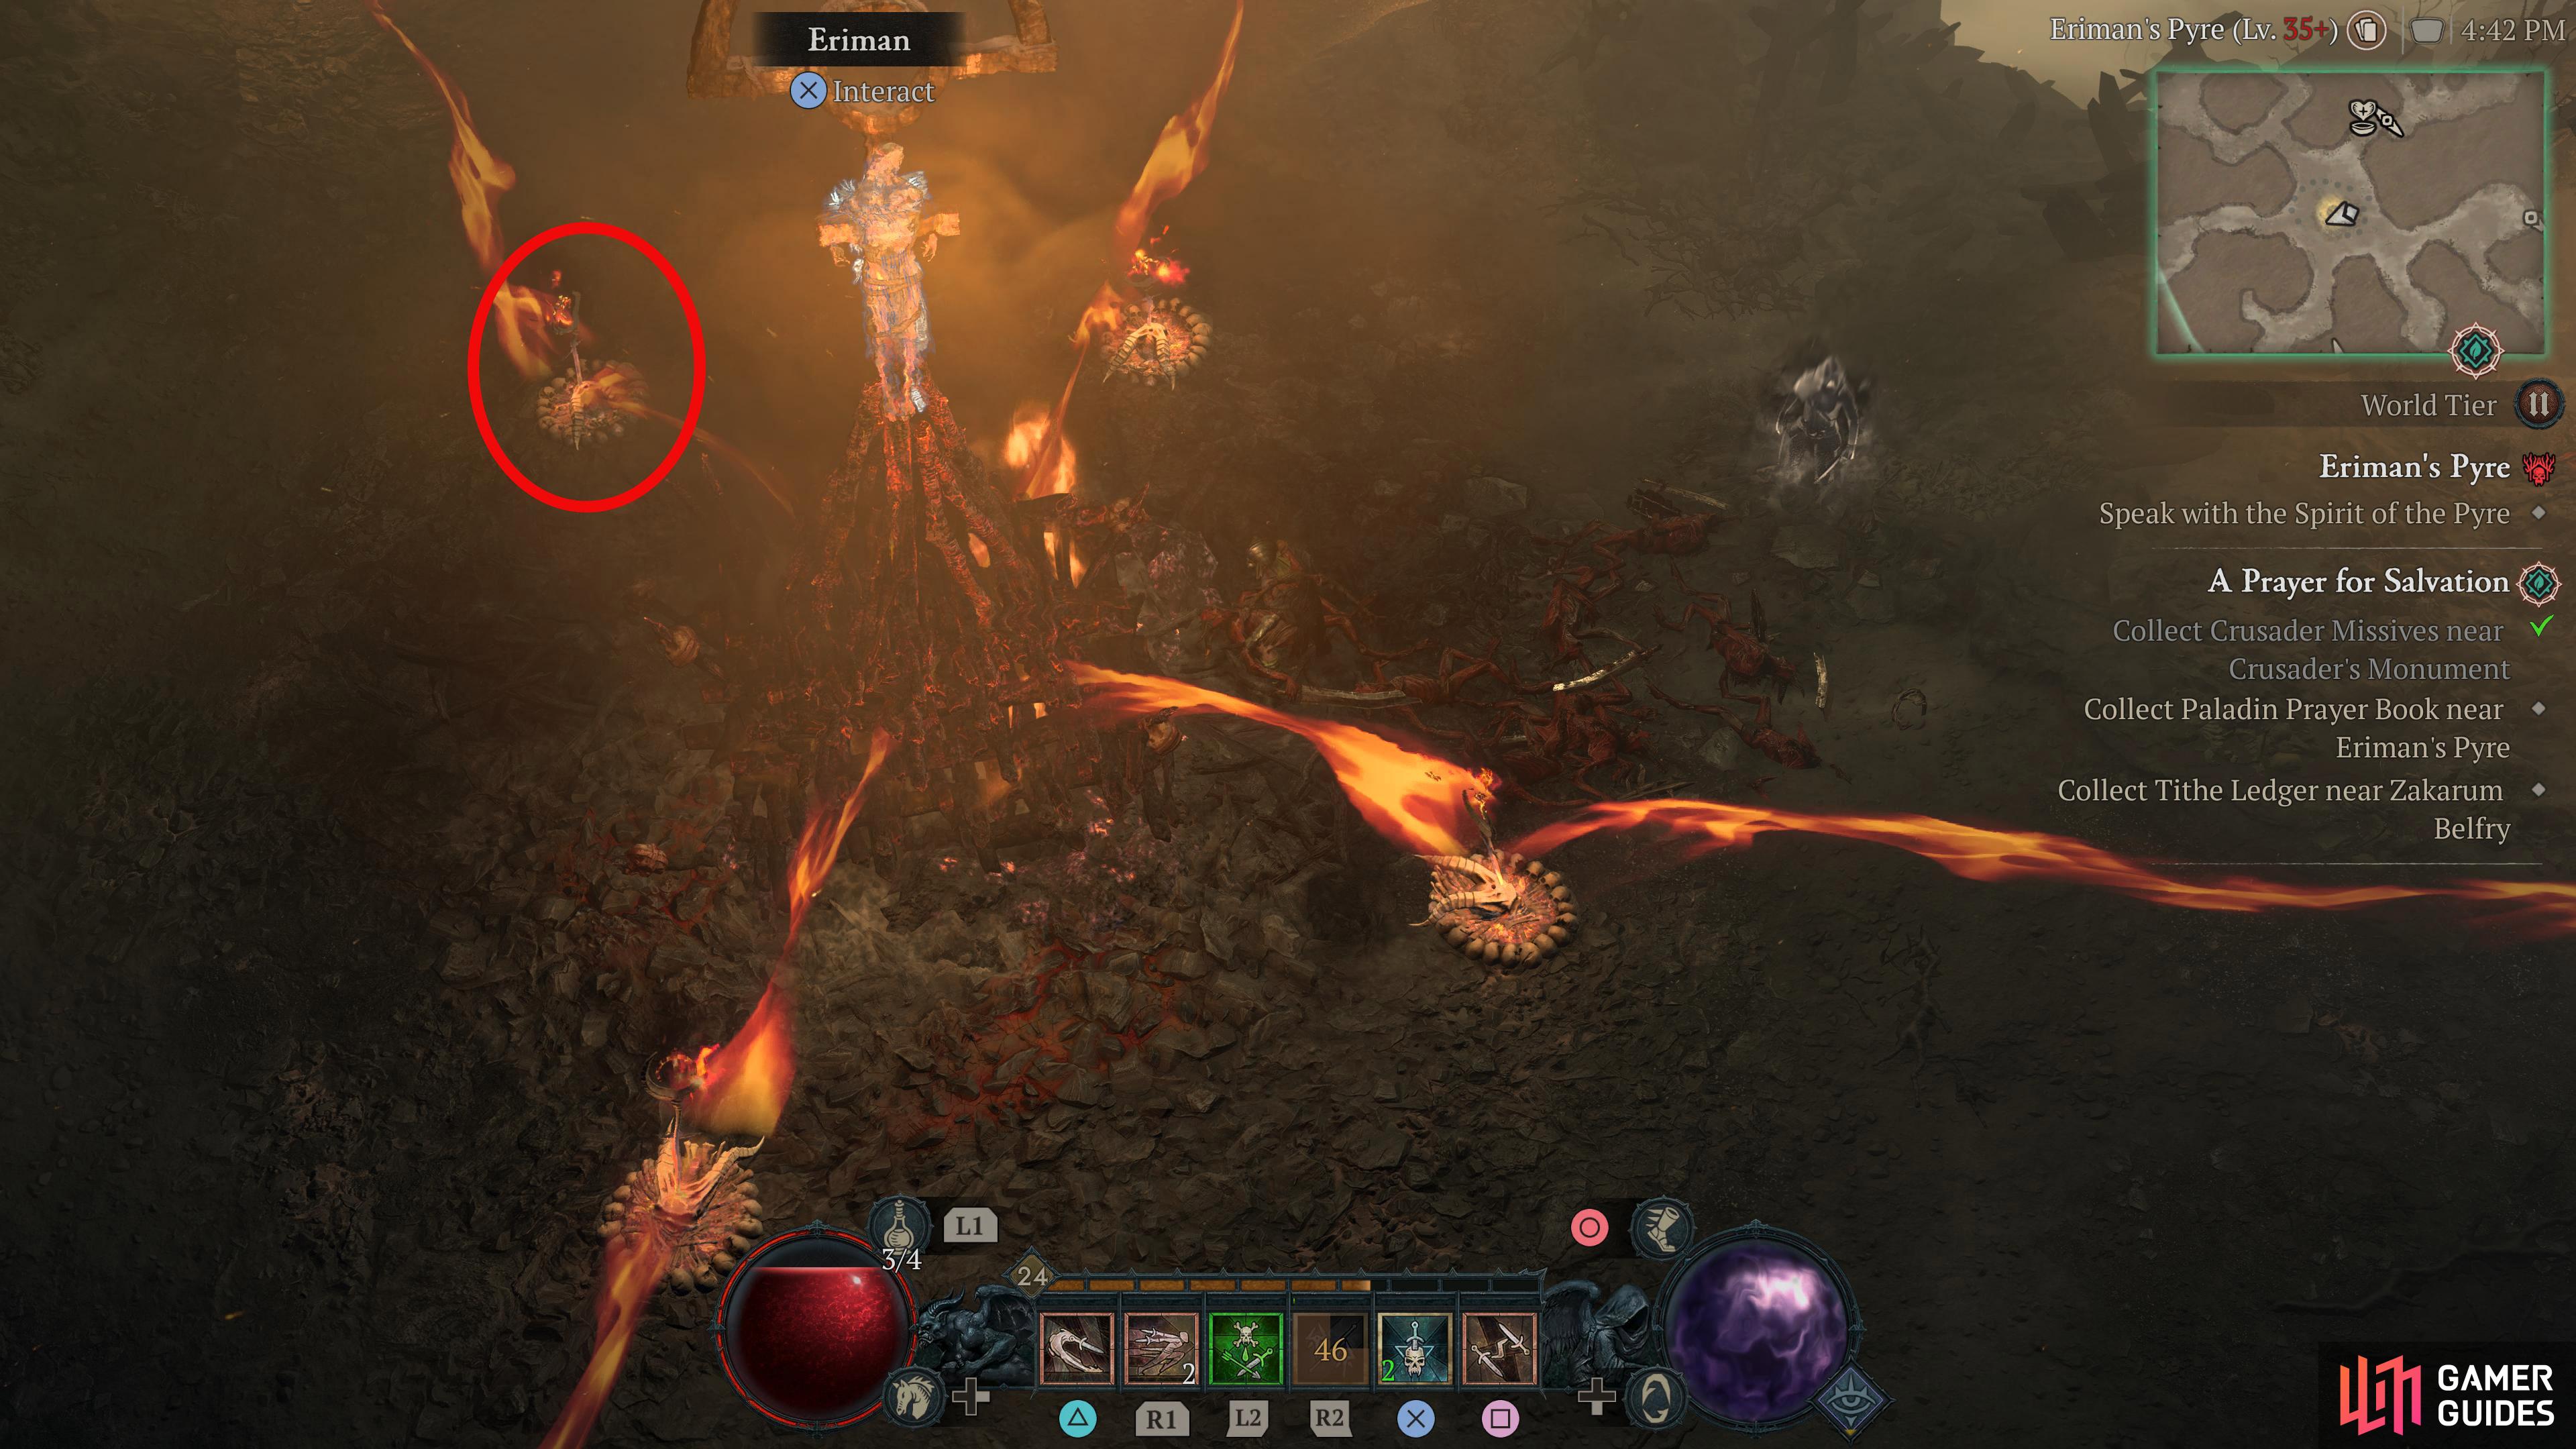
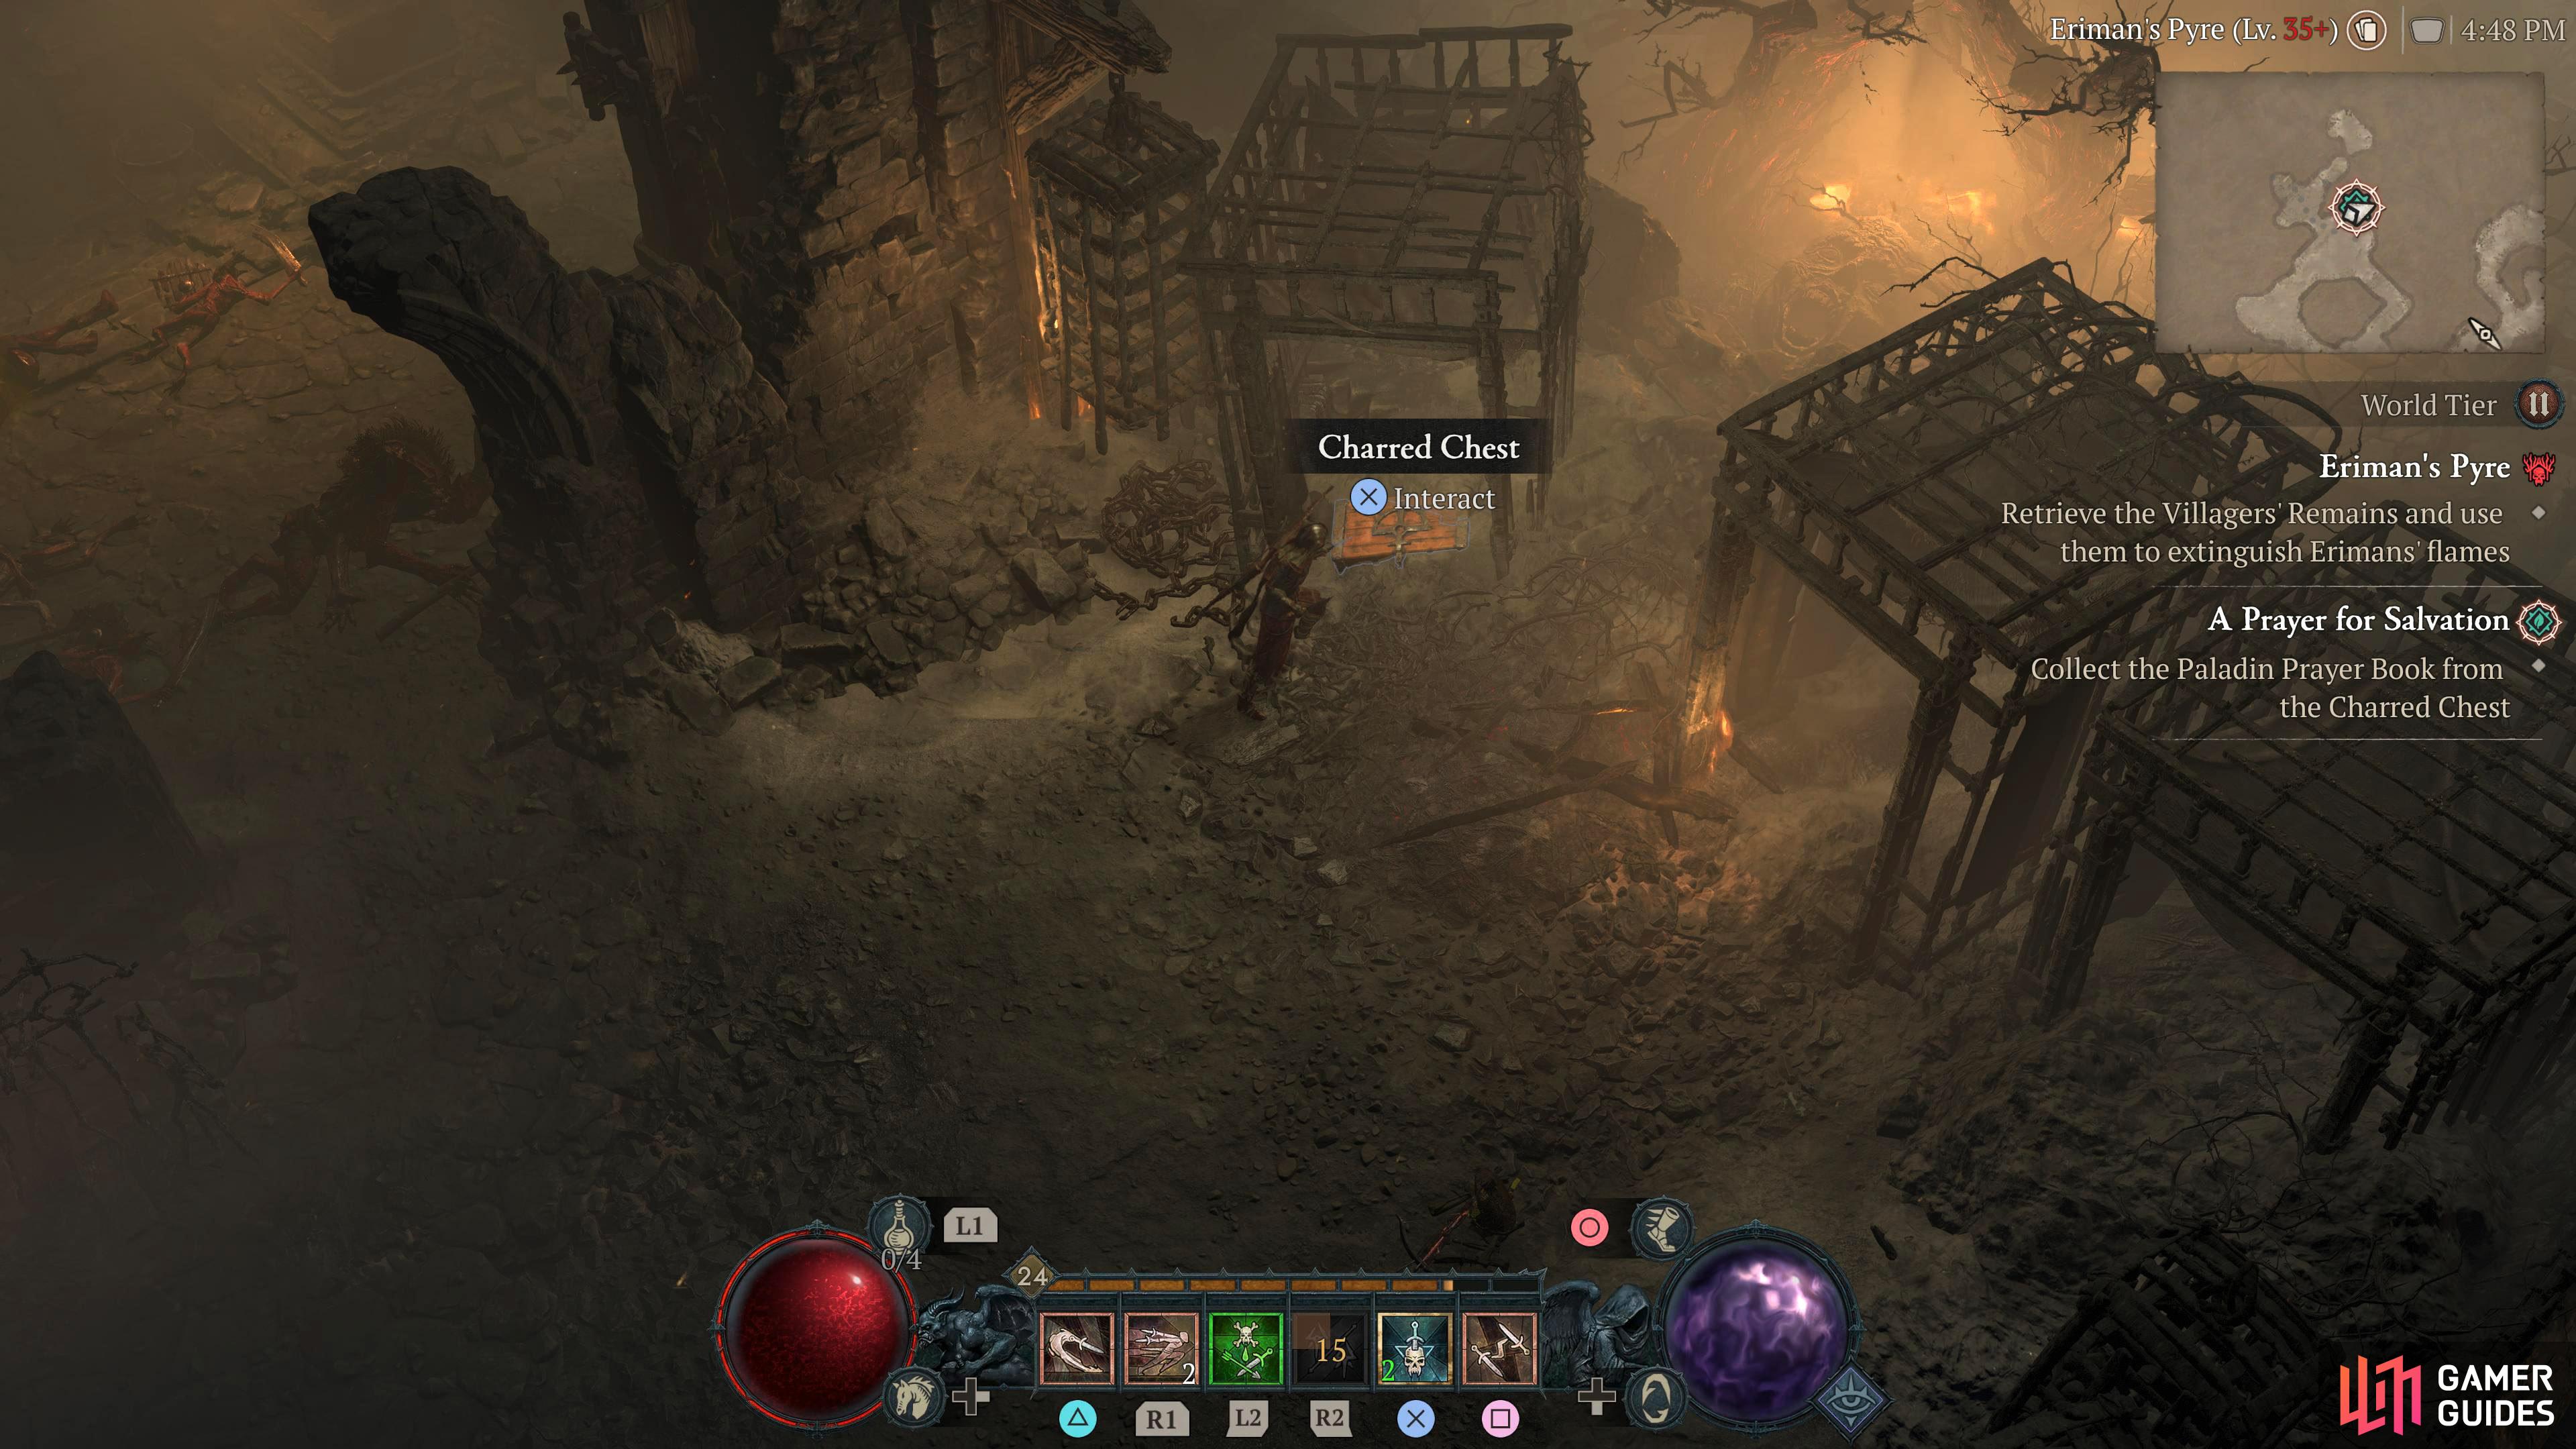
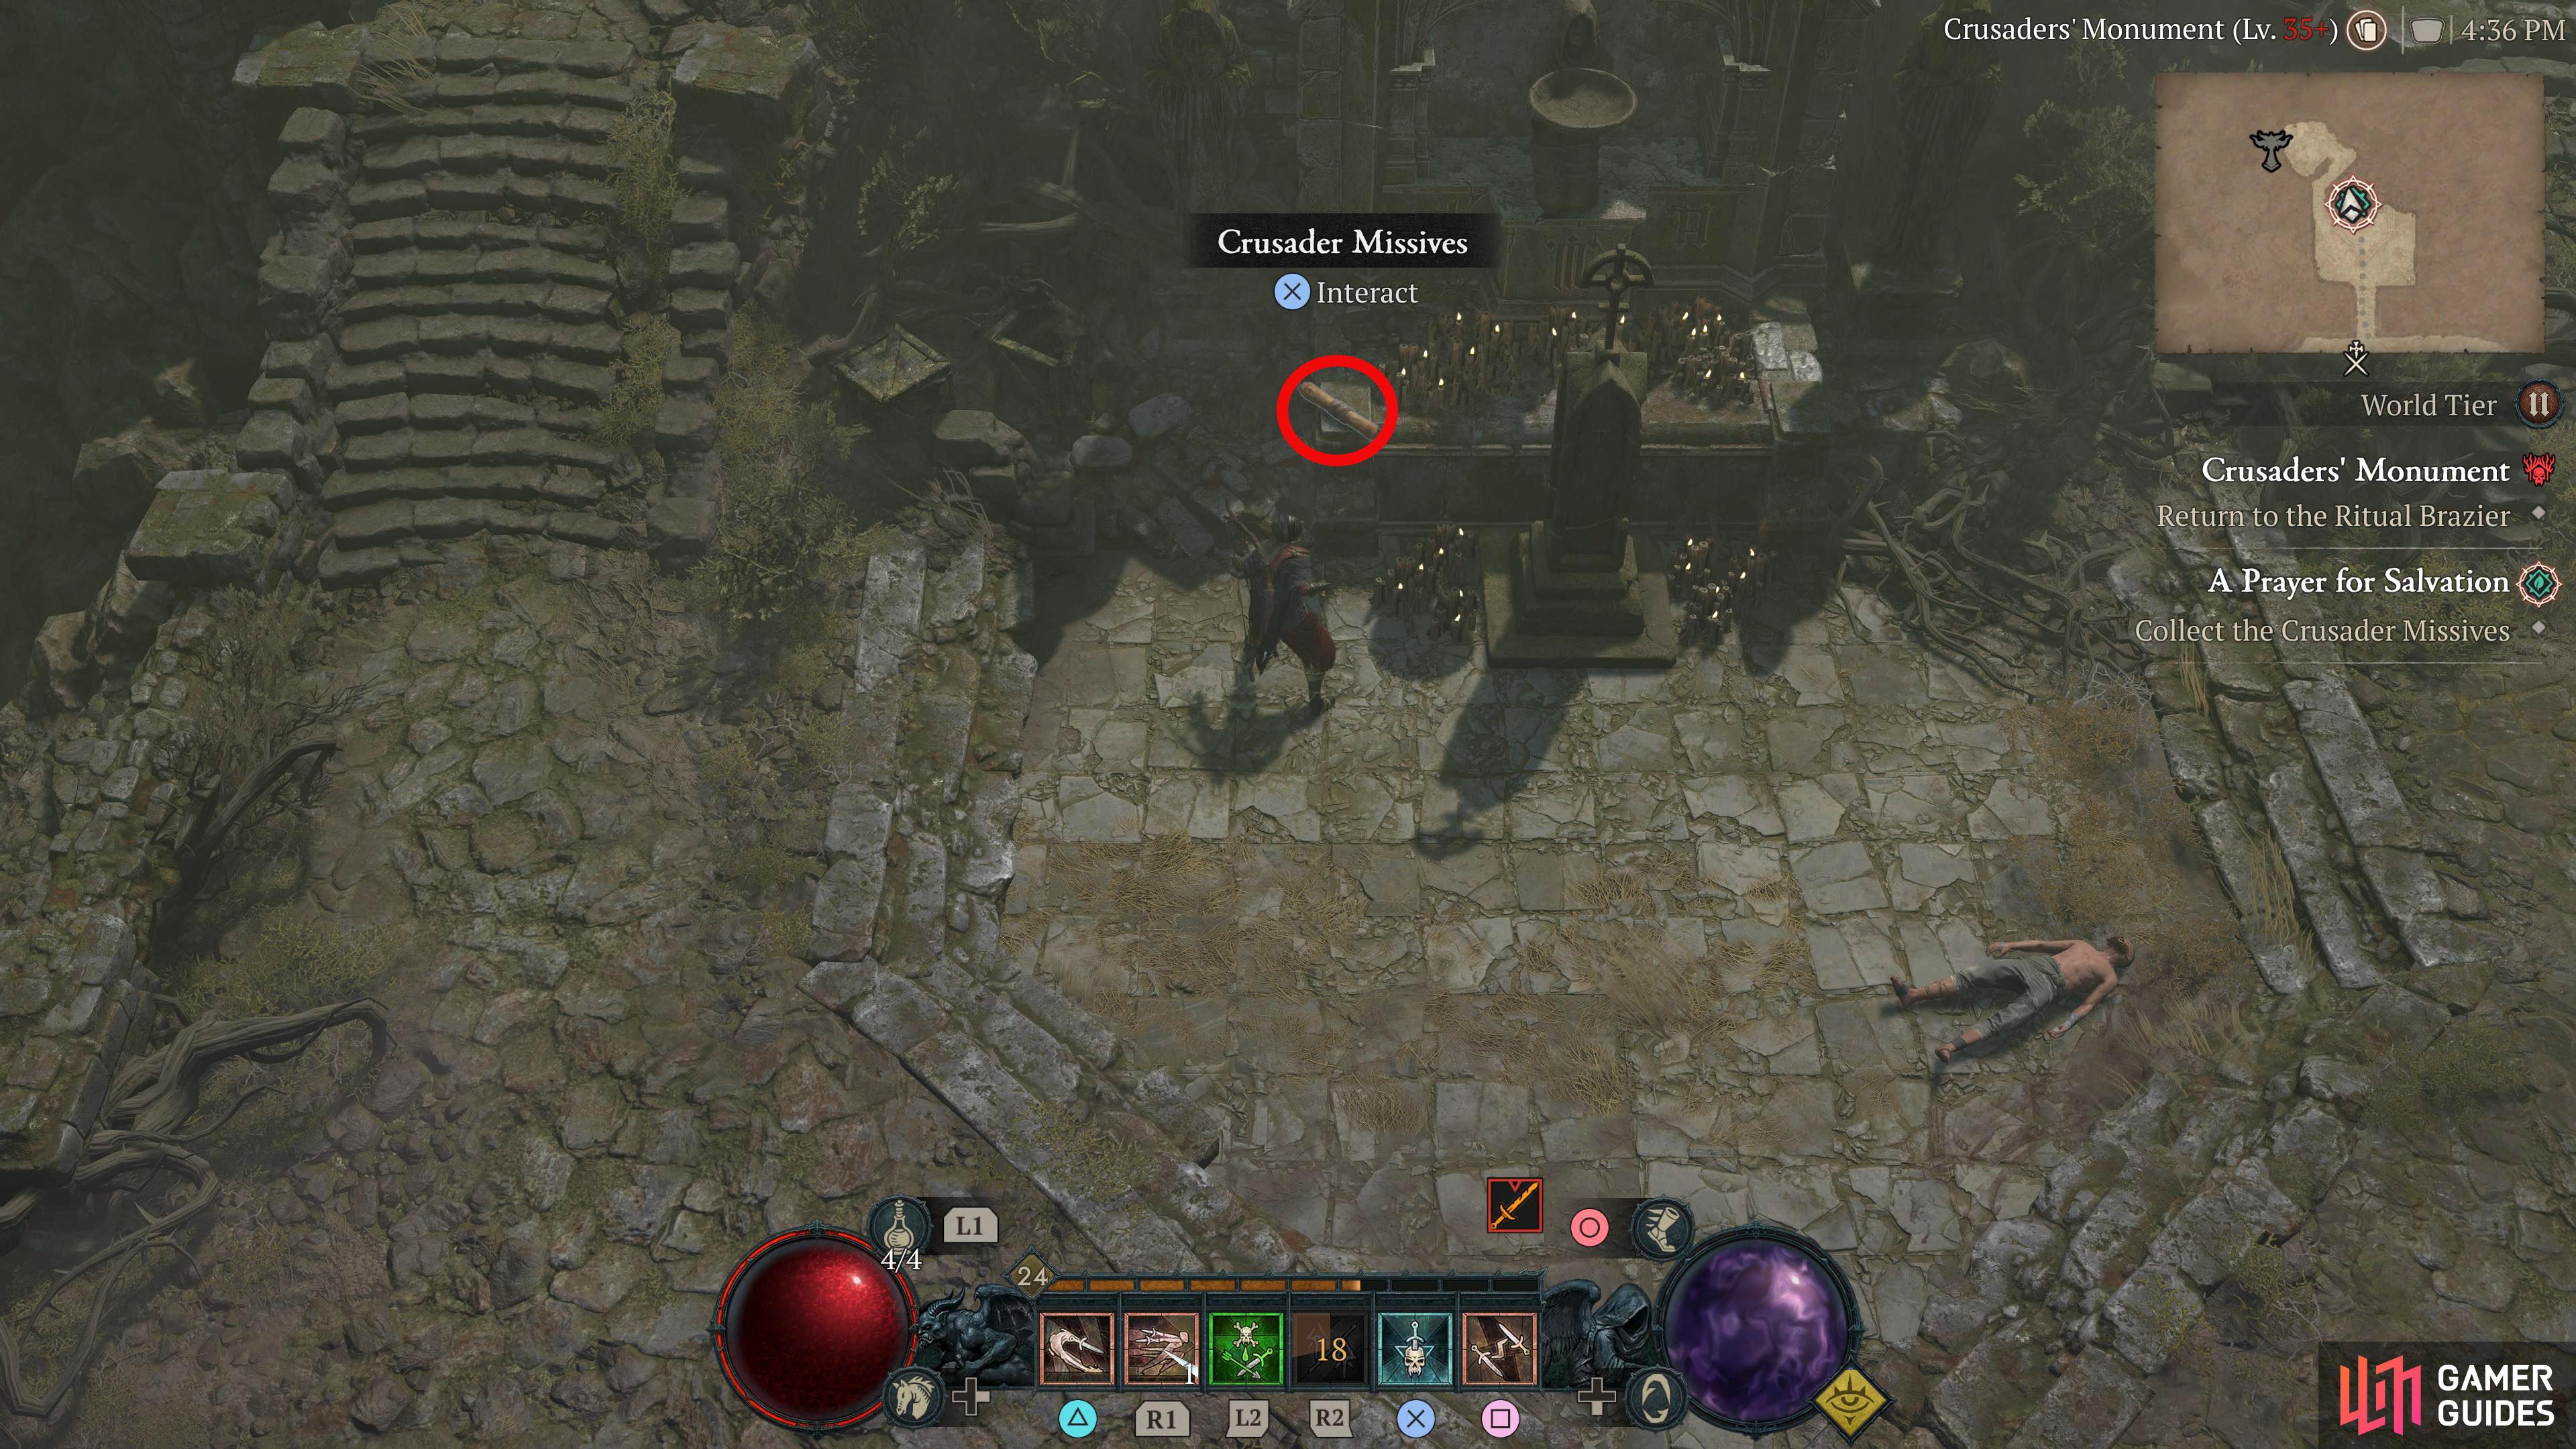
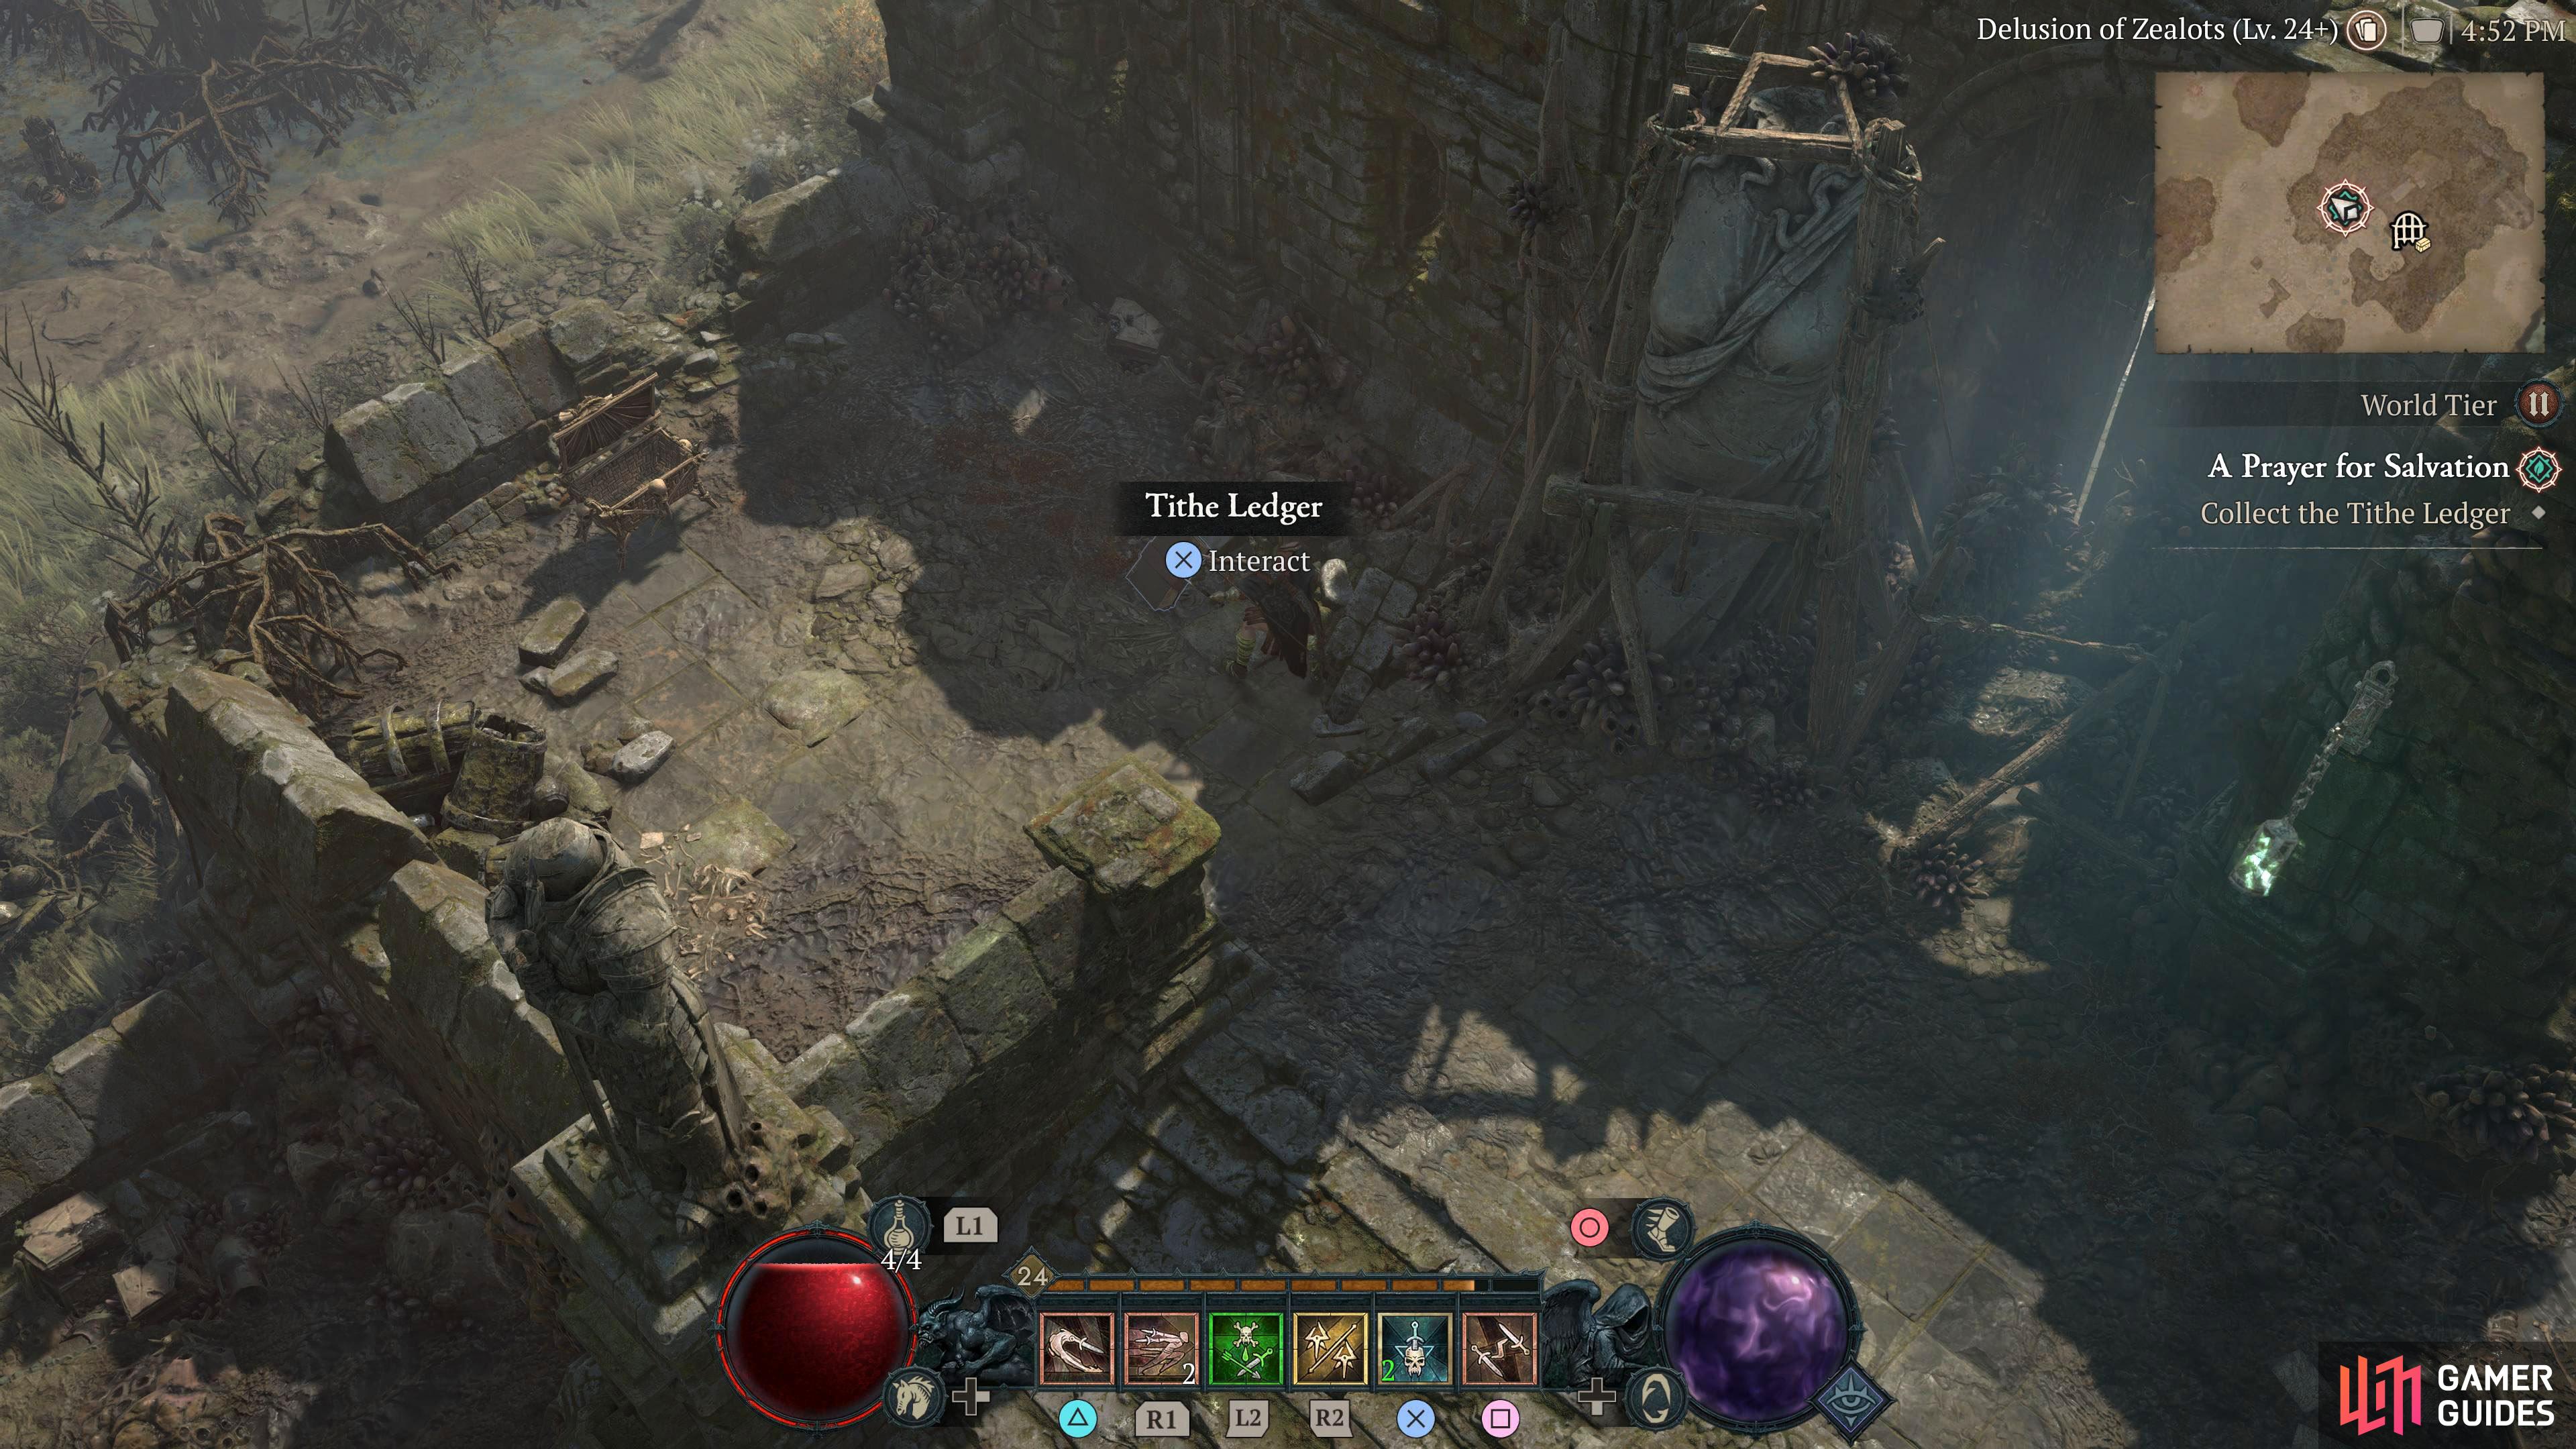
A Prayer for Salvation |
Detailed Location
This quest starts outside Orbei Monastery immediately after you finish the previous quest, Collect Crusader Missives near Crusader’s MonumentThe Missive can be found on the table next to the statue north inside the Collect Paladin Prayer Book near Eriman’s PyreOnce again, you’ll need to head to another stronghold, and this one is called Collect Tithe Ledger near Zakarum BelfryThis one is easy to get as it doesn’t involve a stronghold. The bad news is that you’ll need to head a fair way southeast (above the Hawezar text on the map) to find the When you have completed all three objectives, head back to Cormond near Zarbinzet. After a short scene, the quest will be completed.
In-Game Description
Region
General Reward
XP and Gold |
|
||||||||||||||||||||||||||||||||||||
|
|
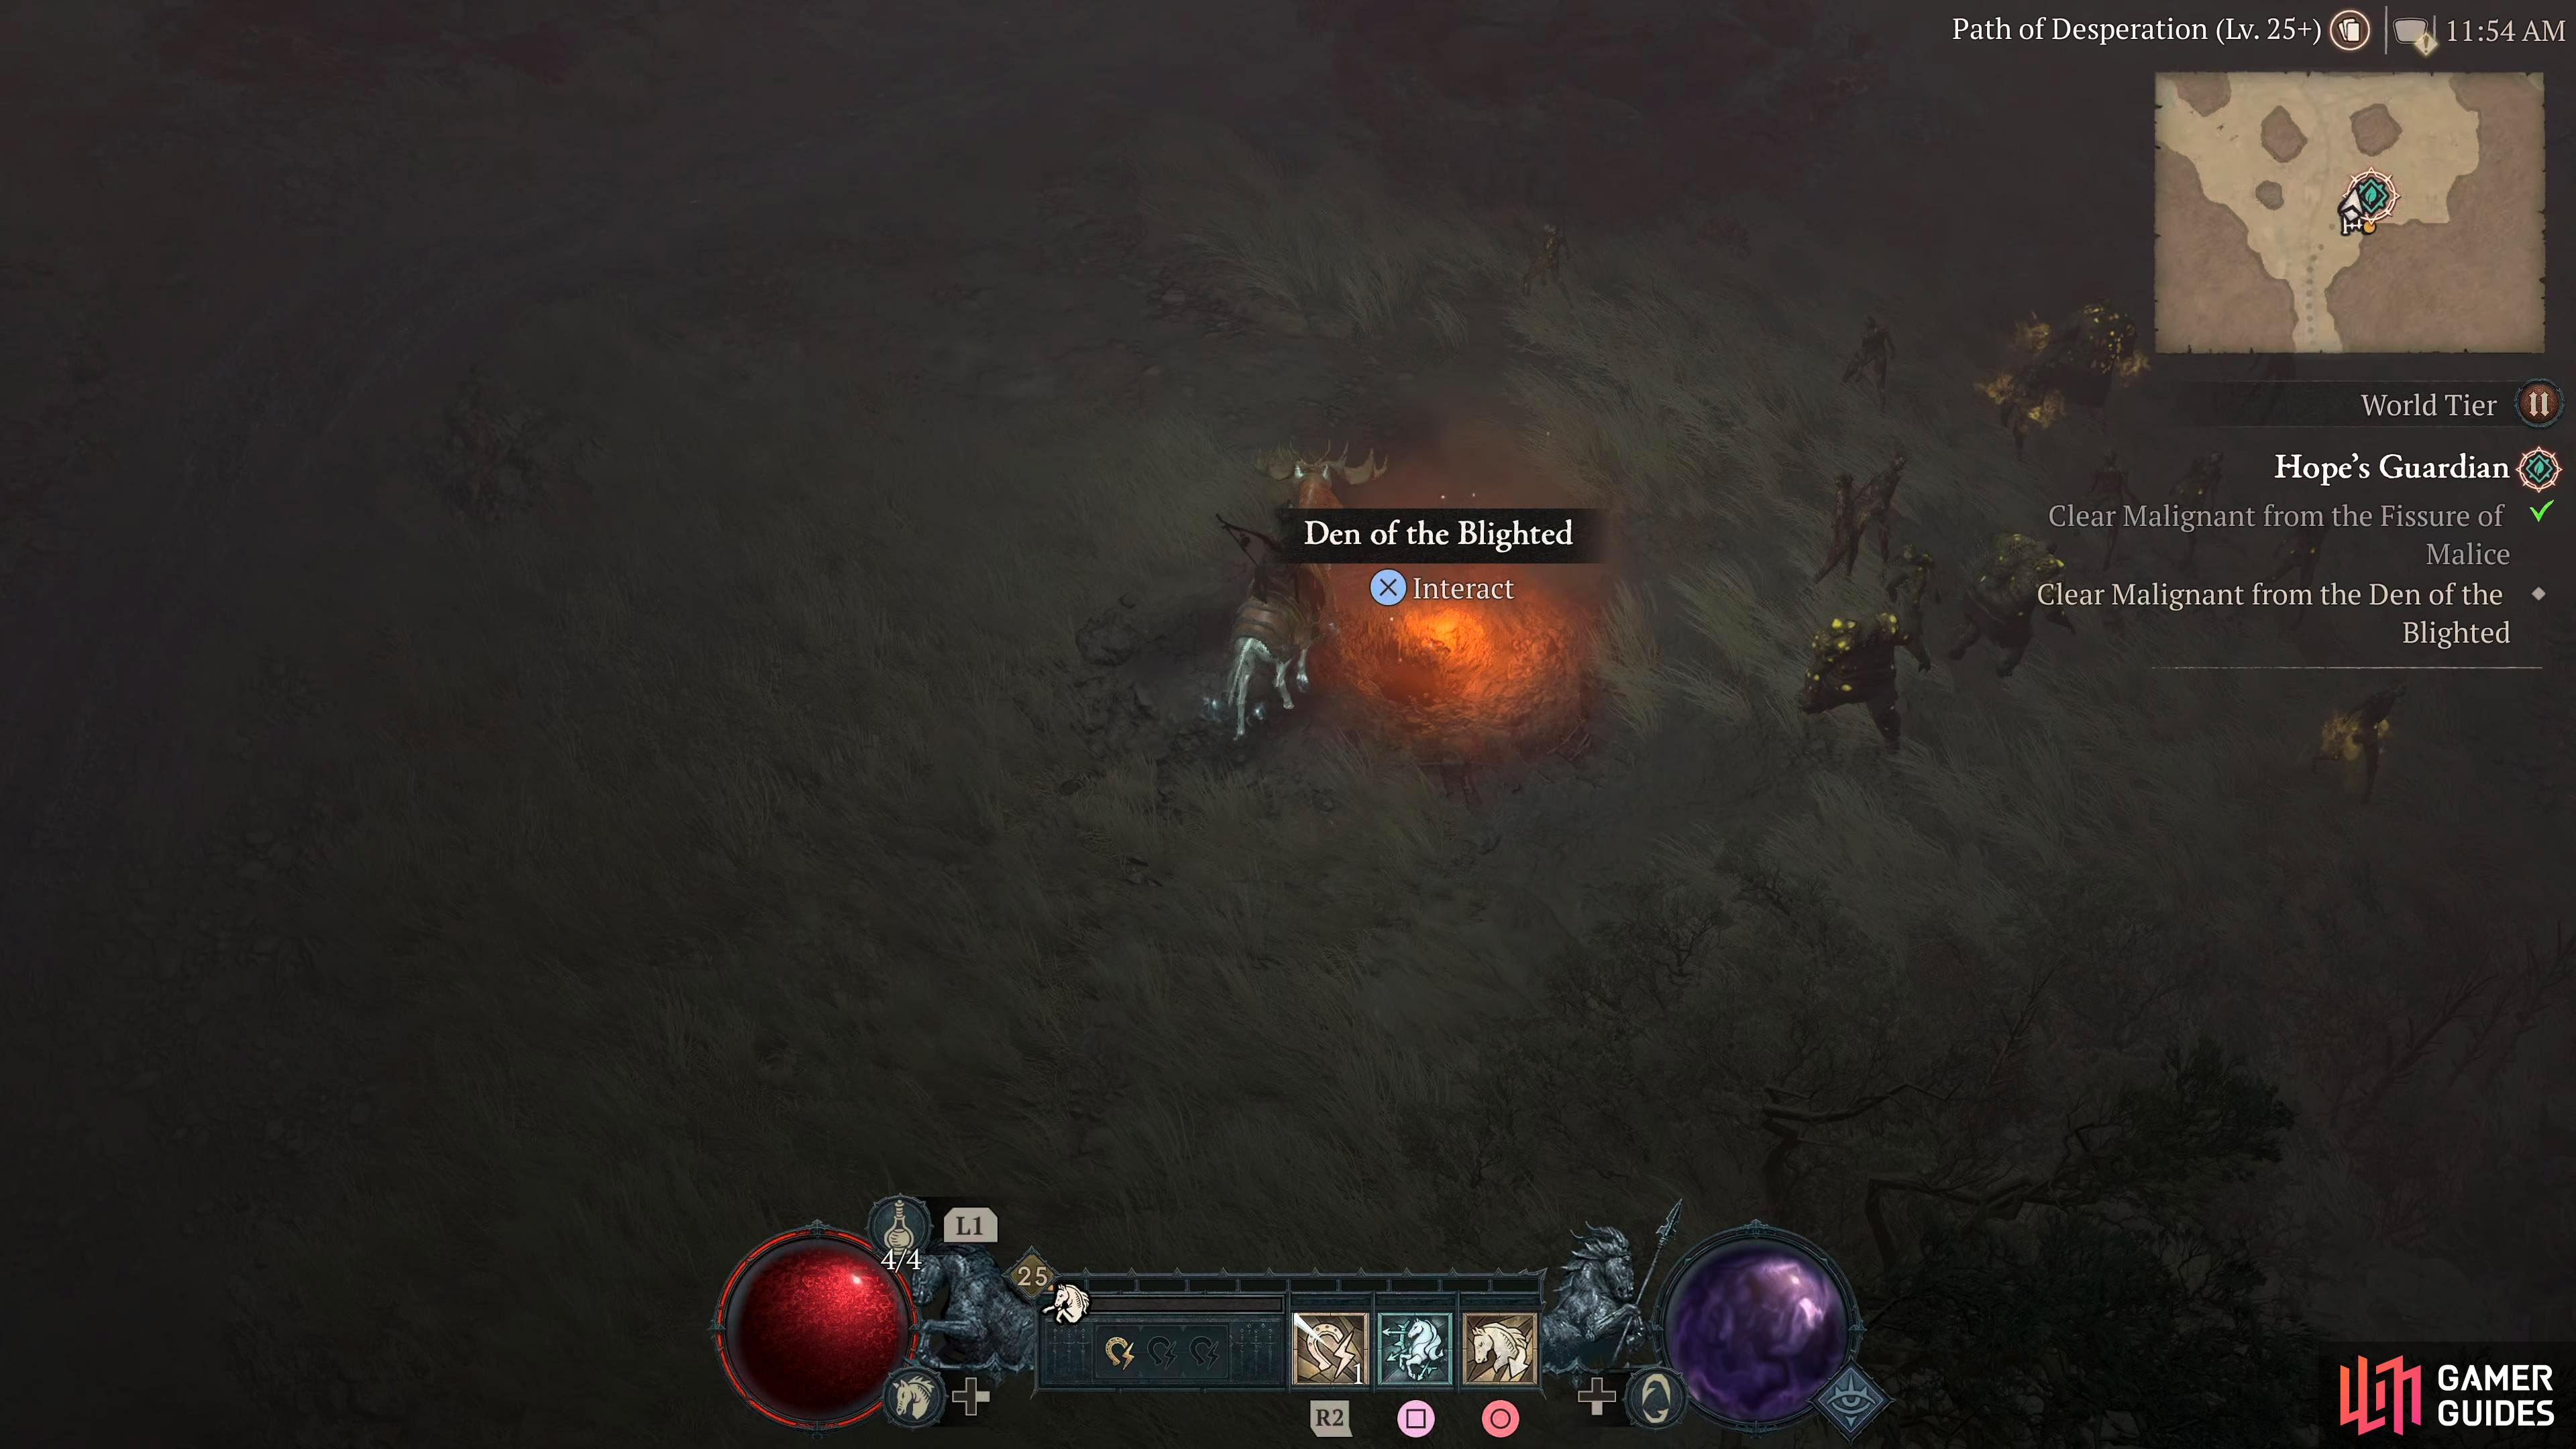
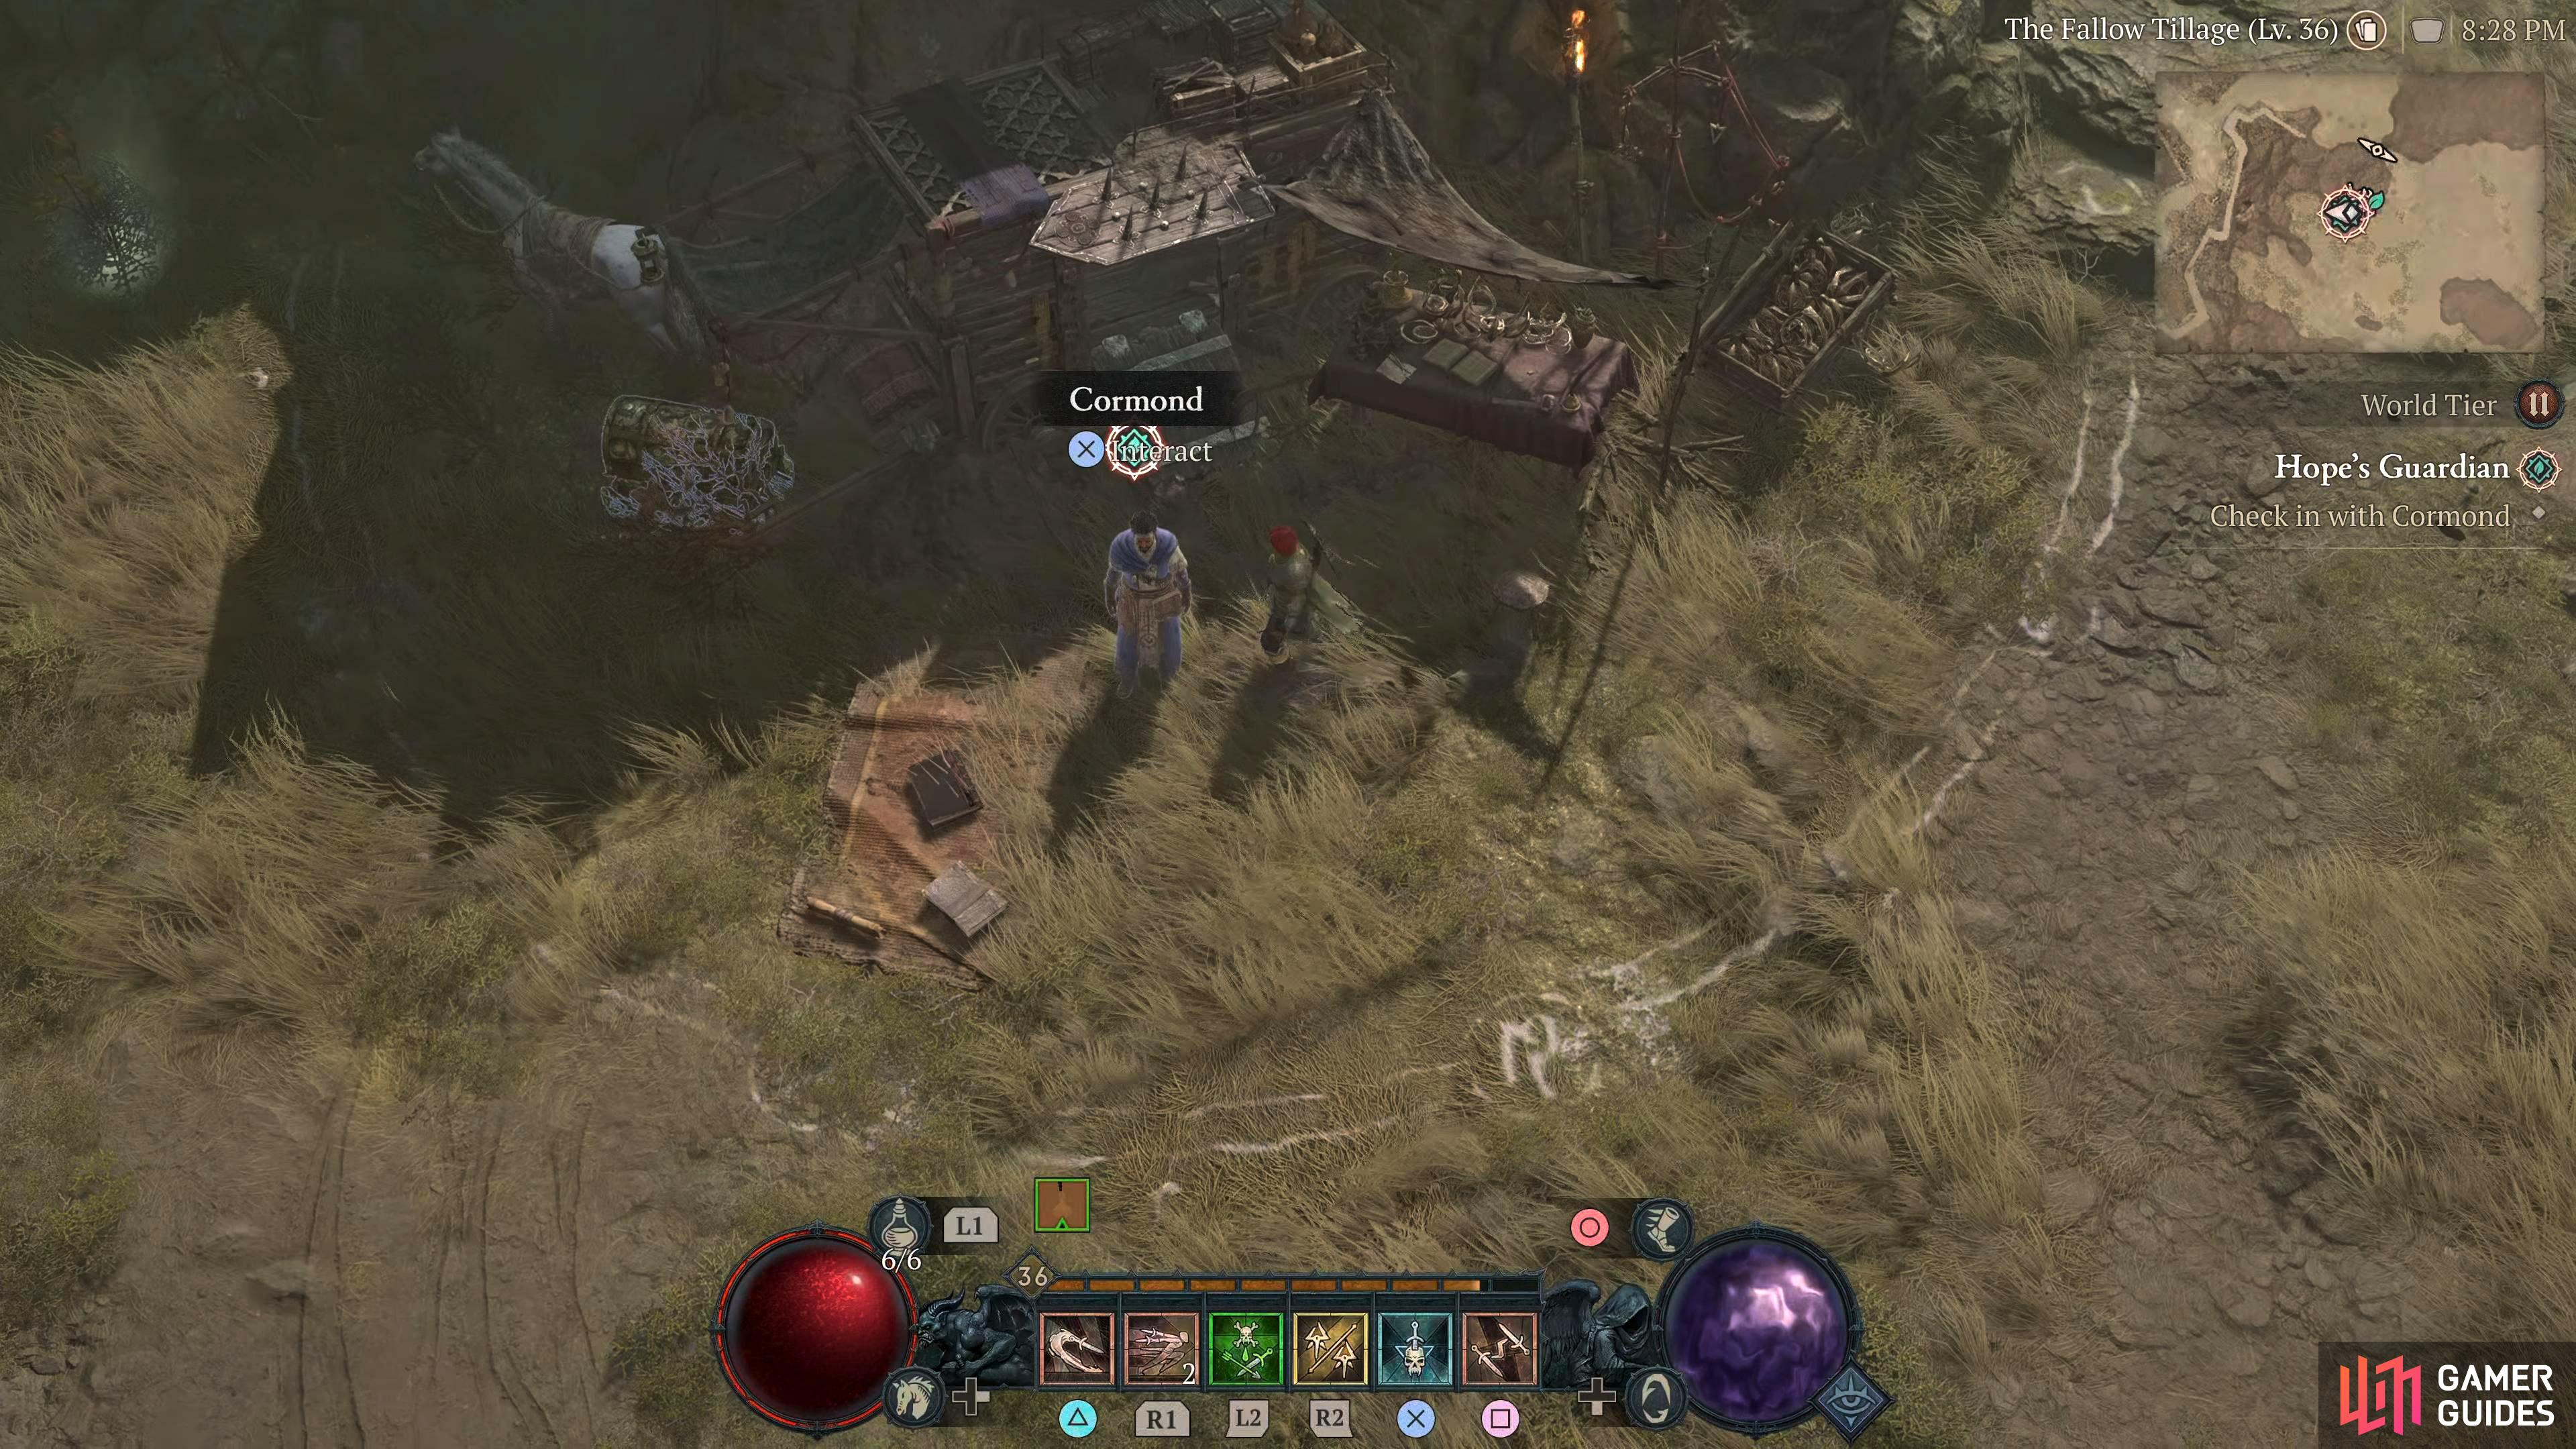
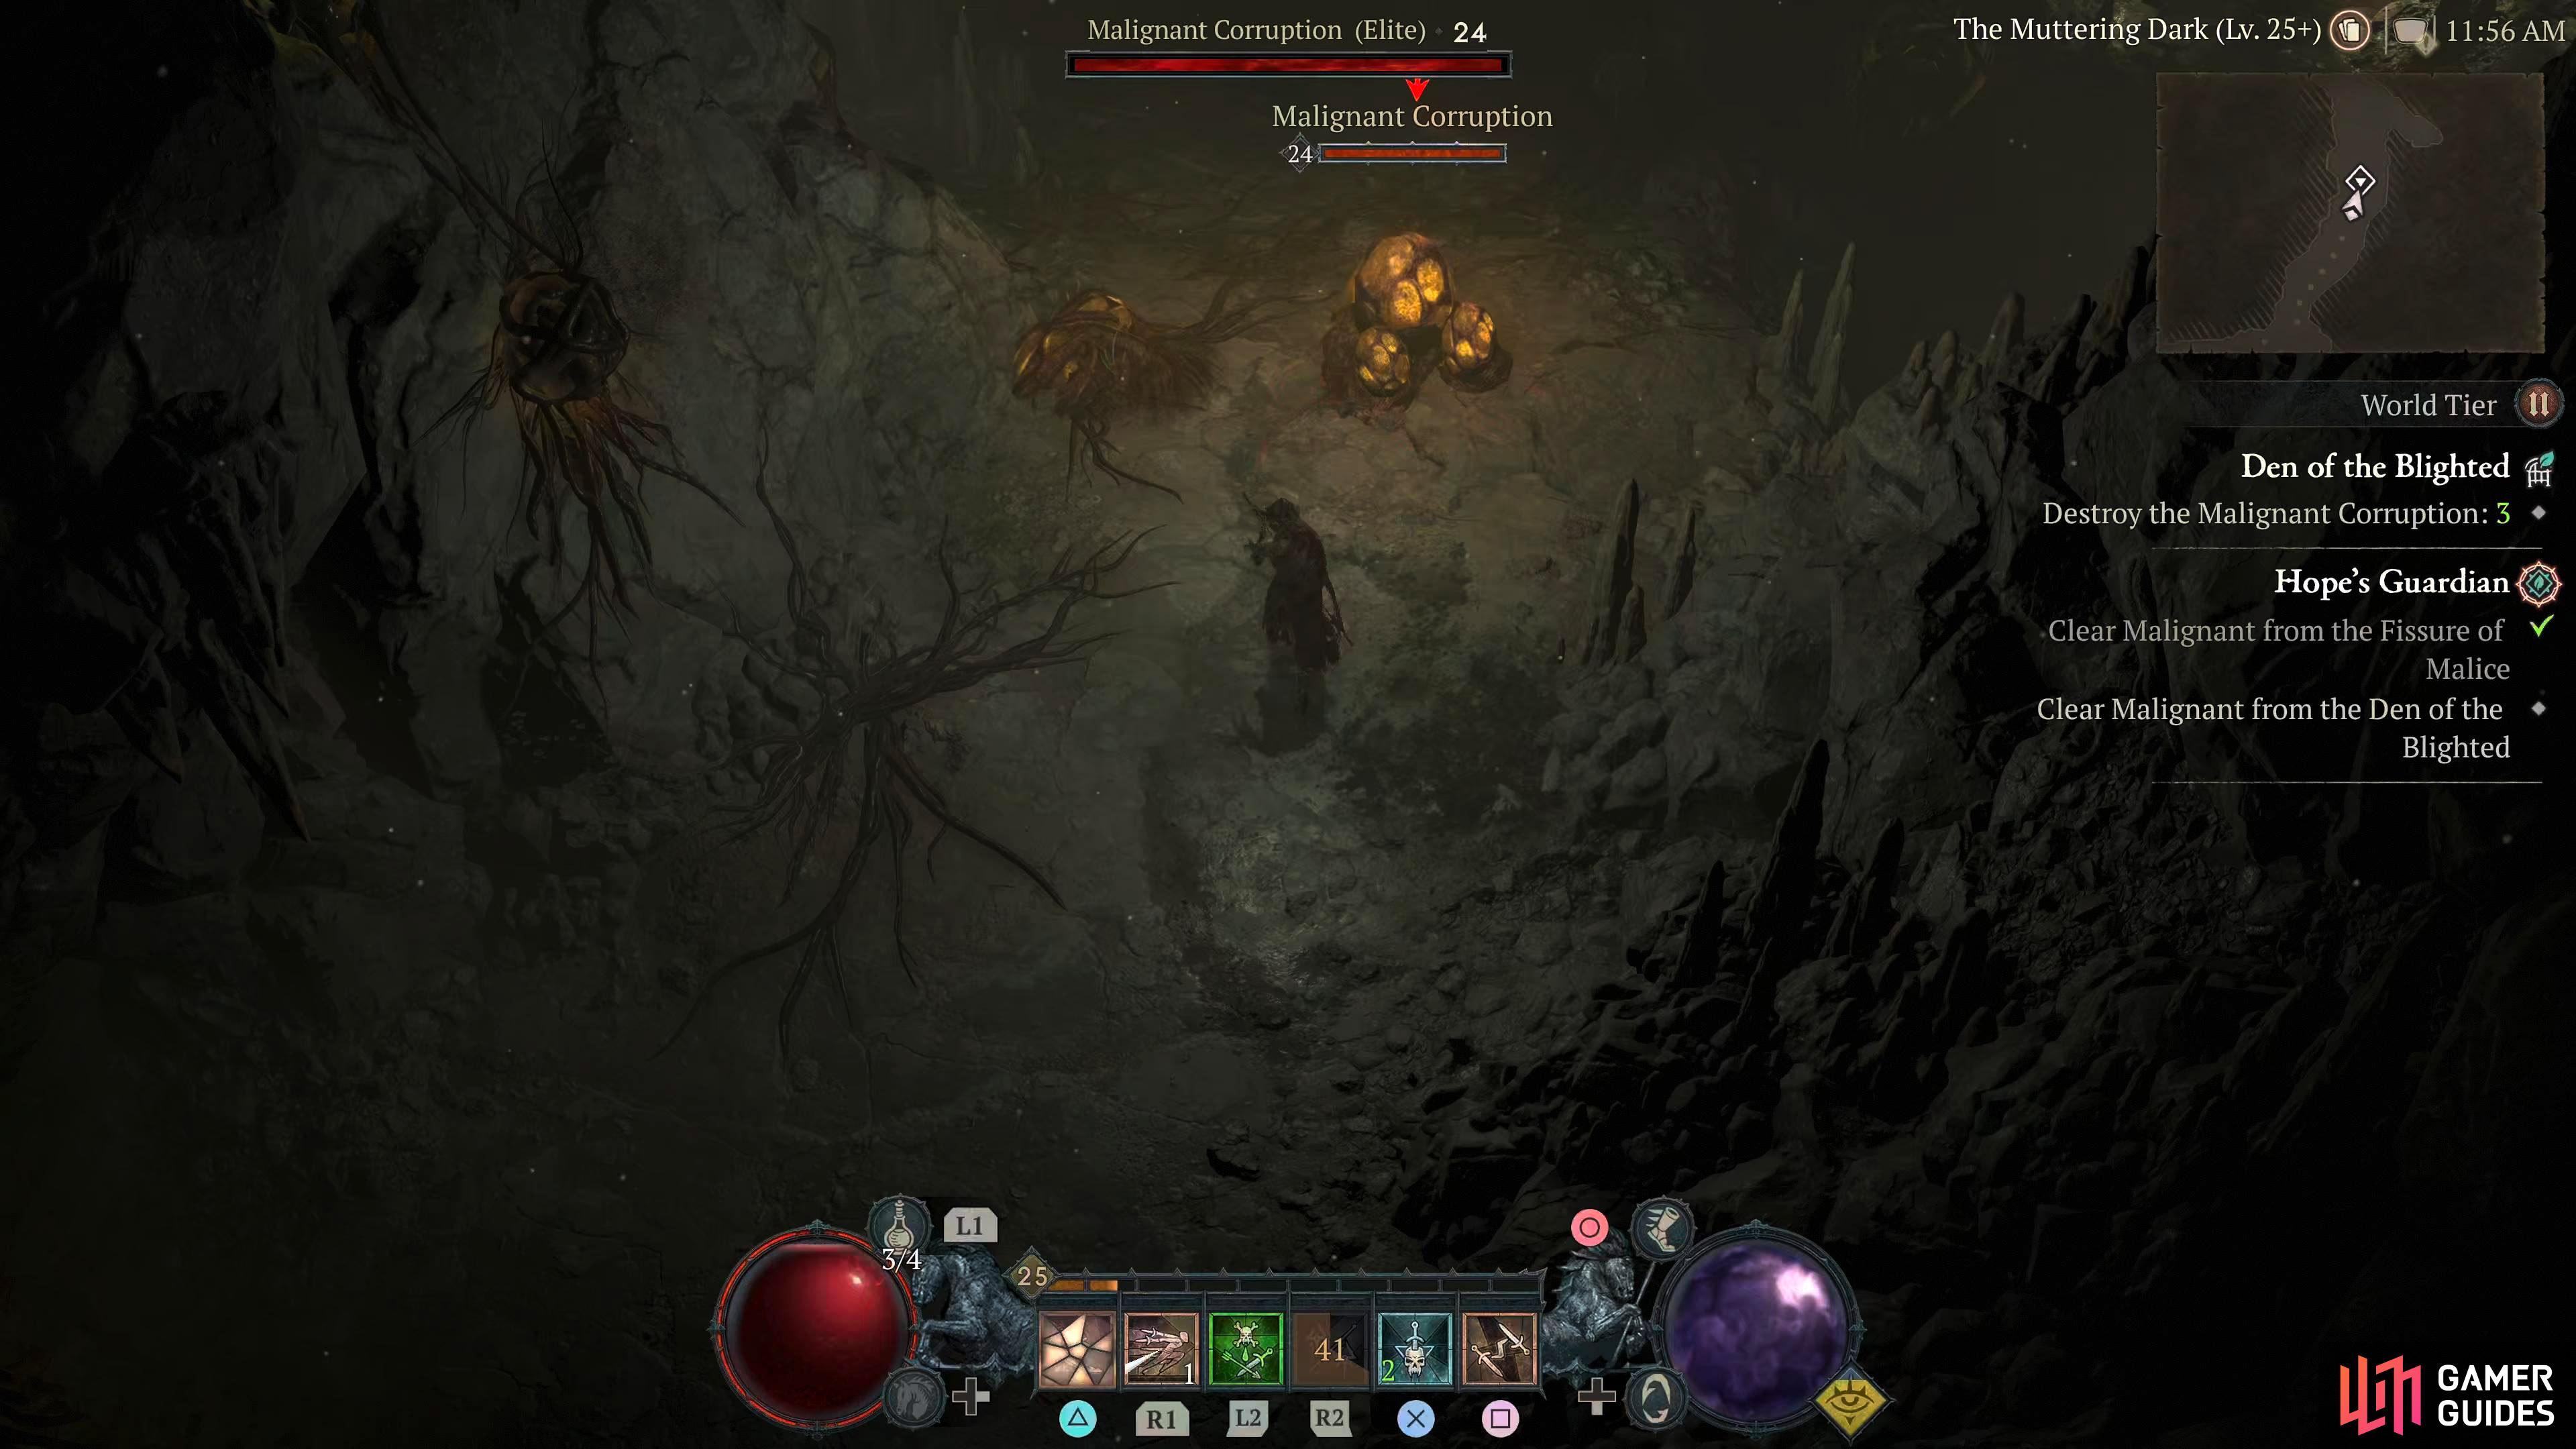
Hope's Guardian |
Detailed Location
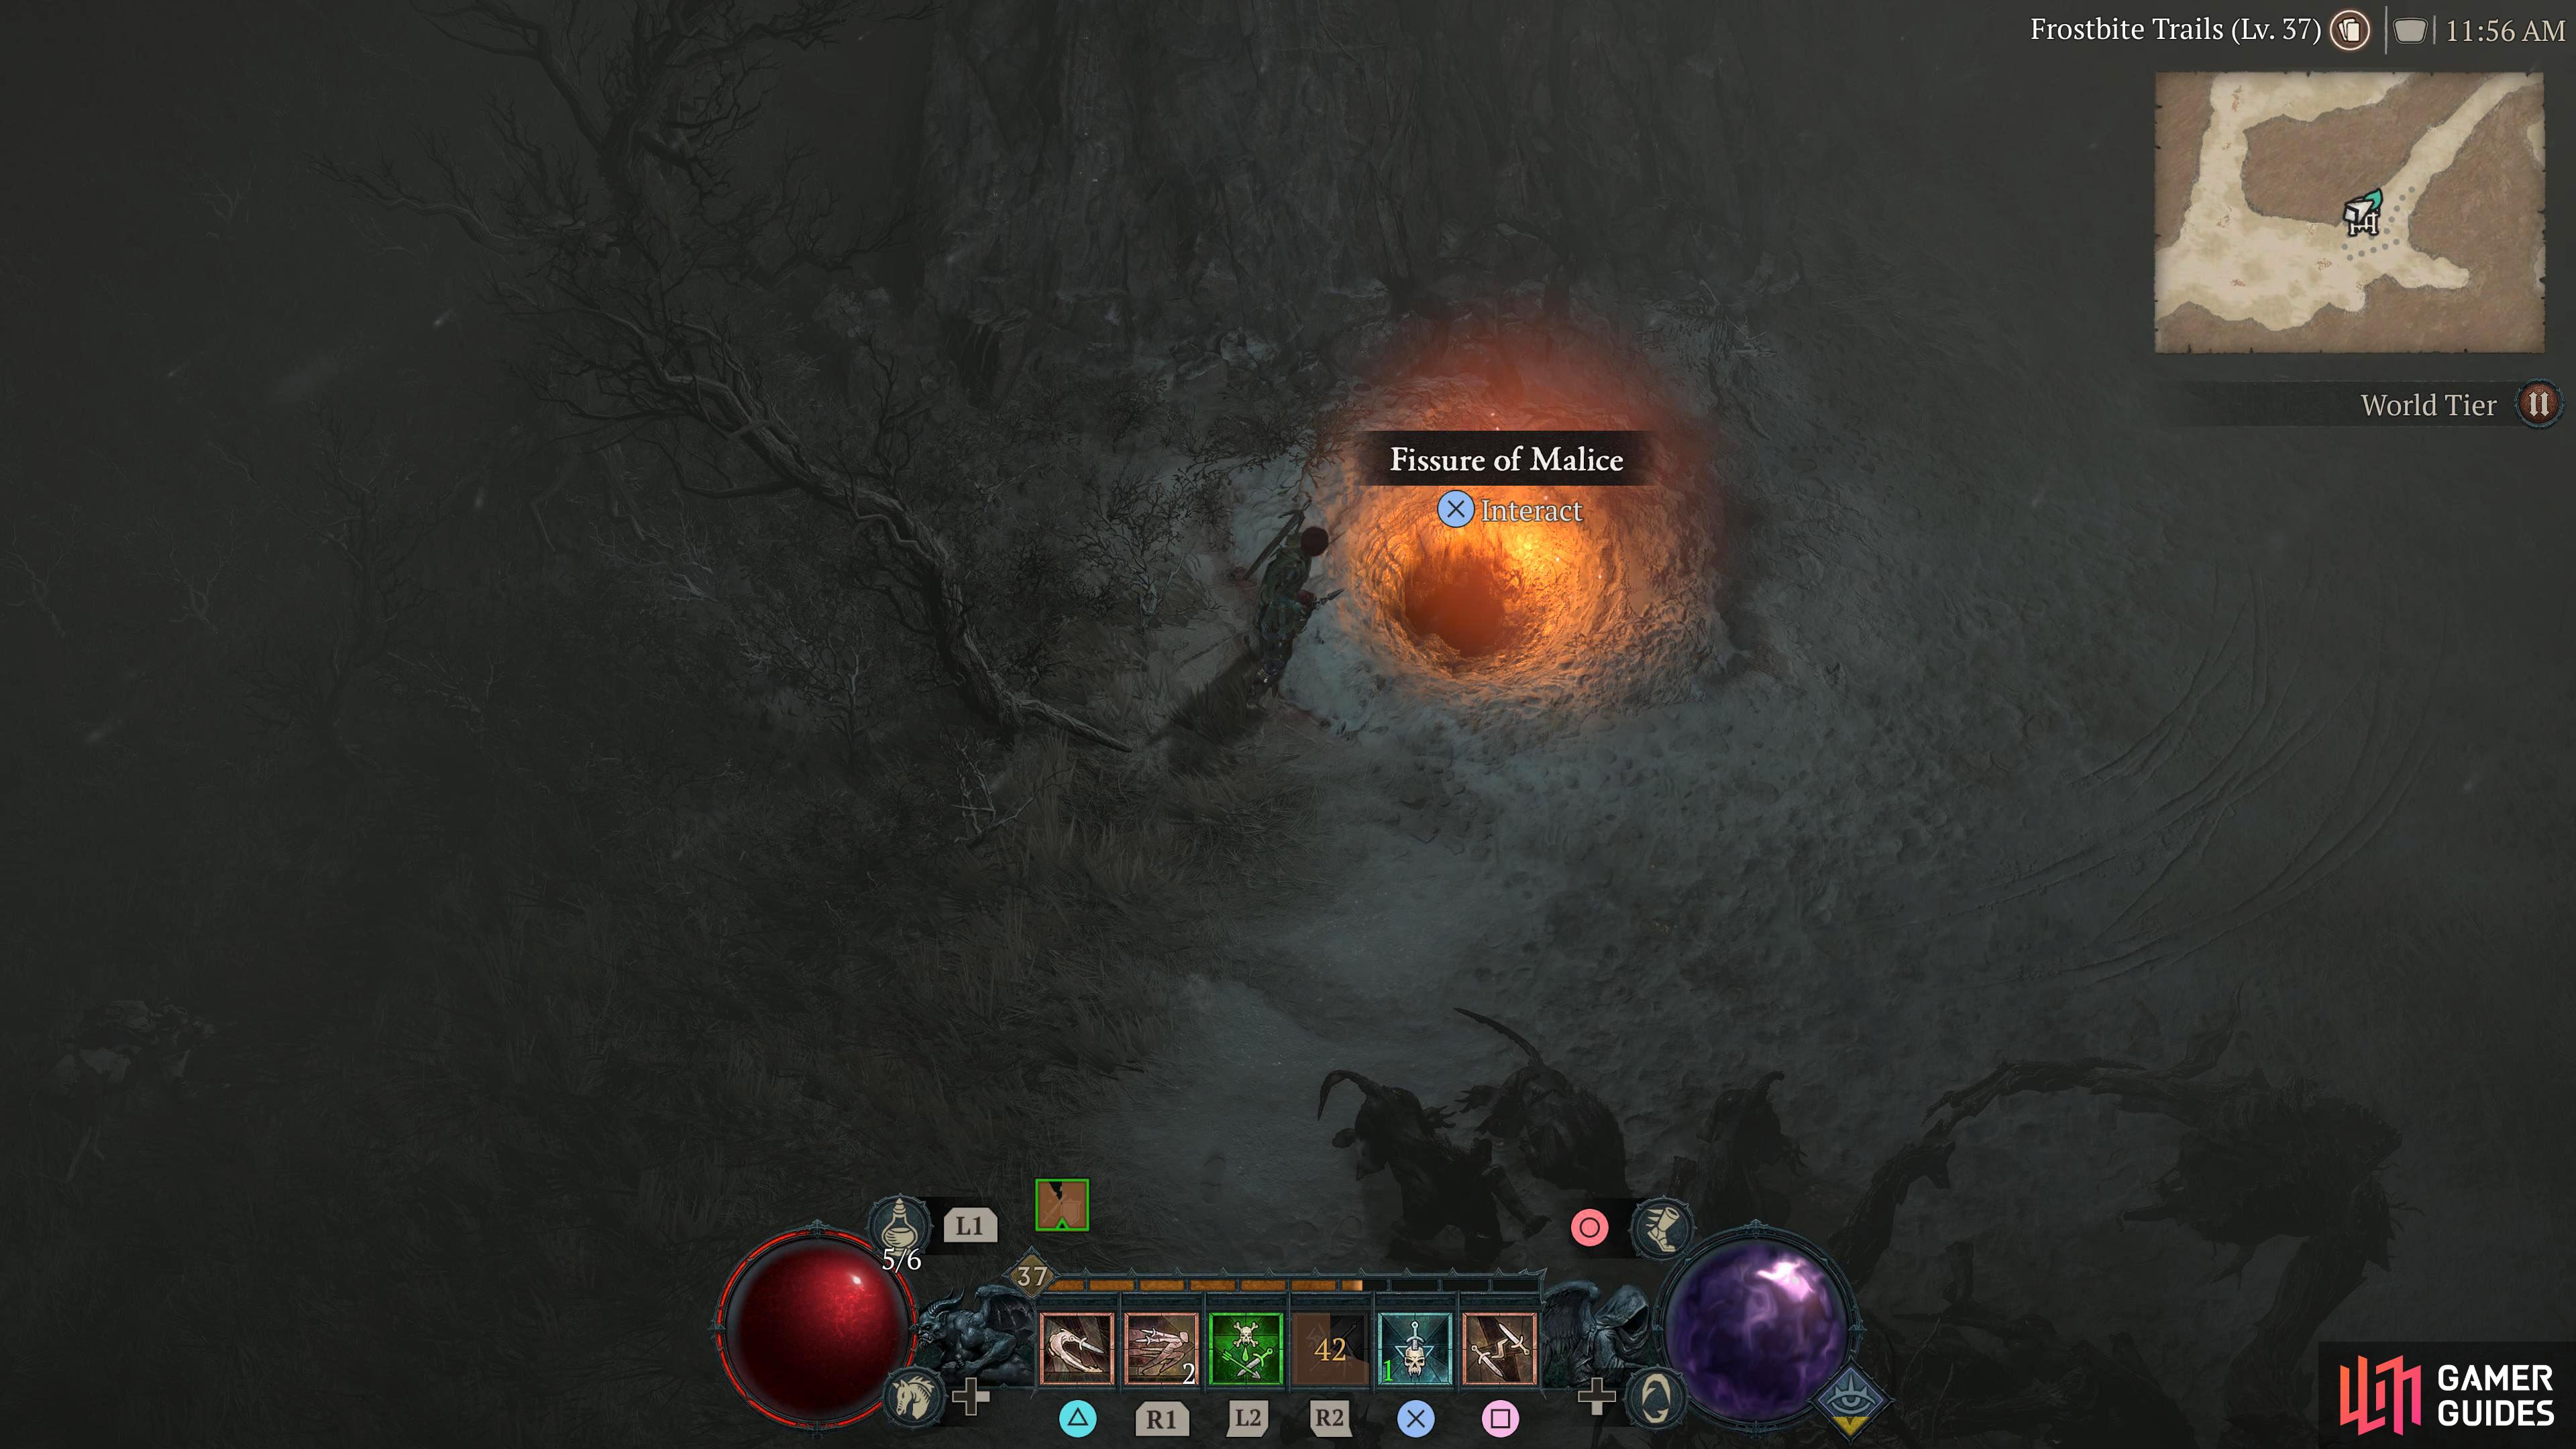
After speaking to Cormond for a bit, you’ll have two objectives to complete, clear Malignant from the Fissure of Malice, and the Den of the BlightedThe Den of the Blighted can be found in the Dismal Foothills in Hawezar with the nearest waypoint being the Ruins of Rakhat Keep. If you don’t have that, you’ll have to get there from either the Zabinzet or Wejinhani waypoints. From the Ruins of Rakhat Keep waypoint, exit from the west and take the following path north to find the tunnel to your right. This is a Malignant Dungeon, and once you’ve entered it, you’ll have an objective to “Destroy the Malignant Corruption x3”. These are large pustules with a health bar, and when you try to destroy them, you’ll have to fight numerous creatures filled with elites. Once you’ve destroyed all three of them, the objective will change to slaying the Malignant Prophet, Tsula Vahn. Don’t worry, Tsula is just an elite, and not an actual boss, so shouldn’t have too many problems defeating it. If you opt for capturing the heart (optional), you’ll have to fight it again, but you will get a Caged Heart for your troubles. Fissure of MaliceThe Fissure of Malice dungeon is a short ride from the Complete Chapter 3 of the Season JourneyNow that you’ve completed the two objectives, you’ll have one more to do, and that is the arduous task of completing most of the Chapter 3 Season Journey which you should be used to doing right now. We recommend avoiding the Grim Reward and the Hunter’s Whispers objectives due to the time it takes to complete them. Click the link below for more information on the Chapter 3 Season Journey Objectives. Check in with CormondThe only thing to do now is head to Zarbinzet, leave via the southeast exit, climb down the small cliff, and talk to Cormond. He’ll tell you what he’s learned then the quest will be complete.
In-Game Description
Region
General Reward
XP and Gold. |
|
||||||||||||||||||||||||||||||||||||
|
|
Ruins of the Faith |
Detailed Location
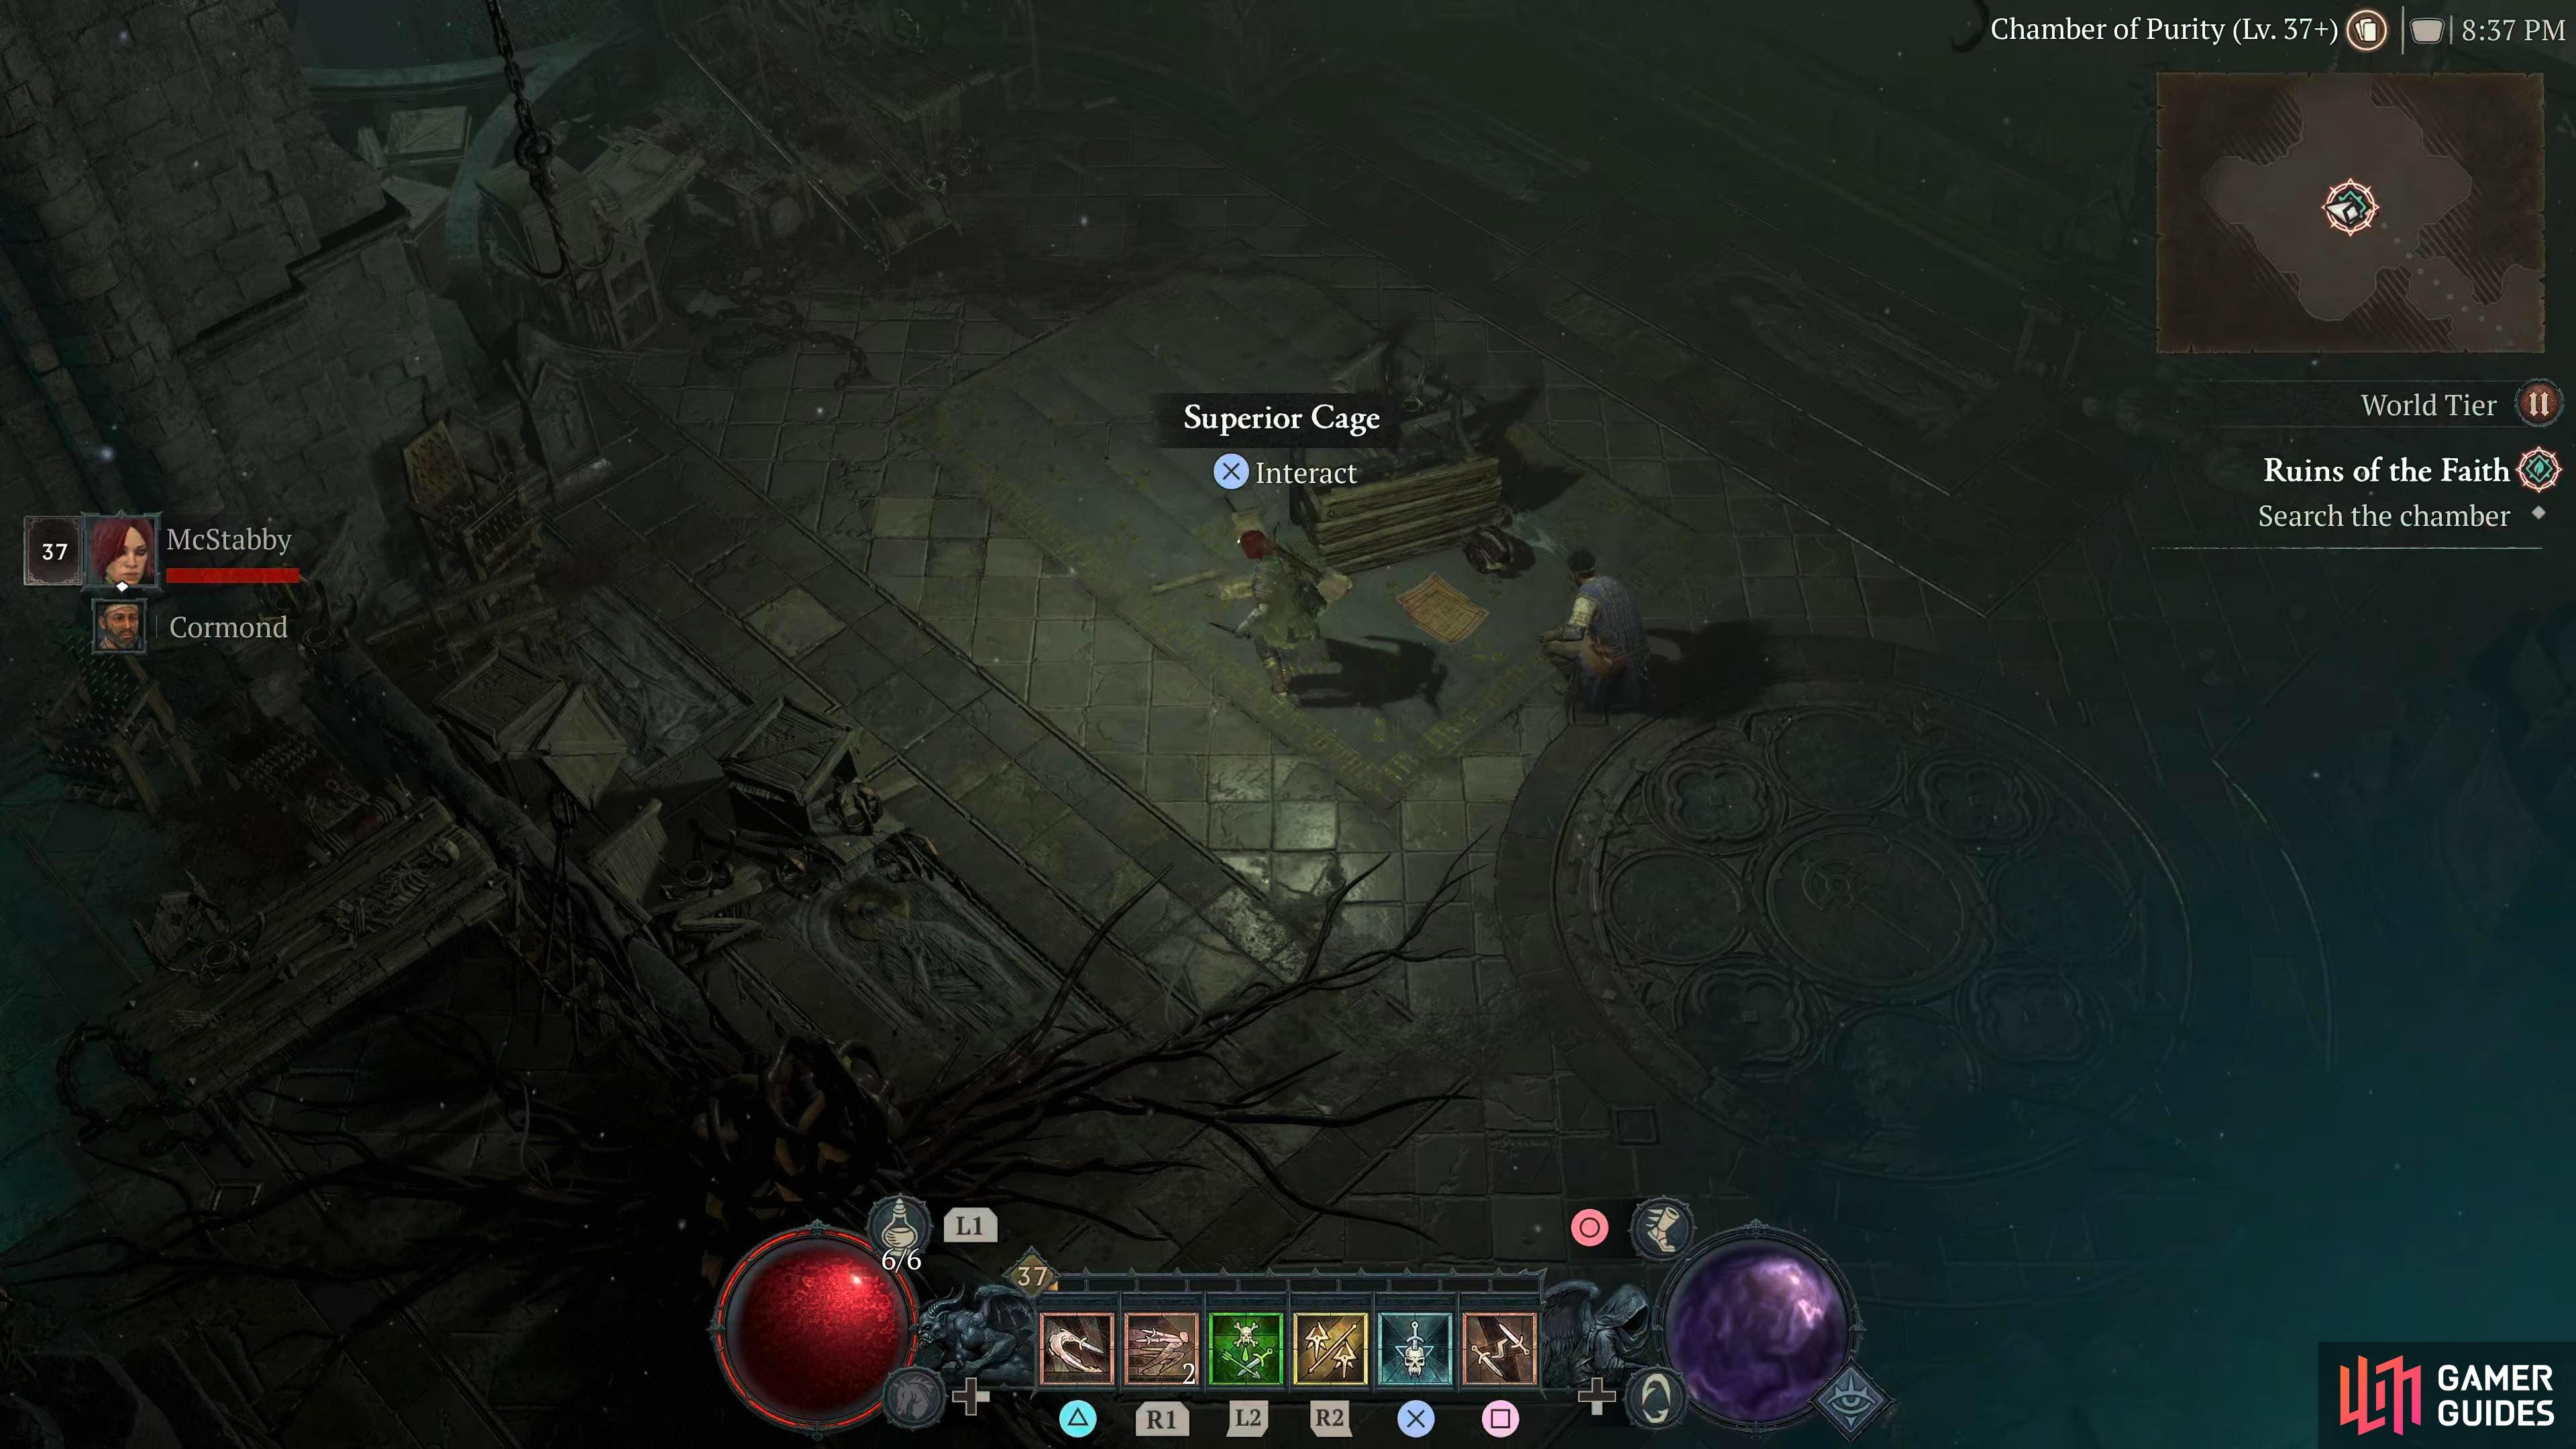
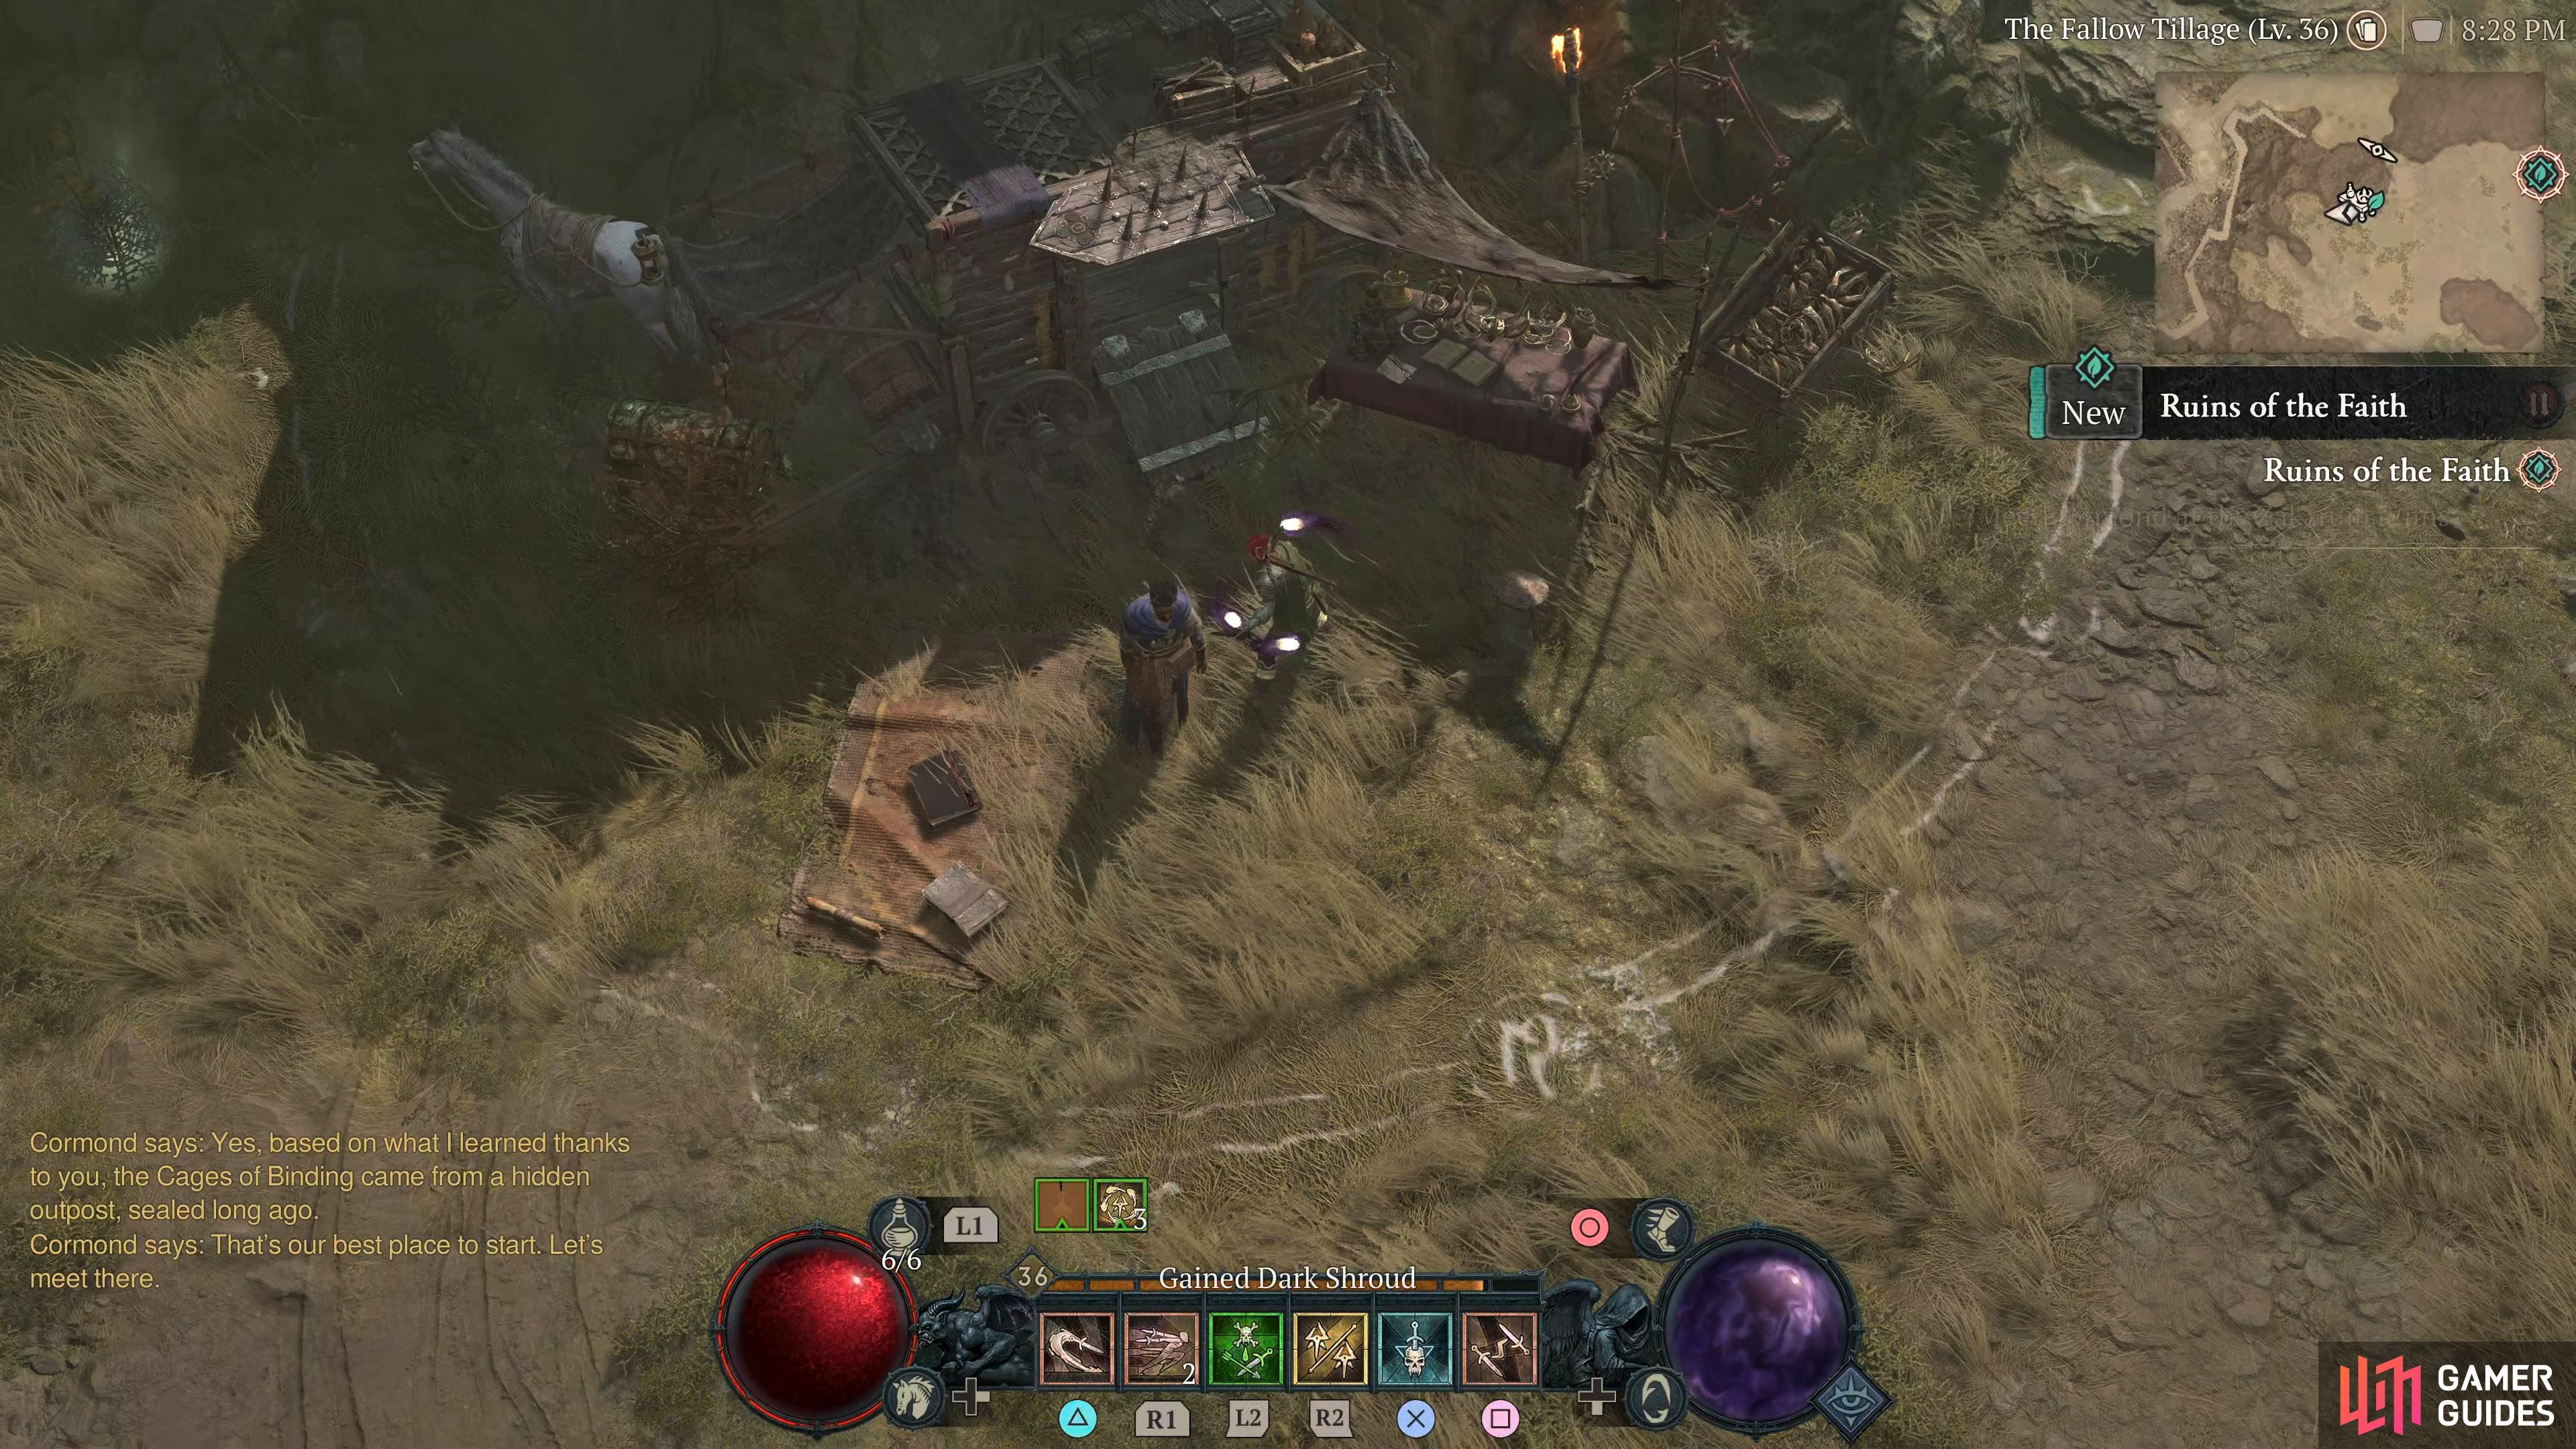
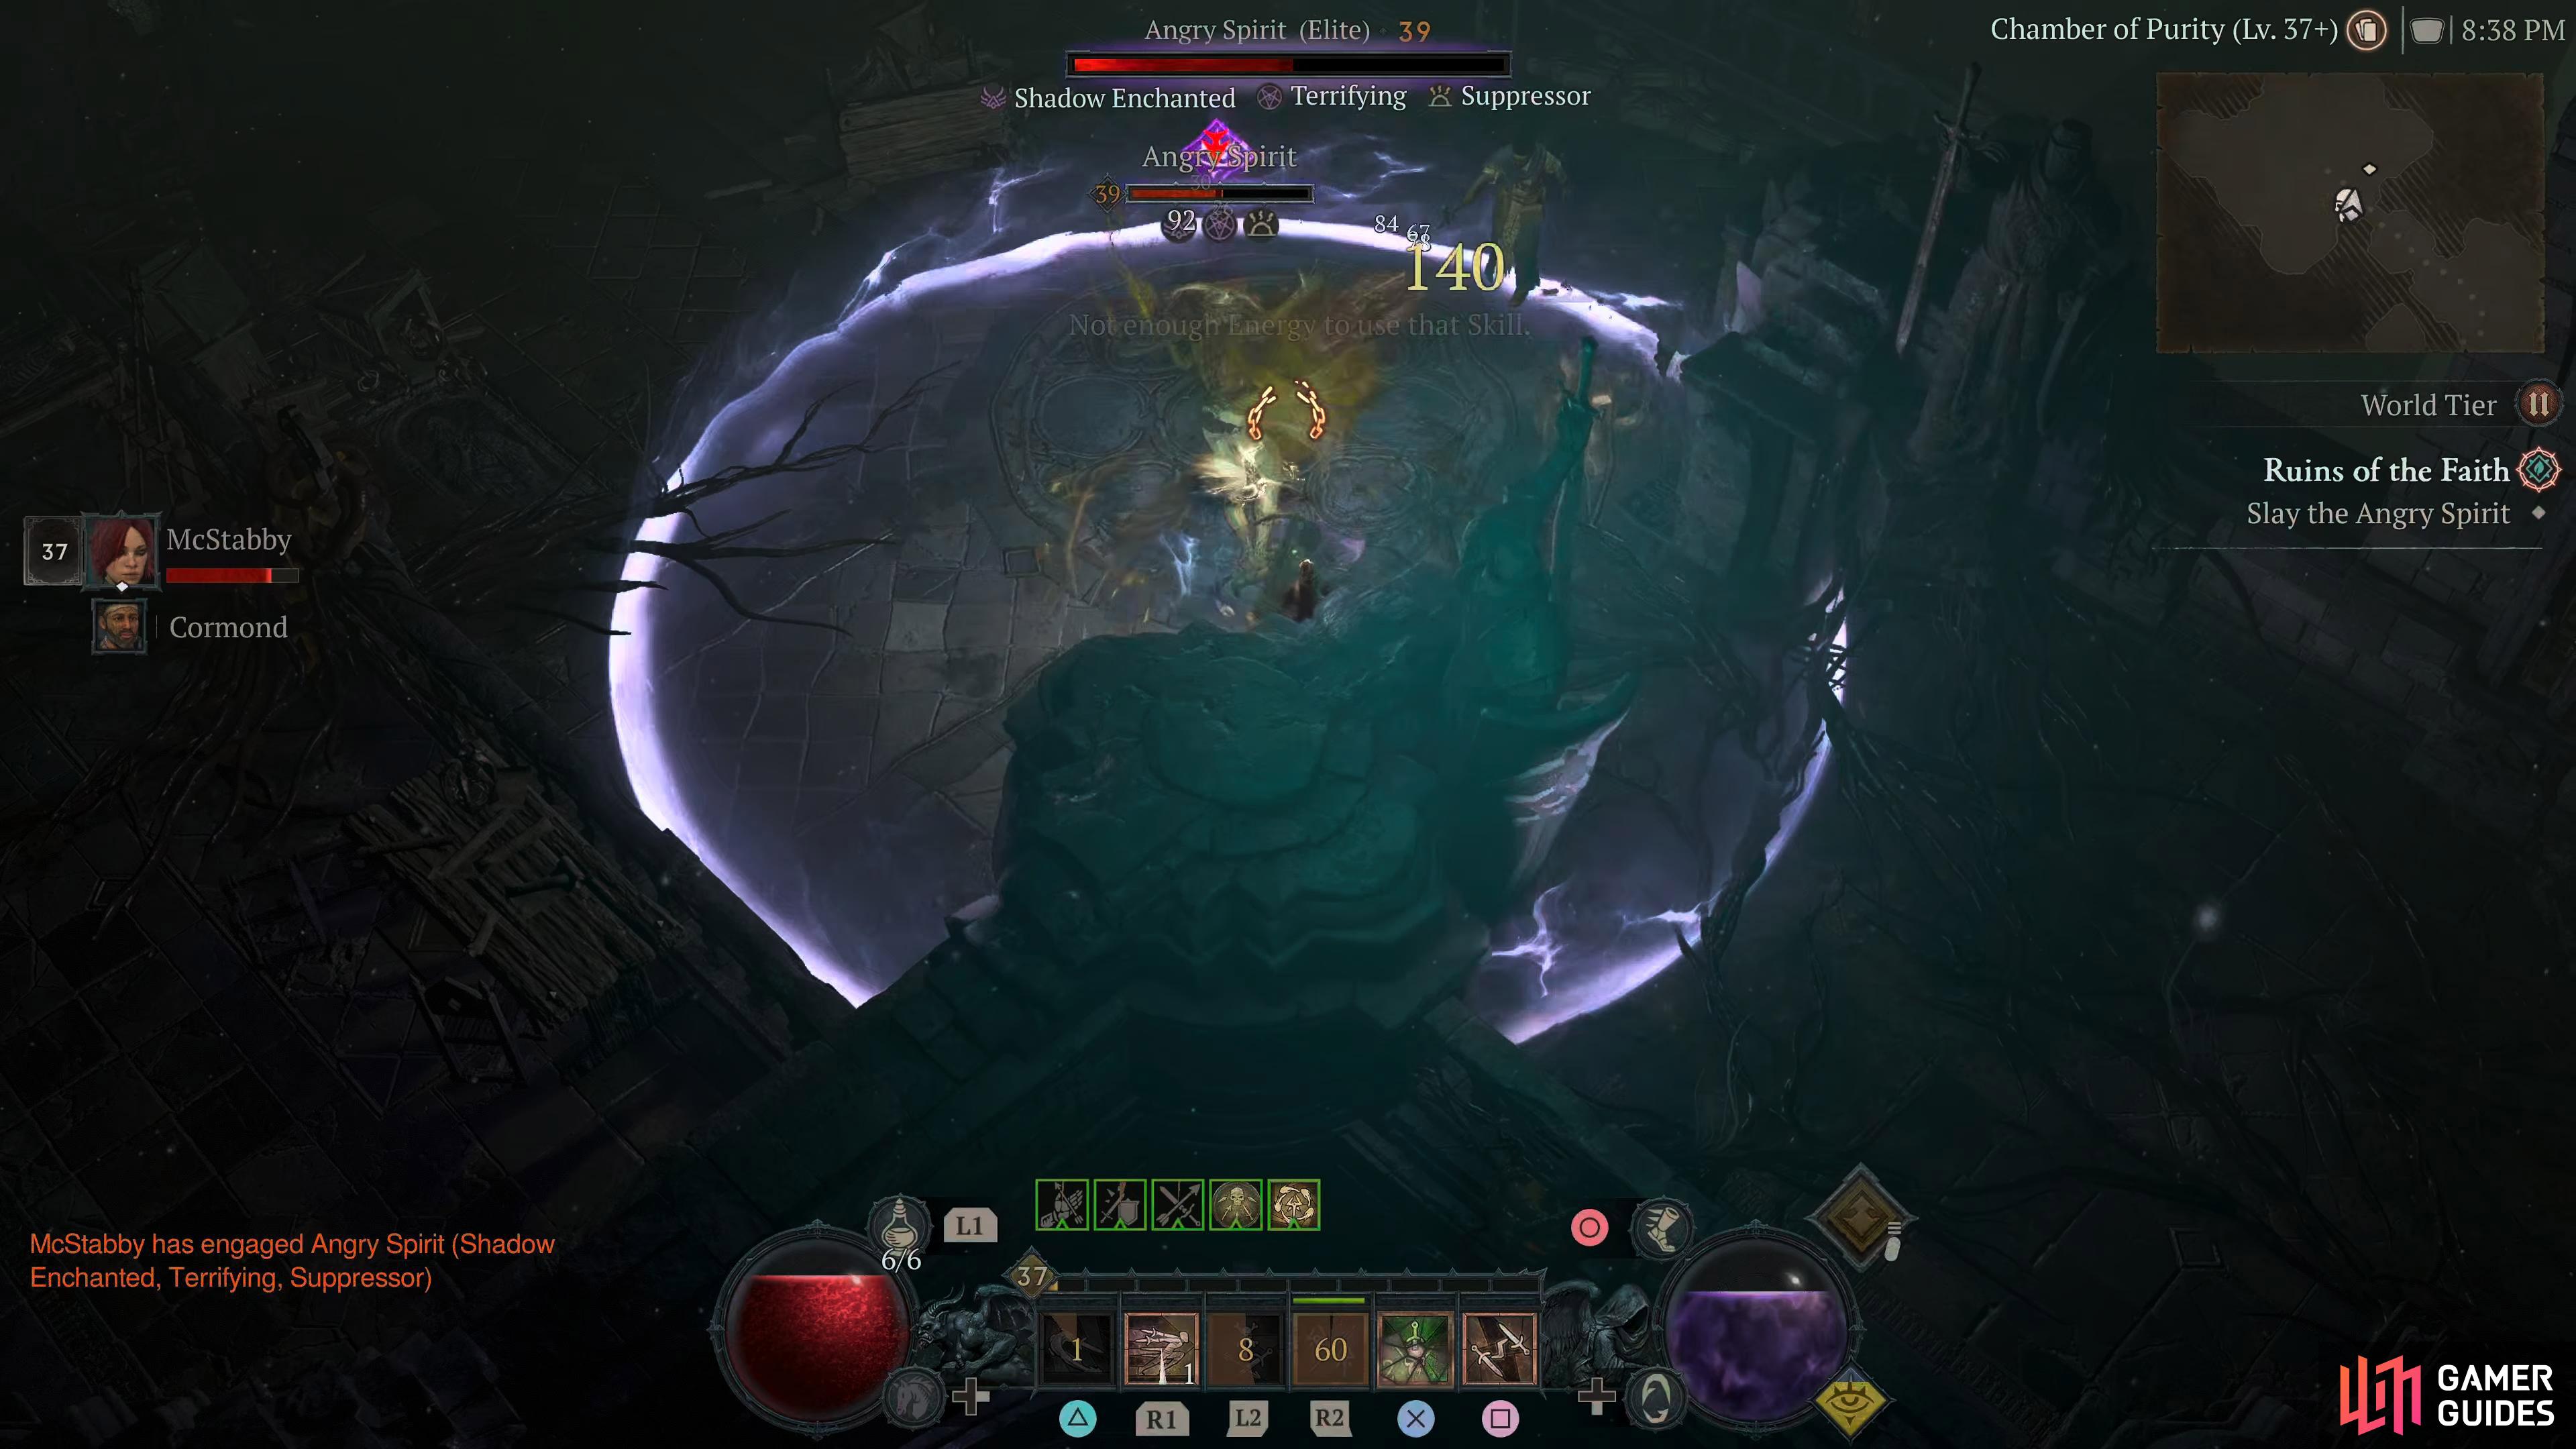
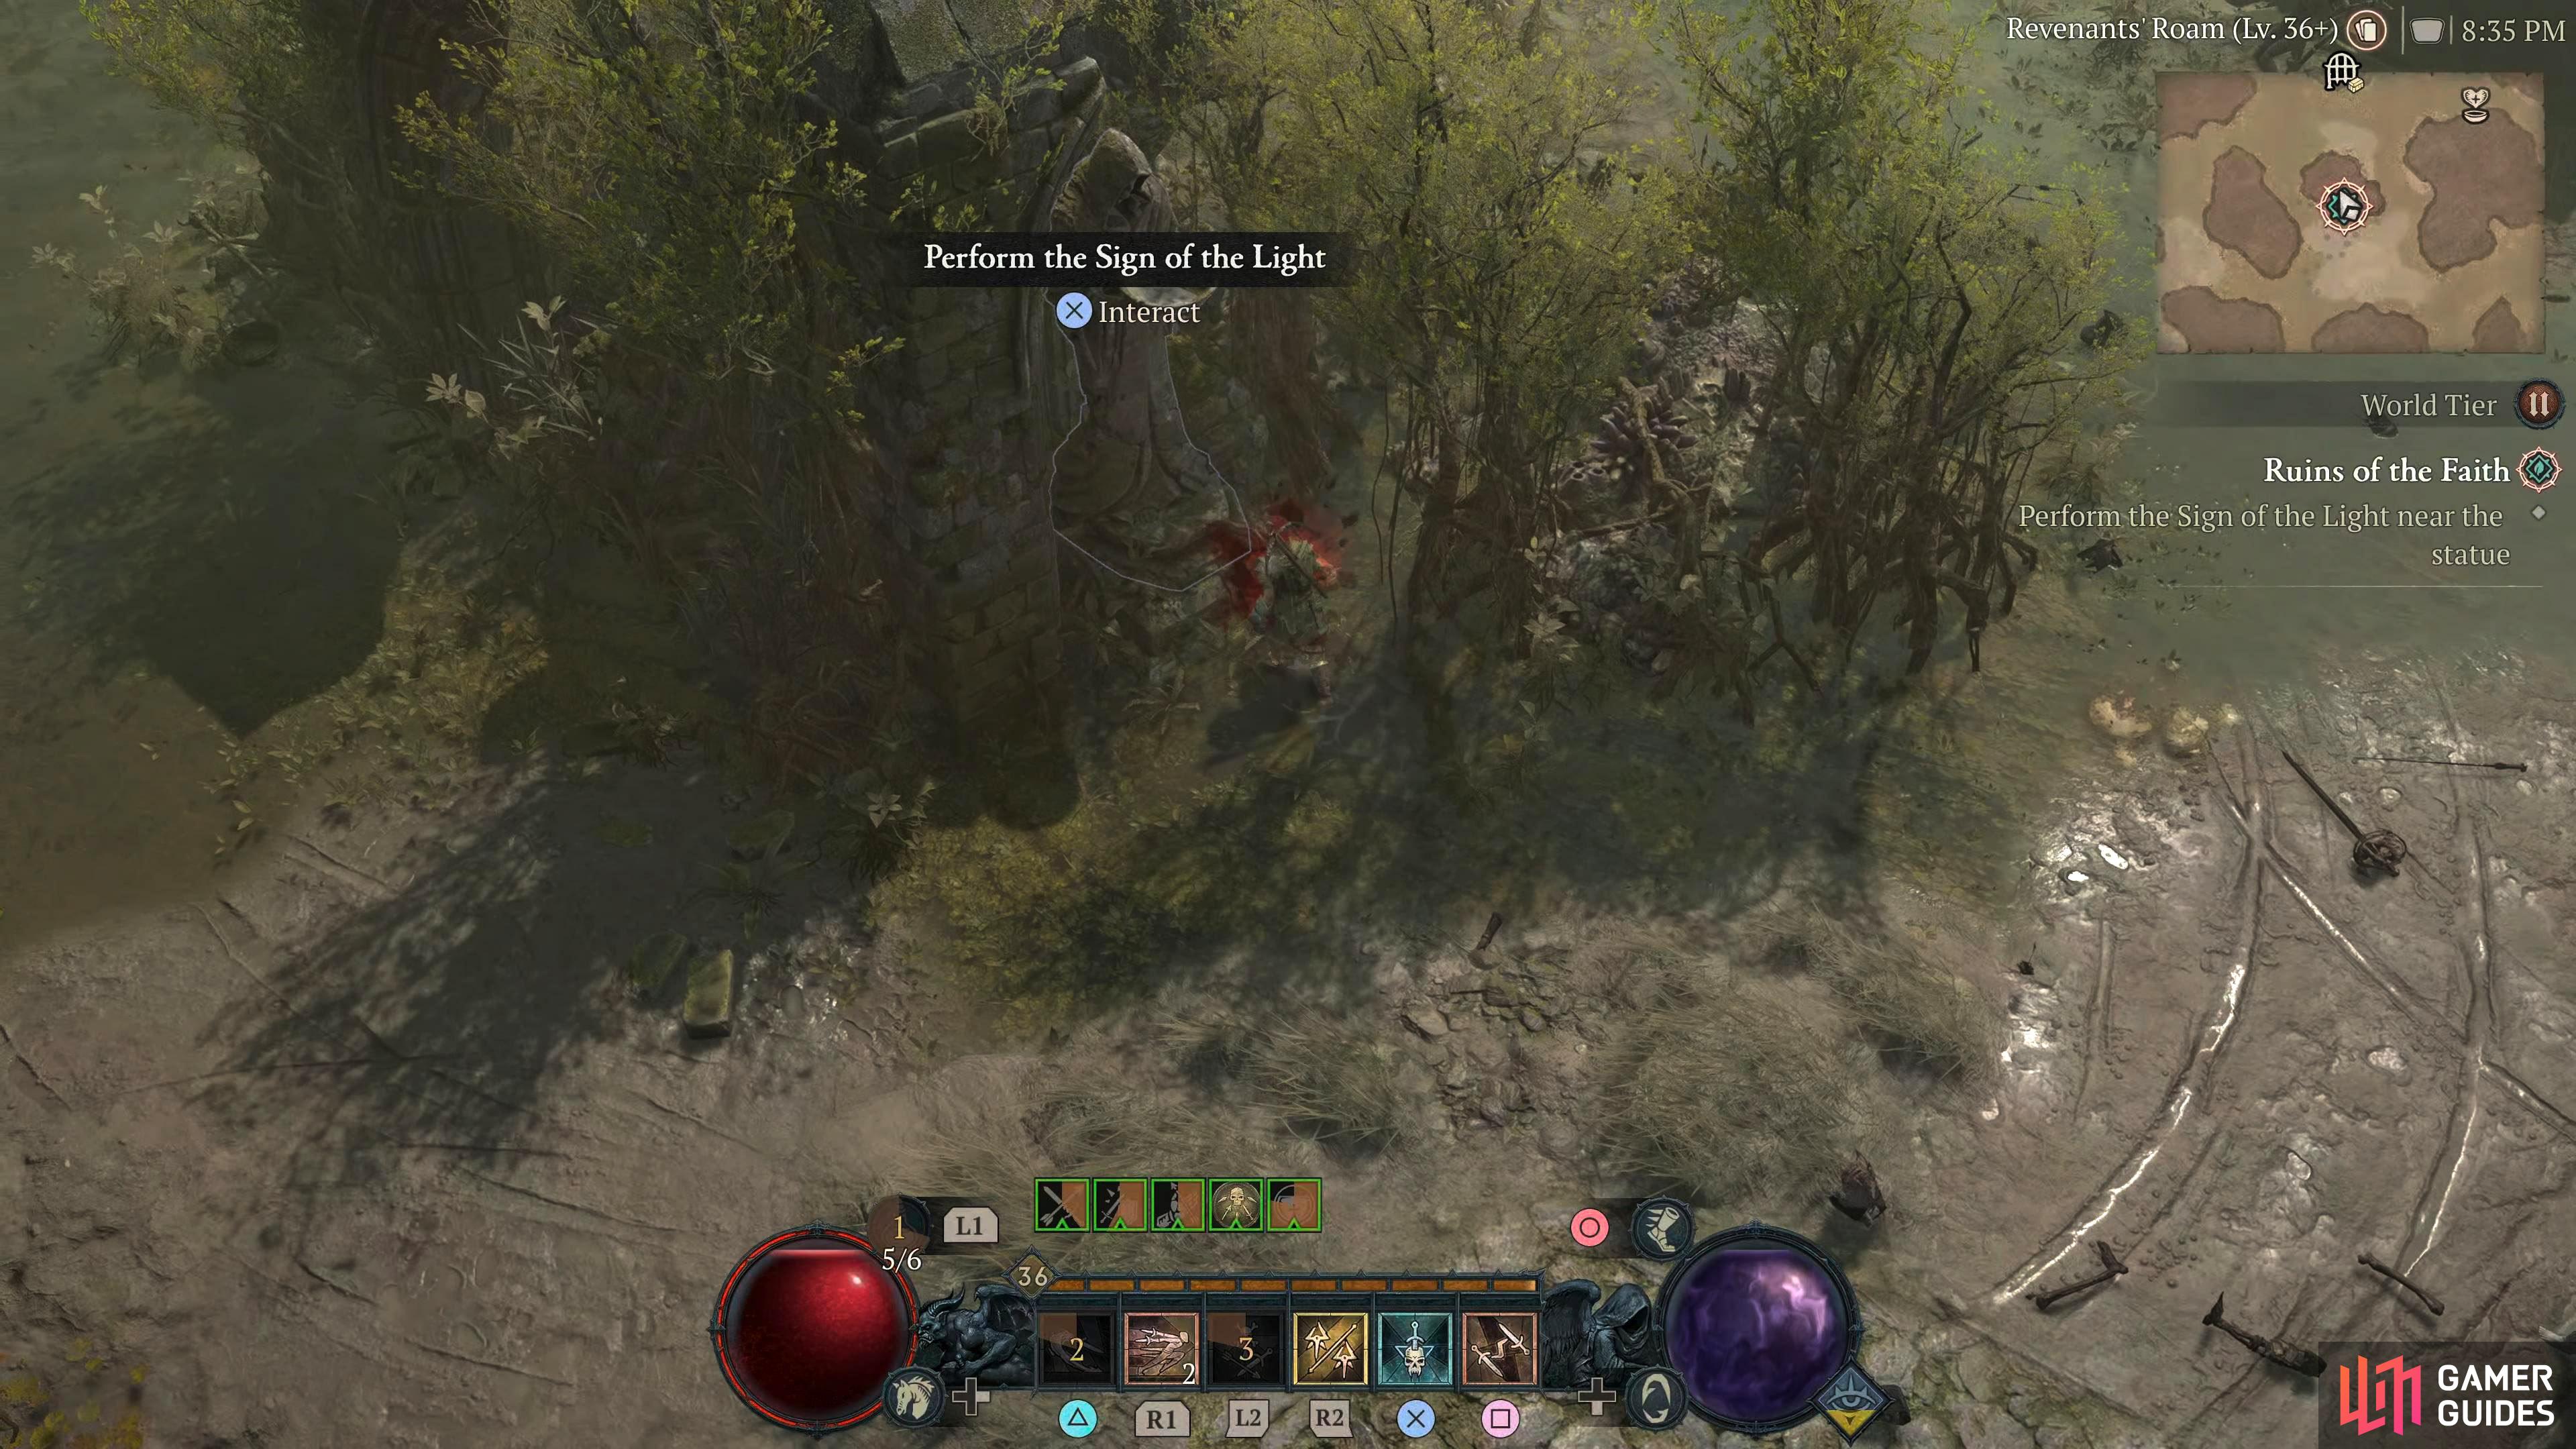
This quest starts immediately after you finish the Follow Cormond north while defeating any monster that attempts to ruin your quiet walk in the swamp. There will be a few elite enemies along the way, so make sure you come prepared. After the short walk, you’ll end up outside the Look at that, it worked! Unfortunately, that is only the first part of unlocking the statue, and Cormond will tell you to look for another statue nearby. This is quite well-hidden, and you may have trouble finding it at first, but if you head directly south into the green circle, the statue will be leaning against the southern side of the ruins, obscured by the nearby flora. Interact with the statue, and an entrance will open up back at the statue near Cormand. Head back to Cormond in the north to find Karamat’s Reach. Karamat’s ReachFollow the linear path down the stairs, and you’ll soon find Cormond battling with some In the next room, you’ll find the aptly named “Superior Cage” on the floor next to the upturned table with some notes scattered about in front of it. Interact with the cage, and you’ll be ambushed again by an Angry Spirit. The Angry Spirit is only an elite enemy which shouldn’t cause you any problems, just make sure you fight it inside the purple circle. Once it’s defeated, speak to Cormond again for a short scene before the quest is complete. Exit the dungeon, and make your way to Velkhova for the next quest.
In-Game Description
General Reward
XP and Gold
Item Reward
1×
|
|
||||||||||||||||||||||||||||||||||||
|
|
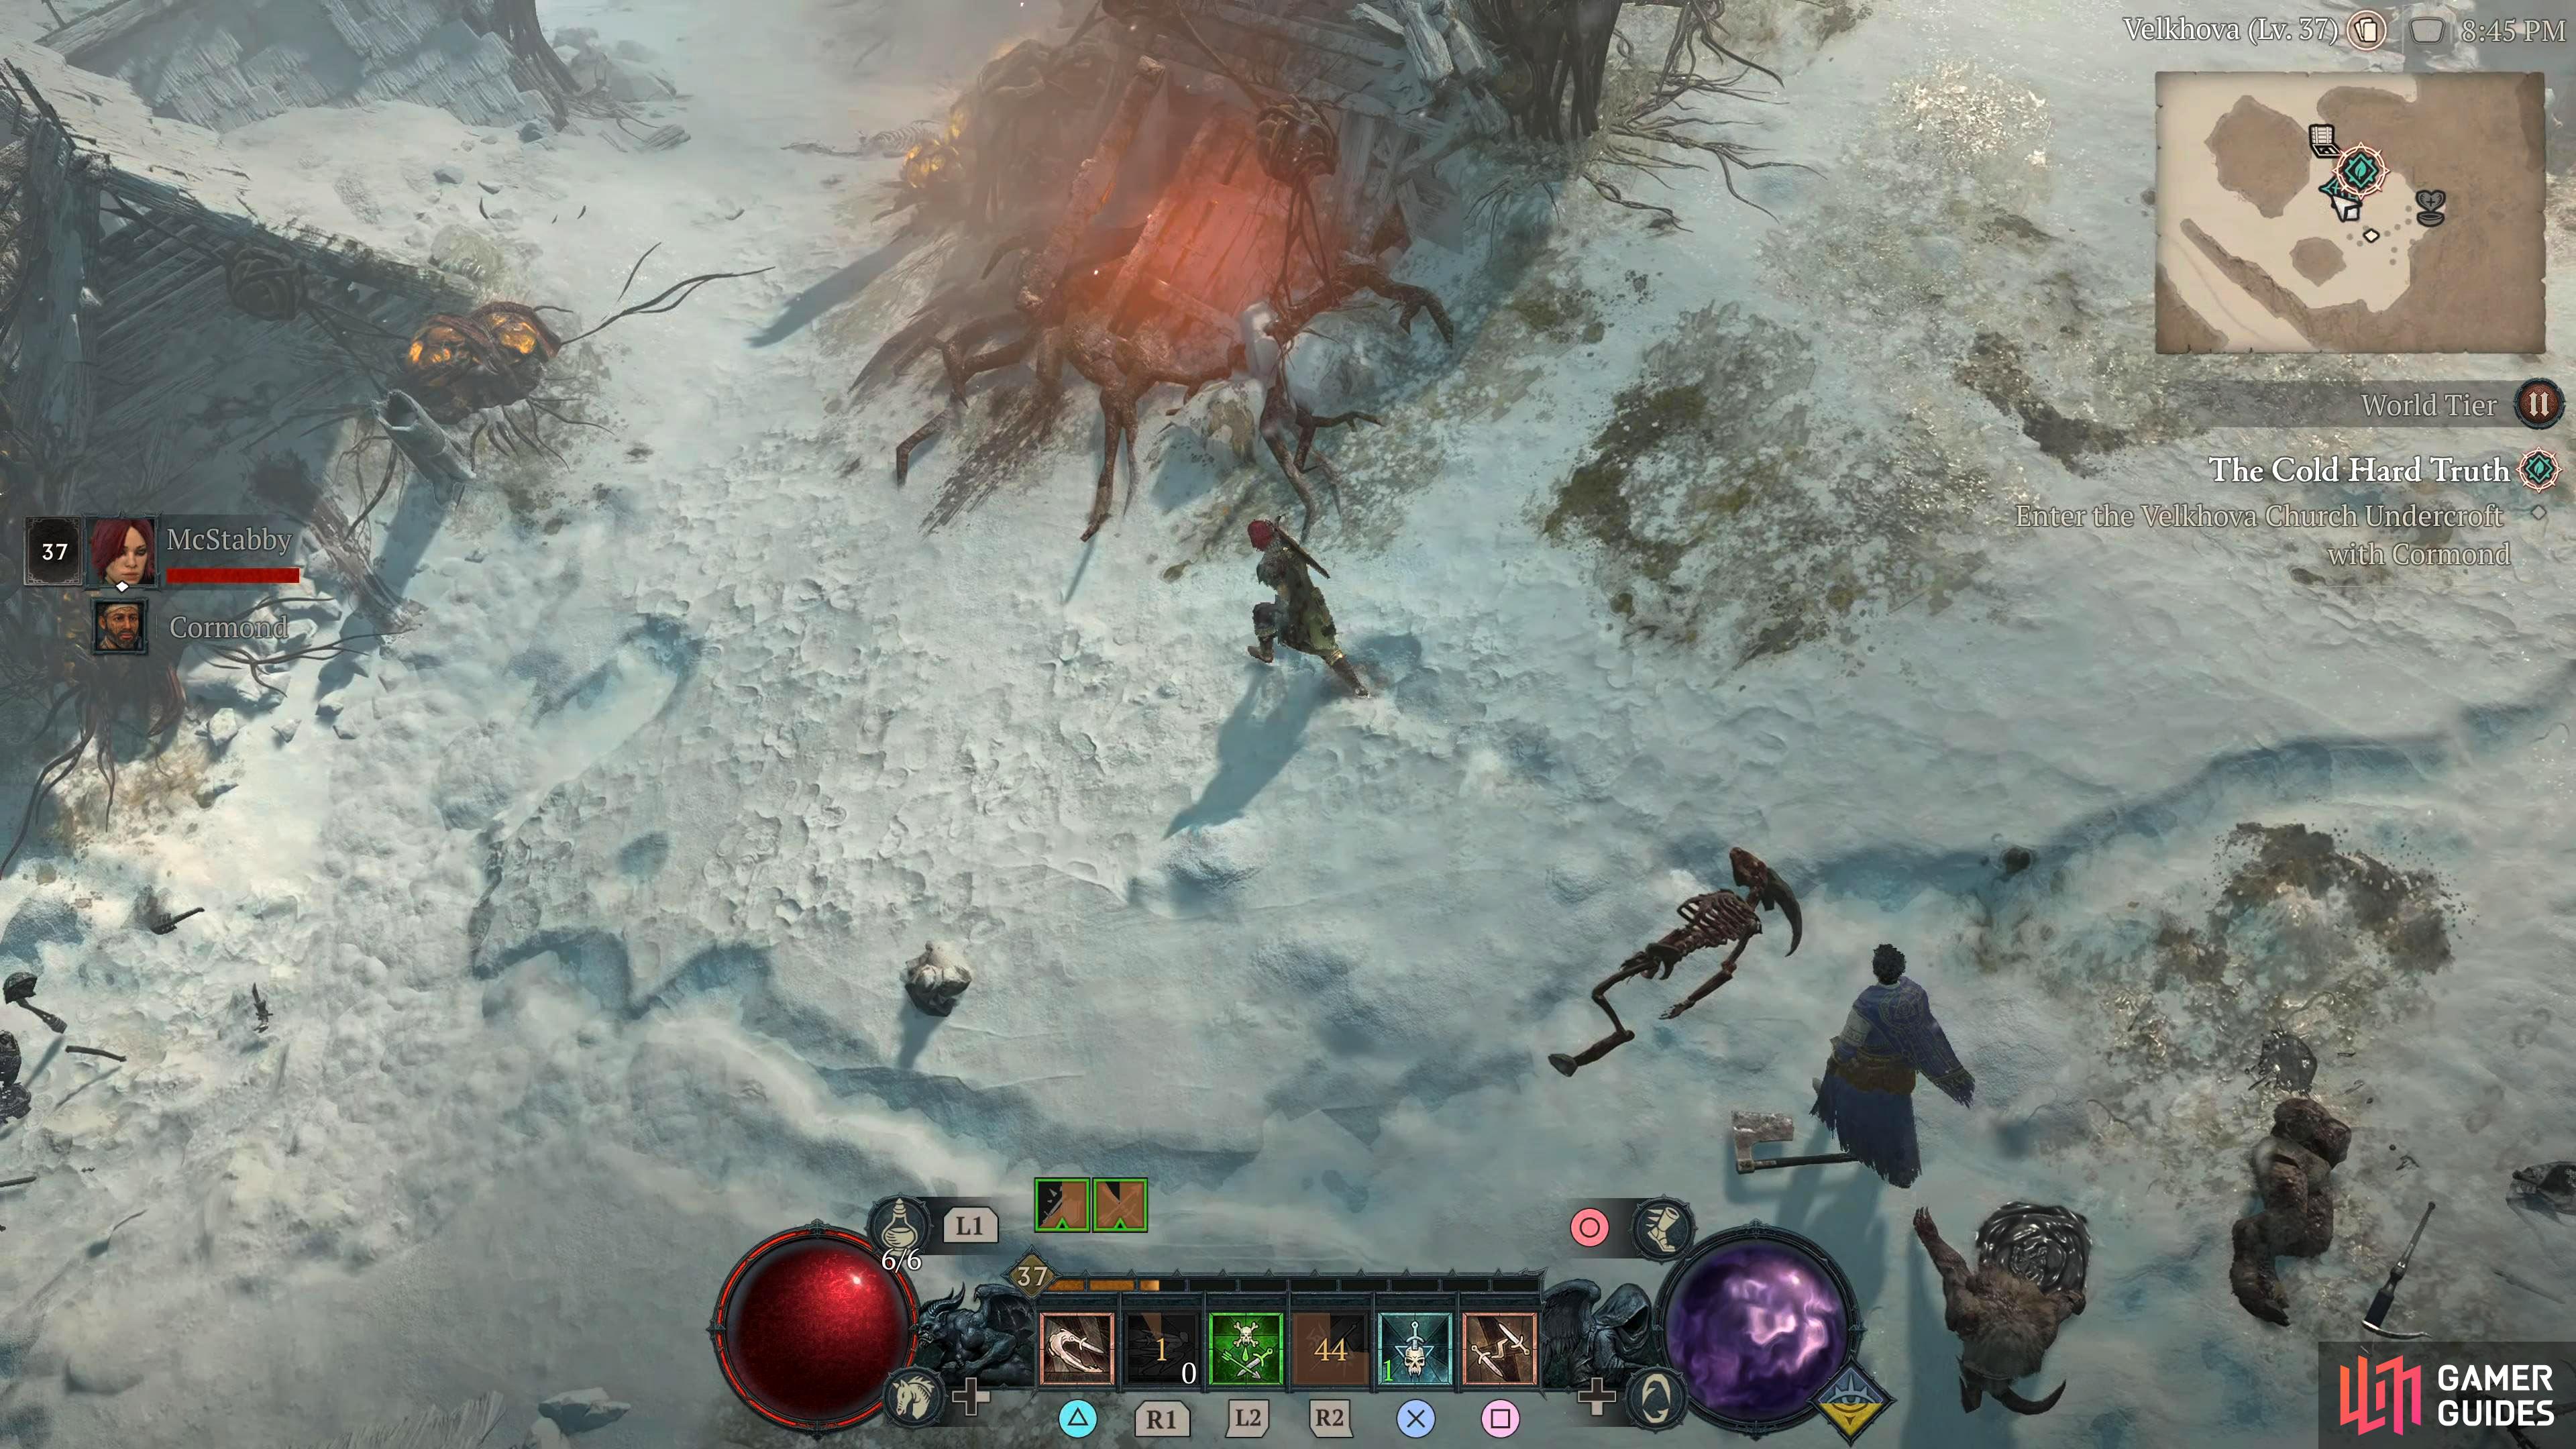
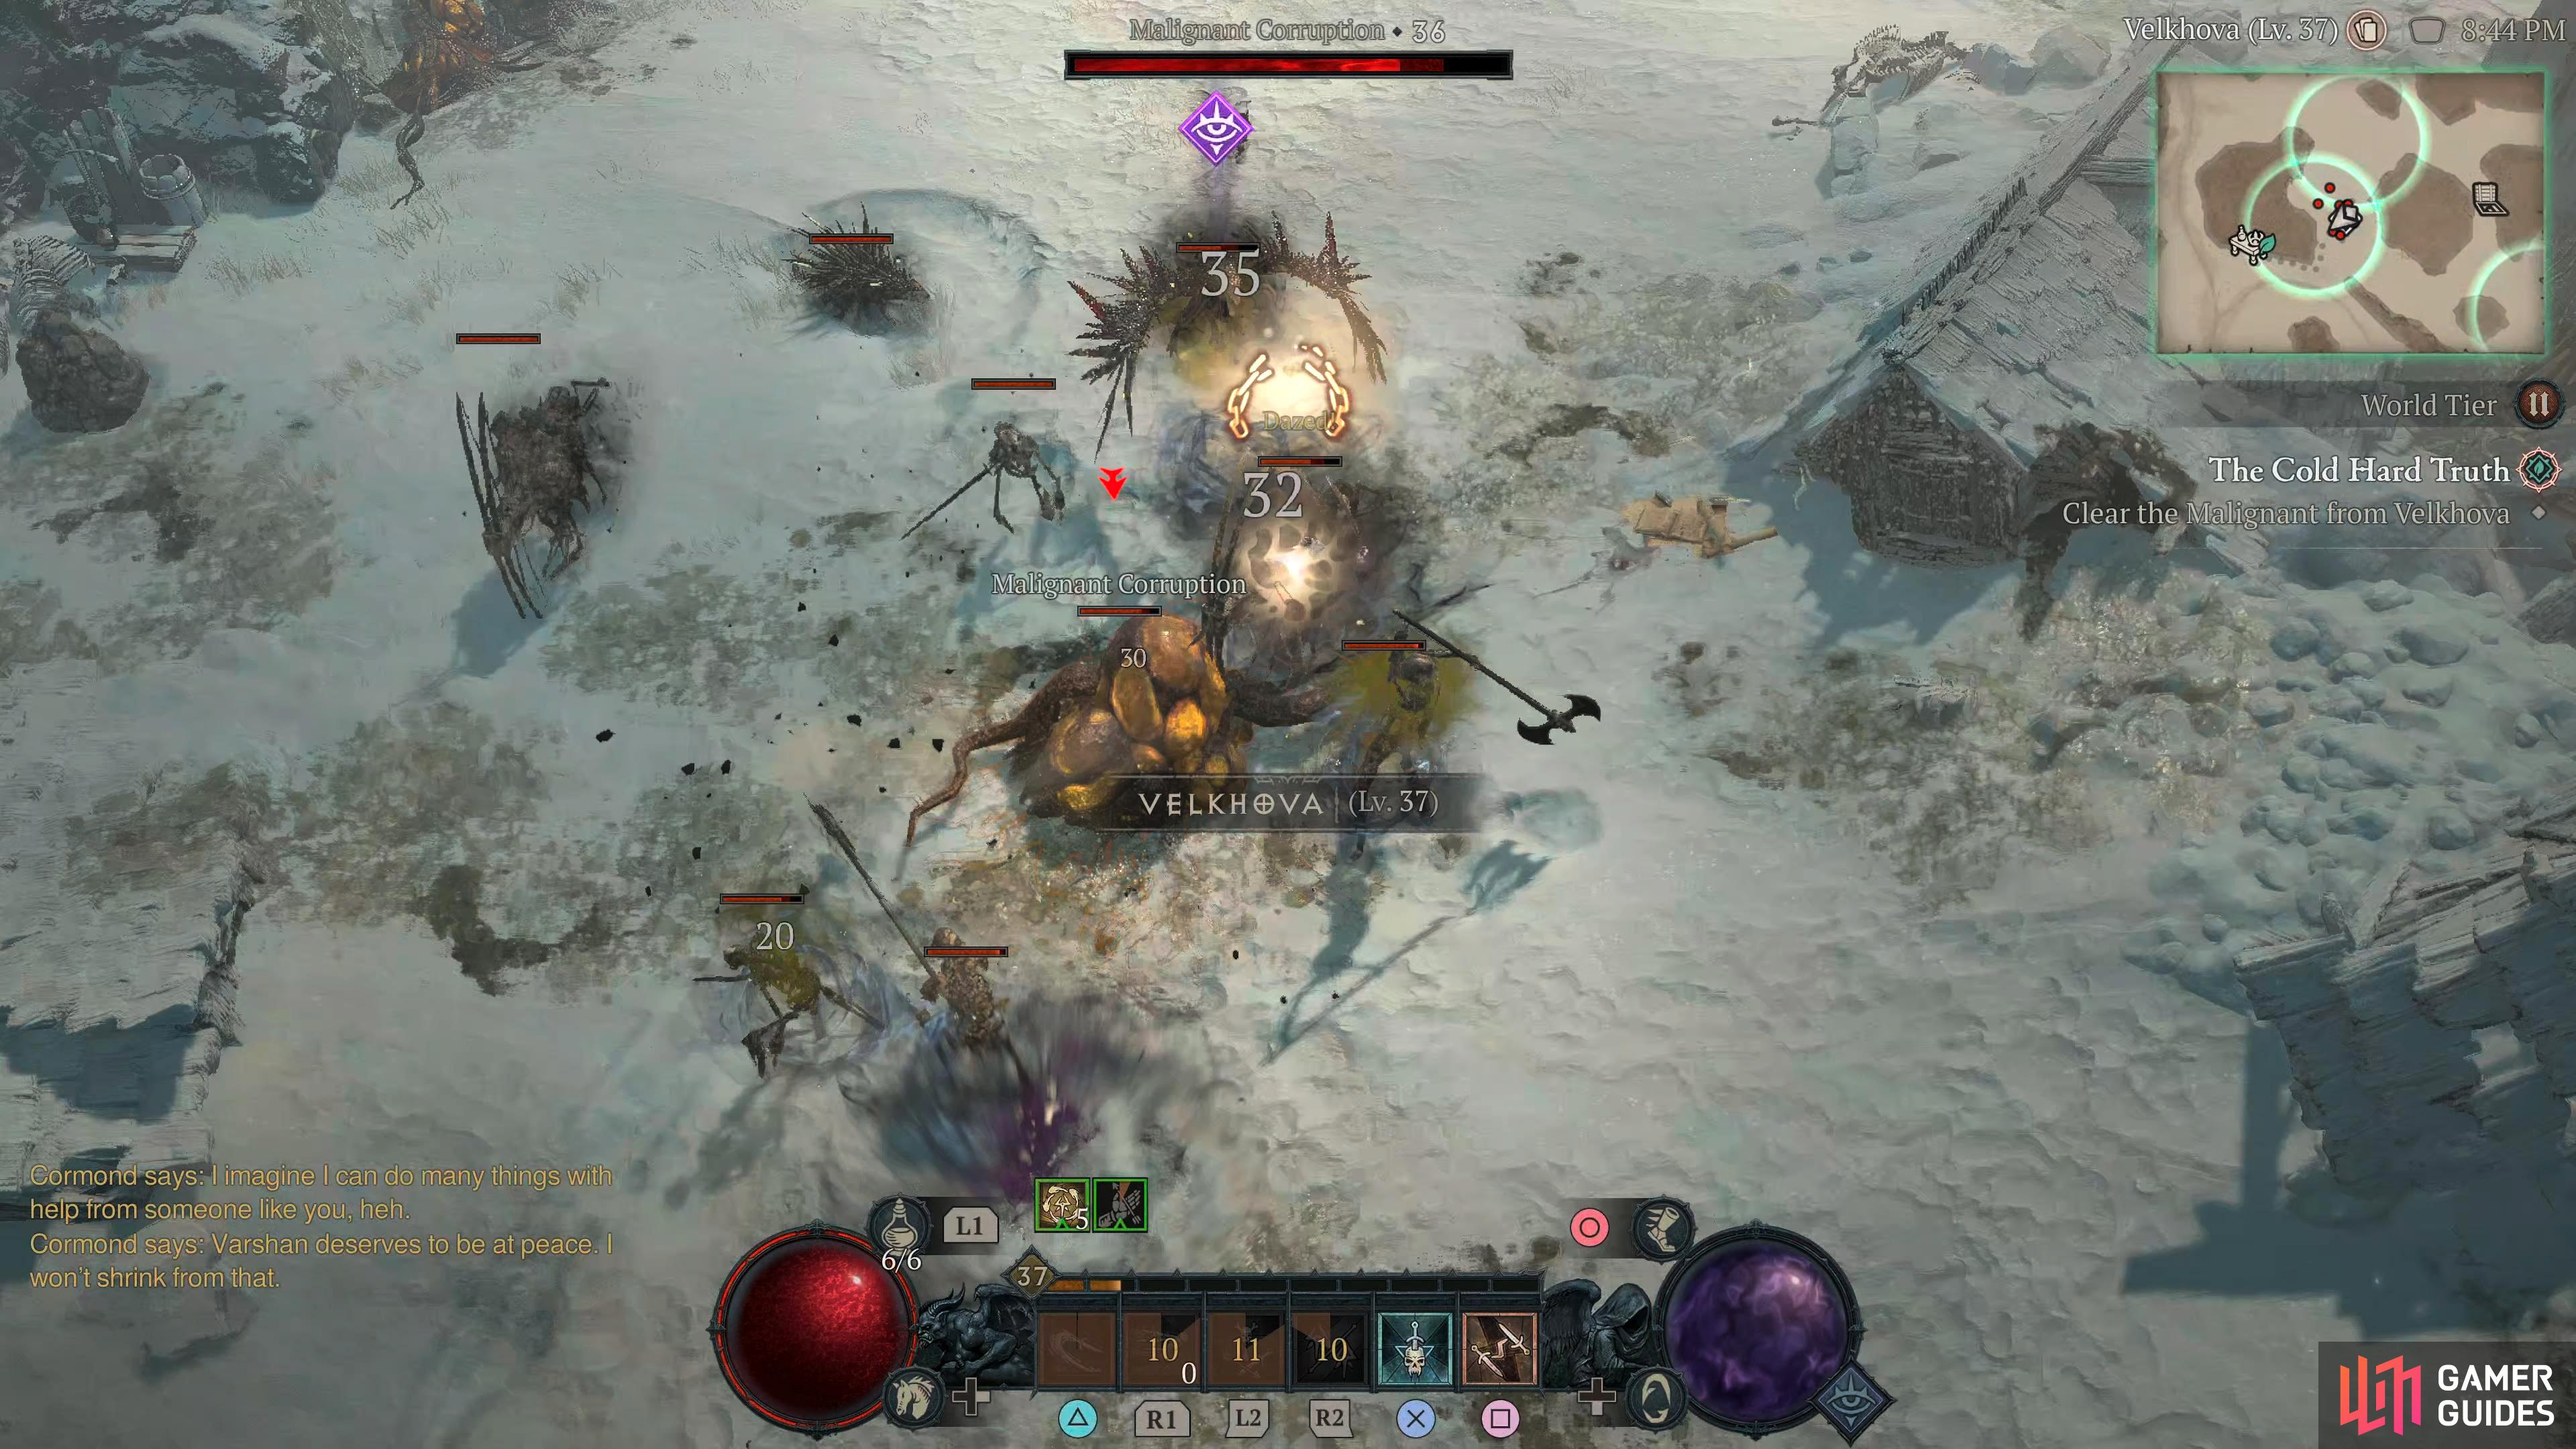
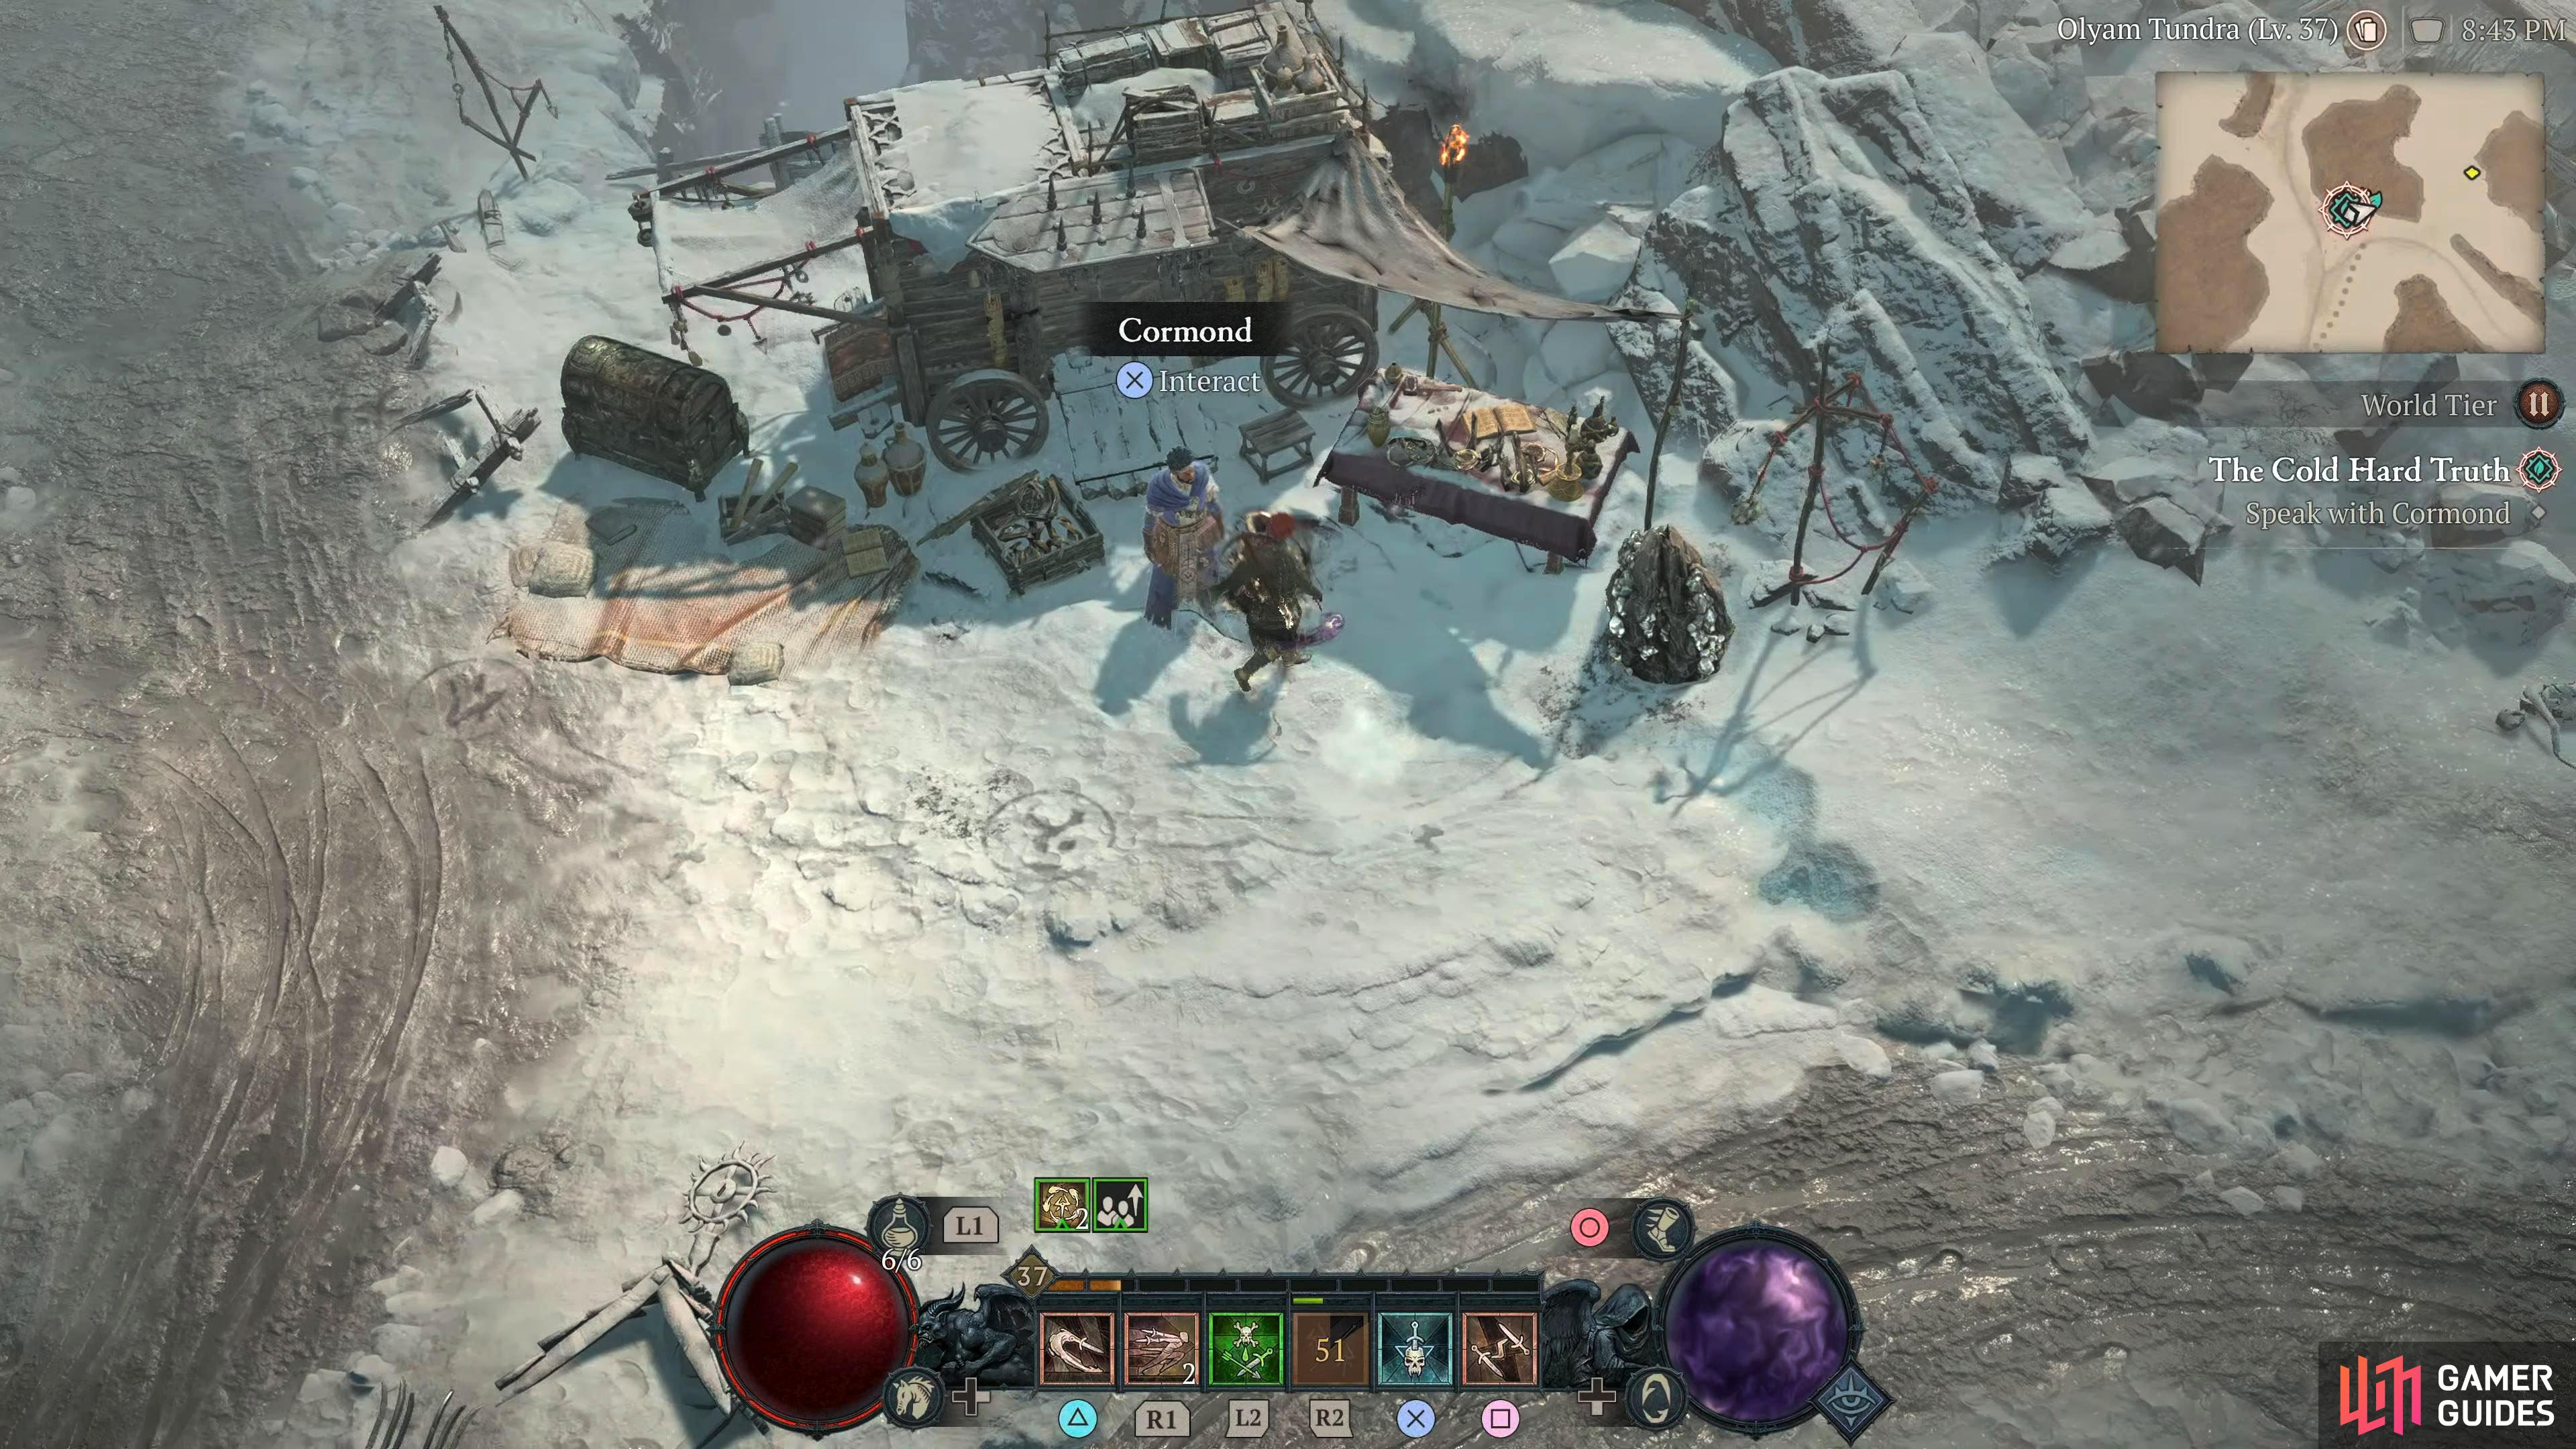
The Cold Hard Truth |
Detailed Location
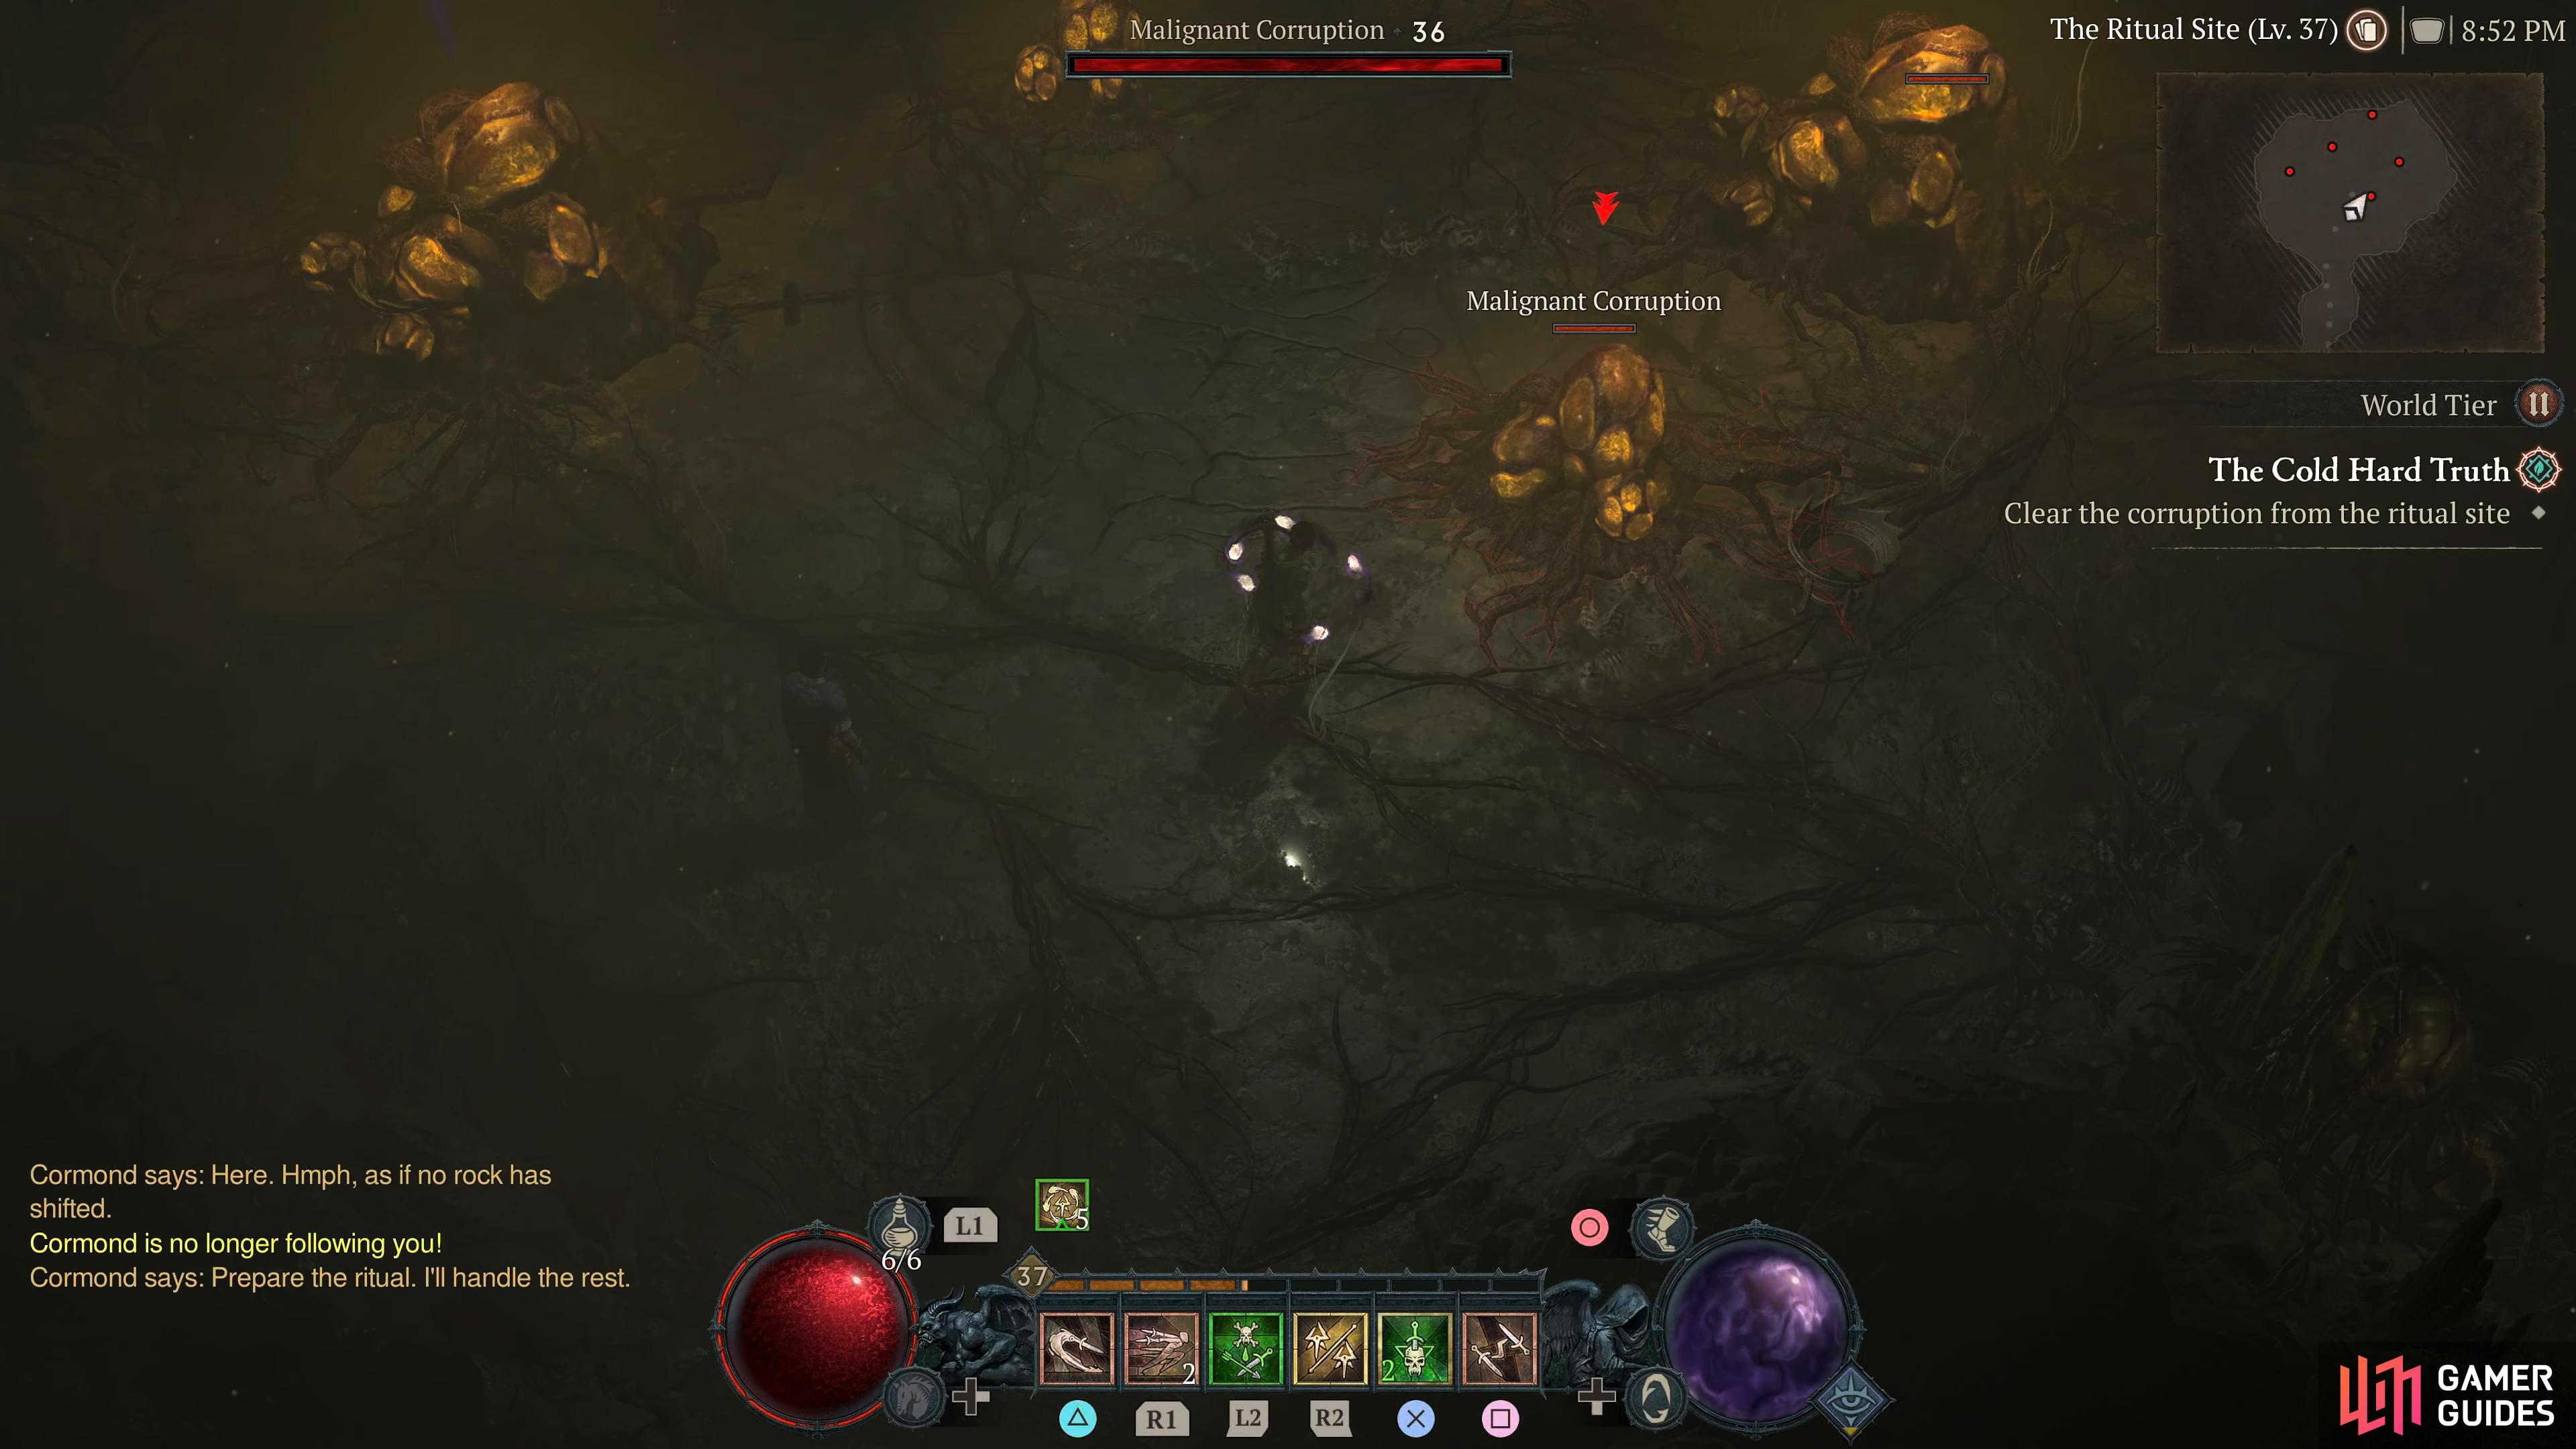
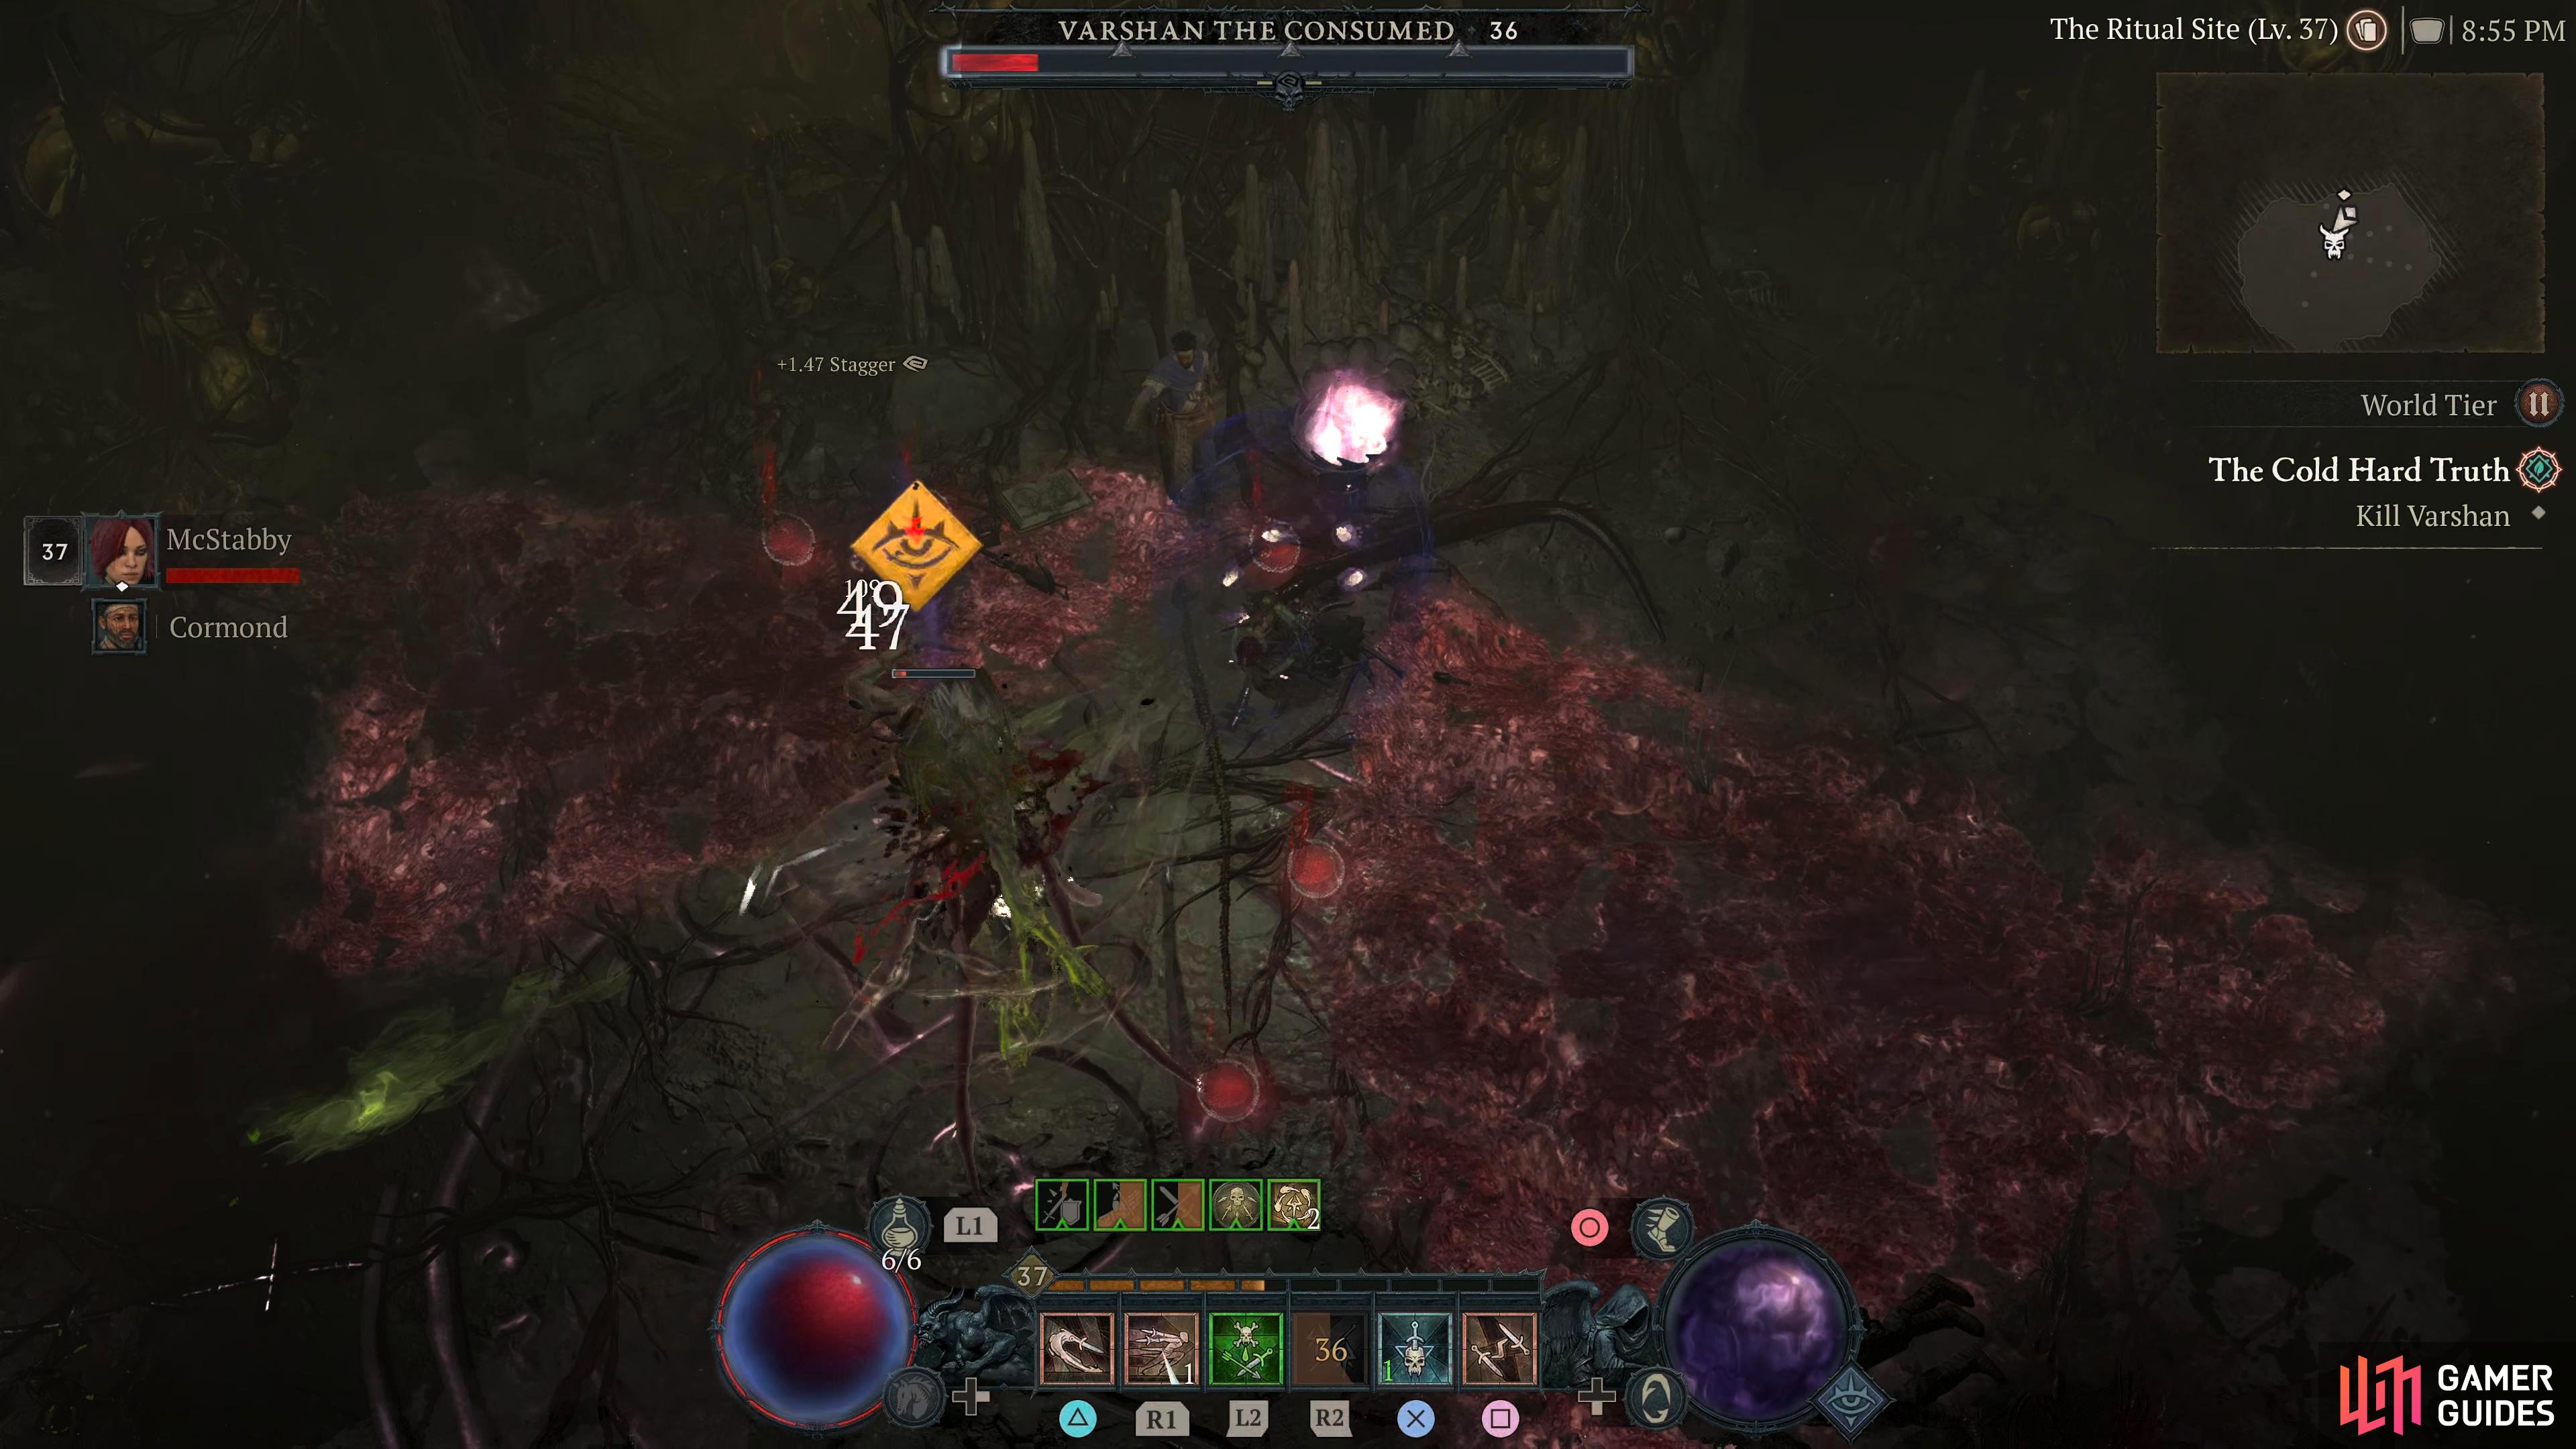
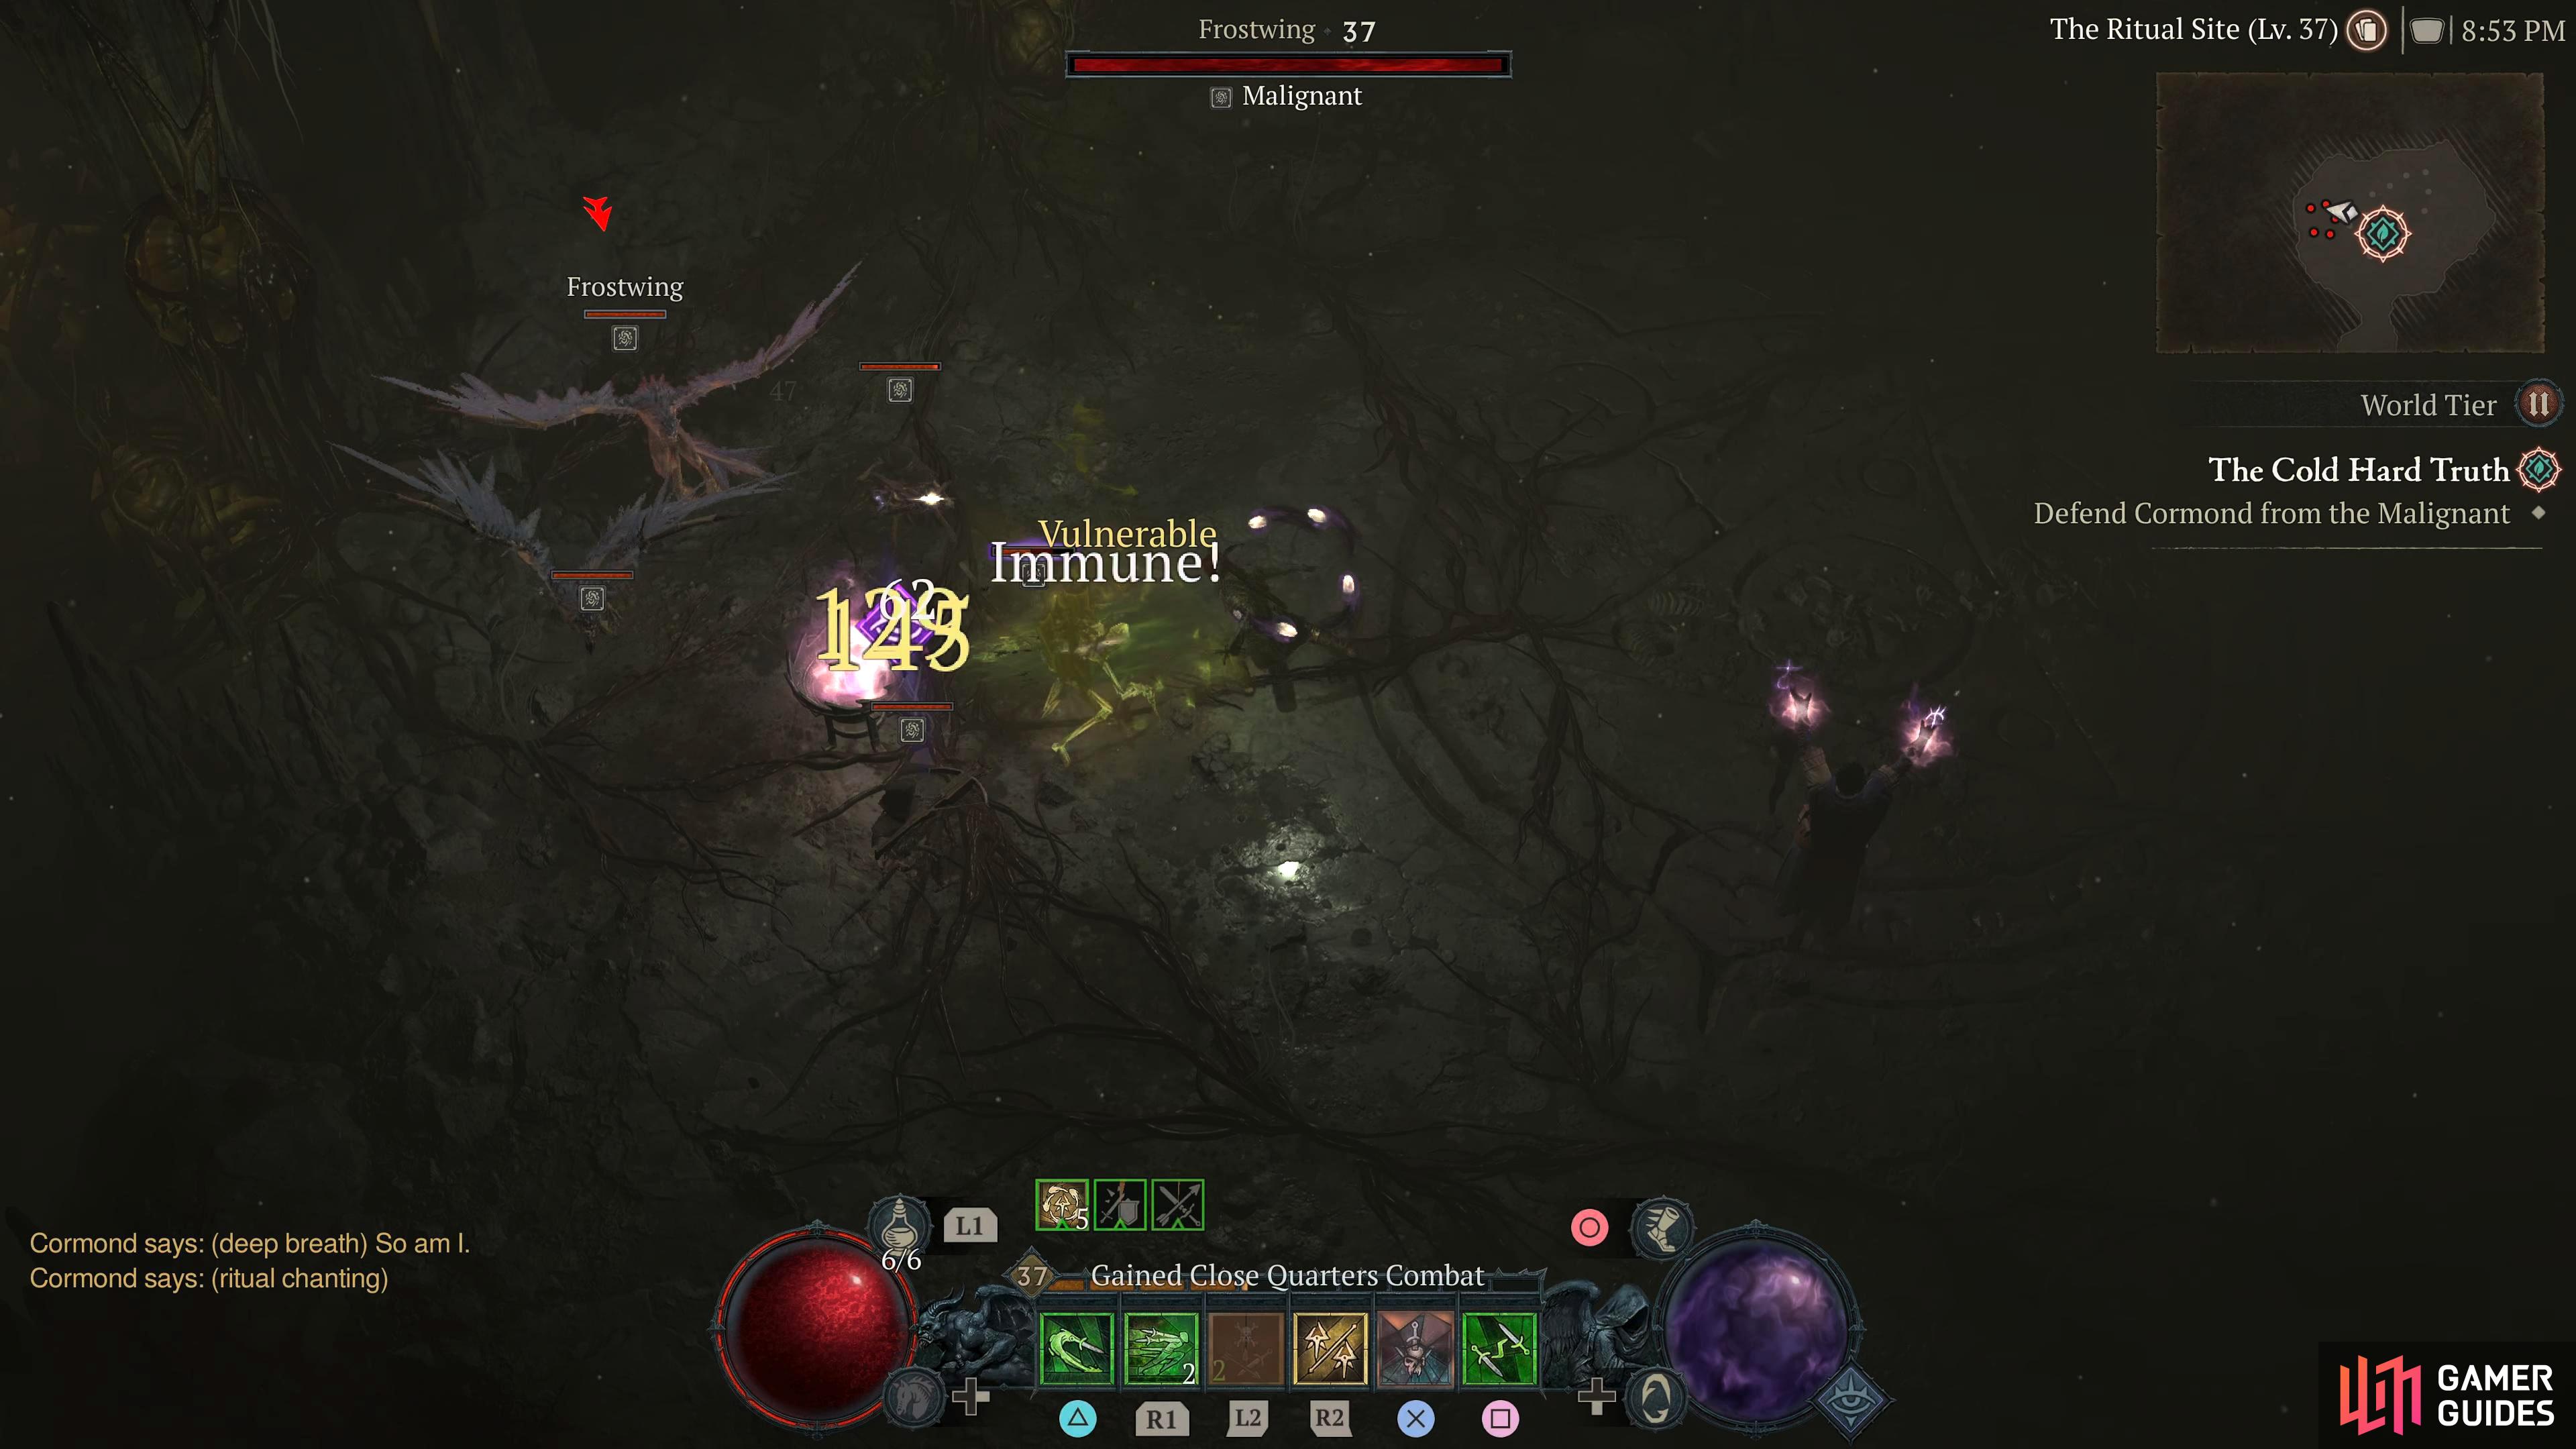
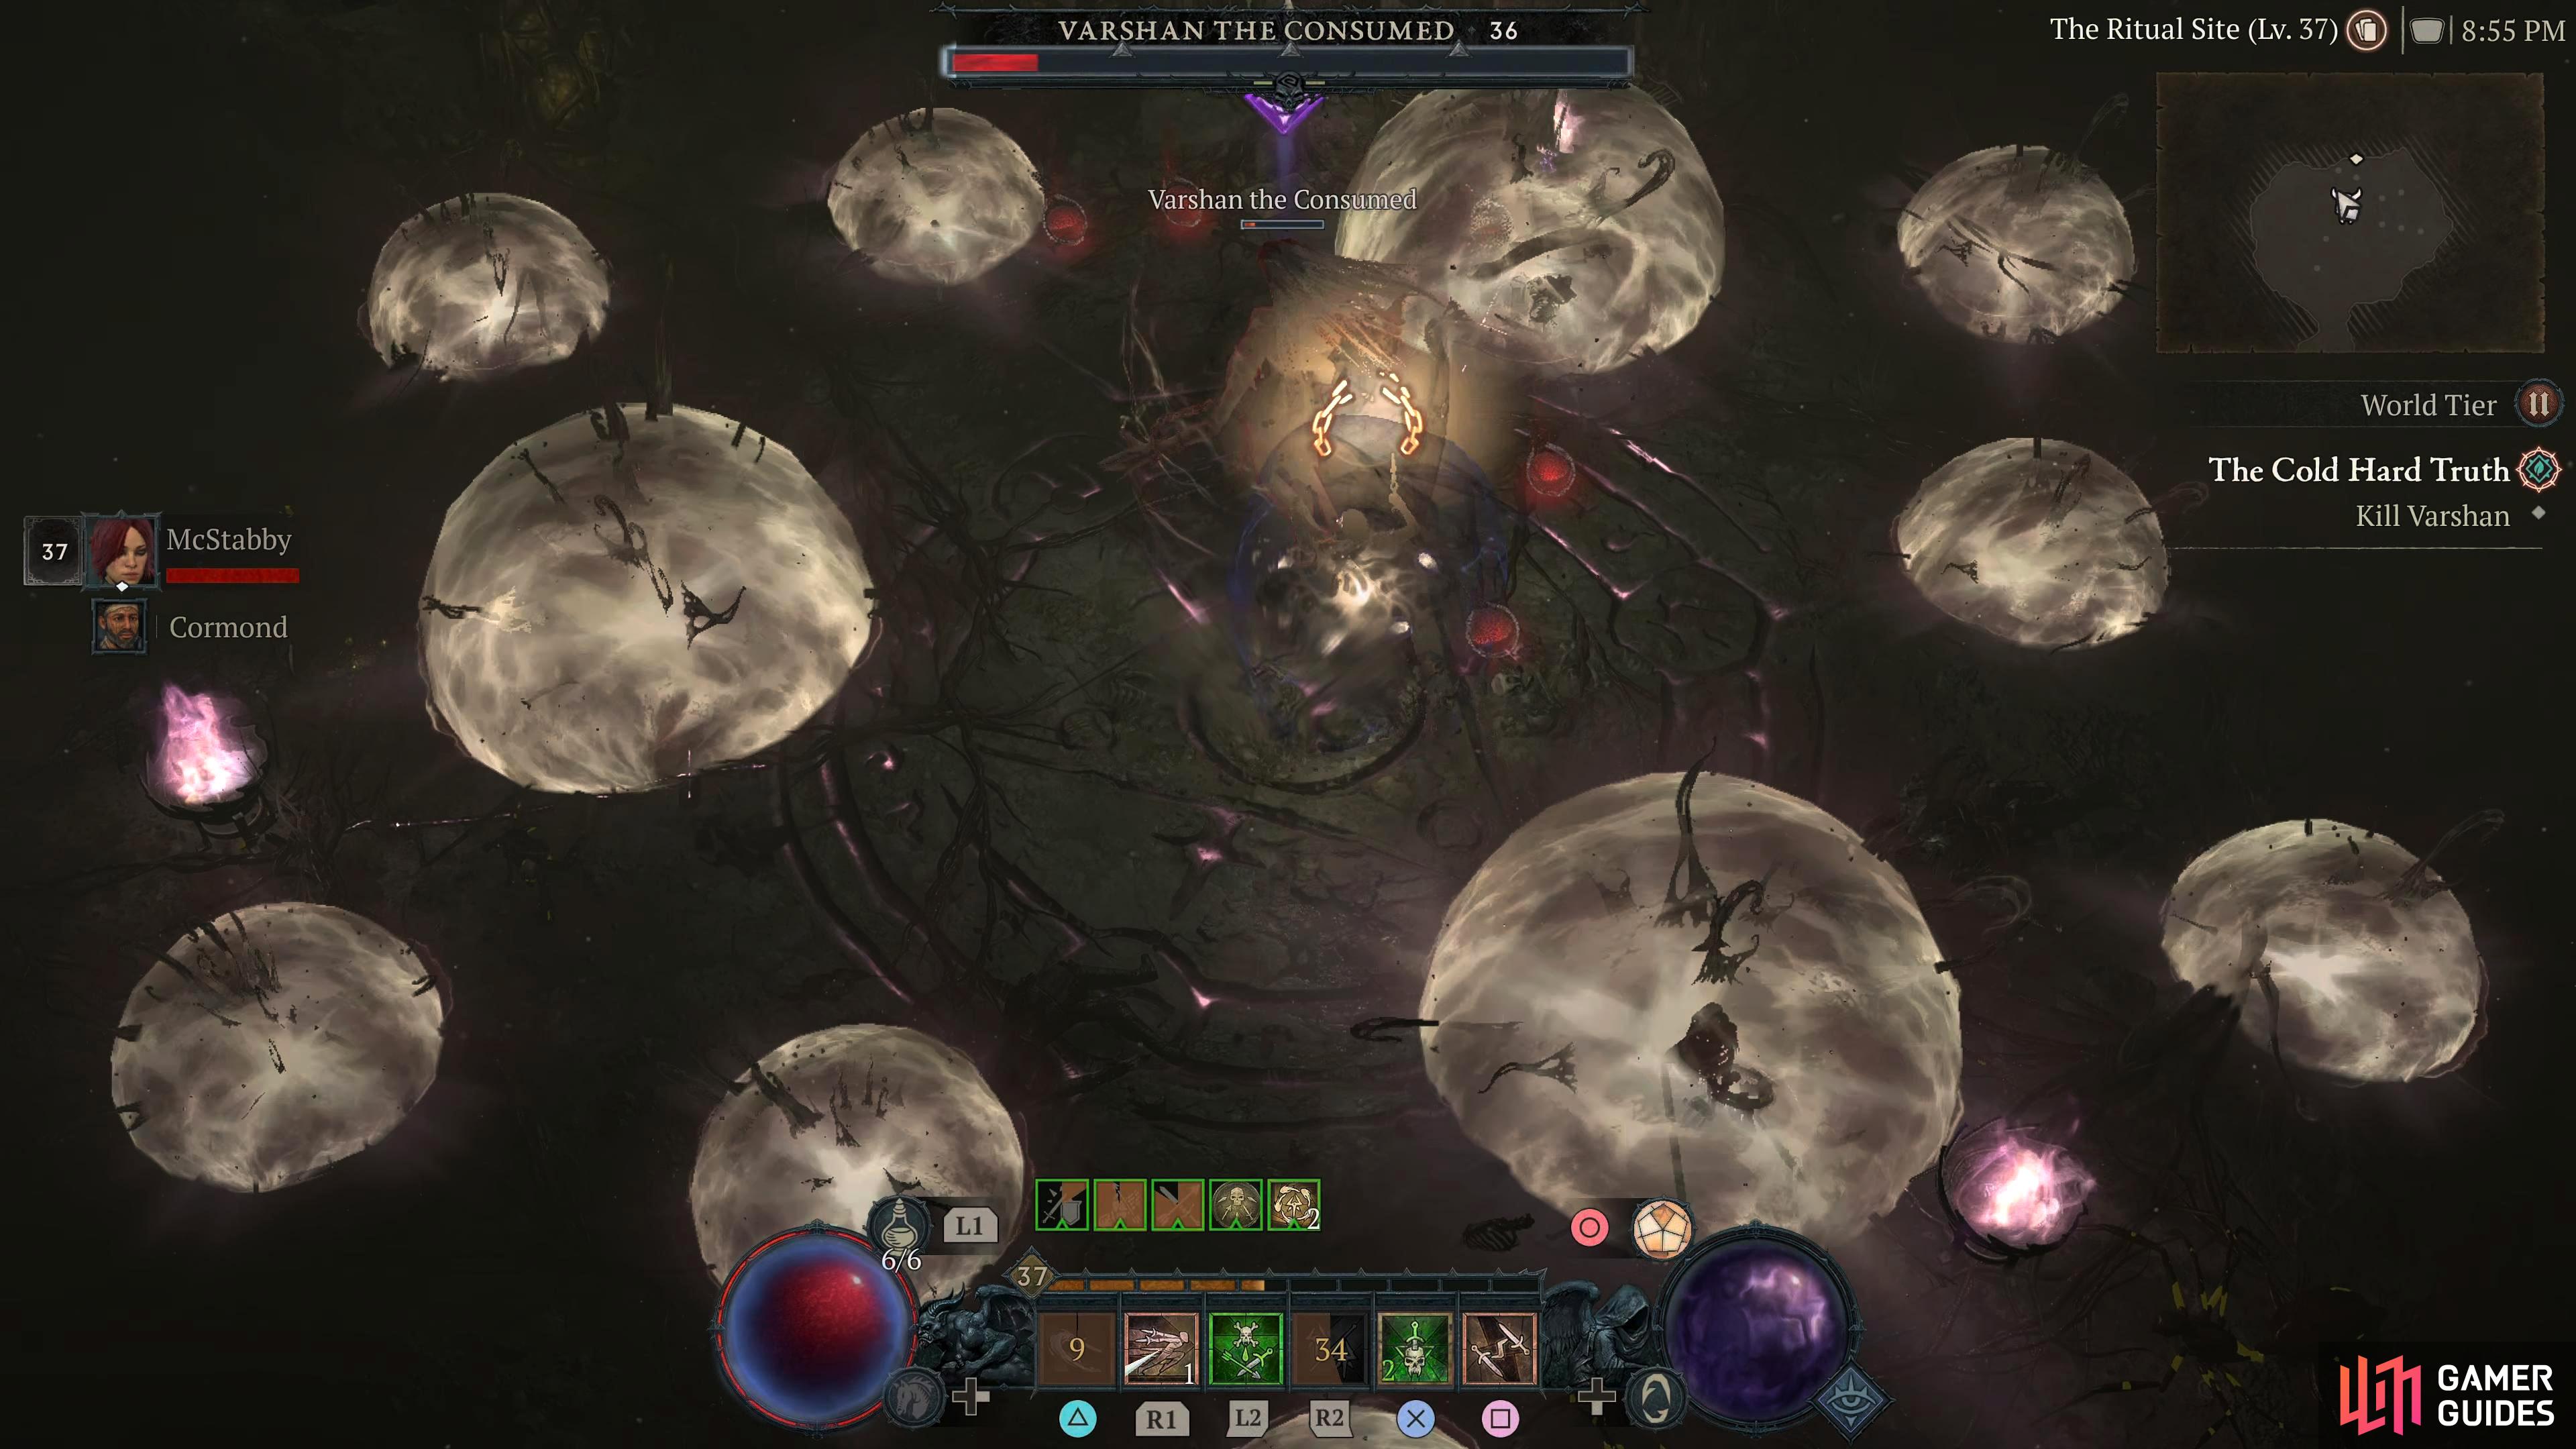
This quest starts off immediately after finishing the Teleport to Kyovashad and leave via the eastern exit then follow the road northeast. If you stay on the road, it will take you straight to Velkhova. When you get there, speak to Cormond, and he’ll ask you to clear out the Malignant from the town. There are three locations where you can destroy a Malignant Corruption, but you’ll only need to destroy one of them. Head to the first one which is just to your right. Attacking these corruptions will lead to you fighting hordes of enemies until the corruption is no more. Focus on destroying the corruption, then mop up the remaining monsters that are left. Once you’ve destroyed the corruption, head back to Cormond. After a short conversation, Cormond will ask you to accompany him to the Velkhova Church. Head a short way east, and you’ll find the Malignant dungeon, Velkhova Church Undercroft. Follow the linear path until you reach the ladder and go down it. Now, you’ll have some enemies to fight on the way to your destination. There isn’t anything special about these monsters other than Malignant elites will sometimes spawn. Eventually, you’ll reach the ritual site where Cormond will want to talk to you. He’ll tell you to prepare the ritual and he’ll handle the rest. There are five Malignant Corruptions to destroy here, but don’t worry, no enemies will appear, at least, not yet. Once that’s done, head over to the three Ritual Incenses, interact with them then head back to Cormond. After the short scene, Cormond will walk into the center of the ritual site to cast purple flames into each incense. He’ll start with the one on the left first, and when that gets lit up, enemies will spawn from that incense. Defeat them and Cormond will do the same again with the incense below him, to the right. Once again, defeat the enemies and Cormond will cast one final flame at the incense in the north. When you’ve vanquished the final group of monsters, Varshan will spawn as a boss. There’s only one thing left to do now, KILL VARSHAN! Varshan The Consumed Boss StrategyThis battle is more or less the same as the first time you fought him, but he’ll have a few more tricks up his sleeves. Expect to see a couple more attacks you haven’t seen while also summoning some elites throughout the fight. You may as well burn down the elites as you can kill them pretty quickly, and they’ll drop some potions when you do. Each time Varshan summons the elites, it’ll be a Devious Triune Admonisher and a random Herald which will have the Vicious, Brutal modifier. The last time he summons the adds, they’ll be a Devious Herald, and a Wrathful Skulker, either defeat the adds quickly, or burn down Varshan to end the battle. Most of Varshan’s attacks will have an area of effect markers on the floor. There’s only one attack to really worry about, and that is the one that starts off with a marker that looks like a radioactive sign, stand in the gap in between the marker, and then another marker will appear where you last stood. Move towards Varshan to avoid that then he’ll finish the attack with numerous small circles covering the arena that’ll explode shortly after. Make sure you’re not standing in a circle, and you’ll be fine. Varshan is a relatively easy boss where you can burn him down pretty quickly, especially if you have access to poison or other damage over time abilities while also having other status effects such as Vulnerable. Even if you don’t, you shouldn’t have many problems as long as you defeat the elites during the battle for their potions. Once you defeat Varshan, the only thing left to do is to capture his heart which is in the center of the ritual site. Don’t worry, you won’t have to fight him again, but you will get some loot as well as his heart. Another item you will get is the Invoker of Varshan which allows you to fight Varshan again. This can only be used at the end of a Malignant Tunnel dungeon in World Tier I and II, however. Finally, speak to Cormond, and he’ll tell you to meet him at his wagon, completing the quest.
In-Game Description
Region
General Reward
XP and Gold |

|
||||||||||||||||||||||||||||||||||||
|
|
A Merciful Fate |
Detailed Location
Immediately after defeating Varshan at the end of the
In-Game Description
Region
General Reward
XP and Gold
Item Reward
1×
|

|