
There are special parameters surrounding the Ultimate Lair that aren’t found anywhere else in the game. Firstly, the Lair only opens on the Extra Day between the end of Day 12 and the Final Day. You can only gain access to the Extra Day by completing a sufficient number of side quests (not Canvas quests). You will need to complete around 40 of them, which, incidentally, equates to almost all of them in the game, before the end of Day 12. Upon returning to the Ark, you will gain an extra day.
After the scenes, a box will pop up explaining about the Ultimate Lair. You can warp straight there from the warp point. Upon entering the Lair, you will be subjected to the following conditions:
- Time does not stop while in battles and Chronostasis cannot be used. Time only stops in menus.
- Each floor up to 28 has a Last One enemy unless already defeated in the outside world.
- Floor 29-32 contain items useful for the final boss
- Floor 33 is the last floor and contains Ereshkigal, the strongest adversary in the game along with Aeronite.
- You can return to the outside world to grab recovery items but you must start from the top again. If you do go back outside, activate Chronostasis to save time.
- Defeating a Last One activates a Cactuar Stone (or if you have defeated them on the outside world, the Stone will already be activated) where, depending on your battle score, you can warp one, two or three floors.
Ultimate Lair Floors and Last One Strategies
Floor 1 - Hoplite Ω
Just do what you have been doing to exploit it’s natural elemental weaknesses to Lightning and Fire. A quick debuff with Deprotect and Imperil always helps too.
Reward - Frostward Bangle.
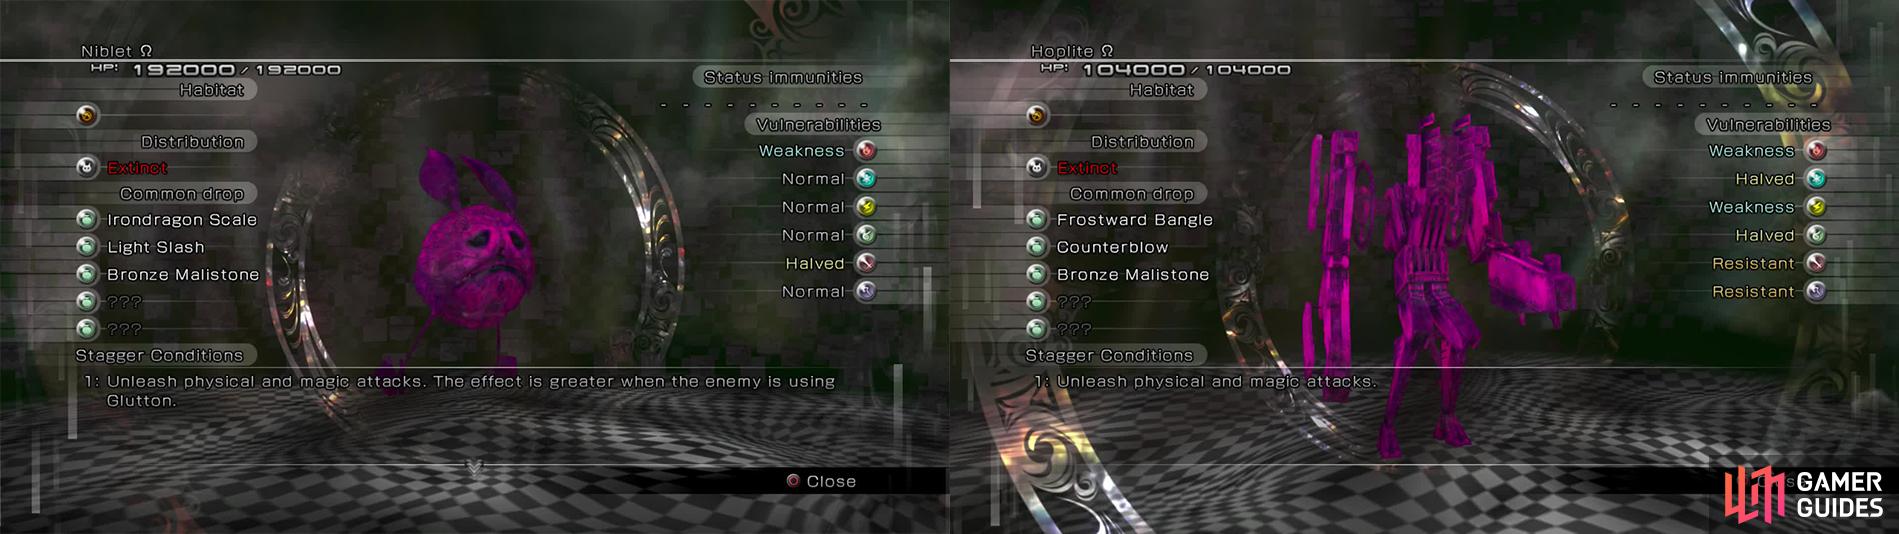
The Niblet Omega will likely be the first one you encounter and it is the weakest one by far. The Hoplite Omega is very easy also.
Floor 2 - Niblet Ω
You really shouldn’t need much help with this one. The easiest Last One in the game and you should have fought hundreds of the blighters to know how to take one out. Exploit its weakness to Fire and it will fall easily.
Reward - Irondragon Scale.
Floor 3 - Zaltys Ω
Equip Chaos’s Revenge and ice spells to your caster schema and inflict Imperil and Deprotect so you can stagger it quickly. Once staggered, launch an all-out assault with your physical schema using Morgenstern and the strongest physical attacks you have. The Soldier of Peace garb allows tremendous power with Artemis Arrows (equip Heavy Slash to use this) and it will make the battle last no more than 2 minutes.
Reward - Fireseal Jewel
Floor 4 - Gaunt Ω
These guys can be a pain because they constantly spam Aerora and Aeroga. If you do not equip Wind-resistance or magic resistance, you will find yourself knocked out before you know it. A high damage-resistant shield like Blasphemy can also help to block the damage (especially if equipped on Quiet Guardian or Splendid Admiral). Equip Lightning-based physical attacks and the Thunderbird Bracelet, then stagger it quickly (or just power through with physical attacks) until it falls. It does not have significant HP.
Reward - Stormward Bangle.
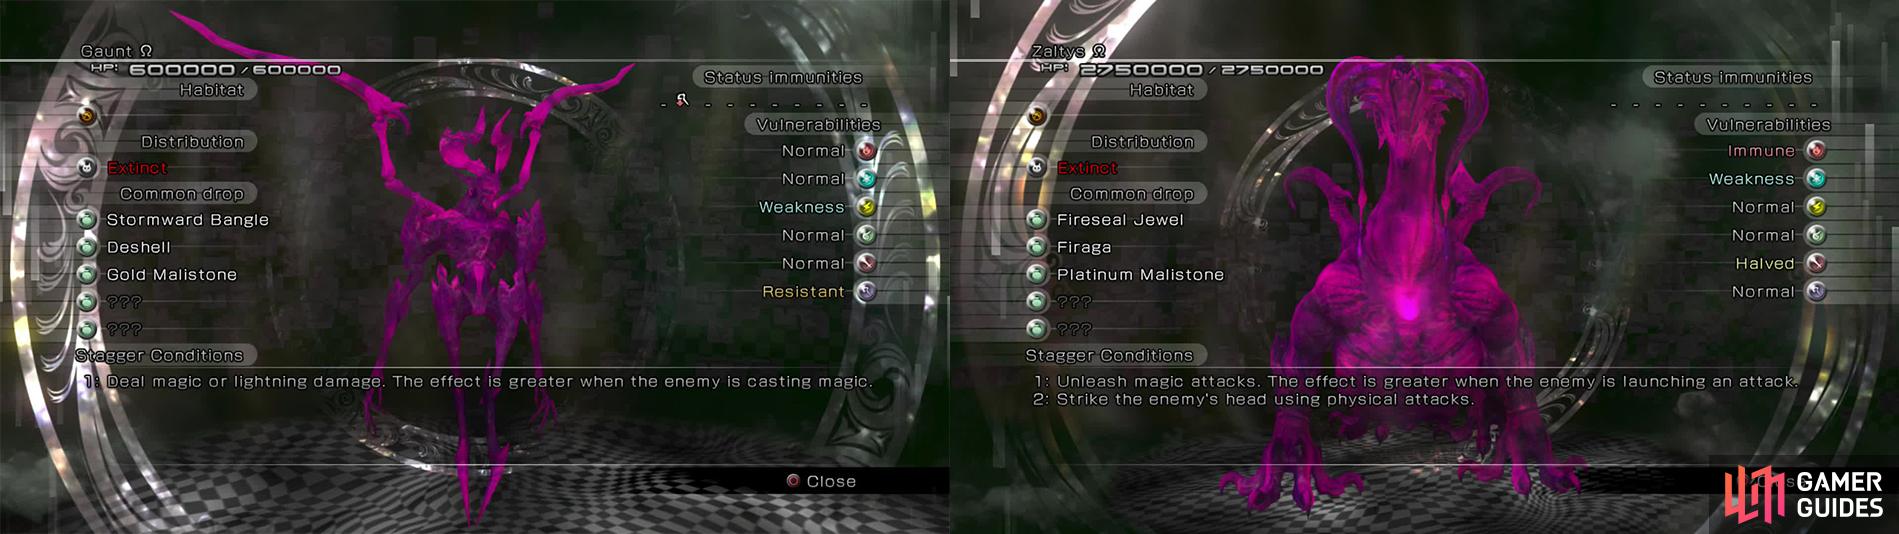
Protect yourself from Wind attacks for the Gaunt and equip Blizzard attacks against Zaltys. Both should be fairly simple to dispose of.
Floor 5 - Gremlin Ω
You should be comfortable fighting these guys by now. Its elemental attacks can hurt quite a bit without magic resistance but after casting Deprotect and Imperil, batter it to submission before it gets a chance to attack.
Reward - Devil Crest.
Floor 6 - Dreadnought Ω
A surprisingly strong enemy to defeat, the Last One has high resistance to everything but Ice elements so equip the Watergod Bracelet and Blizzaga/Blizzara/Flood. Destroy the arms with Heavy Slash/Artemis Arrows, inflict Imperil and Deprotect/Deshell then launch your strongest Ice spells. The Purple Lightning garb is pretty useful for this fight.
Reward - Flameward Bangle
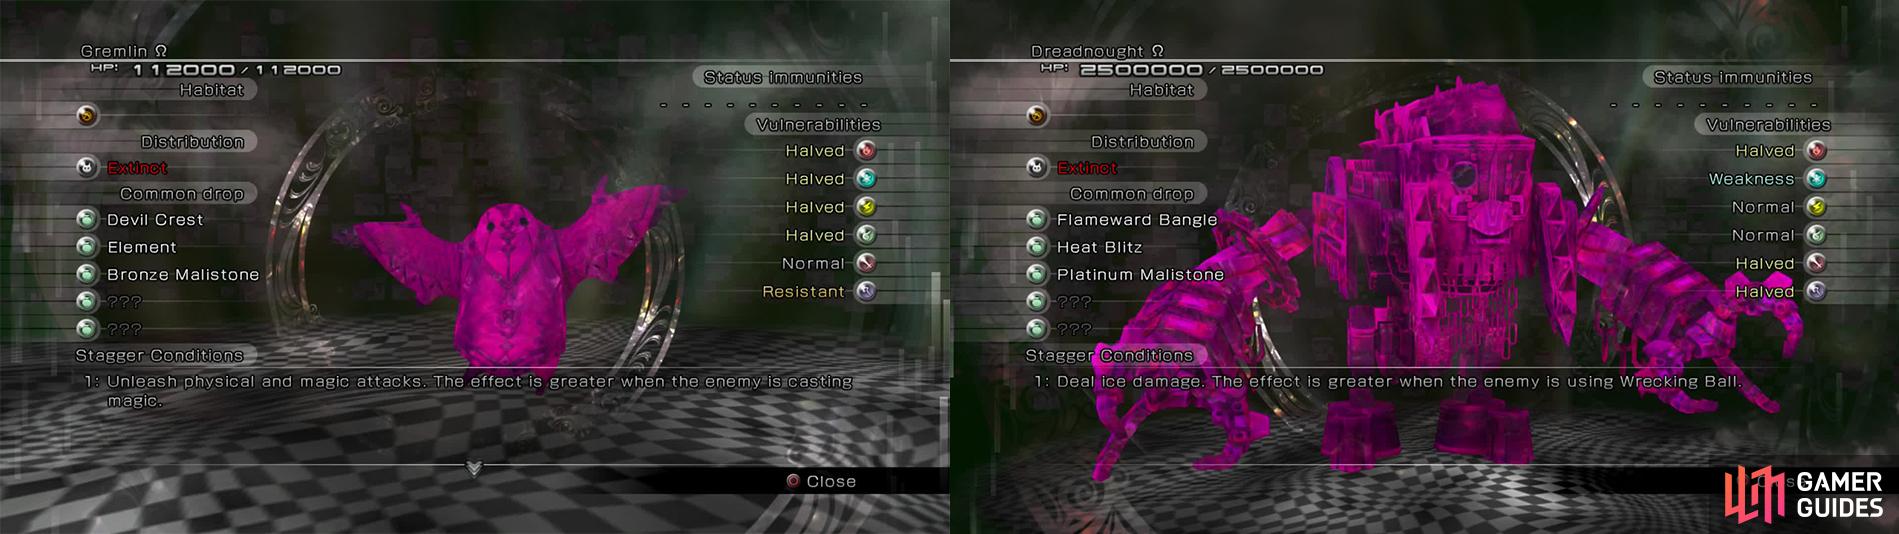
Fighting the Gremlin should be second nature at this point. The Dreadnought is weak to strong Ice attacks so equip Blizzard spells and accessories.
Floor 7 - Gorgonopsid Ω
Virulent Breath should be avoided at all costs as it can be quite devastating. Thankfully, it can be guarded with ease with a strong shield. If it uses War Cry, use Bravery Feeder to steal its buff for yourself and then pummel it with whatever you like. It won’t last long.
Reward - Early-blooming Corsage
Floor 8 - Goblot Ω
Like the Niblet, Goblots are very tame by the time you encounter the Last One. Equip the Satin Scrunchie to avoid the worst of Belch when it opens with this move. Stagger it with wind-elemental attacks and it will fall quickly.
Reward - Dreamdragon’s Scale

Watch out for Virulent Breath when fighting Gorgonopsid. The Goblot is weak to Wind attacks.
Floor 9 - Gurangatch Ω
For a large enemy, the Gurangatch is probably the easiest one of the lot. The Last One is a little harder in that it is more resistant to Stagger and has a lot more HP. Ignore debuffs and head straight for the Stagger using Aerora equipped with Chaos’s Revenge and Beatdown/Jump on another schema. Once staggered, power your way to victory by debuffing and physical attacks.
Reward - Toasty Shawl

Gurangatch is one of the weaker large enemies. Stagger it and it will fall. Ectopudding is very weak to Blizzard spells.
Floor 10 - Ectopudding Ω
Equip Blizzaga, Blizzara and inflict Imperil and Curse at the start of battle. You can then launch Ectopudding repeatedly with Blizzaga and once staggered, it becomes extremely weak to physical attacks.
Reward - Tenacious Ring
Floor 11 - Miniflan Ω
Another very easy battle, throw Lightning attacks at it and watch it crumble.
Reward - Frostseal Jewel

Burn Miniflan with Fire attacks and equip a variety of elemental spells for Aster Protoflorian.
Floor 12 - Aster Protoflorian Ω
Another one better to fight with the Angel before the Lair so you can focus solely on dealing damage and not healing. The Aster Protoflorian is vulnerable to all debuffs so Deprotect, Imperil and Curse as standard are very useful. You may also choose to put on the Ghostly Hood on your defensive schema to tank some of its physical attacks.
As you should know by now, it will change its elemental weaknesses and strengths throughout the battle so you should equip a variety of spells across all elements (or just use Element) to counter this. Throw out whichever spell it is weak to and stagger it. Refresh your debuffs as they will not last as long as normal.
With Imperil on, you can repeatedly interrupt its attacks with Heavy Slash so you won’t be subject to its strongest attacks. You can Overclock during stagger if you wish and it may be necessary if you want 5*. You will replenish all your EP after the fight anyway so nothing is stopping you. Get a level 2 stagger if you can and keep pounding away while remembering to refresh debuffs as needed.
Rewards - Sparkward Bangle
Floor 13 - Schrodinger Ω
This kitty should be a pushover. Debuff with Imperil to interrupt any healing it may do, and then Stagger with Fire attacks. It becomes vulnerable to physical attacks at this point and will merely cower to its death.
Reward - Mage Hunter’s Mask
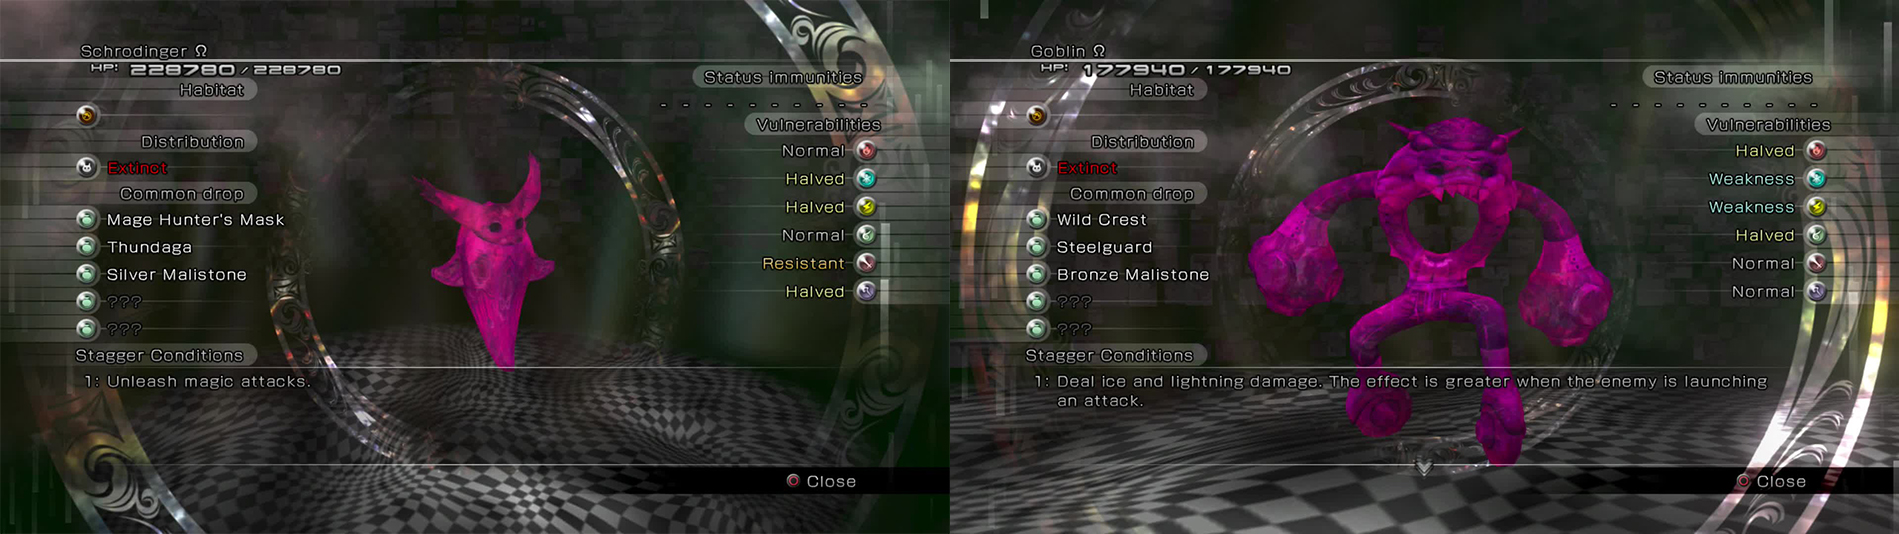
Once Staggered, Schrodinger has no chance. Goblin has a big weakness to Ice and Lightning spells.
Floor 14 - Goblin Ω
Another easy one, simply cast Lightning or Ice attacks to finish it off. Inflicting Curse helps speed things along.
Reward - Wild Crest
Floor 15 - Reaver Ω
Even though the Reaver can be a handful in the early stages of the game, he becomes a mere annoyance later on and the same is true for the Last One. If you equip the Ghostly Hood on your defensive schema you can avoid pretty much all of its attacks. Or if you want to be more offensive, equip shields with good physical resistance and Guard any attacks.
Equip the Thunderbird or Watergod Bracelet, and simply Overclock to victory with strong physical attacks. If you want to conserve EP, then bring along Ice or Lightning spells and opt for a quick stagger. Debuff the Reaver and then continue to Stagger at which point the battle is a formality.
Reward - Flesh Render
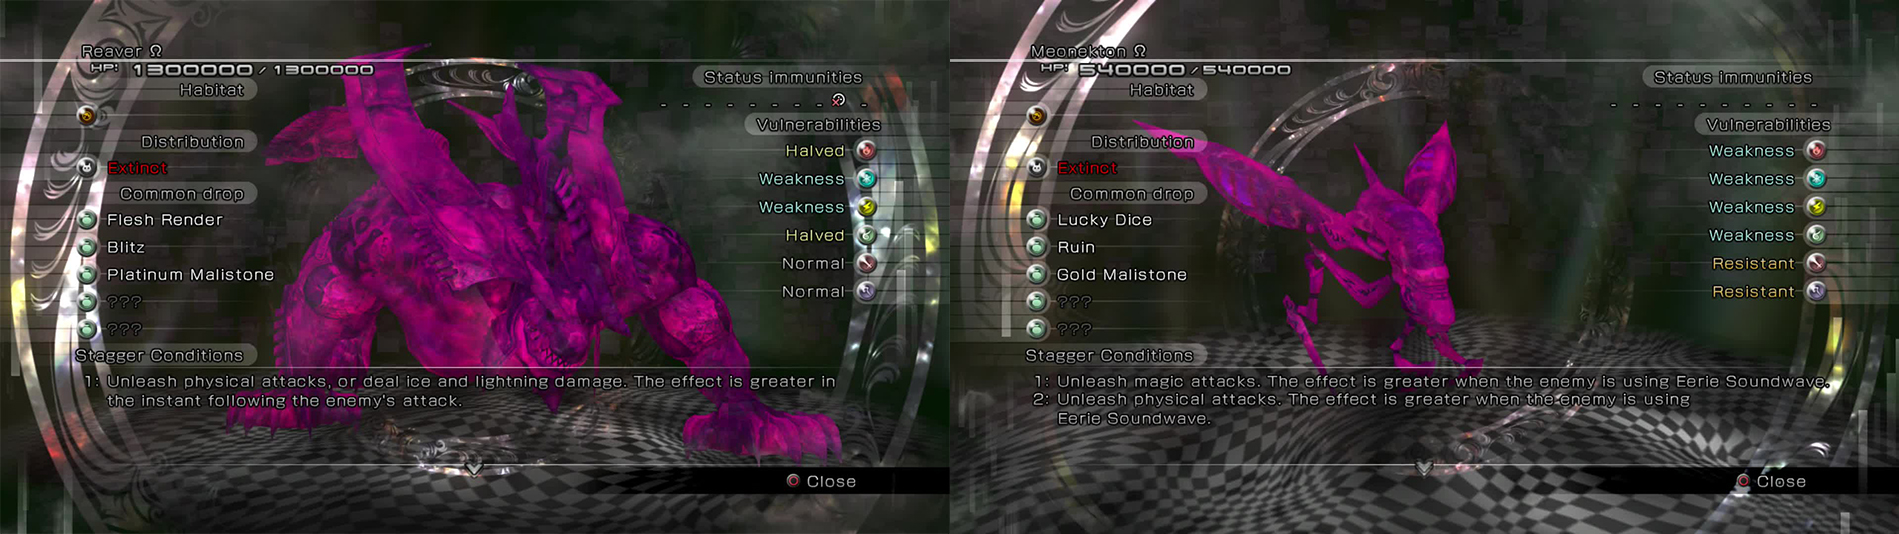
The Reaver, if you equip the Ghostly Hood to block physical attacks, is pretty easy to kill. Watch out for Force Darts with the Meonekton and have high physical resistance.
Floor 16 - Meonekton Ω
The only Last One you cannot kill in the outside world, it has surprisingly strong attacks. Force Darts can really hurt and it can, and will, inflict debuffs using Eerie Soundwave. You absolutely should Guard this attack. During this phase, it will be incredibly vulnerable to Stagger so push for a quick one by throwing all your spells at it. After that, it should be a simple push for victory.
Reward - Lucky Dice
Floor 17 - Cactuar Ω
This little guy will open with Elementa which can be pretty painful unless Guarded and you have decent magic resistance. Equipping the Tri-Point Coronet or Carnival Crusher garb can help with this. After that, simply debuff with Deprotect and Deshell and hammer away with Fire abilities.
Reward - Warrior’s Headband

Use Fire against both Cactuar and Triffid. They have no chance.
Floor 18 - Triffid Ω
Equip the Firewyrm Bracelet to gain an automatic advantage at the start of battle. Quickly debuff and then use Flamestrike and it will fall insanely fast.
Reward - Warrior Hunter’s Mask
Floor 19 - Cyclops Ω
The Cyclops is actually not too difficult because it is very strong, yet incredibly slow. You can repeatedly prevent it from doing too much damage by Perfect Guard and debuffs. Use Splendid Admiral for Transform Bravery and make sure to use a strong physical schema like Dragon’s Blood or Soldier of Peace. Equip your highest strength weapons.
Deprotect and Imperil are the only debuffs you need if you have strong equipment (which you really should at this stage). Equip an elemental physical attack and then Overclock to Stagger. After the initial Stagger, Overclock again to induce another Stagger. Refresh Deprotect if it wears off and just keep Overclocking away until death.
Reward - Destroyer
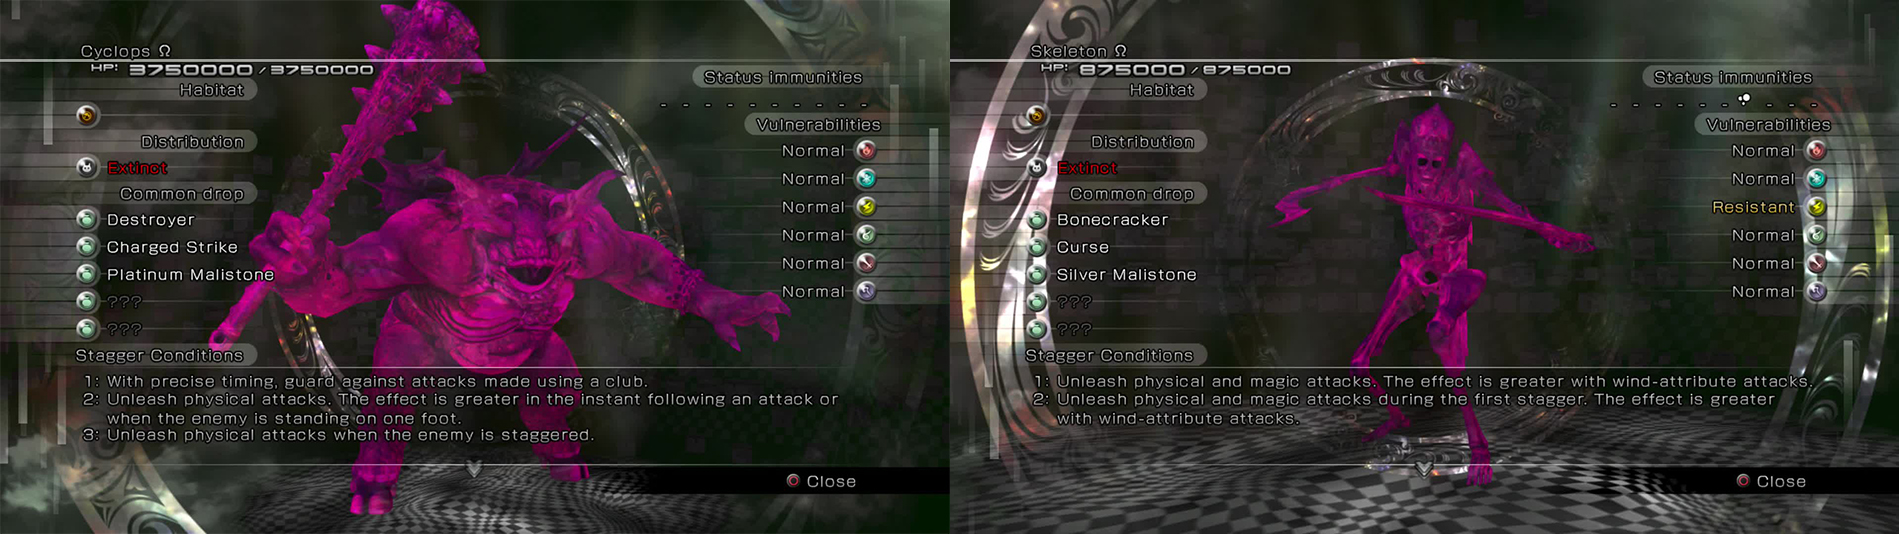
Perfect Guard against Cyclops’s slow attacks to Stagger him. Launch Wind attacks against Skeleton to bring it down.
Floor 20 - Skeleton Ω
You should have already killed this if you completed the quest “Skeletons in the Closet”. Wind elements and Imperil are the way forward.
Reward - Bonecracker
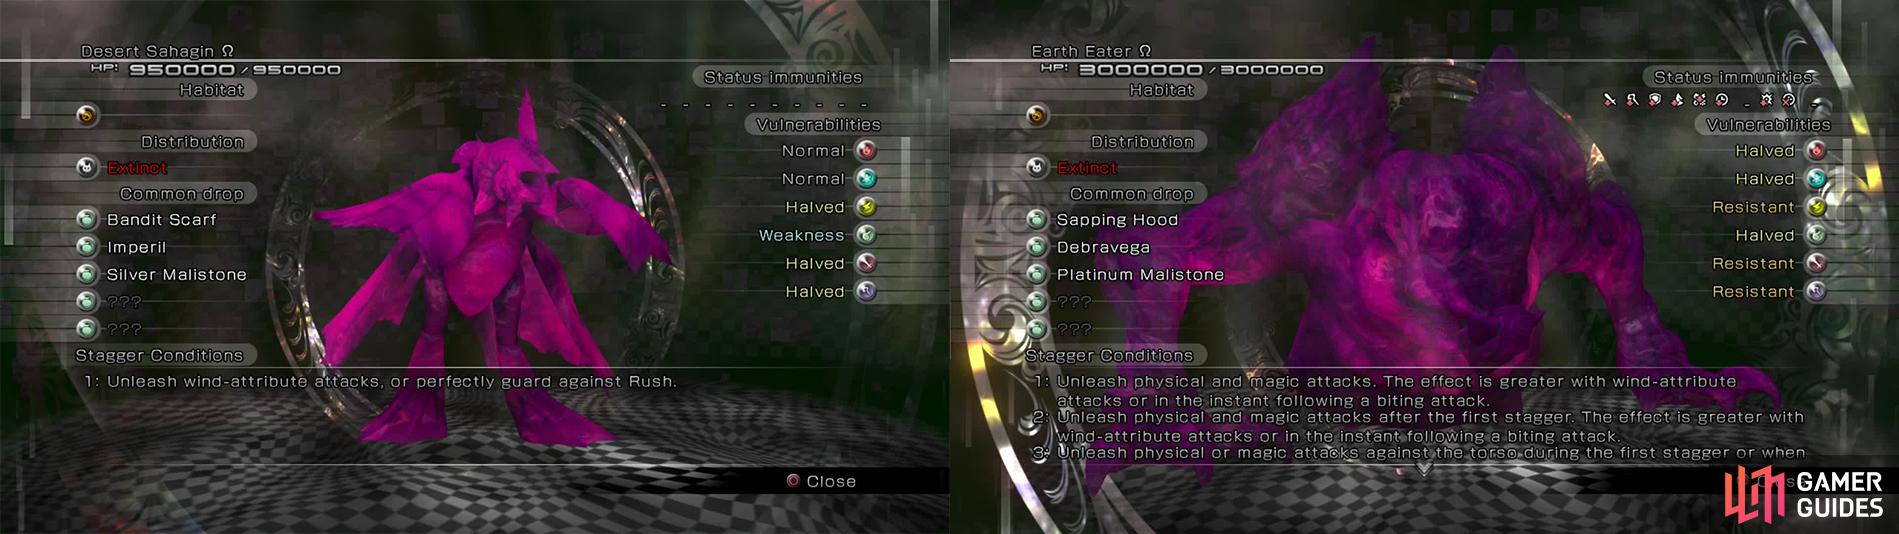
Attack the Sahagin with Wind. You must have strong magic resistance for the Earth Eater. Wind attacks are useful too.
Floor 21 - Desert Sahagin Ω
These guys are a lot easier to deal with when they are alone, so even though the Last One is stronger, it really should not pose much of a problem compared with other challenges. Wait until it uses Rush and Perfect Guard it to induce and immediate Stagger. This will cause Unprotected, leaving you free to launch physical attacks.
Reward - Bandit Scarf
Strong magic resistance is a must on Splendid Admiral. Once Stagger is induced, use Artemis’s Arrows to swiftly reduce Earth Eater’s HP.
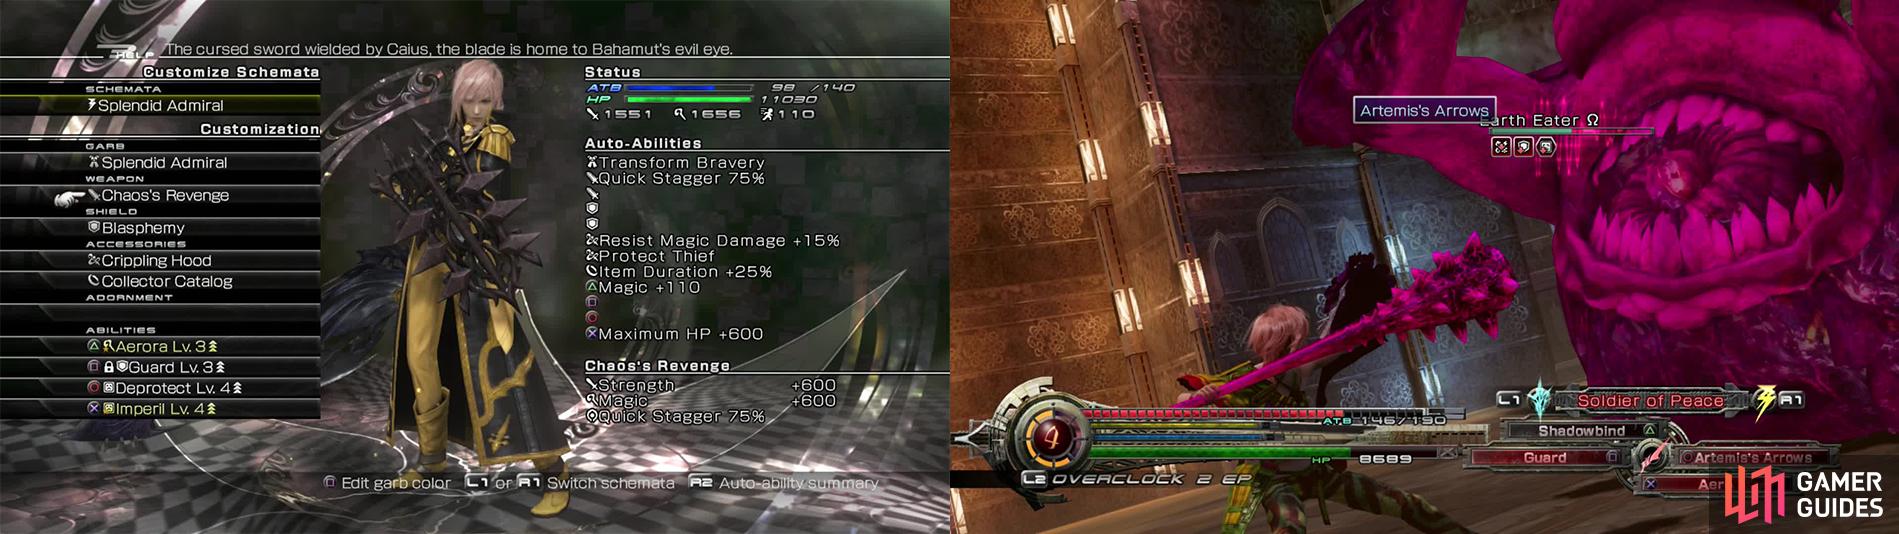
Floor 22 - Earth Eater Ω
The Earth Eater should be left until last if you wish to kill it outside of the Lair. It is the strongest non-unique monster in the game and is a real challenge if you aren’t prepared. You will need a strong physical schema with the ability Hard Hitter. Use the Destroyer from the Cyclops you just killed on the Soldier of Peace garb. The Bandit Scarf allows quick recovery of ATB and Brave Thief and the Enlister’s Gloves augment the damage at close range. Equip Aero just for another boost.
Splendid Admiral is the perfect defensive schema and its Transform Bravery will make things go smoother. Chaos’s Revenge coupled with Blasphemy provide a good balance of offense and defense. The Crippling Hood offers substantial magical resistance and you may also wish to take advantage of Protect Thief. Imperil and Deprotect are essential as is Aerora. This will help you drive up the Stagger Wave quickly as it exploits the Earth Eater’s weakness to Wind.
Finally, another strong physical setup allows you to sail through the battle and maximise damage without giving your foe time enough to severely damage you. Morgenstern, Fighter’s Emblem, Noblesse Veronique and the Dawn Gauntlets make a very strong setup. Galestrike is essential as is a strong Guard just in case.
Trying to cast status ailments at the start of battle is futile because of the resistance Earth Eater has. Instead focus on staggering it as soon as you can with Galestrike, Aerora and Aero. After Stagger, inflict Imperil and Deprotect and then continue with your previous attacks to get to Level 2 Stagger. If you get hit by “ I Don’t Feel So Good ” simply use a Remedy, a buff potion like a Crusader’s Potion or Esunada and continue your assault. Do try and Guard it if you can though as it is very disruptive.
You can choose to push for a quick second Stagger by Overclocking (remember to trigger Bravery with Splendid Admiral once your ATB falls below 10) before doing so. Once staggered, the Earth Eater cannot attack and becomes vulnerable to physical attacks. Unleash Artemis’s Arrows repeatedly by Overclocking during this phase. It is crucial you do this before the phase ends. After a few, you will eventually Stagger it again and it will keel over and you can continue pummelling it to victory.
Reward - Sapping Hood
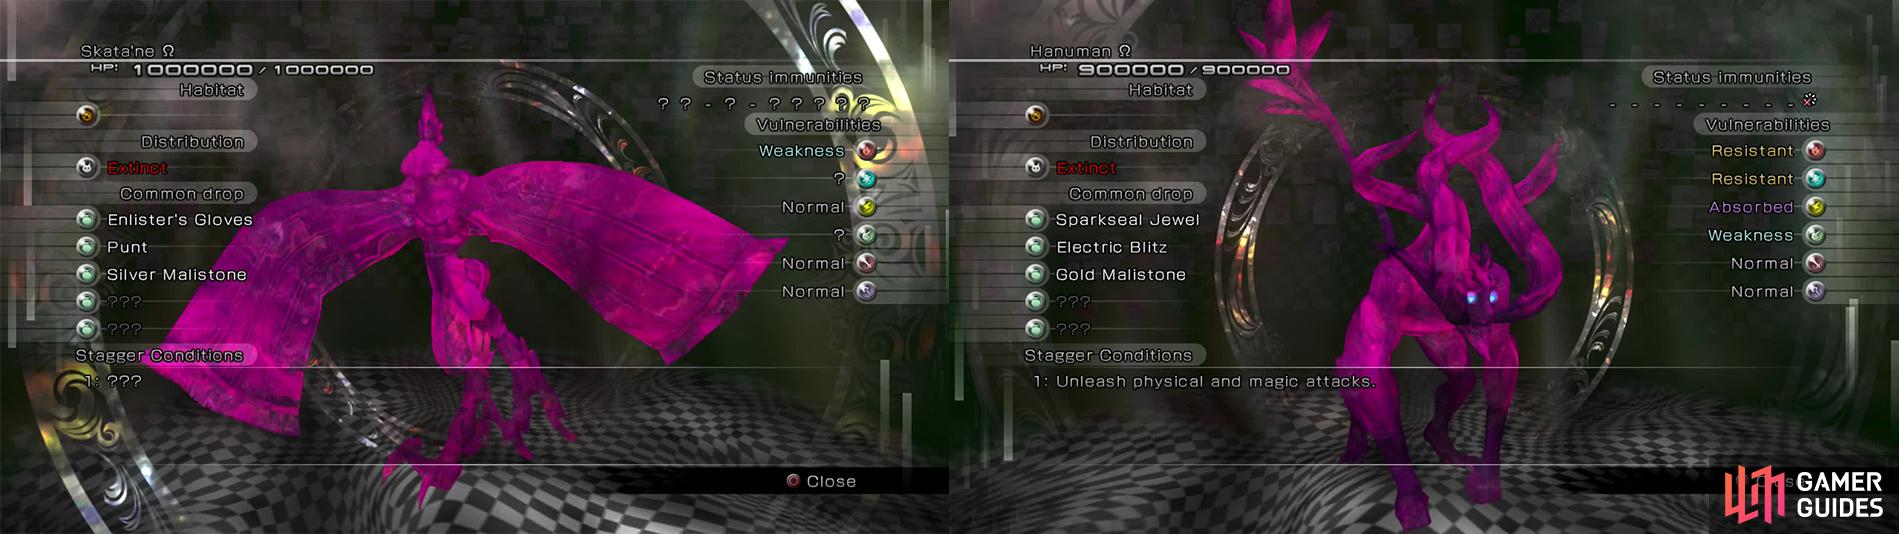
Skata’ne is very weak to Fire attacks. It drops the essential Enlister’s Gloves. Hanuman can be brought down using Wind attacks.
Floor 23 - Skata’ne Ω
The only thing to fear about this enemy is Heel Kick being a lot stronger than normal. It can deal a fair amount of damage even at high levels. Equip the Firewyrm Bracelet and push for a quick stagger with Fire attacks. You should be able to kill it before it does too much damage.
Reward - Enlister’s Gloves
Floor 24 - Hanuman Ω
Without Vali, the Hanuman becomes a mere formality. His attacks are stronger but he should not pose you much of a problem. Equip Lightning attacks and debuff as normal and you should be able to power your way to victory.
Reward - Sparkseal Jewel
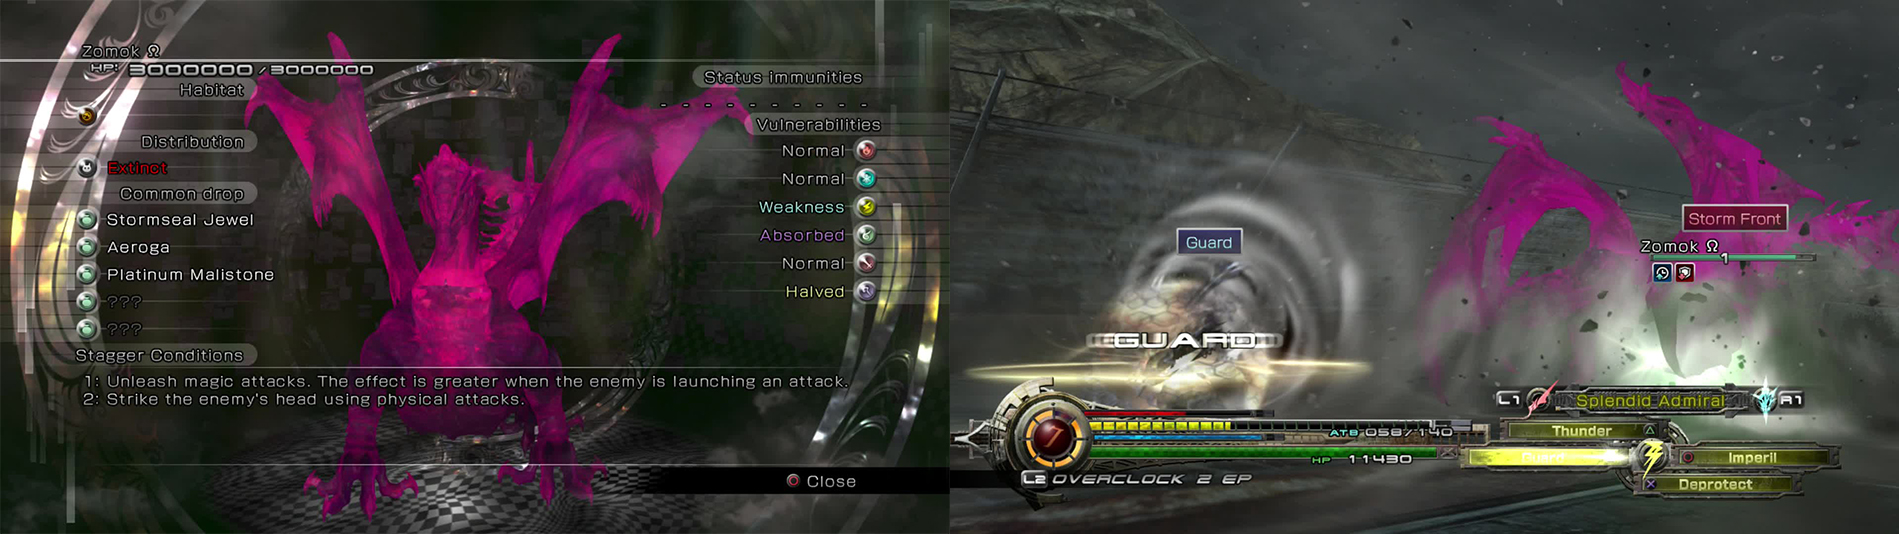
Equip the Stormbane Choker and learn to Perfect Guard Zomok’s rather laborious attacks.
Floor 25 - Zomok Ω
With the Stormbane Choker equipped as well as a good shield, you really have nothing to fear from the Zomok. The Last One is blessed with a fair amount of HP and its attacks are strong but with Guard equipped to all schema (or even just one if you are confident) you should be able to block most of the damage.
The Thunderbird Bracelet, Sparkstrike and Thunder spells (Thundaga especially) are a must for this fight as well as the usual debuffs like Deprotect and Imperil. Use the same equipment you have been using for previous large-scale Last Ones like Morgenstern, Enlister’s Gloves, Chaos’s Revenge etc.
At the start of battle, Zomok will always cast Storm Front so make sure to Perfect Guard it if you can. Cast your debuffs and then proceed to drive the Stagger Wave up with your spells and elemental attacks. Overclock the moment the wave turns red and push it into Stagger. Zomok will suffer from Curse but use Sparkstrike to push it into another Stagger. This will stop it attacking completely. Keep attacking and Overclock once more with Sparkstrike.
After he gets up, he will likely use Heavenly Storm . Switch to Splendid Admiral and back all the way to the edge of the battlefield. Guard the last hit or you will be launched. You should not suffer any damage. Afterwards, return to attacking with Sparkstrike and one last Overclock to finish up.
Reward - Stormseal Jewel
Floor 26 - Dryad Ω
Thunder attacks are your friend against Dryads. You should be well versed in killing them now and the Last One is only a little bit more powerful. Guard against its magic attacks and then batter it to death with ease.
Reward - Sniper’s Gloves
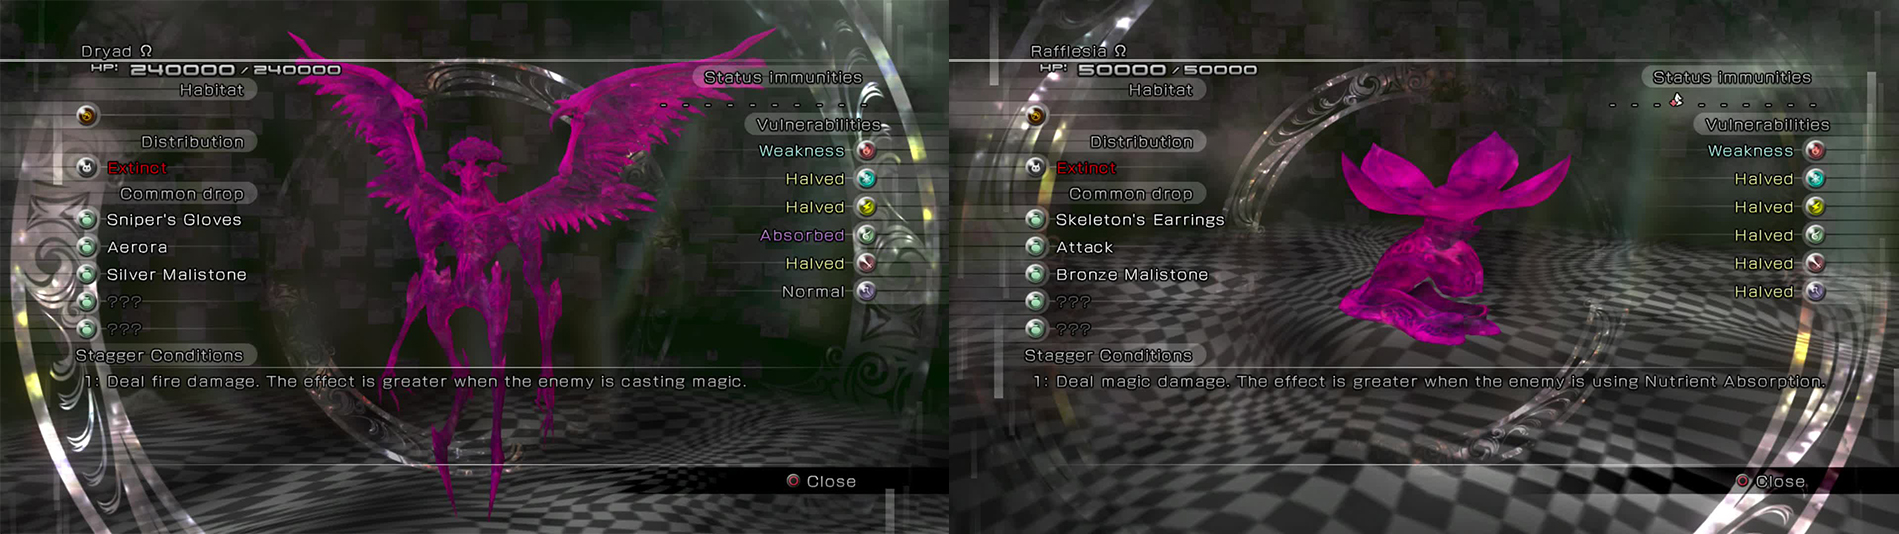
Floor 27 - Rafflesia Ω
When you are used to facing swathes of these things, a lone slightly stronger one will not be a problem. You can simply hack it to death with physicak attacks if you wish. It has no special parameters so do what you will.
Reward - Skeleton’s Earrings
Floor 28 - Chocobo Eater Ω
This one, like most of the others, is definitely better killing while you have the help of the Angel in the Wildlands. It makes no sense to wait until the Extra Day where it has grown stronger to kill it. With the help of the Angel, you should be able to kill it easily.
The Silk Scarf along with the Splendid Admiral garb comes in very handy, as do Thunder spells in general. The Thunderbird Bracelet and an Enthunder Potion or another buffing potion will also be helpful though not necessary. The rest of the setup is the usual mix of powerful physical and magic schema.
At the start of battle, quickly cast Deprotect and Imperil so you can focus on staggering the fiend. Throw your Thunder spells at it until you reach Stagger while blocking any physical attacks it may dish out. If you push for a quick Stagger, you’ll avoid most of the horrible attacks while it is stunned. Staggering with a spell inflicts Unshelled so continue your onslaught with spells.
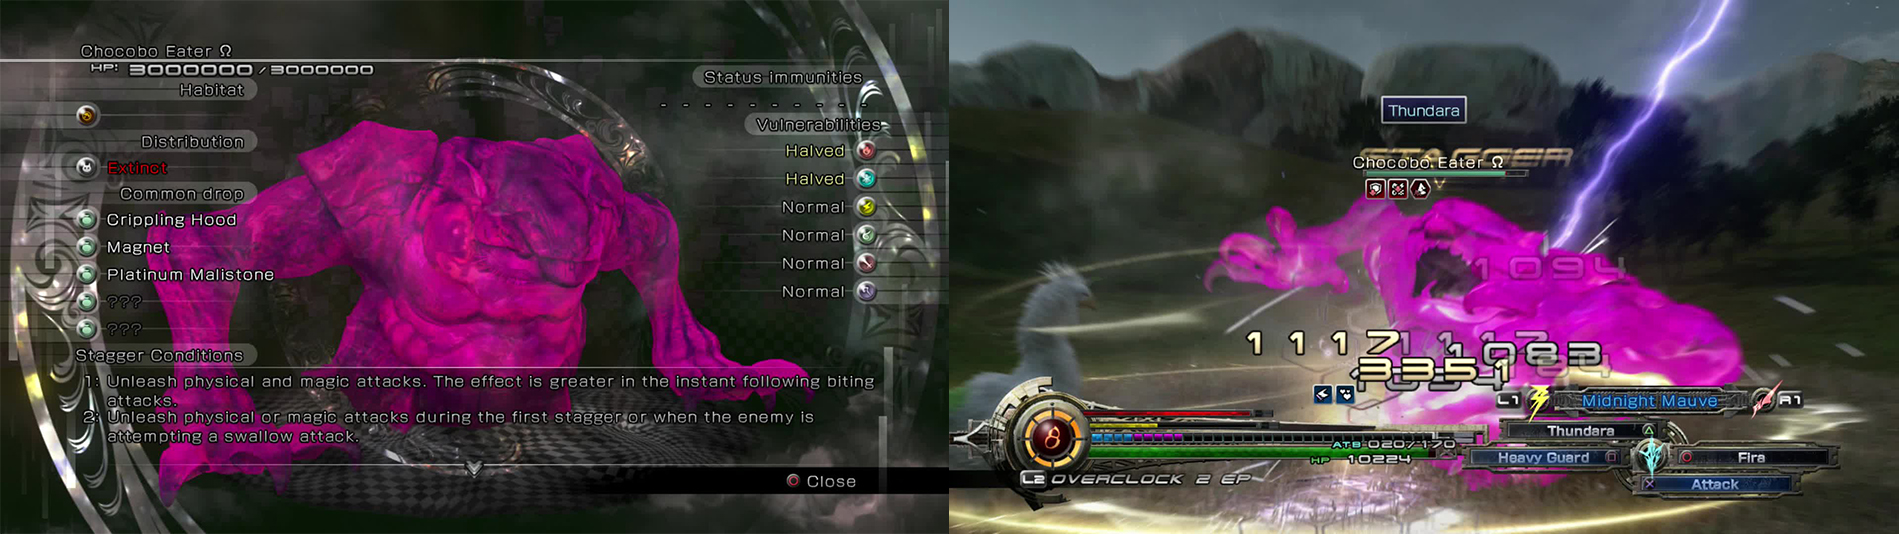
Thunder spells and Enthunder are a must if you wish to finish this fight quickly.
When you have run out of ATB on your magic schema, switch to your physical and strike with Sparkstrike to push the Wave into the red. When this happens, use Heavy Slash to induce another Stagger and Unprotected. Overclock immediately and spam Sparkstrike. Use your ATB up and then Overclock another two times. It should be pretty much dead at this point so just cast a few more spells to finish it off. You will completely avoid “I’ll Cook Them” this way.
If you don’t feel like using all your EP, focus on inflicting Stagger using the above tactics and deal as much damage with Sparkstrike and spells as you can. You may consider the Ghostly Hood on your defensive schema just to mitigate damage from Chef’s Secret and Chomp. The Angel will help heal you anyway. Pushing for the win is better than waiting around at any rate.
Reward - Crippling Hood
Floor 29 - X Potion
Floor 30 - Refresher
Floor 31 - Phoenix Down
Floor 32 - Ether

Goddess of Death
Proof of defeating 10 Last Ones, exterminating forever 10 different species of monster.

30
No Comments