
You’ve done a little bit of sidequesting, which helped procure a few new pieces of gear. However, there’s probably something that’s been in the back of your mind, which are the advanced job classes. It’s about time you tackled them now, but which one should be your first. All of them have quirks to their battles that might prove challenging, but two of them are a lot easier due to a specific strategy (will be outlined shortly). Those two are the Archmagus and Starseer, then following that will be the Runelord and Warmaster.
Preparing for the Advanced Jobs
By now, you should have a good bit of JP saved up on your characters, to the point where you might be able to get a few support skills. Although it might not be needed, but having Saving Grace (the fourth support skill for the Cleric) is very helpful, in case things go wrong. This skill allows you to heal past the max health your character has, allowing for more survivability. The two key jobs for this strategy to work will be the Cleric and Dancer. Specifically, you will want the Dancer’s Divine Skill and the Cleric to have learned Reflective Veil.
Although the fights will leave for more strategy, the basics of this plan involves using Sealticge’s Seduction on the Cleric, then boosting Reflective Veil on your entire party. Since the Archmagus and Starseer are magic-focused bosses, their spells will be reflected back at them. BP is a crucial part of this strategy, so having a Merchant around to use Donate BP on the Cleric is a good idea, although you should have a health supply of Energizing Pomegranates saved up by now. Note that Alfyn is a great ally to have in these fights, due to Concoct being an all-around useful tool for healing, breaking shields, and replenishing BP.
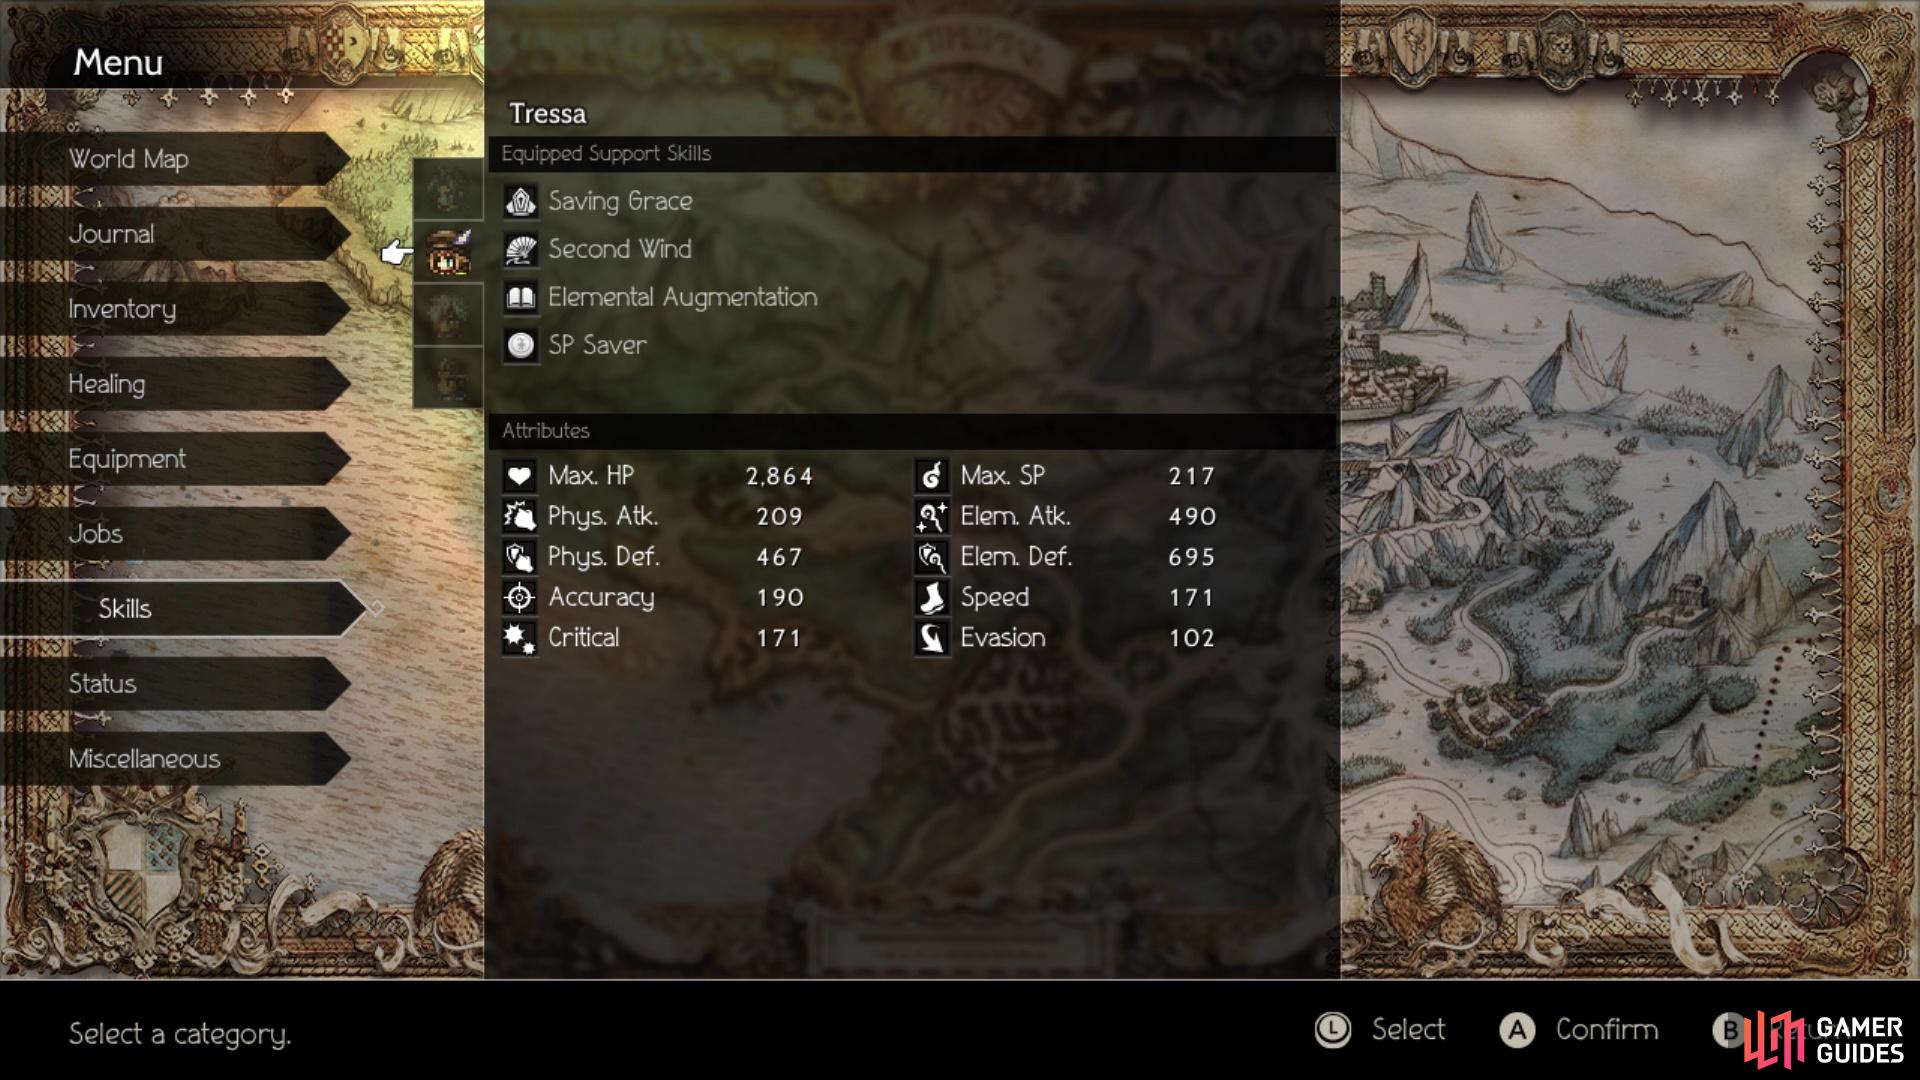
Saving Grace will be the one support skill you will want on everyone for the following battles
Shrine of the Archmagus
First up is the Archmagus, or the Sorcerer advanced job. If you don’t remember where the shrine for this is located, it’s close to Duskbarrow. Exit the town and follow the path normally, until you see some ruins sticking out the left side of a rocky hill, with a chest to the north of it. On the eastern side of this hill is a slightly hidden path that will let you loot that chest and also find the entrance to the Shrine of the Archmagus.
Upon entering the cave, head west from the save point to your north to find a chest that contains an Energizing Pomegranate (L). Return to the save point and continue east, until you find a path that leads to your south, where you’ll find another chest (Shadow Soulstone M). Back on the main path, keep going east, bypassing the split, until you reach another chest at the dead end (20,000 Leaves). Venture all the way to the north, then look to the right to spot a chest there (Revitalizing Jam).
To the west of your current location is the main path, which will bring you to another split. The first path south will lead you back to the east, but the second path south has a chest at the end (Inspiriting Plum M). To your north will be a purple chest, holding a Wizard’s Rod. Head to the end of the dungeon, where you will find the familiar opening with the altar. Approach it and choose to step forward to begin the boss battle.
BOSS - Dreisang, the Archmagus
Dreisang appears simple on paper, but a few skills make it a lot more annoying/challenging of a fight. Dreisang will always open up the battle by using Divine Majesty. What this skill does is make it so you won’t be able to buff your entire party for five turns, although any buffs you might have gotten off beforehand will stay until they run out on their own. This is extremely troublesome, simply because Dreisang can still debuff you without you being able to do anything about it. Note that he can use Divine Majesty throughout the fight, so it’s not just a one and done deal. It also debuffs your elemental and physical attack power.

Dreisang will open the fight with Divine Majesty

All of Dreisang’s spells will hit a total of three times
The upside to the very beginning of the fight is that it can be possible to break Dreisang before he gets his first turn, but it comes down to a bit of luck. He initially begins with four shields and is weak to swords, spears, axes, lightning, and light. Upon recovering from a break, Dreisang will gain three shields, up to a maximum of ten, and change his weaknesses. He has three other sets, which are as follows:
– swords, lightning and wind
– bows, light and dark
– daggers, fire and ice
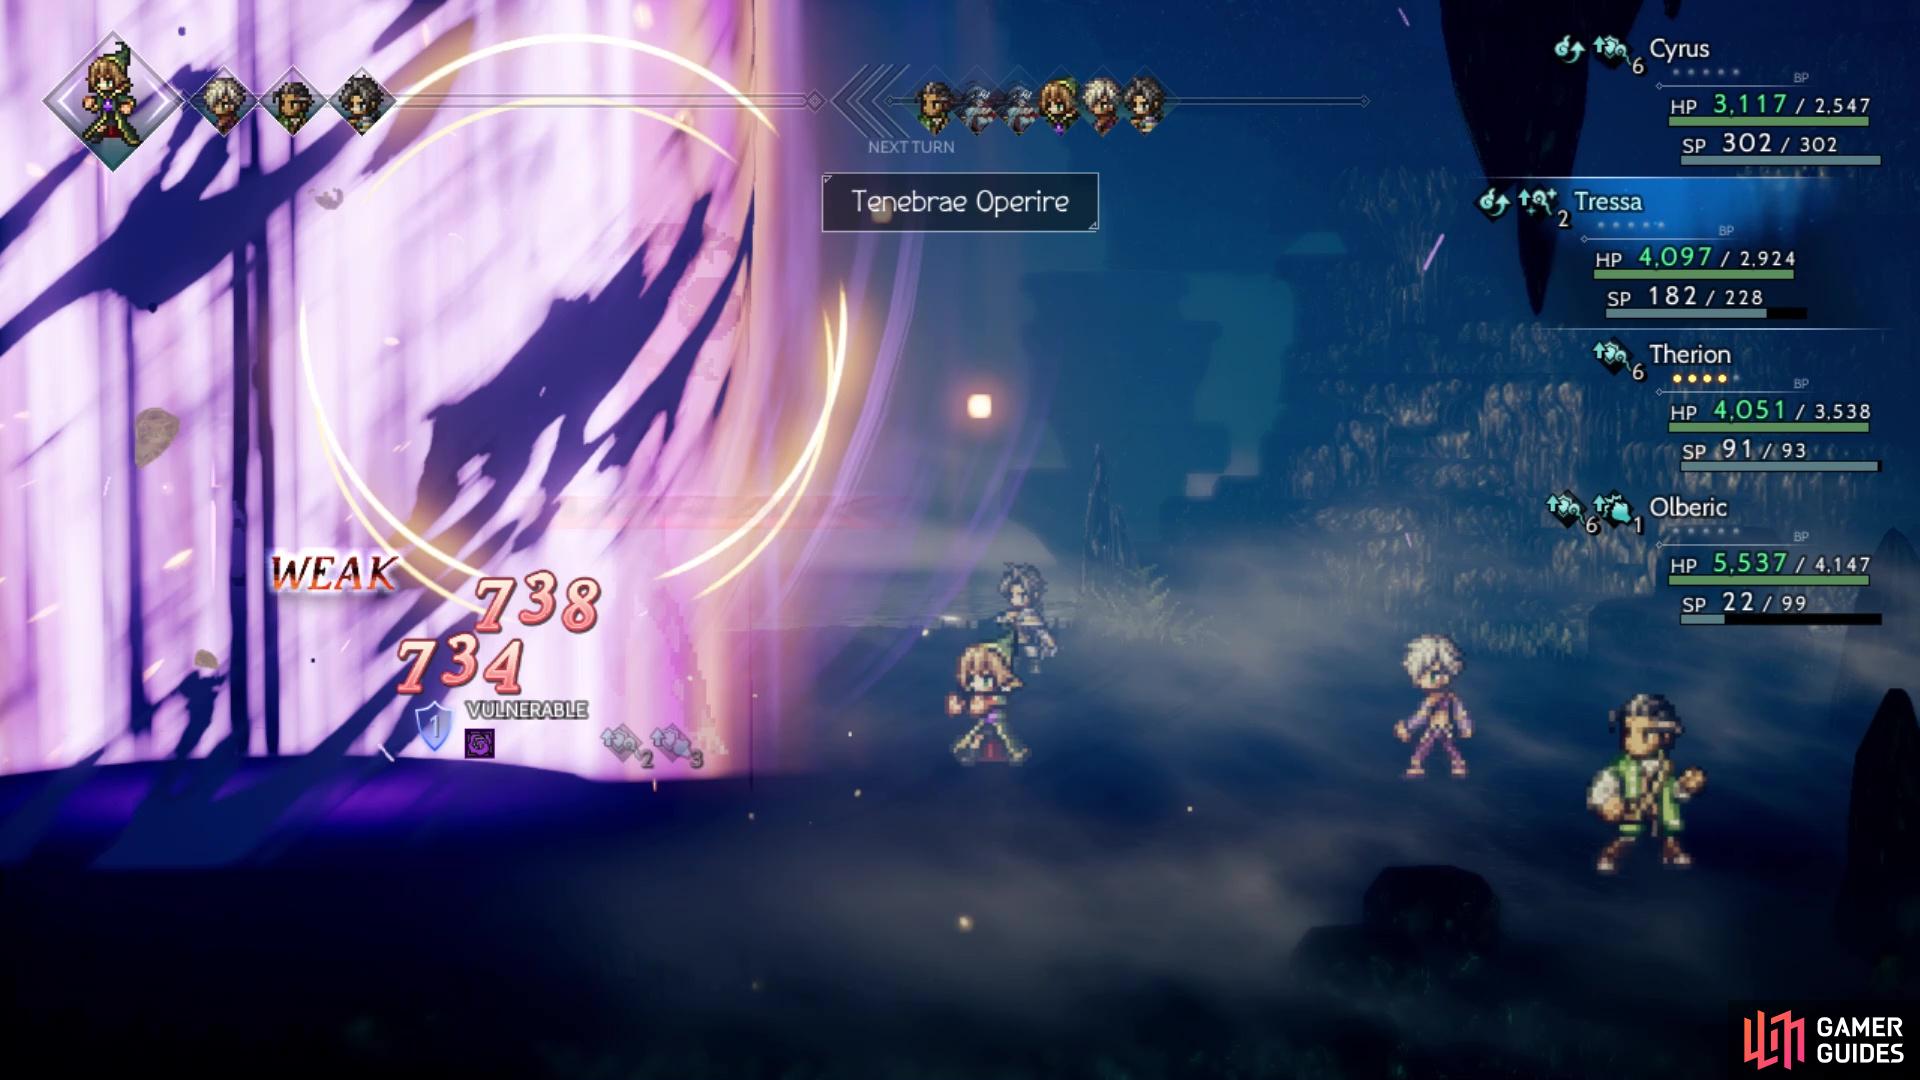
Once you initially break him, Dreisang will randomly switch to any other weakness set, so there is no order. On to his actual moves, being a sorcerer, you know he will be using elemental spells on you. All of his spells hit three times and he has the entire elemental range. Ignis Ardere is fire, Glacies Claudere is ice, Tonitrus Canere is lightning, Ventus Saltare is wind, Lux Congerere is light, and Tenebrae Operire is dark. There is no differences amongst these spells, other than their element, which doesn’t matter to your characters unless you’re wearing damage-mitigating accessories.
Outside of those elemental spells, Dreisang doesn’t have many other attacking skills. Element Break is a staff attack that will debuff a single character’s elemental defense. He also has Element Steal, which doesn’t count HP damage, but he will steal around 35-40 SP from each of your characters. One of the more annoying moves Dreisang has is called Might of the Archmagus, one that buffs his own elemental attack while debuffing your entire party’s. Needless to say, this is a huge boon for him, as his normal spells can do upwards of 1,000+ damage a hit (depending on your defense).
That’s pretty much the entire fight, barring the one new action that can happen whenever Dreisang reaches 50% HP or below. It is here that he will use Extreme Elemental Augmentation. What this does is increase the power of his elemental spells, substituting the second word in each one with Maximus. At their base, they can do around 1,000+ damage a hit, so you know they can put a hurting on your characters if their elemental defense is debuffed or the boss’ elemental attack is buffed. Luckily, breaking him will get rid of it, so once you see him use this move (it has the familiar dark aura), quickly use whatever you can to break him.
And there you have the fight against Dreisang, the Archmagus. By far, the easiest method to dealing with this fight is to use the one briefly outlined under Preparing for the Advanced Jobs above. You will need a Dancer with their Divine Skill, as well as a Cleric with Reflective Veil. As an added bonus, using the Cleric’s Divine Skill will make things a lot easier in the long run. So, to begin this strategy (might need to wait until Divine Majesty wears off if the boss uses it), you want to get enough BP (three) on the Dancer and Cleric, then use Sealticge’s Seduction on the Cleric, as well as have the Cleric use Aelfric’s Auspices on him/herself.

The reflect strategy is a pretty safe strategy than straight-up fighting him
Once that is done, feed BP to the Cleric and on the subsequent turn, he/she will use Reflective Veil fully boosted. If done right, you will have eight elemental reflects on each character. Note that each spell Dreisang uses hits three times, so each character will reflect it three times, using up three of the charges of Reflective Veil. Of course, the spell will be bounced back a total of twelve times, so the damage will be significant on Dreisang. Might of the Archmagus will not be reflected, not will Element Break or Element Steal. Remember that any buffs on characters will stay should Dreisang use Divine Majesty.
If you don’t want to use the above strategy, then Saving Grace is almost a mandatory support skill to have on each character. Couple this with as much elemental defense as you can get to make the battle easier on you. Avoid equipping characters with armor/accessories that have HP regen, as you don’t want this to trigger Saving Grace. Note that the Cleric has Sheltering Veil, which increases a single ally’s elemental defense for two turns. You can combine this with boost and Sealticge’s Seduction to have it cast on everyone. This will help a lot, especially if Dreisang decides to use Might of the Archmagus or Element Break (the former is worse).
For defeating the Archmagus, you will earn the Sorcerer job class, which follows the same rules as every other one. However, each normal skill you purchase costs 2,000 JP, with the Divine Skill still being 5,000 JP. Doing this one first will help a lot with the next advanced job boss, the Starseer.
Shrine of the Starseer
To get to the Shrine of the Starseer, you will be fast travelling to Wispermill in the Flatlands. Exit the town and you should see a save point to your west. To the right of this save point is a red flag, which is your cue to find the hidden path to the immediate right of it. This will leads you straight to the entrance to the shrine.

The path that leads to the Shrine of the Starseer
Once inside, head all the way west, past the split, until the path turns around to a chest on a ledge (Light Soulstone L). Return to the split and go east this time, on the upper path, leading to another chest overlooking the entrance to this dungeon (Inspiriting Plum M). Continue north to another intersection, where you’ll be running west to another chest (Refreshing Jam). Double back to the intersection and go north this time for one final chest, holding an Antidote Stone. The eastern trail at the intersection will bring you to a save point and the altar that starts the fight with Steorra, the Starseer.
BOSS - Steorra, the Starseer
Having the Sorcerer job class will make things a lot easier than doing it without any of the advanced job classes. Also, the same setup in terms of Saving Grace and other loadouts for your characters will work in this battle. The Starseer isn’t too challenging of a boss, although her damage can pile up quite well, especially her single target spells. She will begin the battle with Physical Reflection, which allows her to counterattack any physical attacks with her own that will likely drop the character in a single hit.
That means you do not want to physically attack her while this buff is on her. Luckily, it will go away whenever you break her, so if she doesn’t recast it, then you’re free to smack her with your weapons. Speaking of weaknesses, Steorra is a bit different than other bosses thus far, as the number of shields she has directly ties into the weaknesses she will have. For example, she will always be weak to swords, daggers, fire, ice and lightning whenever she has seven shields. Naturally, with this knowledge, you will know she changes weaknesses and the number of shields whenever recovering from a break. The following is a list of weaknesses, as well as the number of shields she will have in parentheses.
– Swords, Daggers, Fire, Ice, Lightning (7 Shields)
– Dark (4 Shields)
– Spears, Bows, Fire, Ice (12 Shields)
– Swords, Daggers, Lightning, Wind (8 Shields)
The weakness set she changes to is completely random and there is no pattern. To continue with her other moves, Wandering Star is a single-target spell that hits for big damage, plus it has a chance of inflicting Confusion. Baleful Star hits similarly, but it has no ailments attached to it. Shooting Star is the big damage for Steorra, as it hits three times on each party member; each hit is wind/light/dark damage in that order. The last two moves Steorra can do in the initial stage of the fight don’t do any damage. Restore Balance works similarly to Dreisang’s Divine Majesty, except it also removes all buffs and it only hits a single character.

Restore Balance will remove any buffs and prevent you from buffing too

With Sealticge’s Seduction, you can buff your entire party’s elemental defense
Thankfully, she doesn’t really use this skill too often, so it’s nothing you should have to worry about. Song of the Starseer is a buff that she will cast on herself, which increases her elemental defense, physical defense, speed and evasion. Magic doesn’t miss and physical attacks can be voided if she had Physical Reflection up, so evasion shouldn’t matter. Speed can affect her turn order a little bit, but it’s not a huge loss if you ignore it. Also, the defense buffs just mean you deal less damage to her, so they can be safely ignored for right now.
Once Steorra hits 50% HP or below, she will begin added some more stuff to her repertoire of skills. She can buff herself to have three actions per turn, which can make things difficult, but there’s nothing you can do about that. She might use Supernova, which hits everyone for major damage and takes a single BP from them. You might also see Lost Star, a skill that is similar to Wandering Star, but it hits random allies around four to five times (it can confuse). At this point, she can also boost herself (the dark aura), which is followed by Omniscience on her next turn, an elemental attack that hits everyone for a lot of damage. Rarely, she will use Heavenly Protection, a buff that doesn’t seem to go away and allows to her randomly have a chance to nullify damage. Lastly, once she hits 25% HP or less, Steorra could use Ethereal Healing, healing about 10% of her max HP and also granting her a regen buff.
Having Saving Grace is a really good idea for this fight, as it helps mitigate the need to heal so often, especially since Steorra likes to use Shooting Star often. The reflect strategy outlined in the Dreisang fight works here, too, but the only real area-of-effect spell you’ll see often enough is Shooting Star. If you don’t want to try that strategy, having the Sorcerer class will speed things along, especially since there is an elemental weakness in each set. A Scholar and Sorcerer combo will make it so you can destroy five shields on three of the weakness sets. The only one that’s a problem is when she has four shields, since dark is the only weakness, but Tenebrae Operire will make quick work of that.
The Sorcerer’s Tenebrae Operire will make the dark-only weakness phase a lot easier to break
Upon beating Steorra, you will gain the Starseer advanced job, netting you two of the four. Feel free to check out its skills, then it’s time to move onto the third job boss, the Runelord.
Shrine of the Runeblade
To get to the Shrine of the Runeblade, you will need to get to West Everhold Pass. From Everhold, follow the stairs all the way down until you get to the save point. Here, there is a path to the right you can take, with a chest below you. Above this chest, there is a path to the right that you can take that leads straight to the shrine.
Follow the trail in here until you spot a chest below you. Ignore that for now and continue until you see a chest above you, so open that second one for an Inspiriting Plum Basket. Head a little more east, then there will be a path that leads back to the first chest you saw (Healing Grape Bunch). Return to the main path and keep going east, past the stairs, and you’ll see a path leading to the north. Go all the way to the end for a chest (50,000 Leaves), then look for a path on the right side that takes you south to another chest (Revitalizing Jam). Double back to the stairs and climb them all the way to the top to find the altar that leads to the boss fight.
BOSS - Balogar, the Runeblade
Balogar is a fairly straightforward fight, in terms of abilities and gimmicks, although things get a little more complicated, which will be explained. Balogar begins with five shields and will gain an additional two shields when recovering from a break, up to a maximum of nine. He’ll also begin with all five weaknesses available, but on his first turn, he will block three of them, making it so only axes and dark are susceptible (daggers, bows and light are the other three). Note that Balogar can change his blocked weaknesses around during the fight, so be aware of that.
The biggest problem with this battle will come in the form of ailments, as all but one of Balogar’s skills will have an ailment or debuff attached to them. All of the Runes are physical attacks, despite appearing like elemental ones. That means Shackle Foe and upping your physical defense will help a lot in reducing damage. Rune of Flame is the only one that doesn’t appear to have anything attached to it, so it’s purely damage. Rune of Ice can inflict Sleep, Rune of Thunder can inflict Unconscious and Rune of Darkness can inflict Blindness. The remaining two have debuffs on them, with Rune of Wind lowering a character’s physical and elemental defense, and Rune of Light lowering a character’s speed and evasion.
That’s the fight for the most part, until Balogar reaches 50% HP, where he’ll bring up the intensity of the fight a notch or two. At this point, he will use Runestorm, giving him that dark aura like so many other bosses use. What this does is basically make each Rune a party-wide attack, so everyone will get hit. In addition to the damage, you also have to contend with the ailments/debuffs, plus it doesn’t go away upon breaking him, so he will retain it for the remainder of the battle. The upside to him using Runestorm is that all of his blocked weaknesses will now be available for hitting.

Balogar can switch up his blocked weaknesses

Runestorm makes his normal Rune attacks hit the entire party
The majority of the fight is contending with the damage and ailments/debuffs, with one more move that isn’t too bad. Whenever you see “All of the elements are united” appear on your screen, that means Balogar will use Runelord’s Resolve on his next turn. This skill hits a single character six times, one for each element, but breaking him will negate this move from happening. One of the best things you can do for this fight is have a Dancer use Sealticge’s Seduction on an Apothecary, then use Rehabilitate on the entire party (fully boosted, too).
This will protect the party from the ailments, although you will still be susceptible to stat debuffs. Of course, you could also apply this strategy to the Starseer’s Celestial Intervention, which will block you from being affected by the debuffs, too, but other than the physical defense from Rune/Runestorm of Wind, the other ones aren’t too threatening. As already mentioned, if the damage is actually a problem, the Thief’s Shackle Foe works wonders, as does upping your physical defense.
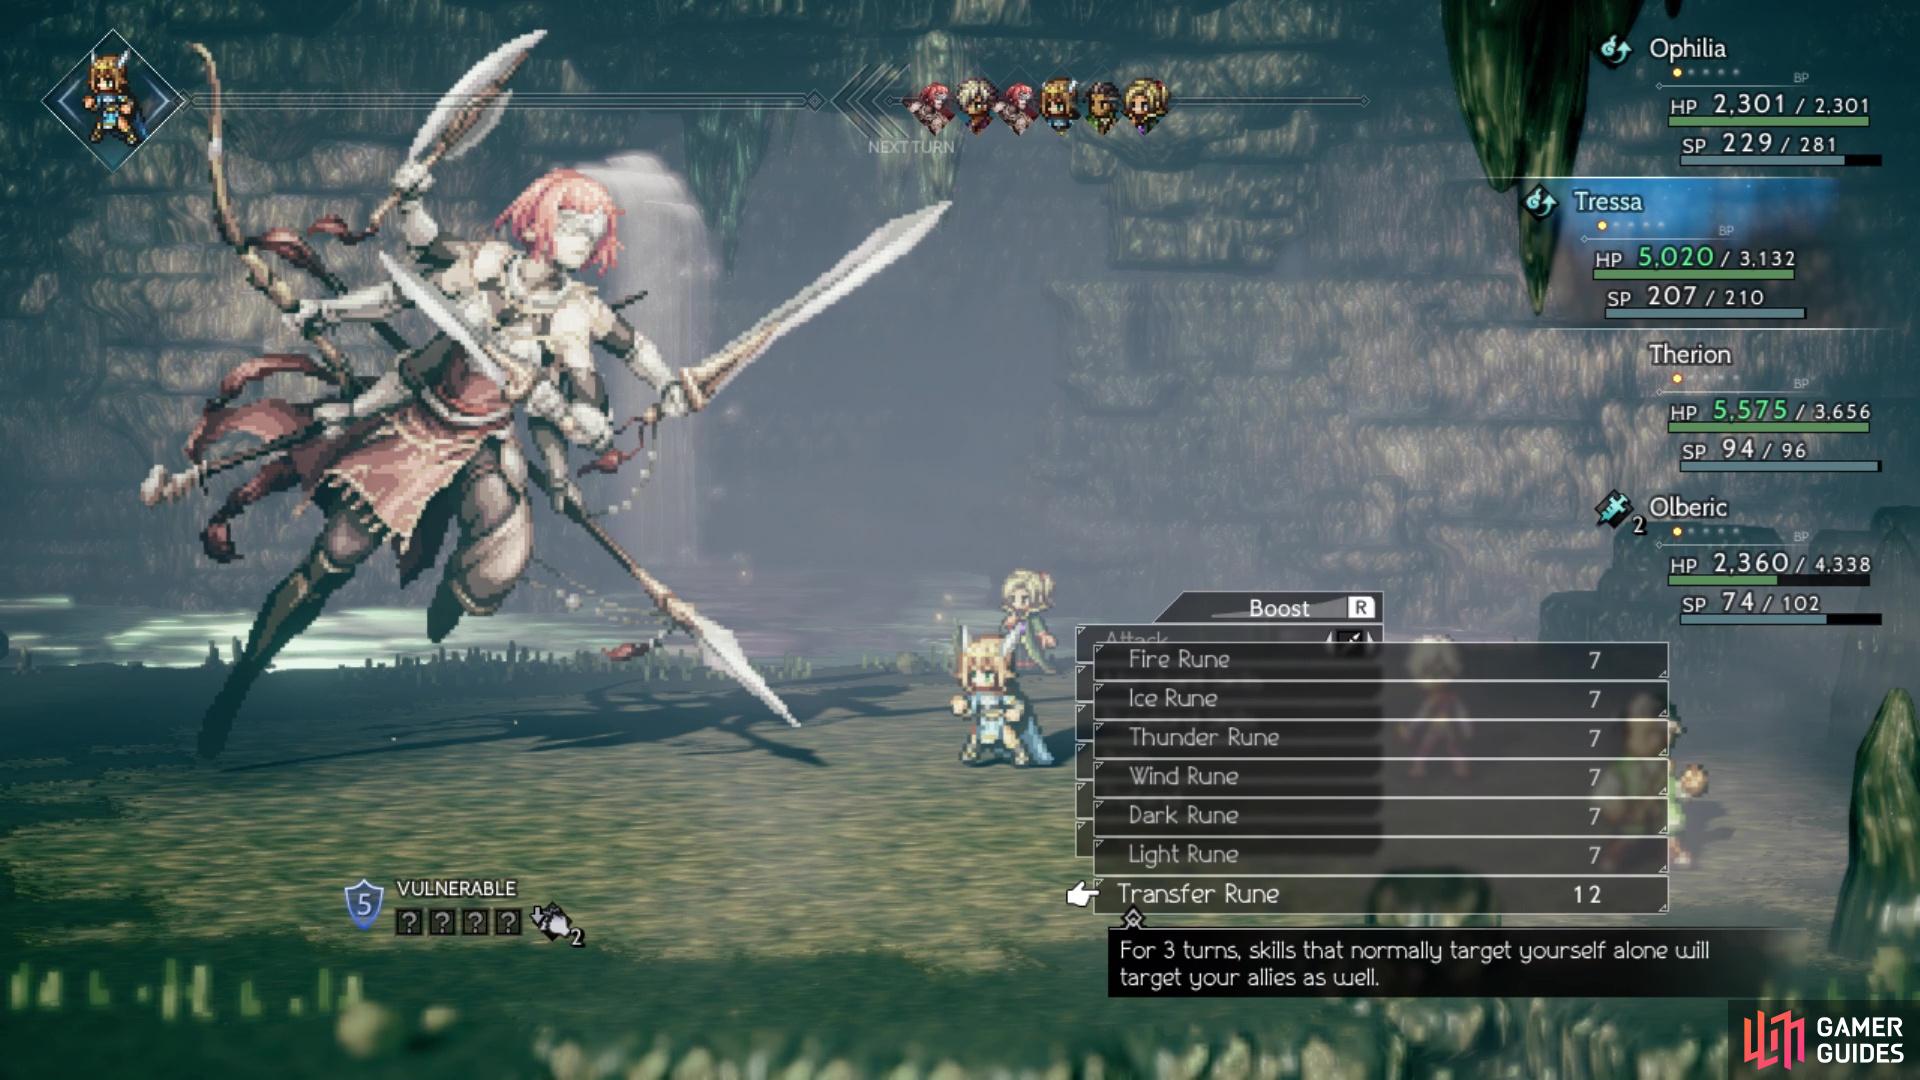
Upon defeating Balogar, you will receive the Runelord advanced job. Unlike other ones, this one seems almost tailored for Tressa. The reason for this is that Transfer Rune, one of its skills, can be used to apply Sidestep or Rest to the entire party. This is one of the more powerful setups for physically-attacking enemies, which just happens to be the final advanced job boss.
Shrine of the Warbringer
To find the Shrine of the Warbringer, head to Riverford and exit the town. Continue straight west until you spot the bridge going north, but don’t head in that direction. Head south to find a “hidden” path that will lead you to the Shrine of the Warbringer.

South of the bridge is where you want to go to find the Shrine of the Warbringer
Follow the path until you come to two relatively close torches, where you want to look southwest to find a hard-to-see path that leads to a chest (Inspiriting Plum Basket). Take the upper trail above you to another split, where you want to venture northwest to a chest (Herb of Revival). Continue north on the main path to another fork in the road, heading northeast to eventually reach a chest (Refreshing Jam). Return west, then go north and east to open the purple, locked chest you can see to your north (30,000 Leaves). Venture west now, and as the path is turning south, you can pass through a secret passage by the plant along the way to find the last chest in this small dungeon, on a ledge overlooking the final stretch (Revitalizing Jam). All that’s left is go down and around to the altar where you’ll confront the boss.
BOSS - Winnehild, Warbringer
Winnehild is considered the toughest out of the four advanced job bosses. Unlike the others, she is all physical, so make sure you stack physical defense on your characters while choosing a Thief and Merchant for their debuff and buff, respectively. She does a lot of damage, so you will always want the physical defense buff active on your party, as well as the physical attack debuff active on her. The first phase of the fight is fairly normal and not too bad, but once Winnehild reaches 50% HP and lower, things will begin heating up.
Winnehild starts the fight with five shields and is weak to staves, ice, wind and dark. Upon recovering from a break the first time, she will have eight shields, then a total of twelve shields when she recovers from the second break. Luckily, she doesn’t do much besides the same attacks for the first half of the battle, with the only annoyance being Yatagarasu. This attack hits twice on a single character for some heavy damage, plus it has a chance to inflict Poison. Phoenix Storm will randomly hit your characters for medium to high damage a total of four to six times.
Tiger Rage is a single-target attack that hits pretty huge, upwards of 2,000+ damage against a 550 or so physical defense rating, with no buffs/debuffs. The last move you will likely see during the first phase is Counter Position. Winnehild will counter a single physical attack whenever she has this buff on her, with the character likely dying in the process. Thankfully, Counter Position will drop upon breaking her, so stick to elemental attacks whenever she uses this. As you can see, you shouldn’t have too much trouble with the first half of the battle, but things get hairy starting with the second half.
At 50% HP (yellow name), Winnehild can cast a permanent buff on herself to grant three actions per turn. It is also at this threshold that she will begin introducing some new attacks. Guardian Liondog is a party-wide attack that hits for medium to large damage. Fox Spirit, although a little on the rarer side, hits a single character for big damage, plus it has a chance to inflict Unconscious. By far, the most threatening move is called Qilin’s Horn, doing around the same damage as Guardian Liondog, but this one can debuff your characters’ physical and elemental defense.
While the elemental defense is useless, with a debuffed physical defense, Winnehild will have a field day with your party. A lot of her attacks can likely one-shot your lower HP characters if their defense is debuffed, meaning you’ll have a hard time recovering. To make matters worse, Winnehild can boost herself to give her a total of six actions on the next turn. If you wish to avoid certain death, you will quickly break her (or try to) before she has a chance to use them all. Once she reaches 25% HP, she can do a different boost, where she says something along the lines of “Behold the ultimate warrior!”
This will be followed up with Warcry, a move that does six physical attacks on all characters. This will undoubtedly KO the low HP characters, or everyone if you haven’t healed past the max with Saving Grace. She will also change her weaknesses whenever she gets ready to get Warcry, which are swords, fire, lightning and light. Saving Grace is definitely the one support skill you want on everyone, as the extra HP will help in surviving the boss’ attacks. Additionally, the Thief’s Shackle Foe and Merchant’s Hired Help (Mercenary) are almost required to minimize the amount of damage your party will take so they don’t get taken out completely.
There is an easy way to win this battle, which involves assigning the Runelord class to Tressa. This class has a skill called Transfer Rune, allowing it to make skills that target oneself to target the entire party instead. Use this in conjunction with the Merchant’s Sidestep to extend this to the entire party. Of course, boosting it will make this combo even more effective. Keeping Transfer Rune + Sidestep up the entire fight makes it a joke and you don’t really need to do much else.
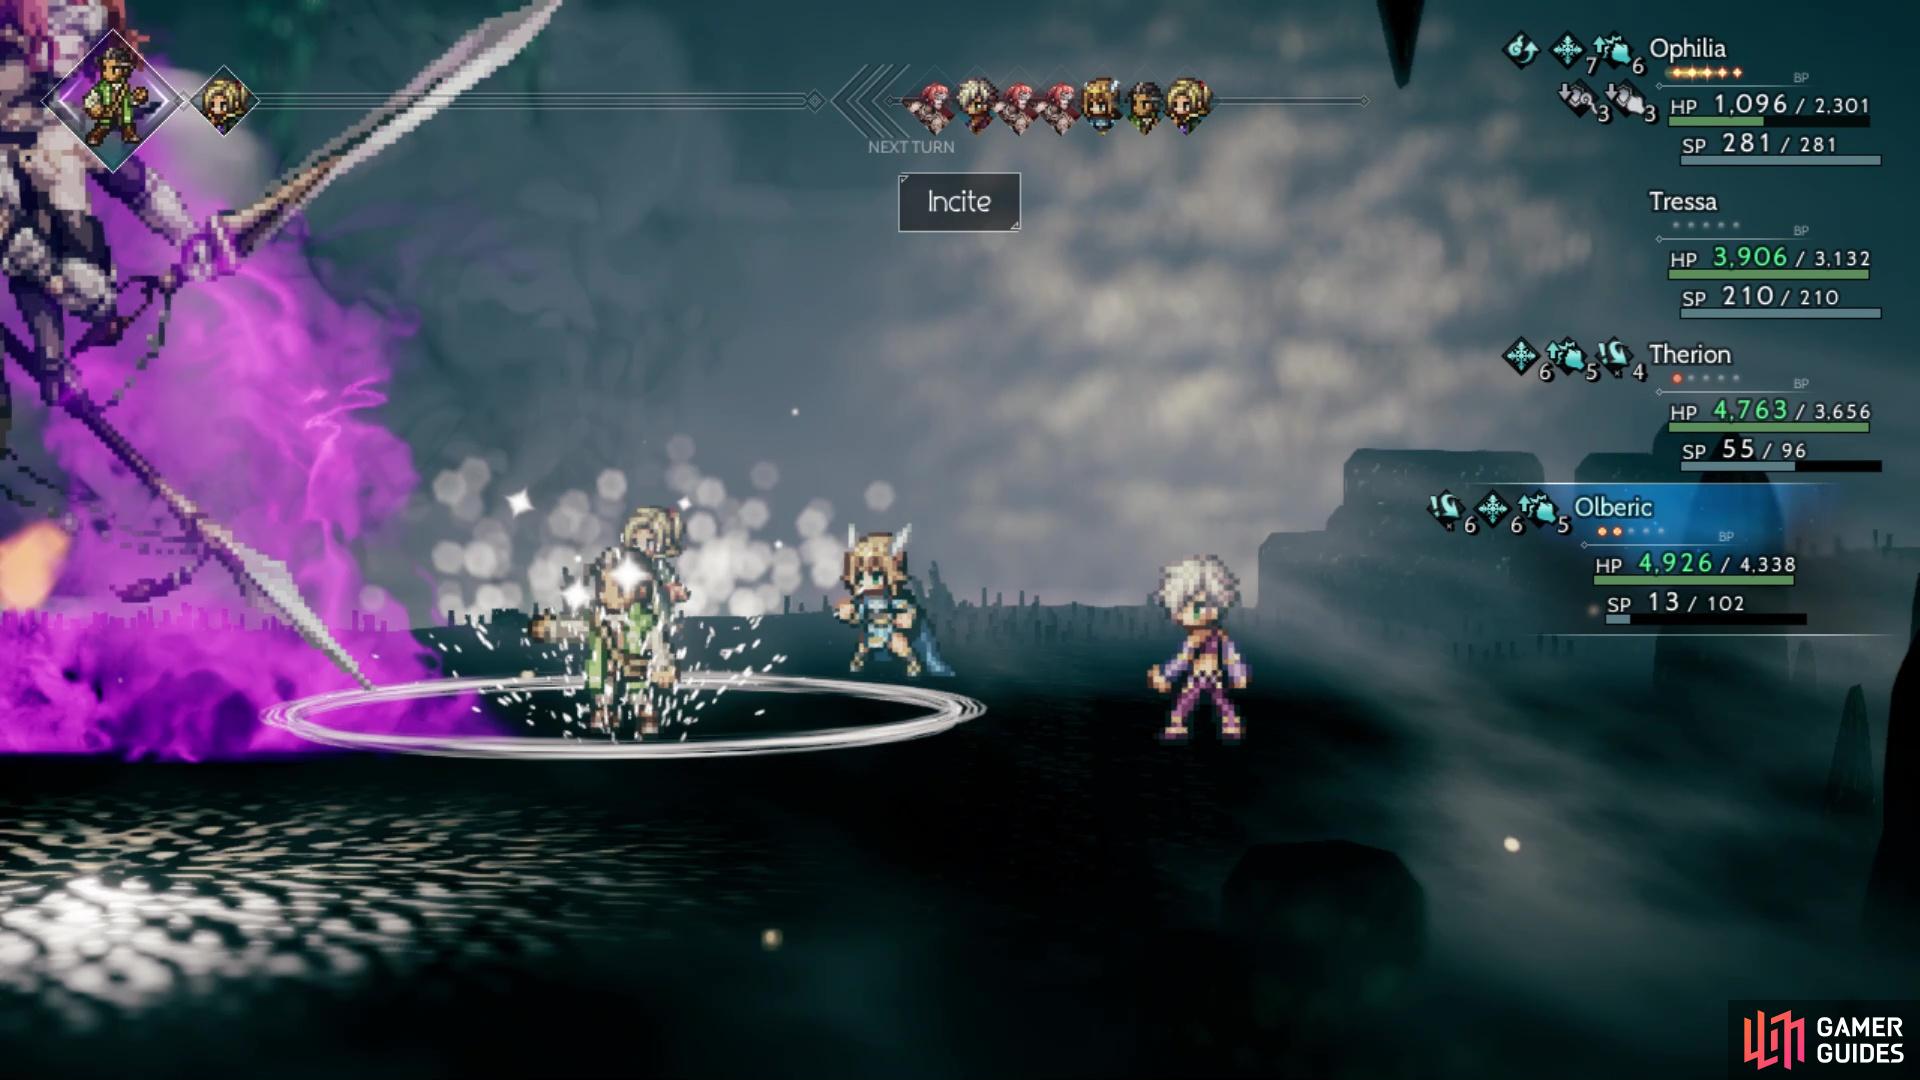
When you know War Cry is coming, use Incite on your Warrior

Winnehild will direct all six attacks on the Warrior instead of the entire party
For a more traditional fight, you will want to keep Shackle Foe and the defense buff from Hired Help’s Mercenaries up at all times. You can add to this by using a high HP character like H’aanit or Olberic, and having one of them using Incite to keep Winnehild on that character. All hits of Phoenix Storm will hit that character and you won’t really need the Merchant’s defense buff for the first phase, although you will want it for the second phase. In fact, Incite makes Warcry, Winnehild’s ultimate attack, only target that single character instead of the entire party.
The Warmaster has fallen, and you will obtain the Warmaster job class for yourself. That also wraps up all four of the advanced jobs, so it’s time to get a move on with the remaining Chapter 4 stories.
No Comments